
Prima Games eGuides
primagames.com Browse Redeem a code Help
Army of Two: The Devil's Cartel eGuide
Sign in My Guides

Sign in or create an account

We'll email you a link. No password needed, and if you don't have an account yet, the link makes one.

By creating an account or signing in, you agree to our Terms of Service and Privacy Policy.

Have a password?

Had an account on the old eGuides site, or a code from a printed guide? Help and troubleshooting

Sign in with a password

By signing in, you agree to our Terms of Service and Privacy Policy.

Check your email

A sign-in link is on its way. It works once and expires in 15 minutes. Open it and you're in, with an account if you didn't already have one.

Contents

  • Essentials
    • Welcome Back to Tactical Worldwide Operations
      • Welcome Back to Tactical Worldwide Operations
    • Operational History and Character Bios
      • Operational History and Character Bios
    • Tactical Operations Manual
      • Tactical Operations Manual
    • Two Gear
      • The Gear Makes The Man
      • Modifications
      • Weapon Skins
      • Tactical Gear
      • Tattoos
    • The Enemy
      • The Enemy
    • Contracts
      • Contracts
    • Achievements and Trophies
      • Achievements and Trophies
    • Concept Art
      • Concept Art
  • Walkthrough
    • Mission 1: New Blood
      • Special Callouts
      • Chapter 1: Protection
      • Chapter 2: Tutorial
    • Mission 2: Cause And Effect
      • Chapter 3: Permission to Engage
      • Chapter 4: Foxhunt
      • Chapter 5: Split Decision
      • Chapter 6: Baptism by Fire
    • Mission 3: Rally Point
      • Chapter 7: Politics in Action
      • Chapter 8: Picking Up the Pieces
      • Chapter 9: Into the Chaos

      • Chapter 10: Riot Act

      • Chapter 11: Urban Chaos

    • Mission 4: Outside Contact
      • Chapter 12: Fuel for the Fire

      • Chapter 13: Observe and Detect

      • Chapter 14: Local Heroes

      • Chapter 15: Stronghold Assault
      • Chapter 16: Suicide Run

    • Mission 5: Last Resort
      • Chapter 17: Holiday Retreat

      • Chapter 18: Room Service

    • Mission 6: Salvation
      • Chapter 19: Among the Dead

      • Chapter 20: Open Season

      • Chapter 21: Rest for the Wicked

      • Chapter 22: Shadows Walk

      • Chapter 23: Into the Light

      • Chapter 24: Loose Cannon

      • Chapter 25: Special Delivery

    • Mission 7: Enemy Territory
      • Chapter 26: Behind Enemy Lines

      • Chapter 27: Guardian Angel

      • Chapter 28: Manhunt

      • Chapter 29: Fight for the Future

      • Chapter 30: Desperate Measures

      • Chapter 31: Objective Lost

    • Mission 8: Narco Hell
      • Chapter 32: Scavengers

      • Chapter 33: Game Face

      • Chapter 34: A Ray of Sun

      • Chapter 35: Rooftop Rampage

      • Chapter 36: Adrenaline High

      • Chapter 37: Mad Science

      • Chapter 38: The Butcher

    • Mission 9: Assault
      • Chapter 39: The Assault

      • Chapter 40: Down But Not Out

      • Chapter 41: Get Her Back

      • Chapter 42: Race to the Quarry

      • Chapter 43: Fish in a Barrel

    • Mission 10: Confrontation
      • Chapter 44: Burning Bridges

      • Chapter 45: No Return

      • Chapter 46: A Hero's Rescue

      • Chapter 47: The Lion's Den

      • Chapter 48: Salem On Trial

      • Chapter 49: The Devil's Due

  • Overkill Vids
    • Mission Overkill Videos
      • Mission Overkill Videos

Army of Two: The Devil's Cartel Guide › Walkthrough › Mission 8: Narco Hell

Chapter 36: Adrenaline High


Chapter 36: Adrenaline High
Salem apparently subscribes to the Evil Villains Handbook, which clearly states that he should stay within close proximity to the heroes and taunt them, preferably using their own means of communication. After a short jaunt down a stairwell, you encounter Salem among the cartel’s “product production lines” and he quickly retreats, sending a swarm of mercenaries in your direction. Don’t waste your ammo on Salem. You can’t take him down just yet.

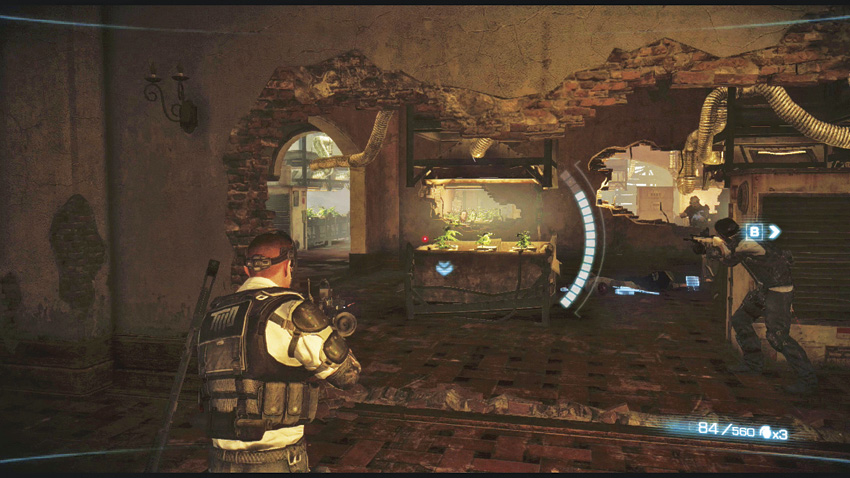
The facility is in rotten shape, with dozens of holes in the walls big enough to provide you or your enemies with additional avenues of travel and sightlines to shoot through. During the first three firefights of this chapter, there are a dozen ways to get caught or to catch your enemies in flanking maneuvers.

The next growing room has the same tactical problems as the first: holes in the walls and a lot of cover to navigate around. Check for hostiles to your right as you enter the area—the whole wall there has a massive gouge that Salem and his people can shoot at you from.

The third firefight begins when you enter a room with a trashed wall directly in front of you, where mercenaries shoot at you through gaps in the masonry. To your right is the direction you need to go, but you’ll have to go through another group of mercs to do so. To the left of them is another wall that has a large section torn out, and yet another mercenary squad takes position there .

OVERKILL

You will likely feel pressured to use Overkill often throughout this entire chapter. The tight spaces and blind corners strewn throughout the building demand that you activate Overkill to deal with all of the blind corners that leave you facing three or four gunmen. If you haven’t been cancelling your Overkills early to conserve your meter, this chapter will teach you the importance of that little trick! Solve the immediate threat, get to cover, cancel the Overkill, and start refilling your meter.

Always, always have your gun trained and ready as you round a corner during this third firefight. Keep in mind that you still haven’t hit a proper checkpoint yet. Should you die, it’s all the way back to the start of the chapter with you. As you might imagine, this chapter can be frustrating on the Hard and Insane difficulties.

Thankfully, you hit the first checkpoint in your pursuit of Salem, going down a set of stairs and through another growing room with a surprising lack of resistance. You eventually reach an AC unit that needs to be pushed aside in order for you to proceed .

To the right of the AC unit is another growing room. At the other end of the room, an RPG mercenary fires a shot that goes wild and hits something very flamable on your side of the room. The growing firestorm begins to consume the whole room, and the cartel mercs in front of you are apparently well-paid enough to try and stand in your way while the fire spreads toward them. You gotta admire their work ethic.

OVERKILL

Just save yourself the pain and charge through the area with Overkill if you can. The fire spreads with surprising speed, and sometimes your only indication that the flames have caught up to you is that you just start taking damage.

Escaping the oncoming wall of flame takes you into a storage room full of burning marijuana. You’ll be attacked by Stabbers as you run through the area, and getting too close to the flames will cause you to take damage.

After escaping the burning storehouse, you’ll come across a hallway with a door you can breach. To the right of the door is a large hole in the wall that you can pass through. If you’re playing with a partner, you can start this next firefight from two different entry points, dividing the enemy’s attention and setting up flanking kills. Be exceedingly careful during your advance through this last firefight, as the room is filled with numerous explosive barrels and canisters that can ruin your day. Once you break through this defensive position, you’ll find that Salem has fled to a lower level through a large hole in the floor. The chase isn’t over yet.

Keep reading with a free account

The first 3 sections of Army of Two: The Devil's Cartel are open to everyone. An account opens the rest of it, and every other guide in the archive. It's free, and there's nothing to buy.

Bought guides on the old Prima Games site? Your account and every guide you own moved here, so there's nothing to buy again. Sign in.

Create a free account Or browse our free guides

PreviousChapter 35: Rooftop Rampage
 NextChapter 37: Mad Science