
The Legend of Zelda: Tri Force Heroes Guide Hytopia's Fab and Drab
The Drab
The Soldiers
There are an awful lot of Soldiers in this game and several of them share the same characteristics, but different armor. We’ll break down what you can expect when you run into one of these guys, but we’ll keep the descriptions here, instead of listing them under their pictures.
Most Soldiers are experts at blocking your attacks with either their swords or shields. A few exceptions to this are the Bomb Soldiers, Spear Throwing Soldiers, and Ball & Chain Soldiers. If you can get in close to them, you can give them a good smacking with your sword, but the challenge, specifically with Ball & Chain Soldiers, is actually reaching them.
The best way to deal with the attack-deflecting Soldiers is to steal their shields with a Gripshot, stun them with the Gust Jar or, if you’re playing multiplayer, have one of your friends distract them while you move in behind them.
Another good technique for dealing with any Soldiers holding a sword or a shield is to position a Doppel behind them, then draw their attention with one of your Links. As soon as they come running, switch to the Doppel behind them and slash them in the back. They’ll immediately change their focus to their new attacker, which is when you switch Links and slash their backs again. Repeat this process until they are defeated.
Green Sword Soldier

Blue Sword Soldier

Spear Throwing Soldier

Silver Ball & Chain Soldier

Gold Ball & Chain Soldier

Bomb Soldier

Sky Sword Soldier

Sky Shield Soldier

Sky Spear Soldier

Sky Bomb Soldier

Sky Ball & Chain Soldier

Sky Fire Chain Soldier

Humanoid-Type Enemies
Aeralfos

These obnoxious flying enemies are some of the most challenging in the game. They’ll flap about in the air, sending down small tornadoes as projectiles at you. Eventually they’ll swoop in on you and begin a three-hit combo. This is your chance to strike! You’ll need to hit them before they swing a third time, then back off. If you have access to a Magic Hammer and the Hammerwear in a level with these flapping foes, you can smash them in a single hit when they start their combo. Otherwise, you’ll have to take your time and hit them as they fly down and begin their combo.
Super Aeralfos

Despite its name, the Super Aeralfos isn’t too different from the Aeralfos, with exceptions of its color and its ability to unleash a pretty mean fire attack on unsuspecting Links. Other than those two things, you can use the same strategies on a Super Aeralfos as you can a normal one.
Spear Throwing Moblin

These fellas are a bit of a pain. They like to keep a good distance away from you and yours while they unleash a volley of spears at you. The spears themselves are easy enough to dodge, IF you’re paying attention. But sometimes you’ll be in a fight with three or four other enemies and this guy will start throwing spears at you from the top of the screen, out of your field of vision. Once you’ve cleared out those enemies and then made a beeline to the Moblin, it’s easy-peasy, but before then you might feel like you’re the world’s most famous juggler who has been asked to juggle two chainsaws, three torches, and an elephant. Yes, they can be that irritating.
Ice Wizzrobe

Wizzrobes are irritating enemies in pretty much every Zelda game, but surprisingly, they’re pretty easy to deal with in this game. For the uninitiated, Wizzrobes are wizards that will disappear and reappear on other points of the map. When they reappear, they’ll unleash a wave of energy and, in this game, that energy is a freezing ice wave. Once they’ve shot out an ice wave, they’ll linger for a good, long while before teleporting again and repeating the entire process. The ice beam is incredibly easy to dodge and Ice Wizzrobes almost only show up when there are no other enemies BUT Ice Wizzrobes. You won’t have to juggle a bunch of different enemies while trying to deal with these icy nuisances. The only real catch to these enemies is that they’ll appear at different heights, meaning you’ll need to make a Totem of the appropriate height to reach them.
Stalfos

Now these enemies will really give you a headache. Stalfos are jumping, bone-throwing skeletons that will dodge most attacks you throw their way. The only real ways to damage them are by backing them into a corner and then unleashing a maelstrom of sword swipes; by stunning them with the Gust Jar, Gripshot, or Boomerang (though they tend to dodge the Boomerang as much as the sword); or by turning their brittle bones into dust with the Magic Hammer.
Gibdo

Gibdo is pretty much just a mummified Stalfos. It’ll attack more relentlessly than Stalfos and it can take more damage, but if you use the Gripshot or Fire Gloves to remove its bandages, it will quite literally become Stalfos.
ReDead

These are the scariest enemies in the game, bar none! They’ll walk around an area slowly, dig into the ground, and then pop back out and let out a blood-curdling scream that will freeze any Link near them dead in his tracks. The ReDead will then charge toward the Link, wrap around him, and begin draining his Heart Containers until it is knocked off or until Link is knocked out. Creepy… These enemies only show up in groups, which can make for a true nightmare as you try to dodge all of their screams. Your best bet is to take them out one at a time and stay a good bit away from them whenever they dig into the ground. If you’re in single-player and a ReDead freezes you, you’ll need to immediately switch to a different Link. If you’re in multiplayer, you’ll need one of your teammates to immediately hit the ReDead with a Sub-Weapon to stun it—sword slashes just won’t do.
Hinox

These big, lumbering, one-eyed gorillas will toss Bombs at you whenever they get the chance. They’re not too terribly difficult, however. Just pick up their Bombs, slap a big “Return to Sender” sticker on them, and then, well, return to sender! They can take a lot of damage, but they don’t do much besides throw Bombs at you.
Monster-Type Enemies
Blob

Blobs are painfully easy to defeat. They’ll just sort of waddle around an area. If they touch you, they’ll damage you, but that’s their only real defense mechanism.
Buzz Blob

Buzz Blobs have the same behavior as normal Blobs, but their defense mechanism is that they are electrified. If you hit them with your sword, expect a nice jolt of electricity. Instead of using the direct approach, hit them with a Sub-Weapon to attack them from a distance or to stun them. You can safely attack them with your sword when they are stunned.
Tektite

The one-eyed, hopping pondskimmers won’t do much to attack you, except jump onto you occasionally. They’re as happy on water as they are on land. Just give them a few sword slashes and they’ll be good and done.
Totem Deku

Totem Dekus are really tall Deku Scrubs that spit Deku Nuts at you from a distance. If you approach them, they’ll dive down into the ground to keep you from damaging them. You’ll need to create a Totem at the same height as the Deku, and then use a Sub-Weapon to stun them or damage them at a distance, the cheeky little plants that they are.
Rat


Rats don’t do a whole lot, save for running around a room swiftly and damaging you if you make the mistake of stepping on them. Your sword is more than enough to deal with these hyperactive rodents.
Rope

These slithering reptiles are a bit like Rats, in that they just sort of roam around a room, waiting for unsuspecting individuals to walk into their field of view. If you do end up in front of them, that’s where the key difference between them and Rats becomes all too apparent. They’ll lunge straight toward you as soon as they lay their thin, cold eyes on you. Let us tell you, they can really move if they’re looking to take a bite out of a Link. You can easily avoid them by moving out of their path, but if you’re not paying attention, they’ll definitely get a nibble or two out of you.
Skullrope

Skullropes are just the Rope’s more gothic older brother. Like their name suggests, they have skulls over their heads, but these slithering reptiles have a few extra tricks up their sleeves. (Or scales? Wherever they hide things is where you’ll find the tricks.) Instead of just milling about and hitting you if you’re clumsy enough to walk into them, Skullropes like to divebomb their prey. They’ll leap into the air and come down on top of inattentive Links. This is made much worse if you’re in multiplayer and you’ve made a Totem. The Skullrope will hit every Link on the way down for a whopping three full Heart Containers! Don’t ignore these fiends whenever you see them in a level; that skull definitely isn’t just for show.
Keese

These pesky, winged rodents also have a good deal in common with Rats and Ropes. They’ll perch or just sort of flap about until you approach them. That’s when the fun happens. They’ll start flapping their way toward you persistently until they get to take a nibble of Link. What makes these enemies a nuisance is that they usually like to hang out when you’re on a small, moving platform or a narrow pathway. Their favorite pastime is knocking Links into the unholy abyss in any level, so be alert whenever you lay eyes on one of these flappy bloodsuckers.
Fire Keese

Fire Keese are Keese that are on fire. The name truly says it all! The difference with Fire Keese is that they’ll light any Link on fire that comes into direct contact with them, or if a Link hits one with his sword. You’ll need to put out its flames with the Gust Jar, stun it, or defeat it at a distance with another Sub-Weapon.
Ice Keese

Ice Keese are almost identical to Fire Keese, except that they freeze you if you hit them with your sword or let them touch you. You’ll need to stun them with a Sub-Weapon or use one to defeat them at a distance if you want to avoid becoming a Linksicle.
Chasupa

Chasupas are just creepy, one-eyed Keese. They move a bit more erratically than Keese do, but they’re still defeated just as easily. Give them a few swats with your sword and they’ll be defeated with no problems at all.
Terrorpin

These terrible turtles will deflect any attack with your sword, no matter how determined you are. Instead, you’ll need to flip them either by blowing up a Bomb near them or slamming your Magic Hammer next to them. This will flip them on their back momentarily, and once that happens, they’ll be as helpless as a turtle. On its back. Because it literally will be. You know what we’re saying!
Hardhat Beetle (Blue)

Blue Hardhat Beetles are like the bouncy cousins of the Terrorpin. They’ll slowly inch toward you and they’ll deflect any sword attacks. The key differences are that you don’t need to flip them and when they deflect your attacks or if they touch you, they’ll bounce you backwards. They specialize in bouncing you off of platforms and into other enemies. Lucky for you, even though they bounce you back when you hit them with your sword, you’re still doing damage to them, so keep up the assault! Just make sure to keep track of where you’re at, to avoid being bounced into anything unsavory.
Hardhat Beetle (Red)

The red versions of the Hardhat Beetles are the same as the blue ones, but they are also on fire. You’ll need to stun them or put out their flames with a Sub-Weapon to be able to hit them, but they’re pretty much the same as their blue counterparts once the fire is gone.
Kodongo


Kodongos are speedy little dinos that love to breathe fire in straight lines. They’re just as comfortable in lava as they are out of it, so when you encounter them, don’t be surprised if you see them camping out inside a pool of liquid, hot magma. Once they’re in your reach, just hit them with your sword and you’re good to go.
Water Tektite

Water Tektites share very little with their one-eyed older brothers. Sure, they can stand on water, but that’s pretty much all they have in common. That’s also pretty much all they do in general. They’ll skate around the water and you’ll take damage if they touch you, but a single slash from your sword will do away with them.
Gyorm

Gyorms are shell-dwelling crustaceans who love to hide when trouble comes a-knocking. You’ll need to get a good distance away from them, and then Gripshot them to pull them out of their highly protective shells.
Keeleon

Keeleons love to fly in the air and spit Bombs at you. They’re pesky during intense fights, but they aren’t particularly challenging themselves. Making a Totem or using the Water Rod below them will allow you get on their level and give them a good thrashing. Just keep an eye on those Bombs!
Fire Keeleon

Fire Keeleons can really give you a hard time. They’ll fly in the air like their Bomb-spewing cousins, but instead of spitting Bombs at you, they’ll spit fire at you. And, of course, if you touch the fire, you’ll go racing around the room until it goes out. You’ll want to either steer completely clear of these foes until you’ve cleared every other enemy off the field, or you’ll want to challenge them immediately. You’ll need to put out these char-broiled foes’ fire with a Gust Jar before you can hit them directly.
Water Octorok

Water Octoroks are an awful lot like Totem Dekus, but instead of being tall and plant-like, they’re short and live in the water. You can use a Water Rod to pull them out of the water at any point, but if you don’t have one handy, you’ll need to stun them with another Sub-Weapon when they pop their heads up out of the water. Just watch out for the rocks they like to spit at their enemies.
Crow

Crows like to wait for you to come by before they swoop in and attack relentlessly. Just think of them as over-confident Keese. You’ll need to try and take them out as soon as possible to keep them from badgering you incessantly. Other than their swooping tactics, they don’t have much in the way of offensive capabilities.
Vulture

Like the Crows, the Vulture is nearly identical to its avian brethren. Vultures tend to be more erratic and persistent than its cousins, but not much else is different.
Leever

A classic Zelda enemy, the Leever shows up in sandy areas where it can burrow into the ground and pop up in other areas of the map. They’ll spin around rapidly, but other than that, there isn’t much to them. Reaching them while they whiz around the room can be a pain, but unless they touch you directly, they have no offensive capabilities. Just stun them or give them a proper beating with your sword to stop these dizzying pests from bouncing around the room.
Karat Crab

Karat Crabs are sort of like sand Ropes, but they are far more persistent. If you’re lined up with them, whether to the north, south, east, or west, they’ll charge at you and they won’t stop until you get out of their range. They also like to hide under sand and bump into unsuspecting Links.
Hokkubokku

Not only are their names weird, the way they fight is too. Their bodies are made up of ball-like segments. When you hit one of them, they go bouncing all over the room at high speed, making them incredibly difficult to dodge. You’ll need to knock each one of its segments out from under its head, then hit its head directly in order to damage it. A handful of hits and Hokkubokku will be finished.
Deadrock

Now these are some pesky enemies. Any time you hit a Deadrock, it will turn to stone, making it completely invulnerable to any follow-up attacks. Well, it would if you didn’t have a Magic Hammer handy. Whenever it turns to stone, turn that stone into rubble with your Hammer.
Helmasaur

Helmasaurs are bothersome little pests to say the least. Their helmets make them impossible to damage from the front, so your only options are to attack from the back or remove their helmets. You can remove their helmets with the Gripshot, so long as you’re pointed directly at their heads. Once the helmet is off, they’ll be little more than Rats.
Life Like

These spongy anglers are about as devastating as a ReDead if you don’t have friends with quick reflexes. Every so often, you’ll see a lone Heart sitting on the ground. You’ll think to yourself, “Well, I do have an empty Heart Container, so why don’t I grab this lone Heart and fill it up?” That’s the moment the Life Like has you! It’ll pop out of the ground and begin draining your life away, unless you switch Links or have a teammate hit it. Life Likes are tricky, while simultaneously simple. They need to reach you to eat you, and a well-placed Bomb in their center will defeat them instantly. But the second you find yourself inside their squishy, spongy maws is when you’re in for a world of trouble.
Morth

Morths aren’t very common in this game. They mostly hang out in sandy areas and they don’t actually have the capacity to deal damage to you. What they do have is the ability to slow you down, which, if you’re on quicksand or facing a lot of enemies, can be a pretty hefty burden. If you’re in multiplayer, have a friend hit them off of you. If you’re in single-player, swap to another Link. Just don’t let them linger.
Skullfish

Skullfish are water-based enemies that like to throw themselves onto land if it means dealing you damage. If they’re in the water, they’ll torment you relentlessly. If you’re feeling safe on a platform, expect them to launch themselves at you. You can use a Water Rod to pull them out of the water, or hit them with your sword when they finally decide to lunge at you.
Sandfish

Sandfish are exactly the same as Skullfish, except they swim around in quicksand. The strategies are the same—pull them up with a Water Rod or wait for them to lunge at you to defeat them.
Mini Freezard

Mini Freezards don’t do much but obscure your path—that is, until you hit them. One swing of your sword and the Mini Freezards will go bouncing around a room wildly. If they come into contact with you, you’ll be frozen solid! You can bounce them away from you with another sword slash, but you’ll have to make sure your timing is spot on.
Freezard

Freezards don’t move; they just stay in one place, breathing ice breath that will freeze any Links who get caught in it. A simple fireball from your Fire Gloves will make short work of them.
Ghosts and Spectral Enemies
Ghini


Ghinis don’t do much except fly around and pester you. If they come into contact with you, they’ll deal damage, but that’s the extent of their damage capabilities. When you hit them with your sword, they’ll disappear and reappear somewhere else in the area, making them a bit tricky to defeat.
Poe (White)

Poes are like slow Ghinis that don’t teleport. They’ll fly around a room, but they’re easy to pin down. Two sword slashes and they’ll be dealt with, no problem.
Poe (Red, Blue, or Green)


Colored Poes are a bit more challenging to deal with. You can only hit each type of colored Poe with a Link that matches its color (Red Link hits a red Poe, blue Link hits a blue Poe, and Green Link hits a green Poe). Generally when these foes show up, it means trouble. You’ll almost exclusively deal with colored Poes under pretty challenging circumstances, so take their appearance as a warning of things to come.
Lantern Poe

You can’t actually damage a Lantern Poe directly. They’ll light the area around them in dark rooms. The way to defeat them is by lighting all the torches in the room they are in. Once you do, they’ll just sort of pop and disappear.
Prankster Poe

Never has there been a more irritating enemy in the whole of the Zelda-verse! These Link-faced jerks attack by picking up Links and throwing them into the nearest pit. When you hit them, they’ll immediately appear behind you. If you’re not quick enough to hit them, you can try to run, but they won’t stop chasing you until they have you. They’re not hard to defeat, but once you’re in their arms, it’s almost a guarantee that you’re going to be thrown off of your platform. Infuriating!
Key Bandit Poe

Key Bandit Poes love keys. In fact, they will do everything in their power to get their hands on their beloved keys whenever they lose them. Just know that if these guys are around, grabbing a key means you’ll be attacked relentlessly until they either have their key back or you defeat them.
Trap Systems and Harmless Enemies
Mini-Margo

The traps are pretty simple. You’re not likely to get hit by them if you observe the trails that they follow along the ground. To defeat them, you need only throw a Bomb into their center.
Beamos

Beamos use their singular eye to search around the room for any Links that they can zap. Unlike their appearances in previous Zelda titles, if you make a Totem and get on their level, you can hit them with your sword or your Sub-Weapons and defeat them. You’ll need to watch out after you’ve defeated them. They’ll begin rolling toward you and flashing, ready and waiting to explode. Just keep track of that rotating eye to avoid getting zapped!
Totem Armos

Totem Armos aren’t really enemies so much as they are mounts for you and other enemies to ride. They’ll hop around the room, stomping anyone who is unlucky enough to get under foot. While being controlled by an enemy, the Totem Armos will jump high into the air and smash down to the ground whenever they are near a Link. Once their rider has been defeated, the Totem Armos will spin around violently towards you and then explode.
Wallmaster

Wallmasters only show up in challenges and the Coliseum and there’s a good reason for that: They are terrible and powerful. They’ll float over a Link momentarily, wiggle their fingers, and then swat down to the ground. If they manage to hit a Link, they’ll KO him instantly. You can hit a Wallmaster while it’s on the ground, but it will just come back after being knocked out, giving you only the most temporary of respite. Keep your eyes on the Wallmaster’s fingers to avoid getting crushed!
Squiddy

Squiddy is harmless. Hitting Squiddy will force it to drop Rupees and Hearts. The more you hit it, the more it will drop, but it will also pick up speed with every hit. If you manage to hit it enough times without letting it sit on the ground for more than a second, Squiddy will explode into a big pile of Rupees and Hearts. Now get out there and give ol’ Squiddy a good thrashing! Really, when you think about it, you’re the monster in Squiddy’s eyes.
Mini-Bosses
Electric Blob King


The Electric Blob King is the leader of the Buzz Blobs and really tries to prove it. It has the ability to shoot out massive amounts of electricity from its tendrils, and hitting it with your sword will only leave your hair standing on end.
Electric Blob Queen


The Electric Blob Queen is very similar to its kingly counterpart. The key difference is the fact that it’s standing in a pool of water. Whenever it shoots out electricity, it electrifies the whole pool. You’ll have to be clever if you want to defeat it.
Li’l Hinox

The youngest of the Hinox Brothers, Li’l Hinox actually happens to be the most pesky of the bunch. The Hinox Brothers love tossing Bombs furiously, but where Li’l Hinox differs is the size of the Bombs it likes tossing. Instead of the normal, small Bombs, Li’l Hinox will throw a massive, megaton Bomb. Just don’t stand too close, or you’ll get a face full of fire!
Hinox the Elder

Hinox the Elder isn’t much different from a normal Hinox. The key differences are that it throws Bombs from a minecart and it throws them much faster than your normal Hinox.
Hinox the Eldest

Hinox the Eldest is just like its younger brother, Hinox the Elder. You’ll face Hinox the Eldest while riding in a minecart. It loves throwing Bombs—perhaps you should follow suit?
Freezlord

As its name implies, Freezlord is a giant Freezard, ice breathing, sliding, and all. It doesn’t stray too far from the center of the room, but if you step into the icy pool of water surrounding it, prepare to catch hypothermia!
Vulture Vizier

This fight is painful. It’s surprising that Vulture Vizier is just a mini-boss when you’re actually fighting it! You’ll have to fight this beast while balancing on an all-too-delicate platform, one that will gladly dump you into the abyss below it if you fail to keep it balanced. This one takes patience, that’s for sure.
Grim Repoe

The king of Poes here in the flesh. Or rather, here in the white bed sheet. Grim Repoe can disappear and stay invisible for as long as it wants, but don’t worry! You can see its scythe no matter where it goes. It sure does hate those torches, huh?
Gigaleon

A giant Keeleon, Gigaleon is a flying battle platform, ready and willing to spew long-lasting fire below itself until all three Links are good and charred. The problem with Gigaleon is that it never leaves the air. If only there was a way to level the playing field!
Bosses
Margoma

Margoma is the big boss of all the Mini-Margos. It will shuffle around the room until it gets within reach of a Link. When it does, it will lunge forward in hopes of turning that Link into roadkill.
Moldorm

A classic Zelda boss, Moldorm’s sole purpose is to push you off of any platform it can find. Now that it has three Links to push, it’ll have to adjust its focus and you’ll have to observe when that shift in focus happens.
Arrghus
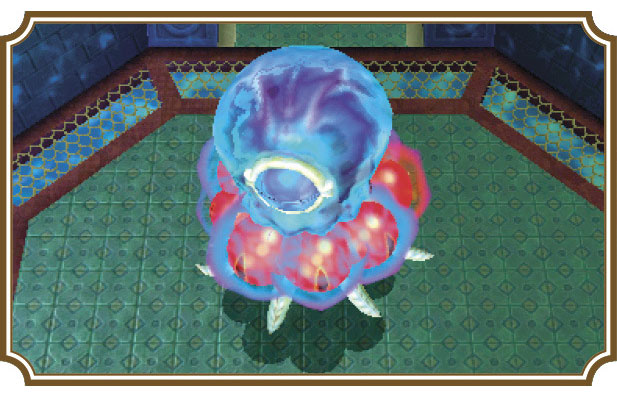
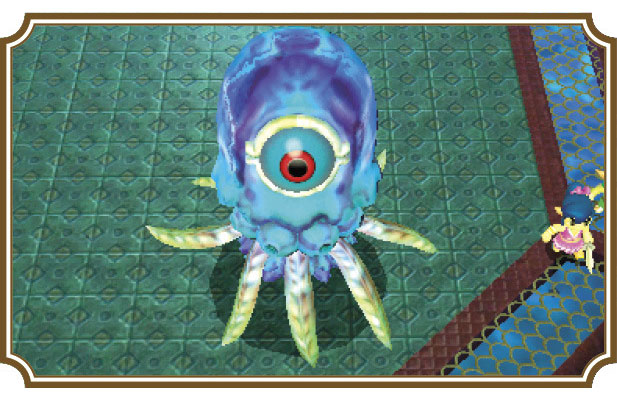
You think your vision is good? Well Arrghus has 20/20/20/20/20/20/20/20/20 vision! This eyeball-based cephalopod uses its eyes to protect its main eye from any attacks. You’ll need to be clever in order to damage this ocular enemy.
Blizzagia

Blizzagia is an ice snake that loves hiding in caves, then popping out and snapping its enemies up in its jaws. You’ll need to be quick to avoid its attacks, but the real challenge is figuring out how to damage the brute.
The Lady’s Pet (Margoma)

A faster, more mobile, more fashionable version of Margoma, under direct control of The Lady. You’ll have less open land to work with this time around, so make sure to be careful.
The Lady’s Pet (Moldorm)

A more erratic and stylish version of Moldorm. This time, it’ll start out just bouncing around the platform, so you’ll have to be careful and quick to avoid taking damage.
The Lady’s Pet (Arrghus)

The Lady’s Pet Arrghus doesn’t have as many eyes as it did during the first fight, but the eyes it does have are definitely more of a pain than the ones it had during your last encounter. You’ll need to use your surroundings and your head to overcome Arrghus this time.
Stalchampion

Stalchampion takes Stalfos tactics to a whole new level. It’ll jump out of the way of your attacks, but instead of just jumping back, it’ll jump straight into the air and come down like an earth-bound meteor. If it doesn’t jump into the air, it will deflect just about anything else. How can you stop something that blocks everything it sees coming?
Prismantus

This glorified triangle can be a pretty mean foe if you’re not careful and quick. You’ll need to hit each of its colored orbs at the ends of its appendages to get its eye open and stun it. There isn’t much to this fight mechanically, but its erratic movements and fast speed allow it to turn any unaware Links to powder within no time at all.
The Lady

The Lady herself. The queen of sheen, the last bastion of true fashion, the sleek sheik. Whatever you call her, The Lady is the source of all of Hytopia’s troubles and she needs to be brought to justice for her crimes against humanity, stylish though she may be! The battle with her is a true test of everything you know about making Totems and working as a team, whether with real players or Doppels. This fight comes in multiple phases and will push you pretty hard. Stay strong! She may be so classy it hurts, but that doesn’t mean you can’t deal a little hurt of your own!