
The Legend of Zelda: Tri Force Heroes Guide Becoming a Fashion Hero
Gameplay Mechanics
You’ll find a breakdown of several of the game’s mechanics in this section.
Single-Player
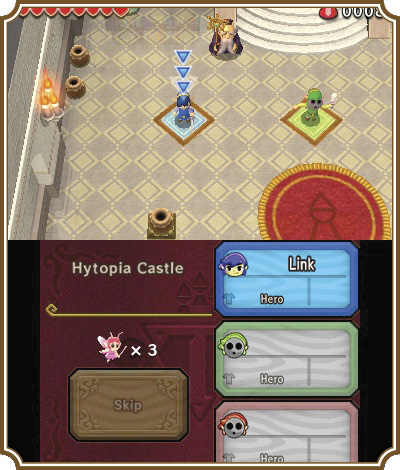
To start a single-player game, you’ll need to enter the door on the right side of the castle foyer; if you’ve gone down the stairs, you’ve gone too far. It will be marked with a symbol of a single “person” in front of it, letting you know that this is for one player only.

Once you’re inside, talk to the old man. He’ll offer you two Doppels for your control. You can pick them up and throw them into each other’s hands to make Totems. If you throw either or both of them onto a Triforce gateway, they’ll automatically re-arrange so that they are each standing on a piece of the symbol.
Take note: You’ll need to have the green Link selected in order to leave the single-player lobby. If you try and leave as either the red or blue Links, the guard will stop you, telling you that Doppels are not allowed to roam free outside of this room, except when in the Drablands.
Switching Characters
While playing in single-player, to replace the two other players you won’t have, you’ll be given two Doppels. You’ll need to control the two Doppels and your Link to complete puzzles. The way to do this is by touching the box of the Link you want to control on the bottom screen.
Try to keep track of where each Link is while you play. You’ll sometimes have to make some quick switches to different Links, and knowing where each Link is will make those situations a lot easier.
Multiplayer
Naturally, multiplayer works differently than single-player. While the levels are all the same, how you tackle them is a very different experience. You can’t take control of other Links when playing with other players, so you’ll have to count on communication and planning to complete some of the game’s tougher, more time-restricted puzzles.
Another key difference is that all three players can choose an Outfit before the level starts. This can allow for some pretty interesting Outfit combinations and strategies. We cover a lot of combinations and strategies in the “Clothing Quest” section of the guide.

To reach the multiplayer lobby, enter the door in the center of the castle foyer, which is marked with three “person” symbols, indicating that this room is for three players.
Once inside, head to the top-left corner of the room and talk to the old man. He’ll present you with three options: Local Play, Online Play and Download Play. Select “Local Play” if you’re in the same room as your friends and they also have a copy of the game. Select “Online Play” if your friends are in their respective homes, or if you want to play with anyone else online. Select “Download Play” if you’re in a room with your friends, but they don’t actually own their own copies of the game. From there, the old man will ask you to create a team or join one. If you host, you’ll need the other players to select “Join a team”, but if your friend is hosting, you’ll need to be the one to select “Join a team”.
Once you’re in a room, you’ll need to talk to the old man to disconnect from the room and to leave the multiplayer lobby. If you try to walk out while playing in multiplayer, the guard will stop you in your tracks.
Communicating in Multiplayer
If you’re playing with friends who aren’t with you in person, you can tap the various callouts on the bottom screen to try and communicate with your teammates. The more you tap them, the bigger they get, so don’t be afraid to really lay into them.

Lucky Lobby Ball

One final note about the multiplayer lobby: You can try using the R Button to ram various spots of the walls in this room. If you hit the right spot (and it changes every time), the Lucky Lobby Ball will fall from the ceiling. Hitting the ball will play various songs from different Zelda titles. If you keep hitting the ball and keep it from touching the ground, the music will continue and you’ll rack up Rupees. Once the ball finally touches the ground, you’ll be told how many hits you got on the Lucky Lobby Ball and how many Rupees you earned. The more you hit the ball, the more Rupees you rack up!
Coliseum
On the far-right side of the foyer, down the stairs and into the dimly-lit lobby, you’ll find the Coliseum, the place heroes go to test their strength and skills.

You can fight against one or two of your friends here for glory, Rupees, and some Coliseum-only Materials. There are a total of eight zones to fight in inside the Coliseum, each one representing a world from the Drablands, and each with Sub-Weapons and elements distinct to that world.


Your goal in the Coliseum is to reduce your opponents’ Heart Containers down to zero, all while keeping yours as full as possible. Your sword, Bows, Bombs, Fire Gloves, and the Magic Hammer are all used to damage your opponent, while other Sub-Weapons allow you to stun them or get you closer to them. You can also throw your opponent off the edge of a platform to deal them damage.

While you fight in any zone, if you’re only playing against one other player, you’ll have to avoid a Wallmaster that will chase you or your opponent around the room. It will wiggle its fingers, then slap its hand down to the ground, crushing any Link underneath it. Getting crushed by the Wallmaster is an instant KO, meaning you lose a life. During the last 30 seconds of a match, the Wallmaster will begin pursuing any player, not just the first-place player.
You’ll need to win in the Coliseum to have a chance at each zone’s rare, golden Material. You only have a 20% chance of getting each Material, so make sure to win on each stage A LOT.
Challenges

Once you’ve played through all four levels in a world, you’ll unlock twelve additional challenges for that world—three for each level. These challenges vary from having less health to playing the level again (but this time in the dark), to having to carry an orb all the way through to the level’s end. Each one will offer different Materials as rewards, some of which can only be obtained by completing challenges.
You can keep track of the challenges you’ve completed and how many more you need to complete for each level by looking at the map on the upper-right corner of the single-player and multiplayer lobbies.


The Triforce gateways indicate how many challenges you’ve completed, while the darkened symbols show what remains to be completed. Use this map to keep track of your progress and use it to beat all 128 challenges and levels in the game!
Sub-Weapons
Every level in the game has Sub-Weapons for you and your co-Links to use. These items are fixed and are used specifically to deal with the challenges that are thrown your way during the level. When you complete the level, the Sub-Weapons are taken away from you and you’ll start the next level without them, free to pick up any new Sub-Weapons this new level offers you.

You can see what Sub-Weapons each level is going to have by taking a look at the Level Selection screen. Each level you highlight will give you details on Materials and which Sub-Weapons you’ll have access to. This will help you pick an appropriate Outfit for the level and help you track down Materials you are looking for.

Each Sub-Weapon does something different, and the way to use your Sub-Weapons is to press or hold the Y Button. Experiment with the different Sub-Weapons to get a feel for how they work. There are always tricks you can find with each Sub-Weapon, so make sure to try out all sorts of techniques.
Outfits
Outfits are the bread and butter of Tri Force Heroes. Sure, you can get through the game without using any Outfits, but you’ll be missing out on half the fun of the game!

Each Outfit has a different and usually beneficial effect. Some of them have general effects that will benefit you and your teammates no matter the circumstances, like the Legendary Dress making Hearts drop more frequently, or the Sword Suit making anyone who wears it do twice the amount of damage per sword swing. Some Outfits, however, are specific to certain circumstances. The Duneswalker Duds keep you from sinking into the quicksand that almost exclusively appears in world 6. The Boomeranger will increase the size of your Boomerang, provided you have access to one in the level you’re playing. You’ll need to look at the Sub-Weapons and the level you’ve chosen, then gauge what the best Outfit would be to help you get through as easily as possible.
The way to make Outfits is by gathering Materials, which only appear at the end of each level (Which includes completing challenges; though some Materials can only be earned by buying them in town or winning in the Coliseum). Each Outfit requires a fixed number of Materials and Rupees to create, and most Outfits will only appear as you complete worlds in the Drablands. Once you have the required items and Rupees, speak with Madame Couture in town to have her craft it for you.
Once you’ve made an Outfit, you’ll need to select it during the Level Selection screen, after you’ve picked which level you’re going to take on. You can use any Outfit for any level without penalty or restriction, but as we said before, some Outfits work on certain levels better than others. Make sure you read the “Clothing Quest” section of this guide for suggestions, and take your time to consider the pros and cons of each Outfit in your wardrobe.

The Town
The Town is the hub you’ll need to visit frequently between levels. This is the place you’ll find Madame Couture’s boutique for all of your Outfit needs; the Street Merchant, who sells Materials (some of which can only be purchased from him); the Photo Bro, who will give you a camera to take pictures during a level, which can then be uploaded to the Miiverse (press the X Button to snap a photo during the level); and the Daily Riches Shop mini-game, which will give you the chance to open a treasure chest daily with the possibility of finding a Material of the shop owner’s choosing.

Another thing to note about the Daily Riches shop: Any time you pick the wrong box, you’ll be given a Material called a “Freebie”. Keep this in mind, because you’ll need ten of them to craft an Outfit that will only appear in Madame Couture’s boutique after you lose the Daily Riches mini-game five times.
Make sure to pop in to Town regularly to check out new Outfits, to look for new Street Merchant Materials, and to play the Daily Riches mini-game.
Important Items
There are a few items of importance that you’ll need to know about if you’re new to the Zelda series.
Rupees

Rupees are the gems that pop out of enemies, destructible objects, and treasure chests. You’ll need these in order to make Outfits and purchase Materials from the Street Merchant. Outfits cost quite a few Rupees, so make sure to grab any Rupees you lay your eyes on.
Hearts
Hearts are essential to keep you alive in any Zelda game, but it’s especially true for Tri Force Heroes. Picking up a Heart will refill one whole Heart Container. (You can see your Heart Containers on the top-left corner of the top screen.)

While playing multiplayer, your Heart Containers are shared, so any damage any Link takes is shared between all three Links. That’s why picking up Hearts as often as possible is the key to staying alive. Even though your Heart Containers aren’t shared with anyone in single-player, the levels are challenging enough that you’ll find yourself burning through your Heart Containers faster than you could’ve imagined. Make sure not to let a Heart slip by whenever you have a chance to grab one.
Treasure Chests
You will find treasure chests scattered around each level of the game. Opening a chest will yield Hearts or Rupees. Always make a point to open treasure chests when you see them, because they will often have multiple Hearts or large quantities of Rupees.
