
Final Fantasy Type-0 HD Guide Walkthrough
Mission 9
The Clash on Big Bridge
Mission Level: 32
S-Rank Requirements
| Time | Phantoma | Casualties |
|---|---|---|
| 25:00 | 108 | 0 |


 Last Line
As soon as you accept the SO for this area, you can just sit back and wait for the timer to tick down. There’s no reason for you to put yourself in harm’s way.
 Second Line
You’ll need to take out the CO in this area to advance to area 3. The CO is using flying Magitek Armor, so make sure to switch to a ranged character to take him down faster.
 First Line
You’ll have to wait for a minute and a half to get support from your comrades. In the mean time, Colossus units will try and take the First Line. Try and hold them off for as long as you can until the timer runs out. Once it does, you’ll be able to perform airstrikes to devastate the remaining Colossus units.
 Border Plains (Safe Zone)
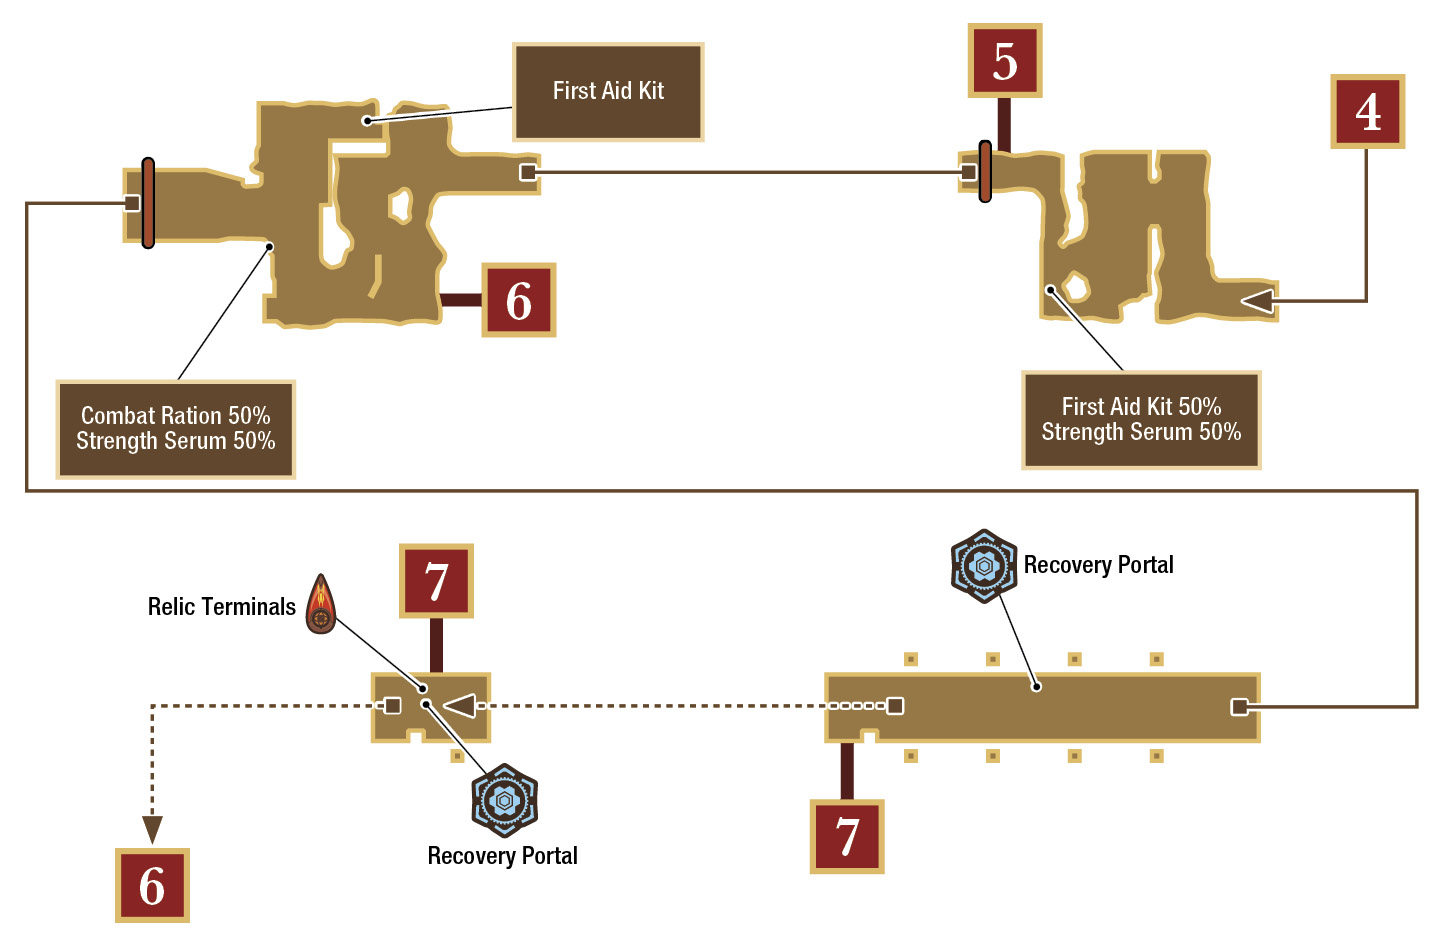
 Former Encampment
You’ll need to defeat the Warrior CO to move on to area 6.
 East Bank
You need to defeat all of the enemies marked on your minimap to get the bridge to open up for you. Once it does, a couple of Warriors, one of which is a CO, will enter the area. Defeat the CO to move on.
The special SO for this area won’t appear until after you open the bridge, so make sure to reject any other SOs and hold off on killing the CO until you have the SO listed below.
 Big Bridge
You need to defeat all of the enemies marked on your minimap. As soon as you defeat the first set of marked enemies, the center of the Big Bridge will lower and another set of enemies, including a Colossus, will enter the area.
The SO will appear as soon as you defeat the second set of marked enemies. The western end of the bridge will drop and two Colossi, along with an Imperial Trooper CO, will enter the area. Refrain from killing the CO to the best of your abilities by avoiding any wide-ranged attacks that he might get caught in.
 East Bank Revisited
Once you’ve taken the Big Bridge, a Relic Terminal and Recovery Portal will appear. When you try and move to the next area, you’ll be cut off by several Colossi. At this point you’ll need to select a character to fight a group of Colossi alone. We are big fans of Jack, but if you have a favorite melee fighter, go ahead and use him or her. We can’t recommend ranged fighters, however, but the choice is ultimately yours.
Whoever you choose, that character will not be usable for a short period of time after you defend Big Bridge.

You’ll have to destroy three Colossi, but once you do, several marked Imperial soldiers will pour into the area. After fighting several waves of marked enemies, a CO will enter the room. Defeat him and you’ll be given the chance to change your party, then you’ll be sent to area 8 to destroy the magic jammer MA.

 West Bank [2]
Major Ernst will be piloting the crystal jammer MA. If you took the SO, you’ll want to defeat him as soon as possible. His front machine guns pack a punch, so stick to his sides. Other than that he won’t give you too much trouble. He remains stationary during the entire fight.
Once he’s been defeated, you regain the
ability to select the character you sent to fight the Colossi at area 6 and Rem’s magic abilities will also be usable again. Once you’ve selected your party, you’ll be sent back to area 8, which now has a Relic Terminal and Recovery Portal.
 Fortified Area
The flying MAs you’ve only seen as bosses and COs are common enemies in this area. They move quickly, so switch to your ranged character to bring them down.
You’ll also need to defeat every marked enemy in the area to be able to move on to area 10.

 Fortified Area [2]
On the south end of the area are several Imperial Troopers and a Nymurod that are unreachable due to the rubble scattered all around them. You can either ignore them and move on to area 11, or use a ranged character to take them out.
 Airbase M-680
You need to destroy the Helldivers in this area to progress. You also need to wait until two minutes pass before you can gain the ability to call in airstrikes. After a minute and a half ticks down on the timer, if you’ve killed the first two Helldivers, two more Helldivers will fly in.
Hold off on destroying the Helldivers until the timer runs out. If you destroy all of the Helldivers, you won’t be able to complete the SO.
Head through the south passage, instead of following the yellow-diamond waypoint through the north passage.
 Airbase M-680 [2]
You’ll need to defeat several enemy soldiers and Helldivers to get the CO to enter the area. Once he has, wait a second before attacking him. The SO won’t pop up immediately and you’ll need the CO alive if you plan on completing it.
Head back to area 11 and proceed through its north passage to reach area 13.
 Field Artillery Station (Safe Zone)

 Heavy Artillery Depot
You’ll need to defeat four Colossi to get the CO to appear. Once the CO shows up, defeat him to shut down the giant turret. He hits hard, so use a ranged character and hide behind cover, peaking out only to attack a few times, then diving right back into cover.
The giant turret was preventing an air strike from blowing up the facility, but with the turret disabled, your allies won’t have any trouble destroying it, even with you in it. You’ll have eight minutes to get out of the enemy base and to safety. Head back to area 13 immediately.
 Field Artillery Station Revisited
You don’t need to defeat any of the enemies in this area to move on to the next one. Only stay long enough to complete the SO, if you’re interested in doing it. Then get out of there quickly.
 Airbase M-680 Revisited
The Keycard you grabbed in the last area can be used on the small building on the west side of this area. There are two more Keycards in this area that will also open small buildings like the one in here.
Once you’re done in this area, if you still have five or more minutes remaining, you can re-enter area 12, via the south passage in this area. There are two more small buildings housing items in area 12, and you happen to have two Keycards. Just know that once you grab the items, several enemies will storm in through area 12’s entrance, which will slow you down a good bit.
Once you’ve collected the items, or if you decide not to go and get them, head through the east passage to reach area 10.
 Airbase M-680 [2] Revisited

 Fortified Area [2] Revisited
You can find two more Keycards in this area and another small building housing an item (refer to the map).
 Fortified Area Revisited (Safe Zone)
 West Bank Revisited (Safe Zone)
Once you reach this area, the timer will stop ticking down. Save and heal—the boss is in the next room.
Boss: Gilgamesh
It is very unlikely that you’ll defeat Gilgamesh during this playthrough. His level is significantly higher than yours and his damage output is well beyond your ability to endure. Once he’s wiped out your entire team, the Mission will be over. If you must try, then switch to a ranged character and keep your distance at all times. He’ll perform a spinning attack, then swing his sword straight down, slamming into the ground. He can do this combination up to two times in a row, but his Breaksight will always appear once he’s finished the combo. If you hit him with a Breaksight strike, he’ll kneel to the ground, allowing you to strike him four to five times. Repeat this process until either Gilgamesh or Class Zero is defeated to complete the Mission. |
Mission Accomplished
For completing this Mission, you will gain the ability to summon the Odin Eidolon and the orderly in Classroom Zero will begin selling Hi-Potions.