
Final Fantasy Type-0 HD Guide Walkthrough
Mission 8
The Battle of Judecca
Mission Level: 29
S-Rank Requirements
| Time | Phantoma | Casualties |
|---|---|---|
| 35:00 (If the Eidolon is not summoned) | 64 | 0 |
| 22:00 (If the Eidolon is summoned) | 64 | 0 |

 Aximo Deck

You’ll start Mission 8 on the deck of an airship with a dragon attack in full force. Hop on the autocannon on the right side of the airship deck and begin unloading on the incoming hoard. You’ll need to survive the dragon onslaught for one minute.

The Wingverns will never show up near the propeller, so if you can see the propeller, move the autocannon to the left. The hardest Wingverns to grab are the ones that show up in a blind spot on the upper-left side of the screen. Make sure to check there if you haven’t seen any Wingverns in a bit.

After the first dragon attack is over, a dragon CO named Zuiun will fly aboard your airship and a new SO will appear. Give Zuiun the boot as quickly as you can and then get ready for another autocannon battle.

Hop back onto the autocannon and take out the incoming Wingvern attack in the same way you did the first time. You’ll have to hold out for one minute again, but this time the attack is a bit more intense. Stay alert and move the camera slightly to the left if you can see the propeller and you’ll end this attack swiftly.
After completing the second Wingvern attack, a Five-Star Dragon begins attacking the ship. This bad beast isn’t something you’re going to be able to take down at this time, so keep shooting to repel it.
The best way to complete the SO is to hop off the autocannon every time the Five-Star Dragon launches an attack at you, then immediately dodge to the far side of the airship, only heading back when you hear the attacks hit the deck of the ship. It helps if your active leader isn’t a slow character, such as Trey, Jack, or Cinque. It helps even more if your active leader is a fast character, such as Cater. Regardless, it can be incredibly difficult to avoid the dragon’s flurry of attacks. Do your best to react quickly and get away from the autocannon as soon as you see fireballs or lightning projectiles head your way.
Once you hear that the ship is about to be impacted by the Five-Star Dragon, the airship portion of the Mission will be over.

 Crash Site (Safe Zone)
 Frozen Trail
The room is filled with stronger versions of Flame Flans and Bombs. You’ll also have to face off with a Dracoknight. These jumpy warriors can be a massive pain. They are incredibly evasive and can block any of your attacks by spinning a lance around in front of themselves.
 Frozen Trail [2]
As soon as you clear the room of enemies, the dragon Seiku will enter the area. Your best bet for challenging Seiku is to switch to a ranged character. Seiku moves a lot and its attacks hit a wide area; your melee characters will have trouble trying to keep up with Seiku and avoiding its attacks. If you’re lucky enough to land a Breaksight strike, Seiku will drop to the ground, allowing you to get some extra attacks on it.

 Frozen Trail [3]
A couple of Dracoknights, two Pyronades, and a Snowsquatch (the angrier, more ferocious cousin of the Snow Giant) need to be defeated before you can leave the room.
 Frozen Trail [4]

Another strong dragon opponent will be waiting for you in the center of the room. Mikazuchi’s elemental attacks are brutal. They’ll often strike all around Mikazuchi, making Mikazuchi a very dangerous opponent for melee characters. Still, using a melee character is the fastest way to defeat Mikazuchi. If you have a heavy hitter like Jack, Nine, or Cinque, switch to him or her and strike once or twice, then dodge. Repeat this method while staying behind Mikazuchi as frequently as possible to defeat it.
 Dominion HQ Pro Tem
Another dragon CO, this time named Ginga, will be in this area. As soon as you defeat it, the area will become a small safe haven for your fellow Akademeia cadets.
 Dominion HG Pro Tem (Safe Zone)
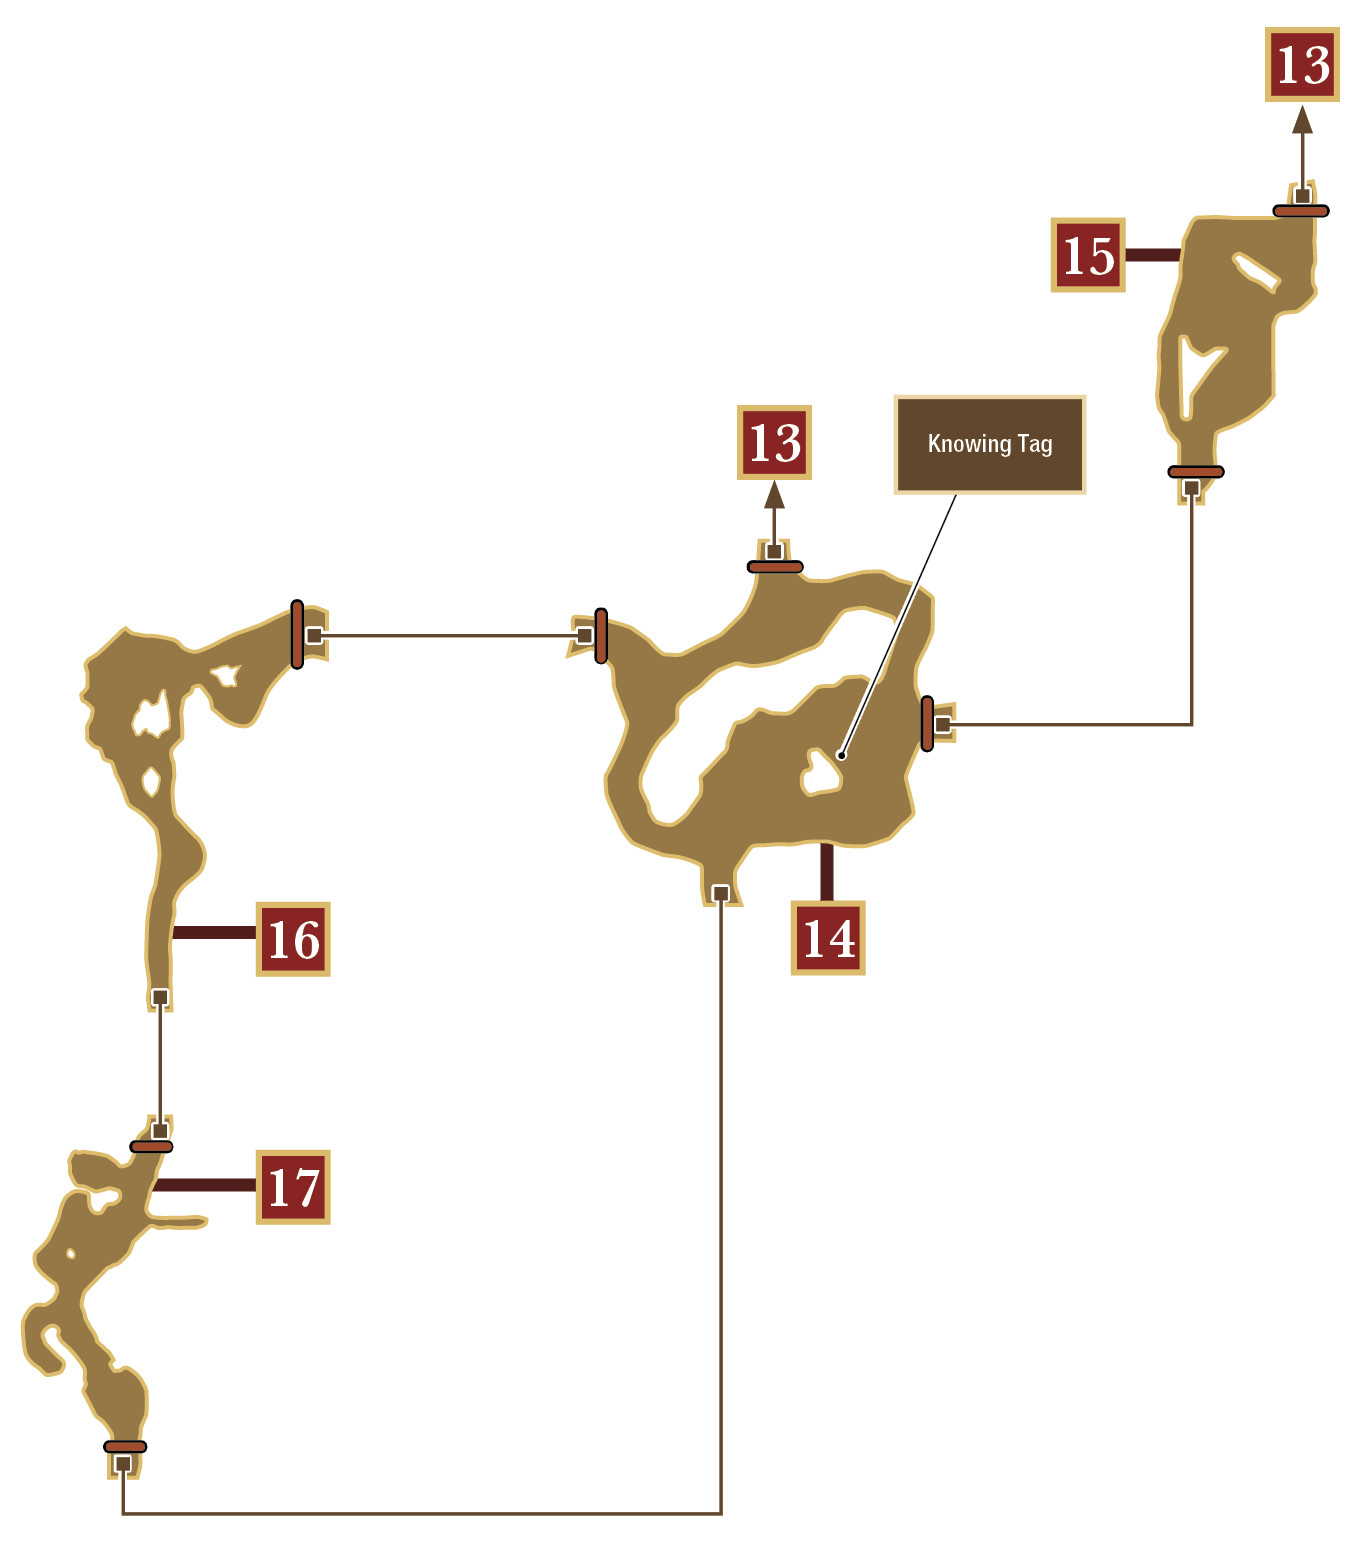
Move toward the waypoint on your minimap to find Naghi. He’ll request that you rescue the other Akademeia cadets that are being attacked by a vicious wyvern. There is a Knowing Tag in this area. To get it, you must talk to the cadet lying on the ice, being healed by another cadet.
 Dominion HQ Pro Tem [2] (Safe Zone)
Heal up at the Recovery Portal and save; this next section requires swiftness and perseverance. You should make Jack your active leader for this next section, provided he isn’t under-leveled. His quick dodge and devastating sword strikes will help you defeat enemies as quickly as possible, which is something you’re definitely going to need.
 Yugumo Approach
You’ll need to defeat all of the enemies in this room to gain access to the next area.

 Yugumo Approach [2]
You’ll have to fight another dragon CO if you want to exit this room. There is also a Recovery Portal next to the passage leading to area 11.
 Glacial Plain
Hold off on accepting the SO just yet. You’ll only have a minute, and picking up items while enemies are around can be an exercise in futility. For now, focus on defeating the Behemash and its buddies.
Once you’re ready to complete the SO, the item you’re looking for can be found in the flaming wreckage to the left of the southern passage.
 Yugumo Crash Site (Safe Zone)
 The Yugumo
Do not waste time here. A timer will start ticking down, marking when your fellow cadets will meet their demise at the hands of a Flyvern without your intervention. Defeat the enemies, then race to the next area.
Hold off on this SO until you’ve cleared the room of enemies. When you’re ready to complete it, you can find the item just south of the west passage. Once it’s completed, head through the west passage.
 Central Station
Fellow cadets are at the mercy of a vicious Flyvern. You’ll need to scare the dragon off by attacking it. After a few attacks, the dragon will fly off to another area, starting another timer. Quickly defeat the enemies marked on your minimap. The location the dragon flies to is random, so jump ahead in this guide to whatever room you’re told to go next.
If you’re trying to complete the SO, the item (a Knowing Tag) can be found in front of the flaming wreckage near the center of the area.
 Eastern Station
The giant Flyvern is harassing a cadet in the center of the room. You’ll need to fight the Flyvern until you deal enough damage to scare it away. Once that is done, you need to kill the remaining enemies, who are marked on your minimap. The cadet will thank you for the rescue with an Ether.
As soon as the Flyvern leaves, the timer starts up again, so clear out of the room as quickly as possible. Head through the south passage back into area 14, then proceed through area 14’s west passage to reach area 16.
 Western Station
You’ll find another cadet in danger of dying at the claws of the Flyvern. Attack the Flyvern until you get it down to its yellow bar of health to scare it away again, then defeat the Snowsquatch to save the cadet. The cadet will thank you by giving you a Mega-Potion.
Race to the south passage of this area to reach area 17.
 Southern Station
Another cadet is in need of rescuing from the Flyvern. Take the Flyvern down to its yellow bar of health and it’ll flee. Defeat the Demonicorn and the cadet will be safe. As a reward, you’ll be given an Elixir.
Now, head south to reach area 14 again, then head through area 14’s north passage to reach area 13 again. Proceed to the north end of the Yugumo and climb the ladder to reach area 12.
Heal, save, and then climb the ladder ahead to reach area 11.
 Glacial Plain Revisited

You’ll need to face off with Sanzashi and his Flyvern in this area. Sanzashi is riding on top of the Flyvern’s head. To target him instead of the Flyvern, you’ll have to change targets with the Right Analog Stick. Most of your attacks will likely damage the Flyvern, so you need to be careful if you want to complete this area’s SO.
The best time to hit Sanzashi is when the Flyvern lands on the ground. If you get the opportunity to perform a Breaksight strike, the Flyvern will lay on the ground, making Sanzashi completely vulnerable to your attacks.
The best time for a Breaksight strike is when the Flyvern begins charging a fireball in its mouth while on the ground. The attack will pull you toward the Flyvern’s mouth, so you are going to have to gamble a bit by continuously shooting at Sanzashi while being dragged in front of the Flyvern’s mouth. Be aware that this leaves you vulnerable to a rather devastating attack, however.
If you managed to keep the Flyvern alive, you can approach it to pick up an Aes Medica, which is an incredibly powerful healing item.
When you’re finished in this area, head through the north passage to reach area 10.

 Dracobaltian Dreadnought (Safe Zone)
Go toward the north passage. Before you can reach it, you’ll encounter creatures called Dracobaltians.
 First Deck
About halfway down the path you’ll find a Dracobaltian. These nasty creatures will pull out every trick in the book to kill your party as quickly as possible.
You must not, under any circumstances, stand still while there is a Dracobaltian in the room with you. Always attack and dodge and attack and dodge, and so on. Dracobaltians can one-hit kill you with two of their moves and can almost kill you in a single hit with a third.
Dracobaltians are hard to predict and they are also very squirrely. They can dig underground and if they get their hands on you, you’re done for. They’ll also try to jump on you. If they land on you, expect to lose a huge chunk of health at the very least. They’ll also shoot out slime that, if it hits one of your party members, will confine him or her to the ground, allowing the Dracobaltians in the room to tear in to that party member.
Dracobaltians aren’t particularly resilient, meaning a few clean shots with a melee weapon should take them out. Always be on your guard to avoid suffering one of their devastating attacks, however.
For the SO, you need to pick up the item in front of the Dracobaltian to complete your investigation.

 Second Deck
You can find the item needed to complete the SO on the last outcropping before the passage leading to the next area.
 Third Deck
This room is the same as the past two: a couple of Dracobaltians will be roaming around that you’ll need to stay on guard for, and the item for the SO is on one of the outcroppings.
 Bottom Deck
Head down the path, following the yellow diamond on your minimap. As soon as you try to leave the circular platform in the center of the room, it’ll begin to move. You’ll be stuck on this bizarre elevator while two waves of Dracobaltians attack you. Defeat both waves of Dracobaltians to get the elevator to move again.
After the first wave, the elevator will drop and parts of the floor will break away, making your already limited space even more limited. Once you clear this wave of Dracobaltians, head north to enter area 22.
 Dominion HQ Pro Tem [2] Revisited (Safe Zone)
 Dominion HQ Pro Tem Revisited
The Five-Star Dragon, named Shinryu Celestia, who destroyed your airship is in this area trying to eat Naghi. Luckily for Naghi, as soon as you approach, Shinryu Celestia will get up and fly away.
 Crystalline Cloudfield
Follow Naghi up the path. If you’re trying to complete the SO, put your weapon away and follow him. Before you cross the threshold into the next area, wait and dodge any attacks that come your way.
 Ark Moorage
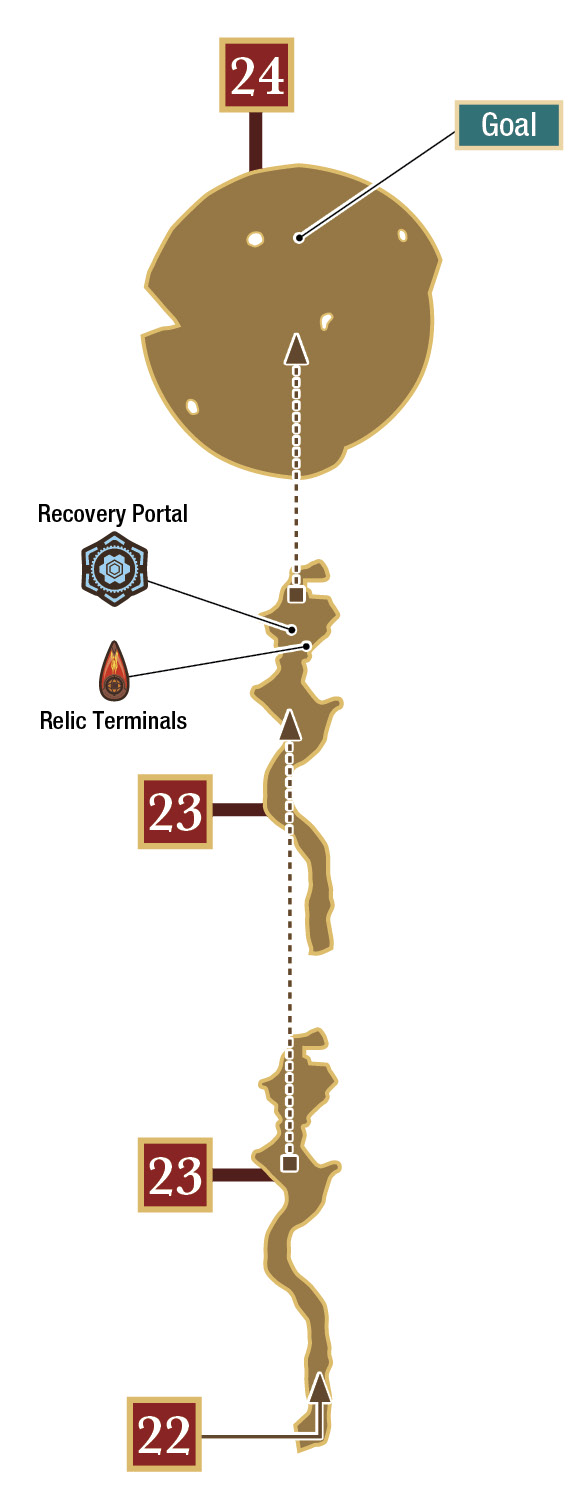
You need to defeat all of the enemies in the area to make it safe for a friendly airship to land and drop off supplies. Once you’ve cleared out all of the enemies, a Relic Terminal and Recovery Portal will appear. Save and heal, because the boss is in the next room.
 Cimmerian Icefield
Boss: Shinryu Celestia
Shinryu Celestia is well beyond your ability to fight during this playthrough. A single hit is all it’s going to take for her to kill any of your squad members. Struggle as you might, every one of your party members is going to fall. That is your fate for this playthrough. Don’t forget it; it will be a motivator to come back and play again. Who knows? Maybe your next time around, Shinryu Celestia will be the one to fall. For now, if you’re hoping to complete the SO, you’ll need to do it before your party is wiped. In fact, you’ll need to do it before anyone is killed at the hands of Shinryu Celestia. Her attacks involve firing fireballs and lightning projectiles. When she fires them, they’ll come out in a random pattern, so the best way to avoid them is to get as far away as possible. To make this fight more difficult, you can’t perform a Lock-On on Shinryu while she’s in the darkness, making it much harder to dodge her attacks. To keep track of her, look in the darkness for her glowing, red eyes. This will help you at least keep track of her. 
The easiest way we found to dodge her attacks is to stay near one end of the arena and wait for her to attack. When she fires, race to the other side of the arena, keeping her in front of you at all times. She’ll always fire fireballs and lightning projectiles back to back, but she’ll sometimes reverse what she fires first. Once you’ve completed the SO, you’ll have to commit to the deed of having all of your party members meet their untimely demise. Another SO will pop up, this time requesting you defeat Shinryu Celestia. You can’t complete the SO if you let your party be defeated, however. Once your party has been wiped out, you’ll gain control of a new Eidolon. To kill Celestia in the most excellent way possible, you’ll need to hold down the Command 1 button to charge your most powerful attack to full power. If you take any damage while charging the attack, you’ll lose the charge, so you need to get Celestia to stop moving first. Continually attack her with your Command 1 button or do shorter charges on your secondary attack until you deplete her health. A Breaksight strike opportunity will appear. After a Breaksight strike, she’ll hold still long enough for you to fully charge your ultimate attack. Enjoy. |
Mission Accomplished
You’ll earn Magic: Fire MIS for completing this Mission with the use of the Eidolon. You’ll receive a different item if you complete this Mission without the help of the Eidolon (see Playthrough Two for details).