There must be 6 or less hours left in the day in order to do Emina Events. Refer to the “Side Quests” Section of this guide for details
Terrace
Tokito
X-Potion
This Event can only be done while Emina isn’t on the Terrace.
Outside of Akademeia
Location
Who
Task
Reward
Note
Cetme
Yatsude
Defeat twenty Imperial Troopers.
Quake Killer
Can be done in any location; you cannot reach Cetme until completing the “Operation Sticky Fingers” Expert Trial.
Roshana
Subaru
Defeat fifteen Mandragoras in the Roshana Province.
Gold Anklet
You cannot enter Roshana until completing the “Operation Dragon Slayer” Expert Trial or until you complete Mission 10.
Rama
Yukisato
Defeat two Marduks in the Roshana Province.
Crystal Shard
Marduks are found in the forests of the Roshana Province; you cannot enter Rama until completing the “Operation Dragon Slayer” Expert Trial or until you complete Mission 10.
Bazz
Sakuya
Defeat an Iron Giant.
Growth Egg
Iron Giants can be found in the Silent Key; you cannot enter Bazz until completing the “Operation Homecoming” Expert Trial.
After accepting the “Operation Sticky Fingers” Expert Trial, head to Cetme, which is east of the Meroë Region. There are no items or red SOs in the Expert Trial.
After accepting the “Secret Agents Zero” Expert Trial, use the Airship Landing to take a flight to the Cetme District. Follow the waypoint on your minimap to reach Mt. Klimov.
Special Orders
Room
Order
Time Limit
Effect
Reward
Note
9
Performance Evaluation: Keep fighting in spite of the snowstorm.
1:00
Regen 0:45
Phoenix Pinion
You just need to fight until the timer runs out.
16
Combat Trial: Annihilate the enemy in under five minutes.
After accepting the “Operation Dragon Slayer” Expert Trial, head to the Roshana Province, which is east of the Eibon Region.
Occupy Domain 3
Help your troops push up to Domain 3 and capture it, then race back to the Main Camp.
Defend the Main Camp
Wingverns from Domain 1 will begin attacking the Main Camp. You’ll need to defend the Main Camp from the Wingvern assault for one minute to complete this Mission. Once the timer reaches zero, if you protected the Main Camp, you’ll gain direct control over it. Order your troops from the Main Camp to take over Domain 1.
Stop the Flyvern
For taking Domain 1, the enemy will send a Flyvern over to Domain 3 and summon two Malboros. Defeat the Malboros and attack the Flyvern and it will fly over to Domain 2 and attempt to do the same thing. Keep attacking the Flyvern and it will give up and fly away.
Neutralize Roshana’s Energy Wall
Help your soldiers push up to Roshana. All of your troops will already be making their way to Roshana, so all you need to do is help them push up to the town itself.
Invade Roshana
Once the energy wall has been neutralized, enter Roshana and capture it. The next three Missions you’ll be given require you to kill enemies consisting of specific element types and then harvest their Phantoma. Don’t try to clear the rooms of enemies. Instead, focus on killing the elemental enemies whose Phantoma you need, then move on. The last of the three Missions involves getting Phantoma from lightning-type enemies, which can be a little tough to find, if for no other reason than there aren’t a ton of enemies in Roshana.
Harvest Two Phantoma from Fire-Type Enemies
While in Roshana, Moglin will task you with harvesting two fire Phantoma. There is a Pyronade in area 1 of Roshana and a second one will also appear if you keep defeating the enemies in that area. Harvesting the Phantoma of both Pyronades is enough to complete this Mission.
Harvest Three Phantoma from Ice-Type Enemies
You’ll find plenty of Cryonades around area 1. You can also find more Cryonades in area 2 as well, if you’ve killed off all the ones in area 1.
Harvest Four Phantoma from Lightning-Type Enemies
This is the same deal as the past two Missions. The lightning enemies to look for are the Gateau Shockalots and the Galvanades.
Drive the Enemies Out of Roshana
Defeat the marked enemies in area 3’s central square to complete this Mission and capture Roshana.
Neutralize Rama’s Energy Wall
The enemy will send the giant Flyvern back onto the field to attack your domains. It will fly directly to the Main Camp to summon more Malboros this time. Rush over to the Main Camp and attack the Flyvern as soon as it arrives. You can prevent it from summoning the Malboros if you’re fast enough and do enough damage. The Flyvern will retreat once again after taking a bit of damage. It will then make its way directly to Domain 2 to attempt to summon more Malboros. Head there and try to interrupt its attacks. Once you’ve scared it off again, it will head for Rama and stay there for the remainder of the battle.
From here on, help your troops take Domain 5 and push up to Rama. You’ll have to fight through incredibly tough turtle-like creatures called Cragapaces. Help your allies push up near Rama and they’ll help you attack the Flyvern. Bring the Flyvern down once and for all and lead your troops up to Rama to bring the energy wall down.
Invade Rama
Once the energy wall has dropped, enter Rama. In area 1 of Rama, a Behemash is causing trouble for your allies. He won’t appear until you reach area 3 and kill the enemy there, but once you do, all you need to do is bring the Behemash down to capture Rama and complete this Expert Trial.
The enemy that needs killing is a spy for the Concordian army who is leaking allied secrets in Rama. He’s hiding out in area 3 and he’ll need to be “dealt with” in order to reach the Behemash. Once the spy has been forcefully retired from his spy career, head back to area 1 to find the Behemash.
After accepting the “Thwarting the Royal Ambush” Expert Trial, use the Airship Landing to take a flight to Mi-Go in the North Togoreth Region. Follow the waypoint on your minimap to reach the Adamantoise northeast of Mi-Go. Approach the Adamantoise to start the Expert Trial.
Strategy
Area 1 of this Expert Trial has you fighting the Adamantoise, named Josai, on a beach. You can’t leave the area and Josai’s health and defense are off the charts. To make matters worse, it has a permanent Regen buff on itself, meaning doing significant damage to it is almost impossible. There is one way to significantly damage it: hit its Breaksight when it attempts to slam down on top of you with its front half. This is the only time you’ll be able to hurt it, so try to avoid it otherwise.
After a few minutes of dodging this repugnant reptile, you’ll be escorted automatically to area 2. From that point, you only need to defeat the Wingvern CO in area 4 to complete this Expert Trial.
After accepting the “Wyverns in the Woods” Expert Trial, use the Airship Landing to take a flight to the Roshana Province, then follow the waypoint on your minimap into the woods just a little northwest of Roshana.
There aren’t any red SOs or items in this Expert Trial, but the forest is an absolute maze, which is quite difficult to navigate if you don’t know where to go. The quickest path to area 8 is to go north in area 1, north in area 2, south in areas 3 and 4, east in area 5, west in area 6, and east in area 7. Once you’ve reached area 8, you’ll find a dragon named Sei-Lan. Defeat the dragon to complete this Expert Trial.
After accepting “The Climactic Clash at Azurr” Expert Trial, use the Airship Landing to take a flight to Cetme, then head to the Azurr District, west of Cetme. Alternatively, if Cetme is not available as a destination from the Airship Landing, you can fly to Iscah and head west to reach the Azurr District. Once you reach the Azurr District, the Expert Trial will begin.
Shoot Down the Mid-Sized Carrier
You won’t have any room to breathe at the start of this Expert Trial. From the word “go” a Mid-Sized Carrier will fly to Domain 1 and begin attacking it relentlessly. Shoot it down to gain direct control over Domain 1.
Neutralize Morina’s Energy Wall
Morina is producing an awful lot of MAs, which means you should tell Domain 1 to produce Spark Units to deal with them. Help your troops push up to Morina so they can remove that energy wall for you. You’ll need to destroy the Autoturret to the right of Morina if you want any hope of ever reaching the town, but once that’s gone it’ll be smooth sailing from then on.
Invade Morina
You’ll need to destroy all of the fuel tanks in Morina within five minutes to help them win the battle. There are Panjandrums posing as normal fuel tanks which won’t count toward the fuel tanks that you need to destroy.
Main Gate
There are no fuel tanks in this area.
Central Concourse
There are three fuel tanks in area 2.
Central Square
There are only two fuel tanks in this area. Destroy them and move on.
Western Warehouse
There are four fuel tanks in area 4.
Northern Warehouse
The final five fuel tanks are in area 5. Destroy them and head back to area 1. Defeat the CO that appears shortly after entering area 1 to capture and gain direct control over Morina.
Defend Morina
As soon as you capture Morina, the enemy launches a counterattack to take it back. You’ll need to defend the town for a minute and fifteen seconds while waiting for reinforcements. Start by telling Morina to produce Spark Units to help deal with the incoming Helldiver units, then focus on taking out the Mid-Sized Carrier attacking the town.
After a minute and fifteen seconds have passed, the assault on Morina will die down and Izumo will appear in an airship to help you protect Morina. You’ll need to destroy the Autoturret southwest of Morina to help your army push up to Domain 2.
Neutralize Arwen’s Energy Wall
With Izumo’s help, taking Domain 2 and Arwen won’t be an issue. Lead your soldiers up to Arwen and wait for them to take down the energy wall. Make sure to tell all of the towns under your direct control to send units to Arwen—the energy wall there is quite strong, so you’ll need all the help you can get to take it down.
You’ll also want to check on Morina as well. Azurr will sneak a Mid-Sized Carrier over to Morina while you’re pushing up to Arwen. It won’t do much damage to Morina, but it will slow down your troop production.
Invade Arwen
Arwen is only one area big, and all you need to do to capture it is defeat the CO. To get the CO to appear, you’ll need to defeat all the enemies that appear in the area. After defeating the Striker MAs, keep your eyes on the right side of the runway. A Mid-sized Carrier will try and fly out of Arwen, but if you’re fast enough, you can shoot it down before it’s able to leave.
Neutralize Azurr’s Energy Wall
The final showdown with Azurr has arrived. Help your soldiers fend off a large force of MAs coming from Domain 3 and Azurr while also helping them take both towns.
After taking Domain 3, you’ll gain direct control of the Izumo Unit. Use the Mogvice command and place markers to guide Izumo to where you want him to go. The markers will appear wherever you’re standing when you activate Mogvice, so make sure you’re standing wherever you want Izumo to go before calling it.
Shortly after gaining the ability to command Izumo, Azurr will send out an arachnid-like MA called Vigilante (it’s just like Vajra from Chapter 3). Vigilante will plant itself near the Main Camp and begin firing on any of your allies as they approach Domain 3. Order Izumo to head to the Vigilante’s position next to the Main Camp.
It will eventually make its way over to Morina. Chase it down and attack it before it can take Morina back. You only need to take out a single bar of health to get the Vigilante to run away. When it does run, it will race right back to the peak it was standing on near the Main Camp. Once the Vigilante approaches Izumo, they’ll begin to fight it out. Assist Izumo in defeating the Vigilante.
After you take another bar of its health, Vigilante will leap back onto the peak. It will stay up there for a minute or so, then it will begin attacking Izumo again. Repeat this process until the Vigilante is destroyed. Just make sure not to leave Izumo alone with Vigilante; the arachnid-MA can tear Izumo apart if Izumo has to face it alone.
Help your troops push up to Azurr and wait for the energy wall to drop.
Invade Azurr
You’ll have five minutes to chase down and defeat the CO in Azurr. In each area you enter, make a point of reaching the CO immediately and depleting his health. He’ll run to the next area after that point and the timer will stop until you follow after him. You’ll waste precious time trying to defeat every enemy in each area before attacking him. You’ll also be required to defeat all of the enemies in the area after he leaves, so you won’t be missing out on EXP or Phantoma by racing to the CO.
Once you defeat the CO after reaching area 3, Azurr will be yours and this Expert Trial will be complete.
Mission 10: The Kingdom’s Final Hours (RTS–Level 34)
Must be done while you only have two to six hours remaining on any day; if you’ve been diligent in visiting Kazusa up to this point, you can wrap up his sub-quest during this Chapter.
Armory
Class Eleventh Moogle
Mega-Ether
—
Ready Room
Carla
222,000 Gil
The amount of Gil Carla gives you is dependent on how much you’ve given her up to this point.
Ready Room
Carla
Cutscene, Sublimation Ring
This Event only appears after doing all of Carla’s Tasks and Events up to this point.
You must speak with the Sorcery Researcher before she’ll talk a second time; if you’ve been diligent in visiting Emina up to this point, you can wrap up his sub-quest during this Chapter after you finish Kazusa’s sub-quest.
Tasks
Location
Who
Task
Reward
Note
Main Gate
Logistics Officer
Give five Megalixirs to the Logistics Officer.
Stalwart Ring
—
Crystarium
Class Ninth Cadet
Take ten prisoners by defeating enemy COs in the forests of the East Nesher Region.
Ballistic Shield
Before you can venture to East Nesher, you must first undertake the “Colonel Faith’s Last Stand” Expert Trial.
Crystarium
Provost
Get information about the pre-RG era.
Gold Anklet
Found in the Silent Key, which is in the Veill Desolands.
Central Command
Chancellor Chival VI
Reach the SP Rank of Commander (50,000+ SPP).
Able to wear Formal Attire.
Second or third playthrough.
Central Command
Commandant
Defeat six Sand Worms.
Diamond Bangle
—
Armory
Armory Guildmaster
Retrieve one Darksoul Swarm for the Armory Guildmaster.
Soul of Thamasa
—
Sorcery
Sorcery Researcher
Obtain one Ivory Phantoma for the Sorcery Researcher.
Crystal Shard
—
Lounge
Cadetmaster
Give 2000 SPP to the Cadetmaster.
Crystal Ball
—
Outside of Akademeia
Location
Who
Task
Reward
Note
Shakara
Ametsuchi
Defeat ten Bombs in the Rilochy Province.
Blaze Armlet
—
Rilochy
Akari
Defeat ten Flame Flans in the Rilochy Province.
Mythril Gloves
They are more common on the plains of Rilochy.
Amiter
Otokusa
Defeat ninety-nine Lesser Lopros in the Dragon Sanctuary.
After accepting the “Operation Homecoming” Expert Trial, use the Airship Landing to take a flight to the Cetme, then head through the cave in the mountains southwest of Cetme to reach the West Nesher District.
Items
Room
Item
Note
1
White Tiger
In the back of the truck on the east side of the area; you’ll need to defeat the Colossus CO at the end of the area to get the truck key.
1
Strength Serum
In the back of the truck in the middle of area 1; you’ll need to defeat the Colossus CO at the end of the area to get the truck key.
1
Combat Ration
In the back of the truck on the north end of the area; you’ll need to defeat the Colossus CO at the end of the area to get the truck key.
After accepting the “Protecting the Defector” Expert Trial, use the Airship Landing to take a flight to Cetme, then head through the cave in the mountains southwest of Cetme to reach the West Nesher District.
There are no red SOs or items in this Trial. You only need to reach area 3 and then head back to area 1 to finish it.
After accepting the “Colonel Faith’s Last Stand” Expert Trial, use the Airship Landing to take a flight to Bazz, then head east to reach the East Nesher District. Alternatively, if Bazz is not available as a destination in the Airship Landing, you can fly to Cetme and head south to reach the West Nesher District. Head east from there to reach the East Nesher District.
Special Orders
Room
Order
Time Limit
Effect
Reward
Note
2
Performance Evaluation: Quickly secure the area.
2:00
Haste 0:30
Megalixir
—
3
Deal 9999 damage to a Colossus in one hit using your active leader.
Performance Evaluation: Use the fuel tanks to defeat the enemy.
2:00
Freecast 0:30
Megalixir
You need to lure an enemy by a fuel tank and then detonate it.
12
Evasion Drill: Avoid all enemy attacks.
2:00
Trance 1:00
Ribbon
You must avoid taking damage and avoid killing the CO until the two minutes are up. Stick to his back as much as possible and you’ll avoid a majority of his attacks.
After Killing the CO in Area 12
11
Combat Trial: Annihilate the enemy in under five minutes.
5:00
Protect 1:00
Lustrous Armlet
—
Items
Room
Item
Note
4
Support Serum 75%/Strength Serum 25%
—
10
Fortified Ration
—
After Killing the CO in Area 12
2
Knowing Tag
—
3
Support Serum 50%/Strength Serum 50%
—
8
Knowing Tag
Whether or not this item appears is completely random
After accepting “The Amiter Resistance” Expert Trial, use the Airship Landing to board your airship. (You can also board the airship from the world map by pressing the two buttons listed on the bottom-right corner of the screen.) Then fly north of Akademeia to reach the Dragon Sanctuary. After landing in the Dragon Sanctuary, follow the waypoint on your minimap to the town of Amiter. The Trial will begin when you reach Amiter.
After accepting “Dominating the Dragon’s Nest” Expert Trial, use the Airship Landing to board your airship. (You can also board the airship from the world map by pressing the two buttons listed on the bottom-right corner of the screen.) Then fly north of Akademeia to reach the Dragon Sanctuary. After landing in the Dragon Sanctuary, follow the waypoint on your minimap to the Dragon’s Nest. The Expert Trial will begin when you reach the Dragon’s Nest.
Special Orders
Room
Order
Time Limit
Effect
Reward
Note
55
Performance Evaluation: Slay all the dragons.
5:00
Aura 0:30
Hypno Crown
—
Items
Room
Item
Note
3
Argentum Medica 50%/Aurum Medica 50%
—
7
Argentum Medica 50%/Aurum Medica 50%
—
16
Aurum Medica
—
23
Aurum Medica
—
29
Draco Medica
—
37
Aurum Medica
—
44
Aurum Medica
—
50
Aurum Medica
—
53
Draco Medica
—
Strategy
This tower is massive, but don’t let that get to you; it’s actually a good bit simpler than you might think. You can run through most of the rooms in the tower without having to fight a single enemy. The only things you really need to watch out for are the rooms with particles floating around in the air. These have pretty terrible effects on your party that you’re going to want to avoid as much as possible. Red particles in a room mean a rapid health drain. Purple particles mean you’ll be poisoned while you’re in that room, which will drain your health, but much slower than red rooms. Green particle rooms are MP draining rooms.
The tower has its twists and turns, but it can’t outsmart the waypoint on your minimap. Following the waypoint will always guide you to the rooms you need to go to next in order to reach the next floor of the tower. Always follow the waypoint to avoid losing your way.
You’ll find a Dragon’s Egg at the top of the tower, which will serve as this Expert Trial’s boss. There isn’t much to say about the fight, because the Dragon’s Egg is completely stationary and its only defense mechanism is calling other dragons into the room to fight you. The Egg also has a massive amount of defense, so destroying it is going to take quite some time. Try to ignore the dragons that the Egg summons, instead focusing all of your energy on destroying the Egg itself. The dragons are little more than pesky, and trying to fight them as they enter the room is an exercise in futility. Just keep fighting the Egg until it’s destroyed and you’ll have this Expert Trial in the bag.
Mission 11: Capturing the Imperial Capital (Level 36)
The Crystal wills you to take down Golem without taking more than 2000 damage.
5:00
Endure 1:00
Aegis Divinum
—
Items
Room
Item
Note
3
Support Serum
—
4
First Aid Kit 50%/Support Serum 50%
—
6
Knowing Tag
—
6
Knowing Tag
—
6
Knowing Tag
—
8
Support Serum
—
8
Support Serum
—
10
Support Serum
—
Strategy
You’ll only be able to play as Machina in this Mission, and you won’t have any choice but to complete the SO-like “Crystal’s Focus” challenges that pop up. The rules of SOs still apply: accept and complete the challenge or die. Luckily, not only is Machina incredibly powerful during this Mission, the Crystal’s Focus challenges are rather simple. Machina will also have the Haste buff cast on him for the entirety of the Mission, making Machina that much more deadly.
At the end of the Mission, you’ll have to face Gilgamesh one-on-one. He’s much more predictable than when you met him on the Big Bridge. You can still only damage him with Breaksight strikes, but those appear after just about every attack Gilgamesh does. We should mention that his Breaksight won’t appear on the first attack he performs after being staggered from a previous Breaksight strike, so always stay far away from his first attack after recovering.



 Occupy Domain 3
 Defend the Main Camp
 Stop the Flyvern
 Neutralize Roshana’s Energy Wall
 Invade Roshana
 Harvest Two Phantoma from Fire-Type Enemies
 Harvest Three Phantoma from Ice-Type Enemies
 Harvest Four Phantoma from Lightning-Type Enemies
 Drive the Enemies Out of Roshana
 Neutralize Rama’s Energy Wall
 Invade Rama


 Shoot Down the Mid-Sized Carrier
 Neutralize Morina’s Energy Wall
 Invade Morina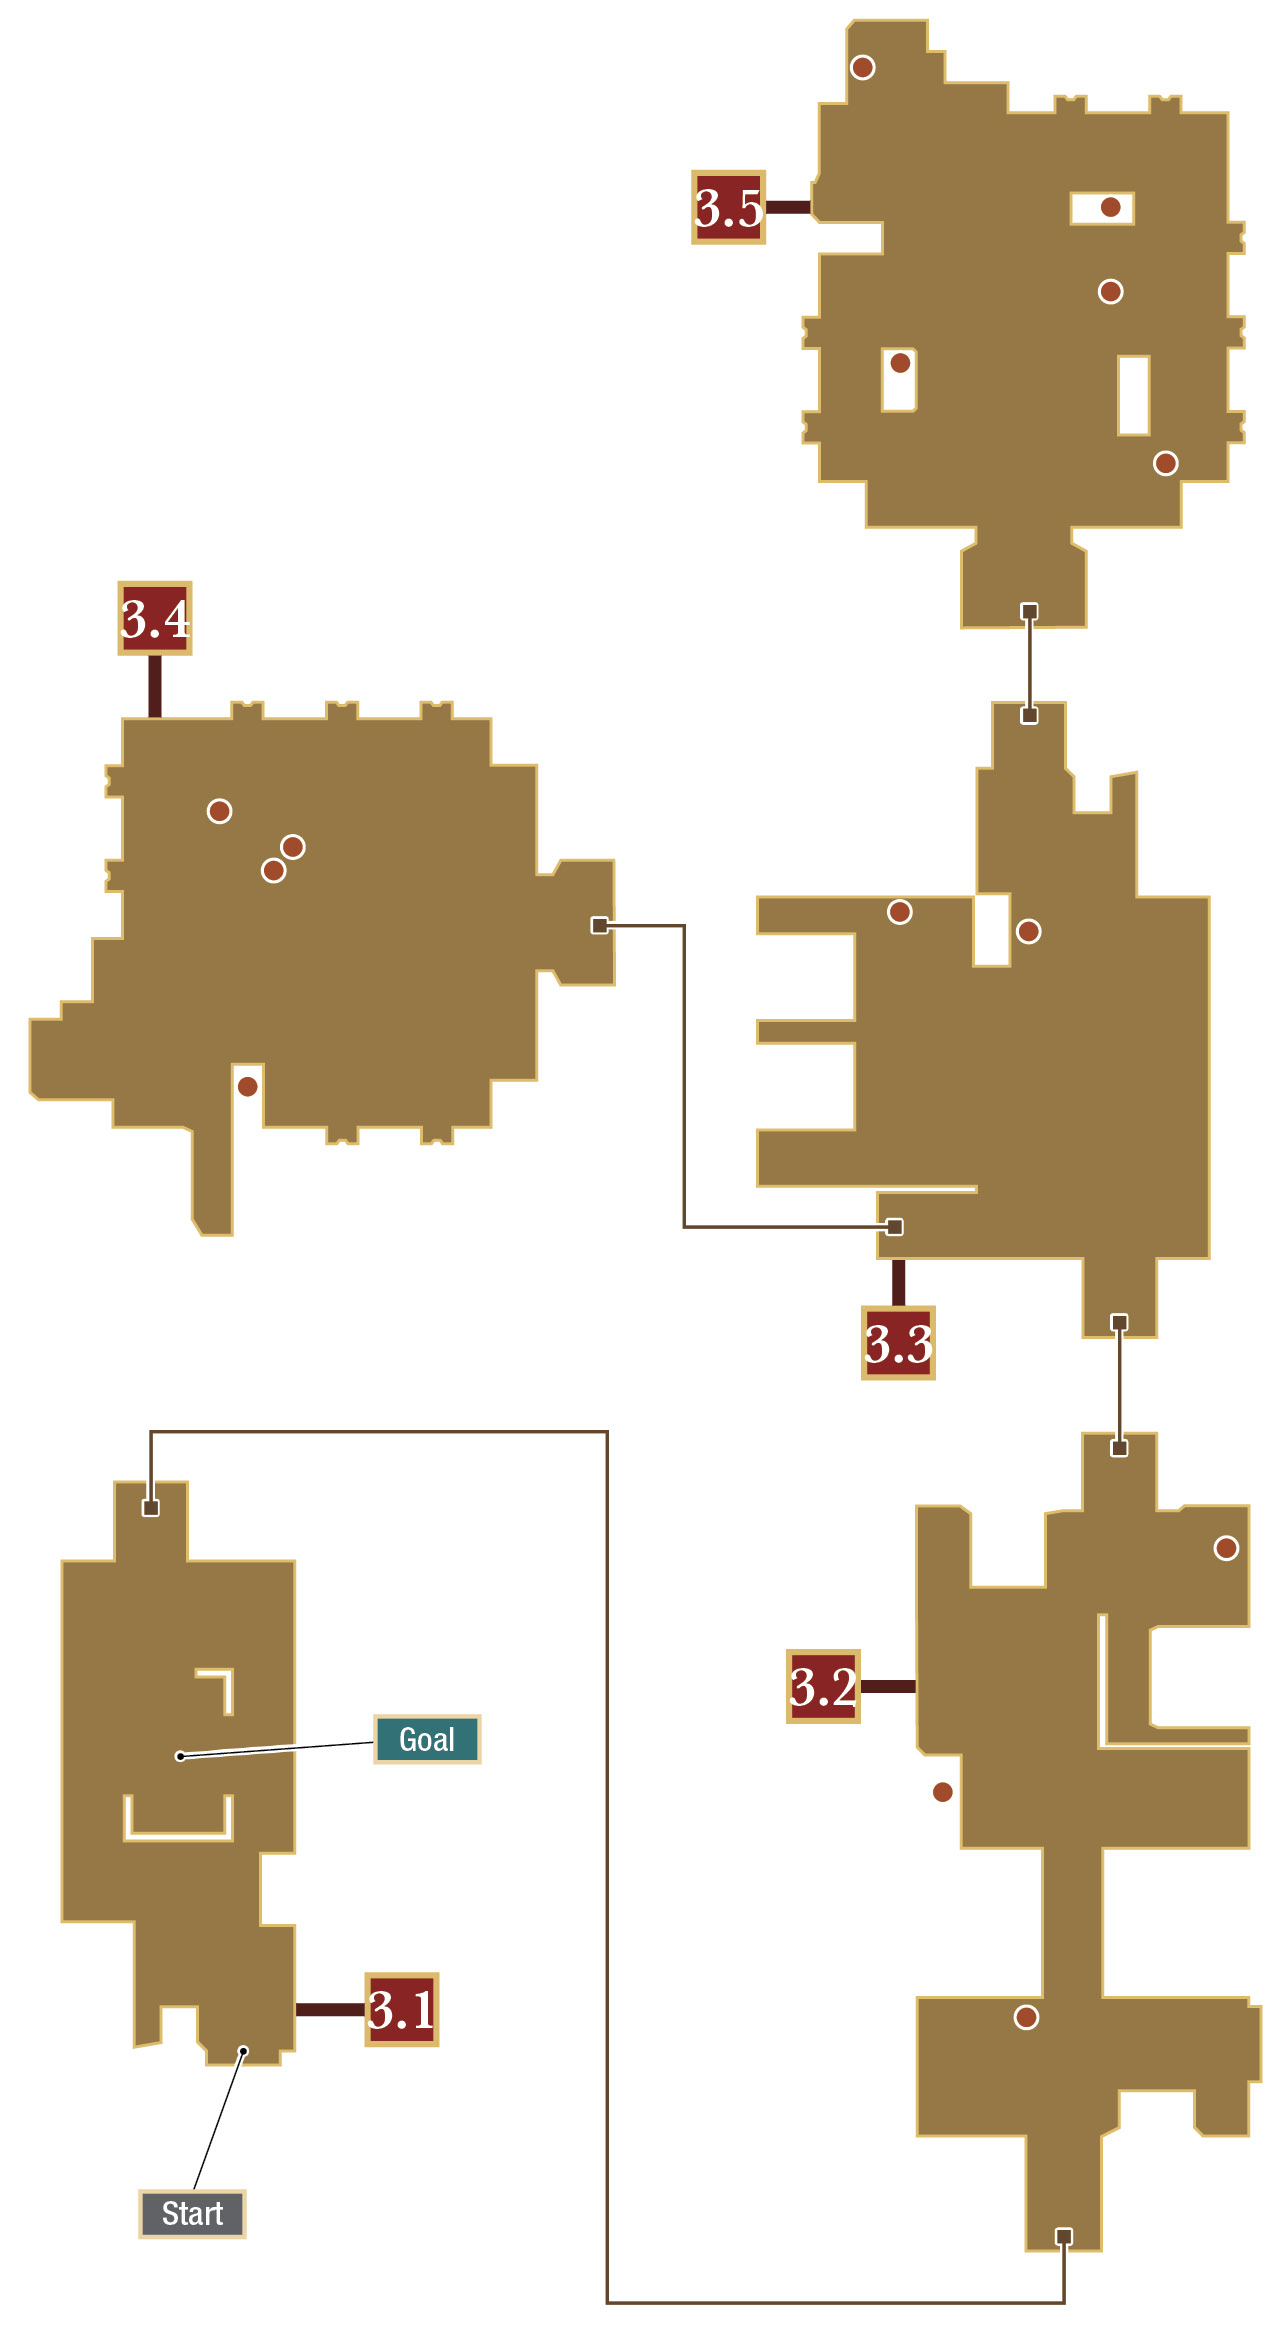
 Main Gate
 Central Concourse
 Central Square
 Western Warehouse
 Northern Warehouse
 Defend Morina
 Neutralize Arwen’s Energy Wall
 Invade Arwen
 Neutralize Azurr’s Energy Wall
 Invade Azurr