
Final Fantasy Type-0 HD Guide Walkthrough
Mission 5
Operation MA Demolition
Mission Level: 22
S-Rank Requirements
| Time | Phantoma | Casualties |
|---|---|---|
| 30:00 | 50 | 1 |

Magitek Mayhem

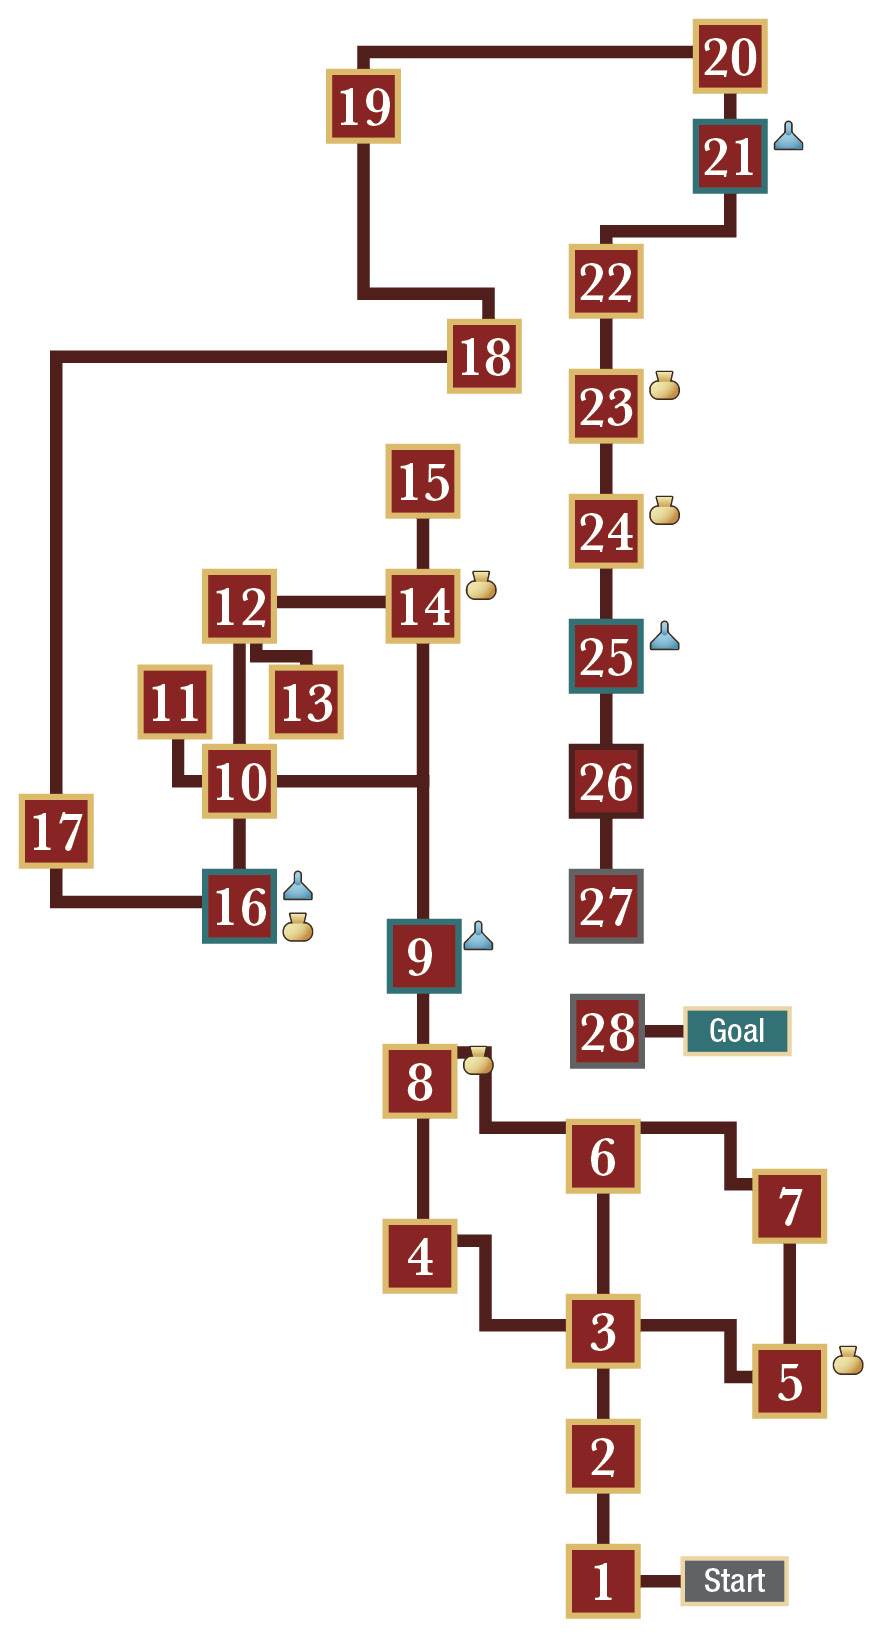
Before the Mission can begin in earnest, you’ll have to use stolen Magitek Armor to traverse Azurr. You’ll have a limited amount of time to roam around the area, but you can refill your time lost by picking up the fuel tanks scattered around the area. You can head directly to the Magitek Armor factory in the north and begin the Mission, or you can explore Azurr to find a handful of items scattered around on the ground.
Magitek Armor Facility
 Materiél Depot
A lot of this Mission involves stealth. There are Panjamdrums with red scan rings around them, and flying Nomads that are constantly searching the area for intruders. Sneaking through the facility isn’t as hard as it might seem. Avoid the scan rings of the Panjamdrums and destroy or stay behind the Nomads to avoid detection. If you do opt to destroy the Nomads, you’ll need to do it with a melee character, or Trey with his Charged Shot upgraded as much as possible, and it’ll need to be done in one hit. Jack is a particularly excellent character for this kind of quick kill. If you can’t defeat a Nomad in one hit, you’ll have the entire room up in arms trying to find you, so make sure you only try to destroy Nomads when you’re certain you can do it swiftly.
If you get caught, things get a lot more complex. All of the Panjamdrums will become active and wave after wave of enemies will attack you until the alarm turns off or until you leave the room.
Head to the south hallway of the Materiél Depot until the right wall explodes. Turn around and go back to the start of the hallway and down the ladder on your right.

 Waterway Sector UG-1
You’ll need to be very careful in this room and make a point to leave as quickly as possible. A Marduk can often be found sleeping in this room and a few others, and if it’s awoken it’ll tear your squad apart in seconds. The enemies in all of the Waterway Sectors will never stop pouring out no matter how many you defeat. Carve a path through the enemies to reach the next area, but don’t linger. The treasures in the waterways are accessible if you Lock-On to an enemy, and then change targets with the Right Analog stick to target the treasure chest. Focus on following the yellow diamond on your minimap instead of exploring this area.
You have no hope of completing the Marduk SOs on this playthrough, so waste no time heading through the northeast passage instead of the northwest one.


 Waterway Sector UG-3
Head through the northeast passage to area 4.
 Waterway Sector UG-6
 Waterway Sector UG-5
The treasure is inaccessible from this side of the room, so if you haven’t already grabbed it of your own accord, ignore it for now and move on through the northwest passage.
 Control Room 16 (Safe Zone)
 Warehouse RD-1
The Sensor Calibration Lab is directly west of your starting position in this room. If you take the SO and head through any other door, you’ll lose your chance to complete the SO, so make sure you look at the room’s name before you enter it.

 Sensor Calibration Lab
If the researchers see you, they’ll race to the alarm and set it off, calling in several imperial soldiers to try and take you down. You don’t want that, especially if you pick up the SO for this room.
To prevent the researchers from triggering the alarm, look through the windows on the top level of the room and locate the alarm. It is the small box with the red light on top of it. Your job is to get in front of that box and then kill all of the researchers that get near it. You need to destroy the alarm, but that can be hard to do when the researchers get near it. The researchers will run away from you if you get too close, so you won’t have to worry about them triggering the alarm if you stand in front of it. Once any nearby researchers have run away, you should be able to target the alarm box. Destroy the alarm box and then kill the researchers. One of them is holding an ID Card that you need to access the computer. Once you have the ID Card, approach the computer marked on your minimap. Access the computer, then leave the area.
Now, head to the Warehouse RD-2 area, which can be accessed through the north passage on the lower level of Warehouse RD-1.
 Warehouse RD-2
The Armor Development Lab is in the south passage, just east of where you start in this room.
 Armor Development Lab
The alarm box is directly below the windows on the upper level of the room. The quick way to get to the box is to go through the passage on the left, then race to the right. Once the box is destroyed, kill the researchers until you find the ID Card. Access the computer, then leave the room.
To reach the next area, head through the southwest passage, which is next to where you entered Warehouse RD-2 initially.
 Warehouse RD-3
The Parameter Stabilization Lab is in the northeast corner of this room.

 Parameter Stabilization Lab
This time, the alarm box is directly in front of the computer on the far side of the room. This is an incredibly difficult SO to complete, because the room is made up like a maze. You’ll need to switch to your fastest squad member, preferably a ranged character, and then race directly to the alarm box without stopping. There are two researchers standing directly near the alarm box, so getting in front of the alarm box, then standing by and taking out the researchers as they approach the box, is the best strategy.
Once you’ve destroyed the alarm box, kill the researchers, grab the ID Card, and access the computer. Then leave the room and head for area 16.
To find area 16, follow the yellow diamond on your minimap back to Warehouse RD-1, then through the large door down on the south side of the room.

 Perimeter (Safe Zone)
 Corridor
The alarms will be set off as soon as you enter the Corridor. There’s nothing you can do to stop that. The rest of this Mission is going to be a lot tougher, so stay on your toes.
 Transport Route MA-1
The way forward is blocked by an imperial barricade, but there isn’t a way around. Yet. Hide off in a corner and wait until the western passage opens. Refrain from accepting the SO just yet. You’ll need to avoid taking damage to complete the SO, which is really easy once you’ve cleared out all the enemies and are standing by the door leading out of the area.
Once Naghi opens the western passage, head through and swiftly defeat the CO at the end of the bridge. Just before he’s been defeated, accept the SO and deal the killing blow to complete it.
 Arsenal 61
The room will be blocked off at its northwest and northeast ends until you defeat all the soldiers in each area.
 Arsenal 68
This area will be blocked off by a gate and you’ll need to tear through the imperial soldiers to drop it and leave the room. After you’ve dropped the gate, you’re free to leave the room.
 Control Room 21 (Safe Zone)
 Transport Route MA-2
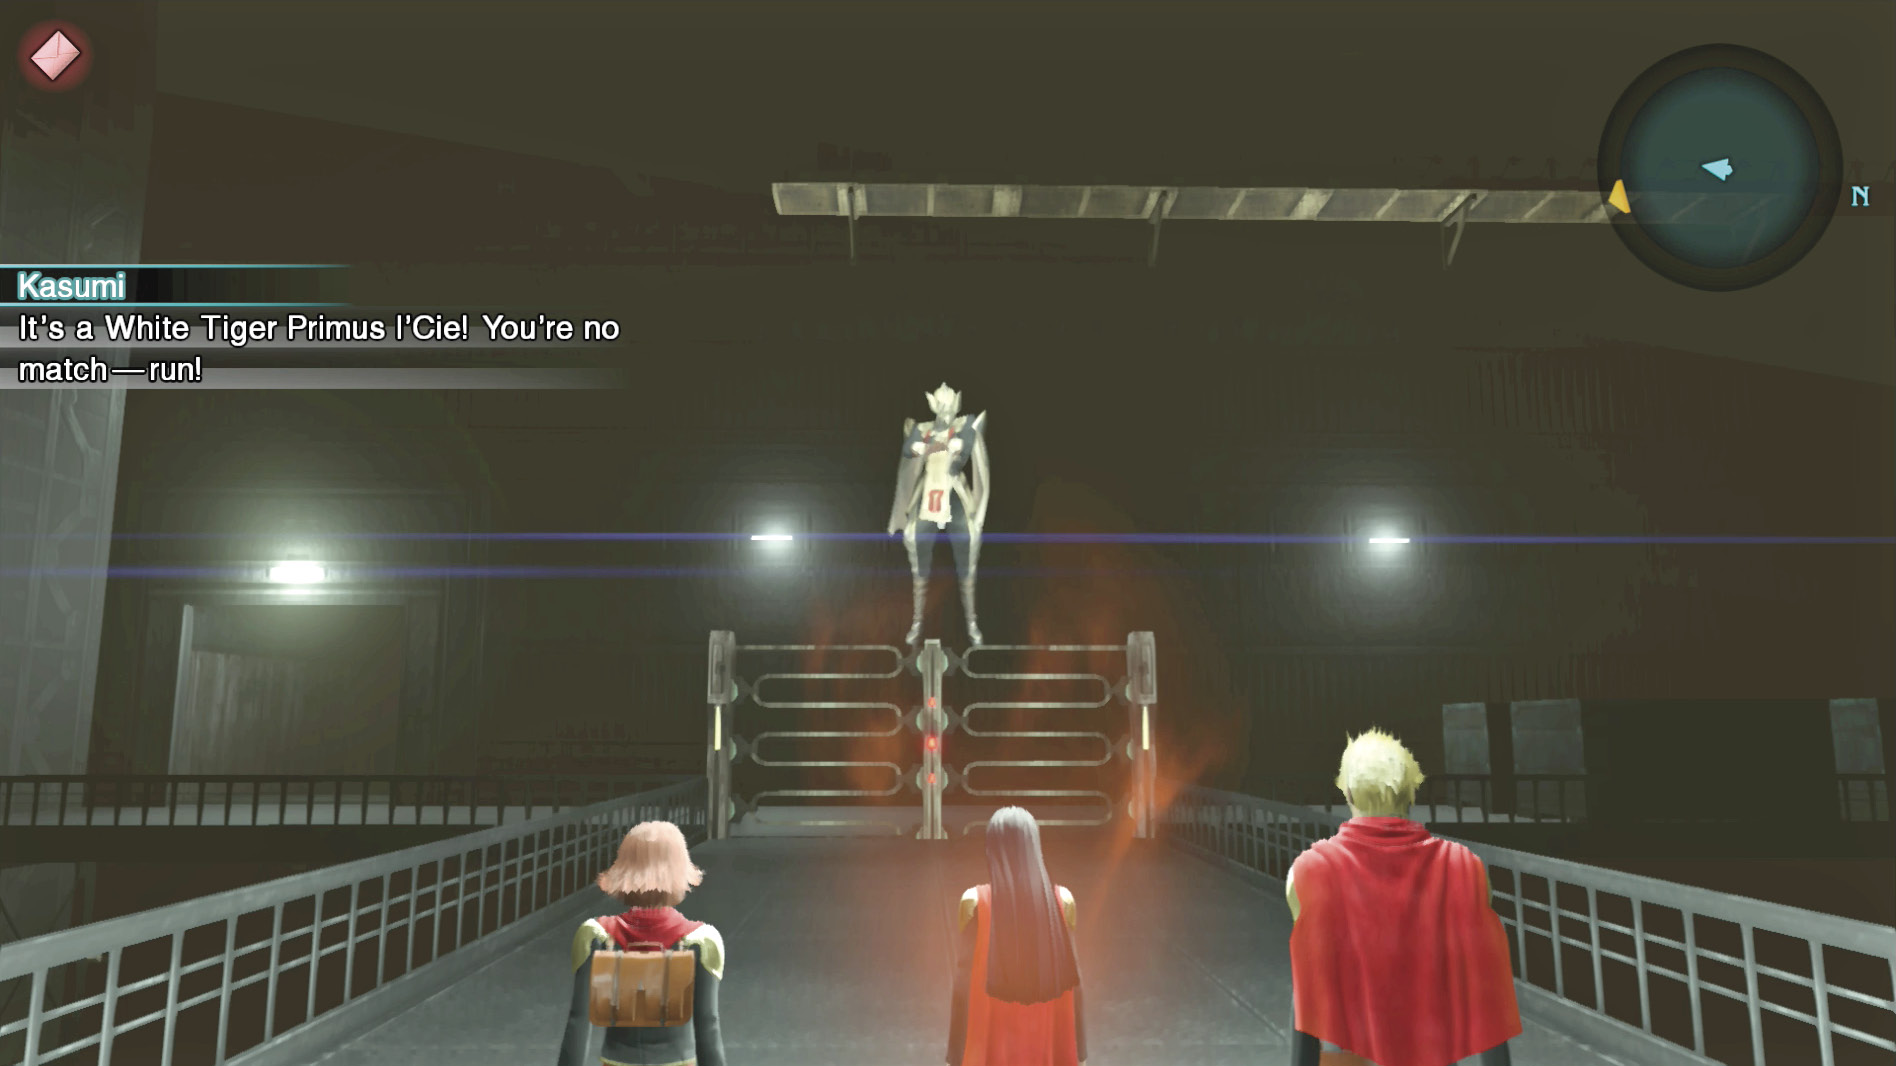
Before you cross the bridge at the end of this area, use a Phoenix Pinion (if you have one) on your party’s active leader. As soon as you begin crossing the bridge, a White Tiger l’Cie appears and immediately kills off your active leader. You can’t do anything to stop this, so don’t worry about it, but if you don’t have a Phoenix Pinion you may want to switch to your least valuable party member for this scene.

 Arsenal 71
There is a CO in this room, but you don’t need to defeat him to move on. You can also find an item in the northeast corner of the room where the CO is residing.
 Arsenal 105
Martinets litter this room. Switch to your ranged character to take them down, then head to area 25 via the southwest passage.
 Sentinel Hangar (Safe Zone)
Save, save, and then save again. The next room is not only hard, it features one of the hardest SOs in the game. If something goes wrong, you’ll want to have a save you can jump back to immediately.
Make sure you have a ranged character as your active leader—preferably not Trey, as his bow doesn’t work well against moving targets, which will be detrimental to this next SO.

 Sentinel Hangar [2]

A Colossus activates immediately after you enter the room. As soon as it’s defeated, immediately look to the right side of the room. An imperial pilot will be making his way from the northwest corner of the room to a Colossus on the west side of the room. You need to shoot him before he reaches the Colossus to avoid failing the SO.
The next pilot comes from the southwest corner of the room. The last pilot, Lieutenant Enriquez, will come from the southeast corner. Cater’s gun works quite well for this SO, as it has enemy-seeking properties that carry the bullets to your target.
You need to kill Lieutenant Enriquez either before he reaches his Colossus or while he’s in it to leave the area. Once he’s been defeated, another CO and his troops enter the room. You’ll also have access to another SO.
Once you defeat the CO, a Relic Terminal and a Recovery Portal will appear. So long as the CO stays alive, a steady stream of enemies with the Rage buff will continue to attack you.
Save before entering the next area. You’d also be wise to drop all your squad members and switch to a ranged character. This next room is the holding pen for the Brionac, which is a giant machine that will kill you and your party members in a single hit if it actually manages to land an attack. Your party members don’t have the reflexes you do, so bringing them along is almost a guarantee to suffer a casualty or two.
Having a ranged character will make hitting the Brionac much easier than if you brought a melee fighter, and you don’t necessarily need to have a high damage output, because most of the damage you’ll do to the Brionac will be from Breaksight strikes.
 Hangar 9
 Engine Room
Boss: Brionac
Most of Brionac’s attacks are heavily projected, so you’ll know when it’s about to strike well before it strikes. The main difficulty is knowing where it will strike. 
If Brionac swings its arm down, it’s going to sweep the entire area in front of it. When you see it pull its arm back, move into the entryway and wait for it to finish its sweep. As soon as it finishes, a Breaksight strike opportunity will be available. If the Brionac begins spinning up its arms as they become electrified, move to the entryway again. Brionac will begin throwing electrified Magitek Armor (MA) at you and you’ll need to shoot all of it out of the air or take damage when it impacts with you. The easiest way to deal with this is to sit in the entryway and use the Lock-On to target the MAs. Whenever they are targeted, the MAs will have Killsight placed on them. If you hit them while they have Killsight on, they’ll fly back at Brionic. Don’t spend too much time in the entryway, however: the Brionac has a move that will attack directly in the entryway. After each of the Brionac attacks, make your way back out in front of it if you hid in the entryway. This will help bait the Brionac into attacking in front of it, instead of in the entryway. If you do end up triggering the entryway attack, signaled by the Brionac pulling its arm back and electrifying it, step out and to either side of the entryway, or as far back inside the entryway as possible to the safe spot against the back wall. Pay close attention to what Moglin has to say. If the Moogle tells you to hide, get into the entryway. If you notice the Brionac lifting its left arm, that’s another telltale sign to get into the entryway. Brionac will slam down with its arms, one at a time, which will give you an opportunity for a Breaksight strike immediately after. It only takes a handful of Breaksight strikes to defeat the Brionac, so never stop firing at it if you can help it. Once Brionac has been defeated, you’ll be ushered to area 28. Boss: Nimbus
We hesitate to even call this a boss fight, because you stand no chance against Nimbus during this playthrough. To end the fight, you’ll either need to defeat him or hang in there until he leaves. Since the former isn’t possible, the latter choice is the only option. Take note that you can just let him kill your party if you’re not in the mood to wait him out, but it will add casualties to your Report Card. Like the fight with Brionac, this is a fight that is best suited for a single squad member. Avoid adding any other party members to your squad and make sure to have a fast, quick-dodging character selected as your active leader. When Nimbus appears near the green, glowing machinery outside of the boundaries of the area, he’ll begin creating symbols on the ground that will shoot a bolt of white light straight down shortly after the symbol appears. If you get hit by this, you’ll be killed immediately. Luckily, they are rather easy to dodge. Wait until one appears below you, then dodge to either the left or right of it—whichever side has more open space. When another one appears, dodge in the direction opposite of where you just dodged. 
Nimbus will do this same move, but on the other side of the room sometimes. When that happens, dodge away from Nimbus instead of shuffling left to right as we suggested earlier. When Nimbus appears low to the ground within the boundaries of the room, get away and to the side of him. If you give him a chance, he’ll do exactly what he did to your party member earlier in the Mission: stab you with a beam of light that will instantly kill you. Nimbus has one more move that he’ll do, where he appears low to the ground and then spins two energy beams around his head. You can avoid this in the same manner as you do when he appears and lunges forward with an energy beam. After about three to five minutes, Nimbus takes off and the fight will be over. |
Mission Accomplished
Completing this Mission will earn you the Fire ROK spell.
The fight with Nimbus ends in a ceasefire between the dominion and Milites. For the time being, you’ll be staying in a hotel behind enemy lines. Things are going to play out a little differently during this next chapter.