
Final Fantasy Type-0 HD Guide Walkthrough
Mission 6
Escaping the Imperial Capital
Mission Level: 23
S-Rank Requirements
| Time | Phantoma | Casualties |
|---|---|---|
| 25:00 | 90 | 0 |


 Grand Foyer
As soon as you clear the first area and the energy wall drops, the SO will pop up for you to accept. The Guest Registers are near the computers at the front desk in the next room.
 Hotel Entrance (Safe Zone)
 Hotel Armada
A ranged character is ideal for this area, because two imperial soldiers are standing on top of trucks that you have no way to climb.
 District 0709
 District 0711
To complete the SO for this room, you’ll need to switch to your ranged character to take out the Mid-sized Carrier.
You’ll need to defeat the CO, who will appear after you take down the other soldiers and the Mid-Sized Carrier, for the north gate to drop.
 District 0714
You’ll have to be on your guard in this room, as there are a couple of Colossus units running amok. They are much easier to challenge with a melee fighter instead of a ranged one. Stand in front of the Colossus to bait it into swinging at you. As soon as it stops and raises its arms, dodge behind it and wait for Breaksight to appear, then strike. You’ll make short work of it in no time.
Once you’ve defeated one of the Colossi the gate will drop, allowing you to access the second half of the room. As soon as you approach the gate on the other end of the room, a Colossus CO will appear. Defeat the Colossus CO to drop the energy wall and gain access to the next area.
 District 0720 (Safe Zone)
 District 0722
A train car will roll up to the center of the room and imperial soldiers will jump off to engage you. If you approach the north end of the area, a CO will enter the room from its north passage. Defeat the CO to be able to exit the area.
 District 0723
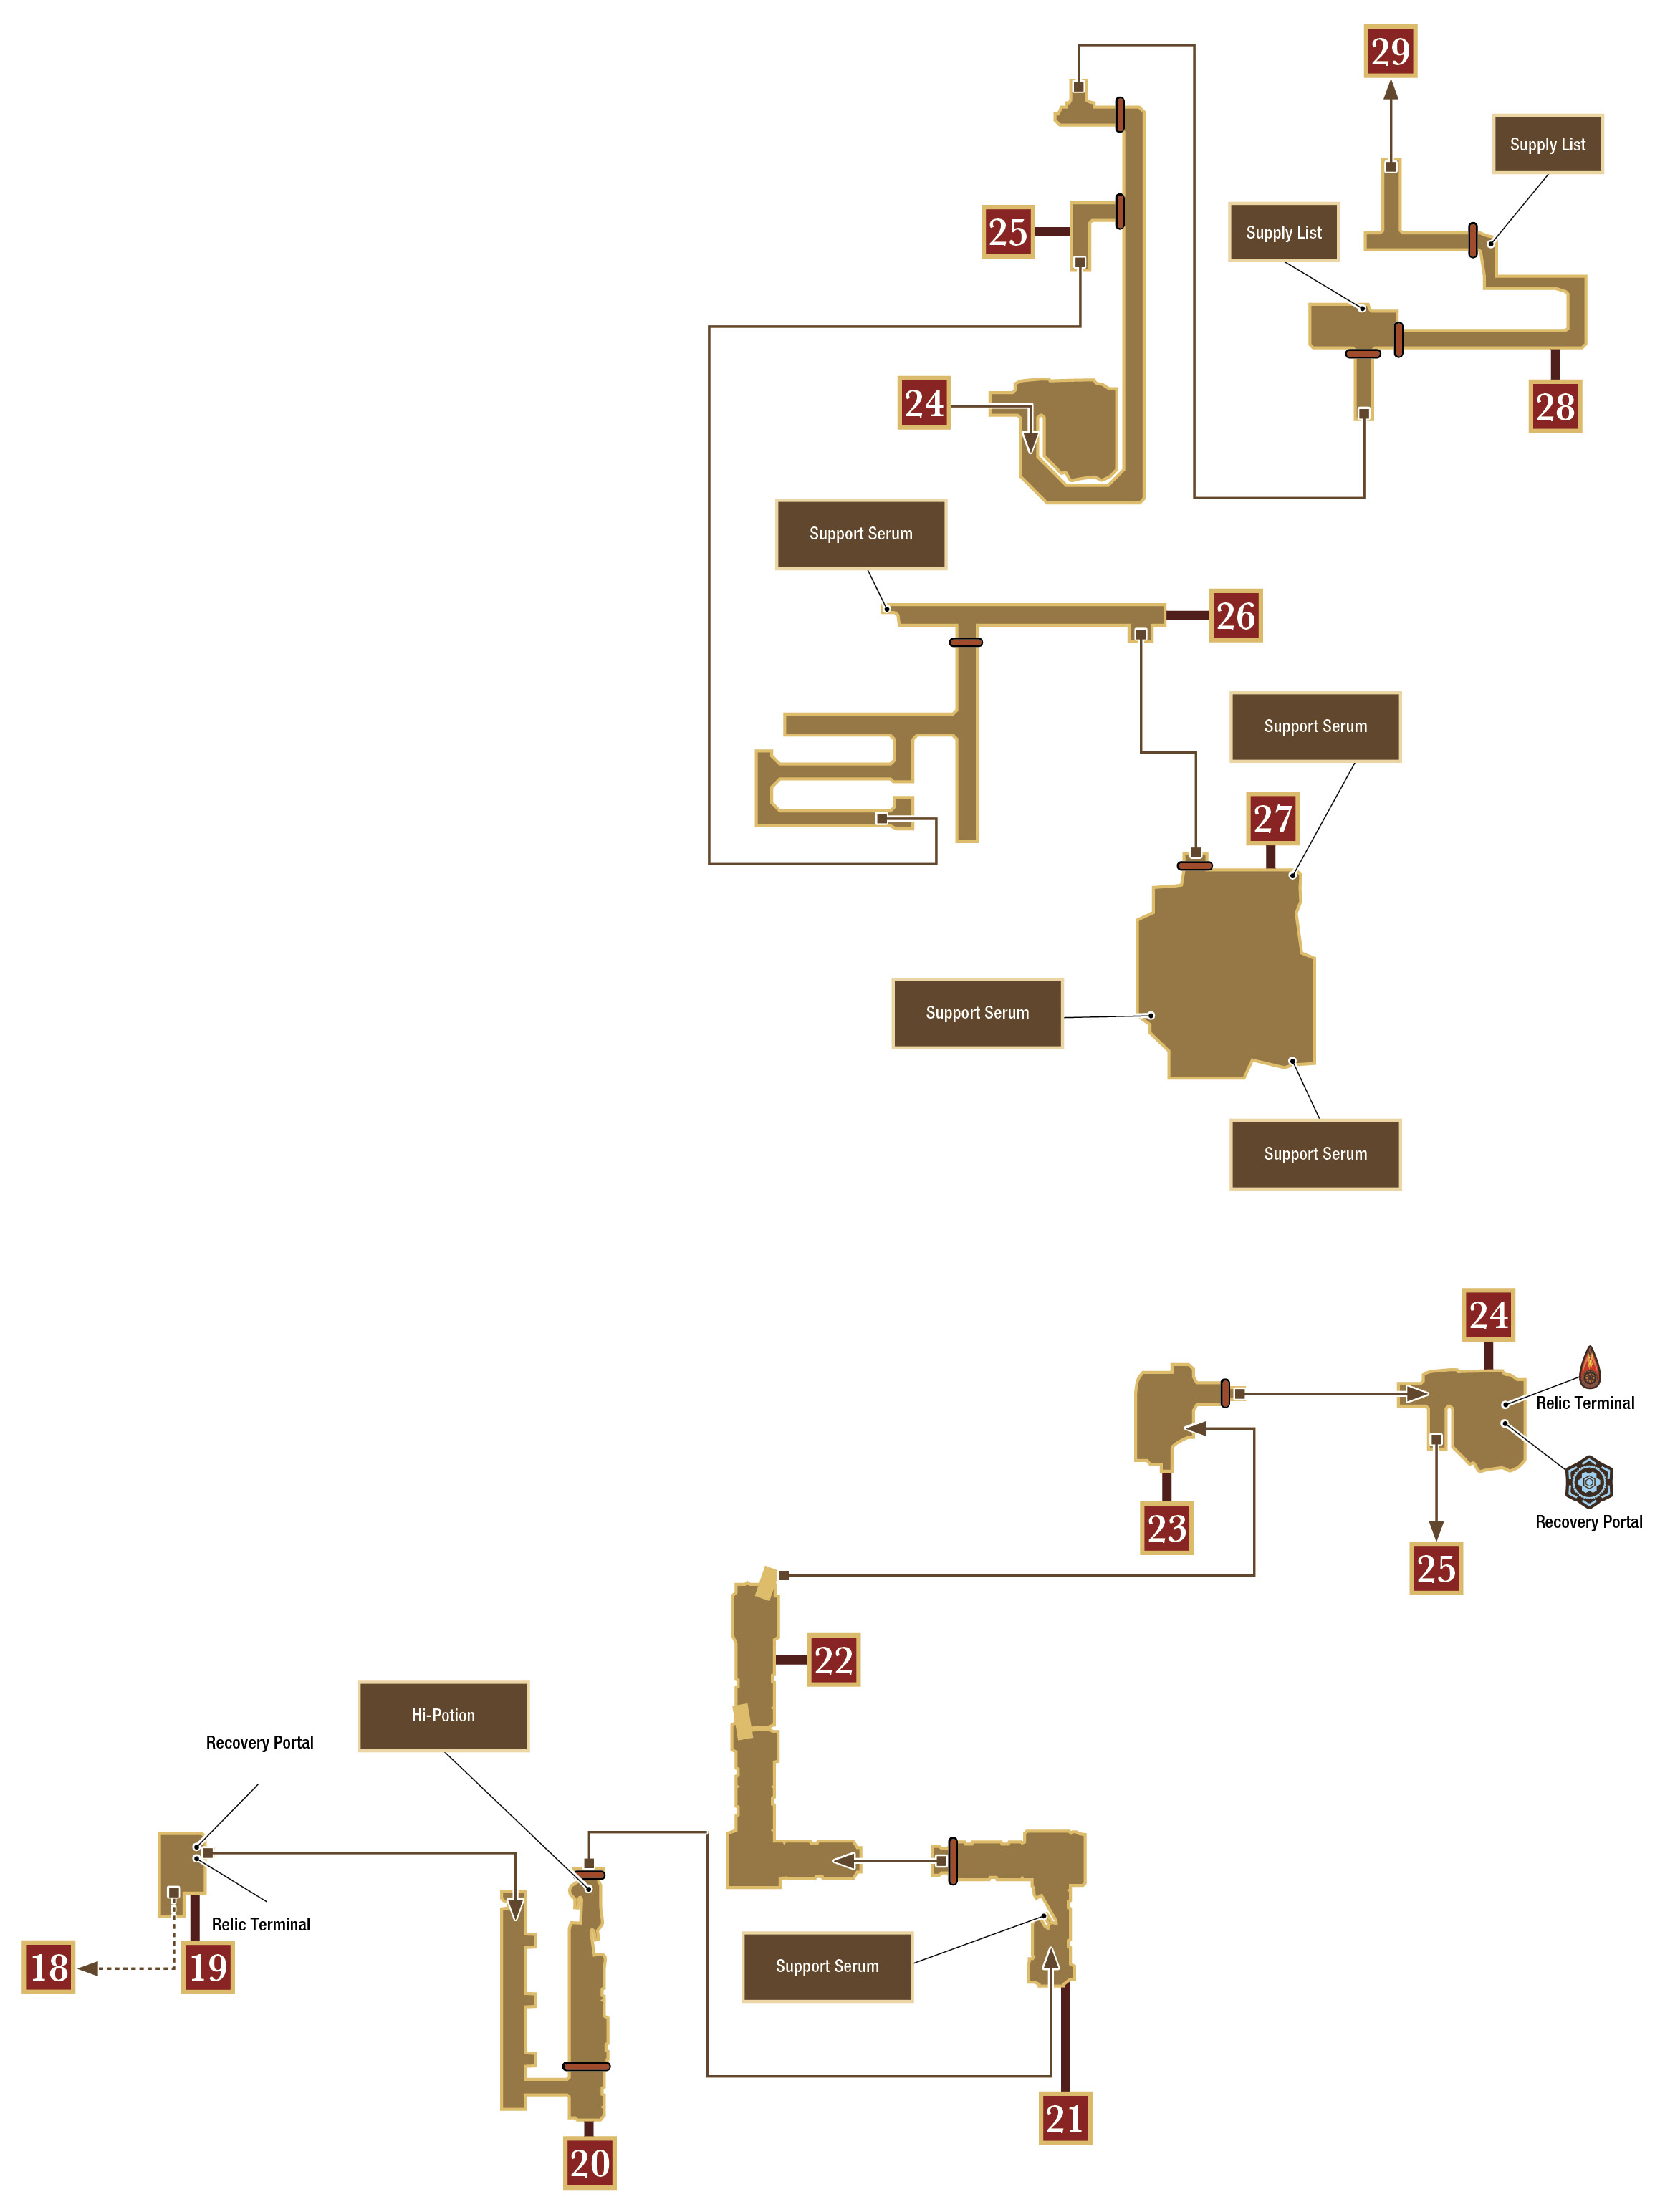
To complete the SO, you need to pick up three Army Notebooks scattered around the room. Refer to the map for this room for each of the items’ locations.
Once you defeat the Colossus CO, you’re free to move through the north passage.
 District 0724

Shortly after entering this area, Supersoldier Akkad, a monstrous maniac carrying a brutally large sword, will enter as well. He will stalk you through the train tunnels for the rest of the time you are here. Killing him right now is nearly impossible, so your best bet is to avoid him entirely.
If you’re trying to complete the SO for this room, avoiding him is your job. Don’t Lock-On to him; just run to the other side of the room whenever he gets near you.
 District 0725
Be swift about defeating the enemies in this room. You only need to kill the CO to exit the room, but if you’re going for the SO, you’ll need to hold off until you’ve killed at least two other imperial soldiers first.

 District 0726
To complete this SO, you need to perform a Killsight strike on an Imperial Trooper, not the Colossus. You’ll need to be extra careful, because Troopers are in short supply and Akkad will enter the room shortly after you do.

 District 0727
Don’t worry about the CO in this room. He’ll escape through the passage you entered from as soon as you enter. It is possible to defeat him if you attack him as soon as you enter, but if you want the SOs in the following rooms, you’ll have to head down the path he was going to take anyway. Defeat the remaining Imperial Troopers, then head to the yellow diamond on your minimap.
It turns out that the CO who ran from you was carrying the keycard to that door. You’ll have to backtrack to find him and obtain the keycard from him.
 District 0726
A Colossus CO will be in the center of the room. Defeat it to open the path to area 14. Before you leave, however, you’ll be given another SO—this time involving Akkad.
 District 0728
The CO will be running up the ramp directly ahead of you. Chase him down and kill him to obtain the Gate Key. Head back to area 13 whenever you’re ready.
If you’re doing the SO for this room, refer to the map to see where each of the Railway Maps are.
 District 0729 (Safe Zone)
 District 0730
As soon as you enter the room, a timer will begin ticking down, marking when the train you desperately need to be on is departing. You only have three minutes to defeat the CO and hop on the train.
To make matters worse, as soon as you approach the ramp leading down to the lower level of the room, Akkad will burst through the vent-like wall and begin pursuing you again.
The room is structured in a maze-like fashion. In order to navigate it, refer to the map below. As soon as the CO has been killed, race around the trains to the yellow diamond on your minimap to ride the train out of this area.
If you’re trying to complete the SO for this room, refer to the map for all of the Formation Chart locations.
 Tiger Liner 703A (Safe Zone)
When you first enter this area, it’s completely safe. You can save, heal, and upgrade your characters. If you move down the ramp just ahead, enemies will ride in on another train to try and take you out.
 Tiger Liner 703A Cont’d

Imperial Troopers and Airborne Troopers will do their best to hassle you, but if you switch to a ranged character, you should have very few problems dealing with either of them.
Move north until you can’t proceed any farther, then knock the large ramp down onto the train to your right. As soon as you begin heading north after crossing over to the other train, an SO will appear.
Continue defeating the imperial soldiers as you make your way up to the front of the train. Kick down the second ramp and cross over to the other side to find the last two enemies in the area. Once you’ve defeated them, you’ll be ushered to the next area.
Hold off on defeating the last two enemies if you want to grab the item on the north point of the train.
 Station 3348 (Safe Zone)
 District 3348
You’ll need to defeat all of the Imperial Troopers ahead of you to open the path to the northeast passage. As soon as the energy shield drops, head north and you’ll encounter two trucks full of Imperial Troopers. Well, there are two trucks, but we shouldn’t say they’re “full.” A total of three Troopers exit the backs of the trucks and try to take you out. Defeat them and the northeast gate will open, revealing one more Trooper and a CO. Defeat the CO to get the gate down permanently.
Defeating the CO first will allow you to loot the MPV-A1 Trunk Key from the surrendered Trooper. Use the key to open the truck closer to the gate. Inside you’ll find two surrendered soldiers. One will give you a Hi-Potion, while the other will give up the key to unlock the other truck.
 District 3349
An Imperial Trooper with two Coeurls will bum-rush you as soon as you enter the room. Defeat them and two more Imperial Troopers will appear. Knock them out as well, then approach the western gate to get the CO to appear. Once you’ve defeated the CO, he’ll drop the key to the truck located near the entrance of this area.
Run to the back of the truck and hit the Action button to open it. Enter the truck to find a Support Serum.
 District 3350

This area marks the beginning of a long pursuit by the scorpion-like Magitek Armor, Vajra. Things will require more patience and timing from here until the end of the Mission, so be sure to play it safe whenever Vajra’s around and keep your eyes open to either escape or attack the mechanized arachnid.
There is a barricade blocking you from the north side of the room. Vajra will jump over the barricade and challenge you directly. Its attacks come at you quickly, so stay alert.
Using a ranged character is a good idea for this fight. You can easily slide under Vajra’s legs to escape it, so the best approach is to keep your distance, then slide under its legs whenever it starts to back you into a corner.
After dealing enough damage, Vajra will climb away, and then begin firing at you from the buildings north of you. Once this happens, the SO for the area will appear. The best way to complete the SO is to head back around the corner toward where you entered from, then wait out the timer. Vajra can’t reach you from here, so patience is the only thing you need to complete this SO.
To get to the north side of the room, stand behind the truck in the barricade and wait for Vajra to fire. Vajra’s missile will destroy the truck, creating a passage for you. Head north and then do the same thing again with the truck on the right side of the barricade, then enter the passage on your right.
 A-13 Building
Vajra will be just outside the building you’re currently in. Switch to a ranged character and fire on Vajra until it climbs up to the second floor. Stay to the right side of the room while running toward the rubble. Vajra will fire a volley of missiles that is easily avoided if you’re near the rubble on the right side of the room.
Once Vajra leaves, head through the door behind you.
 A-13 Building 1F (Safe Zone)
 A-13 Building 2F
As you approach the end of the hall, a Snow Giant will swing in along the ceiling and attack you. Using a ranged character in these tight quarters is recommended. A melee fighter can get cornered or pressed against a wall, making it an easy target for the Snow Giant. If you keep backing up while shooting the Snow Giant, then slide past it when it gets too close, you should easily avoid most of its attacks.
Head through the first opening on the left side of the hall. There is another passage at the end of the hall, but we’re going to hold off visiting there for now.
 A-13 Building Basement
The basement is loaded with Bat Eyes, all of which need to be killed for the energy shield to drop. There is also another Snow Giant in this basement that is heading directly toward area 27, so try not to race there.
Head through the northeast passage to reach the Underground Storeroom.
 Underground Storeroom
You’ll have to face off with two Snow Giants in this room. There is plenty of space to roam around, so switch to your heaviest hitter and go to town on the ice creatures. You can hold off on accepting the SO until at least one of them is at a single bar of health to help assure the SO’s completion.
Once you’ve defeated them, look in all corners of the room to claim your rewards: three Support Serums. Once you’ve grabbed them all, head back up to area 25 and proceed down its north passage.
 Supply Route
There are a handful of Evil Eyes flying around this area that will need to be defeated to remove the energy shield. The SO for this room can be surprisingly tricky. The first Supply List is in the first room right after entering the area, while the second one is directly in front of the second energy shield, hidden between two boxes.
 Elevator Lobby

This room is pretty lousy. A gigantic Behemoth in an enclosed space is a cruel task to subject anyone to, but here we are. Switch to your heaviest hitter and stay behind the Behemoth while attacking it. If you see its tail raise slightly, dodge back, because it’s going to do a spinning attack that will hit anyone near it.
Once the Behemoth is dead, an imperial soldier named Piett will enter the room. Defeating Piett will land you a Hi-Potion.

 A-13 Building Rooftop (Safe Zone)
 Emergency Stairs
As soon as you approach the energy shield, Vajra will hop up on the roof you’re on. You’ll need to watch it and memorize its pattern, then slide in and strike it when it stops firing. As soon as you hit it a couple of times, it’ll drop off the roof.
As you approach the stairs leading down to the ground floor, Vajra will hang from the roof of the building behind you and begin firing missiles again. You can repel it by switching to your ranged character and firing at it. You don’t need to do a lot of damage to get Vajra to flee. Once it’s gone, head down the stairs, take out the Imperial Troopers, and then move to the next area.
 District 3352
Defeat the two Supersoldiers ahead to drop the energy shield blocking your path to the west side of the room.
As soon as you approach the west side, the western gate will drop and two Colossus units will walk out from behind it. This is a pretty tough fight. Your best bet is to try to divide and conquer, but that strategy won’t always work. Switch between targets when necessary to avoid getting sandwiched between the two giant machines.
To complete the SO, Lock-On to the fuel tank on the left side of the path in front of the Colossus units and wait for them to approach. As soon as you complete that SO, another one will pop up. You just need to get the key to the trucks from the CO and then grab the items inside each truck to complete that SO.
 District 3360 (Safe Zone)
 District 3361
Boss: Vajra A ranged character is recommended for this fight. Use the strategies you relied on in all of your other encounters to take down Vajra. It’ll move a lot faster and more frequently, but you’ve already seen all of its moves, so you know what to expect. Like every boss you’ve faced up to this point, you only need to hit its Breaksight to knock it down a peg. Once you’ve hit its Breaksight once, you’ll be given several opportunities in a row to do it again. Vajra may move fast, but it doesn’t have much in the way of health. It shouldn’t take more than one of these Breaksight breakdowns to put Vajra out of commission. |
Mission Accomplished
For completing this Mission, you’ll receive Magic: Thunder ROK.
You’ll start the next Free Time session at an abandoned house in the middle of the woods in the Old Lorica Region. There isn’t a whole lot to do at this point, except talk to your fellow classmates to pass the time.
Events, Tasks, and Expert Trials (Second Break—8 Hours)

If you want to skip forward to the next day, you can speak with Eight near the Relic Terminal and he’ll give you the option to rest until morning.
Events
| Location | Who | Reward | Note |
|---|---|---|---|
| Abandoned House | Cater | Cutscene, Mega-Potion | — |
| Abandoned House | Cinque | Cutscene, Turbo Ether | — |
| Abandoned House | Deuce | Cutscene, Hi-Potion | — |
| Abandoned House | Queen | Cutscene, Hi-Potion | — |
Once morning arrives, run back to the house and collect l’Cie Anshar’s Crystal just past the Relic Terminal, then head out.
You need to get to Jubanla Region, but chocobos are strictly prohibited. Follow the yellow diamond on your minimap to get to Jubanla and get ready to fight your way there. Without chocobos to ride, you’ll run into plenty of random encounters. Once you reach Jubanla Region, however, you need only reach the nearby airship to be rescued from behind enemy lines.