
Atari Flashback: The Essential Companion Guide 1981-82
Stellar Track

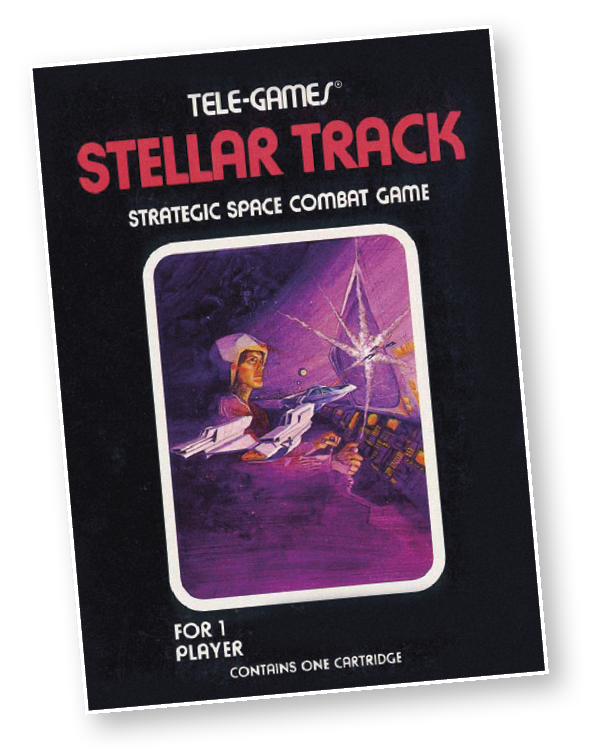
It is 2000 years since the unification of our planet and we “Terrans” have peacefully excelled in art, philosophy, and science. Our technology has mastered all but one problem: the hyperwarp drive (which would allow us to travel to other planets). Trapped in our own solar system for lack of the hyperwarp drive, there seems to be no way out until we are discovered by extraterrestrial life. These “Aliens” are anxious to trade their hyperwarp technology for Terran art and science to revitalize their stagnant culture.
As time passes, we Terrans expand our empire through interstellar trade and the use of hyperwarp technology. Increasingly, the Terrans and Aliens compete over the riches of the universe. We develop phased energy weapons and force shields, while the Aliens insist on escorting their merchant envoys with warships. Tension begins to grow.
The Terran government, directed by the House of Viceroys, decides to build an indestructible Starfleet and two Galactic Starbases to ensure cosmic military supremacy. With the invention of a deadly photon-launcher and the virtual invisibility of the starbases (their location is a closely guarded secret), we Terrans feel that a single Super Warship can keep the scattered Alien fleet in check. You are the captain and sole commander of that warship.
While the Viceroys are relaxing and confident of our military superiority, the Alien Council of Elders rules that the Terran culture must be destroyed. This is to be done before Alien dominance in the heavens is lost. As the commander, you must throw back the Alien invasion.
About the Game
Stellar Track was based on a text-based Star Trek game found on college mainframe computers in the 1970s. One of a handful of games sold exclusively at Sears stores, Stellar Track was released to a mixed reception. The complexity of the game and relatively simple graphics made it difficult for Stellar Track to stand on its own against other games released around the same time.
Object of the Game
The object of your mission is to destroy the Aliens in the galaxy using Photons or Phasers before they destroy you. If you run out of time (Stardates) or fuel (Energy), we Terrans are lost!
How to Play
After selecting the mission size, press the red controller button to start. The Galaxy Map command will flash near the bottom of the screen. In total, there are seven commands.
These commands are chosen using the joystick, then entered by pressing the controller button. Each command is displayed (flashing) on-screen as you move the joystick right or left.
You won’t know which commands to use (and especially in what order to use them) until you learn more about each one through these instructions. For now, remember that when the command you want to use is displayed on-screen, you must press the red controller button to enter it.
Mission Overview
So far, you’ve been given some basic information on the history of the war, the overall mission objective, how to select the size of a mission, and how to get the mission started.
This information alone addresses only the beginning of the mission. Now you must learn how and when to use each command. You must also learn how to deal with other mission factors, such as the difference between a quadrant and a sector, what a starbase can do for you, and so on.
Quadrants/Sectors
The galaxy is divided into 36 quadrants and each quadrant is subsequently divided into 64 sectors. It may help to think of the quadrants as states and the sectors as cities within those states. The general flow of the mission is as follows:
- Use the Long Range (LR) Scan to see which quadrants contain Aliens and/or starbases.
- Use the Warp command to travel or jump among the quadrants and sectors as you pursue Aliens and starbases.
- Use the Short Range (SR) Scan to see which sectors contain Aliens and starbases.
- Use Photon/Phasers to destroy Aliens.
- Use the Status command to track remaining Aliens, time left (Stardates), Energy, and damage to your ship.
- Use Starbases to refuel and repair damage to your ship.
- Use the Galaxy Map to coordinate the entire mission.
- Use a note pad to keep track of all the above.
If you destroy all the Aliens, your mission is successful and you receive a ranking (Cadet, Ensign, Lieutenant, Captain, Commodore, or Admiral). Ranking is based on how much time and energy it takes to destroy the enemy. The less energy used, the higher your ranking. You’re ranked at the end of a mission regardless of how it ends. Naturally, if you save the galaxy, your rank tends to be higher. However, if you waste resources to win, you might still be reduced to Cadet!
If you run out of time (Stardates) or fuel (Energy), the Terrans must surrender to the Aliens.
When you are in a quadrant containing both Aliens and a Starbase, the screen will be red. Once you destroy the Aliens in that quadrant, the screen will turn grey.
Galaxy Map
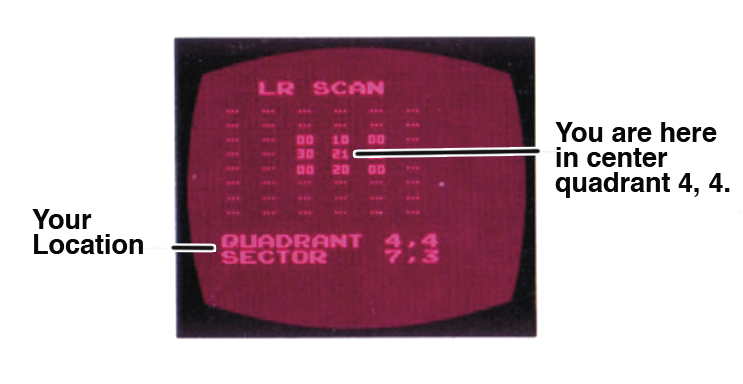
The Galaxy Map is a 6x6 grid that starts out empty at the beginning of each mission. Each time you scan one of the 36 quadrants, that quadrant will appear on the Galaxy Map the next time it is displayed. A scanned quadrant shows a two-digit number. The left digit indicates the number of Aliens in that quadrant, while the right digit indicates whether a Starbase exists in that quadrant.
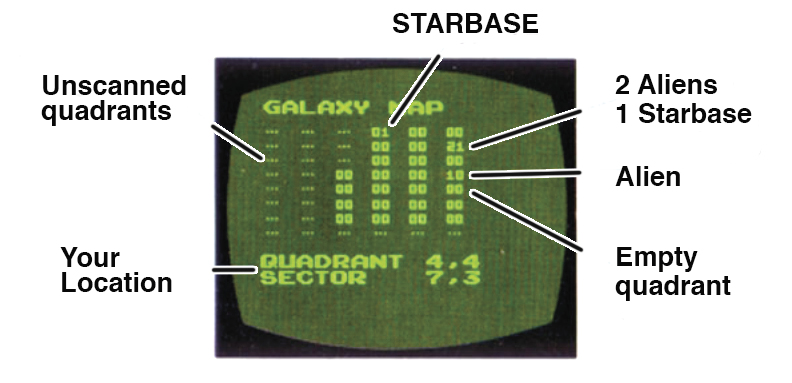
As an example, an entry of 21 reveals two Aliens and a Starbase in the quadrant. Keep in mind that although some commands use time or energy, calling the Galaxy Map is completely free.
Long Range (LR) Scan
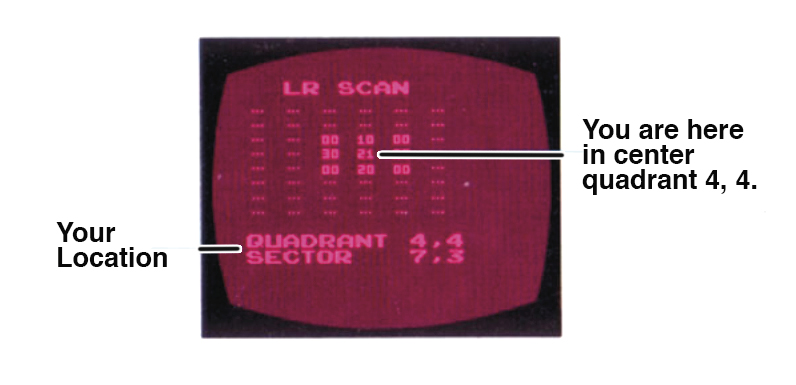
The LR SCAN is a 6x6 grid that shows the contents of the current quadrant, plus all adjoining or adjacent quadrants. As with the Galaxy Map, the information is presented as a two-digit number. The left digit shows the number of Aliens in the quadrant; the right digit indicates whether a Starbase exists in the quadrant.The LR SCAN does not use energy or startime. However, when you are in a quadrant with Aliens, they will fire at you (one by one) after you use the LR SCAN. Note that the LR SCAN shows adjacent quadrants while the Galaxy Map cumulatively displays all the quadrants you have scanned.
Short Range (SR) Scan
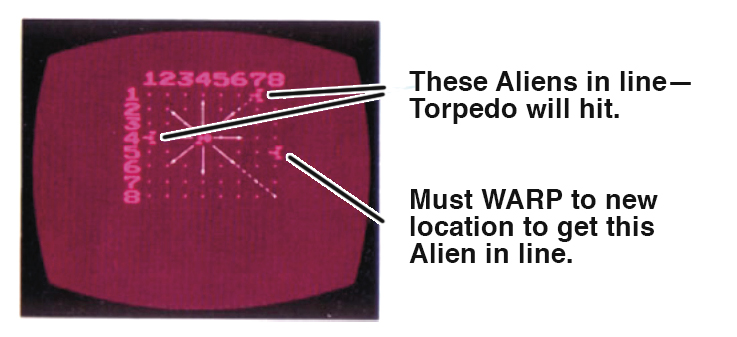
Each quadrant contains 64 sectors. The SR Scan is an 8x8 grid that enables you to see exactly what is contained in your quadrant by showing what appears in each of the 64 sectors. A SR Scan fills in the Galaxy Map for the current quadrant only.
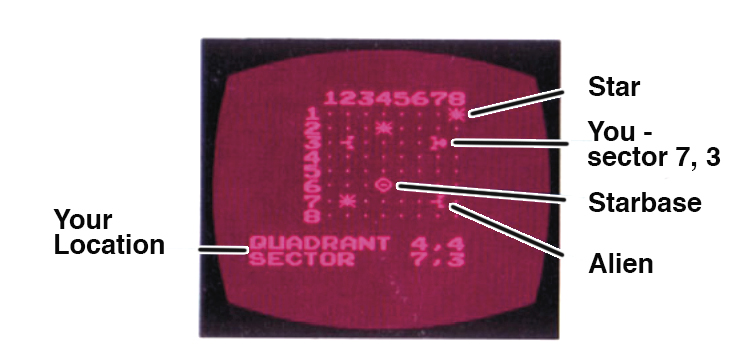
You must use the SR Scan to find out exactly where the enemy a Starbase is located. It does not use energy or startime, but like the LR Scan, any Aliens in your quadrant will fire at you (one by one) after you use it.
Warp
The Warp command is used to move your ship from one quadrant to another, or from one sector to another. Using the Warp command is expensive—it uses Startime and Energy.
Warping Among Quadrants
Startime used = one Stardate for each quadrant jumped.
Energy used = 100 units for each quadrant jumped.
Warping Among Sectors
This maneuver costs 10 units of Energy for each sector jumped, but uses no Stardates. How to Warp:
- Using the Joystick, display the Warp command on-screen.
- Enter the Course number, which is the direction you want to travel. This is done by moving the joystick to the right or left. There are eight possible directions to move (with corresponding numbers).
- When the number you want is displayed (flashing) on-screen, press the red controller button to enter it.
- Enter the Factor numbers, which represent the distance in quadrants and sectors you want to travel. Move the joystick right or left to change the numbers on-screen. Next, press the red controller button button to enter the numbers. The first (left) number indicates how many quadrants you want to jump. The second (right) number indicates how many sectors you want to jump.
- Remember, when moving within the same quadrant (sector to sector), you must enter “0” for the first number since you do not want to move quadrants, only sectors.
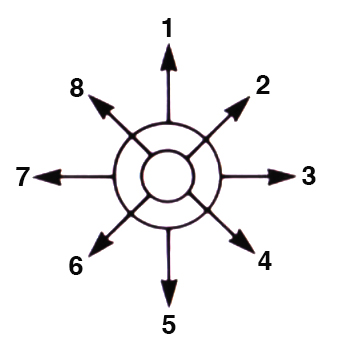
When you successfully Warp into another quadrant the Status report automatically appears on-screen. If you fail to Warp, you will hear a loud buzz sound and the screen will remain unchanged (you tried to warp through a star).
Photon Torpedo
Your Photon Torpedoes are one of two weapons you have to destroy Aliens. The other weapon is your Phasers, explained in the next section.You start with nine torpedoes. All nine torpedoes are automatically replaced whenever you dock at a starbase.
There are eight different directions (CourseS) to fire Photon Torpedoes. Your ship must be directly in line (right, left, up, down, or diagonally) with an Alien to successfully hit it with a torpedo. You cannot shoot through a star or out of one quadrant and into another.
How to Use:
- Select the Photon command using your joystick.
- Enter the Course (direction) number in the same manner you enter the Warp Course number.
- Press the red controller button to fire.
Using your Photon Torpedoes requires no Energy or Stardates. The Alien is always destroyed when hit by a Photon Torpedo. Any undestroyed Aliens in the quadrant will fire back after you use a Photon Torpedo.
Phasers
Your Phasers are energy weapons. A Phaser blast can cause damage or destroy an Alien if it’s strong enough. To destroy and Alien, the Phaser blast energy value must be greater than the energy value of the Alien ship. (All Aliens start with 99 units of energy.)
You do not have to be directly in line with an alien (as with protons) to destroy or damage it with Phasers.
The power for your Phasers comes from your Energy supply. Think of your Phasers as a flashlight beam with great power close and less power further away. The closer the enemy, the less power you need to destroy him.
To use Phasers:
- Select the Phasers command using your joystick.
- Assign the energy (Phaser units to fire?) using a three-digit number. You must enter three numbers for it to work. The energy fired will be deducted from your Energy supply.
- After entering the last (third) number by pressing the red controller button, the Phasers will automatically fire. You must fire once for each Alien in the quadrant.
After firing a Phaser, you receive a message saying “Alien Destroyed,” or:
- How much energy hit the Alien (Unit Hit).
- The coordinates of the Alien that was hit.
- How much energy the Alien has left.
Damage
Aliens in your quadrant will fire only after they detect a maneuver on your part. Their sensors are unable to detect when you use the Status or Galaxy Map, so these are the only “free” moves. All other actions antagonize the Aliens to return fire, which can damage one of five ship functions: Launcher; Phasers; Engineers; SR Scan; LR Scan.
Your Status Report will show “OK” if a function is undamaged, a negative number will indicate how many Stardates must be used up before that function is repaired. For example, if a ship function shows -3, then three Stardates must be used up before you may use it again.
Docking at a Starbase repairs all damage to your ship, regardless of Stardates. If you attempt to use a ship function, the computer will respond with a buzz and the command will not be entered. Your Engines are a special case when it comes to damage.
- You cannot leave a quadrant with damaged Engines.
- To fix damaged Engines, enter a Warp command for the same number of quadrants as Stardates needed to repair the damage.
- Instead of moving quadrants, your ship will move only the number of sectors entered for quadrants.
- Although Stardates and Energy will be deducted, your Engines will be repaired and you can leave the quadrant.
Status Report
|
STATUS |
||
|
Stardate |
11 |
Number of Stardates left to destroy all Aliens. |
|
Aliens |
08 |
Number of Aliens left in the galaxy. |
|
Energy |
1250 |
Amount of energy left in your ship. |
|
Photons |
8 |
Number of photon torpedoes remaining. |
|
DAMAGE |
||
|
Launcher |
-3 |
Photon torpedo launcher. |
|
Phasers |
OK |
Phasers. |
|
Engines |
OK |
Ship engines for using Warp command. |
|
SR Scan |
OK |
SR Scan. |
|
LR Scan |
OK |
LR Scan. |
|
LOCATION |
||
|
Quadrant |
4, 4 |
Which quadrant you’re in. |
|
Sector |
7, 3 |
Which sector of that quadrant you’re in. |
Damage:
- OK = There is no damage to report.
- -3 = This ship function is damaged and you must use three Stardates to fix it, or dock at a starbase for repair.
Starbase Docking
Docking at a Starbase repairs all damage to your ship. This procedure provides you with a new supply of Energy (3000 units). It also replaces all nine of your Photon Torpedoes.
To dock at a Starbase, Warp to the same quadrant and sector as the Starbase. This places you virtually on top of the Starbase.
There are always two starbases in the galaxy. Starbases are randomly placed at the beginning of each mission. They never move or get destroyed.
If your ship receives damage while docked, you must back off the Starbase and then back on to it for more repairs and refueling.
Aliens
All Aliens start each mission with 99 units of energy. If you leave an Alien in a quadrant and then return later, it will be refueled to 99 units of energy (if damaged) and it is very likely that it will move. When you are in a quadrant with an any Aliens, you and the enemy side take turns:
- You Warp into a quadrant containing an Alien, then you use your SR Scan to find it.
- The Alien will then fire at you.
- You execute another command.
- The Alien fires again.
- You execute another command.
- The Alien fires again and so on.
Each time an Alien fires at you, you receive a report on how much of a hit you took as well as how much Energy remains. If there is more than one Alien in a quadrant with you, each Alien takes its turn before it becomes your turn.
Command Summary
|
SHIP FUNCTION |
COST |
|
Galaxy Map |
Free |
|
Status |
Free |
|
Photon |
Photon & Turn |
|
Phasers |
Energy & Turn |
|
Warp |
Energy, Stardate(s), & Turn |
|
SR Scan |
Turn |
|
LR Scan |
Turn |
Game Options
The game select and reset buttons both have the same function, which is to randomly select the size of a new mission. There are two factors that vary with each mission. One is the number of Stardates you have and the other is the number of Aliens you must destroy to win. Press either button to change and/or select the size of each mission. Continue pressing either button until you select the size mission you want.
The right difficulty button controls the shield strength of damage probability. In the Novice position, the probability of damage is lower. In the Expert position, the probability is twice as high.
The left difficulty button controls your Phaser strength. In the Novice position, your Phasers (or energy units) are twice as powerful as the Aliens’ Phaser strength. In the Expert position, your Phasers are equal in strength to the Aliens’ Phasers.