
Call of Duty: WWII Guide Multiplayer Maps and Modes
Game Modes
There are a slew of game modes in Call of Duty: WWII that long-time players will recognize and a new mode called “War” that will be unfamiliar to all. Read on to get brief descriptions about each mode, then check out the maps section to get strategies and tips on how to handle objective-based modes on each map.
Team Deathmatch

Your classic team-based battle to the death. There are no tricks, frills or objectives to hold you back—just good, old-fashioned running and shooting. The first team to reach 75 points is declared the winner.
General Tactics
Success in Team Deathmatch comes down to three things: loadout, map awareness, and skill. Know your map and know your own playstyle, then use your playstyle to make the map work to your advantage. If you’re a short-range player, stick to narrow, enclosed locations and stay out of open areas. If you’re a long-range player, do exactly the opposite and get out under the sky. Knowing which locations on a map benefit your playstyle and which locations hamper it is key to getting the most out of each round.
War

War is an objective-based, constantly shifting battle meant to reenact some of World War II’s most defining battles. Instead of having a single objective, every completed objective pushes the battle lines back and shifts the focus onto a new point to attack or defend. Build up walls, machine gun emplacements, and other elements of the map to help your assault or hinder your opponent’s.
General Tactics
War is all about playing the objective. You won’t have a lot of room to flank and outmaneuver your opponents while playing this game mode, so focus on utilizing the resources at your disposal. Remember: it’s not about kills, it’s about taking your team to victory. If you cut off the enemy’s ability to reach the objective, that’s as good as taking down their entire team. Use buildable walls and machine gun emplacements to keep them suppressed. If they’re capturing a point, sit in a covered corner and stall them until the rest of your team arrives. If the enemy has a position heavily-fortified, then spam grenades and move cautiously. You won’t do your team any favors if you keep rushing toward the point and dying before getting there. Work together and think about the objective above all else and you’ll have a fighting chance at taking a victory for your team.
Domination

Three points appear on a map and your team’s job is to capture most of them. Points tick up every few seconds based on how many control points you hold, which means capturing and holding more control points than the opposing team is the name of the game.
General Tactics
Always try to hold two points. You can go for the shut out and grab all three, but holding two points a majority of the game means you win by numbers alone. Don’t get caught up trying to rack up kills; get on a point and hold it down until you see the enemy team making an attempt for a second point. If you are simply capturing points and leaving them unattended while roaming about, you’re practically begging the enemy team to steal them back from you. If you have two or more points, hunker down and wait for the enemy to try and steal a point back.
Hardpoint

Hardpoint is a battle for a constantly shifting zone. Hardpoints are captured instantly once your team stands in the zone. Every second in the zone is a point in your team’s favor. If a member of the enemy team steps foot in the zone, it becomes contested and neither team scores points—at least until the enemy is removed. A Hardpoint only stays in place for 60 seconds. After that, it is relocated to another part of the map and the battle continues. Be the team with the most points, or the first to reach 250 points, to be declared the winner.
General Tactics
Learn where the Hardpoints are going to appear and how best to approach them. Each map presents Hardpoints in a slightly different way. Some have massive, room-filled Hardpoints, while others have smaller Hardpoints in open areas. We cover the locations of each Hardpoint in our coverage of each map, so read ahead and take a look at the maps we’ve supplied to get an idea of what you’re up against before the match even begins.
This is an easy game mode to rack up a lot of points for Scorestreaks, so don’t be afraid to bring some heavy hitters. Glide Bomb is a very practical and effective Scorestreak for Hardpoint. Since there’s only ever one point on the map, you’ll have a good idea of where most of the enemy team is located if you don’t currently hold the Hardpoint. One properly placed Glide Bomb can dislodge their entire team from the point, leaving it for your team to claim.
Capture the Flag

A staple of first-person shooters, Capture the Flag is a near endless battle (at least it can feel that way) to steal the flag from your opponent’s base while protecting the flag in yours. It’s stressful, it’s intense, but above all it is unadulterated, adrenaline-pumping action that never gives you a moment to breath.
General Tactics
Capture the Flag is a tough mode. The chaos of battle won’t protect you when you have an icon hovering over you after grabbing the flag. Use flanking paths to grab the flag, then immediately head down the nearest path with plenty of cover. You need to break line of sight above all else. It doesn’t matter if the enemy team can see you with a flag icon overhead if they can’t actually shoot you.
While holding the flag, you’ll gain a ton of points for each kill (100 for the kill and an additional 100 for killing with the flag in your possession). Bringing beefier Scorestreaks to this mode is not a bad idea. Carpet Bombing and Fire Bombing Run are particularly devastating. If you place a Fire Bombing Run in the path of the enemy flag carrier, you can drop them and your flag along with them.
Search and Destroy

No respawns are allowed in this attack and defend game mode. One team attempts to attack an objective, while the other tries to prevent it. This mode requires careful play, open ears, and map awareness beyond any other mode. One mistake and you’re out for the round, so don’t make mistakes!
General Tactics
The key to winning a match of Search and Destroy is situation awareness and loadout. Pay attention to where enemies appear on your minimap and you’ll know how to approach the Bombsites and the enemy. If you’re on defense, those enemy locations will direct you to an impending bomb plant. If you’re on attack, those same locations indicate which Bombsite is the least defended, or where you should attempt a flank.
Keep lower-cost Scorestreaks in your loadout. Since there are no respawns, you should expect a lower kill count overall, meaning less opportunity for heavy-hitting Scorestreaks. Recon Aircraft, Counter Recon Aircraft, Supply Drop, and Glide Bomb are all cheap and effective.
Kill Confirmed

Kill Confirmed is Team Deathmatch with a twist. Kills are not enough to win here. When you drop an enemy, he drops a dog tag. Collect the tag and your team scores a point. If the opposing team picks up the dog tag before your team, that’s a point denied. You need to make hard calls in this mode. Do you grab that one enemy’s tags and score a point, or let it go to grab the three allied tags sitting nearby? Make the right calls and you’ll see the Victory screen. Flounder and it is guaranteed defeat.
General Tactics
The same strategies that apply to Team Deathmatch apply to Kill Confirmed. Focus on collecting dog tags—your teammates and your enemy’s—and you’ll be well off. Play to the strengths of your loadout and the makeup of the map and play with more care than you would in a standard Team Deathmatch game. Getting kills means nothing if you’re not grabbing tags; dying repeatedly just gives the enemy more tags to collect for themselves.
Free-For-All

They say no one person is an island, except when playing Free-for-All, where everyone is. If you’re tired of your team letting you down, and you want to show the rest of the world that there is an “I” in “team,” play this mode. It’s a battle to see which individual can get the most kills when there’s no one around to guard your rear.
General Tactics
Stay out of open areas, but utilize windows and cover that overlooks them in order to grab kills at a distance. You’re always in danger of getting shot in the back while playing this game mode, so do your best to avoid open areas whenever possible. Don’t stay in one spot for long unless you’re seeing a lot of action. It doesn’t take a lot of kills for an enemy player to win the match, so don’t sit and camp for a single kill while your opponent is gunning down foes with impunity. Ammo is a constant issue in this game mode, so Forage isn’t a bad Basic Training to equip. Recon Aircrafts are also quite spectacular, since you’re the only one benefitting from it.
Gridiron
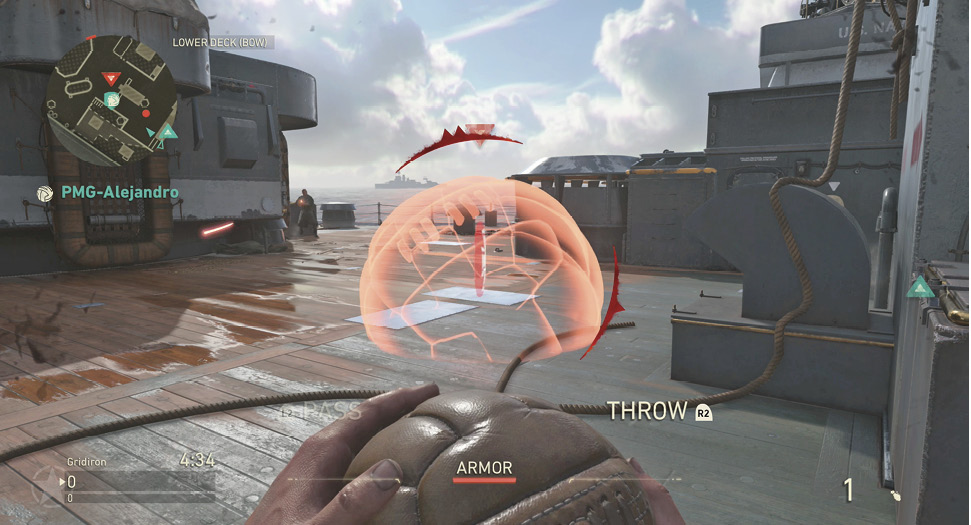
A rousing game of football, but with a Call of Duty twist. You need to grab a ball at the center of the map and run it into your opponents’ goal to score points. Throw it in to earn a single point, but run it in for a “touchdown” and your team will score two points. You must wield the ball carefully to succeed in this game mode. While you’re holding it you can’t fire a gun, but you also have guaranteed 1-hit melee kills and stronger Armor. Cleverness and map knowledge will lead you to victory above all else, so don’t be afraid to try risky plays in order to take the game for your team.
General Tactics
Capture the Flag strategies apply to this game mode better than any others. The ball always starts in the center of the map and you always need to deliver it to the goal in the enemy base. Grab the ball, find the nearest path leading into a building (or other good cover) and make a run for it. If you see the goal, but you’re not confident you can run it in, then throw it instead. Getting a point is better than no points.
You can’t fire your weapon while holding the ball and, while that might seem like a rough proposition, keep in mind that you can throw the ball. If you see an enemy ahead while you’re holding the ball, give them the ball. They’ll have additional Armor, but they’ll lose the ability to fire their weapon. IWhen this happens, use range to your advantage to take down your enemy. Odds are when you do this, they won’t be expecting it; they’ll lose a second or two just trying to figure out why their gun isn’t firing, which is more than enough time for you to take them down. Grab the ball and continue on your path to the goal. Keep in mind that this won’t work if there’s more than one enemy ahead. If you’re good, you can throw the ball to one enemy, kill the second enemy, then gun down the first one. However, that’s definitely not a strategy you should rely on unless you’re completely out of options.
Be willing to pass the ball to teammates and don’t be afraid to retreat and take a different route. Getting tunnel vision and trying to run down an enemy will work some of the time, but will give the enemy the ball most of the time.