
Assassin's Creed IV: Black Flag Guide Walkthrough
Sequence 12
PREVIOUSLY...
Freed from almost a year of imprisonment, Kenway assists Ah Tabai in saving Anne Bonny (an old acquaintance from Nassau) and Mary Read (an Assassin better known, of course, by her James Kidd alias) from a military prison. Mary, desperately sick after complications arising from her recent pregnancy – a gambit or coincidence shared by Anne, which had forestalled a trip to the gallows for both after their earlier arrest for piratical crimes – does not survive the escape.
After Ah Tabai departs with Anne, Kenway embarks on an indeterminate period of blind drunkenness, in which his crazed hallucinations and recriminatory dreams enable him, albeit obliquely, to come to terms with the tragedies and trials that his decisions have caused in recent years. He is discovered, ruinously hungover and sleeping rough, by Adewalé, who – in a brief and bittersweet encounter – returns the Jackdaw to its erstwhile captain, yet stands down as quartermaster having pledged his lot with the Assassins.
Acceding to Adewalé’s request that he visit Tulum, Kenway arrives to find the Brotherhood weakened by attacks by Templars and their agents, the result of his actions under the guise of Duncan Walpole years before. After he helps to repel a further assault, Ah Tabai – intrigued, perhaps, by Kenway’s evident sorrow and greater awareness – offers the Brotherhood’s support in his search for Roberts.
Memory 01 “A Governor No Longer”
Mission Overview
Optional Objectives
- Kill the diplomat from a haystack.
- Kill Rogers from a bench.
Notes & Further Reading
- If you have yet to explore Île à Vache, you should do so now: as Sequence 12 begins with Kenway anchored just off its coast, it’s a convenient time to visit.
- You may wish to try this Memory without our assistance on a first playthrough to get the full experience that its designers intended. It’s perhaps a little too quick and easy once you have prior knowledge of where to position Kenway at key moments, as our walkthrough here distils all potential steps to a very clinical routine.
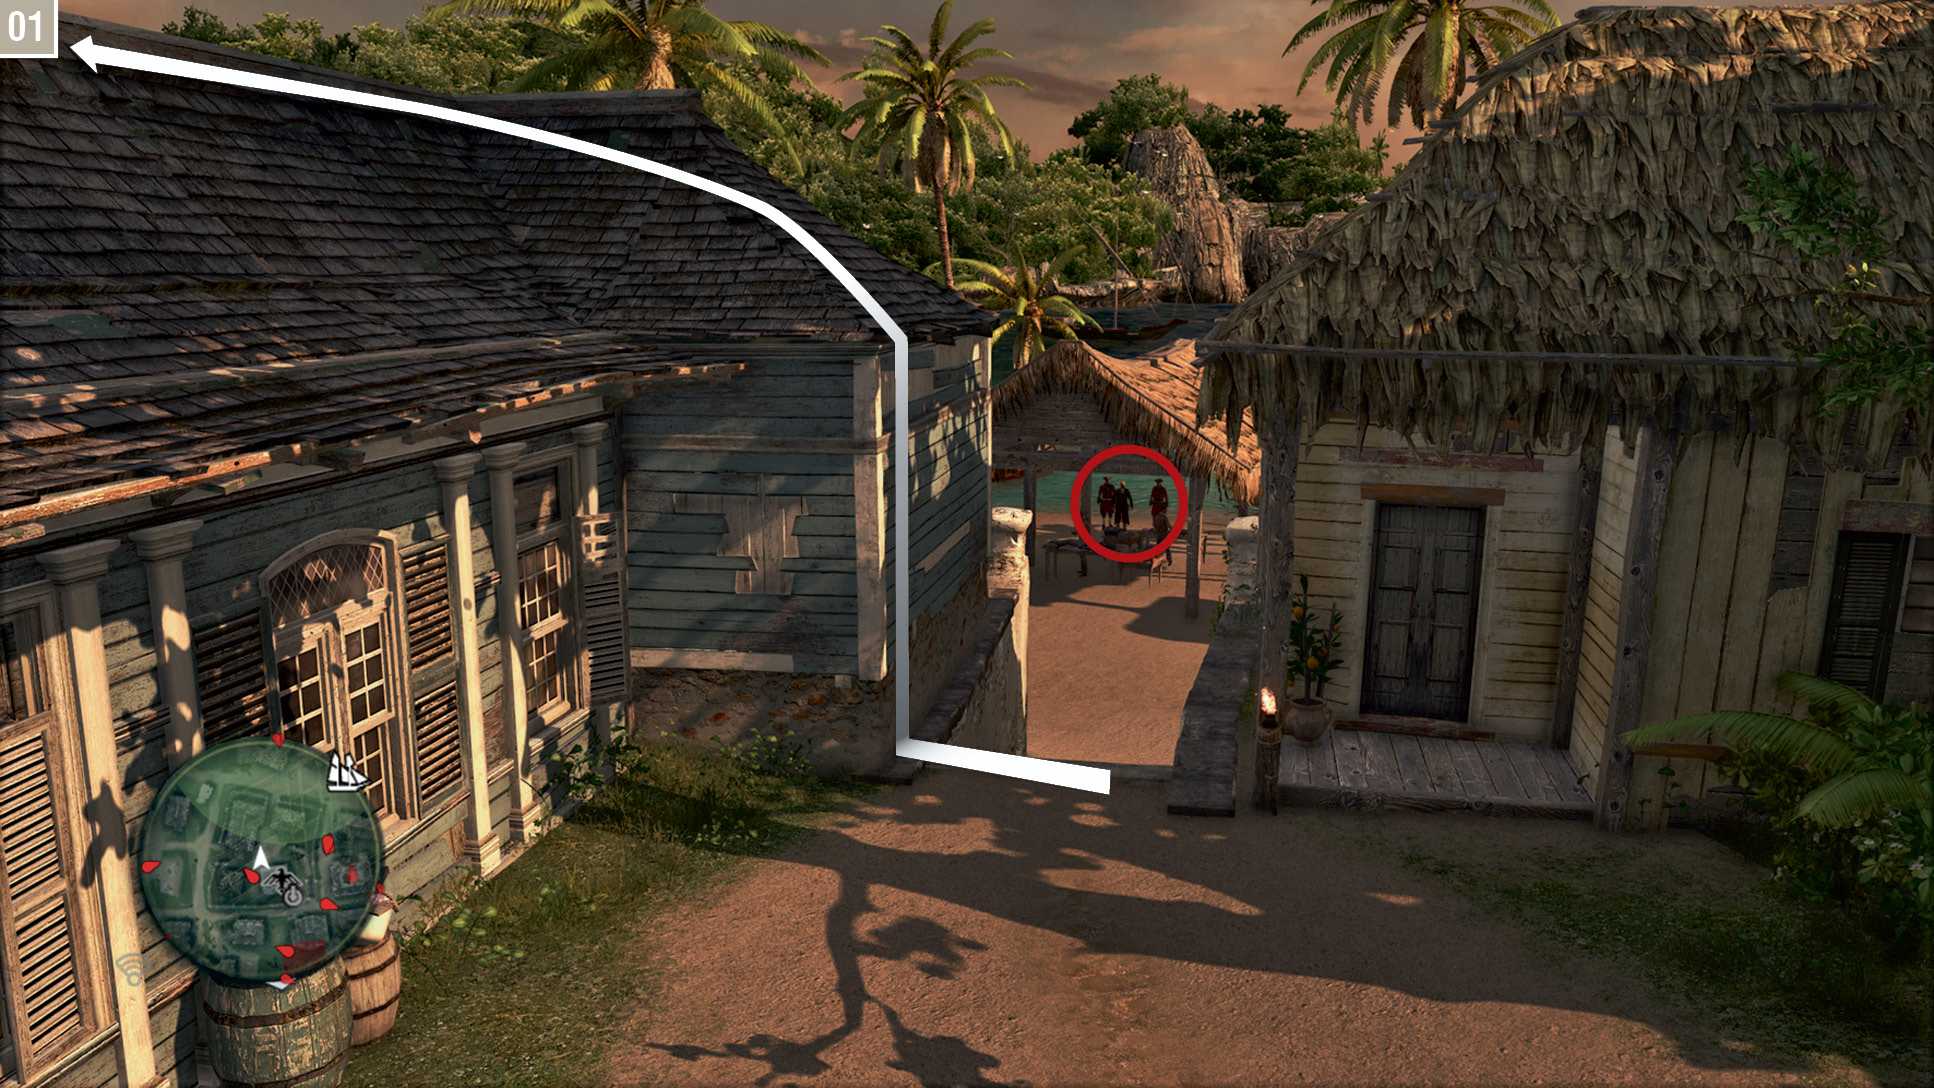
Sequence 12 begins with Kenway conversing with his new quartermaster as the Jackdaw sails in the southeast of the map. Kingston is the destination of the next story installment, so make your way there when you are ready. Speak to the Assassin at the  marker to begin. Your first task is to locate an Italian diplomat in the search zone southeast of your start position. For an advantageous start, position Kenway between the Viewpoint and the general store, then use Eagle Vision to identify your target. With the diplomat marked, there is no need to follow him around. Simply move to the rooftops of the building shown here and keep your target in sight until he approaches along the main path from the east.
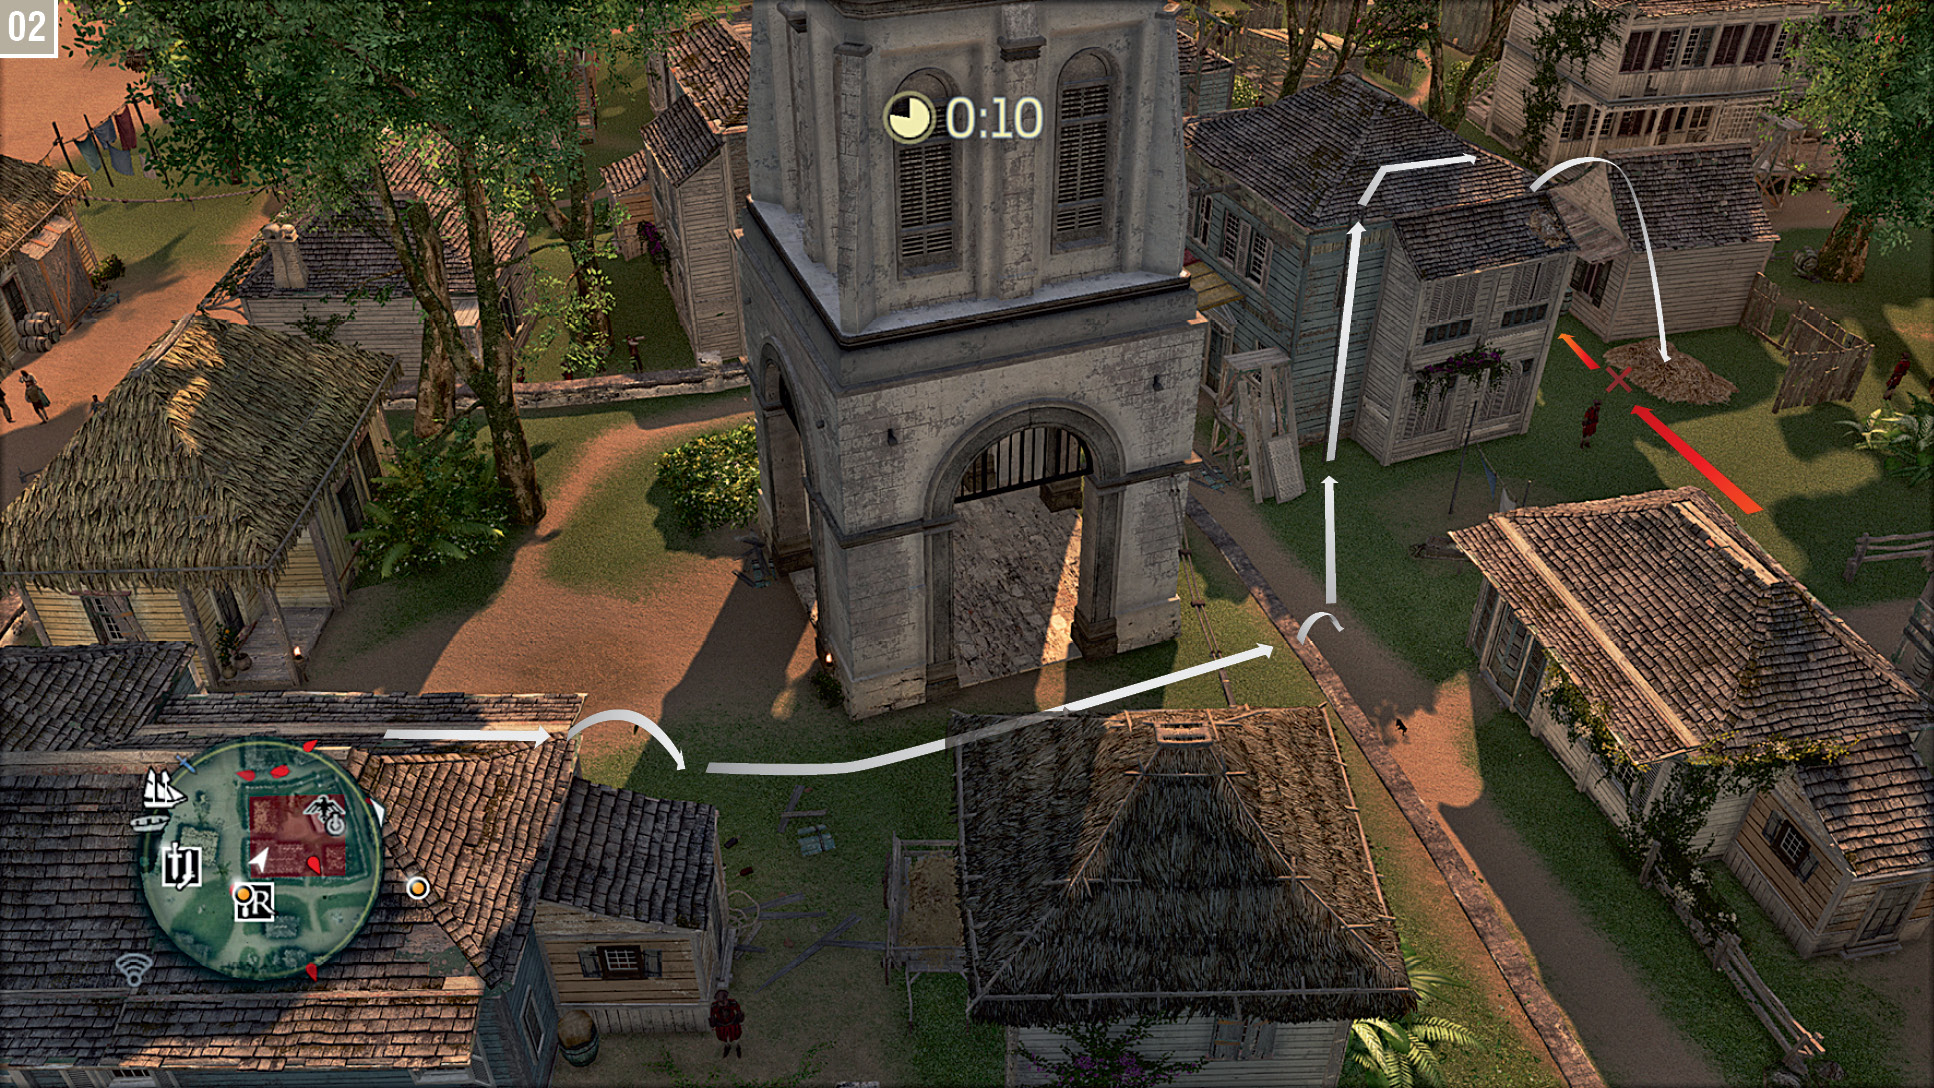
When the diplomat moves within 30 meters, jump onto the path and climb the ladder, as shown here. From the rooftop, perform a Leap of Faith into the hay pile in the small restricted area – and then bide your time. When your target arrives, you get a brief window of opportunity to assassinate him. Watch for the special onscreen prompt, then strike after the target’s bodyguards move away. (As a point of interest, if you do not assassinate the diplomat here, he leads you on a tour of similar sites, with the same restrictions: a small period of time where an assassination is allowed.)
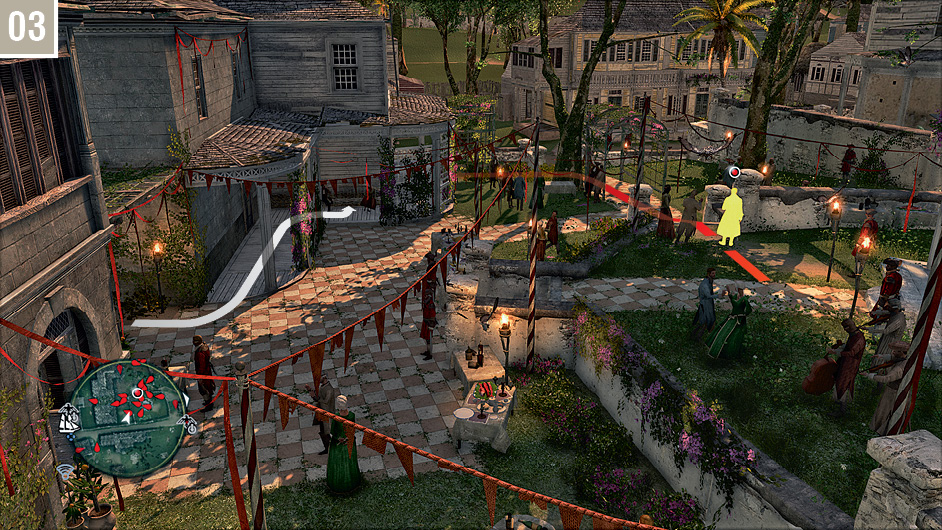
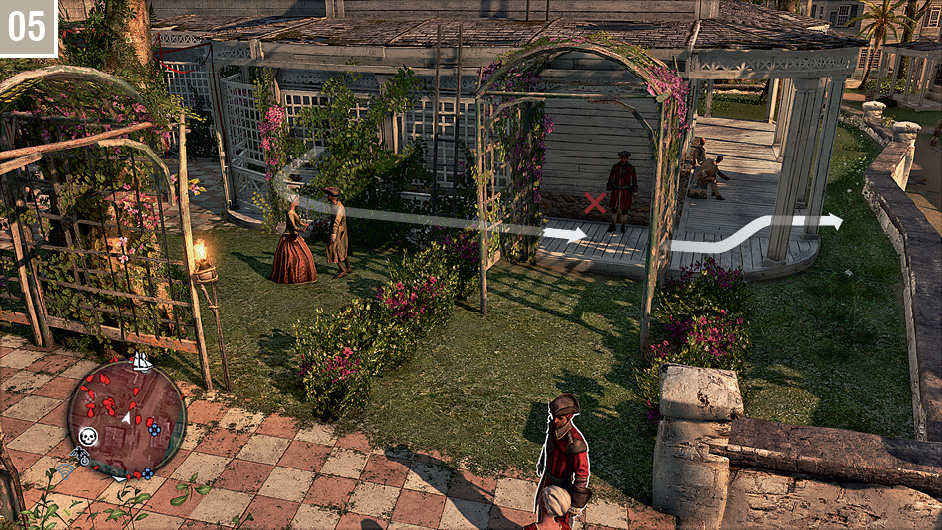
When play restarts after the cutscene, walk to the waypoint. Rogers will easily (not to mention quickly) recognize Kenway if you stand in plain sight. Turn left to walk behind the cover of the veranda and sit on the bench in the position shown here.
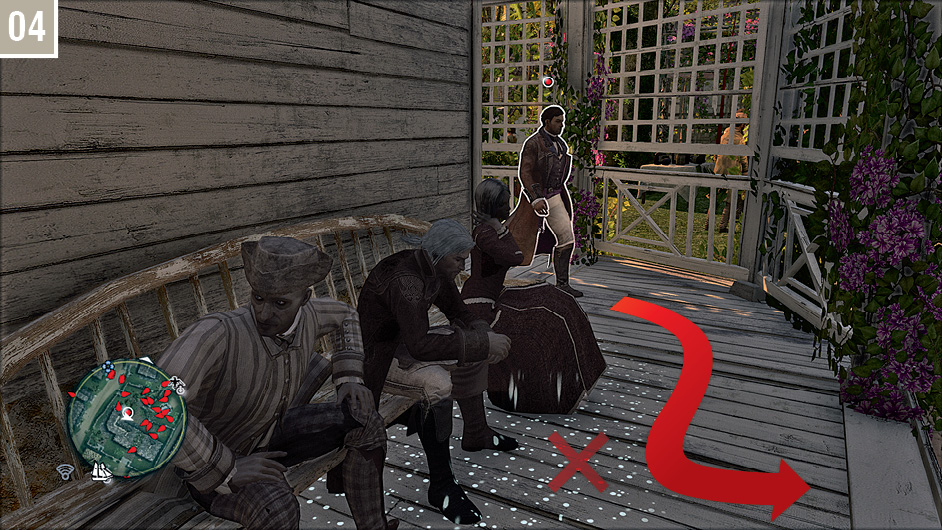
Watch to the left; you will see the target marker highlighting Rogers as he begins circulating among the guests. After no more than a minute, he will walk past Kenway’s position. Perform the assassination when he is highlighted.
After the “white room” cinematic, decisive action will enable you to escape the area without a major fight. Immediately walk around the corner of the veranda (the direction that Rogers arrived from moments earlier), align the camera, then perform a running assassination on the soldier before he can identify Kenway; if you’re feeling creative, a Berserk Dart would also suffice.
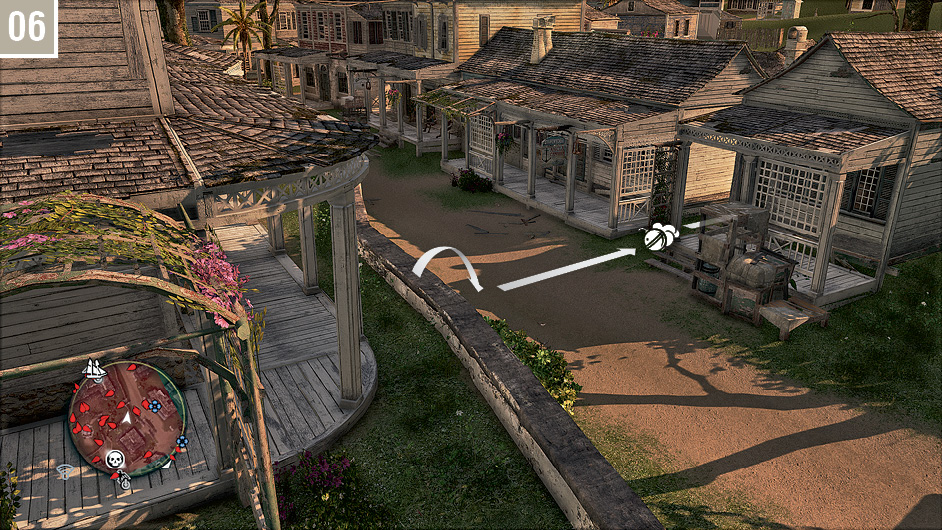
Sprint over the street to reach an alleyway between the two houses, dropping a Smoke Bomb to deter pursuit. You can then turn south, and run unimpeded until you exit the search zone. Return to the waypoint marker to conclude the Memory.
Memory 02 “Royal Misfortune”
Mission Overview
Optional Objectives
- Kill eight guards by destroying powder barrels.
- Use a Rope Dart to kill Roberts.
Notes & Further Reading
- A certain level of Jackdaw improvements are essential for this Memory. You should, at very least, have the Advanced Hull, Advanced Mortars and Reinforced Mortar Storage upgrades, or better. The improved hull will enable you to weather attacks, while the mortar is your best hope for a speedy resolution to an otherwise difficult naval engagement.
- You should definitely replenish your stocks of all ammunition types before you begin, particularly bullets, Rope Darts, Smoke Bombs and Blowpipe darts for Kenway, and mortar shells for the Jackdaw.
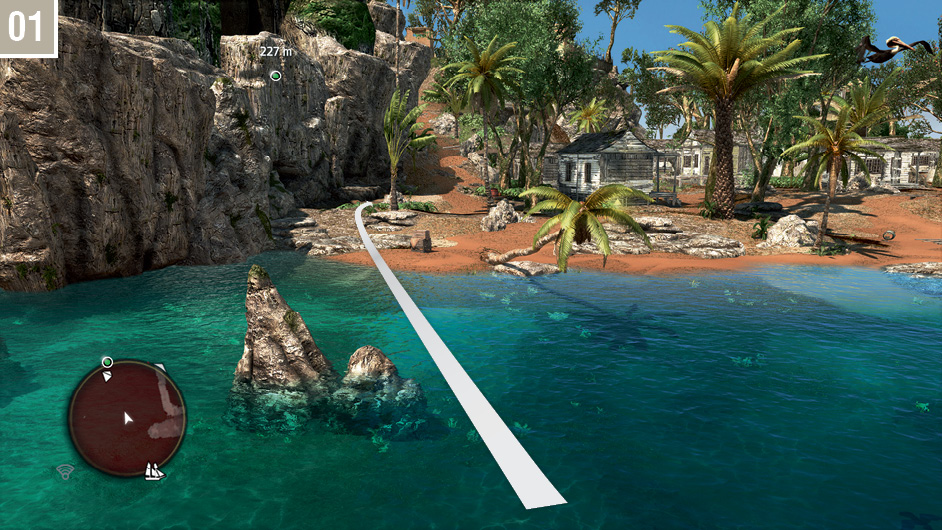
You cannot Fast Travel direct to Principe to begin this Memory, so either sail there or opt for another Fast Travel position – Tortuga is closest, though Great Inagua is safer. On arrival, jump into the sea and swim to the position marked on the accompanying screenshot, then conceal Kenway in the Stalking Zone.
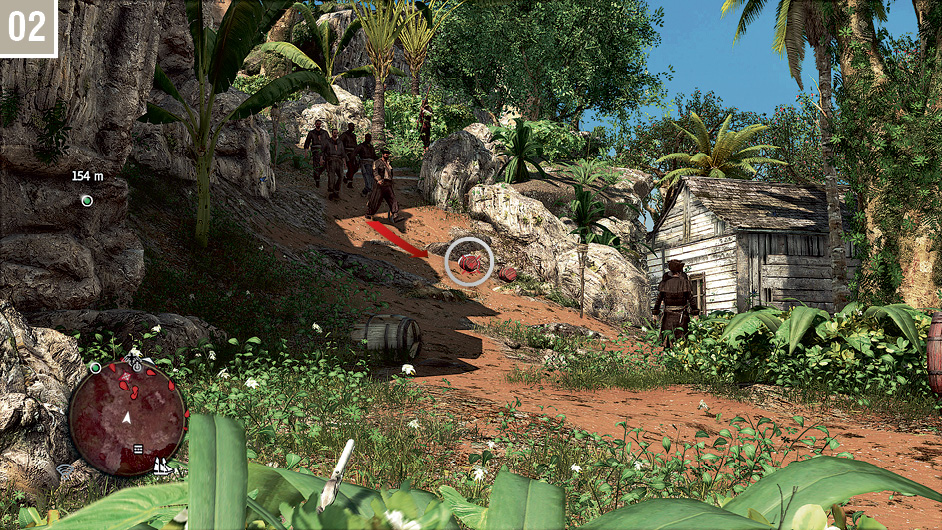
Target the powder barrel shown here using free aiming, and wait until the large patrolling group moves within range. They will usually pause for a moment in this position. Shooting the keg will set off a chain reaction, usually killing five or six soldiers instantly. Other guards will immediately rush to the area. While it is possible to evade detection by moving back in the Stalking Zone, only eliminating guards who move close, it’s probably a better idea to just leap out and wipe them all out in a fight: stealth is definitely not a priority in this Memory. As ever, liberal use of Smoke Bombs can turn the tide of this battle firmly in Kenway’s favor.
We focus on the steps required to complete the first Optional Objective here. If you wish to head directly for Roberts, skip to step  . Run behind the row of houses to reach a Stalking Zone in the distance; you may recognize this area from your earlier visit to Principe. When you enter the first Stalking Zone, eliminate the nearby Brute: this makes it easier to escape the area after your next action.
From the Stalking Zone, look to the northeast to have a clear free aiming shot on the powder barrel, then wait for the patrol to move inside the potential blast radius. After you open fire, stay hidden in the Stalking Zone and retrace your steps behind the houses to the slope leading to the upper area.
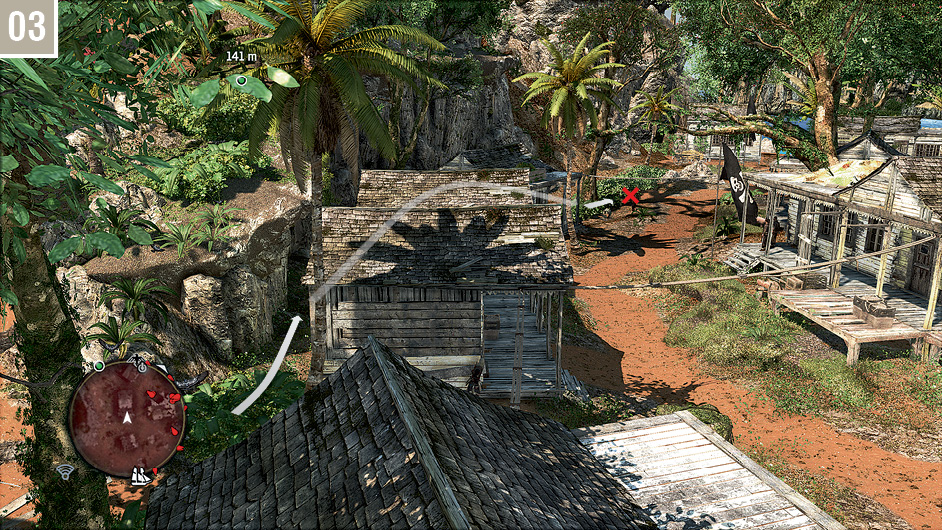
At this point, your only priority is to locate Roberts. From the top of the sloped path (which should be clear of enemies after the earlier explosion and following melee), sprint via the route shown here to reach your target. Though guards will run to engage Kenway, you can safely ignore them – or, in a pinch, drop a Smoke Bomb to deter pursuit. A checkpoint is triggered at the very moment that you cast eyes on Roberts after entering the stockade.
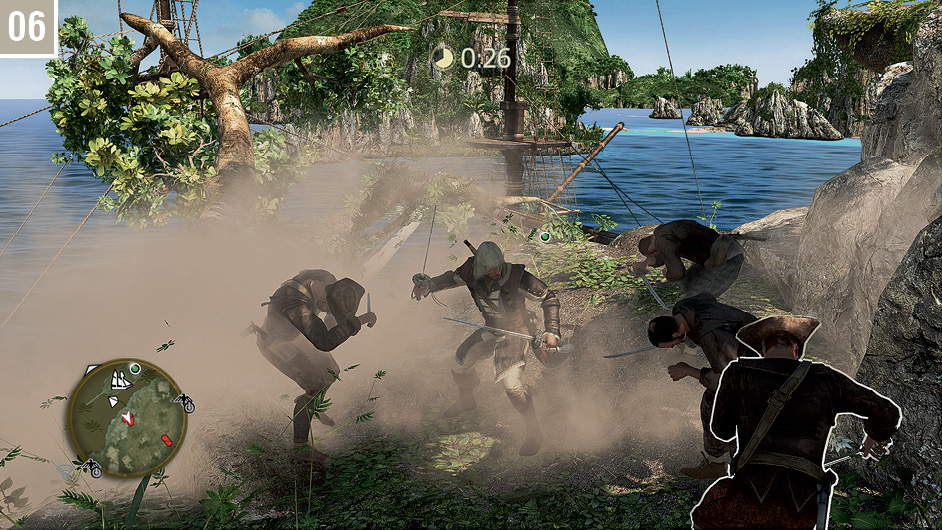
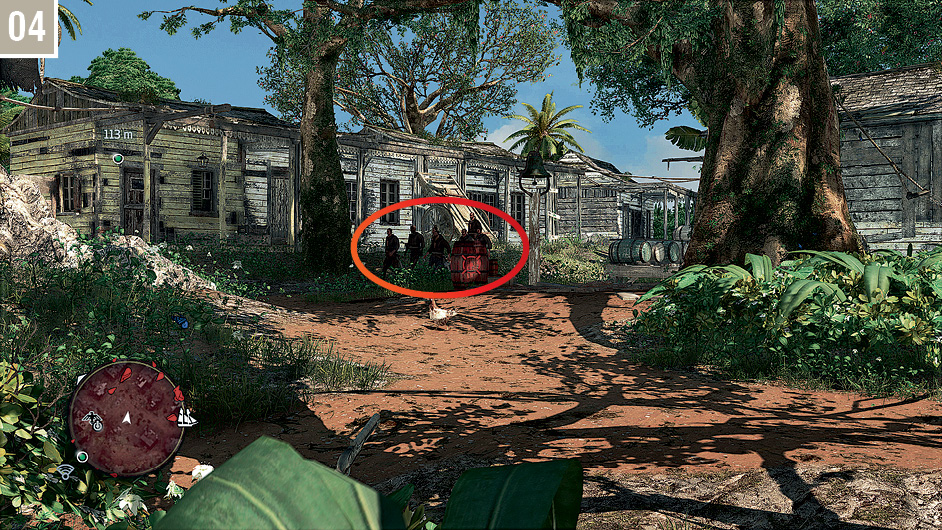
Roberts will leap onto his ship, which will sail away before Kenway can reach him. You must then fight his soldiers for approximately 10 seconds while you wait for the Jackdaw to move into position. Don’t get too engaged in combat: time is of the essence here. It’s better to position Kenway close to the tree that he will use to reach the Jackdaw, dropping Smoke Bombs to incapacitate assailants.
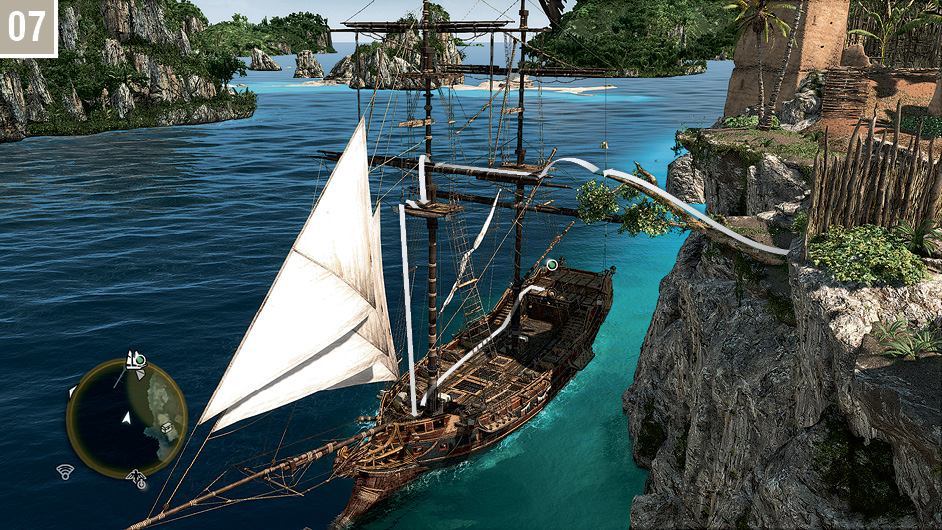
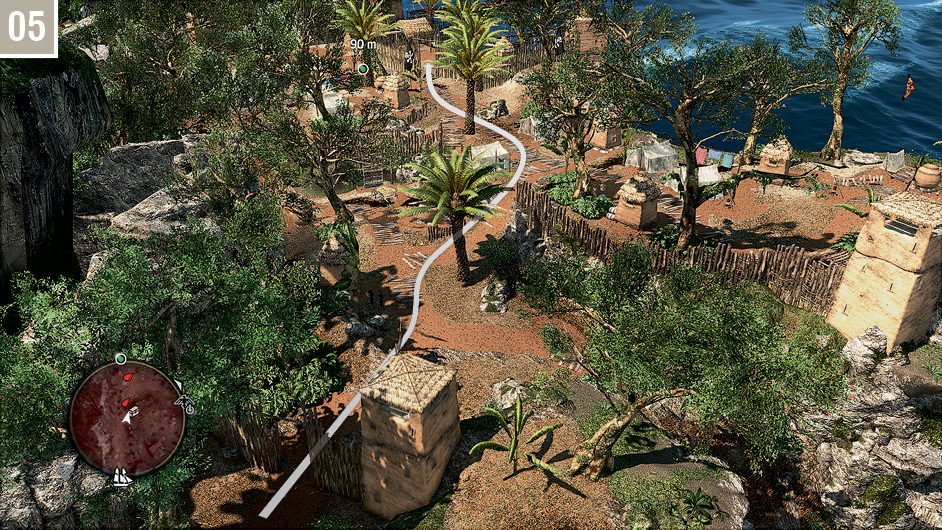
When the Jackdaw arrives, leap onto the closest yardarm and drop down to the platform. You can then jump to the nearby hook ( , High Profile Button +
  ) to rapidly descend to the deck. Run to the wheel and take control of the ship before the countdown expires.
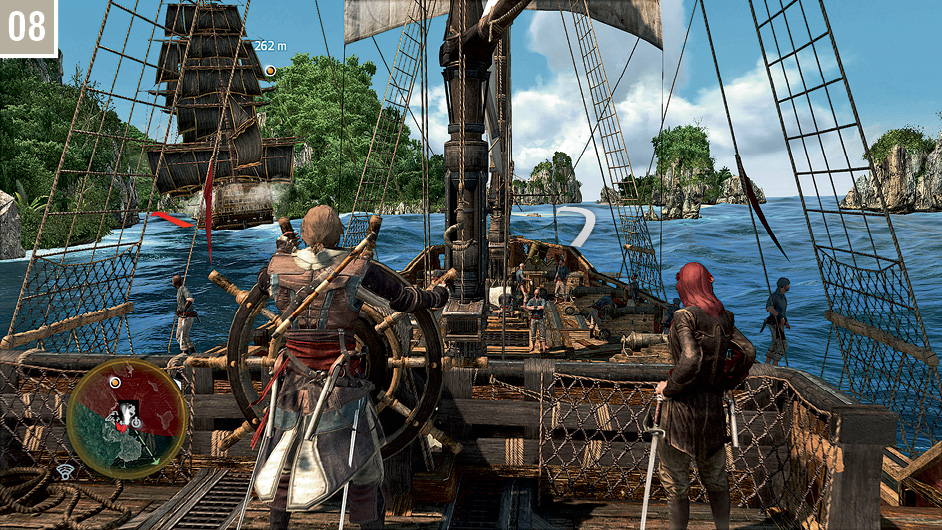
As you set off, steer the Jackdaw to the right: you cannot follow the Royal Fortune directly at this stage. You can, however, begin to whittle away at the vessel’s structural integrity with mortar barrages. The Royal Fortune will reply in kind as you move within range.
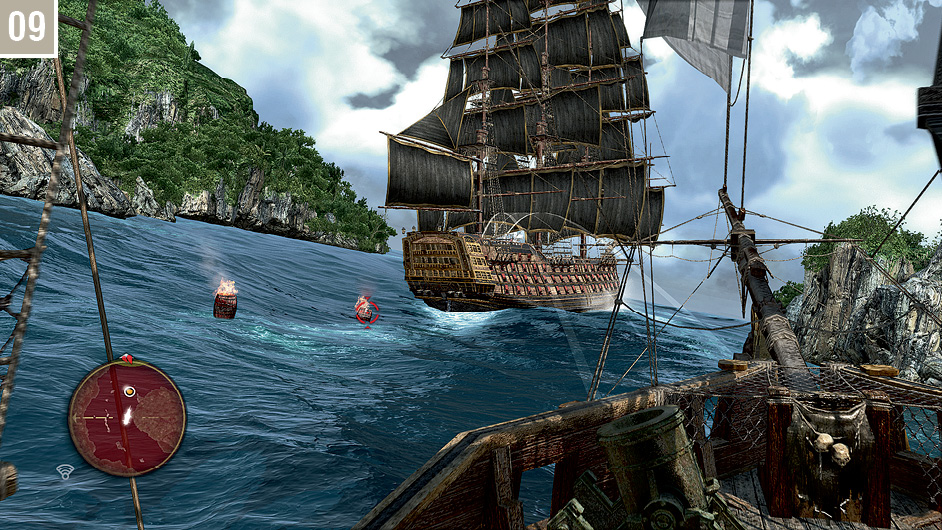
When you sail into the Royal Fortune’s wake, try to steer the Jackdaw on the inside of the turn (to the right of Roberts’ ship) to avoid fire barrels (which, where necessary, you can obviously destroy with the swivel guns). Meanwhile, alternate between chain shot and mortar fire to deplete its health bar. With a heavily upgraded Jackdaw, you may achieve this long before both vessels reach the open sea. As it is not possible to incapacitate the Fortune before a very specific point (you may note that its health remains fixed with a tiny remaining sliver of yellow), you can cease your mortar fire at this stage to conserve ammunition.
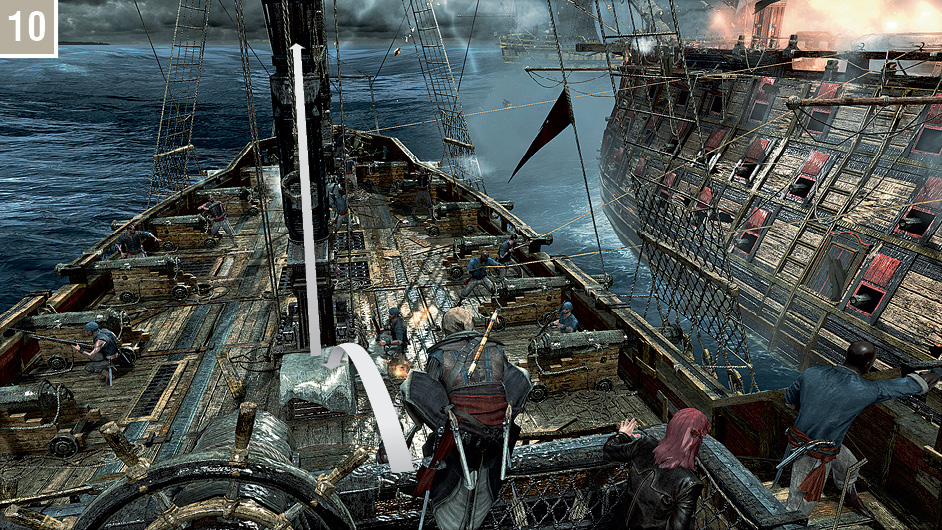
When the British ships arrive and open fire, ignore them: the Fortune is your only concern. Hit the vessel with any weapons you please until it is ripe for boarding, then move in close and do just that. As soon as Kenway releases the wheel, ride the lift directly ahead, then move into position to await a suitable alignment of the yardarms that will enable you to jump to the Fortune.
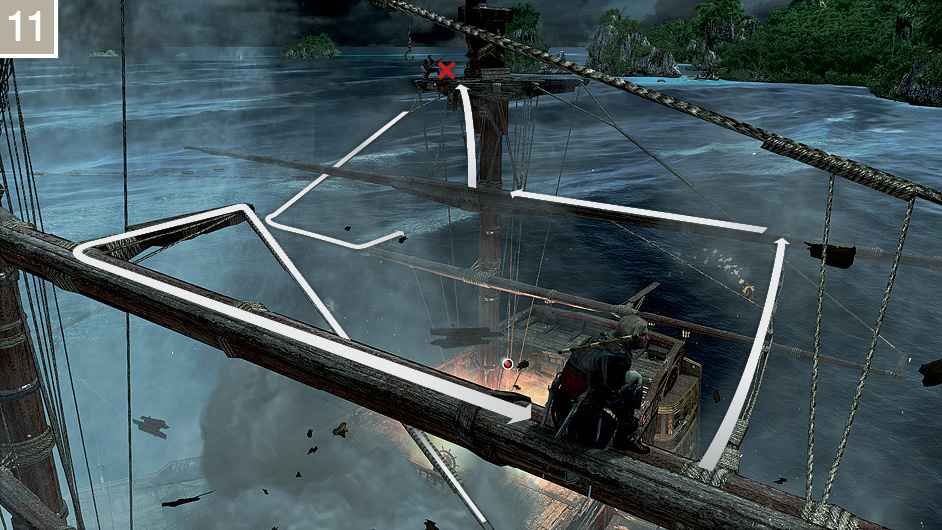
Make a careful approach to avoid being shot by the Gunner on the platform close to the position where Roberts stands below. While you can usually cross the ropes and eliminate him up close, it’s better to just kill him as soon as you move within pistol range. You can now move to the position marked on the above screenshot. Select the Rope Darts, carefully ensure that Roberts is targeted on the deck below, then hold  to kill him, completing both the second Optional Objective and the Memory.
Memory 03 “Tainted Blood”
Mission Overview
Optional Objectives
- Stay out of combat.
- Use two guards as a human shield.
Notes & Further Reading
- Replenish your stocks of ammunition if they are low after the previous Memory. Bullets, Sleep Darts and Smoke Bombs are particularly useful.
- If you have not acquired a new pistol set yet, this is probably an opportune moment to do so. See the Reference & Analysis chapter to learn more about your options before you commit to a purchase. We would also strongly recommend that you have at least two Pistol Holster upgrades and at least one Pistol Ammo Pouch upgrade.
- Havana is one giant Restricted Area for the duration of this Memory due to a curfew. Naturally, this is not a good time to hunt for collectibles or attempt to undertake other optional activities in the city.
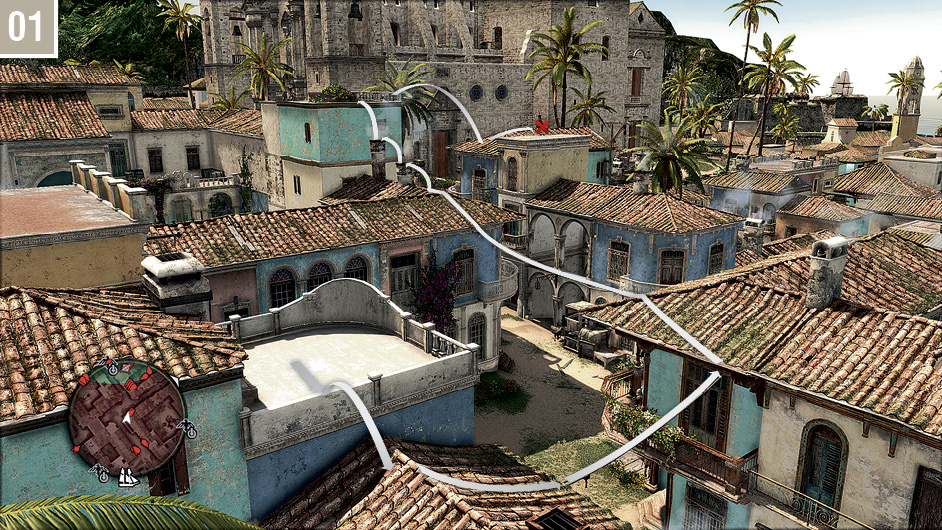
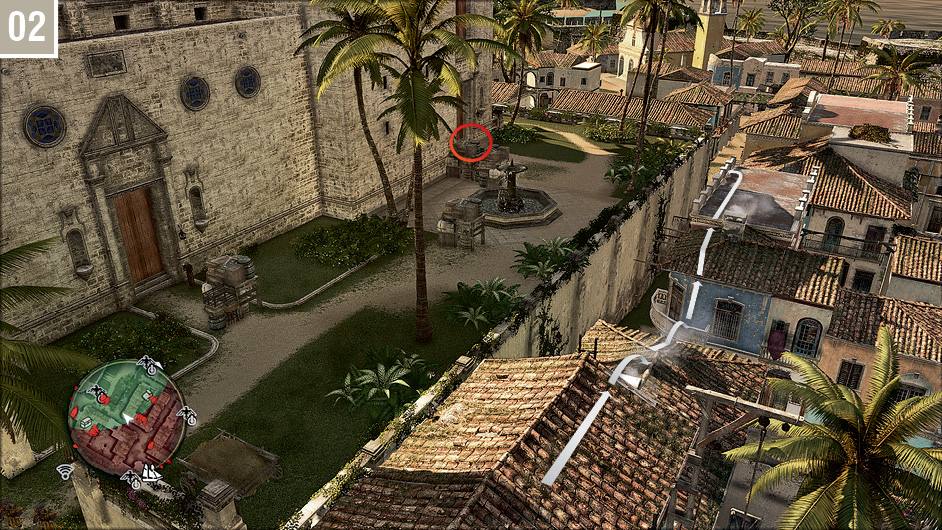
Fast Travel to Havana, and – avoiding guard patrols – speak with the Assassin at the  marker to begin. You should then follow the route shown here. The “Stay out of combat” Optional Objective does not become active until later in the Memory, but it’s still a good idea to tranquilize Gunners and other elevated sentries with Sleep Darts before they notice Kenway. Your first such target is encountered as you approach the cathedral.
Free run to the north, along the rooftops, until you can see the Templar group standing at a back entrance to the cathedral, then use Eagle Vision to identify them.
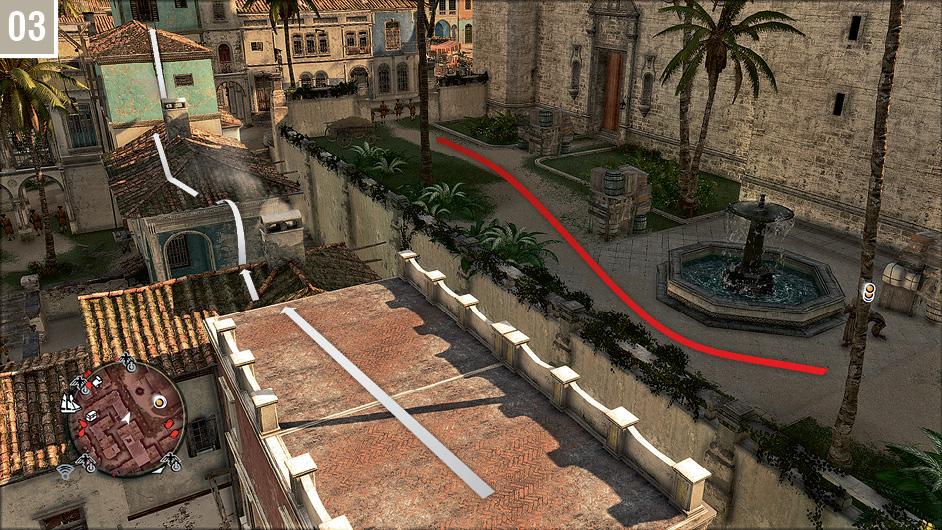
Once the Templars begin walking, move back along the row of rooftops. As it’s possible for Kenway to be spotted here, it makes sense to run ahead. Remember to stay within 40 meters of your targets.
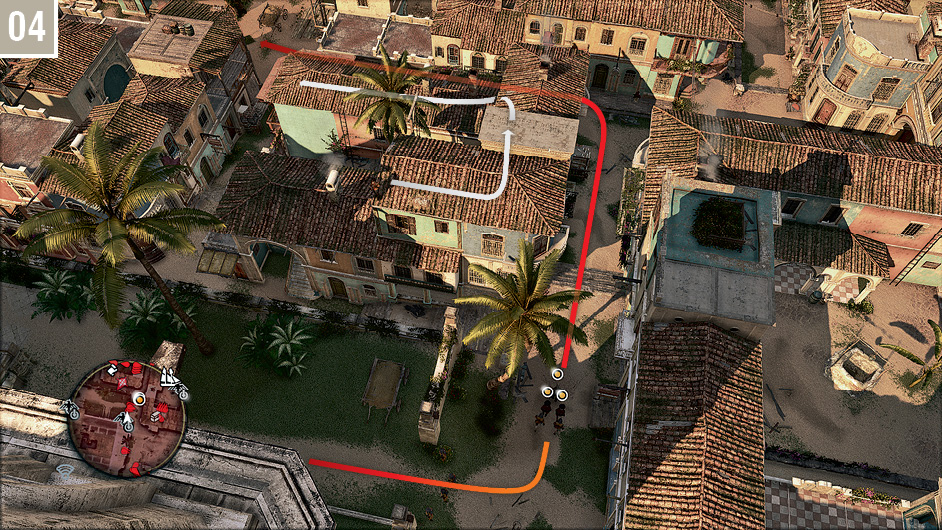
The Templars will turn left as they leave the cathedral grounds. Ensure that you have them marked with Eagle Vision to enable Kenway to see them through solid surfaces, then wait above until they turn left once again.
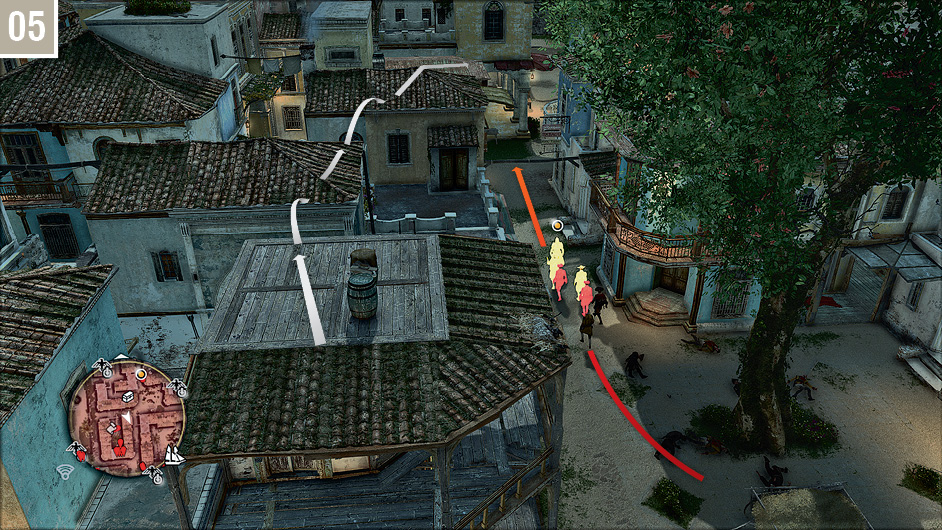
El Tiburón will make his presence felt in a situation on the street below: don’t be tempted to intervene in any way, and keep tailing your targets.
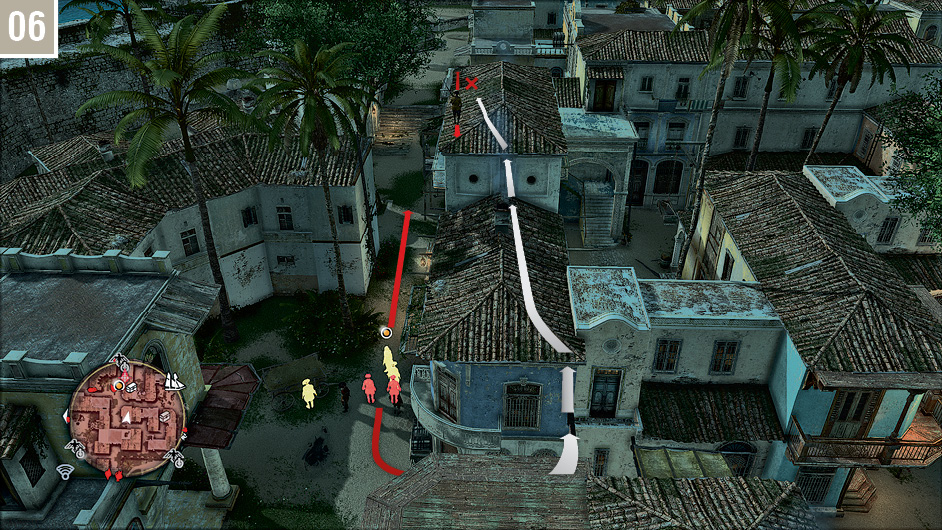
When you reach this position, a Captain will detach from the group to check a hiding spot. This is a good opportunity to run ahead and eliminate a Gunner on a nearby rooftop.

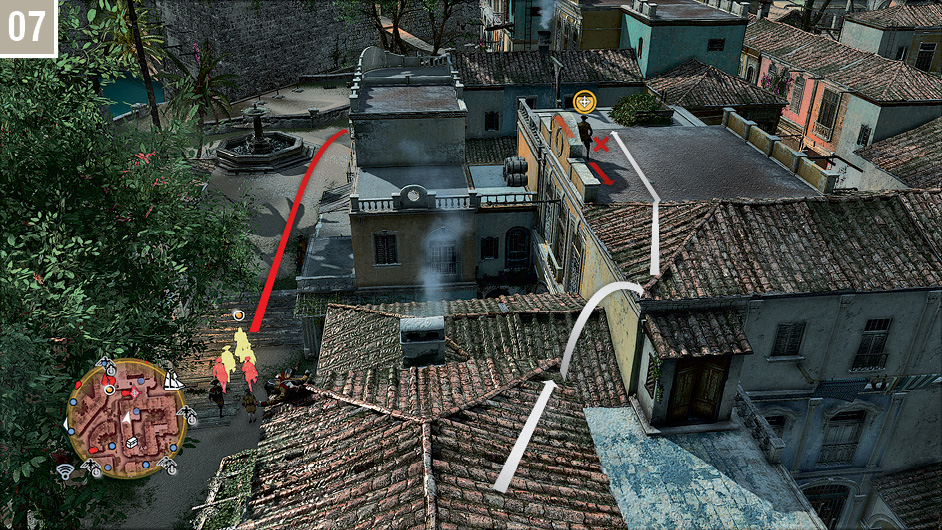
As soon as the previous Gunner has been disabled, continue on the path shown here to deal with another. It’s prudent to hit him with a Sleep Dart for an easy approach.
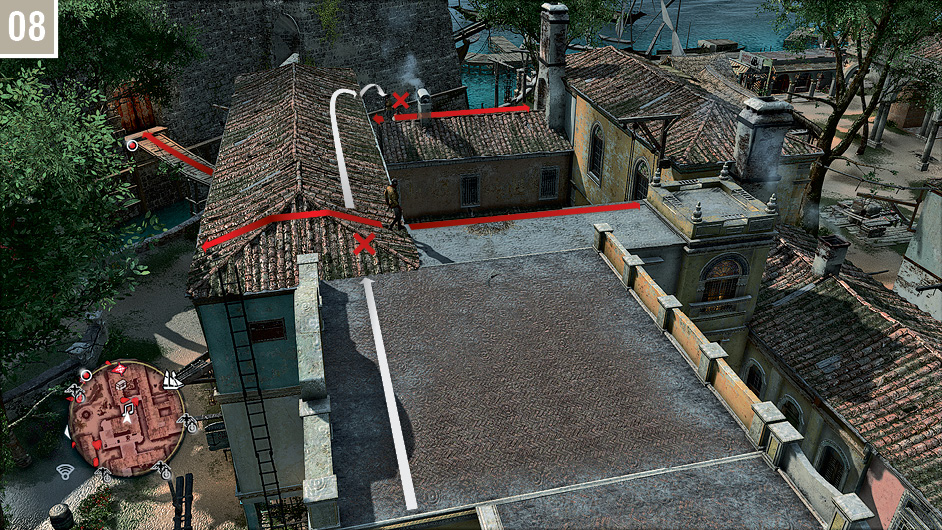
You must now eliminate two enemies in fairly quick succession: a Scout directly ahead, and a Gunner on a low rooftop further along. Hitting both with Sleep Darts before you run in close to knock them out is the best strategy. Meanwhile, the Templar party will enter the fort. At this point, the Optional Objective to avoid combat becomes active.
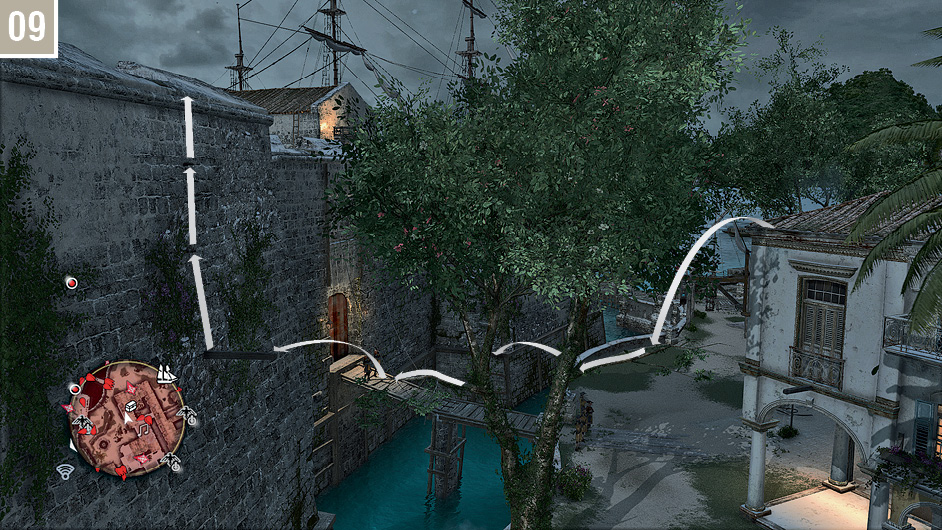
Free run through the trees to reach the outer wall, then climb to the edge.
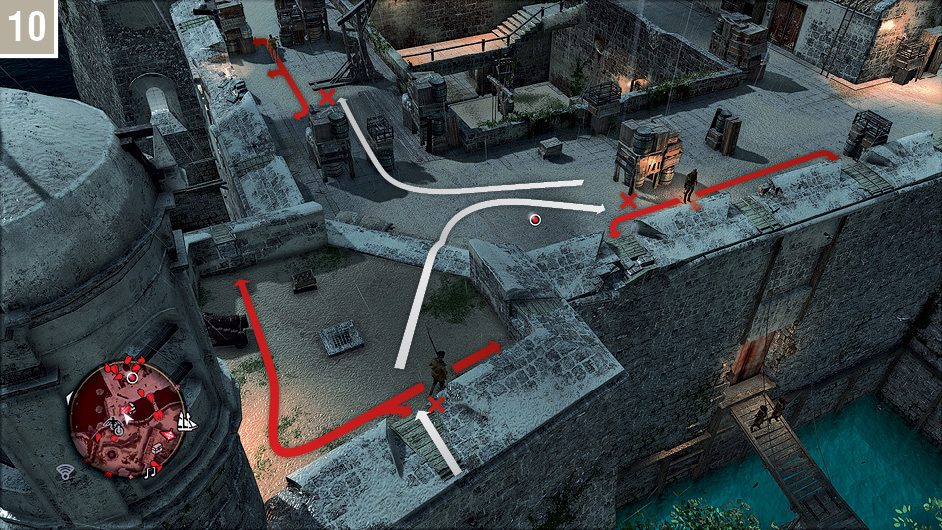
You have at least three guards to neutralize to maintain stealth during your approach for the assassination. Start by assassinating the Gunner close to the Viewpoint tower when his back is turned, then hit both Scouts shown here with Sleep Darts before running over to knock them out.
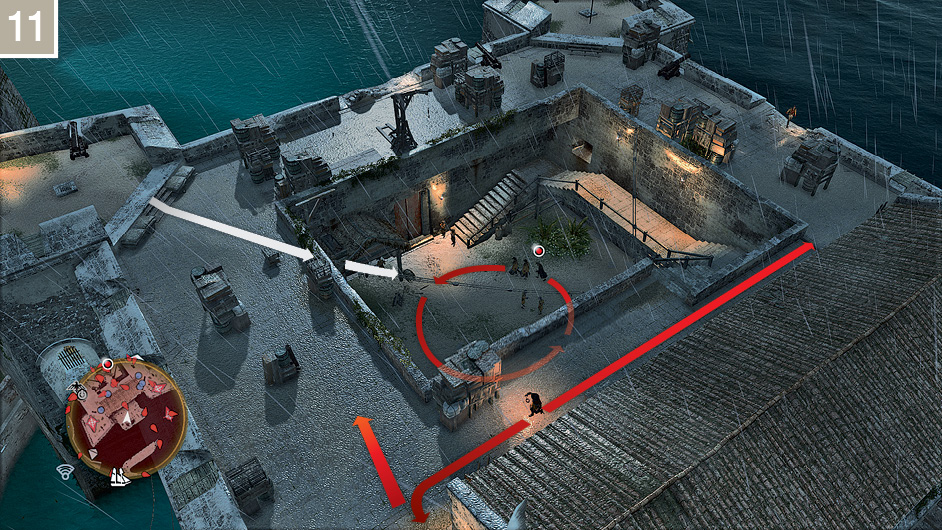
There is a Captain walking a long patrol around the edge of the upper level. If he is approaching, hit him with a Sleep Dart. You can then move out onto the rope above the inner courtyard. Ensure that the marked target is highlighted, then perform an air assassination. In the confrontation with El Tiburón that follows, you should note that he is effectively impervious to everything but pistol fire. For the first part of the fight, most players will wish to concentrate on the Optional Objective. While taking care to avoid the Spanish giant, focus on parrying attacks by his allies. When El Tiburón raises his pistol to take a shot, you can use one of the weaker soldiers as a human shield. Repeat this twice to satisfy the requirements.
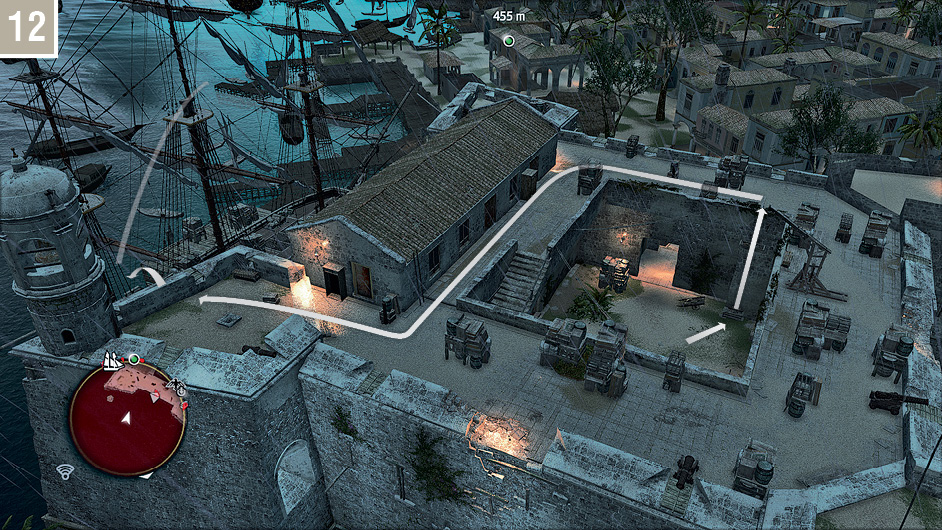
When you are ready to put your assailant down, eliminate the guards and hit him with pistol shots. Other soldiers will run in to replace their fallen comrades after a short interval; make killing these a priority. If El Tiburón is poised to fire and you have no available human shield, you can either shoot the giant or drop a Smoke Bomb to interrupt the attack. If you need additional bullets, you can find them in crates dotted around the “arena”. After the white room valediction, you must reach a waypoint in the far south of the city. The easiest way to achieve this is to run into the lift shown here and then dive from the east corner of the fort to the water below. From there, you can easily swim, submerging when required, to within 50 meters of the waypoint to the south. However, we would recommend that you attempt to fight your way there on land at least once: it’s an exhilarating race, with more than a few surprises.
Memory 04 “Ever A Splinter”
Mission Overview
Optional Objectives
- Free seven Guardian hostages.
- Use the Observatory’s defenses to kill four guards.
Notes & Further Reading
- Though you can naturally return to enjoy optional tasks and free roam in both the past and present after the closing credits, this Memory (and the linear chain of events that follow) takes you to the end of the main storyline. We mention this as a courtesy to players who might wish to complete a perfect 100% Synchronization score in a single playthrough.
- Be sure to replenish Kenway’s ammunition stocks before you begin, with Sleep Darts a particular necessity for the first Optional Objective.
After assassinating Woodes Rogers at a party in Kingston, Kenway returns to Principe to track down Bartholomew Roberts. Though he attempts to escape, Roberts discovers that even his Royal Fortune is no match for the Jackdaw. As the decks of his mighty ship are bloodied during the boarding, Kenway strikes decisively. Roberts, stoic in death, congratulates his killer on his tenacity – but then, apropos of a strange purpose that isn’t immediately clear, makes the dying wish that Kenway destroy his body to prevent it from falling into Templar hands.
Later, in Havana, Kenway tails Grandmaster Torres across the city to eliminate the Templar leader… only to find his victim is a dupe in a trap sprung by Templar enforcer El Tiburón. Though Kenway conquers the mighty Spaniard, who once humbled him effortlessly in their first confrontation so many moons before, he takes no pleasure in the death of a man he regards as a fellow soldier. When he receives word that Torres has travelled to Long Bay, hoping to claim the Observatory, Kenway sets sail in pursuit…
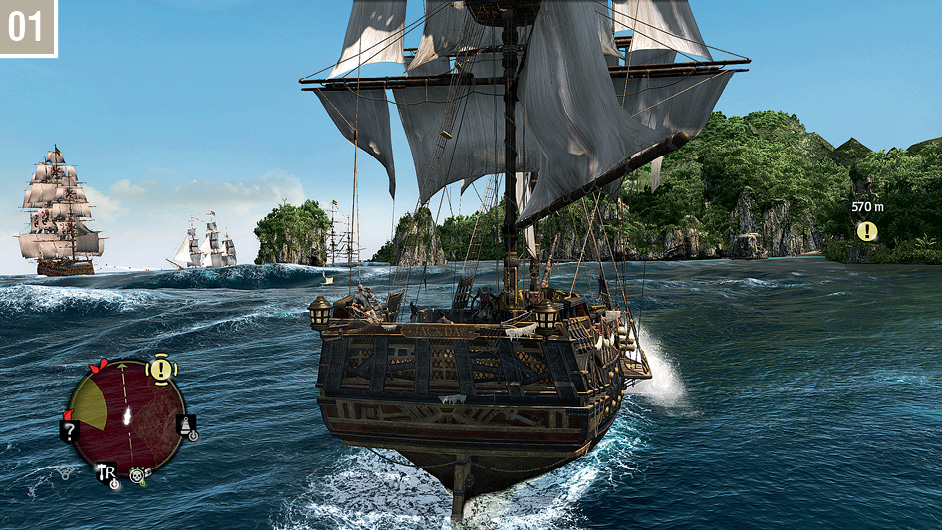
You cannot Fast Travel directly to Long Bay to begin this Memory, so pick a nearby shortcut and then approach the location from the north. There are two imposing men o’ war to the west and east of the landing location, and you’ll need to fight and incapacitate at least one to reach your destination: Long Bay is unavailable if you are in active combat. If you hug the coastline from the east or west, you can usually lure one of the vessels away, leaving its companion undisturbed and a clear path to land once the battle ends.
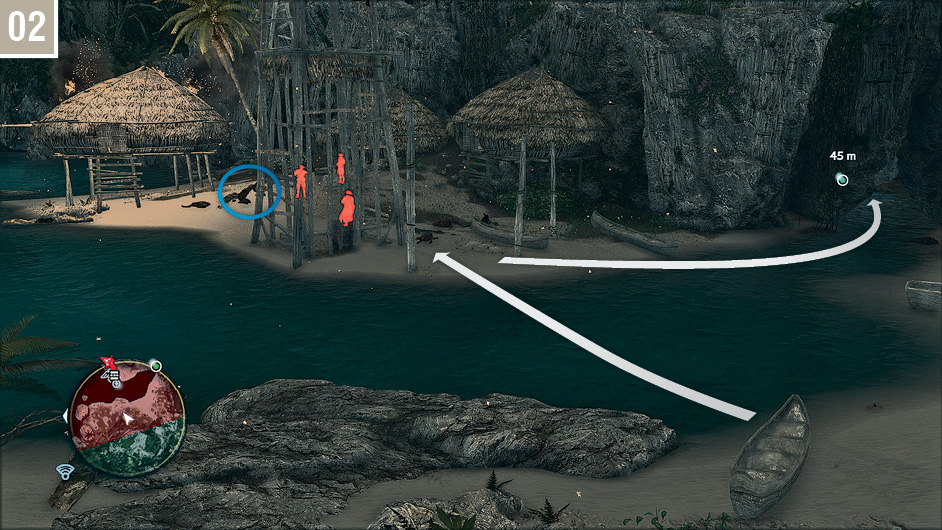
As you will remember this location well from your earlier visit (and, perhaps, subsequent journeys here to explore), you should have no problems with finding your way to the Observatory. Our walkthrough will focus only on the steps required to free the Guardian hostages for the first Optional Objective. On arrival at Long Bay, follow the linear sequence of waypoints through the jungle until you reach the beach before the caves. Use Eagle Vision to detect the soldiers close to the Viewpoint tower. Hit the soldier and the Gunner with Sleep Darts, then run forward to assassinate the Brute when he moves to investigate. You can then free the first group of Guardians and head for the caves.
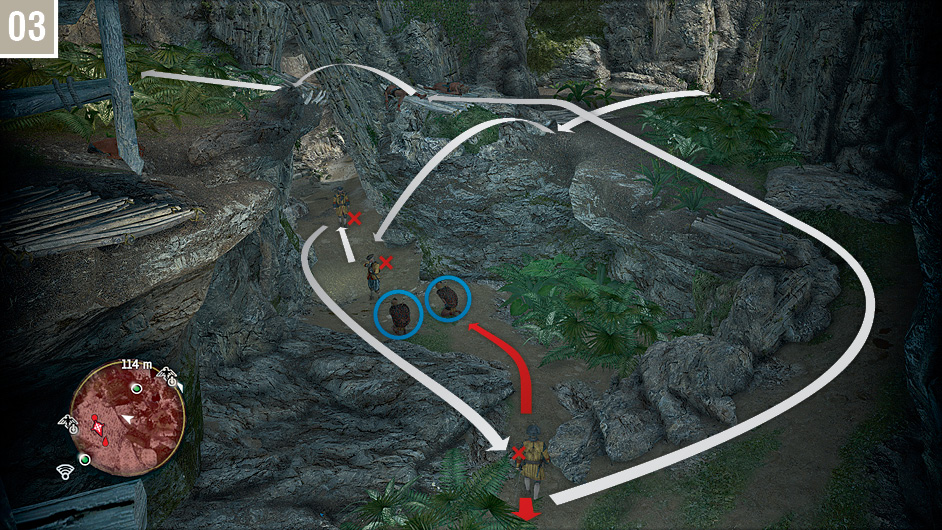
Be cautious when you enter the caves: the second group of Guardian prisoners is in the area below when you reach the top of the sloped path, and there is a patrolling soldier who can easily detect Kenway. You only need to take out the Gunner to remove the immediate danger, so you might as well perform an air assassination on him, then kill his two soldier companions in open combat.
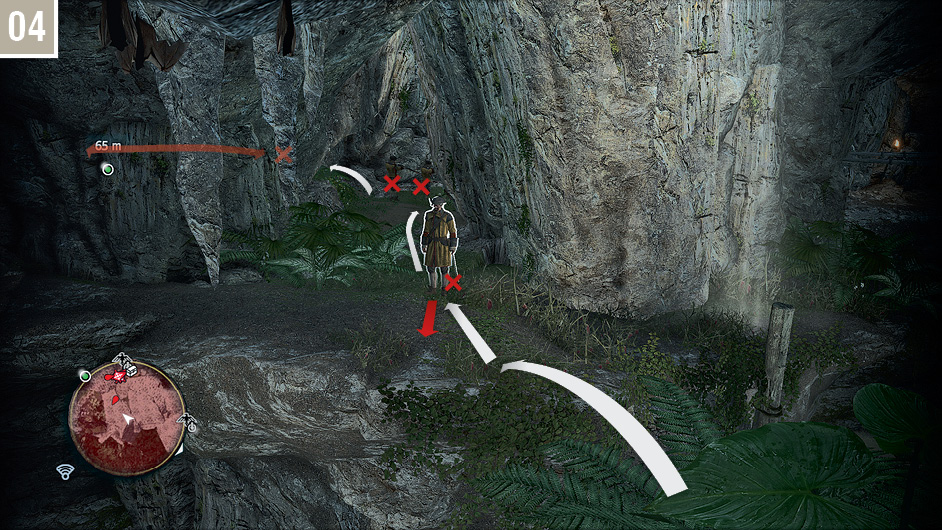
Further into the caves, there is a final group of four soldiers with three Guardian prisoners. From the Stalking Zone overlooking their position, hit the closest patrolling soldier with a Sleep Dart, then do the same with the two Gunners in the distance. You can then run in to eliminate the fourth target and free the captives.
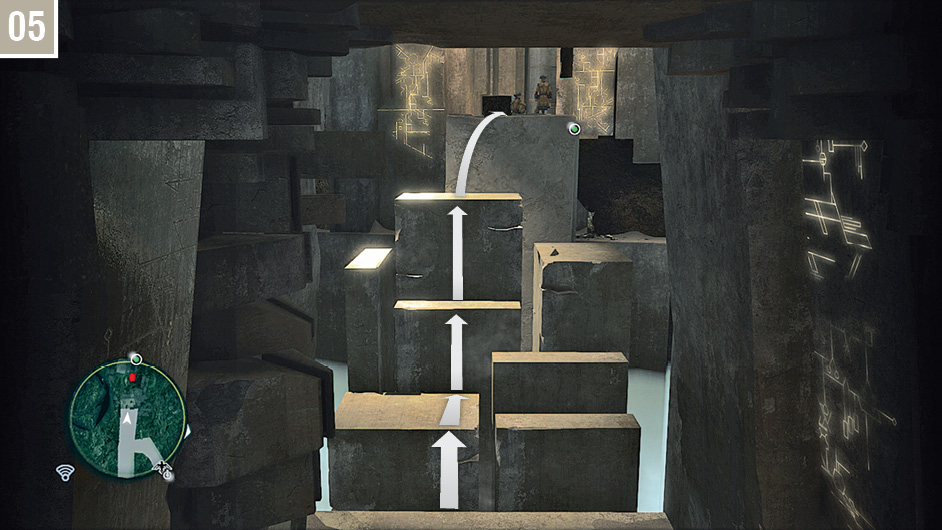
With the Optional Objective satisfied, follow the waypoints to reach the Observatory entrance, then make your way to the first large cavern. When you come to the moving blocks in this position, quickly free run to reach the moving platform before it passes. Be ready to fight the Spanish soldiers when you arrive.
PREVIOUSLY...
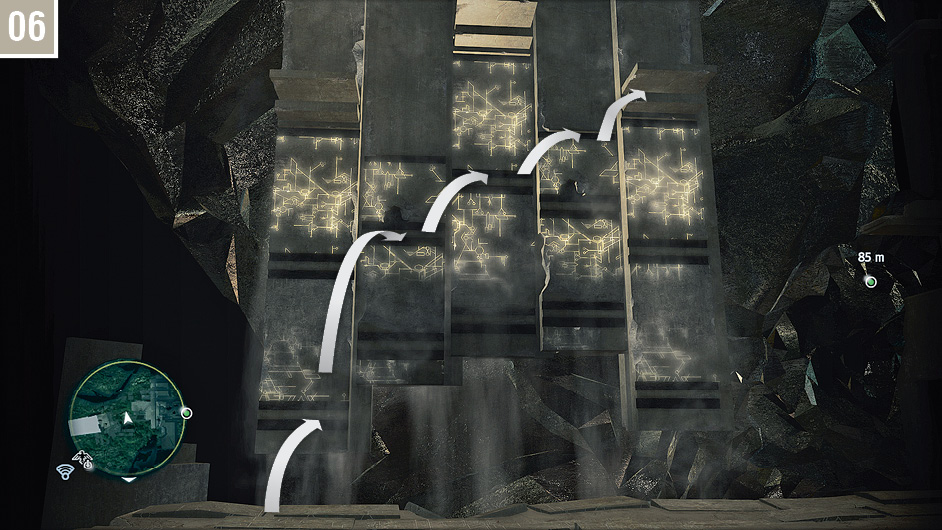
You must now use the moving ledges to reach a platform on the far right. Start on the left-hand side, then move to the next ledge in line whenever your current ledge reaches its highest point.
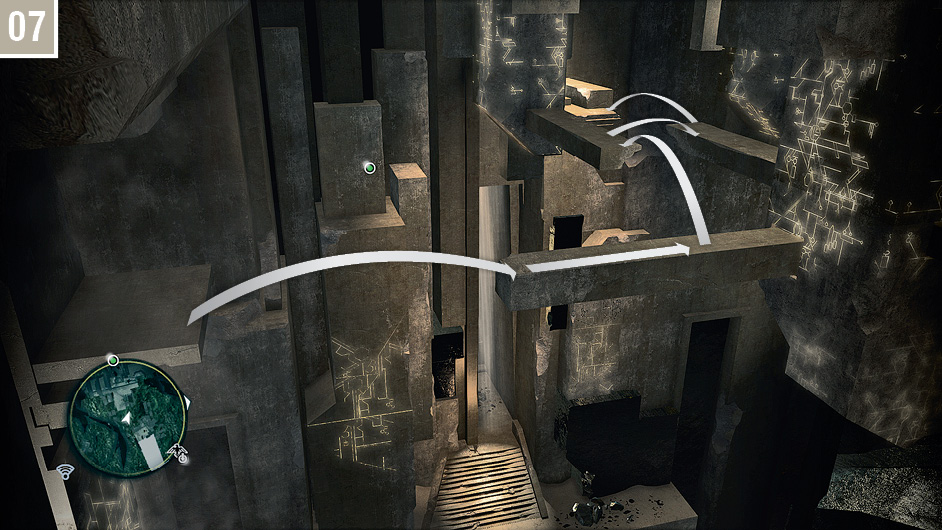
When the camera is realigned to highlight a free run course, jump over to the beam. From here, leap to the illuminated platform above the doorway far below. After Kenway lands, run to the waypoint.
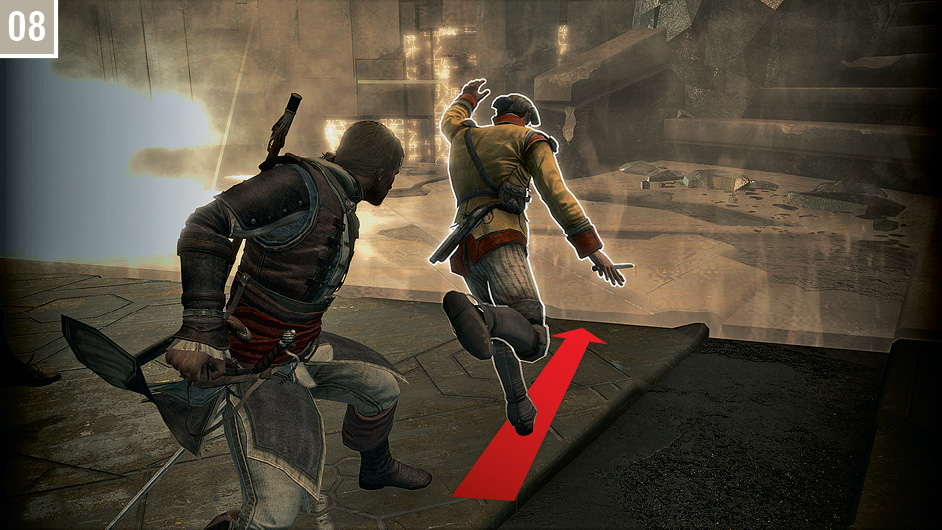
To complete the second Optional Objective, you must use the Observatory’s defenses – specifically, the bright “disintegration fields” – to kill four soldiers. To accomplish this, use the throw move: press  to counter an attack, then tap
  again while simultaneously directing the throw towards an active security field with
  .
.
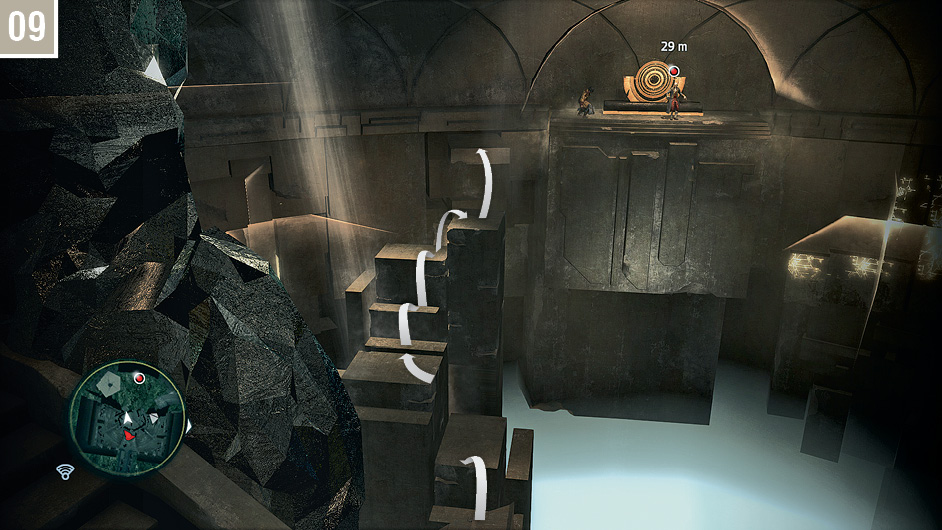
Use the moving platforms to reach a ledge to the left of the area where Torres stands. After Kenway plummets to a lower level, swing on the bars until the final bar in the line provides access to a ledge on the wall.
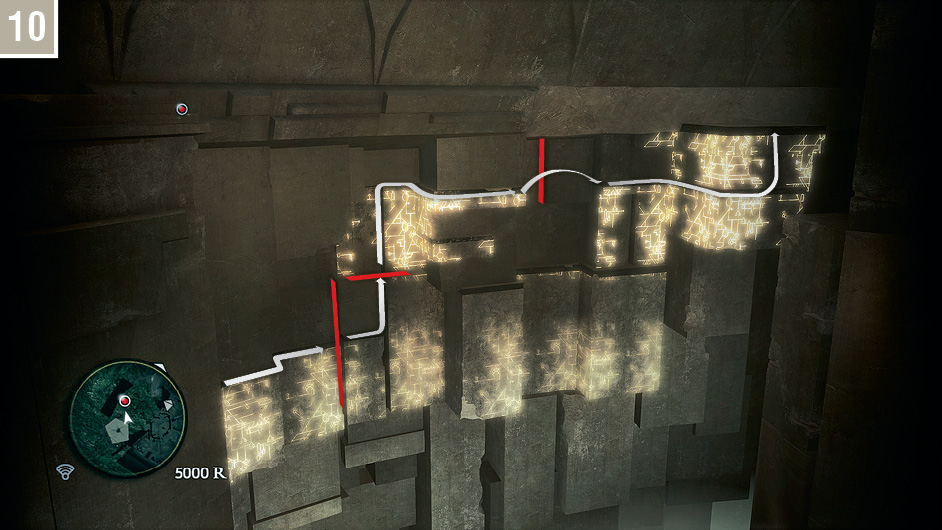
In the accompanying screenshot, we mark the direction in which Kenway needs to move and the locations where the Observatory’s security fields regularly activate. Stop just before these and wait until they are shut off before you traverse to a position close to the next beam. After the third and final instance (a daring lunge to the right), climb up to the platform above.
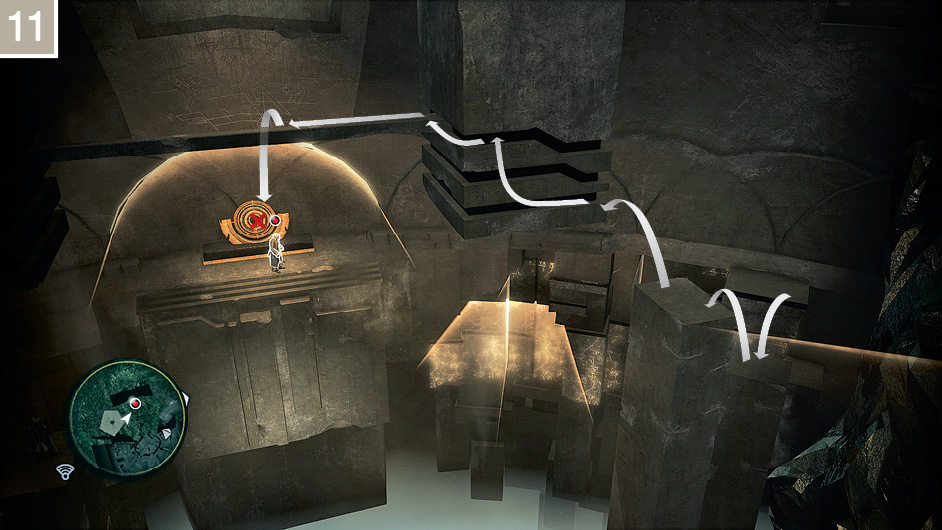
Jump to the second of the two moving pillars, then leap to the ledges above when they are within range. Traverse to the left and climb to the beam above. Watch Torres carefully. When the “disintegration field” above his head is inactive and Kenway is within range, perform an air assassination.
Epilogue
Both the past and present strands of the Assassin’s Creed IV storyline end with events that are entirely focused on concluding the parallel narratives, and require no guidance to enjoy. You will find, however, that there are still plenty of places to explore, activities to engage in and secrets to find.
After the final visit to the present day, you can officially move freely through all previous areas of the Abstergo Entertainment office to collect remaining sticky notes and hack computers for fascinating files.
In the past, we’ll wager that you will still have countless hours of entertainment to enjoy as you travel the Caribbean map in search of new adventures. Turn to the Charts & Collectibles section of the Side Quests chapter for assistance in setting a course to fresh challenges.