
Assassin's Creed IV: Black Flag Guide Walkthrough
Sequence 07
PREVIOUSLY...
Nassau may be a haven, free from crown interference, but disease is exacting a toll on the inhabitants of this nascent pirate democracy. After consulting with other leading pirates, Kenway purchases a diving bell and attempts to retrieve medicine from a Spanish wreck, but finds that the liquid has spoiled during its years beneath the waves.
Despite an earlier (albeit tenuous) consensus that medicines be acquired without antagonizing the British, Ed Thatch – now embracing his Blackbeard persona – opts to take direct and aggressive action. After obtaining directions from Ben Hornigold, Kenway lends assistance to Blackbeard during a battle with a British man o’ war. Later, he finds the legendary pirate blockading a settlement on the North American mainland, his ships adorned with hostages. With the local commander refusing to yield, Kenway favors stealth where brute force has failed. After sailing the Jackdaw on a perilous inland course to reach Charles-Towne, he assassinates the stubborn official. He returns to Blackbeard with the medicines, and the means to mix further doses. Though the legendary pirate approves, he expresses a desire to travel north – implicitly signaling that he wishes to play no further part in Nassau or its troubles. After bidding his friend farewell, Kenway returns to the island.
Memory 01 “We Demand A Parlay”
Mission Overview
Optional Objectives
- Kill three guards while hanging from ledges.
- Sabotage the alarm bell.
Notes & Further Reading
- From this Memory onwards, Nassau is policed by British soldiers. That said, you can make extremely profitable sweeps of the town and its surroundings to rescue pirates from Redcoats whenever your crew levels are low. For the rest of the story, this will be the most efficient place to embark on recruitment drives.
- Acquiring the Advanced Hull upgrade for the Jackdaw in time for the final Memory of this Sequence will make it much less fraught. There are two major naval battles in succession that will severely test any players who have yet to improve the Jackdaw’s capabilities.
- If you have neglected it so far, a prompt: Harpooning is a solid method of accumulating both reales and resources required for crafting key upgrades for Kenway.
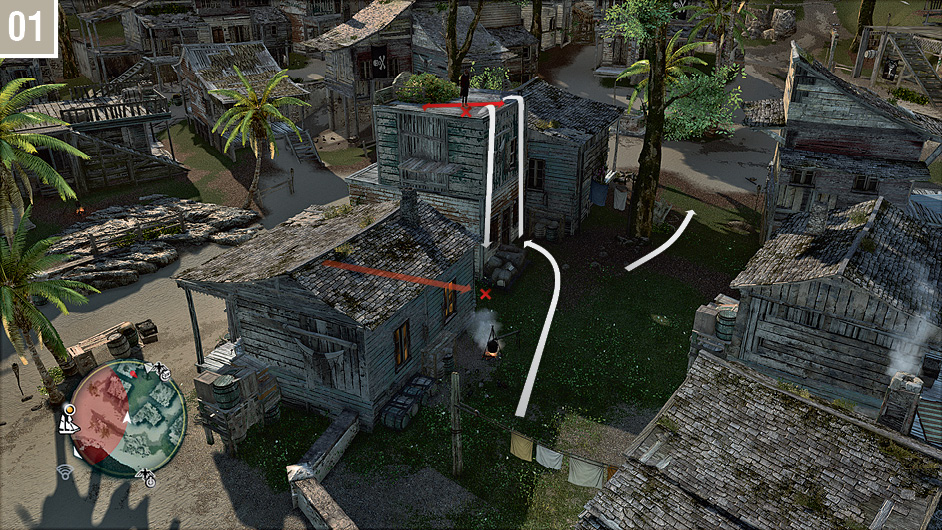
This Memory takes place in Nassau, with a start point close to the beach. As soon as the opening cinematic ends, activate Eagle Vision to “tag” Woodes Rogers and his entourage on the beach. You should then climb the nearby ladder and quietly assassinate a Scout on the rooftop; be sure to release the High Profile Button to avoid kicking him to the street below. A single soldier will detach from the main party and enter the alleyway below your position. Wait until he is out of sight of his allies, then perform an air assassination. Take cover behind the tree and watch your targets until they move on.
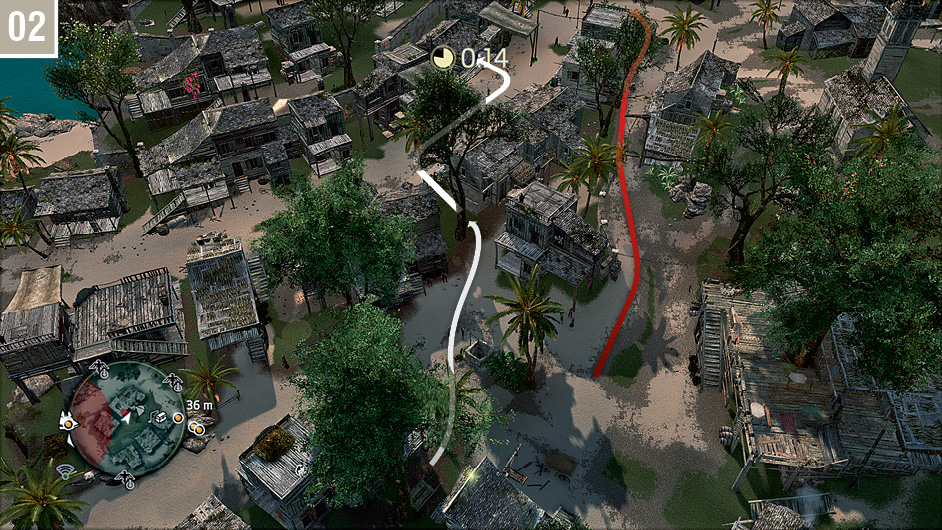
Rogers and his companions are positioned at the heart of a mobile Restricted Area, which means that you must stay at least 25m away. Tag all targets with Eagle Vision, even those that arrive from the tavern. When the group leaves, and the Restricted Area begins to pull away, carefully skirt the edges of it as you follow the route illustrated here. As the Eagle Vision “tag” effect drops after 35m, you may need to cast eyes on Rogers again to reset the timer as he approaches the path leading to the fort.
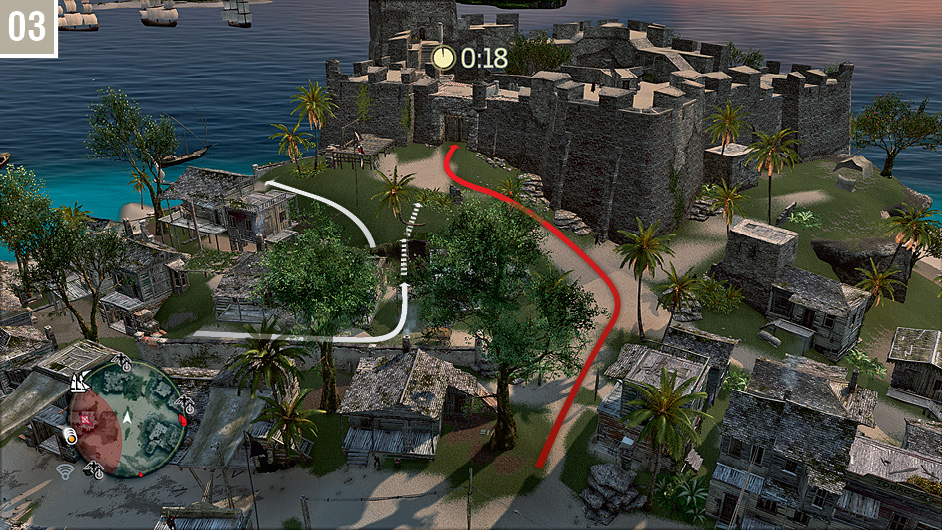
Approach the steep bank, out of sight of the fort entrance. You can actually satisfy the mission objectives by simply standing here, far from danger. If you would like to listen to the conversation clearly, however, you can optionally scramble up the slope and hide in the Stalking Zone. When your next objective is given, head to the north.
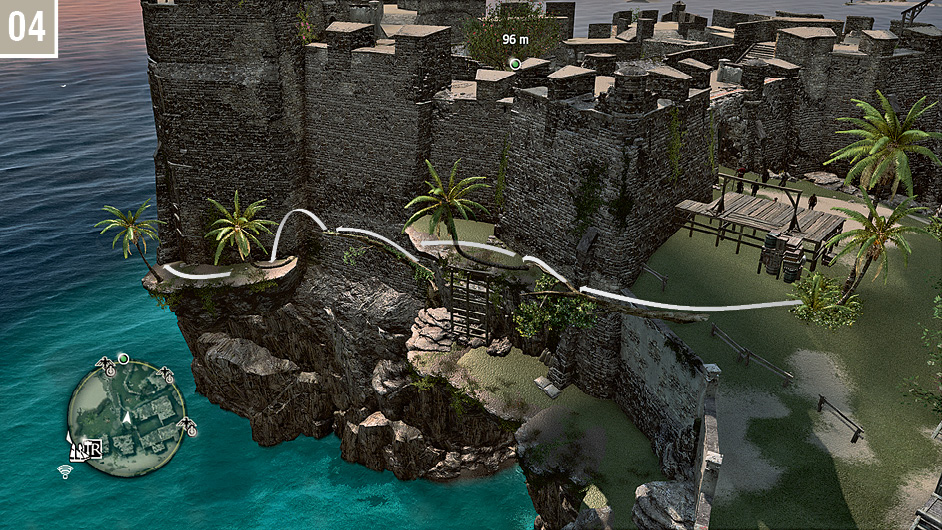
Use the free run course pictured here to begin your infiltration of the fort.
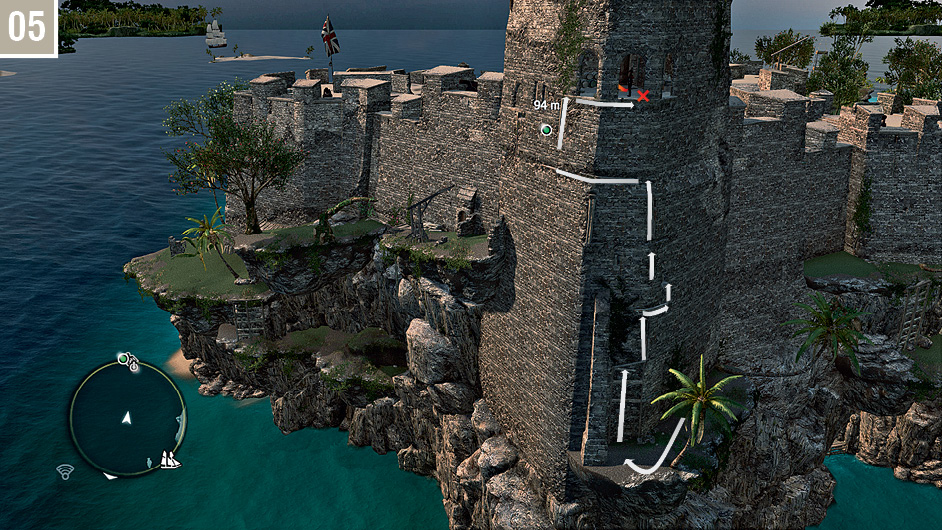
Follow the climbing route shown here, then carefully traverse to the right to hang beneath the middle window. When the Gunner approaches, perform a ledge assassination to complete the first of three required for the first Optional Objective.
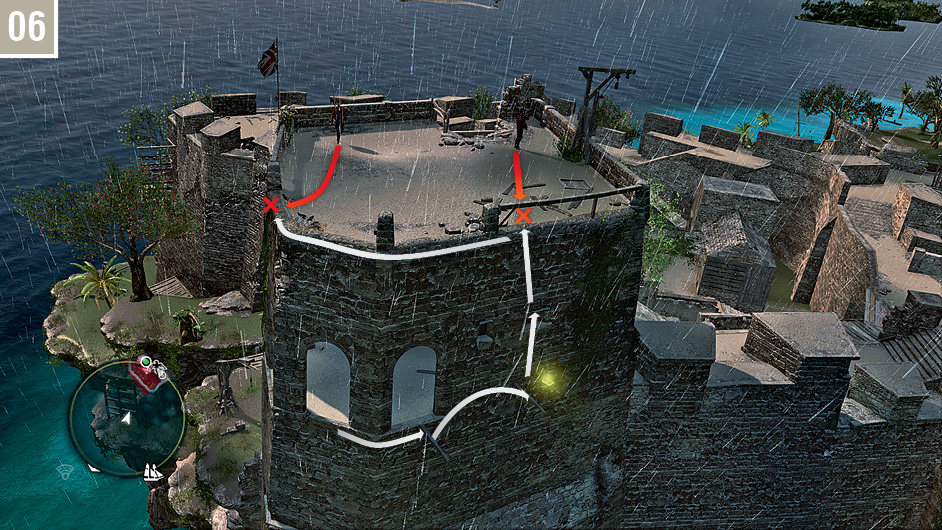
Traverse to the wooden beam, then climb to the top of the wall above. There are two Gunners here who walk on short regimented patrol routes. Eliminate them both with ledge assassinations to complete the related Optional Objective, then climb up. If you have yet to do so, you may wish to Synchronize with the nearby Viewpoint before you continue.
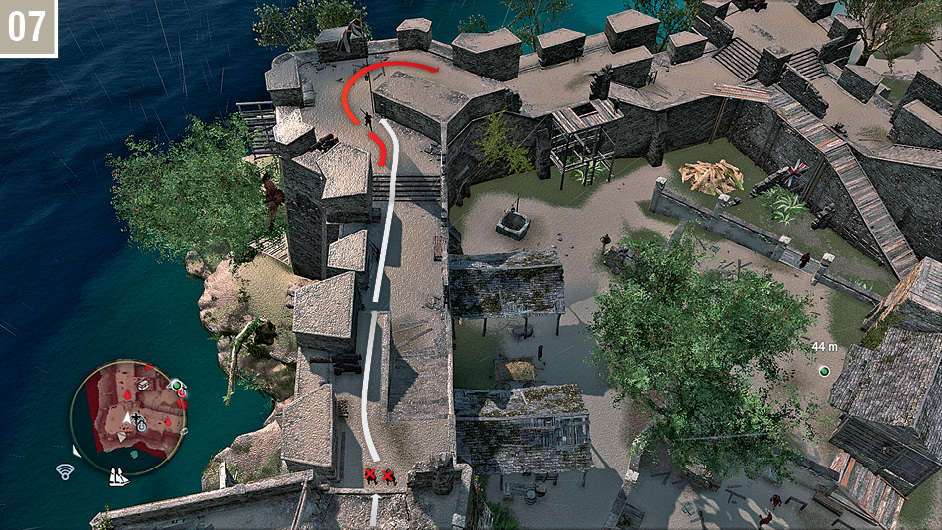
Watch the wall to the southeast. When the soldier in the distance walks away, perform a double air assassination on the two guards below. You can then sprint to the position marked on the screenshot and press against the corner of the wall; whistle the approaching guard, then assassinate him when he moves within range.
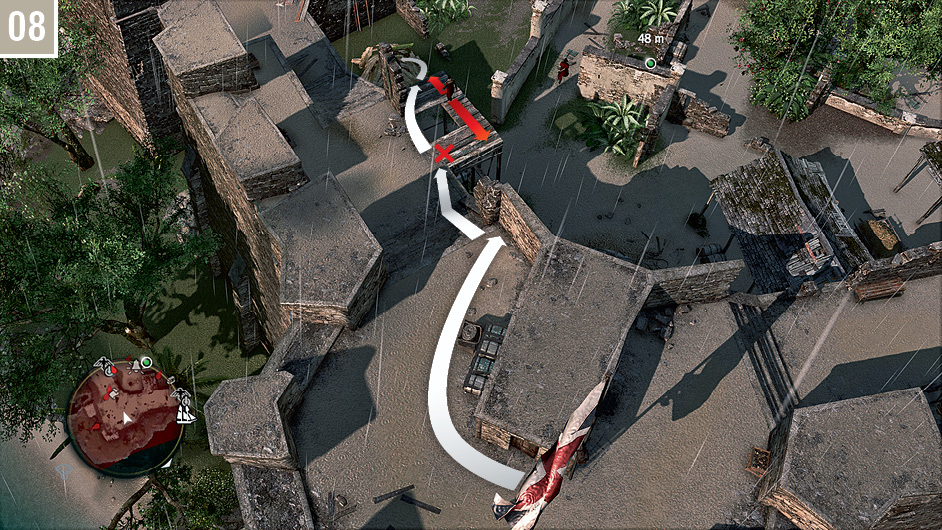
Watch the Scout on the wooden scaffold. When he moves to the left-hand position on his patrol, sprint over and press Kenway against the left side of the broken wall. Whistle, and the sentry will (rather curiously) jump to the steps; be ready to press  just after he lands for a silent assassination. A Captain and a Scout walk a long patrol around the outer edge of the fort interior, checking hiding places. If they are not approaching the hiding spot below (check the screenshot for entry
  to see their route), you can quickly run onto the scaffold and perform a Leap of Faith into the hiding place.
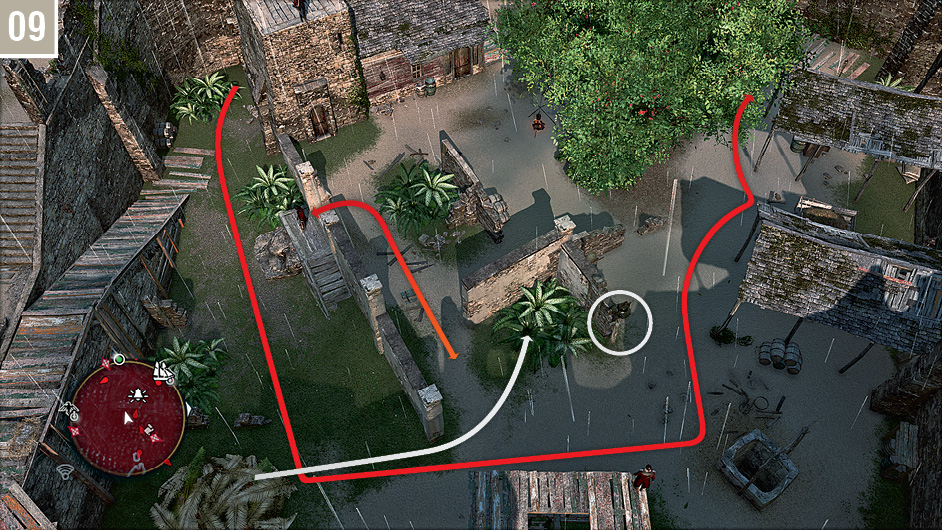
While it is possible to eliminate the patrolling Captain, there’s actually no need to do so. When the nearby Brute moves to the left-hand position on his short patrol, make a quick dash for the Stalking Zone. If the coast is clear when he returns, whistle and eliminate him; if not, wait for the next opportunity. You should then be clear to step out of the Stalking Zone to quickly disable the alarm, completing the second Optional Objective – and, incidentally, removing the threat of Desynchronization if Kenway is detected.
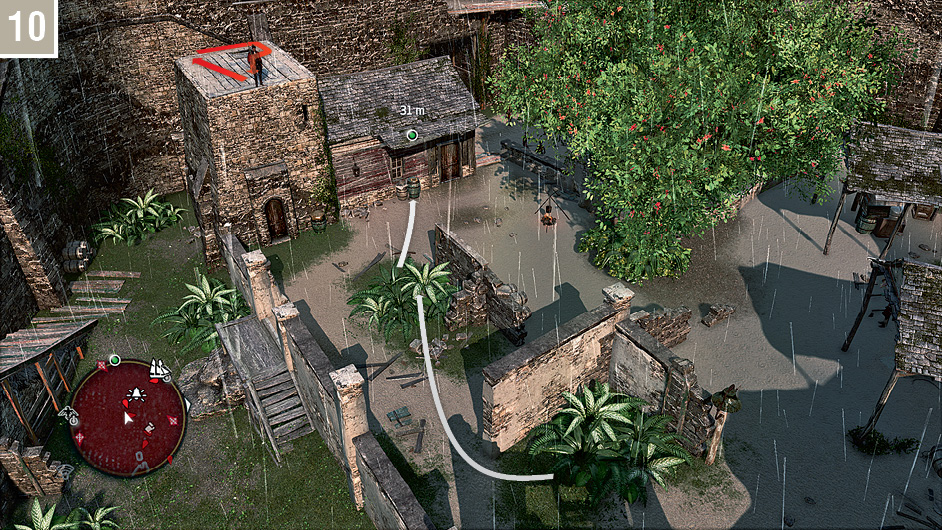
You can incapacitate the Gunner on the rooftop to the west with a Sleep Dart if you wish, but it’s just as easy to sprint into the next Stalking Zone when he turns away. From here, it’s just a short run to the required documents. Press  when you move in range to collect them, and trigger the closing cinematic for this Memory.
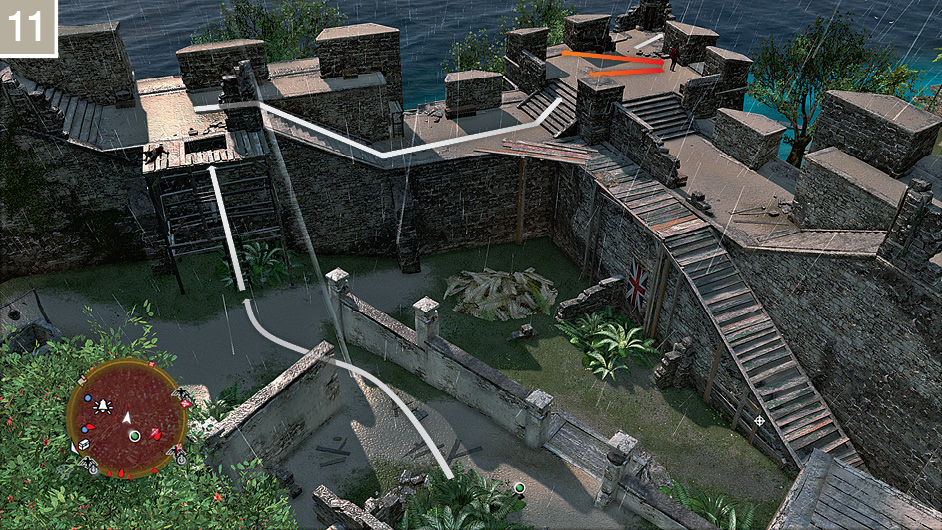
Even though the mission has ended, Kenway still needs to extricate himself from the fort. Climb the scaffold to the east and run to the south, assassinating the Gunner when he faces away. The climb down is easy from here, and there’s a Leap of Faith position a short walk to the south, behind the tent.
Memory 02 “The Gunpowder Plot”
Mission Overview
Optional Objectives
- Kill four guards in one kill streak.
- Use 10 Blowpipe darts on guards.
Notes & Further Reading
- You will need a full inventory of Blowpipe darts for this Memory’s Optional Objectives. At this stage in the story, you really need at least one Dart Pouch upgrade. If you overlooked our earlier advice, you can obtain this first ammo capacity enhancement by hunting howler monkeys on the east side of Kingston. It’s always wise to have a stock of bones with which to craft new darts in emergencies. If your totals are low, there are wild pigs, rabbits and crocodiles to skin on the west side of Nassau.
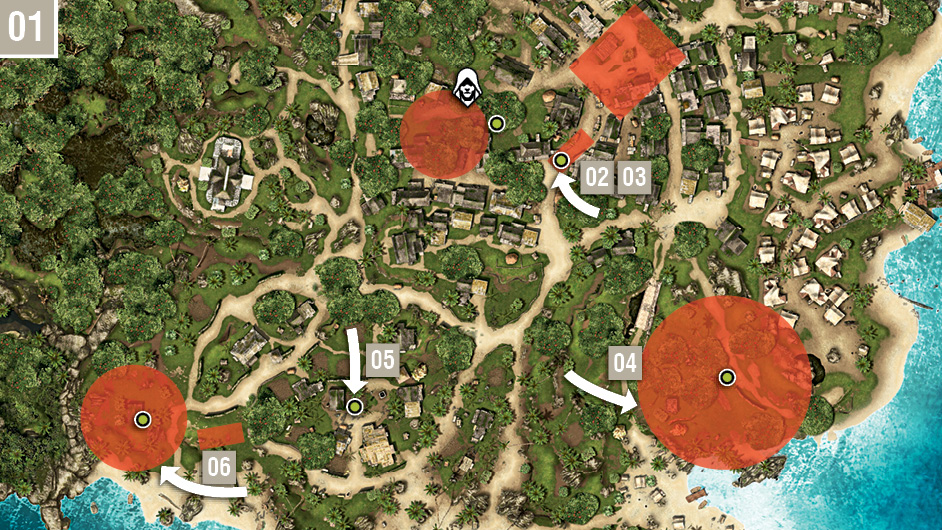
Speak with Charles Vane at the tavern to begin this Memory. You must collect four gunpowder kegs from the locations marked on the map. As the two Optional Objectives suggest, there’s no penalty for a more boisterous approach in this mission; indeed, it’s a great opportunity to cut loose and cause chaos. We’ll cover each of the four locations in the order shown on the above map. The arrows show the optimal direction of approach to each Restricted Area.
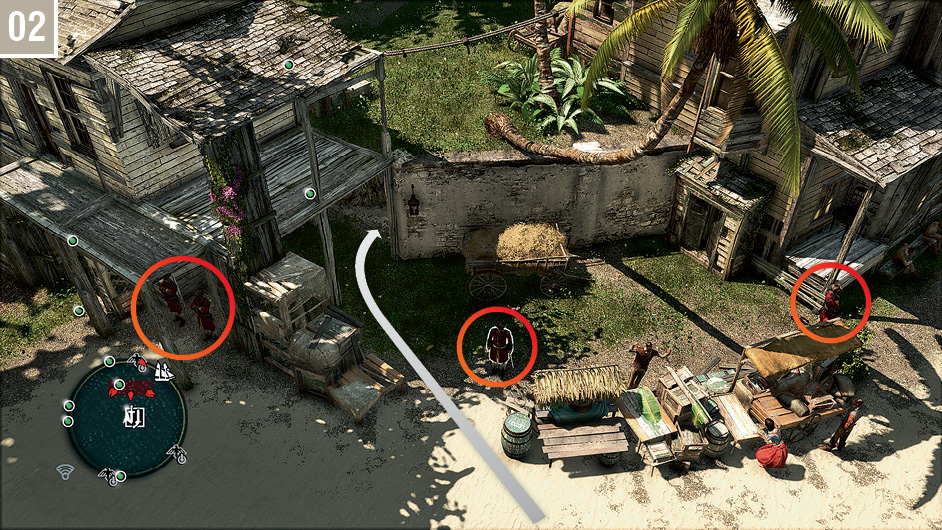
The two marked locations closest to the tavern may cause a little consternation until you realize that these are used to indicate the entrances to an underground storage room, where a single keg can be found. Rather than fight your way in through the circular Restricted Area that surrounds the west entrance, head for the entrance to the east. There are five regular soldiers here, plus others that may join from a nearby patrol, which makes it the perfect opportunity to complete the kill streak Optional Objective. Antagonize one guard, and they will all move to attack; lead them into the street, and you can complete the required kill streak with relative ease.
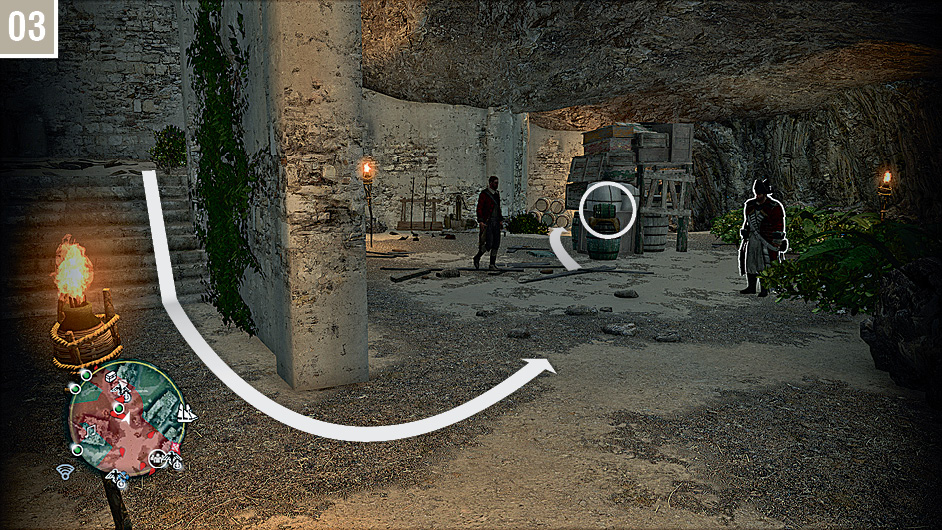
You will encounter a Scout as you make your way down into the storage room, with a Brute and another Scout guarding the keg. This is a great time to start racking up Blowpipe hits for the second Optional Objective. When the guards have been incapacitated, approach the keg and hold  to loot it. If you wish, you can then run to the west exit (note the Treasure Chest here) to gain two further Blowpipe hits for the Optional Objective. Hit the Brutes with Berserk Darts from a safe distance, then retrace your steps to return to the streets.
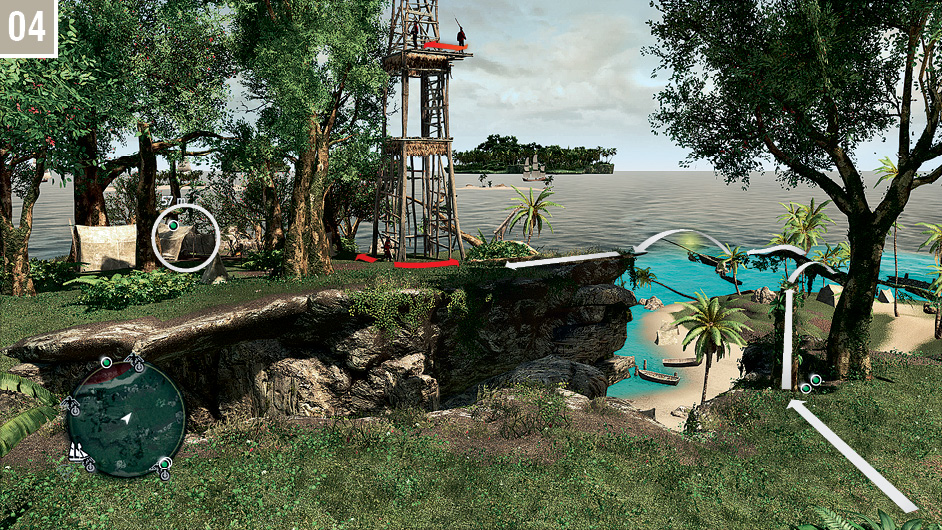
This location is a huge circular Restricted Area. While you can simply fight your way to the keg, the presence of two Gunners on the Viewpoint tower makes this a little dangerous. Instead, approach from the west and hit both Gunners with Berserk Darts, then dash into a Stalking Zone. From here, you can pepper other troops in the vicinity with additional darts. When the effect of the Berserk Darts wears off, you can stroll to the waypoint and collect the keg from inside the tent.
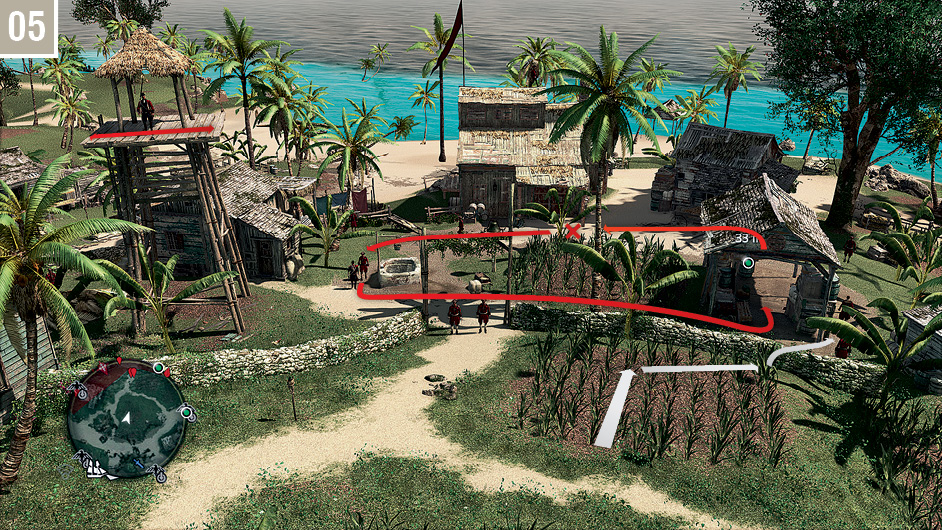
This spot is traditionally the location of Nassau’s oft-raided warehouse, with the large Restricted Area now occupied by well over a dozen soldiers. Approach from the north, and enter the Stalking Zone. There is a Gunner in the watchtower to the east, with a Captain patrolling the central area, regularly passing the gunpowder keg that you require. When he reaches the location marked on the accompanying screenshot, hit him and his companion with a Berserk Dart apiece. To add to the chaos, do the same with the Gunner. Check the right-hand side of the shed where the keg is stored for any hostiles who have not been drawn into the unfolding melee, and quickly becalm them with Sleep Darts. You can then casually hop over the wall and appropriate the keg.
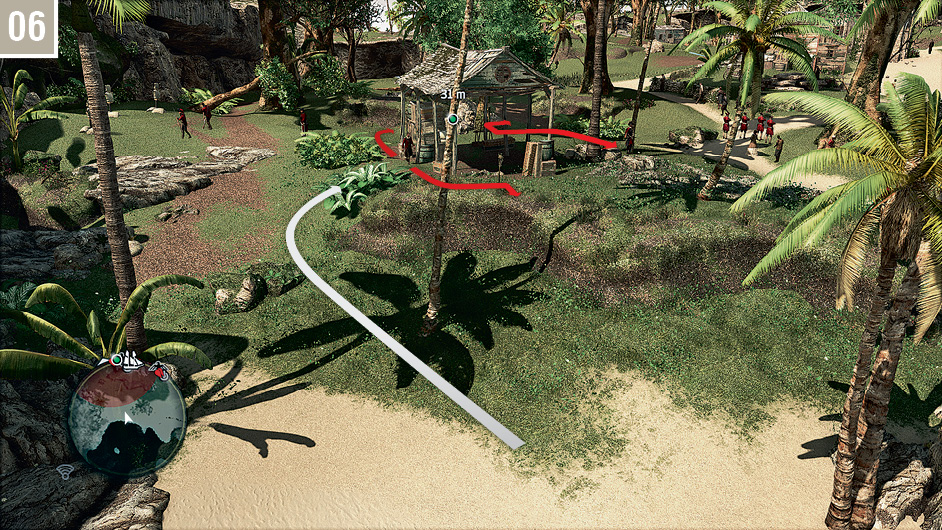
The final area is much easier to infiltrate. Approach from the beach to the south and sneak into the Stalking Zone when the patrolling Scout looks away. Lure and assassinate him on his return, then hit the Captain on the far side of the tent with a Sleep Dart. Stealing the keg ends the Memory immediately, so if you have yet to complete the Optional Objectives, you should do so beforehand.
Memory 03 “Commodore Eighty-Sixed”
Mission Overview
Optional Objectives
- Kill three guards from Stalking Zones.
- Air assassinate Chamberlaine.
Notes & Further Reading
- As you may have exhausted your stocks in the previous Memory, replenish your supply of Sleep Darts before you begin. These aren’t essential, but they may help to avert potential disasters.
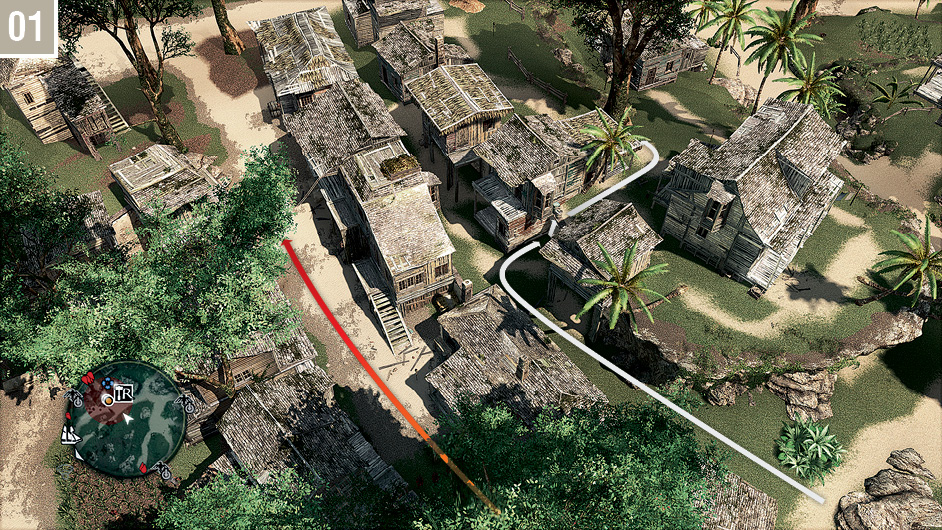
Reconvene with Charles Vane close to the house surrounded by a Restricted Area to begin the Memory. After the introduction, you must tail two guards through the town. Tag them with Eagle Vision, then immediately assassinate the guard standing by the nearby Stalking Zone to begin work on the Optional Objective. When the pair walk along the main path, follow along the alley to the right, then climb the wall.
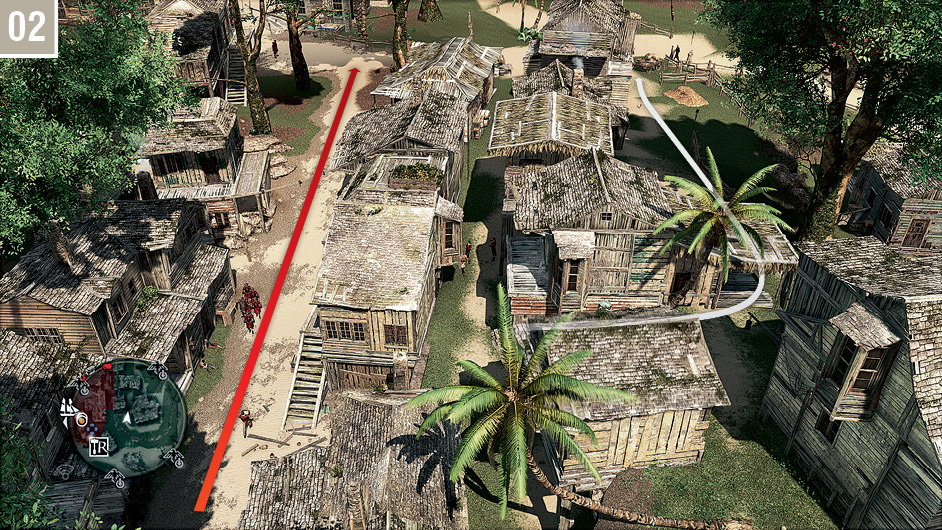
Staying behind the second row of houses moves you out of the Restricted Area, and enables you to avoid two pairs of guards in the alleyway (not to mention sentries on rooftops). As long as you approximately match stride with your targets and look in their direction at regular intervals, it’s literally no more than a leisurely walk at this stage.
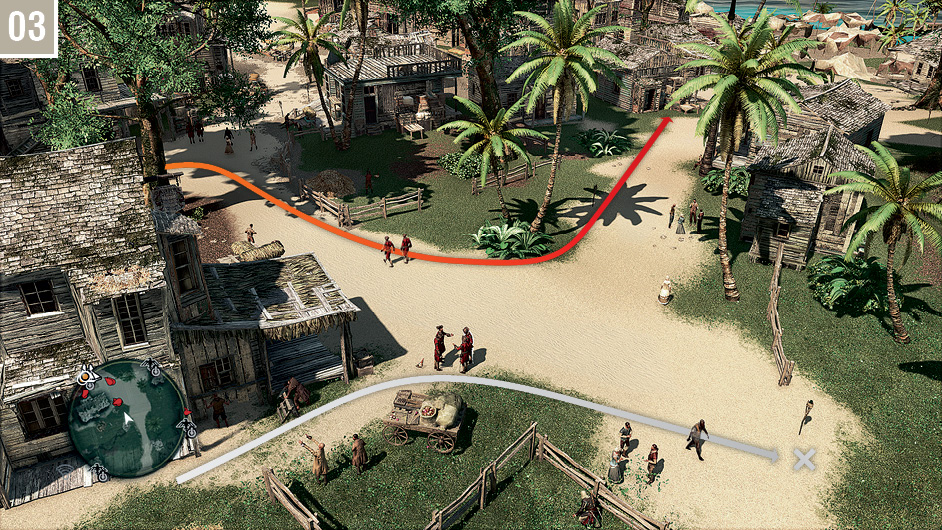
As the two targets reach the end of the street, they will briefly separate. Move to the position shown here to stay just out of range of the soldier approaching you. If you have a Desynchronization warning, move a little closer, but try to ensure that the closest target does not move within any less than 25-20 meters of Kenway.
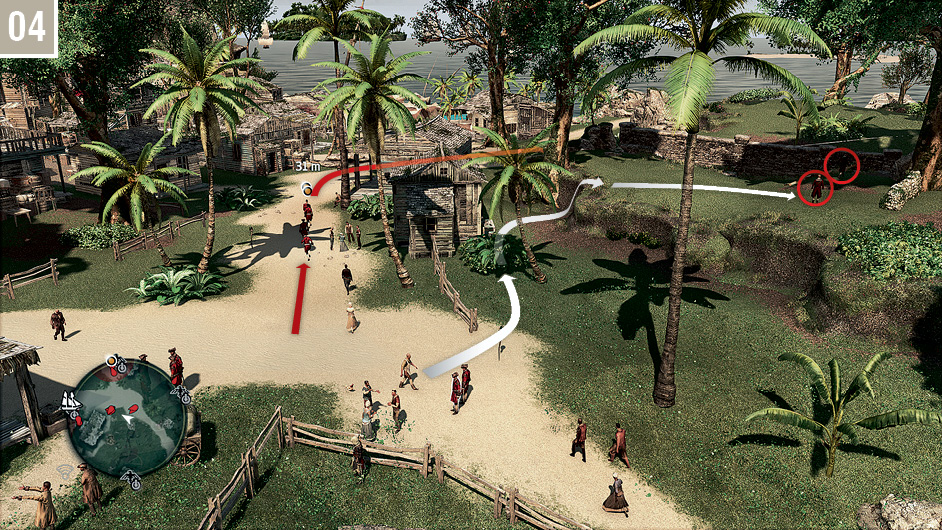
When your targets draw near, move into the Stalking Zone and reacquire the Eagle Vision “tag” on both as they pass. Wait behind the house until they turn and walk to the south, then scramble up the bank and hit both Scouts with Sleep Darts.
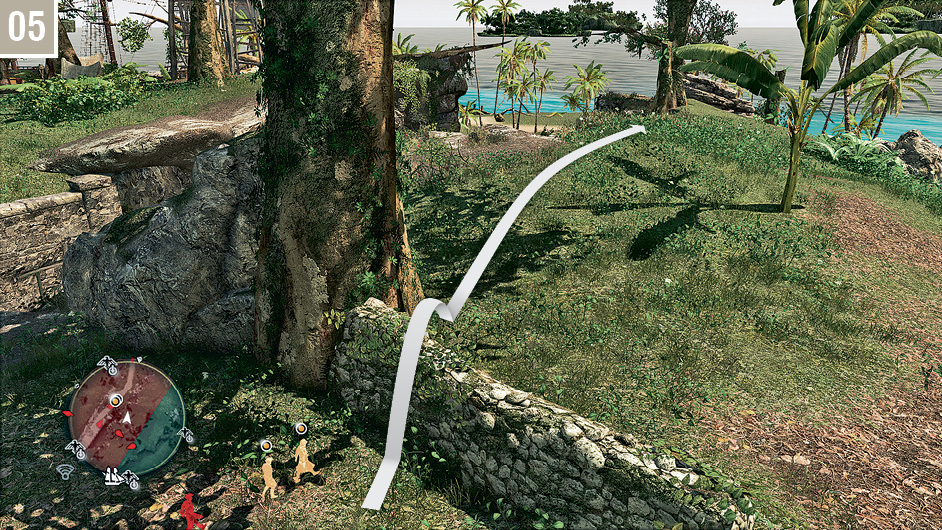
Match stride with the two soldiers as they walk along the path. Don’t forget to align your camera to view their outlines whenever the timer falls below 10 seconds.
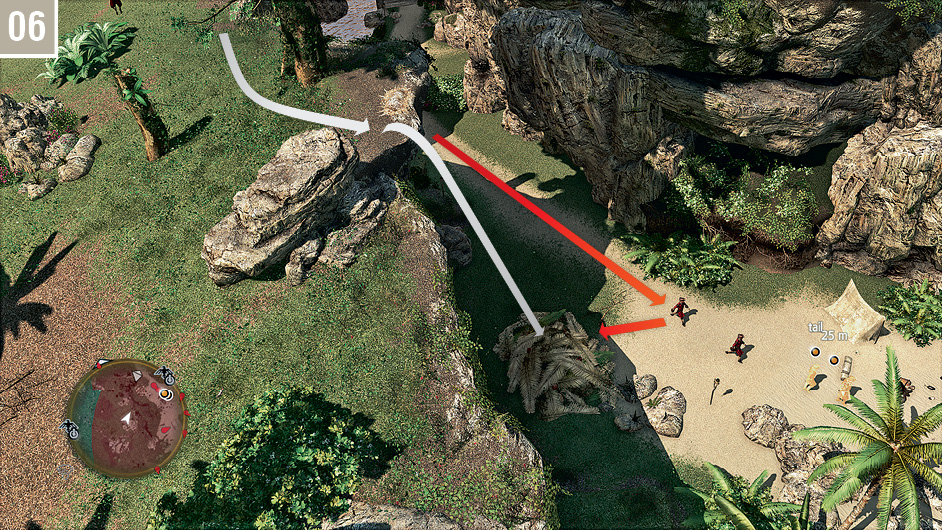
Wait until the group passes below, then make a Leap of Faith into the hiding spot. When your two main targets press forward, one of the soldiers that accompanied them on the later portion of the tail will move to stand in an altogether deadly position. Assassinate him as soon as he presents his back.
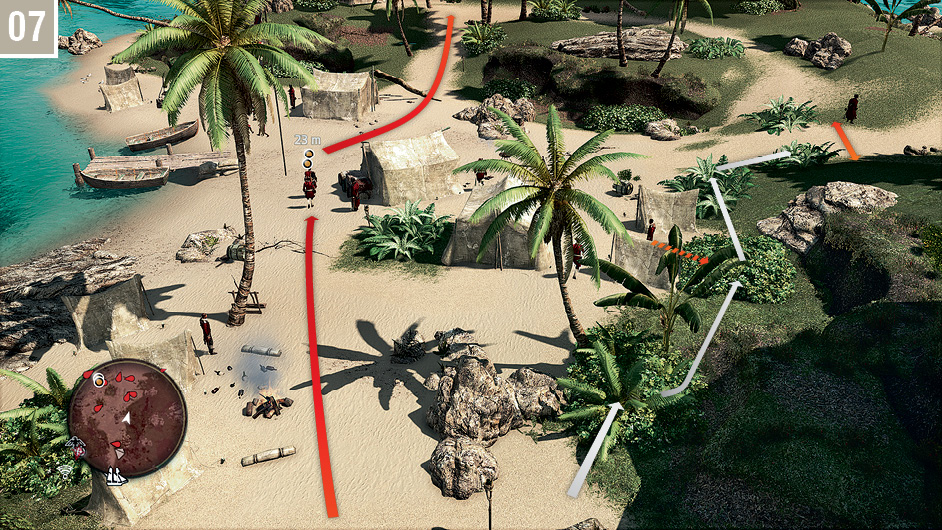
You can then easily move through a sequence of four Stalking Zones to avoid the soldiers in the camp. When you reach the second of these, there is a Scout to your left that you can entice quickly with a whistle; kill him to keep working towards the Optional Objective, then move to the fourth Stalking Zone while the Brute is facing away.
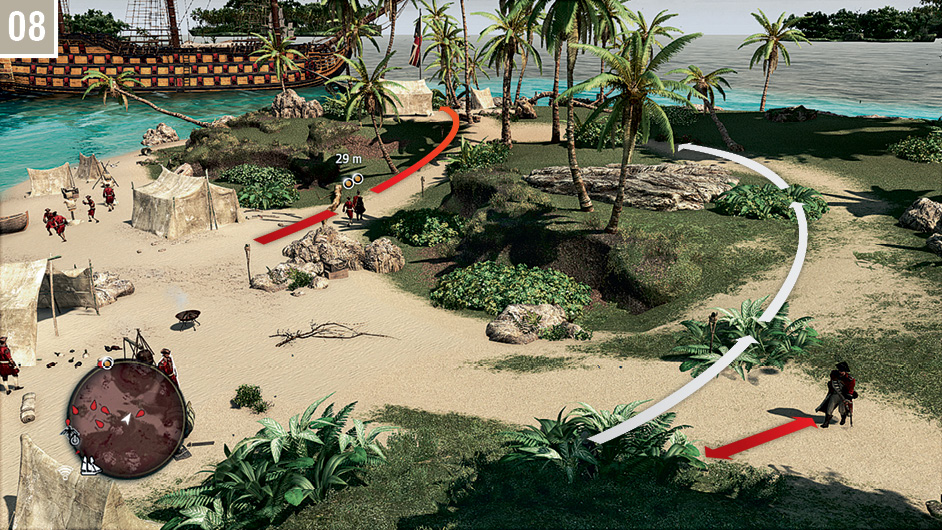
Perform the final kill for the Optional Objective, then tail your targets from a safe distance until they eventually reach their destination.
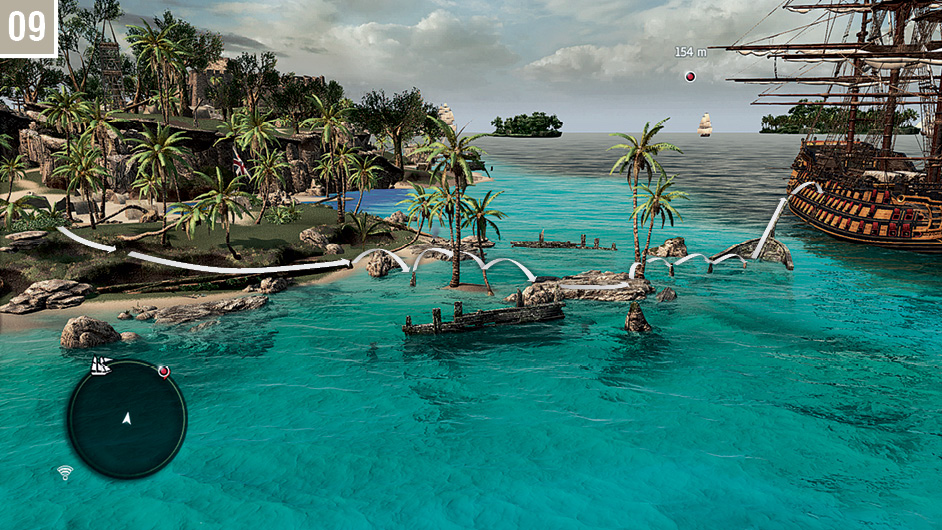
From the Stalking Zone, and being careful not to alert the guards in the camp area directly ahead, follow this route to reach a wooden beam that extends from the Commodore’s mighty “ship of the line”.
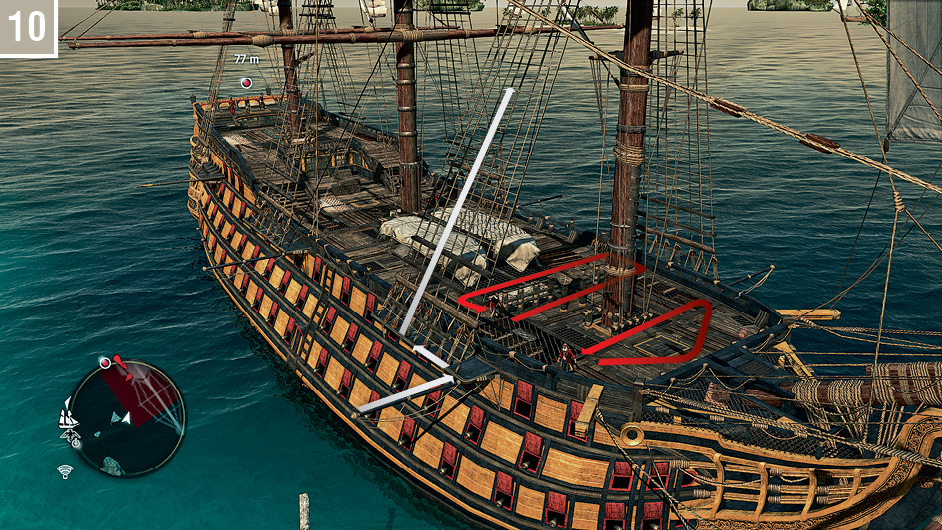
From the beam, traverse to the ledge beneath the cordage to avoid detection. Watch the two patrolling soldiers on the deck. When they both face away, climb to the ropes to move out of sight.
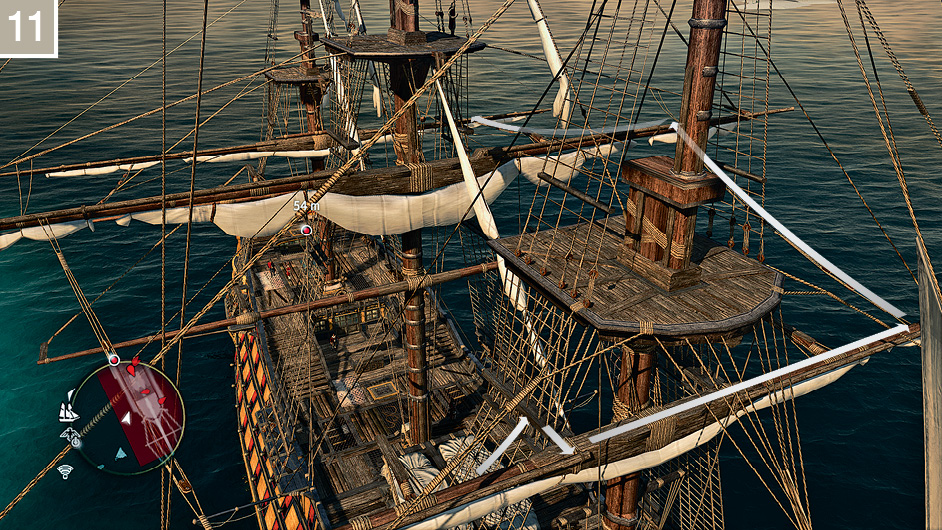
To satisfy the second Optional Objective, you must kill Chamberlaine with an air assassination. This can be achieved from the mizzenmast at the rear of the ship.
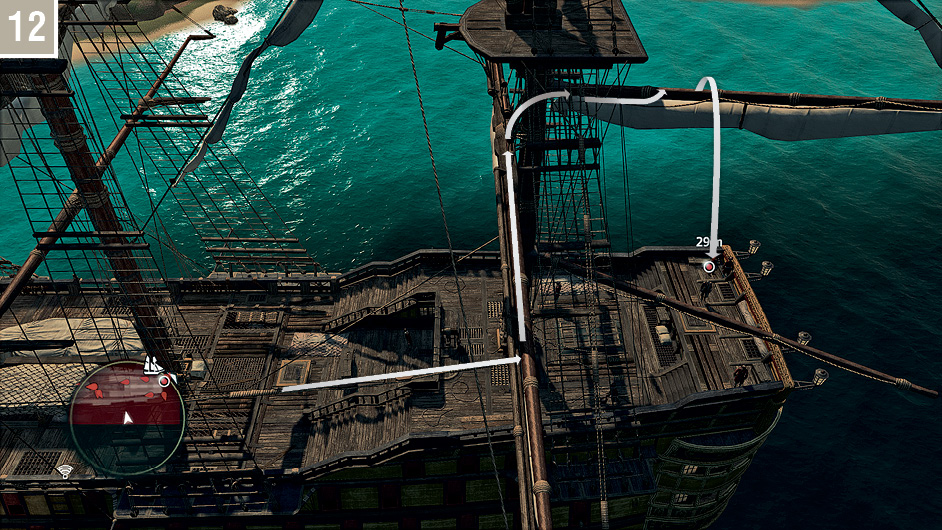
When you reach a position above Chamberlaine that is within air assassination distance, double-check that he is highlighted (and the assassinate prompt visible in the top right-hand corner) before you strike. When play resumes, the soldiers on board the vessel will quickly move to attack. Dive overboard and swim for the shore to avoid unnecessary combat.
Memory 04 “The Fireship”
Mission Overview
Optional Objectives
- Use the mortar to sink three ships.
- Use a fire barrel to sink a ship.
Notes & Further Reading
- As we mentioned earlier in the walkthrough for this Sequence, the Advanced Hull upgrade will make this Memory much easier to complete. If you intend to complete the Optional Objectives, you should also have Reinforced Mortars and Advanced Fire Barrel Strength upgrades as a bare minimum – and ideally better. Enhanced fire barrel and mortar storage are also practical (and eminently affordable) improvements.
- Naturally, it also makes sense to ensure that the Jackdaw’s stock of mortar and fire barrel ammunition is full before you begin. It’s an easy mistake to make…
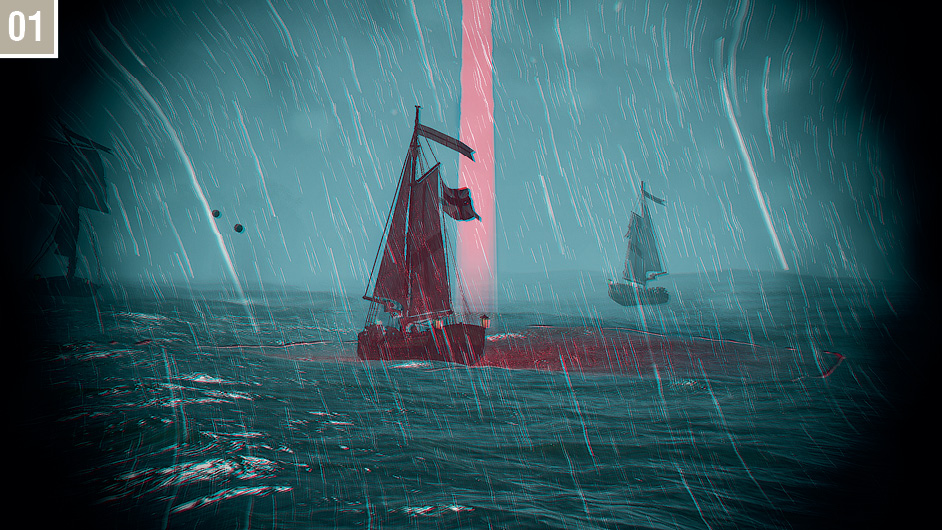
Meet up with Charles Vane and Calico Jack on the beach, and interact to begin this short but intense naval-oriented Memory. In the first (and major) section of this mission, you must follow the Royal Phoenix as waves of gunboats move in to attack. The moment when gunboats first appear is the perfect time to work on the Optional Objective to sink three vessels with mortar fire.
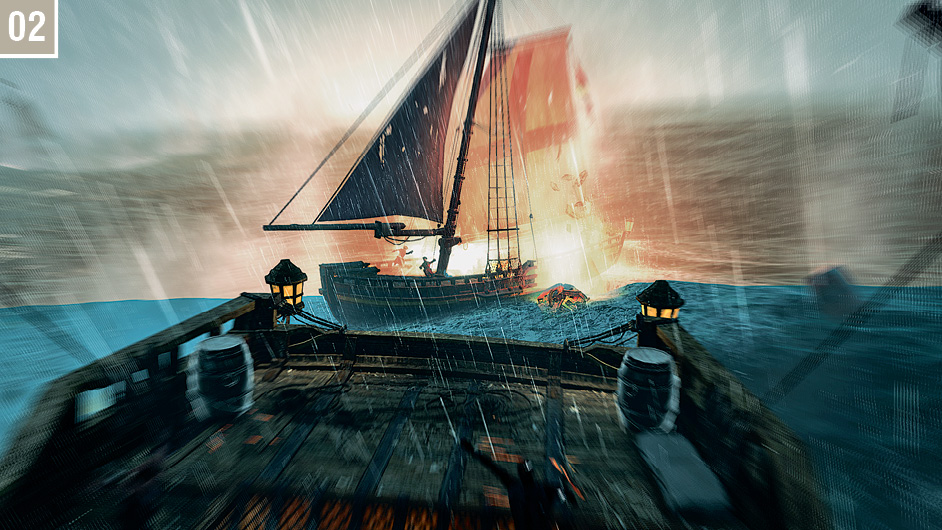
As the battle becomes more chaotic, you will find that you have gunboats on all sides. Watch the mini-map carefully; when one sails behind the Jackdaw, rotate the camera and drop fire barrels to sink it, completing the second Optional Objective.
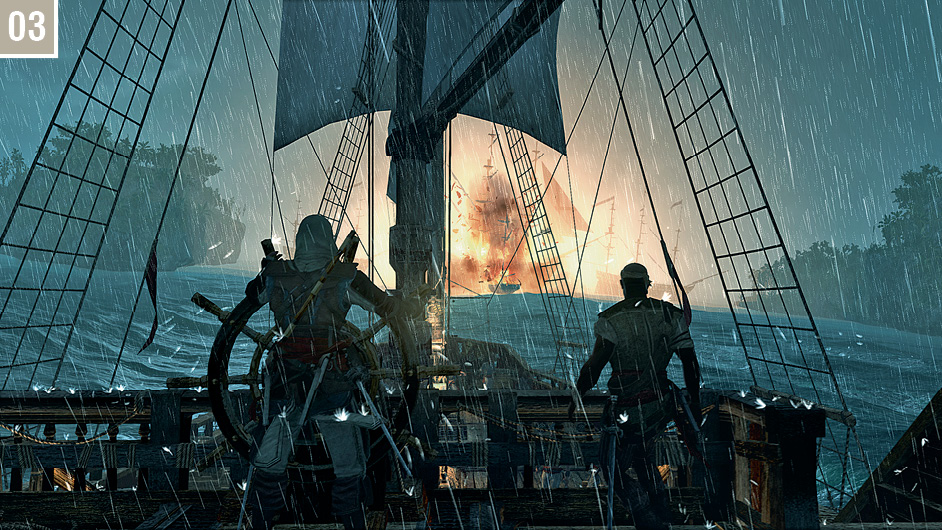
After the fireship finishes its circuitous journey, it will sail towards the blockade. When the notification of this event appears, you have a little time to complete any remaining Optional Objective requirements. Be sure to stay well clear of the explosion area.
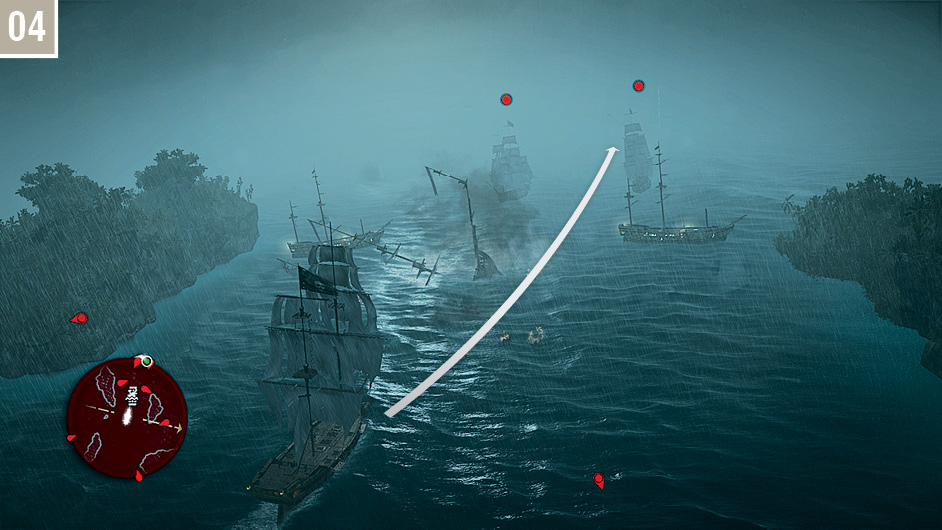
After the Royal Phoenix explodes (and entirely fails to live up to its nominative billing), go to full sail and steer the Jackdaw through the gap in the blockade. There’s no profit in attempting to engage the other ships here, so – while making sensible evasive maneuvers to avoid incoming fire – set a direct course for the waypoint marker in the distance. Enter the highlighted area to end both the Memory and Sequence 07.