
Assassin's Creed IV: Black Flag Guide Walkthrough
Sequence 06
Kenway and his allies attack a fort where Governor Torres is known to be storing a large quantity of gold, capturing both the prize and the Grandmaster himself. However, Torres informs Kenway that the money is set aside to pay a Dutch slave trader, Laurens Prins, for custody of the Sage. Despite Adewalé’s strong reservations, and warnings that the crew might lose patience with Kenway’s quixotic dream of obtaining a fortune from the Observatory, the pirate allows Torres to go ahead with the intended trade.
Following the Templar and Prins from a safe distance, he is forced to intervene as James Kidd arrives to assassinate the slave trader – a long-term Assassin target. When Prins realizes that they have been followed, both he and the Templar escape. Kenway and Kidd agree to cooperate to assassinate Prins. During the events that unfold, Kenway discovers that his Assassin friend is actually a woman named Mary (posing as “James” as a necessary subterfuge), and that the Sage – far from being a captive – was actually an employee of the Dutch slaver. The Sage raises the alarm after the death of Prins, and Kenway is forced to flee for his life. With the Sage lost once again, Kenway returns to Nassau…
Memory 01 “Diving For Medicines”
Mission Overview
Optional Objectives
- Loot three Treasure Chests.
- Avoid being attacked by a shark.
Notes & Further Reading
- The purchase of the diving bell, locked until this stage in the story, makes it possible to access several unique destinations. See the Underwater Shipwrecks & Caves section for guides to these locations, tips on underwater navigation and features, plus information on the rewards you can obtain.
- There is one feature that you will definitely need to know for this Memory: hold
 to interact with the diving bell or an air barrel. This will enable you to refill your breath meter whenever it gets dangerously low. Air barrels are single-use objects, so you need to use them strategically if you have several objectives to complete in an area (such as picking up collectibles).
 - You can find the design plan for the Elite Hull upgrade during this Memory. Though it’s unlikely that you will be able to afford to purchase the improvements at this stage (both in terms of reales and cargo), it now becomes a plausible goal to work towards over the coming Sequences.
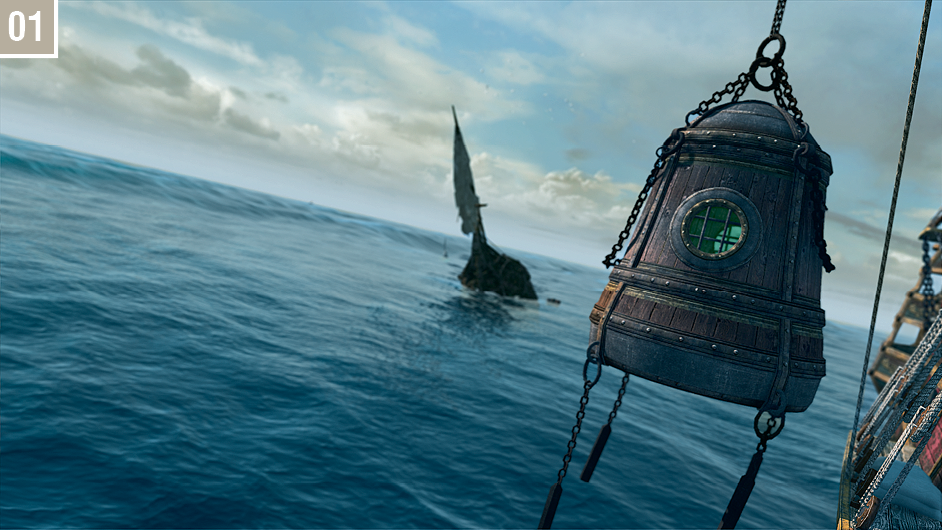
Return to Nassau to begin this Memory. After the cutscene, walk with Blackbeard and Ben Hornigold as a plan is devised and agreed upon. Naturally, responsibility falls on Kenway to fund the purchase of the diving bell. Once you acquire the requisite funds and hand over the 5,000R fee to a Harbormaster (see the Jackdaw Upgrades section of the menu to find the diving bell), you can continue with the main storyline. Return to the Jackdaw and set sail. If you have already visited Florida or liberated the Dry Tortuga fort, you can Fast Travel to one of those destinations to cut the journey time. On arrival, tap  when prompted to start the Memory; after the introduction, make the short sail to the marked shipwreck and hold
  to begin the dive.
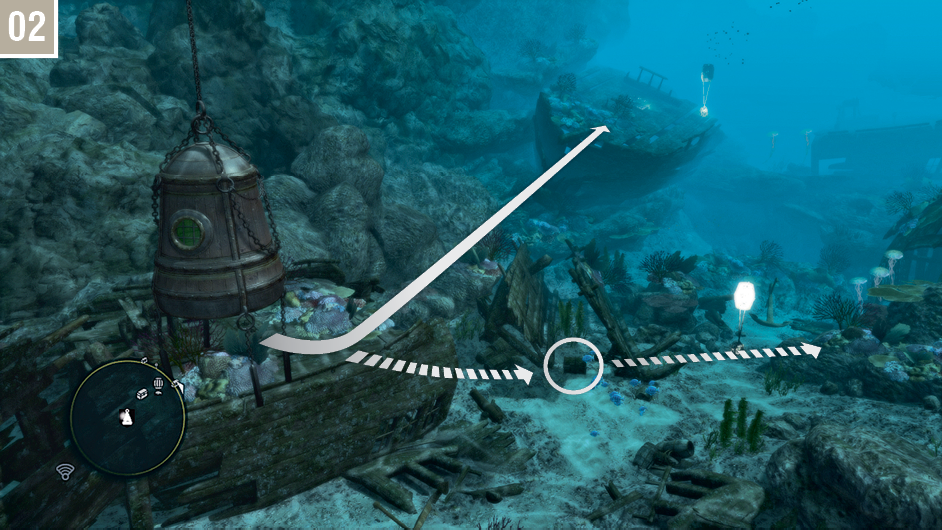
There are six Treasure Chests and three Animus Fragments to recover from the vicinity of the San Ignacio Wreck. As it makes sense to collect these now (and obtain a valuable design plan), we’ll cover all nine collectibles here. If you would rather just progress in the storyline, swim straight for the glowing hatch on the ship and resume the walkthrough at step  . Otherwise, swim down and open the first Treasure Chest on your way to the hull portion with three jellyfish in front of it. Ignore the air barrel for now.
PREVIOUSLY...
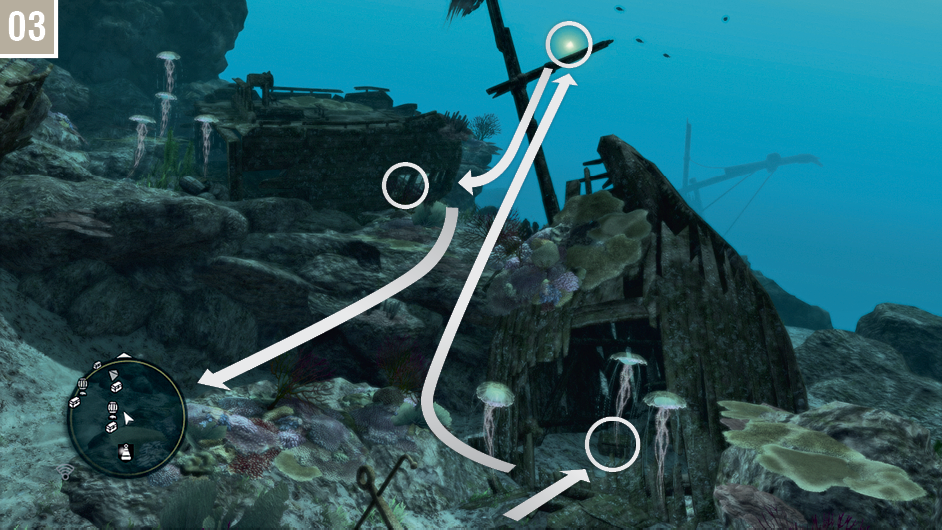
Taking care to avoid the jellyfish, loot the second Treasure Chest, collect the Animus Fragment from the mast above, then swim to the right-hand side of the hull section to the north to find a third Treasure Chest. You can now swim to the glowing hatch. Before you enter, press  in close proximity to the nearby air barrel to replenish the breath meter.
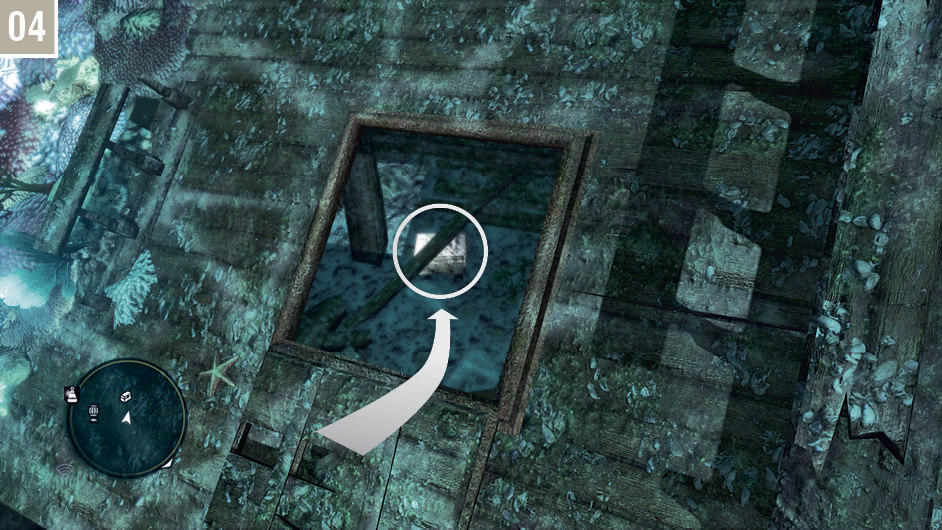
Press  to interact with the hatch, then swim inside and approach the chest trapped beneath a rotting beam. Open it to trigger a cutscene. When this ends, swim through the new tunnel to the west until you reach an air pocket (
 ), where you can swim to the surface to replenish the breath meter. After this, continue to the west until Kenway is caught in a strong current. Use
  to dodge hazards during this brief challenge.
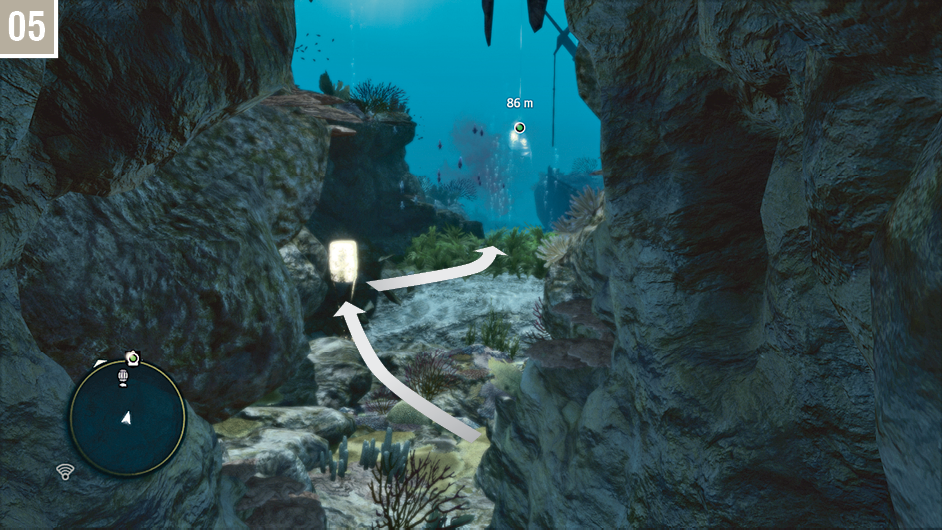
Swim through the short remaining section of the cave. Kenway should be in fairly immediate need of oxygen, so swim to the air barrel; an ambient event directly ahead of your position will foreshadow what the next challenge will be. From the air barrel, swim into the patch of seaweed. Sharks cannot detect Kenway while he is in these areas, so think of them as underwater Stalking Zones. If Kenway is attacked by a shark, follow the onscreen button prompts to repel it.
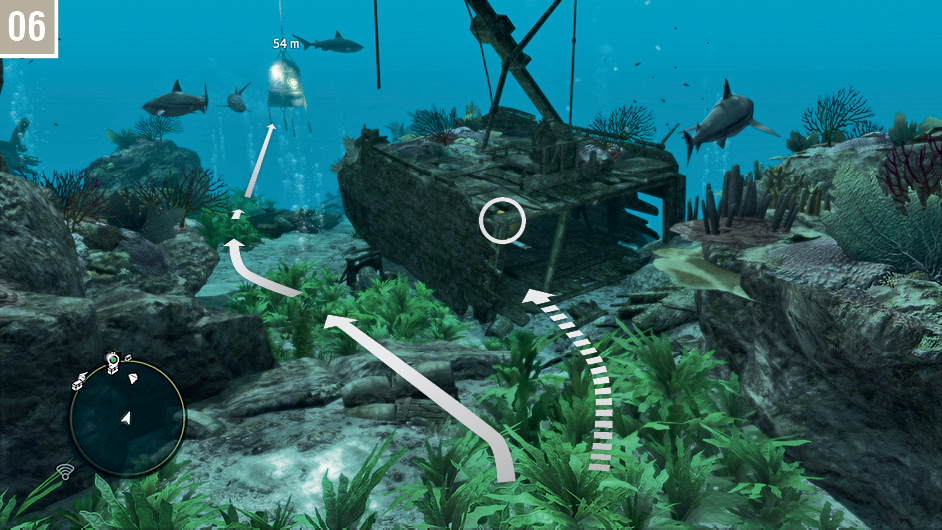
If you watch the sharks carefully, you will note that they move in predictable patterns. If you simply wish to return to the surface and complete the Memory, follow the route shown here to reach the patch of seaweed closest to Blackbeard’s diving bell. When the nearby shark swims to the south of your position, quickly swim towards the diving bell and press  to enter, and again to end the mission when prompted. If, however, you would like to pick up all collectibles – including the Elite Hull upgrade for the Jackdaw – and 100% synchronize this shipwreck before you leave, you have more work to do. Start by swimming into the hull section to the right to collect an Animus Fragment.
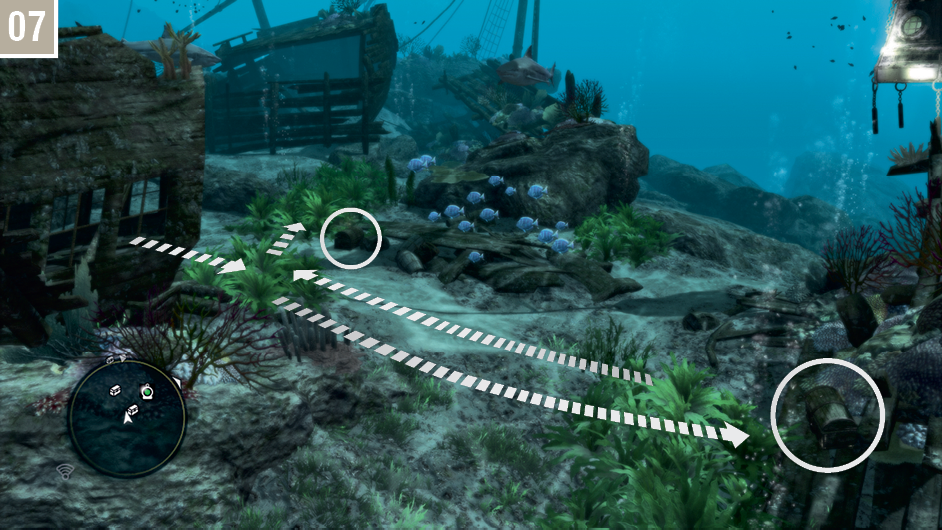
Take your time in reaching the remaining four collectibles. Should a shark attack you and make you fail the Optional Objective, you can simply restart from the last checkpoint. If you angle your approach carefully, Kenway can open these two Treasure Chests while concealed by seaweed. You may wish to move to the diving bell to replenish the breath meter before you continue.
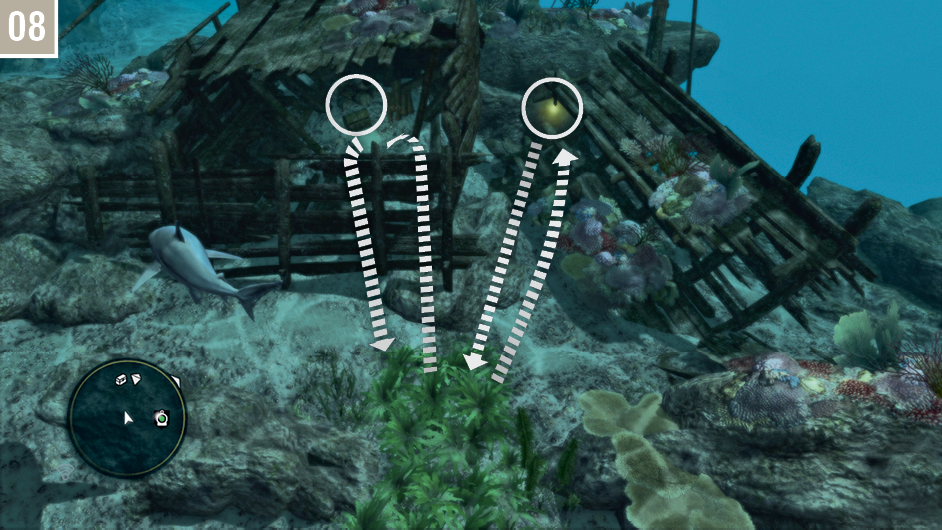
Finally, collect the remaining Animus Fragment on the right, then return to the seaweed patch. Watch the shark to the left carefully; when it swims away, squeeze through the gap to open the last Treasure Chest. This contains the design plan for the Elite Hull upgrade, so it’s definitely worth the risk. You can now backtrack to the seaweed leading to the diving bell.
Memory 02 “Devil’s Advocate”
Mission Overview
Optional Objectives
- Rescue five survivors.
- Kill three guards stunned by Smoke Bombs.
Notes & Further Reading
- Replenish your stock of Smoke Bombs before you begin: though required for an Optional Objective, they also make a large battle much easier to complete.
- Though you won’t stop for long, this Memory features the first story-mandated visit to Mariguana Island.
- This is the first main story Memory where you are likely to encounter frigates: a class of warship more powerful than the schooners and brigs you may have encountered so far.
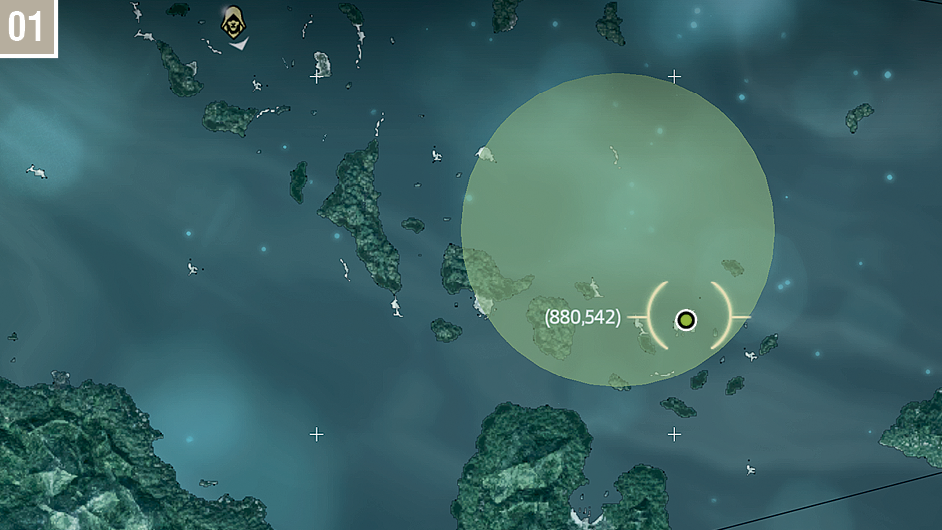
Fast Travel to Salt Lagoon, then approach the ship at the  marker and press
  to begin. You can then set sail for the waypoint, where you will find a huge circular search zone that is, naturally, a Restricted Area – and teeming with British ships. The Optional Objective to rescue five survivors can be accomplished both by picking up strays on the sea (by far the easiest method), or by sinking hostile ships to create them. Naturally, with the area heavily populated by frigates, one battle tends to lead to another – so you may prefer to explore the periphery of the search zone to collect the five men. When you have accomplished this task, or are ready to proceed, move to the position marked on the accompanying map to locate the Queen Anne’s Revenge.
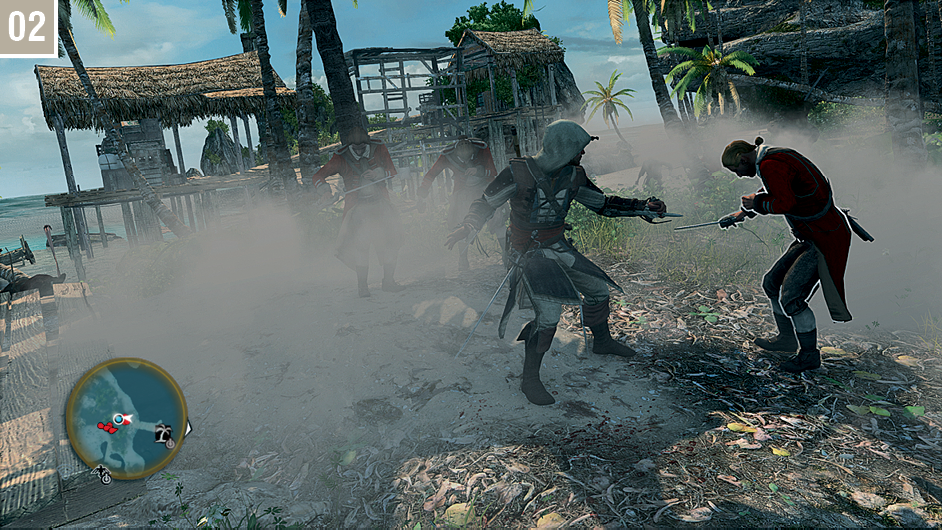
On arrival at the waypoint on Mariguana Island, steer in close to the Queen Anne’s Revenge and release the wheel. Dive overboard, swim to the beach and join the fight. As you enter the fray, drop Smoke Bombs to set up easy assassination kills and complete the second Optional Objective. As a fringe benefit, this also serves to make a chaotic battle much easier to deal with. When the final soldier falls, board Blackbeard’s ship and take the wheel.
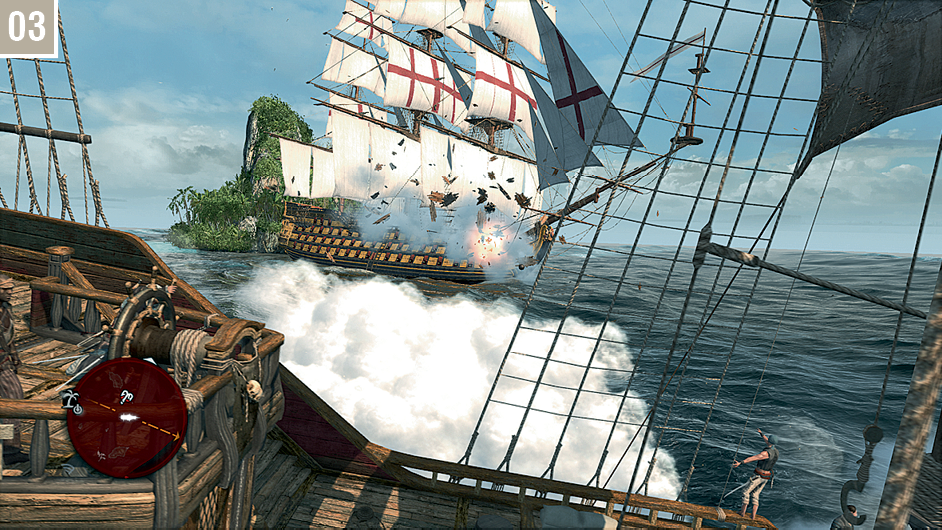
Immediately set sail for the enemy man o’ war, steering to avoid its mortar salvos during the approach. Blackbeard’s mighty ship fires broadsides in a staggered sequence of three barrages, which makes it incredibly powerful – but be mindful of the fact that you must therefore maintain a suitable course to keep the enemy ship targeted until the third round of cannonballs have been fired. Though a sustained and aggressive assault can work well, taking the time to brace and reduce damage from enemy fire is still a very good idea. When the man o’ war has sustained sufficient damage, cease your bombardment and sail in close to trigger a cutscene.
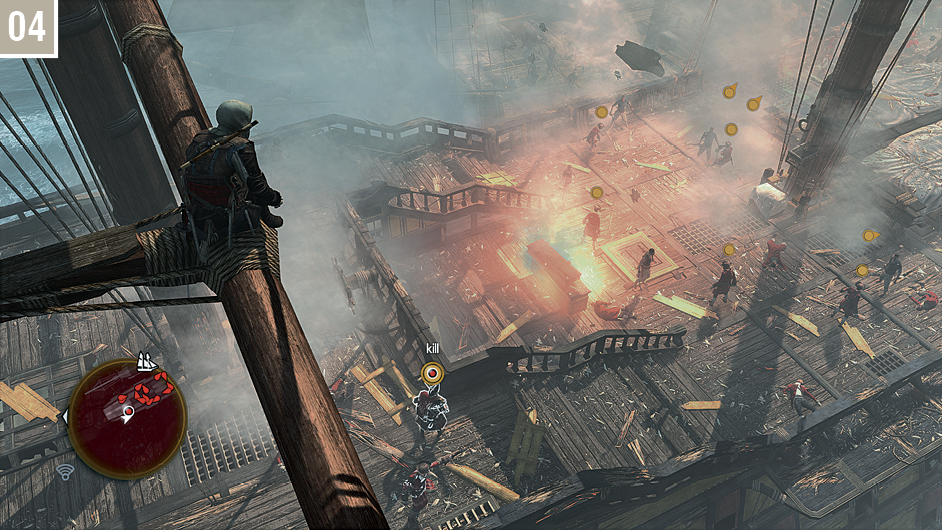
After Kenway rides a lift to the upper reaches of the Queen’s Anne Revenge at the close of the cinematic, free run through the rafters to reach the enemy ship, making sure you take down the two Gunners standing on the mast platforms with your pistols or the Blowpipe. From there, you can move to a position above the highlighted Captain and perform an air assassination to complete the Memory in dramatic fashion.
Memory 03 “The Siege Of Charles-Towne”
Mission Overview
Optional Objectives
- Use three Sleep Darts on crocodiles.
- Skin a crocodile.
Notes & Further Reading
- Ensure that you have a stock of Sleep Darts (or the means to craft them) before you begin this Memory: they are required for the Optional Objectives.
- Those aspiring to not a single percentile less than 100% Synchronization may wish to visit Nassau to clear it of collectibles and side quests before they begin this Memory. Sequence 07 begins with a plot development that will make these activities a little more complicated and time-consuming.
- The location that you visit during this Memory is exclusive to this section of the story, and features no collectibles.
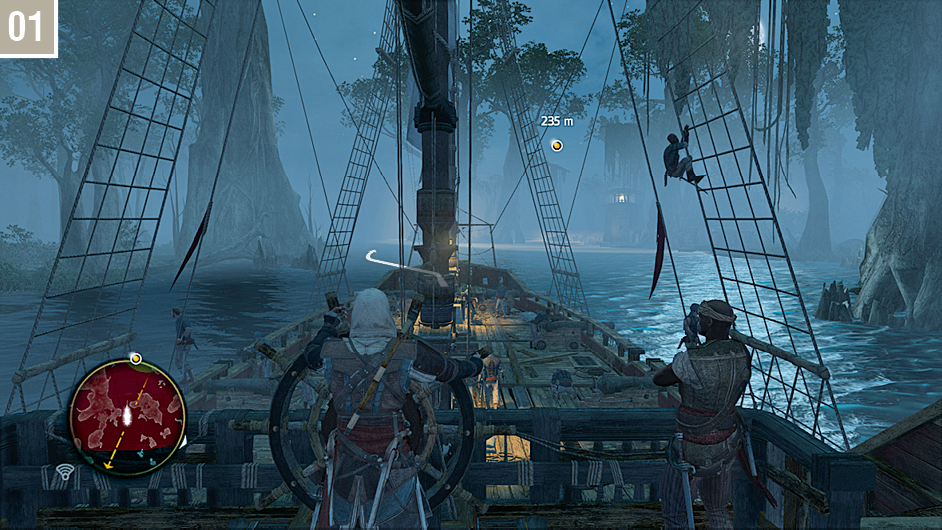
The Memory Start position is a short sail to the west of Nassau, so you can Fast Travel there (or the nearby Andreas Island) to reduce the journey time. When the mission begins, you must tail a ship through a waterway dotted with guard posts and potential witnesses. You should maintain a speed no faster than half-sail throughout this section. Start by taking the left-hand channel, then stick to that side of the water to avoid detection. Note the pools of illumination that indicate the approximate extent of enemy vision range; you can also refer to the mini-map for a more precise guide on where not to sail.
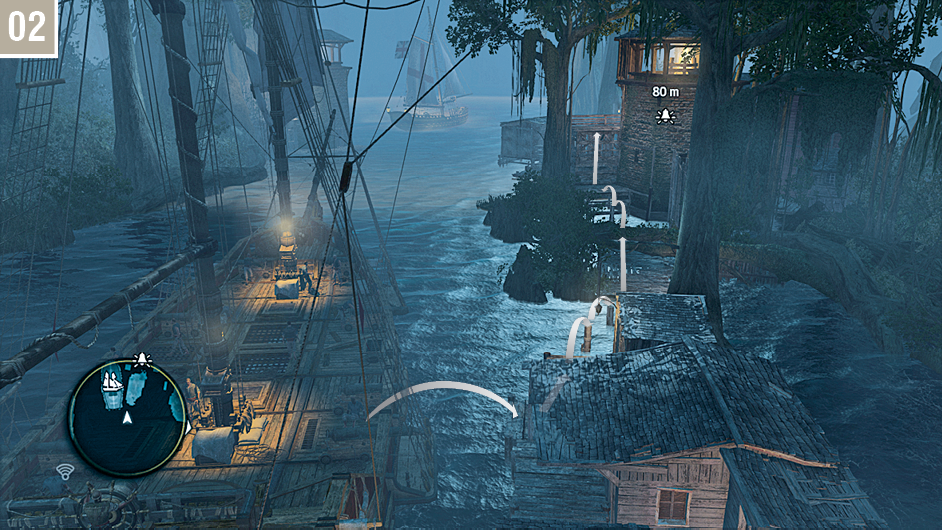
After staying close to the left-hand bank for a minute or two, you will reach a narrow section of water where the Jackdaw will automatically come to a halt. Disembark and follow this course to begin the approach to the alarm bell.
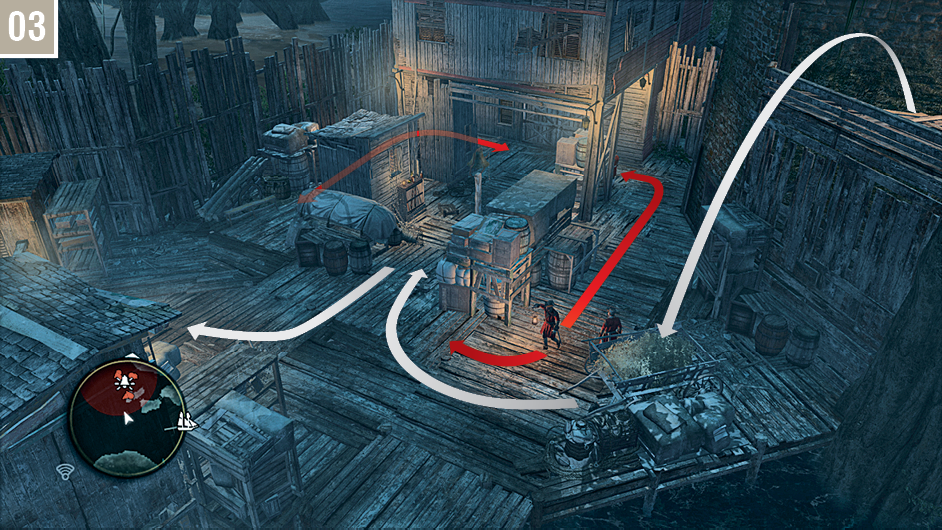
From the balcony, perform a Leap of Faith into the hay cart. Assassinate the stationary guard, then wait for a patrolling soldier to approach your position; whistle to lure him over, then strike. There are stationary guards on the covered section of the walkway, so it’s prudent to avoid them entirely. Wait until the second patrolling guard (on the left-hand side of the illustrative screenshot) is out of sight, then make a quick dash to the bell to disable it. Adewalé automatically steers the Jackdaw to your position at this point, and the vessel you are tailing resumes its journey. Return to the wheel to continue.
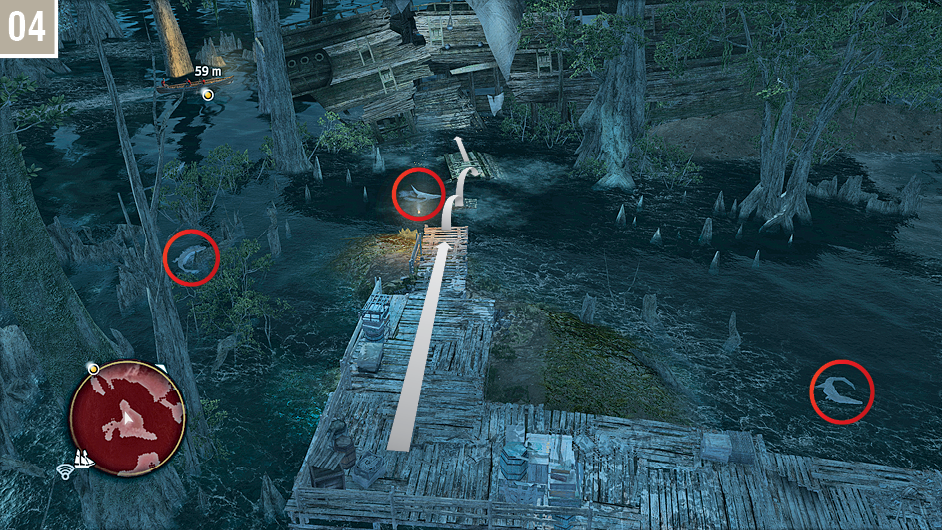
The remaining section of the journey on the Jackdaw is entirely linear. When you reach the jetty, Kenway will decide to continue tailing the boat on foot. Run into the ruined ship directly ahead. However, if you wish to complete the Optional Objective to use Sleep Darts on crocodiles, this is the perfect place to do that – you will find three or four swimming in the surrounding water. After drugging the required number, skin the crocodile closest to the path to complete the second Optional Objective. There is a checkpoint right here, and you actually have a surprising amount of time until your primary targets move out of range.
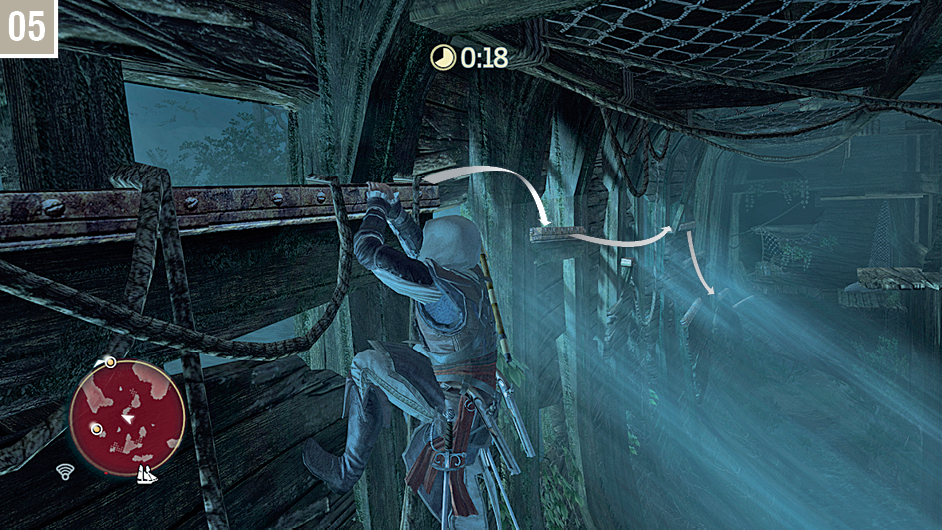
Climb to the top of the hull, then traverse to the right until you can go no further. You can then drop down (hold  to make Kenway release his grasp), then run through the hole in the hull.
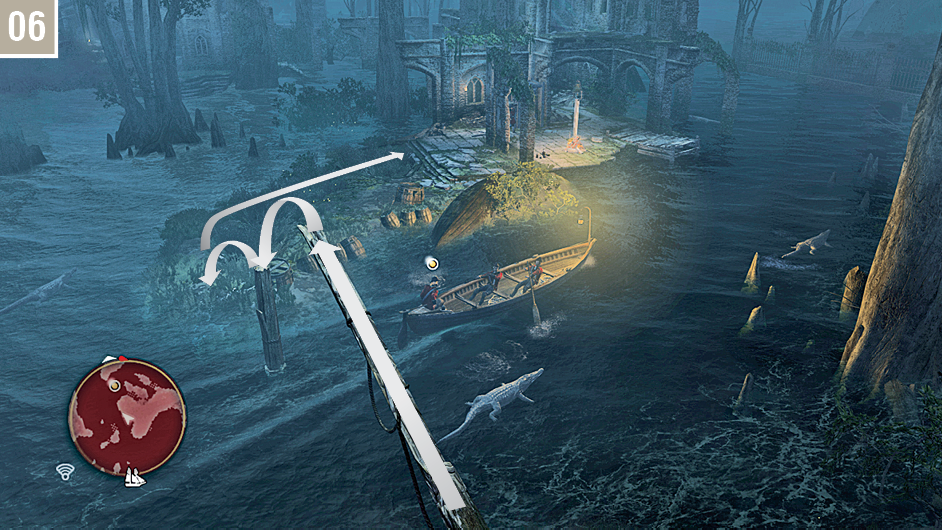
Safely cross the river via the wooden free run elements, then use the Stalking Zones to stay out of sight as you pass the soldiers.
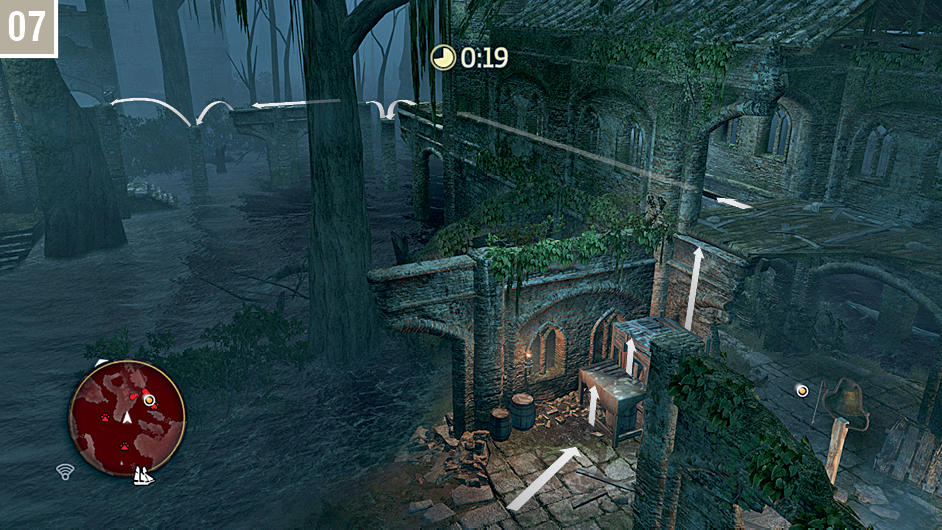
Run for the crates and climb into the building, then turn left – be careful here, as you’ll need to align Kenway with a narrow wooden beam – and free run to the other side. When you emerge, use the dilapidated masonry to reach the wall of the tumbledown church.
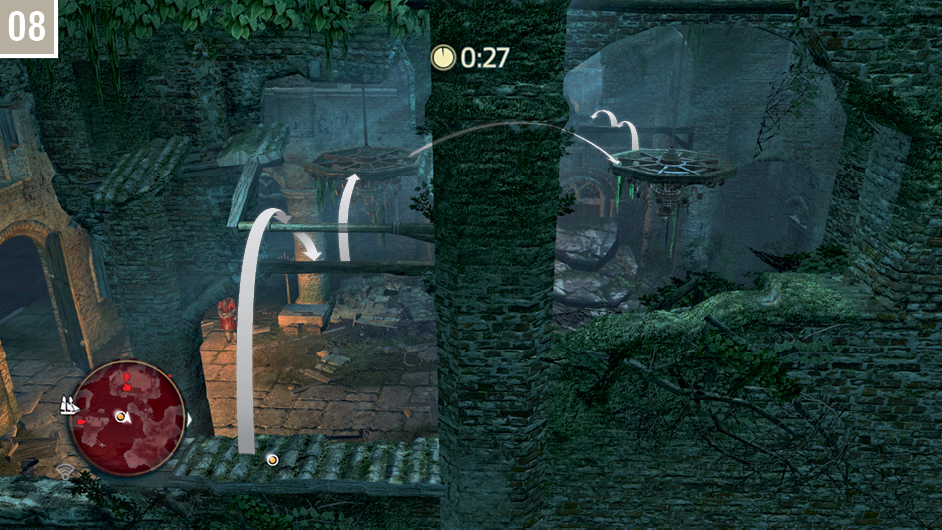
Swing via the wooden beam to reach a chandelier, then turn right to leap to another chandelier. Turn left and hop to the wooden beam, then jump to the gap in the wall. Continue free running in the same direction until Kenway lands in a Stalking Zone. There is a checkpoint at this stage.
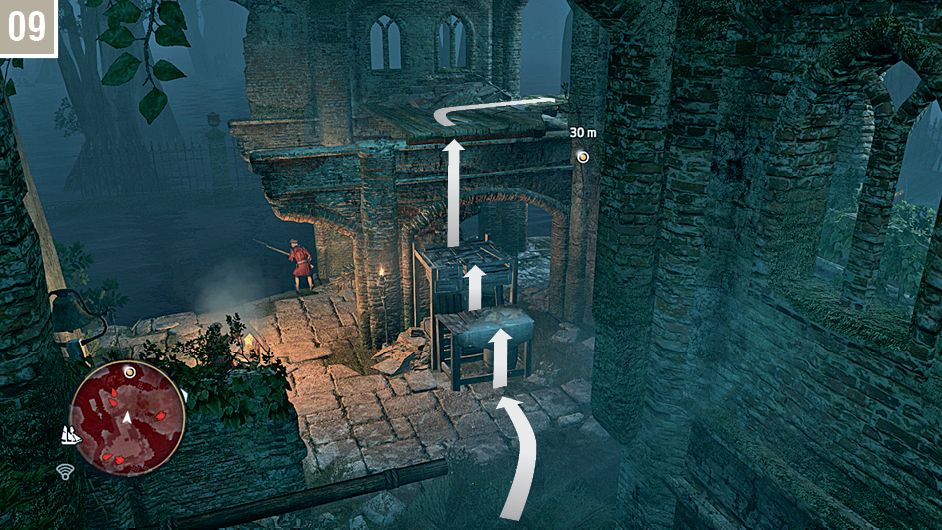
From the Stalking Zone, use the crates to reach the upper floor of the building directly ahead, then turn right.
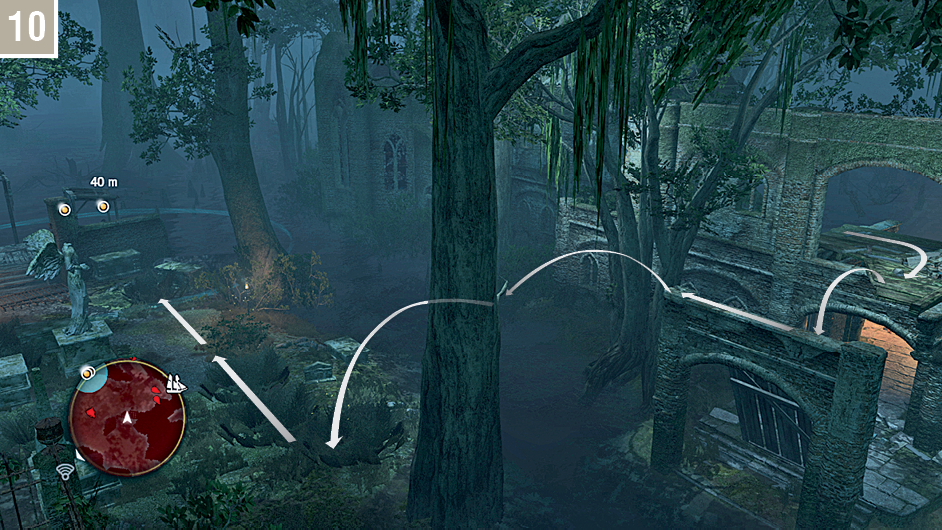
You may need to wait here to allow the boat to sail past. When it does so, use the branch on the tree to swing down to a Stalking Zone in the graveyard. You can now carefully make your way along the water’s edge until you reach a wall.
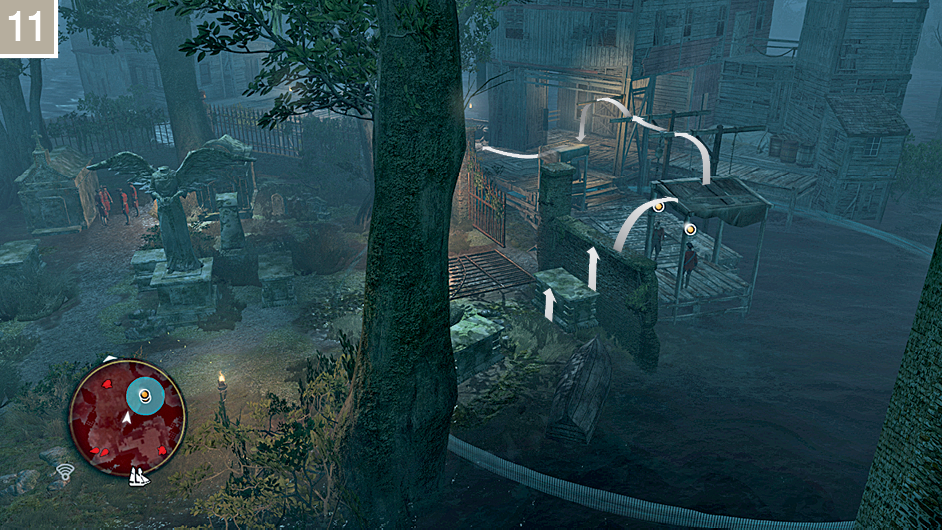
When you enter the eavesdrop circle, the soldiers will start walking. Begin by cautiously free running on the beams; stop and wait when they pause to converse. When they move on again, swing down to the ground and hide behind the wooden wall to the right before, once again, they stop to talk. Follow them and hide behind the nearby barrels. Shortly afterwards, the alarm is raised, and Kenway must pursue and kill the Captain.
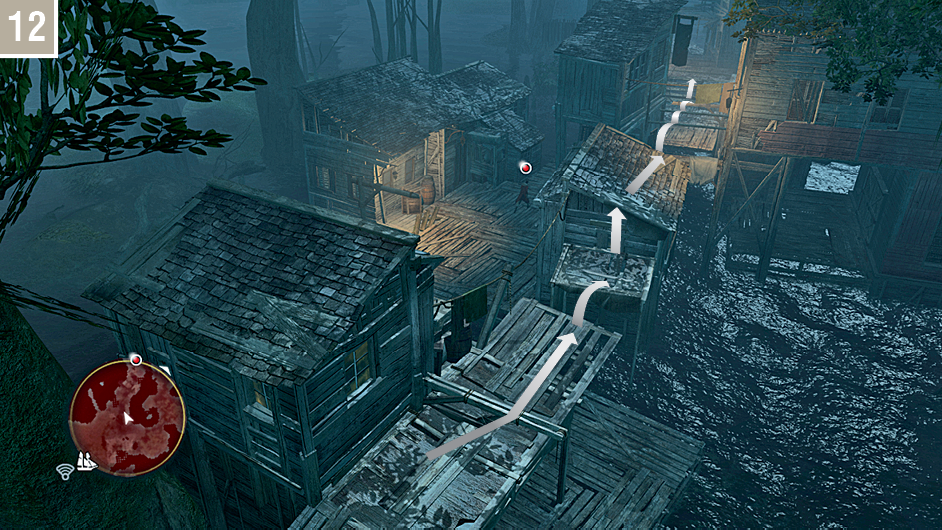
Early in the chase, after rounding the first corner, you will reach the free run course shown here. You cannot catch the Captain until a specific stage in the pursuit, so focus on swift, decisive movement to keep up with him.
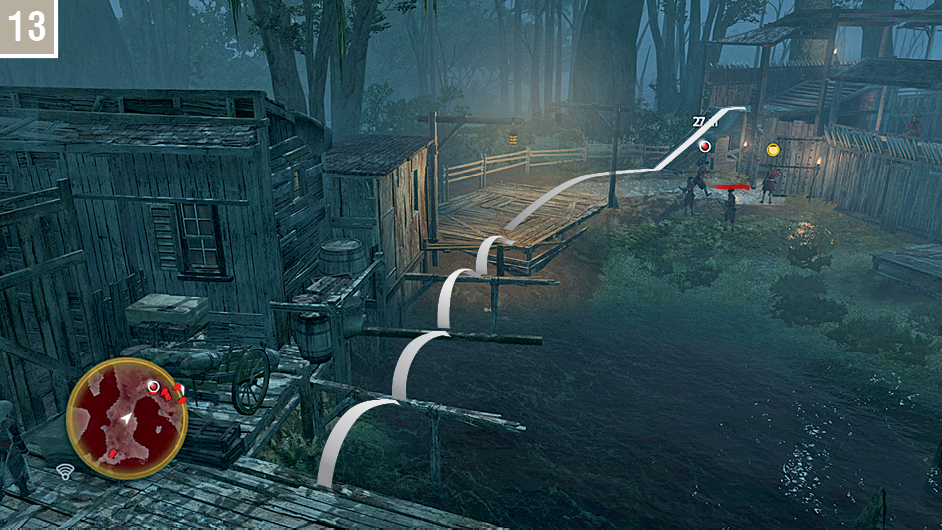
An explosion clears the path of assailants in this position, leaving Kenway clear to hop over the beams. When you approach the gate, use the upturned cart to the left to begin another stretch of free running.
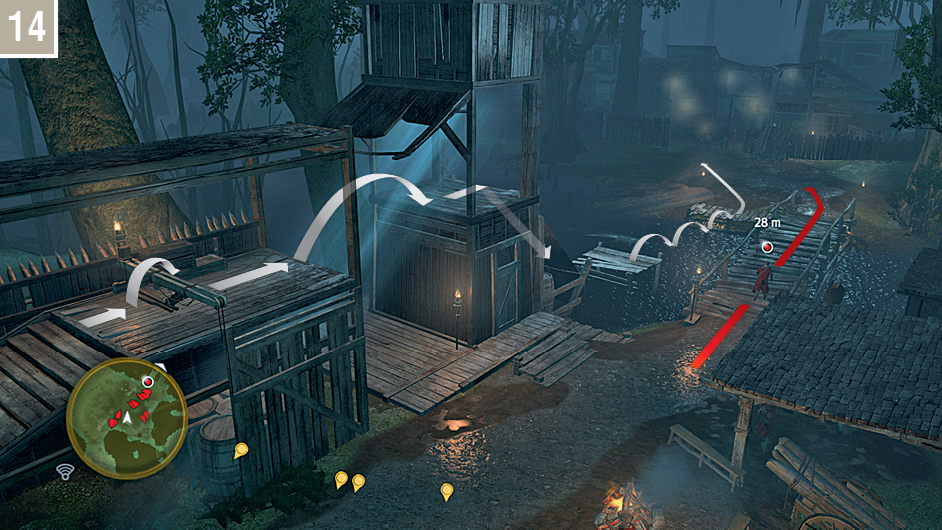
This stretch of the chase seems entirely straightforward at first, but there’s a unique feature here: when Kenway slides down the slope towards the crocodiles, press  to jump over them. Angle your approach to the left of the soldiers as you near the opening.
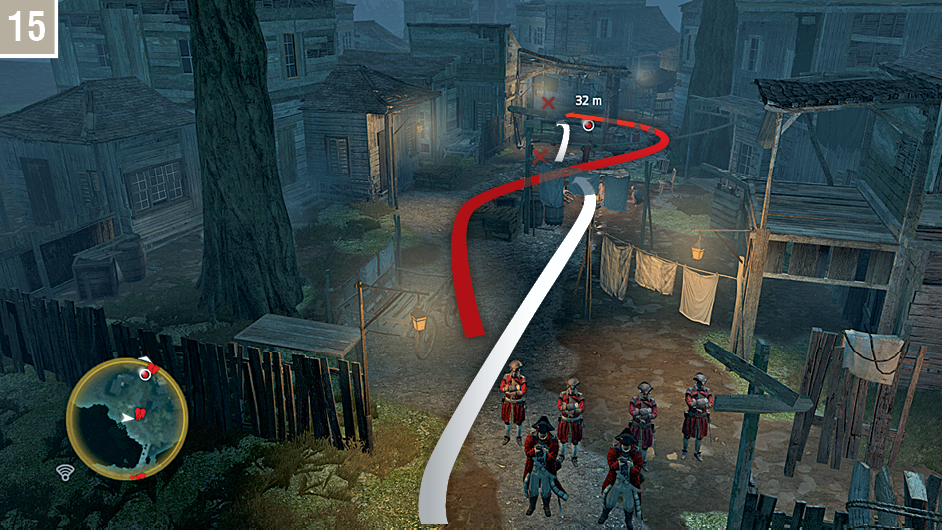
Once you pass the blockade at the gate, the Captain will begin to tire as he runs for his life. There are two potential assassination spots here. If you have made good time so far, you should catch him at the first.
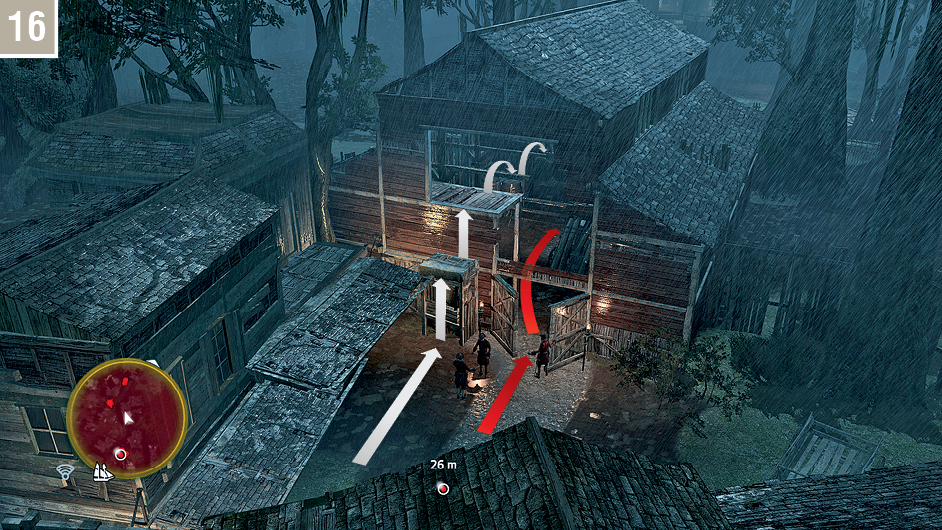
If the Captain eludes you and enters the warehouse, you have one last opportunity. Climb the boxes to the left, then free run over the beams; you should gain an air assassination opportunity before the Captain reaches the final gate. If you fail, don’t feel too annoyed: the checkpoint places you back at the start of the pursuit, and it’s always easier after an initial practice run.
Present Day: Part Three
Accompany Melanie to the CCO’s floor, then follow John from IT’s instructions to reach the security room and hack the camera control panel. The new hacking minigame requires you to select numbers that, when multiplied, add up to the target number. Use  to move between number groups, and
  to select individual figures. The broad strategy for this puzzle type is to infer the solution from the target number.
The solution here, if speed is of the essence, is 2-5-7. When the surveillance ends, use the window cleaning platform, as directed, to reach Olivier’s office and hack his computer. This introduces the third and final style of hacking minigame, where you must use  to “transfer” data from the left side of the screen to the right. Red lines represent security programs that will destroy your data, returning it to the left side of the screen. You will also notice wavy blue lines. These are safe in this state, but will regularly become active security programs (solid red lines). Time your approach carefully to take this hazard into account.
As before, return to the lobby to deliver the data to the courier. You now have Security Level 2 clearance, which opens new doors in the lobby area and on the Sample 17 floor. Explore these and the secrets they might yield if you wish. When you are ready, return to your Animus to continue Kenway’s story.