
Assassin's Creed IV: Black Flag Guide Walkthrough
Sequence 04
PREVIOUSLY...
Assuming the captaincy of the El Dorado, now dubbed the Jackdaw, Kenway names Adewalé his quartermaster and sails for Nassau, a pirate haven. After expanding its crew and taking his first “prizes” as captain under the tutelage of his associates Benjamin Hornigold and Ed Thatch, Kenway meets with James Kidd, who suggests that he raid a sugar plantation to turn a quick profit.
Ed Thatch – not yet the Blackbeard of legend, perhaps, but still an imposing figure in the burgeoning community – proposes that the pirates steal a powerful Spanish galleon to improve Nassau’s ability to defend against incursions by crown forces. When Kenway recognizes Julien du Casse on board, however, he resolves to murder the Templar before he can be identified. After crossing the island of Great Inagua by foot, eluding Spanish patrols, he strikes his quarry down on the deck of the galleon anchored in the cove. The other pirates are then free to launch the assault… and the story resumes with Kenway taking a siesta in its aftermath.
Memory 01 “This Old Cove”
Mission Overview
Notes & Further Reading
- This short Memory has no Optional Objectives.
- There are three major feature unlocks once this mission ends. The most obvious of these is the acquisition of Kenway’s Great Inagua hideout. While you have the option to upgrade the facilities in the cove village immediately, we strongly advise you to save your reales for Jackdaw upgrades, and leave Great Inagua until much later in the story.
- You can also now take part in Templar Hunts: four major side quest chains that consist of multiple missions. Complete each self-contained story, and you gain a key for the door inside Kenway’s new abode; finish them all, and you can acquire the Templar Armor.
- You can also begin collecting Mayan Stones by completing Mayan Stela puzzles, though their purpose isn’t revealed until the end of the Sequence. We document the locations of these in the Charts & Collectibles section of the Side Quests chapter.
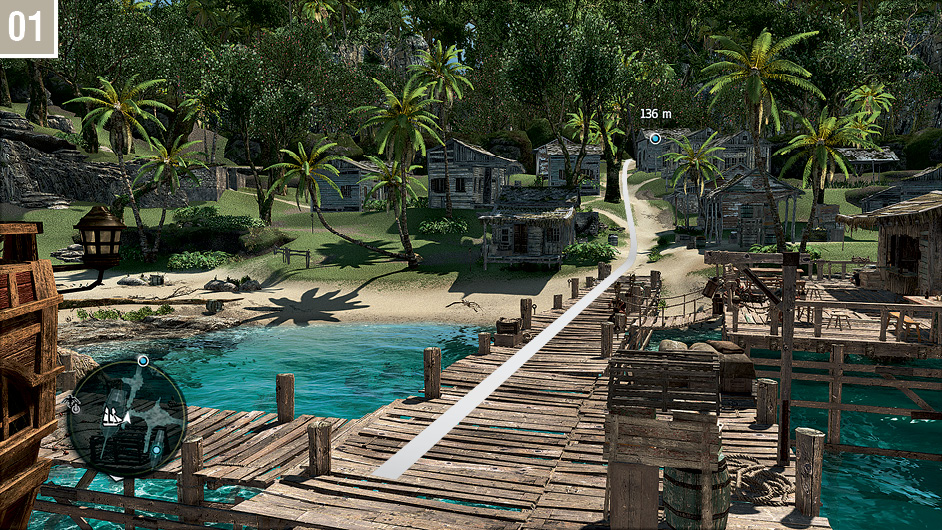
Follow James Kidd into the jungle: the entrance is at the south end of the main path that leads through the center of the village. Once you catch up with the pirate, follow him through the gap in the rock face to arrive at a curious arrangement of pillars; approach him to trigger a cutscene.
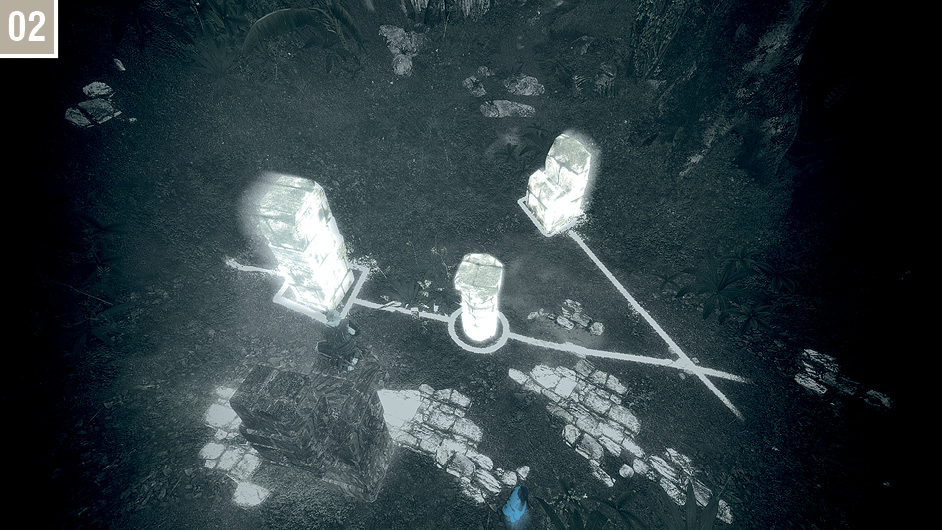
Use Eagle Vision to identify the Stela, then climb on top of it and tap  to activate a puzzle. The solution is shown above. You can then claim your prize from the waypoint marker.
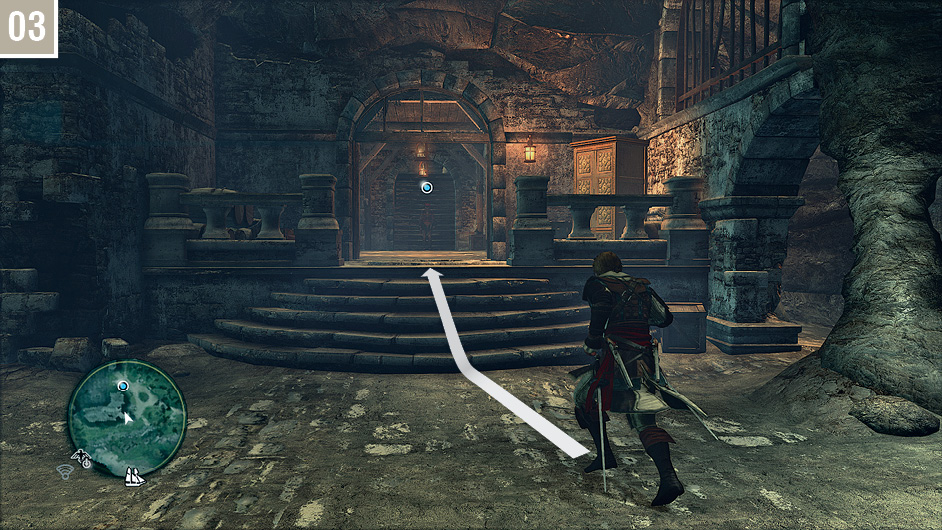
Once again, keep up with James Kidd as he runs along a path to the north, through a cave. Enter via the opening shown here, and up two flights of stairs to trigger another cutscene.
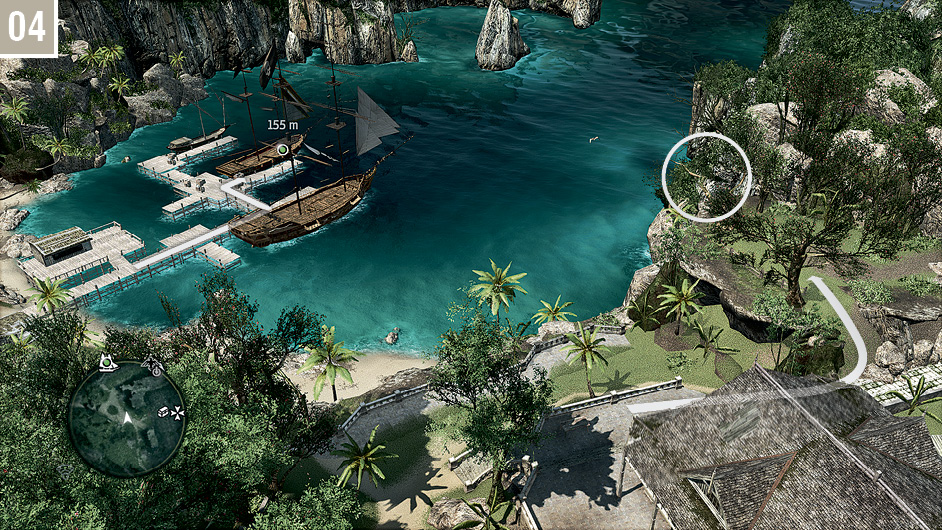
To conclude this short Memory, reconvene with Kidd at the docks. When you leave the mansion, it’s a good idea to Synchronize with the Viewpoint to the north of the building on your way to the beach: this reveals the map for the entire cove and the jungle to the south.
Memory 02 “Nothing Is True…”
Mission Overview
Optional Objectives
- Open four Treasure Chests.
- Knock out three Assassins.
Notes & Further Reading
- Starting this Memory begins an unbroken sequence of three missions where you cannot free roam or attend to other activities. However, as completing them also enables you to unlock an important new weapon, it’s worth your while to do so.
- After you sail from Great Inagua, you gain the ability to capture ships and send them to Kenway’s Fleet.
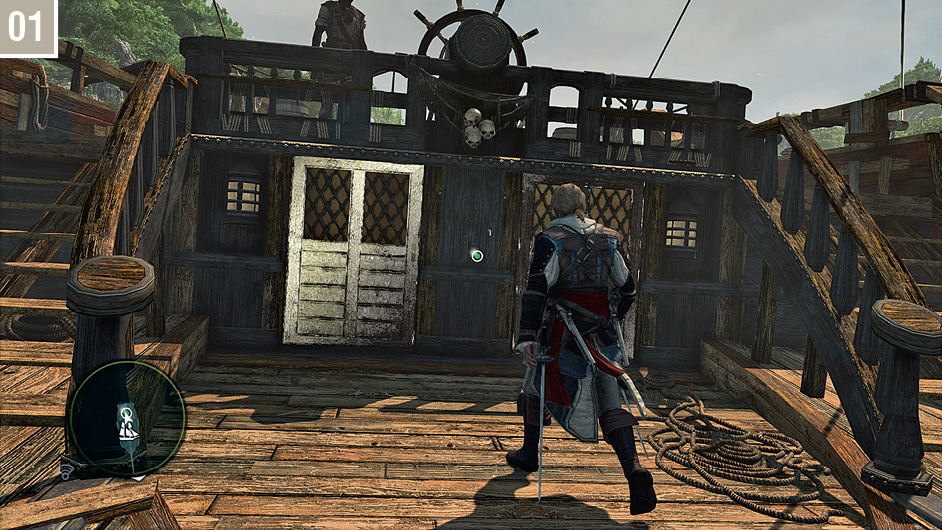
When you are ready to begin, climb on board the Jackdaw and head out to sea. After the conversation with Adewalé, enter the Captain’s Cabin and interact with the map. This feature requires an active internet connection, and relevant online service subscriptions or sign-ups for console formats. If you are not connected, there’s nothing to do here for now; if you are, you are given an introduction to the Kenway’s Fleet metagame.
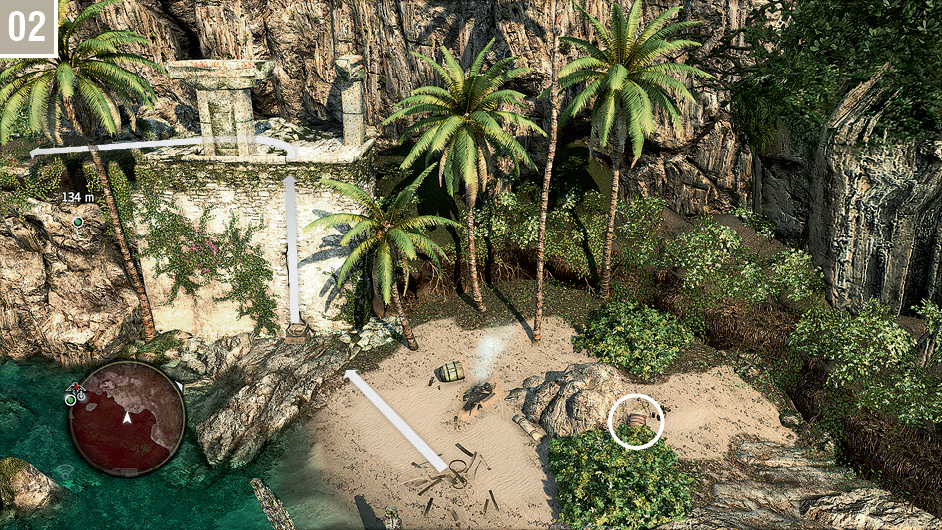
When you are ready to continue with the story, you have a long journey to Tulum on the far west side of the Caribbean map. You might like to take this opportunity to sail there, paying Naval Forts a wide berth and discovering a few new locations during the trip. If you would prefer a more direct route, Fast Travel to Cape Bonavista (north of the  icon), then slip past the Naval Fort at Conttoyor to reach your destination. On arrival at the waypoint at Tulum, sail towards the beach to formally begin the Memory. After looting the nearby Treasure Chest to begin working on the main Optional Objective, climb the wall and carefully enter the Stalking Zone to the west.
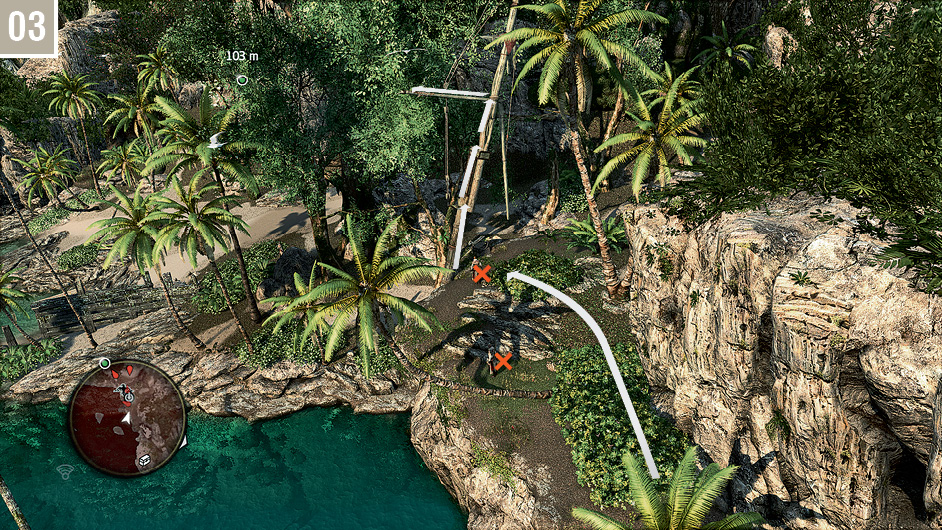
Killing an Assassin will lead to automatic Desynchronization, so ensure that Kenway’s fists are selected as your active weapon at all times. Wait until one of the two moves away, then attract the stationary Assassin with a whistle and then disable them; you can then do the same with the remaining man. Climb the ship’s mast and Synchronize at the Viewpoint position.
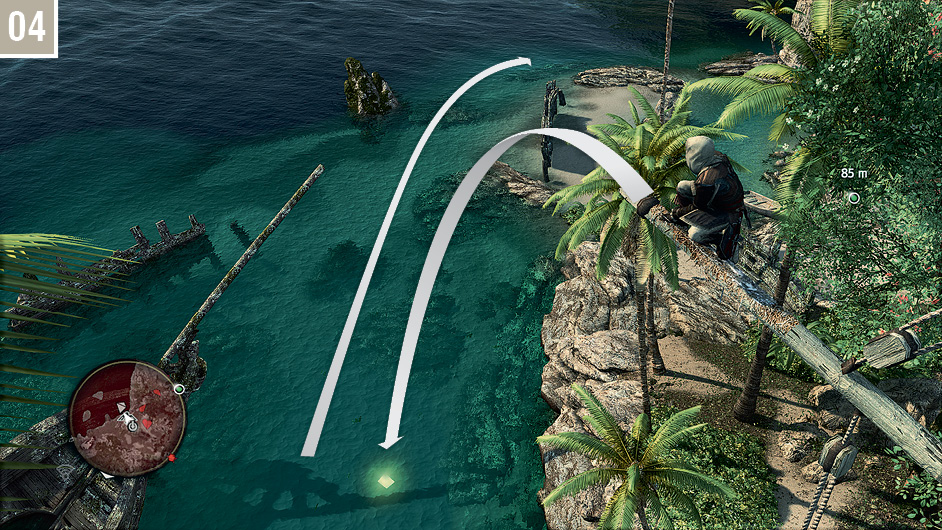
Though it’s relatively easy to negotiate the patrols on the beach (with a little selective cracking of skulls), it’s much faster to simply swim past. Perform a Leap of Faith into the water below (collecting an Animus Fragment during the dive), then swim on the route shown here. The Assassins shouldn’t notice Kenway, but you can hold  to submerge beneath the surface if they do.
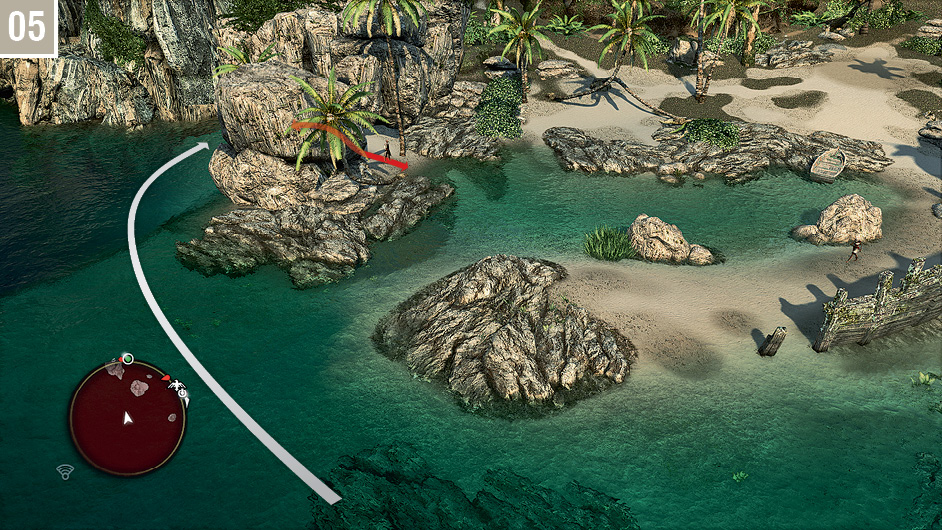
Swim behind the rocks and watch the guard while submerged or behind a rock. The Assassin here walks a short patrol. When his back is turned, emerge from the water and incapacitate him from behind. You can find a second Treasure Chest for the Optional Objective to your left before you walk through the natural rock arch.
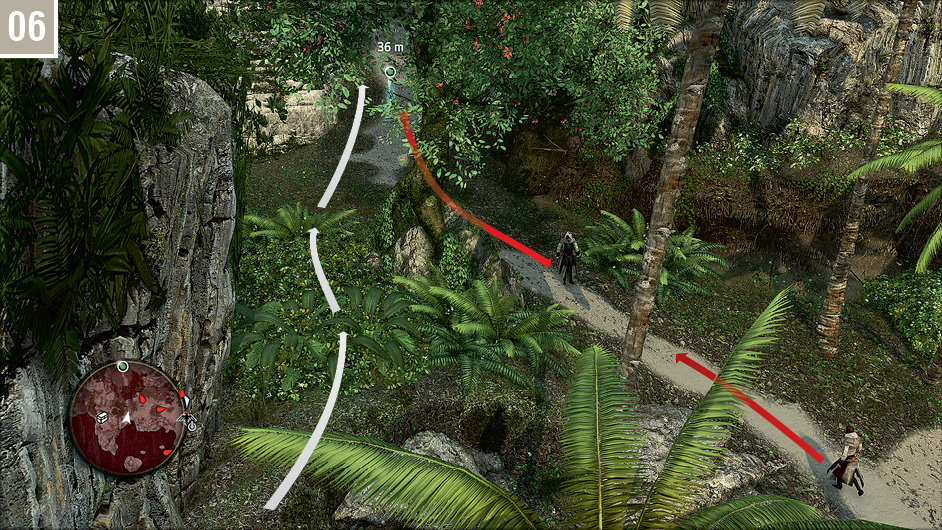
Enter the Stalking Zone on the slope. There are two Assassins patrolling in this area. You can safely whistle from the final Stalking Zone and incapacitate the individual closest to the waypoint if you wish, though it’s probably easier to just sprint by when he faces away. Follow the linear path until you reach another marker, then immediately move into the Stalking Zone to your left on arrival.
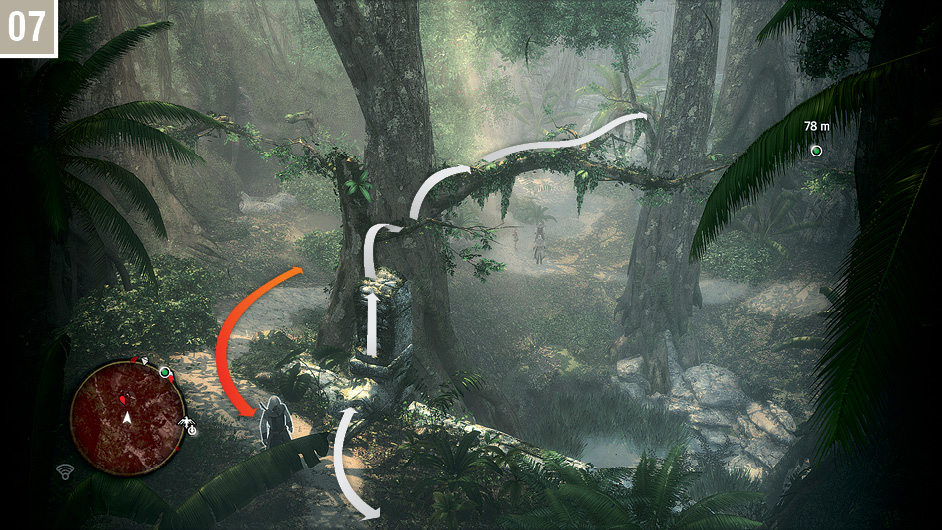
Quickly check to ensure that the Assassin on the slope is facing away, then use the broken pillar to reach the free run course through the trees. Head north, without pause, until you reach the V-shaped section.
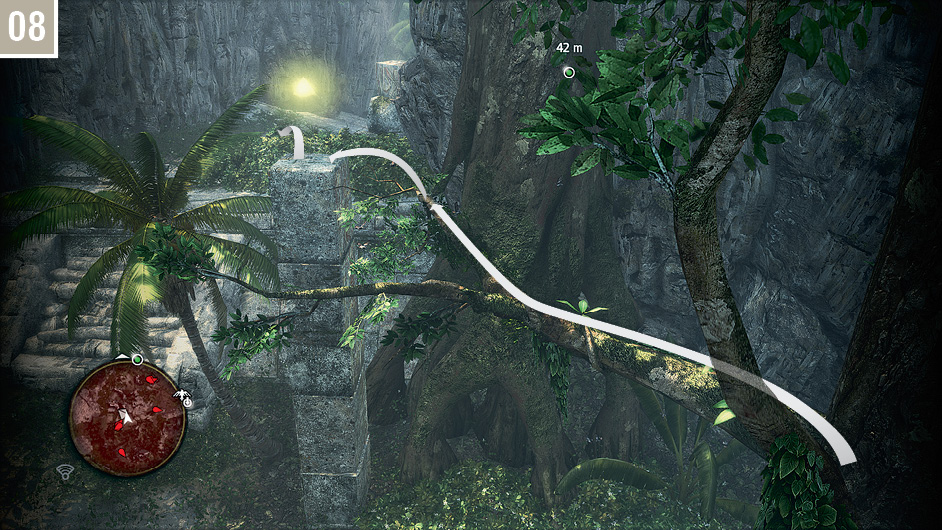
Move purposefully to the Stalking Zone back on solid ground. Don’t worry about suspicion from other Assassins in the area: you can be out of sight before they can identify Kenway.
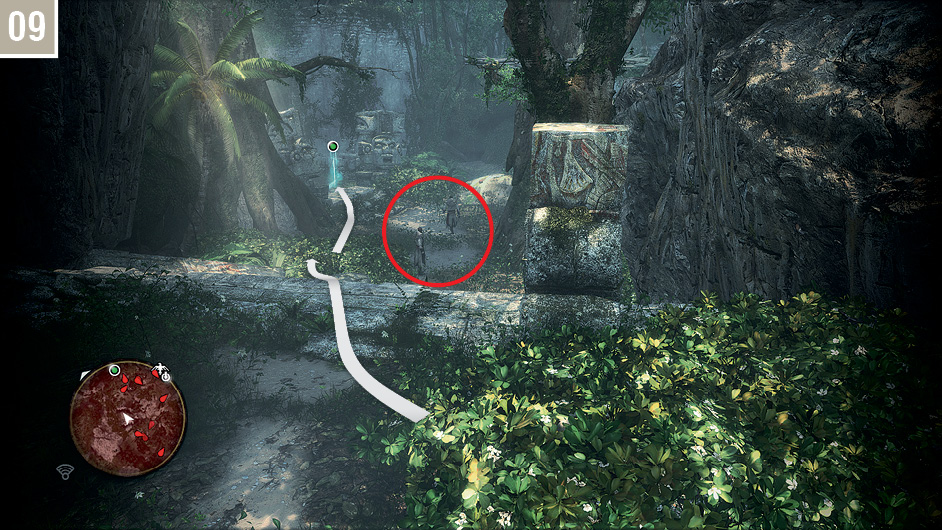
Watch the two Assassins ahead of your position. When they turn to walk away, sprint for the next Stalking Zone, staying to the left to avoid attracting attention. You can now easily neutralize both guards from this position, then stroll to the next waypoint.
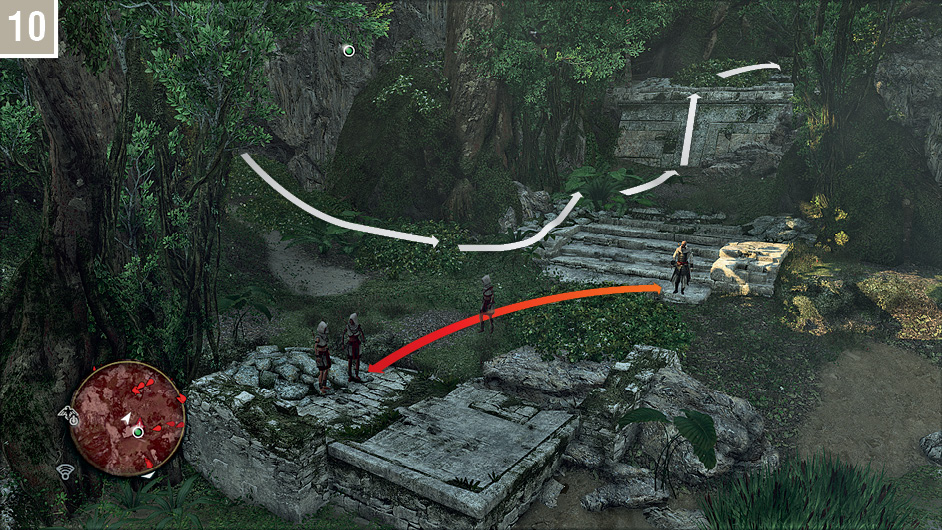
When the path leads to this open area, follow the run of Stalking Zones and watch the guards directly ahead. When the patrolling Assassin walks to her two comrades, quickly sprint around the corner and climb the wall.
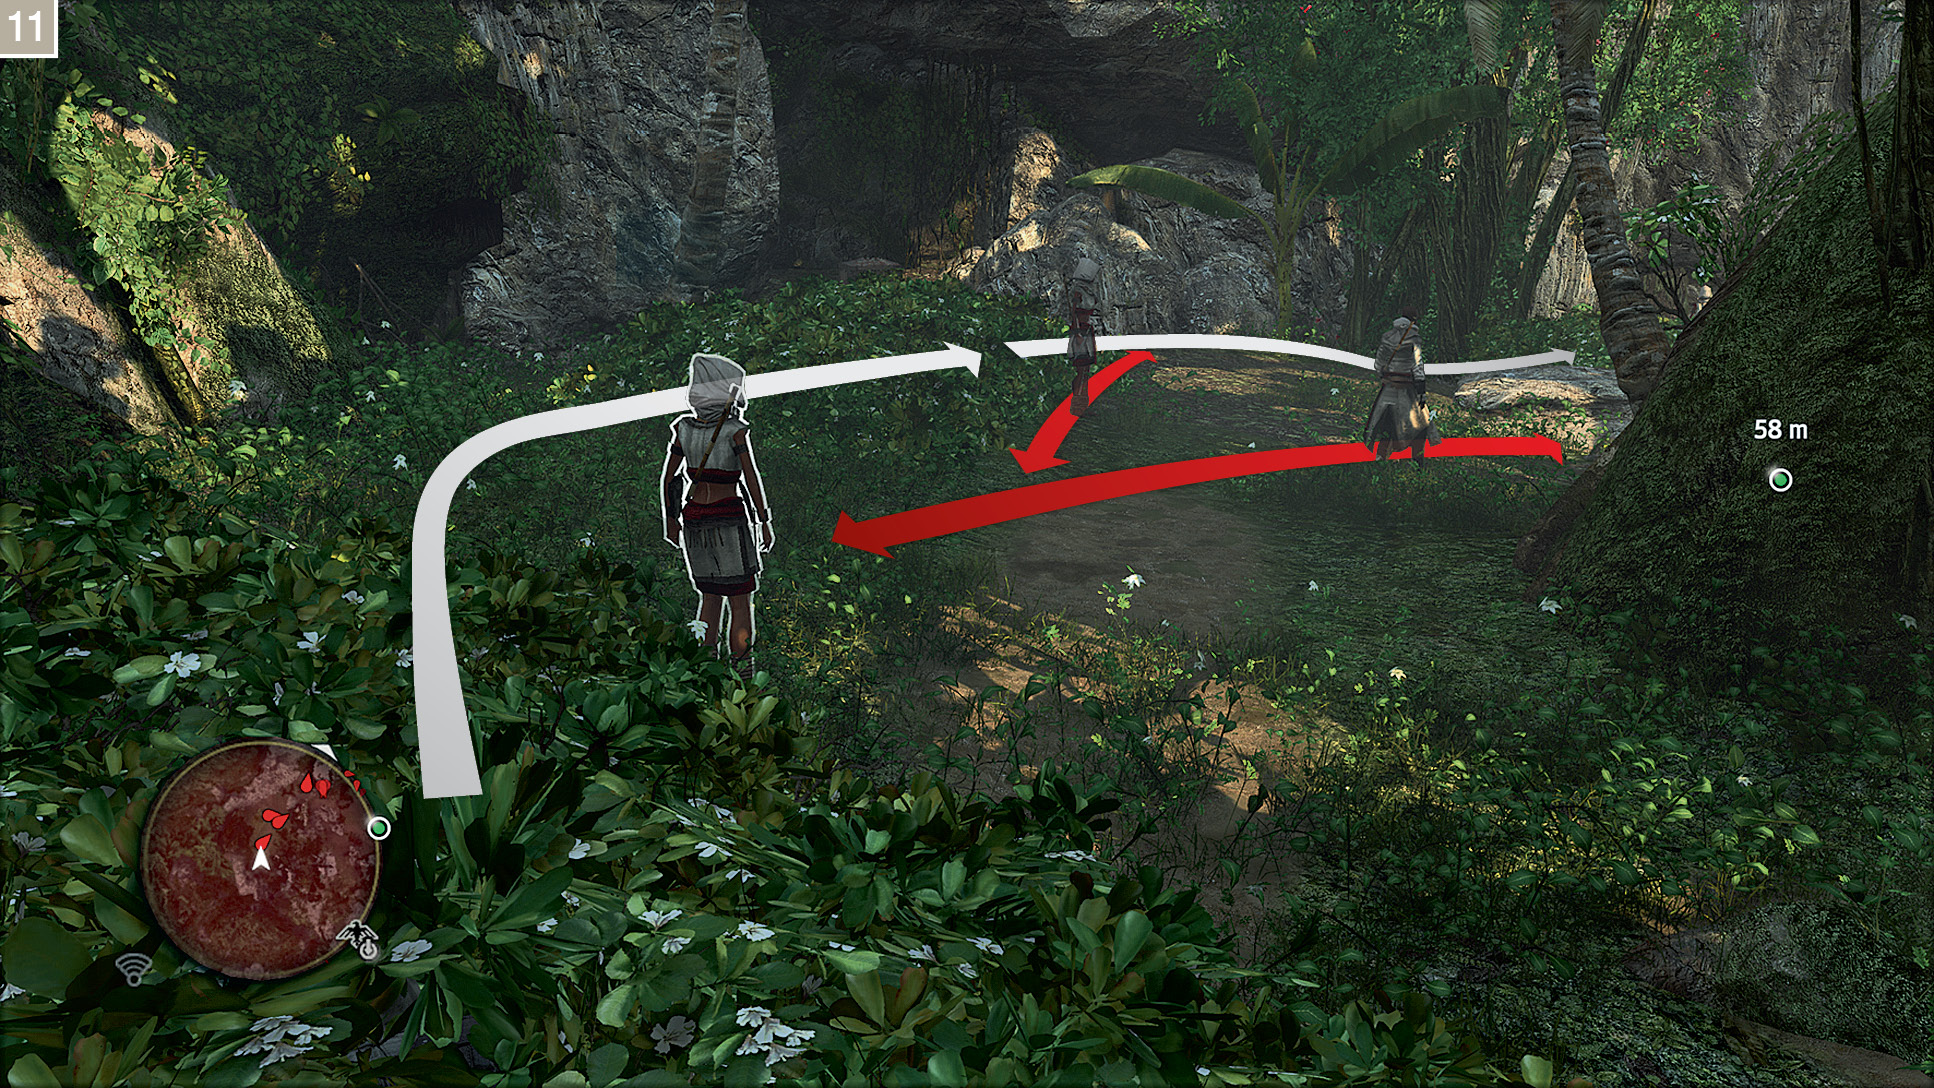
There are three Assassins to incapacitate in this area. When one of the two in front of you sets off on a patrol (route marked here), quickly move up and knock out the closest Assassin. Lure the patrolling guard into the Stalking Zone with a whistle when he returns, then press forward into the next Stalking Zone to neutralize the third when she faces away. You will find another Treasure Chest for the Optional Objective just off to Kenway’s left before you press forward. For the rest of this mission, note that using Eagle Vision can make the process of spotting and keeping track of your targets much easier.
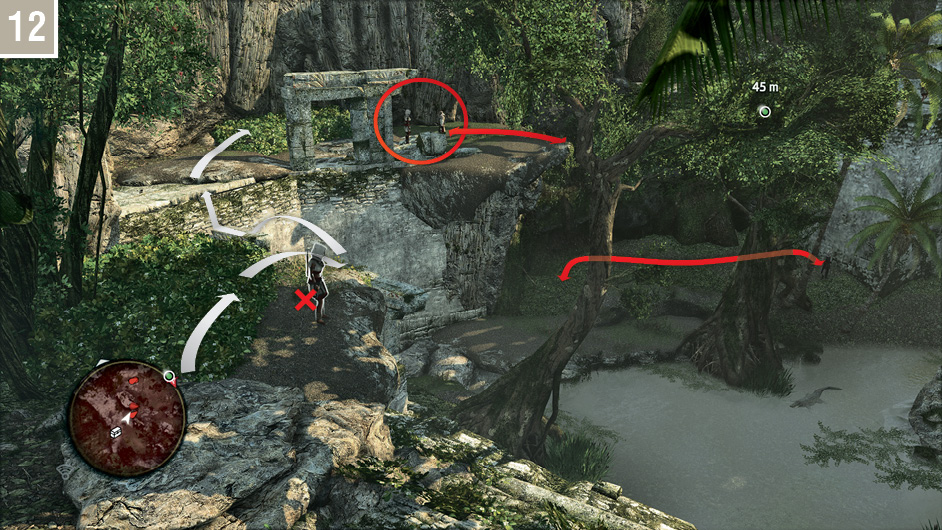
Sneak into the Stalking Zone by the edge, knock out the Assassin sentry, then watch the two patrols marked on the accompanying screenshot. When both Assassins face away at the same time, free run via the marked course and sprint into the Stalking Zone.
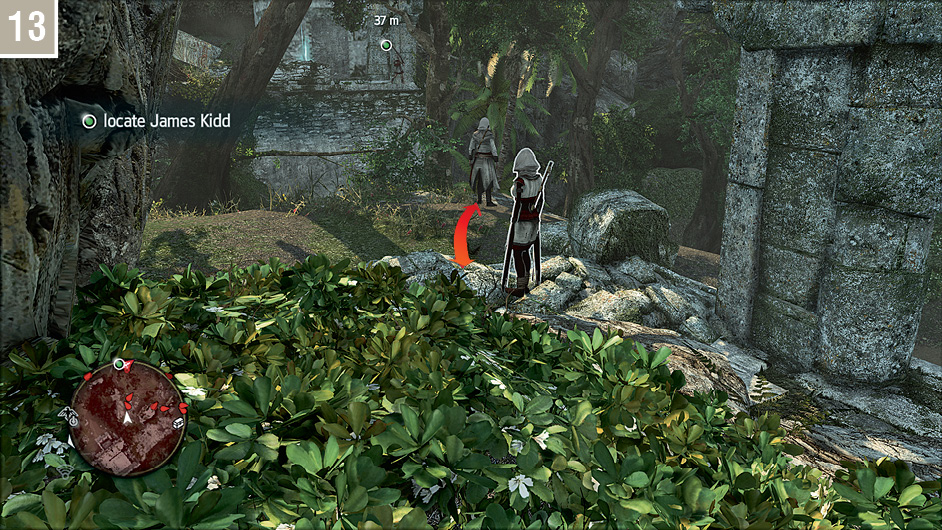
Incapacitating these two guards is slightly more technical than before. Hang back in the more distant reaches of the Stalking Zone until the patrolling Assassin has taken several steps away before you whistle to lure the stationary guard to your position, and be quick to strike; if you whistle too close, or too soon, you may attract both Assassins. If the first strike passes without incident, you can then whistle again to entice the second target over.
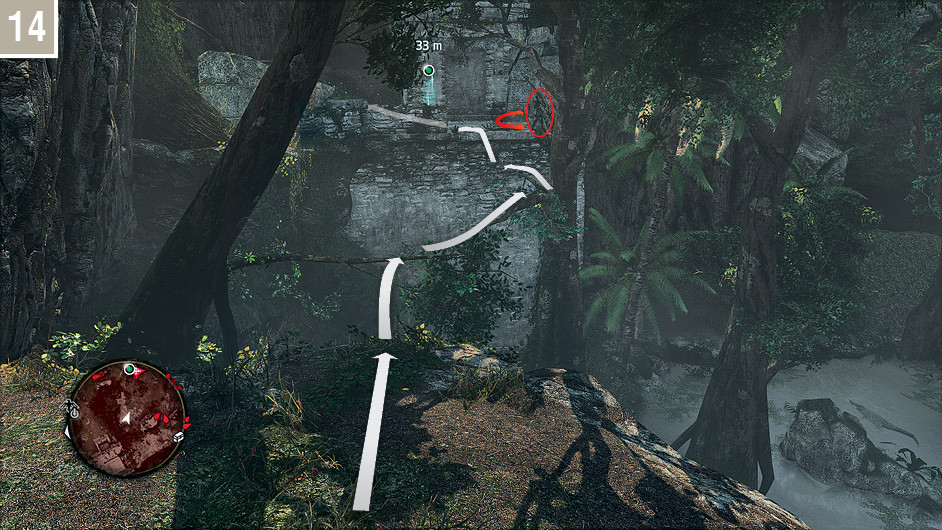
The next step requires precision timing. From the Stalking Zone, watch the Assassin marksman to the east, right next to the waypoint. When she turns to walk to the furthest section of her short patrol route, immediately follow the free run course shown here. You can optionally incapacitate the Gunner after you land, but you don’t actually need to do so – there is a checkpoint at this precise position.
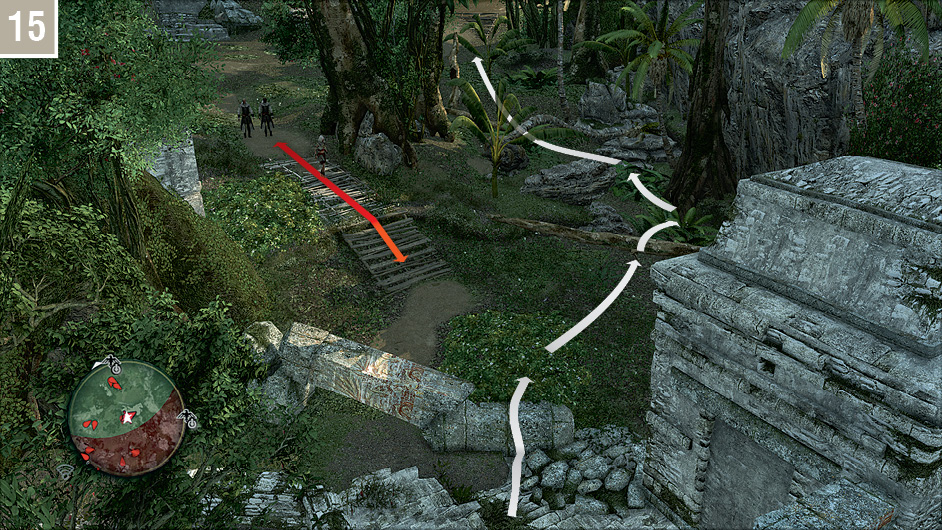
Sprint past the broken pillar, duck beneath the broken branch and run up the slope to avoid detection by the three Assassins.
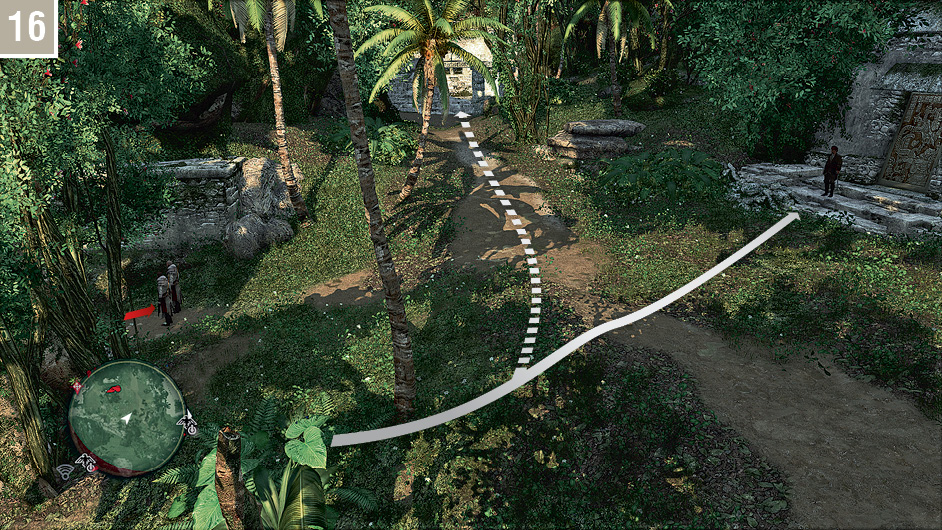
You can now either run straight to James Kidd and press  to move to the next Memory, or take a detour to the west to complete the remaining Optional Objective.
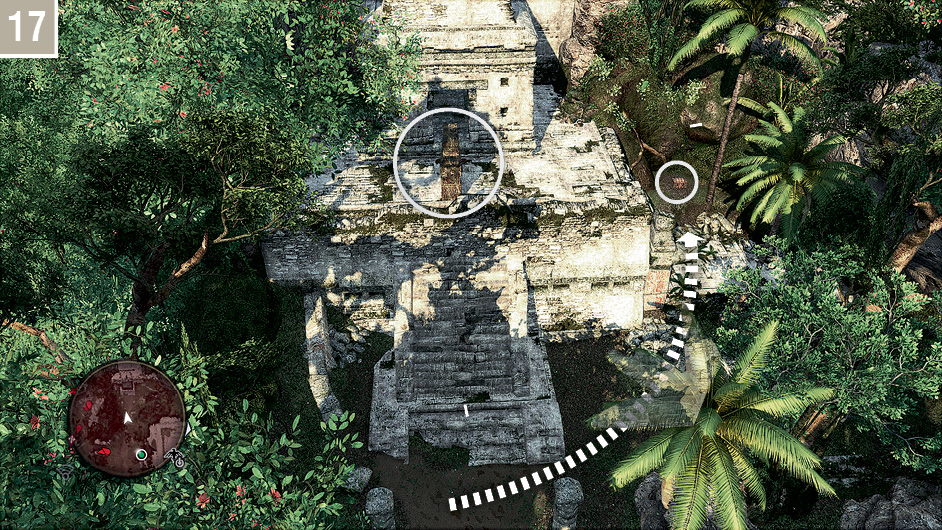
The final Treasure Chest can be found to the right of the ruins. There is also a Mayan Stela puzzle that you can solve here before you backtrack to Kidd’s position.
Memory 03 “The Sage’s Buried Secret”
Mission Overview
Notes & Further Reading
- Although the transition is seamless, this Memory begins as soon as Kenway and James Kidd enter the temple.
- There are no Optional Objectives for this Memory.
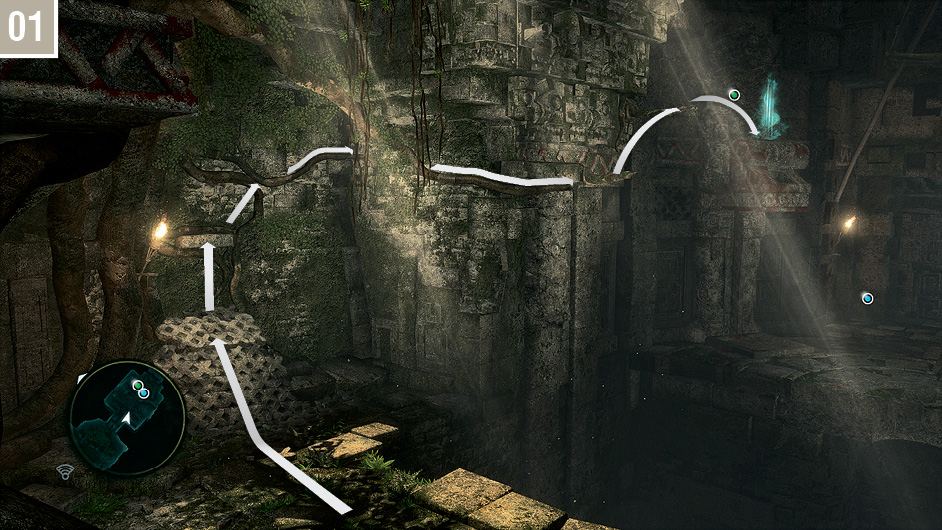
Accompany Kidd into the temple, following the Assassin’s lead until he and Kenway are briefly separated by a gap that is too wide to leap. You can then follow the path illustrated here to reach the waypoint, opening the way forward.
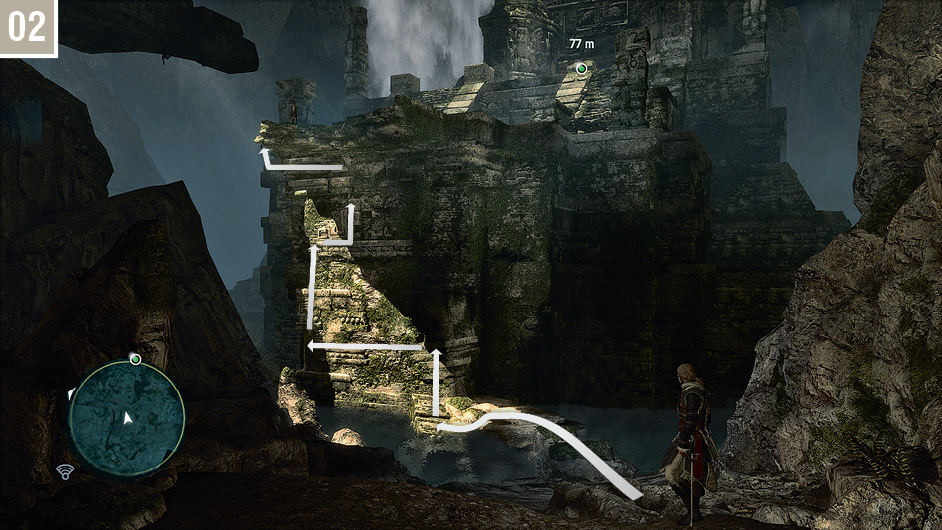
Once again, follow the route taken by Kidd. After the jump into the water, note the appearance of a new icon on the mini-map: this is an air pocket. Hold  to submerge beneath the surface of the pool, then control Kenway’s motion with
  and his direction with
  . Swim to the air pocket icon, where Kidd awaits, then tap
  to surface for a few breaths of stale air. You can also hold the High Profile Button to swim faster. Follow Kidd on the second part of the swim to reach a huge cavern, where you must lead the climb to a waypoint marker. Follow the route shown here to reach it.
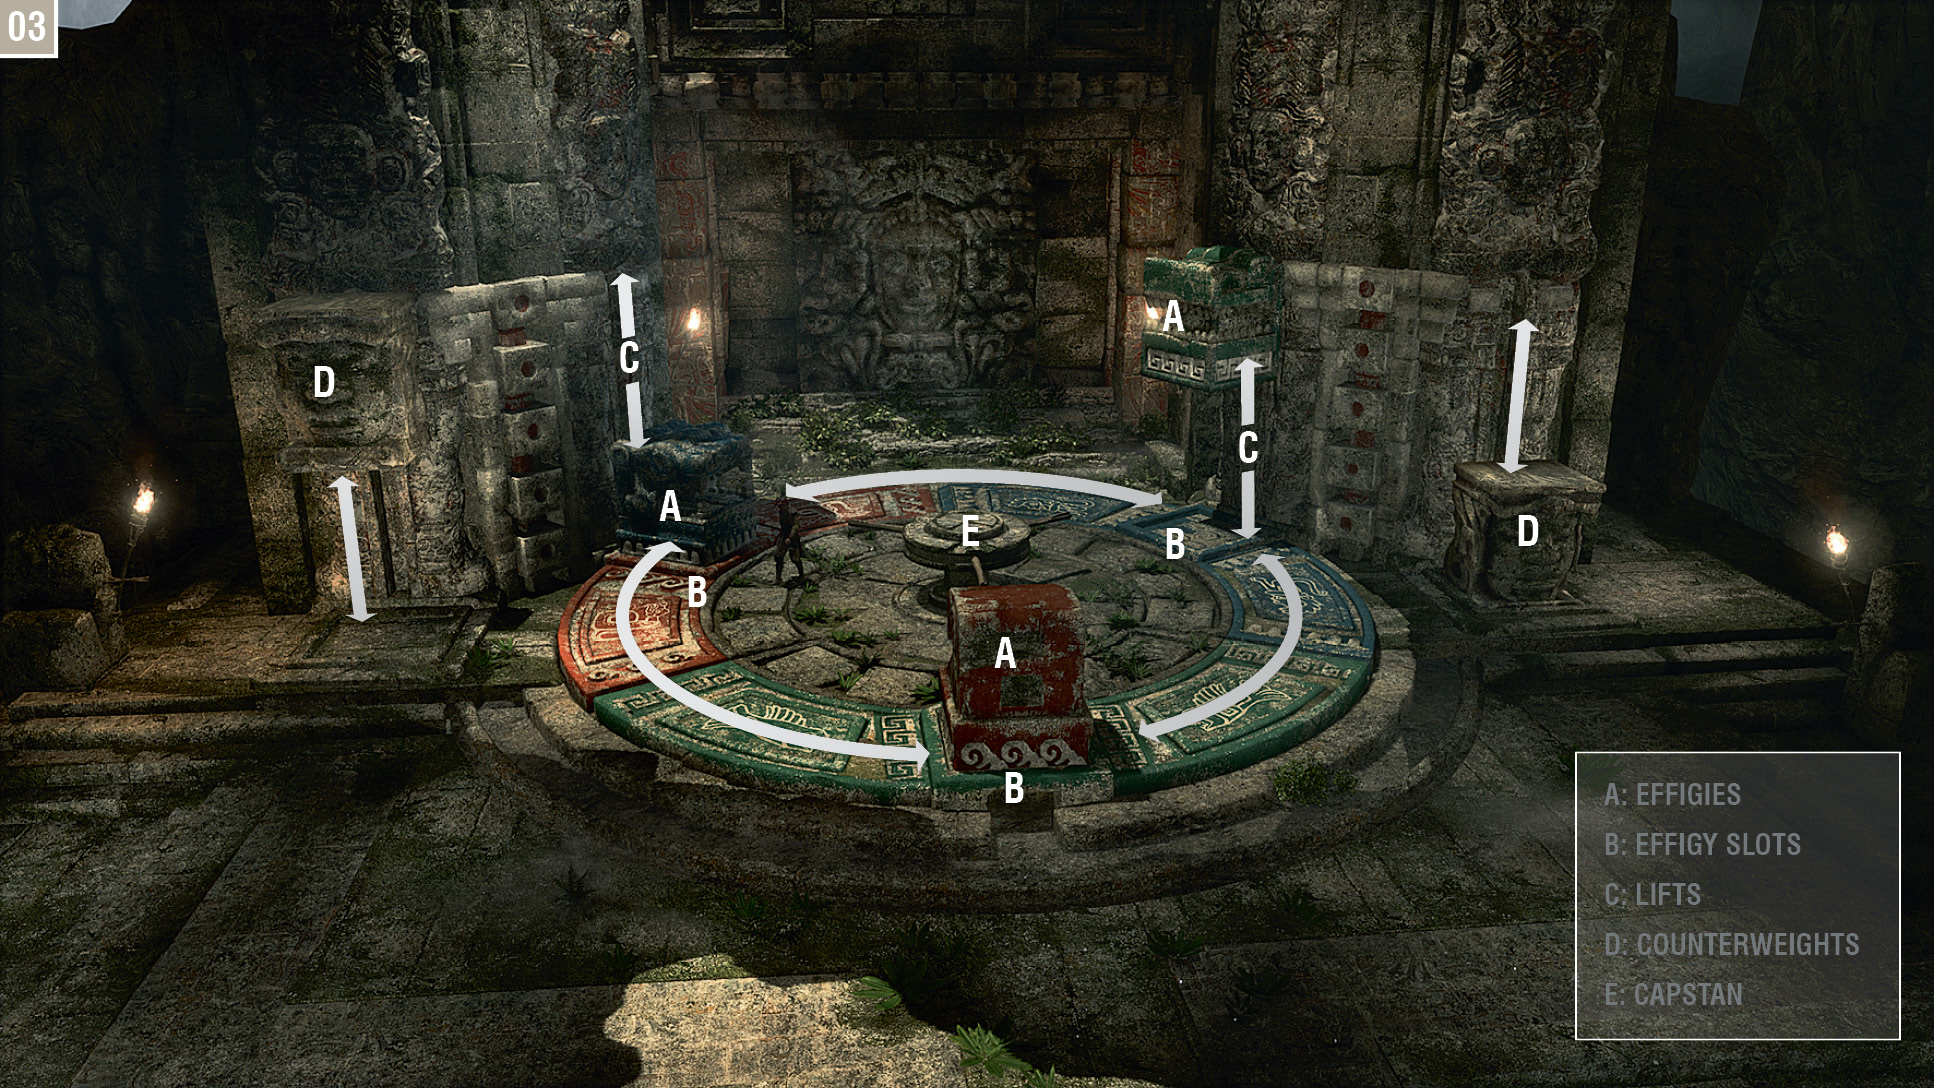
There is a puzzle to solve to complete the Memory. As the color-coding immediately suggests, you must move the three effigies into their appropriate slots. To do this, you must utilize the capstan at the center to rotate the disc, and the lifts on either side of the circle to raise and lower the effigies, as required. To raise an effigy, you climb onto the nearby counterweight; to lower one, climb onto the effigy itself. It’s a fun puzzle, and not one that should take too long. If you get stuck or feel too impatient, feel free to just follow the direct solution detailed here:
- Climb onto the left-hand counterweight to raise the blue effigy.
- Turn the capstan anticlockwise once to align the blue slot with the blue effigy above, then climb onto the blue effigy to drop it into position.
- Rotate the capstan anticlockwise once again, then climb to the left-hand counterweight to raise the red effigy.
- After another single anticlockwise rotation of the capstan, climb on the left-hand side and grab the red effigy to make it descend to its rightful position.
- Finally, after an anticlockwise rotation, climb up to the right and drop the green effigy to trigger the closing cinematic.
Memory 04 “Overrun And Outnumbered”
Mission Overview
Optional Objectives
- Use eight Sleep Darts on guards.
- Use two Berserk Darts on guards.
Notes & Further Reading
- Once again, this Memory begins immediately.
- You obtain the Blowpipe at the start of this Memory, a versatile and, most importantly, silent weapon that facilitates interesting tactics whenever stealth is necessary or desired.
- At the end of the Memory, James Kidd introduces Assassin Contracts – a majorform of side quest. These can be found in many locations throughout the Caribbean. Kidd also reveals the purpose of the Mayan Stones: they are used to unlock a door in the ruins at the heart of the Brotherhood camp.
- Before you depart Tulum, search the area east of the temple Viewpoint to find capuchin monkeys in the trees; Eagle Vision makes this extremely easy. Shoot and skin two of these, and you can craft the Berserk Dart II upgrade.
 Follow James Kidd to trigger a cutscene. When this ends, Kenway takes possession of the Blowpipe. Follow Kidd’s instruction to hit the approaching soldier with a Sleep Dart. Hold the Manual Aim Button and use
  to move the target over any point of the victim (note how the target is red when you are within range), then press the High Profile Button to fire. As with the pistols, you can also tap
  at close range (when a target is highlighted) for a snap-shot.
Note how Kidd kicks the incapacitated guard: this is an important clue. Sleep Darts only render the target incapable of action for a short period of time, as indicated by the circular meter. They will wake when this time expires, or if roused from their stupor by an ally. To knock them out permanently, move close to them and press  for a decisive kick. Berserk Darts take effect after a short delay. The afflicted target will then engage anyone – friend and foe alike – in combat until incapacitated, or the timer expires.
Every time you free a group of Assassins (but not pirates) in this Memory, your stocks of both dart varieties are automatically replenished. You can also occasionally regain Blowpipe ammo by looting the bodies of your enemies, or by searching dead Assassins. If you have taken the time to hunt animals and obtain bones, you can even create them via the crafting menu.
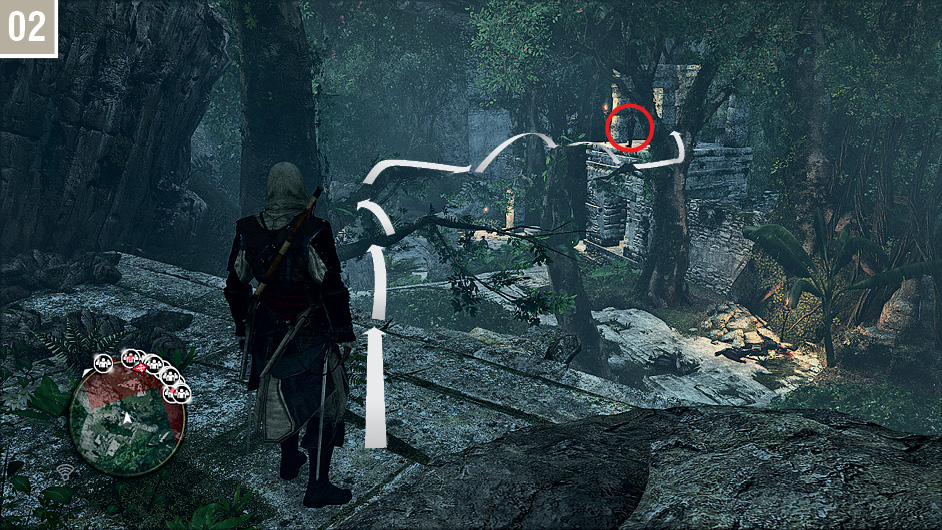
You must now free 14 captives, with one major complication: the soldiers (particularly those with rifles trained on their hostages) will attempt to kill any Assassins or Jackdaw crew members if they spot Kenway. Each hostage death will cause the “casualties” meter to deplete: once empty, you fail the mission. For this reason, you’ll need to avoid open conflict in favor of creative Blowpipe use. From your starting position, make a dash for the Gunner stationed on the nearby tower. You should be able to reach and assassinate him before he looks your way, though there’s no shame in firing a Sleep Dart to err on the side of caution as you move within range.
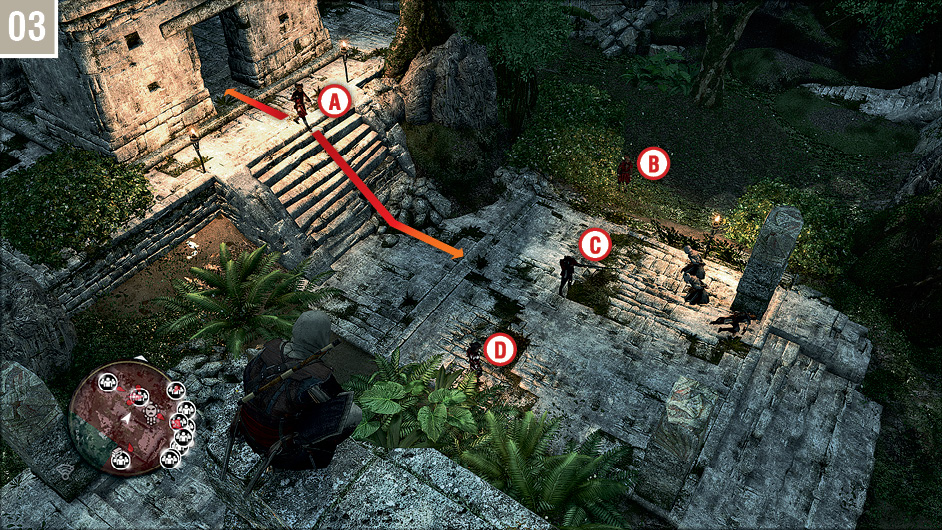
From your vantage point, you have a commanding view of the situation below. Equip the Sleep Darts. Shoot the patrolling soldier first ( ), then the soldier on the far side (
 ), then the marksman with his rifle trained on the captive Assassins (
 ), then target the final soldier directly below your position (
 ). Quickly knock out the drugged soldiers, then free the two captives in the open. Don’t neglect to free the lone Assassin in the tower to the northwest before you press on.
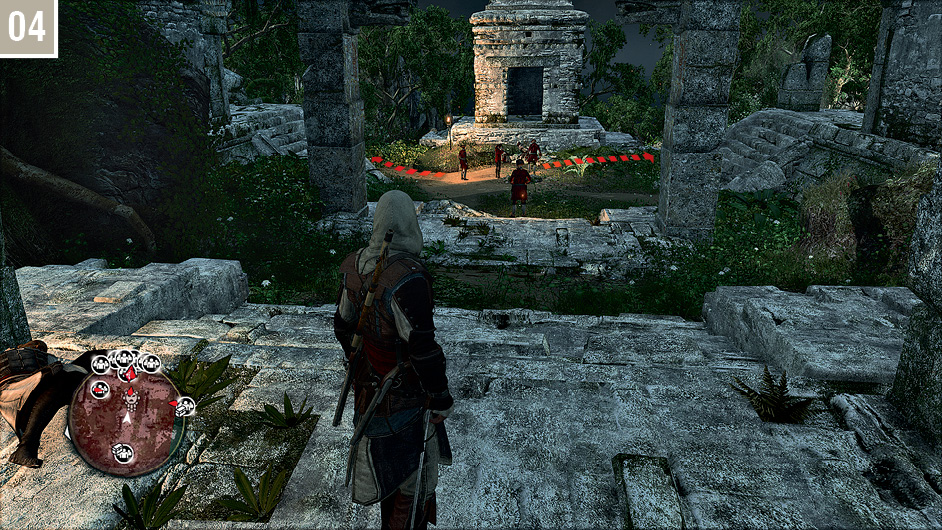
Head to the east and stop at the precise position shown in the screenshot: this is just close enough to have all four guards in range, but not so close to trigger the patrols of the soldiers to the left and right of the Gunner. As before, hit the guard at the rear of the group first, then shoot the trio further ahead with soporific darts from left to right in quick succession. You may find that the soldier on the right begins to move just before you reach him; in that eventuality, either move forward to keep him in range, or sprint behind him for an assassination. Knock out all guards, then free the captives.
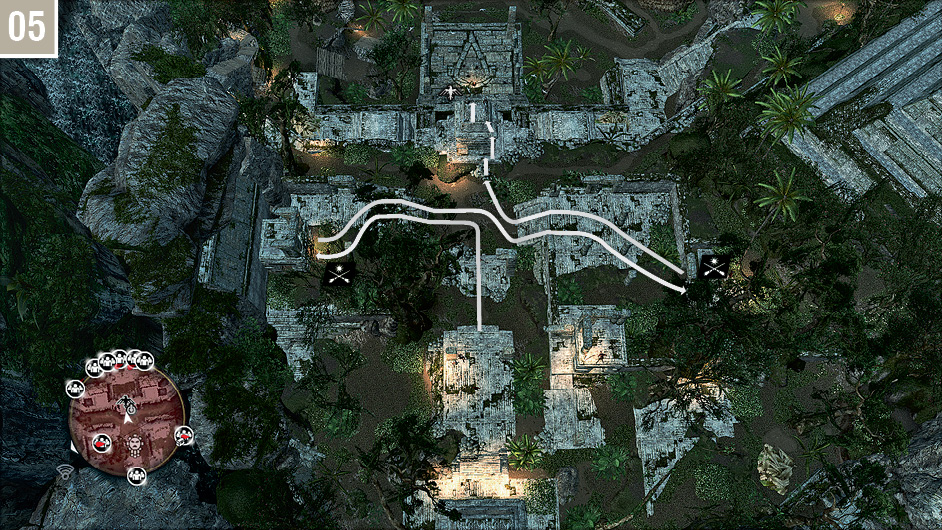
If you are curious about the lack of prompts to use Berserk Darts so far, there’s a very good reason for this: their effects are perhaps a little too chaotic for the purposes of your objectives here. However, there is an Optional Objective to use them on two guards. The hostage locations directly to the northeast and southwest of your position are the perfect opportunity to meet this requirement. In each instance, hit the lone guard with a Berserk Dart, then run in and assassinate him before the intoxicant actually takes effect. Once all prisoners have been freed, climb to the Viewpoint and Synchronize.
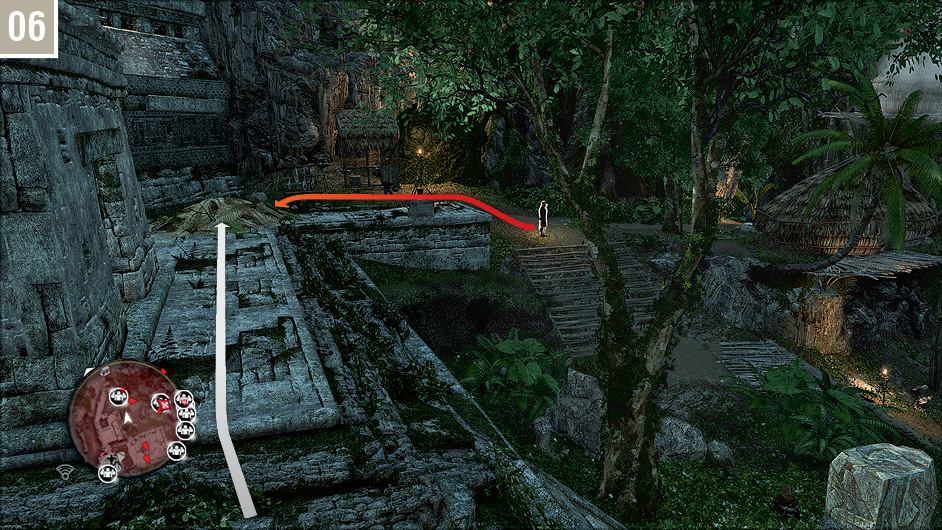
Perform a Leap of Faith into the pool below, then watch to the north. When the lone guard walks to the east, run and take cover in the hiding spot. You can assassinate him when he returns, then free the pirate.
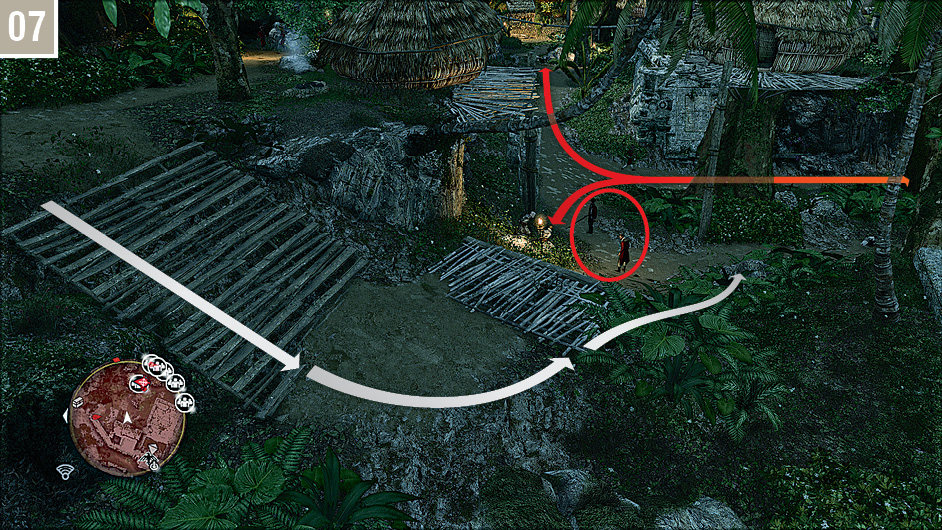
From the pirate’s position, run down the bank to reach the next pair of prisoners. From the Stalking Zone, you can easily knock out the two closest guards with Sleep Darts; when their patrolling colleague returns, incapacitate him too before he causes a scene.
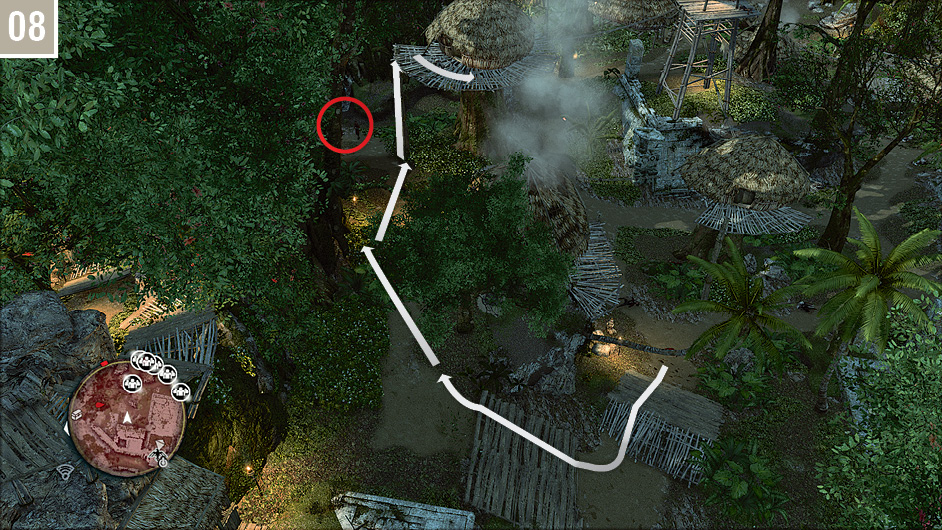
Retrace your steps, back up the wooden ramps, and head to the east. Stay on the left-hand side of the path, in the Stalking Zones, to avoid detection as you approach the two guards. They will break off to walk two separate patrols when you approach their position. This is your opportunity to climb the nearby post to reach the wooden walkway above.
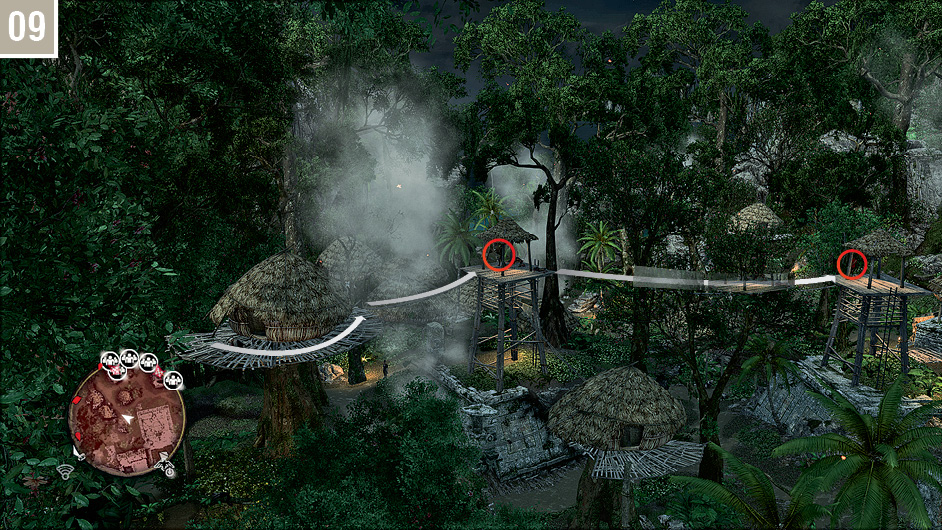
The reason for this detour is important: there are two Gunners on guard towers with a wide overview of the area where most of the remaining captives are located. By eliminating them beforehand, you make the final steps much, much easier. Equip the Sleep Darts, then drug the first Gunner. You can then safely run over the rope to the first tower, knock the soldier out, then free the prisoner. Once again, use a Sleep Dart to knock out the Gunner in the next tower, then free run over the tree to reach the ropes that lead to him. Once he has been neutralized, the end is in sight.
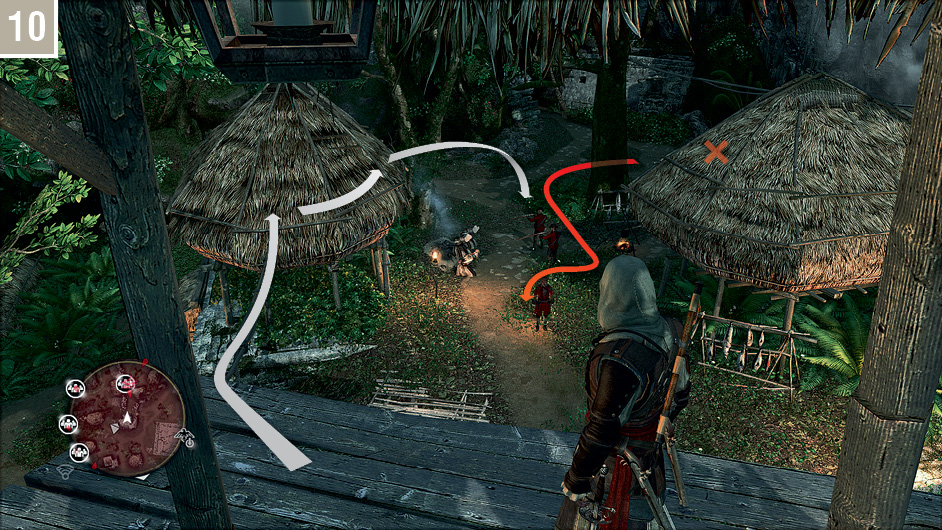
From the tower, look to the south. You should have three Sleep Darts remaining. Wait until the patrolling soldier moves within range, then shoot him and the two Gunners in quick succession. If you are low on (or out of) Sleep Darts, you can alternatively make a quick sprint to the hut roof to the left and perform an air assassination on one of the two Gunners; quickly dispatch the other one, then slay their nearby ally. There is fourth soldier further ahead, behind a tree (marked by an X on our screenshot) who you can kill in combat – as long as you don’t use a pistol, a fight won’t attract any attention. If you have enjoyed a 100% success rate in saving prisoners so far, a cutscene will herald the end of the Memory: skip to step  . For those who haven’t, or require further Blowpipe attacks to complete the Optional Objectives, we will cover optimal strategies for freeing the remaining captives.
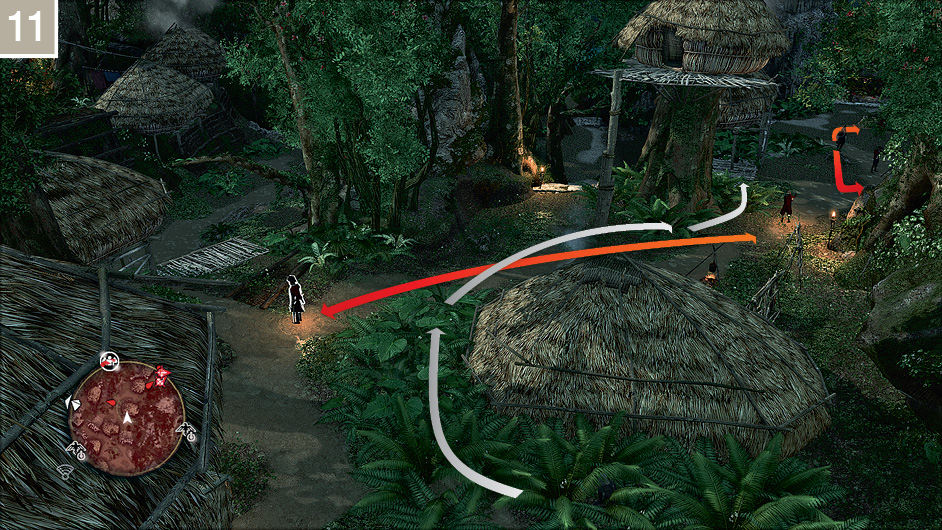
Run down the wooden steps to the east and enter the Stalking Zone that surrounds the hut. Eliminate the Captain, then press forward into the first Stalking Zone close to the large tree; use a whistle to entice the lamp-bearing sentry to his demise. When the patrolling Captain faces away, quickly transfer into the next Stalking Zone in line, then whistle to lure him over for another stealth kill.
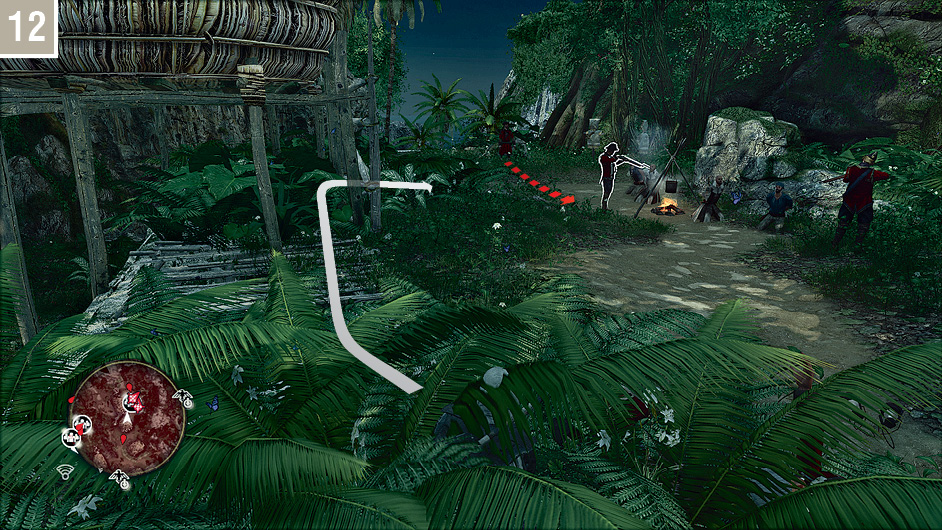
There are four prisoners in this location and you should have two Sleep Darts: use these to knock out the man on the right first, followed by his ally on the left. You can then run into the Stalking Zone to your left to flank and assassinate the remaining soldier as he walks to investigate. If you are short on Sleep Darts, Berserk Darts will suffice, but you’ll need to be quick to engage and eliminate the Gunners before they shoot any captives.
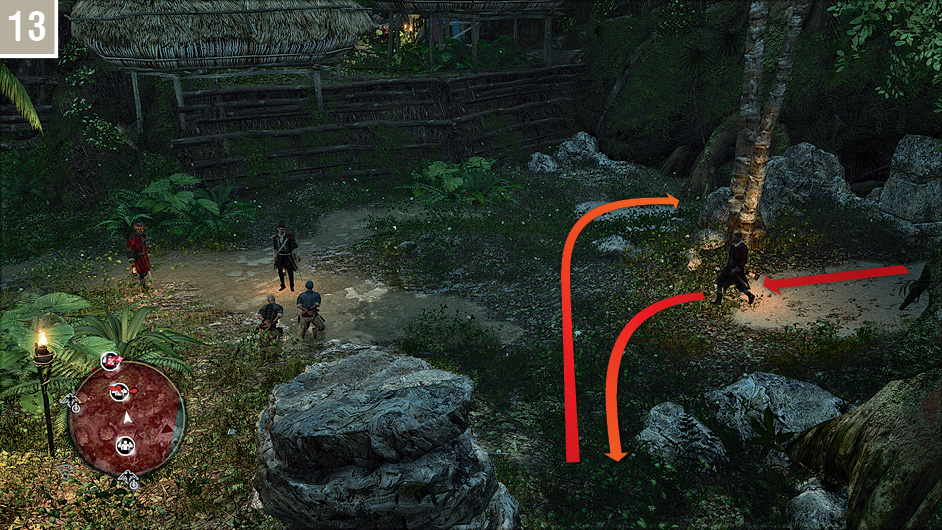
The penultimate group of prisoners is a short walk to the north, and features a Captain watching the captives with a colleague, while a third guard follows the patrol route marked on the screenshot. Due to the absence of Gunners with weapons poised, you can just eliminate the guards in a straight fight.
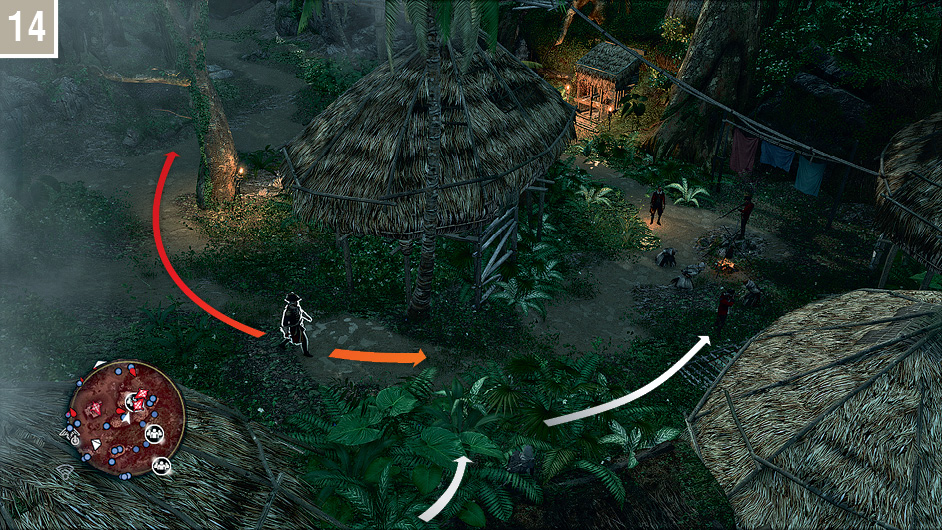
If you still haven’t satisfied the prisoner quota, this location is the last-chance saloon. If you are out of Sleep Darts, decisive action is your best course of action. Eliminate the patrolling Captain from the Stalking Zone, then sprint towards the closest Gunner and perform a running assassination. If you can reach and engage the second Gunner immediately, he’ll focus his attention on Kenway rather than execute the prisoners. You can optionally drop a Smoke Bomb to bring the fight to a swift conclusion.
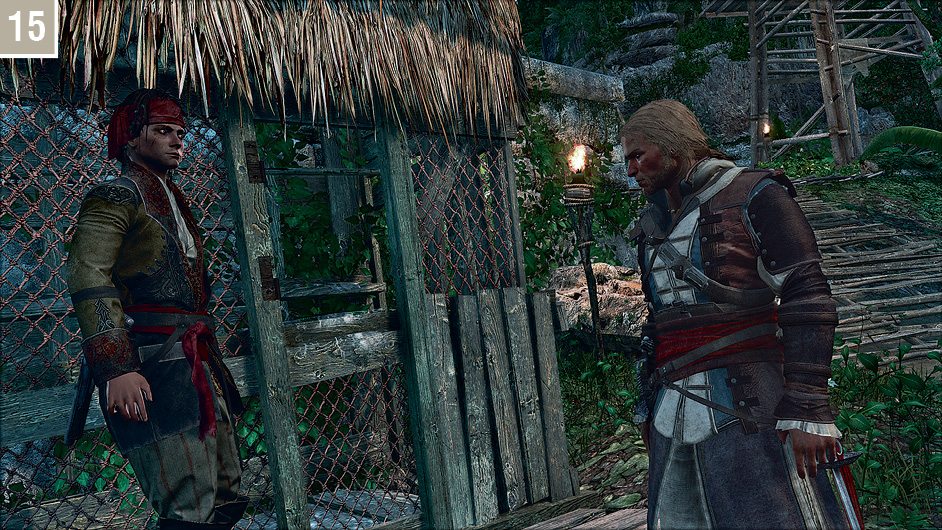
Once you reach the required 14 prisoners freed, the Memory ends after two cinematic interludes. After the mission summary, James Kidd briefly introduces the new Assassin Contracts side quests (see “Mission Overview”). Interact with Kidd again, and follow him into the ruins. When you reach the door, press  to place the Mayan Stone recovered earlier into the appropriate slot. You are then free to return to the Jackdaw when you are ready to proceed.
Sequence End
At this point, it’s worthwhile to note that you will require a sum of 5,000R to continue with the main storyline at the start of Sequence 06. If you are short of funds, we suggest that you undertake optional activities that offer financial rewards (such as Assassin Contracts, warehouse raids, Treasure Maps and piracy) to raise capital during Sequence 05.