
Assassin's Creed IV: Black Flag Guide Walkthrough
Sequence 09
PREVIOUSLY...
Kenway and Charles Vane sail to North Carolina, where Blackbeard is toasting his imminent retirement. He informs Kenway that the Sage, real name Bartholomew Roberts, can be found among the crew of a slave ship known as the Princess. Noting a suspicious figure among the revelers, Kenway follows him to a meeting with British soldiers. Curious to learn of their intentions, he tails them to an elevated position overlooking the sea… only to watch helplessly as they signal an attack from a vessel concealed offshore in the early morning gloom. As barrage after barrage lays waste to his surroundings, Kenway races to the deck of the Jackdaw, where Blackbeard awaits. They set sail for the man o’ war that initiated the attack, and succeed in boarding it, but Blackbeard is cut down in the fierce melee that ensues, with Kenway bowled overboard and forced to flee.
Disheartened by his loss, but with a new lead on the Sage, Kenway (with the assistance of Charles Vane) attacks a ship from the Royal African Company to learn the location of the Princess. The boarding is an unqualified success… but their return to the Jackdaw less so, as they find Calico Jack at the head of a mutinous crew, with Adewalé powerless to intervene. The story resumes with Kenway and Vane marooned on the uninhabited Isla Providencia. The pair clash as Vane grows ever more furiously delusional, blaming Kenway for their predicament. An altercation over food leads to an extended confrontation where Vane attempts to kill Kenway. Though Kenway beats the crazed pirate savagely, he cannot bring himself to kill him – but this is the final kindness he extends to his former friend. When a ship later sails to the shores of the island, Kenway escapes alone…
Memory 01 “Imagine My Surprise”
Mission Overview
Optional Objectives
- Sabotage two alarm bells.
- Kill four Brutes.
Notes & Further Reading
- Sleep Darts and Smoke Bombs are useful resources for this mission.
- If you have been following our recommended Jackdaw upgrade plans, you should now be ready to begin conquering the most difficult Naval Forts. You may also be equipped to deal with Legendary Ships.
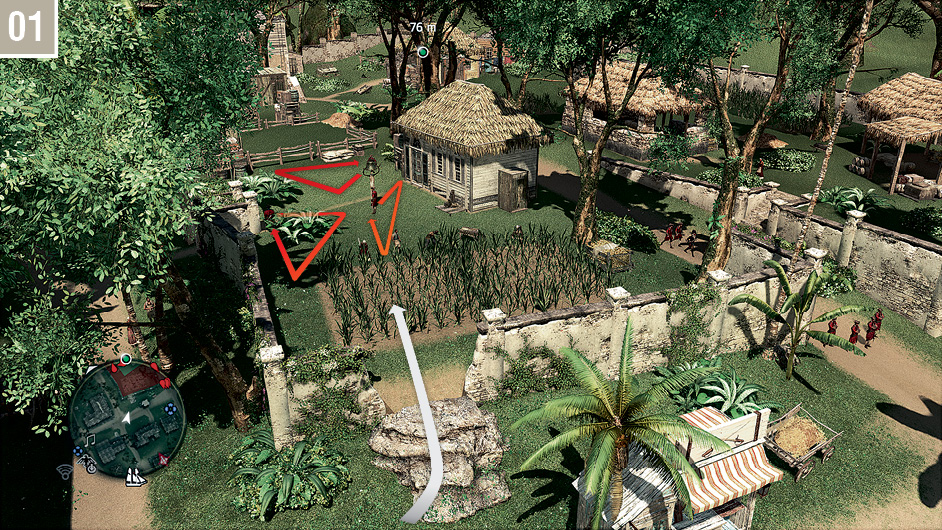
Fast Travel to Kingston and head for the  marker, where Adewalé awaits with a new source of information. After the introduction, you must infiltrate a Restricted Area to locate Hornigold and Rogers. Start by entering the Stalking Zone just inside the southwest corner of the Restricted Area. Quietly eliminate the three patrolling guards (including a Brute required for the Optional Objective), and you can easily sabotage a first alarm bell – and, as secondary perk, remove a potential complication when you return to this area a little later.
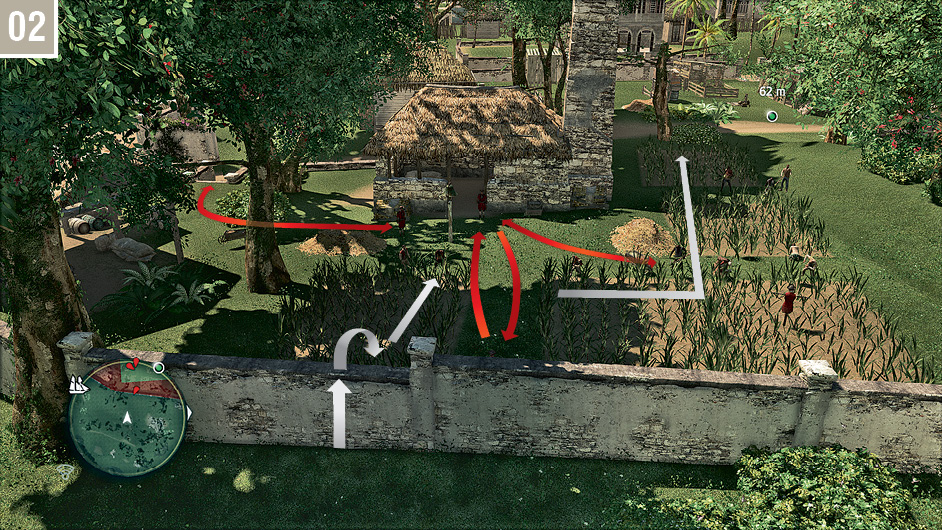
Leave the Restricted Area and make your way to the southeast side of the zone. Once again, the vicinity of the alarm bell is covered by light patrols. Eliminate the three soldiers, then sabotage the alarm. You can then head west via the run of Stalking Zones. Be careful not to activate Eagle Vision or move too far to the north at this point – your two primary targets are a short distance away to the north, and it’s better not to disturb them just yet.
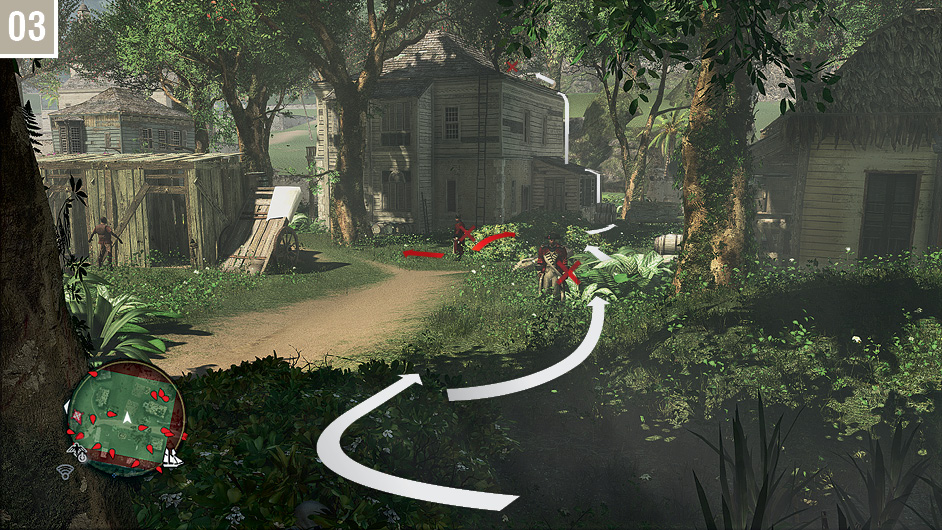
From the Stalking Zone shown here, watch the surrounding patrols carefully. As soon as everyone else is facing elsewhere, emerge from cover and stand still until the Brute’s detection meter is half full, then immediately move back into the Stalking Zone. This will cause him to approach your position for an easy kill. When the coast is clear, move to the Stalking Zone close to the house and kill the next Brute. You can now incapacitate the troublesome Gunner on the rooftop with a Sleep Dart before you climb up to knock him out.
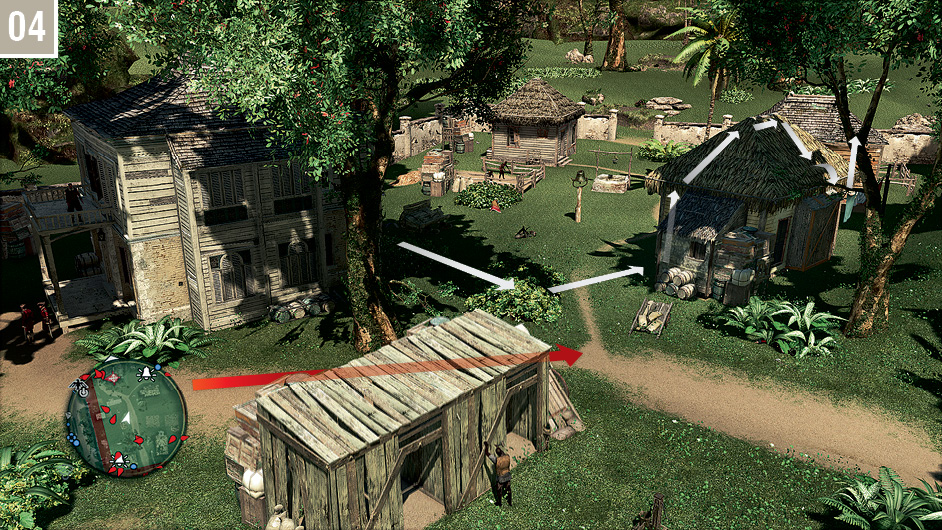
Return to the ground on the east side of the house. Watch the two-man patrol to the southwest; when they turn away, climb onto the thatched roof and carefully move to the east side until you see a man below; activate Eagle Vision to identify Hornigold and Rogers. Immediately jump and climb into the nearby tree as the pair walk around the building.
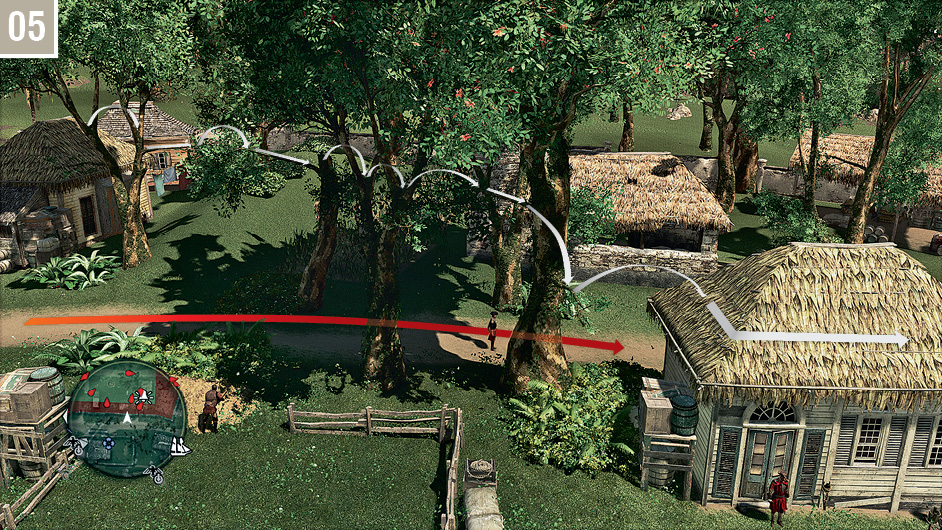
Free run through the trees as your targets walk the path below, taking care to not move ahead of them. When you reach the thatched roof, hide on one side to avoid detection when they pause to converse.
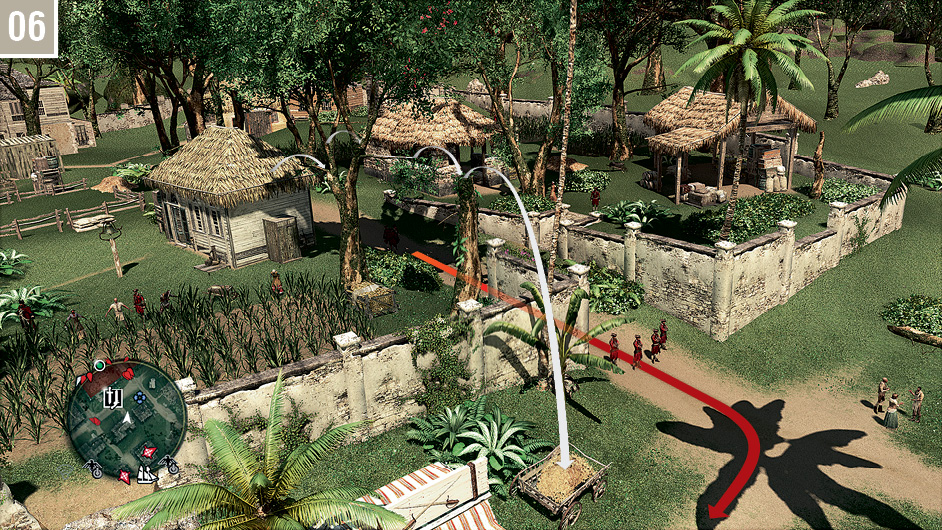
Wait until the targets leave the Restricted Area and walk by to the right, then free run through the trees and perform a Leap of Faith into the pile of hay outside.
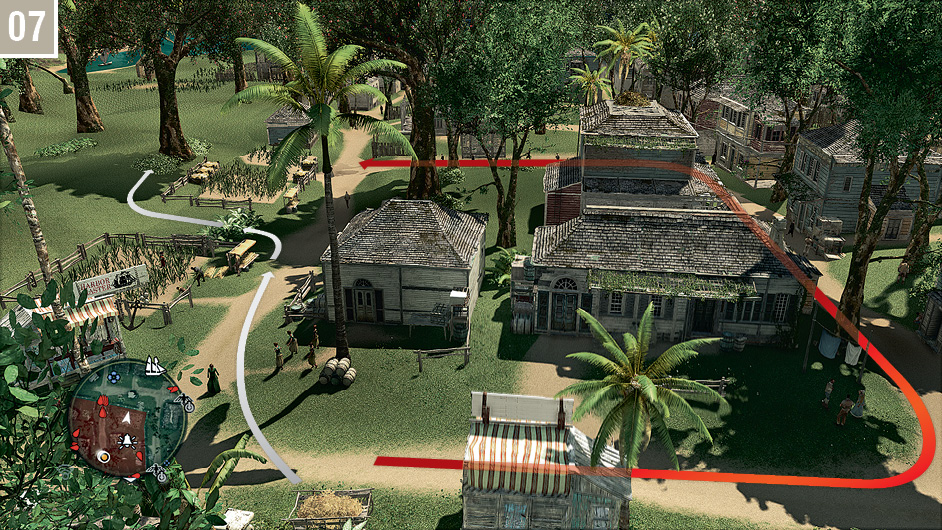
There is no need to tail Hornigold and Rogers directly. Watch them until they round the corner, then follow this route, being careful to move no further than 40 meters away; you should also keep the camera trained in their direction to catch glimpses as they move between buildings to reset the countdown. Ensure that Kenway is safely concealed in a Stalking Zone when they approach.
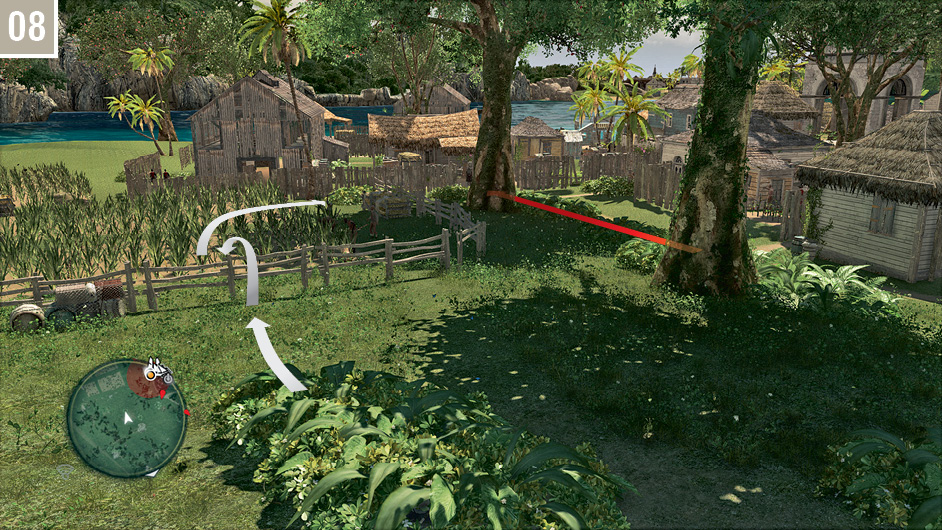
Continue south, using Stalking Zones to avoid detection, until you reach a large Restricted Area. Wait in the final row of crops, just outside the fence, until an eavesdrop circle appears; enter the Stalking Zone to your right to begin.
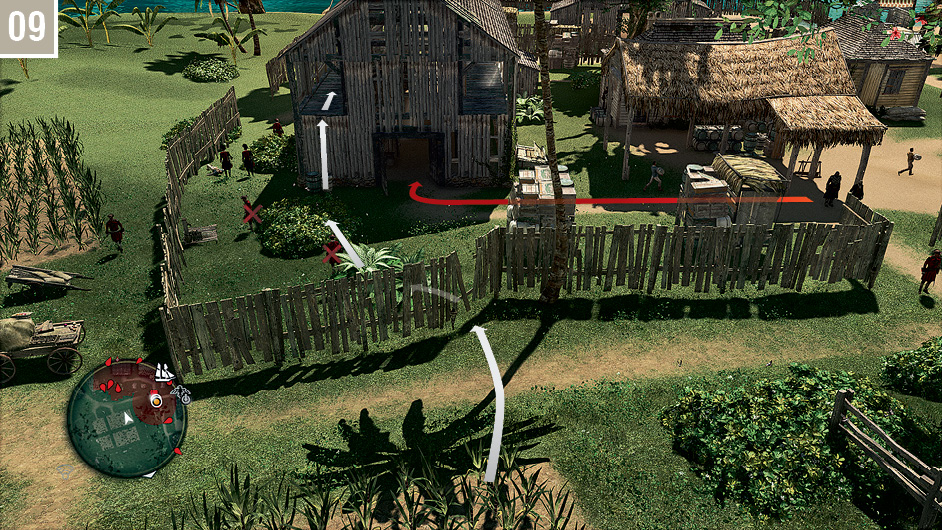
When the eavesdrop begins, quickly jump through the gap in the fence and kill the nearby guard from the Stalking Zone. Wait until the Templars enter the warehouse, then move to the next Stalking Zone to eliminate a second soldier. You can then climb to the opening to the left of the warehouse entrance. Follow the party via the upper walkway, being careful to not walk too far ahead and attract attention. Assassinate the sentry on the far side.
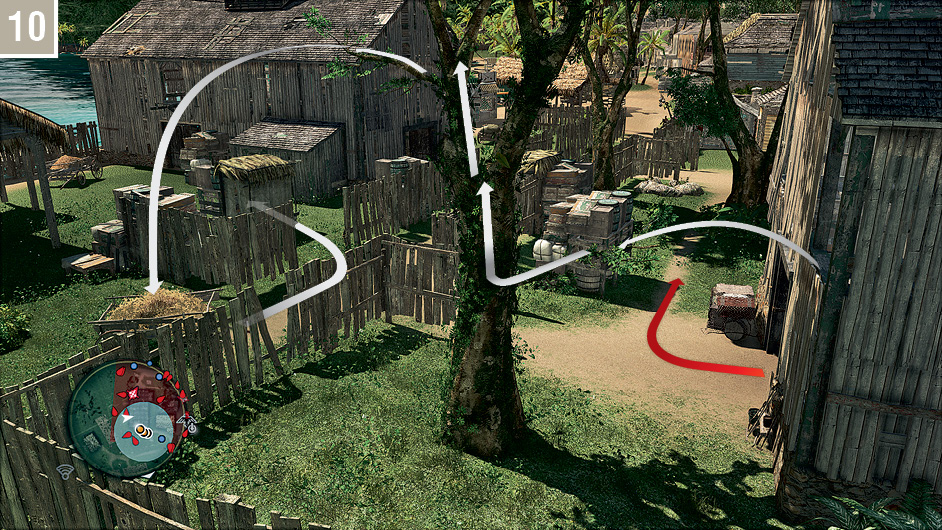
From the upper walkway, jump to the branch, ascend to the V-shaped section at the center of the tree and tap  to ascend to the upper branches. Perform a Leap of Faith into the hay cart, then – and this is the tricky bit – move into the cloth-covered hiding spot a short walk away. If you can do this without attracting attention, you can wait in safety for several seconds until the circular border of the eavesdrop zone forces you to jump out. At this point, simply walk to the outer wall of the warehouse: a cinematic sequence will begin before Kenway can be detected by guards.
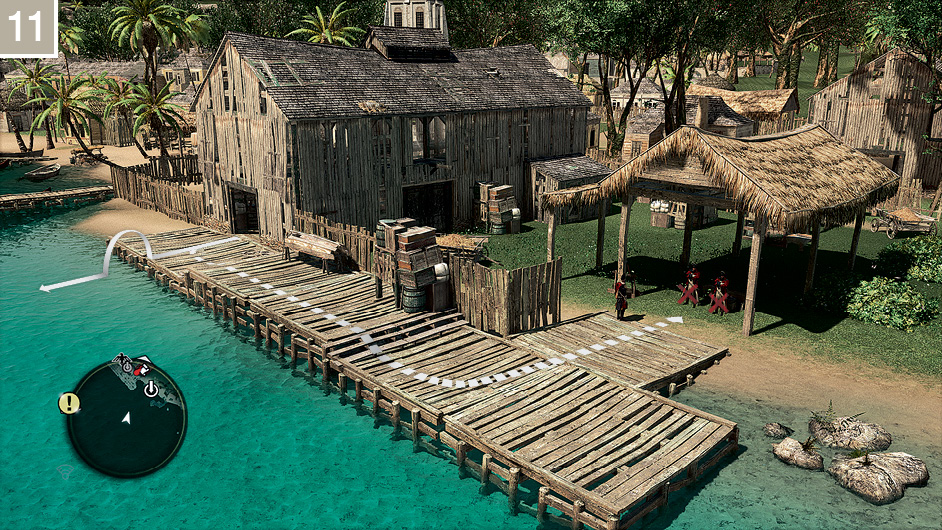
After the cinematic, Kenway must escape the area. If you would like to complete the second Optional Objective, you must make a quick detour before you flee. Drop a Smoke Bomb to incapacitate the hostiles in the warehouse, then sprint out of the south exit and turn left. There are two Brutes outside. Drop another Smoke Bomb to disable them, then make a quick kill to complete the quota; if these are missing, you can find a Brute on the west side of the first warehouse that you passed through during the eavesdrop. You can now simply jump into the sea and swim to the Jackdaw to the west, using stealth swim to avoid gunfire if required.
Memory 02 “Trust Is Earned”
Mission Overview
Optional Objectives
- Free two groups of pirates.
- Double assassinate Cockram and Burgess.
Notes & Further Reading
- Principe is unlocked as a destination after this Memory ends, with a Fast Travel position located east of Great Inagua. There are numerous collectibles here, but your first visit is not the ideal time for exploration and acquisition. If you return here after completing the Sequence, you can hunt jaguars on the west side of the map to obtain pelts for Health Upgrade III and the Feline Pelt outfit.
- You may benefit from a full supply of Sleep Darts and ideally at least one capacity upgrade (or a supply of bones to craft further stocks) if you plan to complete the Optional Objectives.
- Players who are diligently picking up all collectible items en route to 100% Synchronization should note that Principe is the penultimate “locked” location. Though there is certainly no hurry to pick up most items, power gamers should be aware that you can potentially obtain all Mayan Stones (and claim the final reward from Tulum) when you arrive at a new destination during Sequence 10.
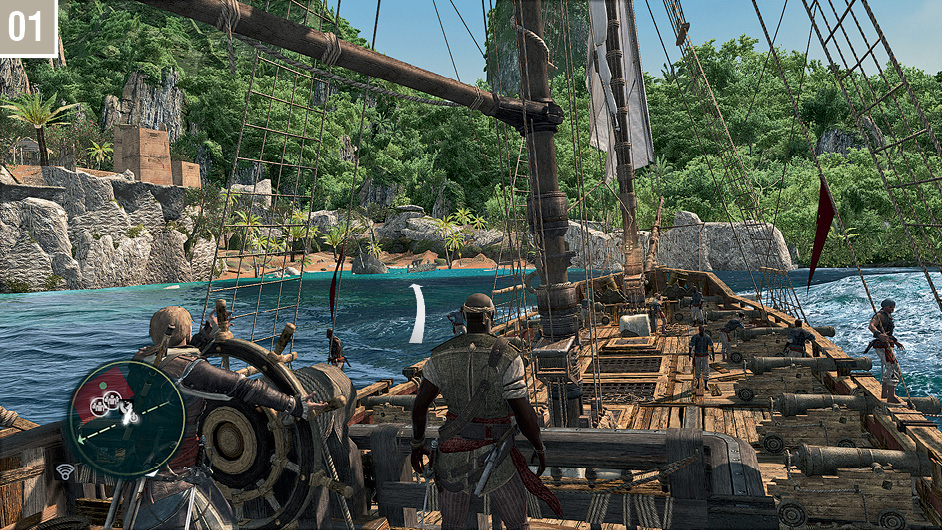
Return to the Jackdaw and sail to sea. The next Memory waypoint is in the southeast of the map. After the opening cinematic, you must sink five ships: four gunboats and a fairly substantial frigate. Note that you cannot send the frigate to Kenway’s fleet from Principe, so unless you particularly need or want its cargo, or repairs for the Jackdaw, it’s more efficient to just sink it. Sail to the west beach, as shown here, then Synchronize with the Viewpoint before you head to dry land.
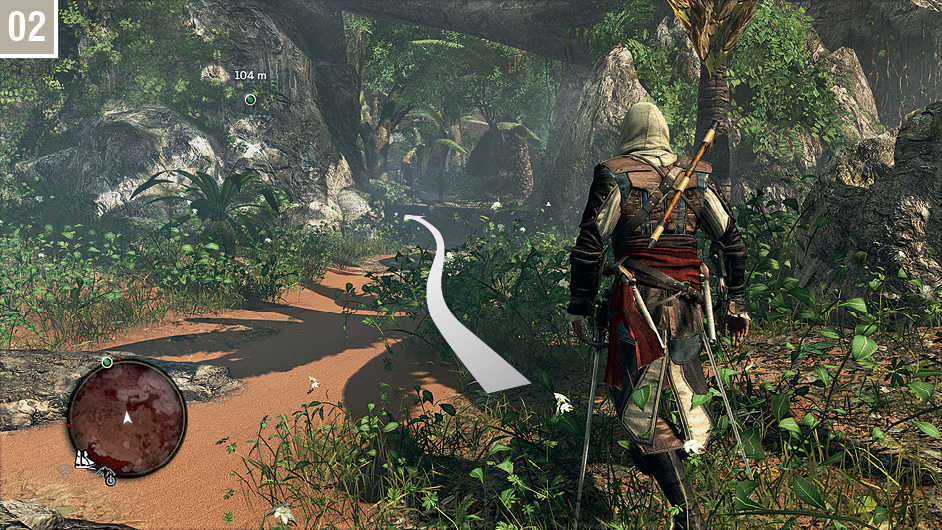
Follow the path to the southeast, through a natural stone archway. There are two pairs of guards here: two stationary Brutes, and a couple of soldiers who walk a long patrol. You can either bypass them entirely as you continue to the south, or eliminate them with well-timed double assassinations.
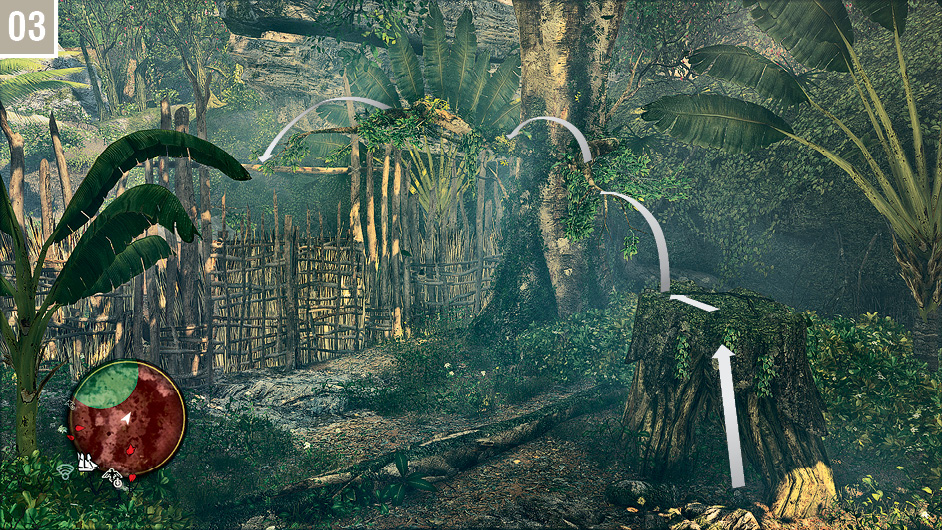
As you approach the search zone, a fence and closed gate block your path. Use the nearby tree to bypass this obstacle. Shortly after Kenway lands, a cutscene will begin.
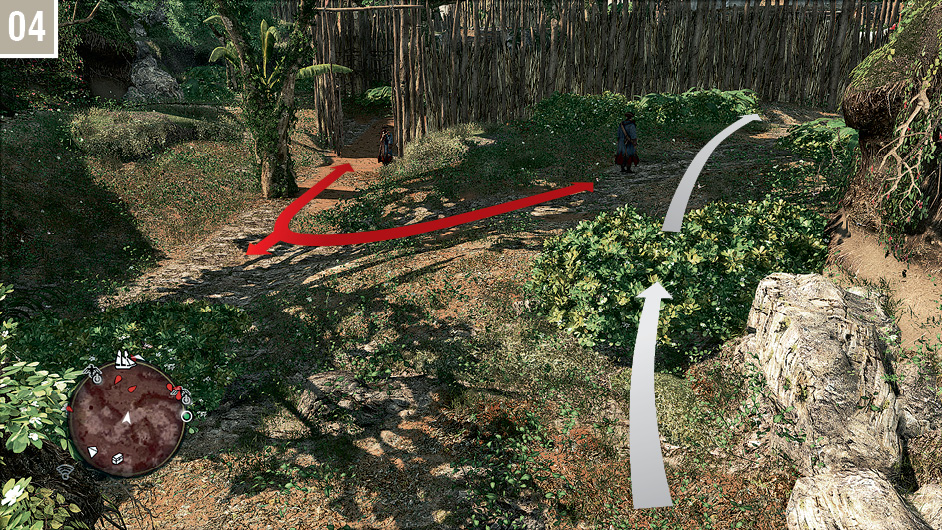
At this point, if you have no desire or need to complete the Optional Objectives, you can sneak or fight your way to the east beach to reach the search zone – or even swim there, bypassing combat entirely. Should you opt for this fast and furious conclusion, you can find your two targets in the north of the green area. If you wish to save the pirates and double assassinate Cockram and Burgess, your route will be rather more circuitous. Start by following the path that leads to the north from Roberts, then bypass the two Brutes guarding the entrance to the military encampment by heading east when you reach this location.
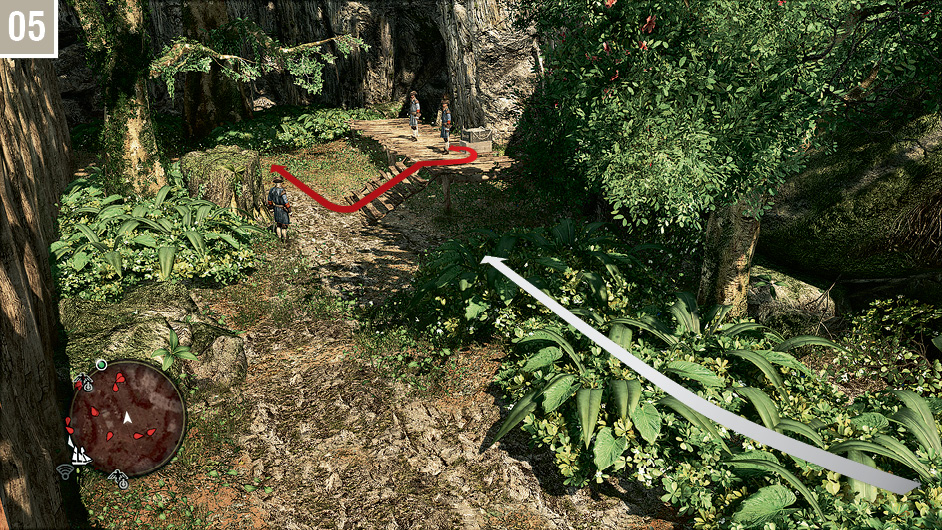
Eliminate the three guards in this area. A fight will not attract attention from elsewhere, though it’s easy to stealthily dispatch the stationary guard to the left with a whistle, then brazenly run into the Stalking Zone beside the tree to cause the soldier on the platform to investigate. The final guard is then a mere formality.
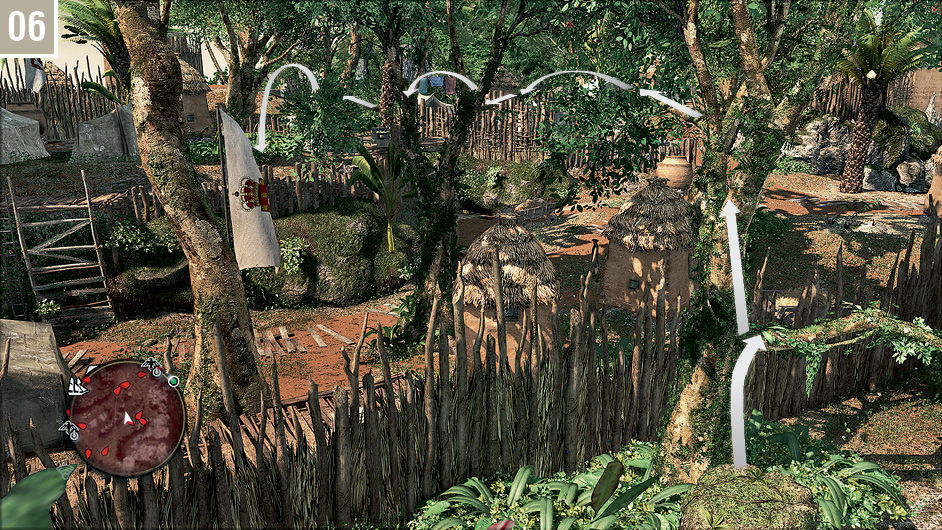
Use the free run course in the trees to infiltrate the camp, landing in a Stalking Zone to the north.
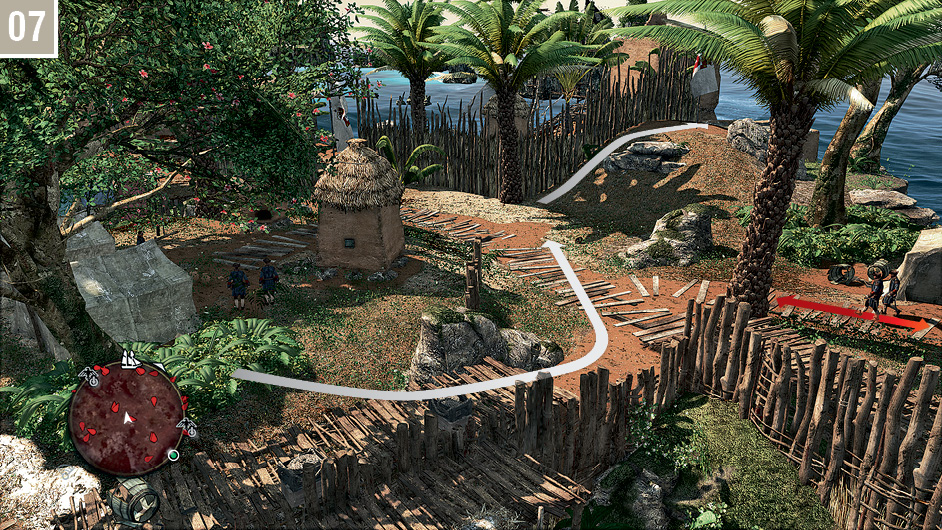
Wait until the patrol moving from east to west return to the east, then make a decisive sprint along the path to the north shown here. Running down the wooden steps will interrupt the Scout’s detection of Kenway.
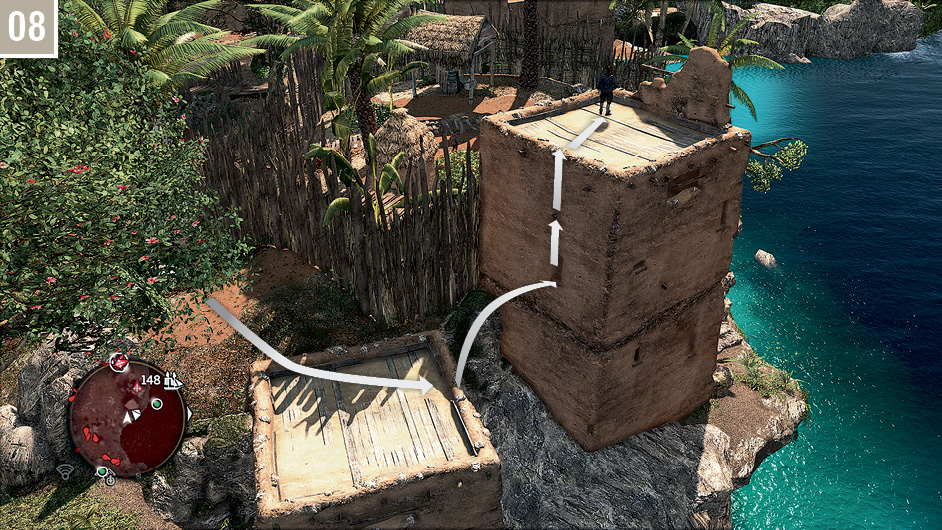
Climb the wall and assassinate the Gunner.
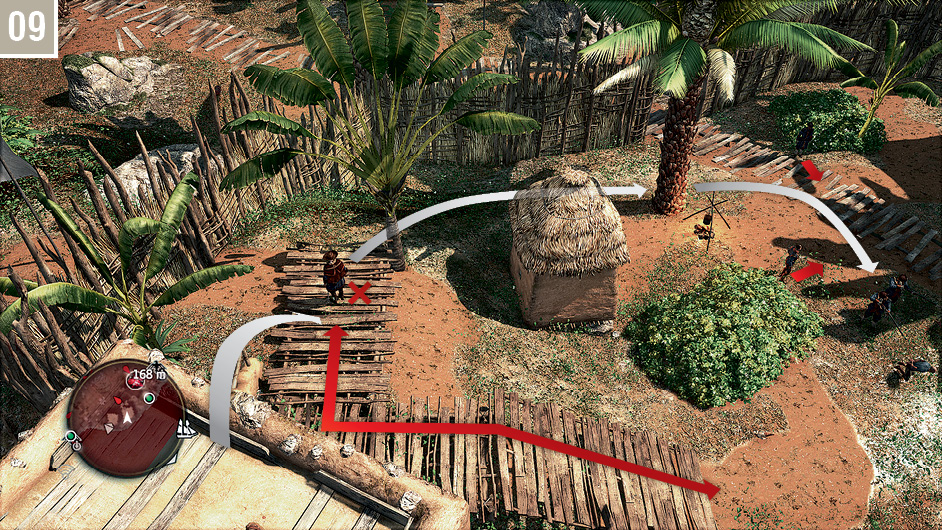
When the Captain approaches the leftmost part of his patrol, with his back to Kenway, perform an air assassination. Move behind the guards watching the Gunners and hit them both with Sleep Darts; with that accomplished, walk behind the marksmen and perform a double assassination. You can then knock out the two sleeping guards before you free the pirates.
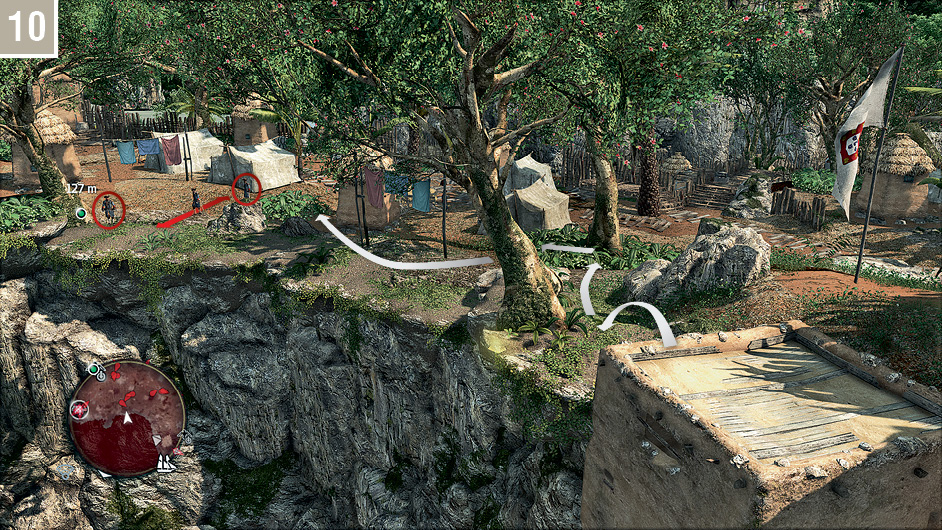
Backtrack to the tower and drop to the other side, then move to the Stalking Zone via the route shown on the accompanying screenshot. There is no harm in entering combat at this stage: just be sure to conclude any fracas far away from the remaining prisoners to the east. That said, the three nearby soldiers can be easily dispatched from the Stalking Zone with judicious use of whistles.
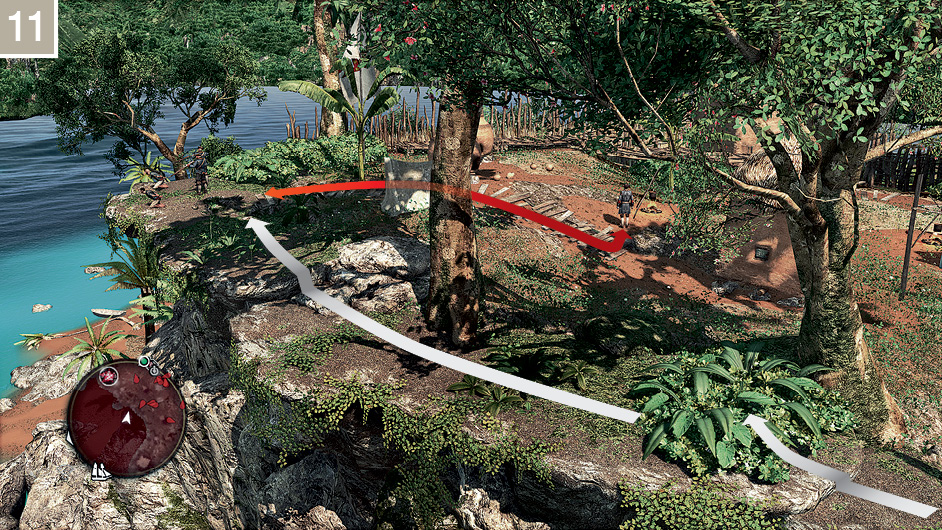
Move to the next Stalking Zone to the east, and hit the two Gunners standing over the prisoners with Sleep Darts; you can then do the same to the patrolling soldier when he moves to investigate. Staying close to the cliff edge, walk over to the prisoners and free them, then knock out the slumbering guards.
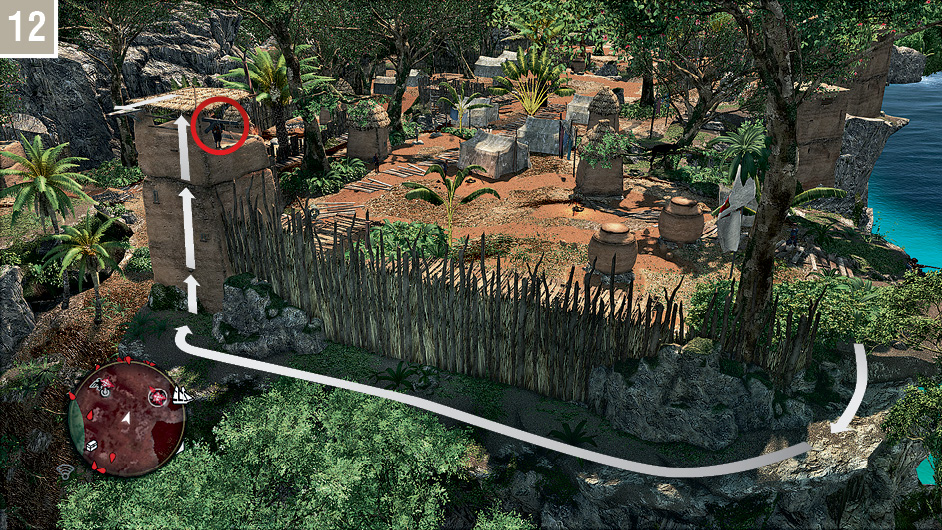
If you move into the Stalking Zone just beyond the cliff edge where you freed the prisoners, you will find a concealed route to the nearby Viewpoint. Climb this – be careful to time your movement past the window to avoid alerting the Gunner – then Synchronize on the perch.
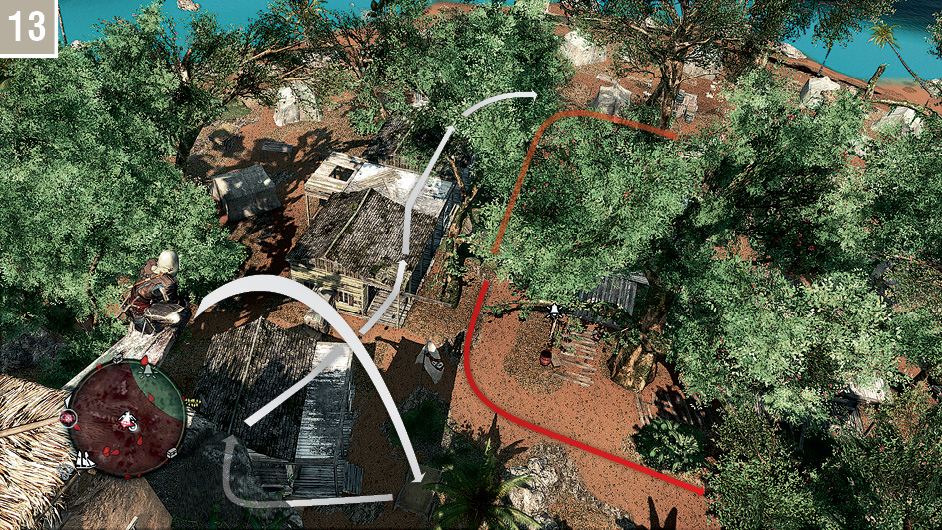
Before you perform a Leap of Faith into the hay cart, take a moment to study the area below you. If you plan to complete the Optional Objective to assassinate the two Templars, you need to be meticulous in the steps that follow. Cockram and Burgess begin east of your position, and then take a long walk that eventually leads to the ship at the dock. There are two plausible moments to perform a double assassination, with both occurring at the early stage of their journey. After that point, they walk separately – and the opportunity passes. We outline here the basic route that you will be taking to the best chance to simultaneously kill both Templars.
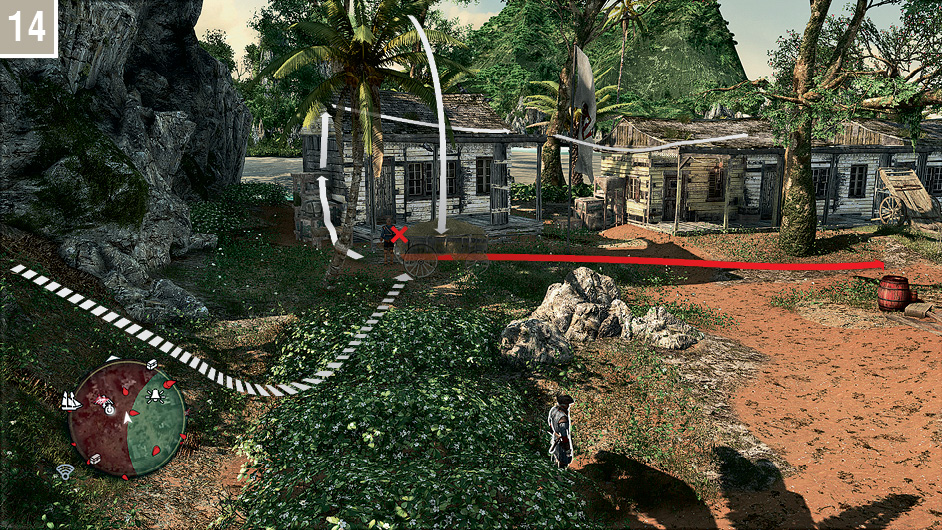
After landing in the hay cart, assassinate the Scout then climb the west face of the building. If you are restarting from the checkpoint, Kenway will begin on a nearby slope adjacent to the Viewpoint. The basic steps are broadly the same: slide to the Stalking Zone, sprint to the cart (the dotted line on the accompanying screenshot indicates your approach), kill the guard, then climb the building.
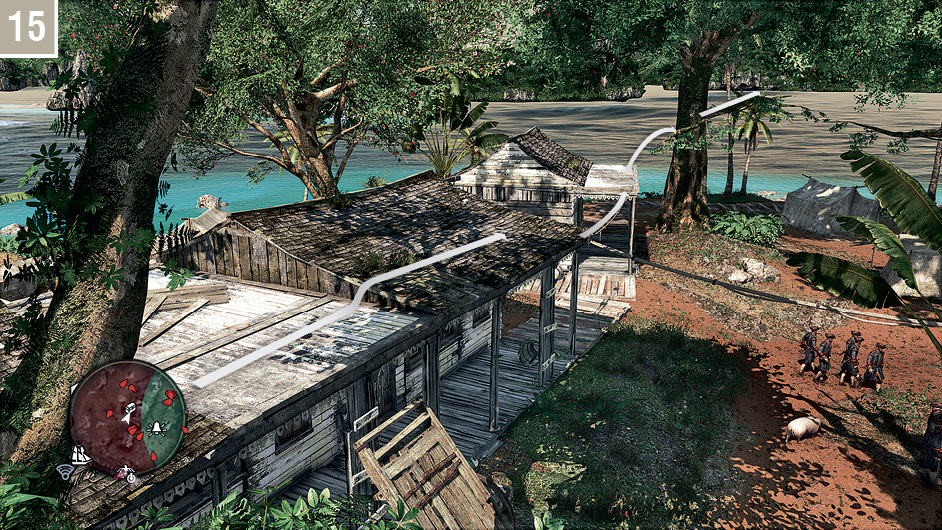
Sprint along the row of houses, free running over the ropes that span the wider gaps for maximum speed, but generally remaining close to the center of the rooftops where possible. You will hear sound effects and see indicators that show that soldiers are suspicious of Kenway, but don’t delay: they will not initiate combat or formally identify him if you are fast enough. At the end, leap to the tree branch and quickly climb up.
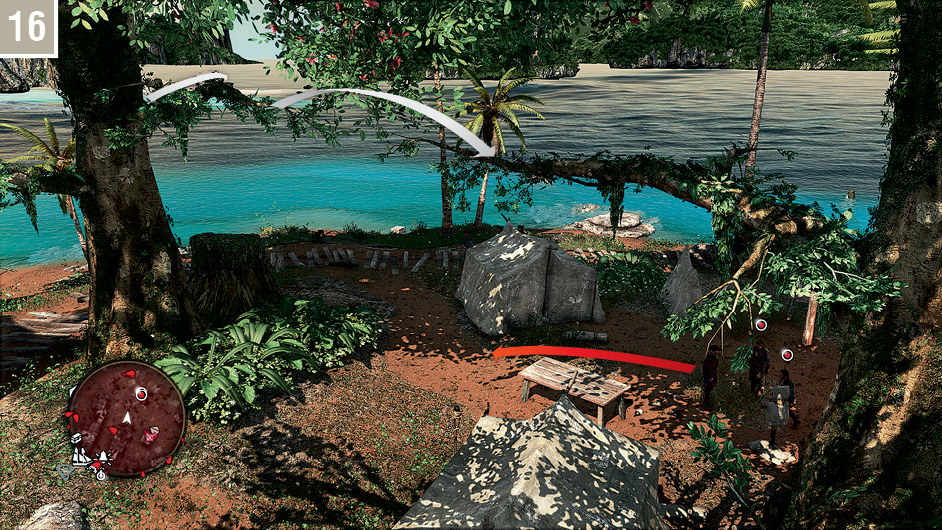
Jump to the next tree in line, then watch below.
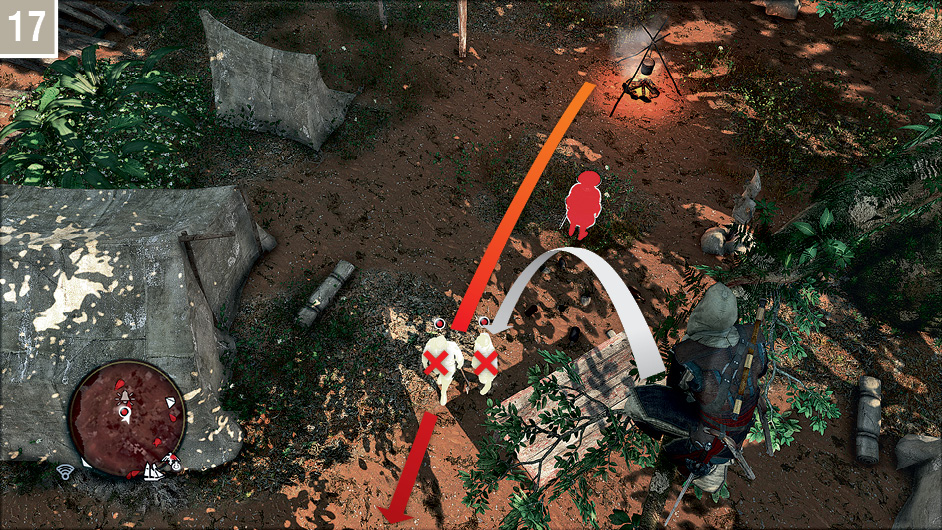
Cockram and Burgess will be approaching, and in perfect alignment for a double assassination.