
Assassin's Creed IV: Black Flag Guide Walkthrough
Sequence 05
PREVIOUSLY...
Having appropriated du Casse’s Great Inagua compound as his new hideout, Kenway travels to distant Tulum. There, he meets with James Kidd and – rather unexpectedly – Ah Tabai, a Mentor of the Assassin Brotherhood. Ah Tabai denounces Kenway for his earlier support of the Templars, and his complicity in Assassin deaths in Havana and other locations exposed by Walpole’s maps. It is perhaps only the word of Kidd – now revealed to be an Assassin and aware of Kenway’s capacity for “the Sense”, more commonly known as Eagle Vision – that stays the Brotherhood blades at this most delicate moment.
Kenway and Kidd enter an old Mayan temple, as directed by Ah Tabai, where they operate an ancient apparatus to reveal a stone face carved hundreds, perhaps thousands of years before. This is the visage of the Sage, recognizable by his features alone, but clearly marked by the rare and distinct heterochromia of his eyes. Kenway then aids the Assassins in repelling an attack by slave traders, but Ah Tabai is unmoved by this oblique act of contrition. Though he absolves the pirate of his earlier errors of judgement, he states in no uncertain terms that Kenway is not welcome at the Brotherhood base. Kidd, however, suggests that Kenway might help their cause by completing Assassin Contracts – but for a price befitting his mercenary proclivities. Leaving Tulum, Kenway continues his search for the Sage: the only man who can lead him to the Observatory.
Memory 01 “The Forts”
Mission Overview
Optional Objectives
- Use the mortar to damage the fort.
- Use a running assassination to kill the officer.
Notes & Further Reading
- To complete the related Optional Objective in this Memory, you must purchase the first mortar upgrade, which unlocks the weapon itself.
- This mission unlocks the Punta Guarico location. It is a small Naval Fort that can only be conquered during this main Memory.
- If you have yet to do so, this is definitely an optimal time to clear all Level 1 Naval Forts. If your Jackdaw is bristling with powerful upgrades, you will benefit by conquering Level 2 locations as well.
- After you complete the mission, this zone of the map is unfogged, revealing Cumberland Bay, Tortuga and Petite Caverne in the region. You might profit by visiting these locations before you continue to Kingston to begin the next Memory.
 Fast Travel straight to Nassau to view a cinematic that formally begins Sequence 05. Once this ends, board the Jackdaw and take the helm. You must now set sail for the Punta Guarico Naval Fort to begin the actual mission – though you can cut the journey time by a few minutes if you Fast Travel to Great Inagua. Sail carefully through the Restricted Area to reach your destination. When the prompt appears, press
  to begin the Memory.
Your strategy in the initial stages of this Memory should be informed by the current state of the Jackdaw. If you have a very basic set of upgrades, you may benefit by luring the brig just out of range of the Naval Fort’s mortars, then sinking it; you can then board the vessel and use it for repairs, if necessary. With a more powerful Jackdaw, however – especially if you have the Reinforced Hull upgrade – it’s better to focus your fire on the highlighted areas of the fort itself, ignoring the enemy vessel. Use mortar fire to satisfy the Optional Objective, then hit the highlighted areas with broadsides. Don’t neglect to fire the swivel gun whenever weak points appear: this causes massive damage, especially if you have upgraded the weapon.
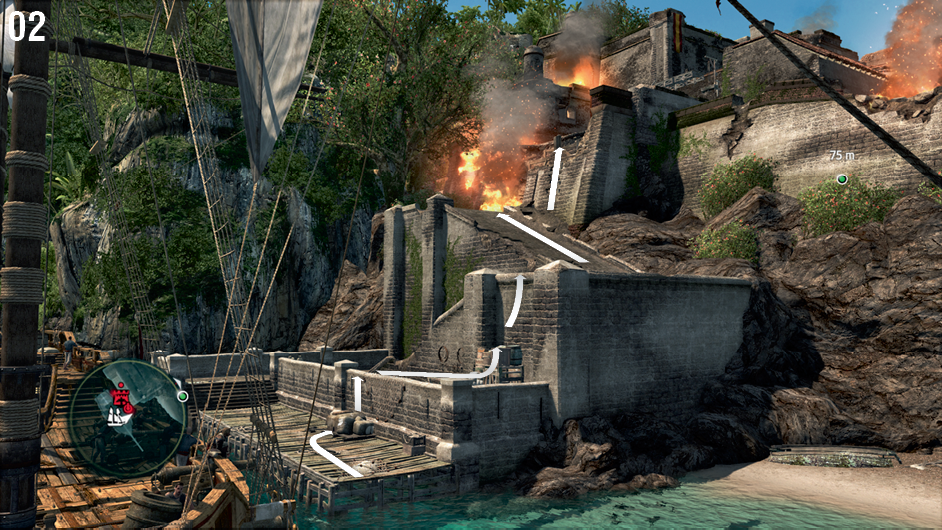
With the towers destroyed, you are now free to make an assault on the ground. Sail into the highlighted area on the south side of the fort and hold  to dock, then follow the route shown here to reach the inside of the fortress. If you destroyed the defenses before engaging the enemy brig, you may be able to dock before it engages the Jackdaw. If not, you will need to incapacitate it before you can relinquish control of the wheel.
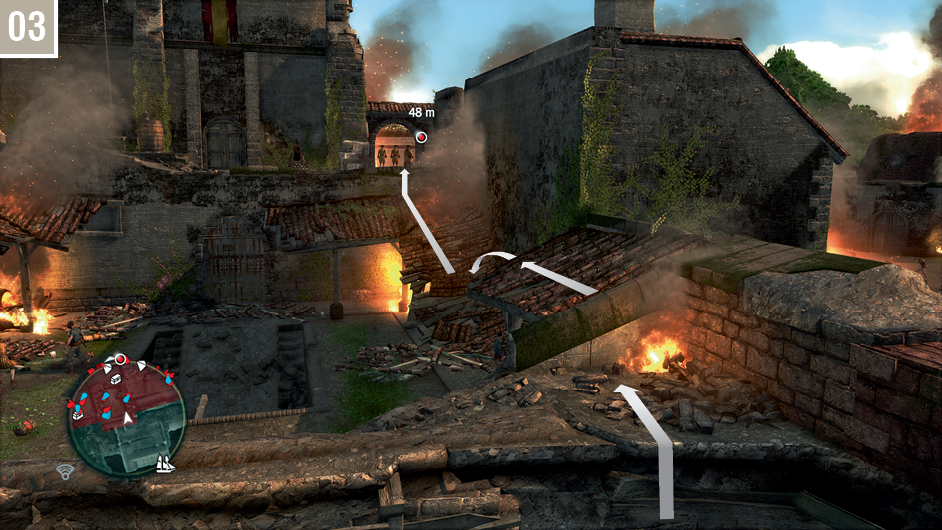
There’s no need to get involved with the combat in the courtyard: just follow the route shown here to reach an archway. Your target lies just beyond the opening.
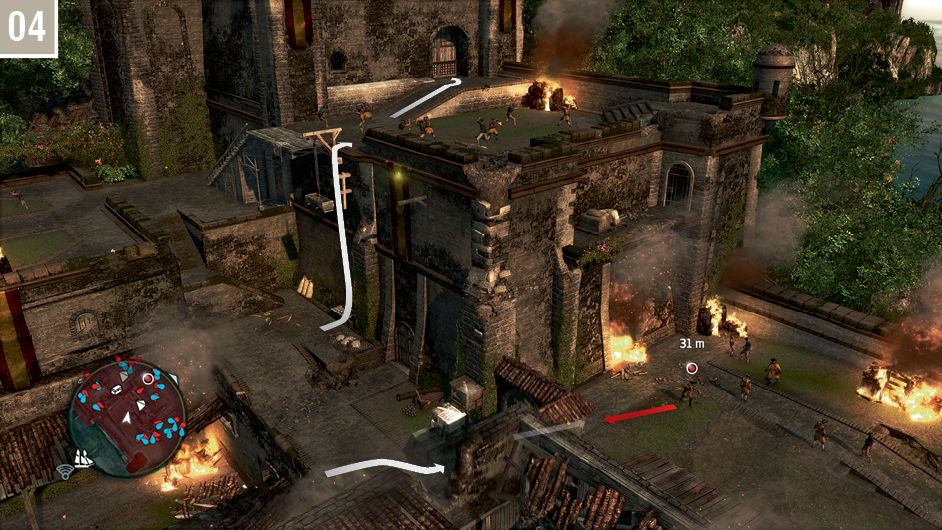
Your target will attempt to run… but towards Kenway. The second Optional Objective requires that you kill the fort’s officer with a running assassination so, without breaking stride, press  to perform that very feat. Once he has been eliminated, all other hostiles will cease their resistance. Use the lift to quickly reach the upper area, then approach the doors marked by the waypoint and press
  to complete the final objective.
Memory 02 “Traveling Salesman”
Mission Overview
Optional Objectives
- Kill four Gunners.
- Kill five guards stunned by Smoke Bombs.
Notes & Further Reading
- The most convenient route to Kingston takes you close to the Navassa fort. If the Jackdaw is up to the task, it makes sense to conquer it to remove the Restricted Area that complicates travel through the region.
- As this is your first visit to Kingston, it may be prudent to explore a little before you continue with the story. As ever, Synchronizing at Viewpoints is a good use of your time, though you can skip the two sites in the northwest for now: you’ll visit these locations during a forthcoming Memory.
- Stock up on Smoke Bombs before you begin: you’ll need these for an Optional Objective. Sleep Darts are also highly useful.
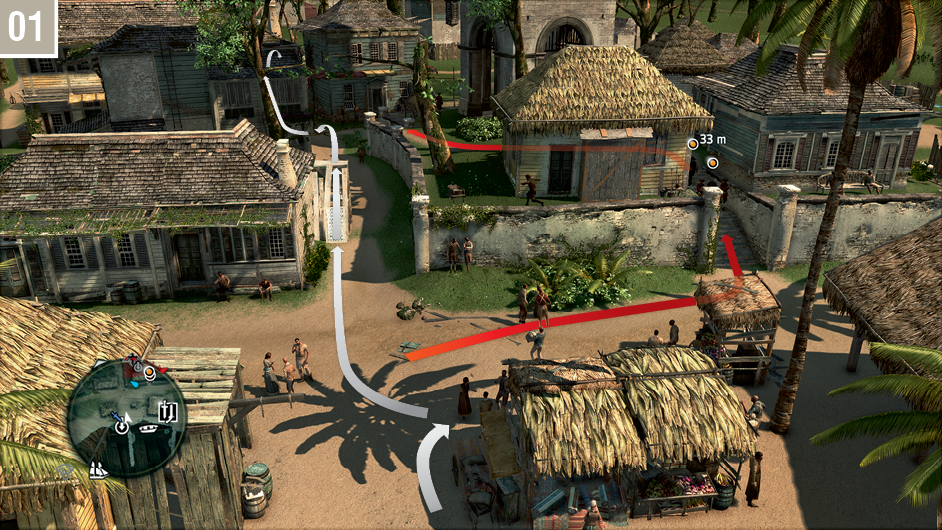
Travel to Kingston and speak with Adewalé on the beach to begin the Memory. Mark your targets with Eagle Vision, then run to the nearby ramp and climb to the upper branches of the tree; from there, you can jump to the rooftop and watch the two targets safely from above. Though Kidd continues his pursuit on foot, Kenway is much better served by keeping track of Torres and Prins from above.
Free run via the route shown here to keep up with your targets as they walk below. Keep your eyes directly ahead as you move through the trees: there is a Gunner on the next rooftop. You can incapacitate him with a Sleep Dart if there is a danger of detection during the approach; if not, just move behind the sentry and assassinate him to begin the Optional Objective.
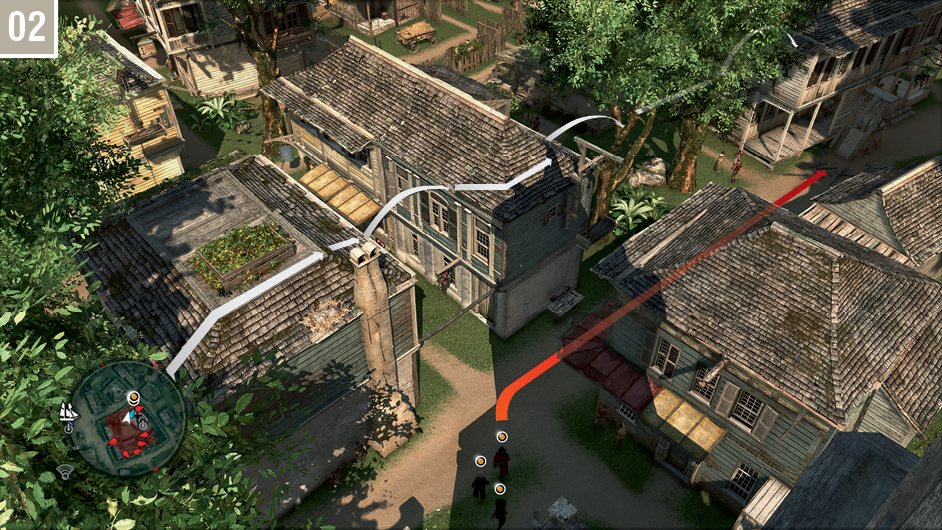
Continue to the next rooftop in line via the trees, as shown here. A Gunner will climb the ladder to reach the rooftop as Torres and Prins walk beneath. Hide behind the chimney, then whistle to attract him for a quiet kill.
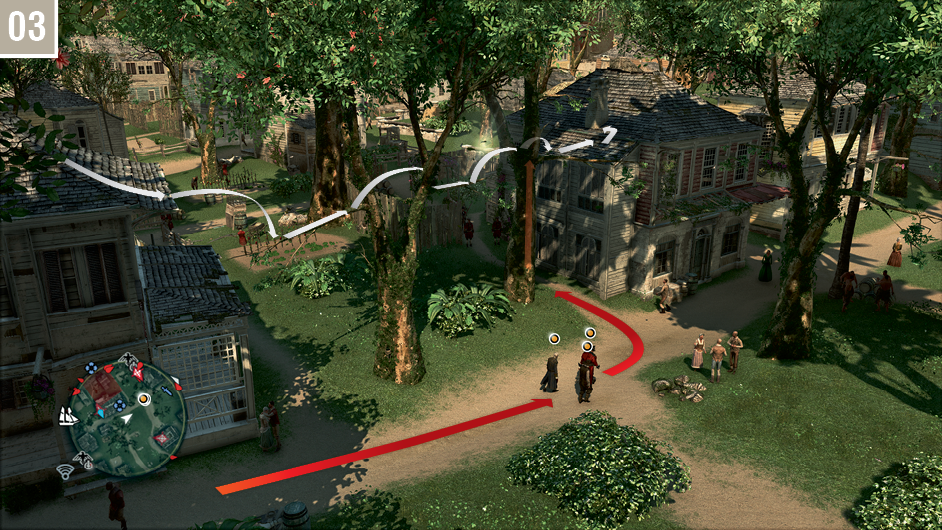
Move to the west side of the same rooftop and watch your targets below. When they move off to the northwest, jump down and move to the next building to the west. Climb the ladder to reach the rooftop.
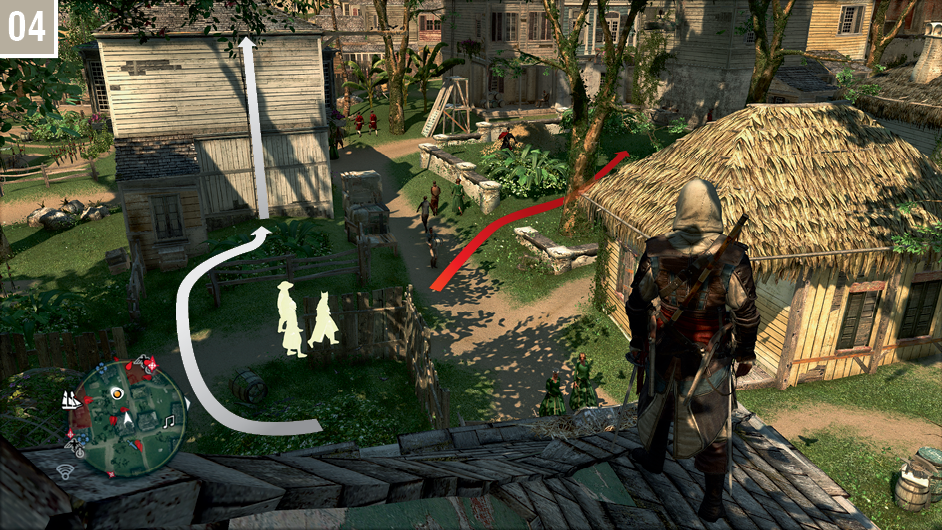
As the targets walk south, free run through the trees to reach the next rooftop.
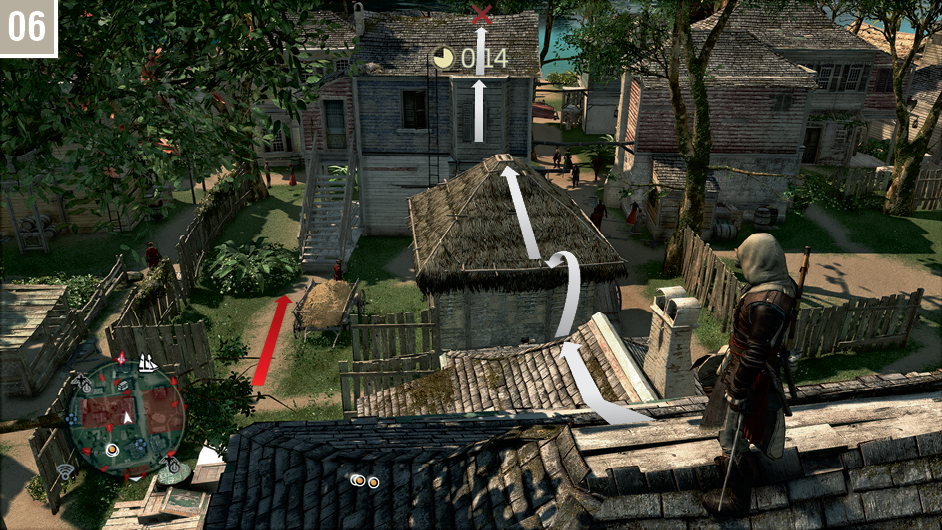
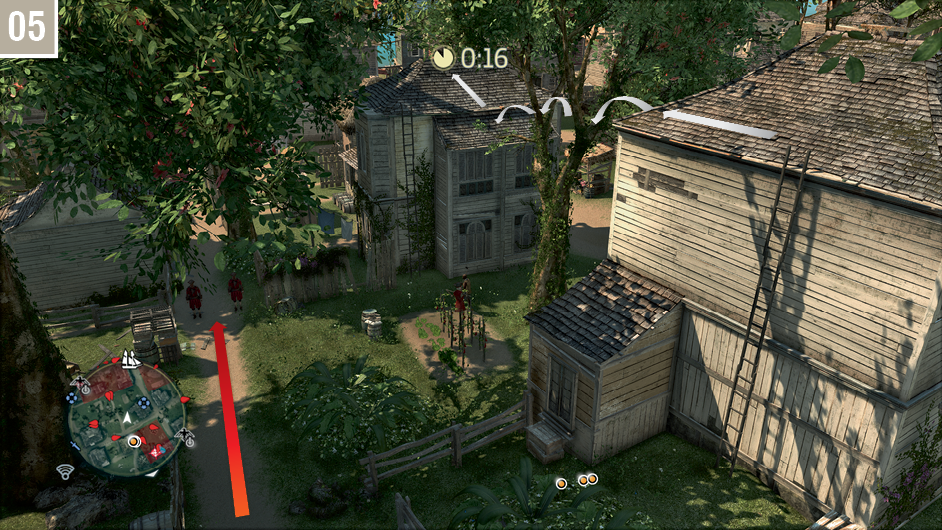
Timing your movements carefully to avoid detection, continue south until you reach the thatched roof. There is a rope on the other side that offers easy access to the next building, which you can climb without fear of detection once your targets have passed. The third Gunner required for the Optional Objective can be found on the opposite side of this rooftop.
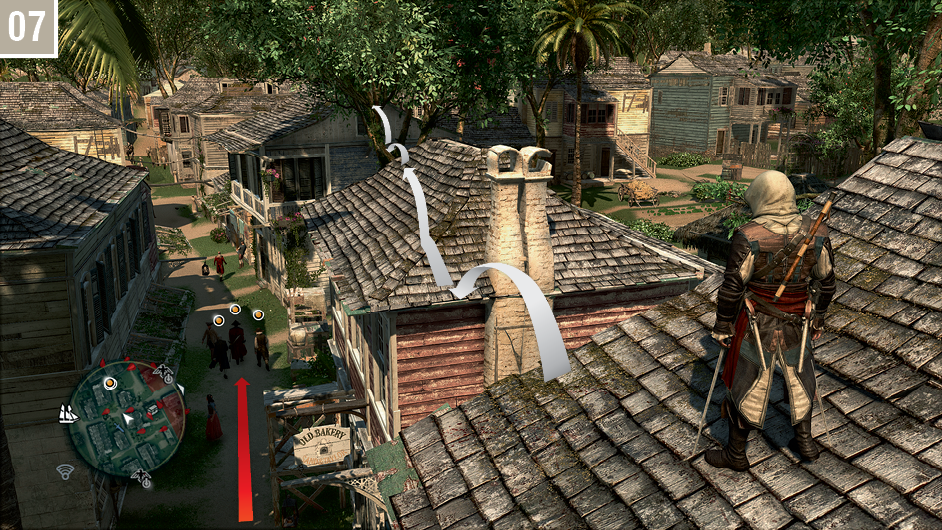
Turn to the west and free run via the route shown here to reach a building further along the street.
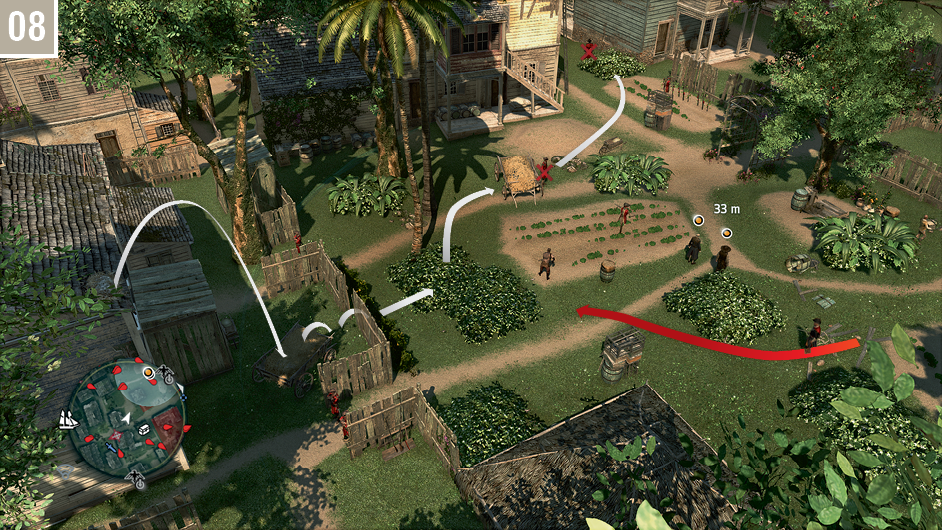
When Torres and Prins arrive at the garden, an eavesdrop begins. Perform a Leap of Faith into the hay cart, then slip through the gap in the fence to reach a Stalking Zone. There is a Captain patrolling to your right here, but he’s usually at the far extent of his route when you arrive; a glance to ensure that this is the case is a good idea before you continue. When your targets move past the next hay cart, jump into it and assassinate the soldier there; you can then move up and eliminate the Brute from the Stalking Zone.
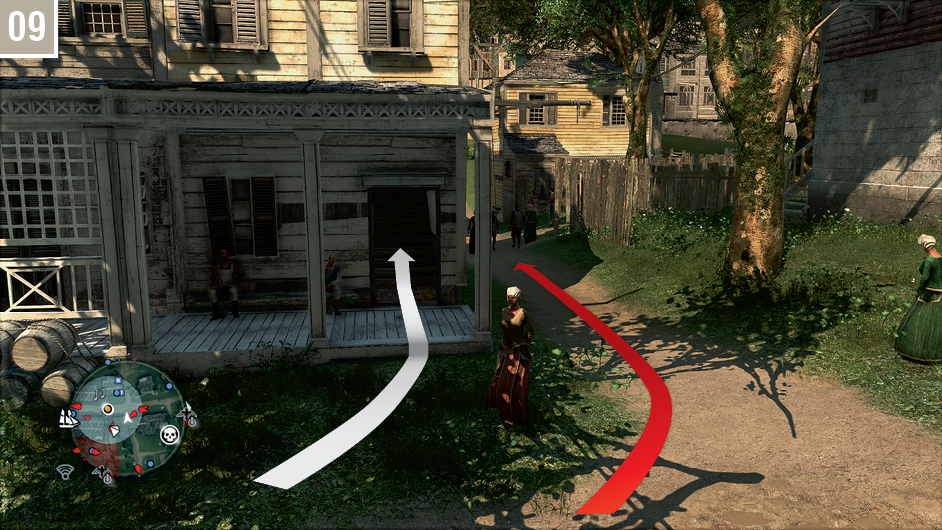
When you arrive on the street, wait until your targets move around the corner, count to five, then run through the open doorway. This will deliver you through the house automatically, with Kenway jumping to a branch outside.
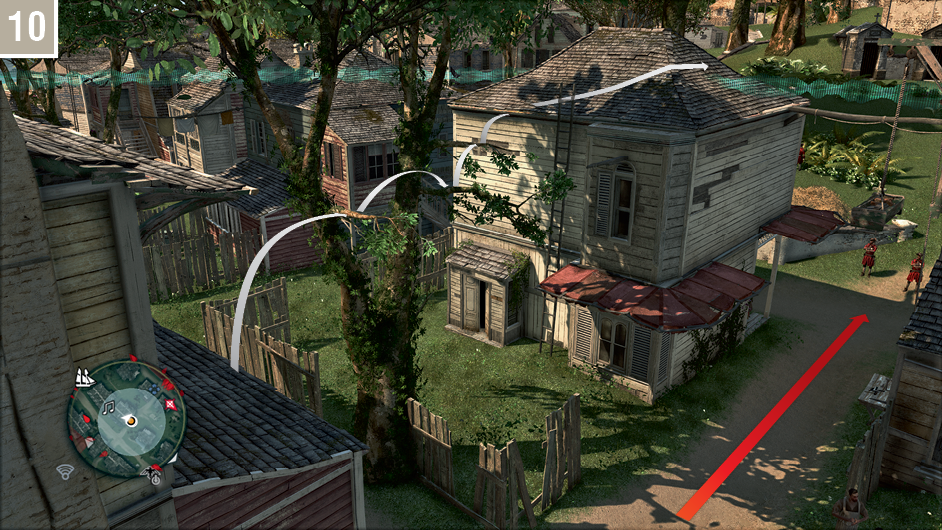
Climb the branch and free run to the next rooftop. If you made your move a little too early, you may briefly interrupt the eavesdrop. As long as you reach the roof quickly, this will have no lasting repercussions.
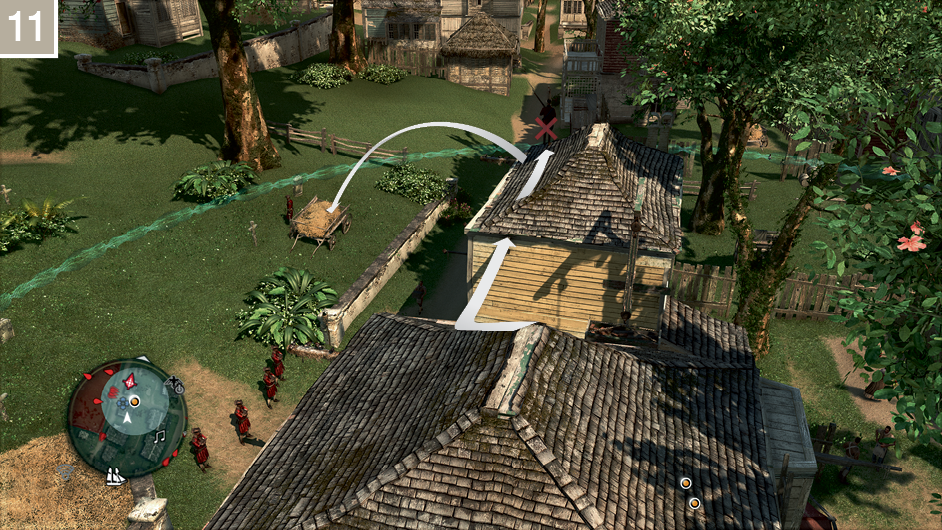
Use the beam to reach the rooftop to the north, then eliminate the fourth and final Gunner to complete the Optional Objective. When Torres and Prins have passed that position, perform a Leap of Faith into the hay cart.
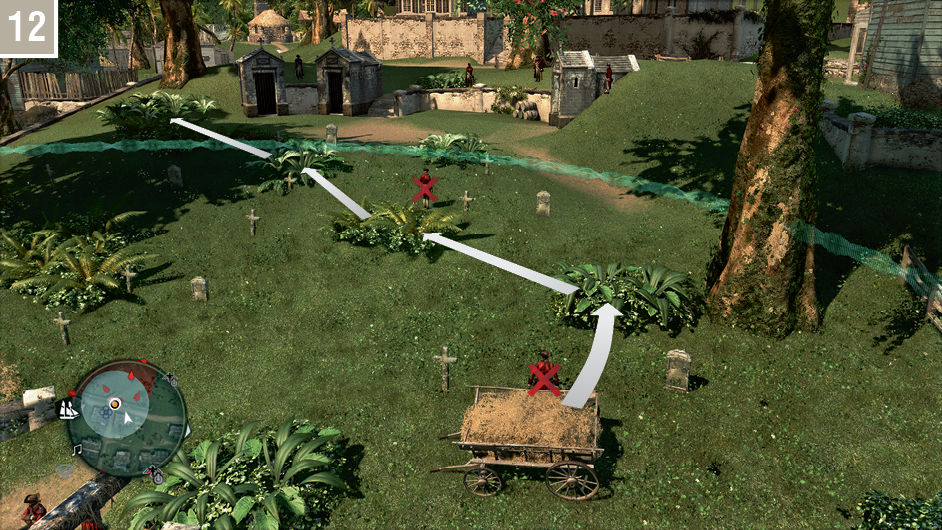
Assassinate the guard in front of your hiding spot, then move through the Stalking Zones. There is one more soldier to eliminate, then you can reach a Stalking Zone where Kidd awaits. Take the time to select Smoke Bombs: this will enable you to hit the ground running after the cutscene.
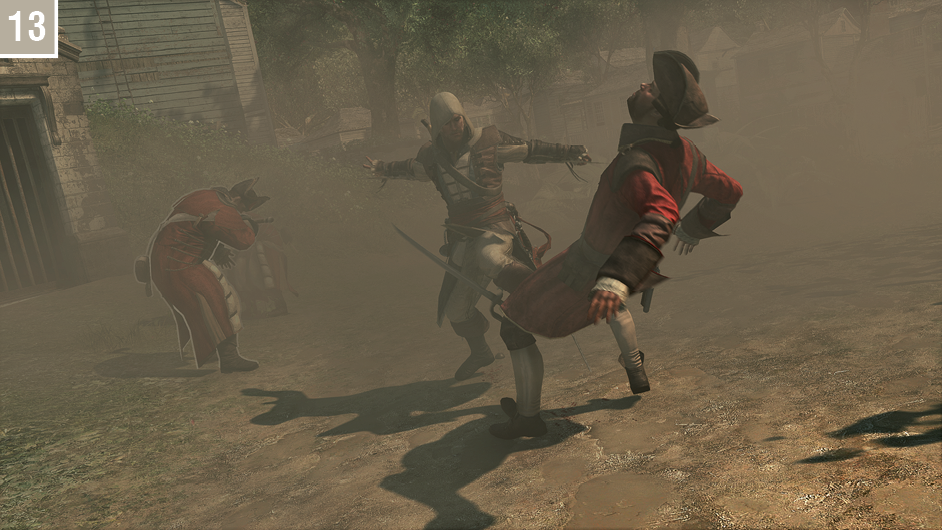
Run straight for the guards and drop a Smoke Bomb to incapacitate them; you can then eliminate at least three with simple assassinations before the cloud dissipates. Drop a second device, then quickly kill additional targets to satisfy the second Optional Objective.
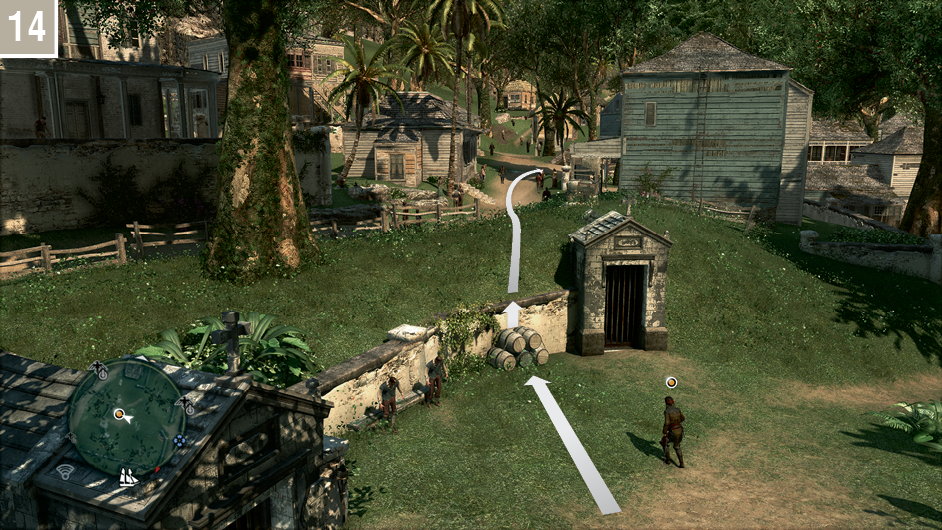
After the cutscene that follows the battle, you must chase and tackle Kidd. Though he will make his way onto the rooftops when the pursuit turns to follow the path to the east, you should resolutely remain on the ground. Quickly obtain additional Smoke Bomb kills if required.
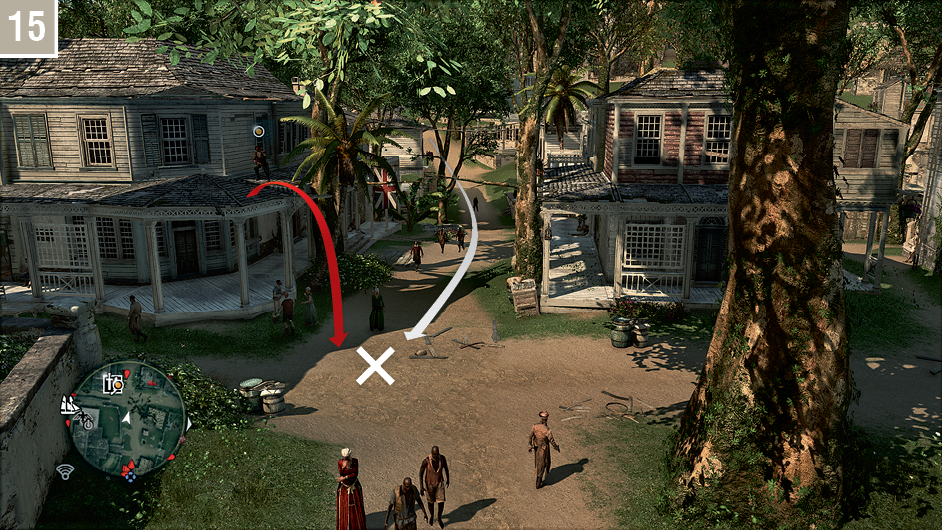
Ignore Kidd, and just sprint to the east to reach the intersection pictured here. You can then turn and wait for Kidd to return to ground level, then hold the High Profile Button and press  with the Assassin highlighted to perform a tackle, and end the Memory.
Memory 03 “Unmanned”
Mission Overview
Optional Objectives
- Use two Berserk Darts on Brutes.
- Use two Sleep Darts on Gunners.
Notes & Further Reading
- If you wish to complete the Optional Objectives, you must ensure that you have a sufficient stock of both types of Blowpipe dart before you begin. Head to the southeast side of the city to hunt and skin two howler monkeys. Use Eagle Vision to spot them, and Sleep Darts to knock them from their perches (note that pistol fire may attract nearby soldiers). This will enable you to craft the Dart Pouch I upgrade, increasing the capacity of both dart varieties to 10. This upgrade is an enormous boon in numerous main Memories, so it’s definitely worth the diversion.
- If you are out of Smoke Bombs after “Traveling Salesman”, we would suggest that you acquire at least a few before you start here – or take the time to loot slain foes to replenish your stocks while playing the earlier stages of this Memory. These may prove useful during a later situation.
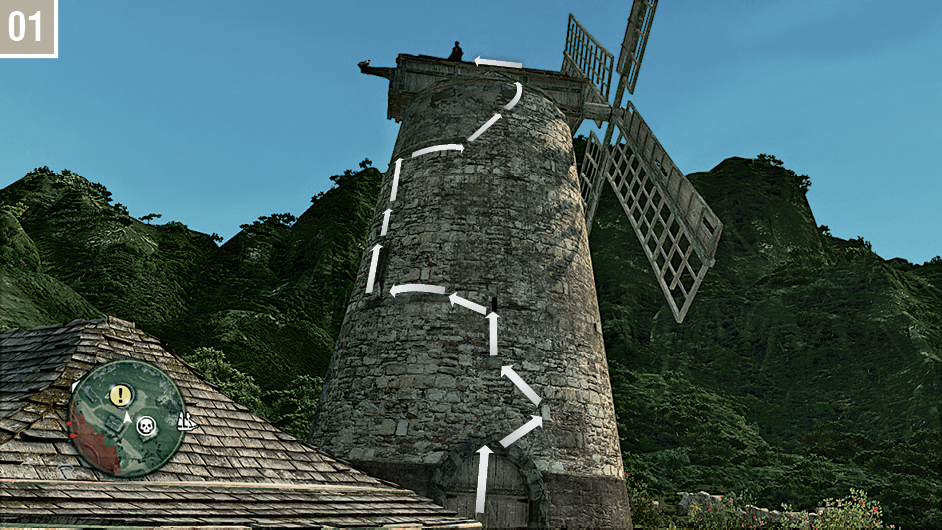
Follow the path shown here to reach the top of the windmill and meet with James Kidd.
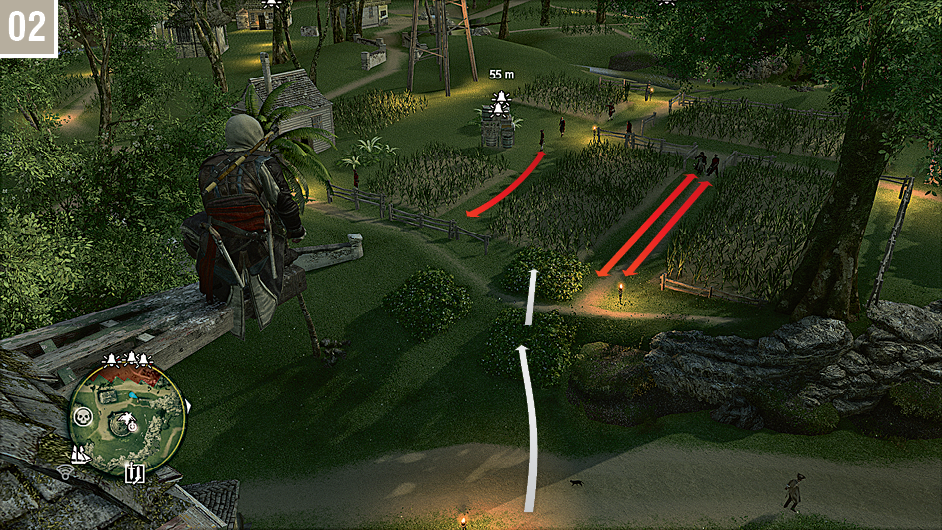
After the cinematic, Synchronize at the Viewpoint and take a moment to view the challenge ahead of you before you perform a Leap of Faith back down to the ground. Begin your approach via the route shown here; be careful not to draw any attention from the highlighted patrols.
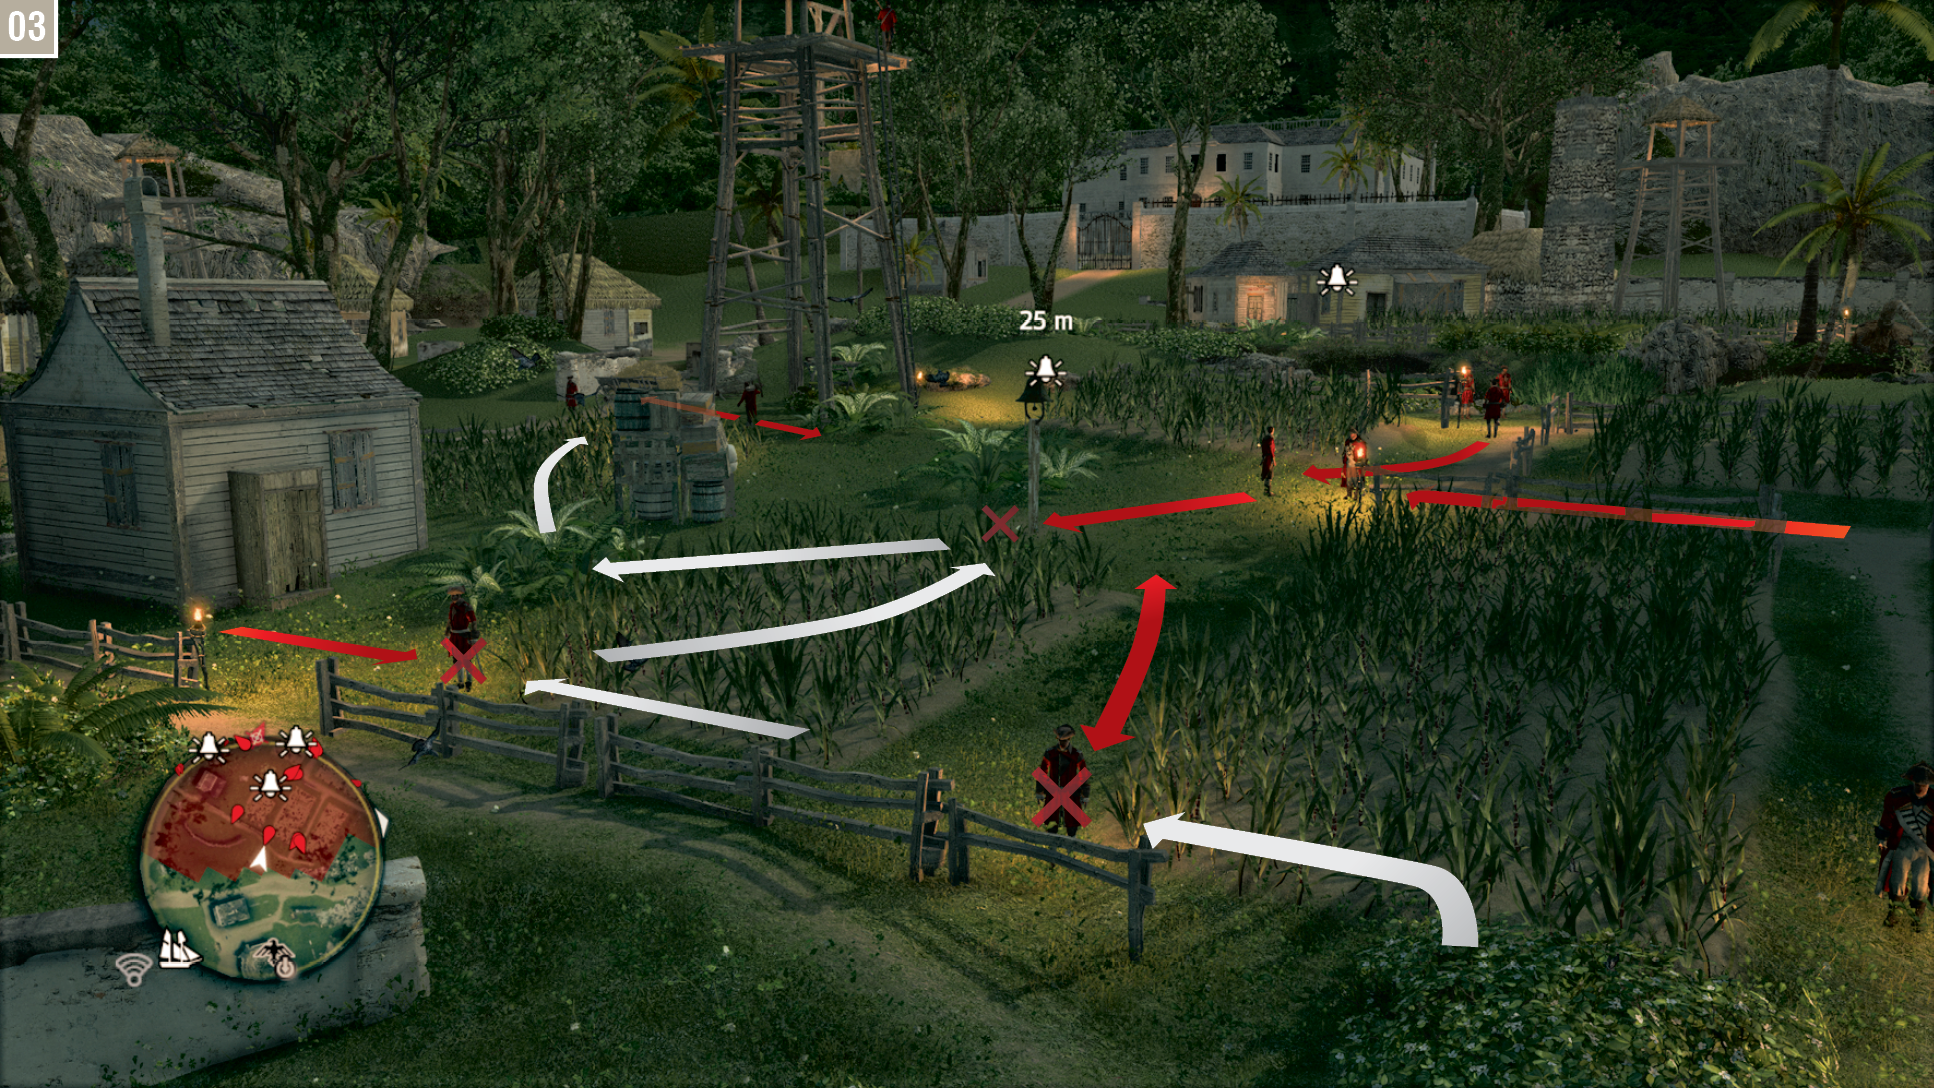
Stealth isn’t actually mandatory during this mission, though the sheer weight of numbers ranged against you (and the presence of Gunners in guard towers) means that it’s distinctly practical. To disable the first bell, you only actually need eliminate three targets, as illustrated in the accompanying screenshot. Once these antagonists have been removed from the equation, wait until other patrols are facing away before you step out and press  to disable the alarm. In the event that you are spotted, quickly return to the Stalking Zone and, if necessary, deal with a guard if he should arrive to closer scrutinize the area. When the coast is clear, move into the Stalking Zone close to the tower. (The checkpoint recorded when you disable the first bell is in this position, so you can easily reload from the Pause menu if a fight breaks out.)
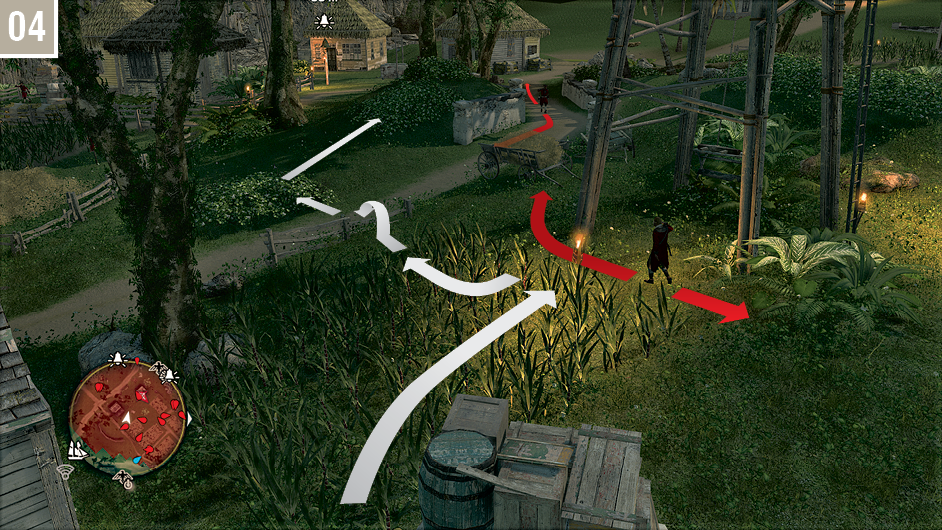
Eliminate the nearby Scout, check the road for a patrolling soldier, then sprint over the path to reach a Stalking Zone just beyond the fence. If you would like to complete the Optional Objectives, turn and face the tower. When the Gunner moves into view, hit him with a Sleep Dart. You can then whistle the nearby soldier and kill him. Press forward to the next Stalking Zone to begin your assault on the second alarm bell.
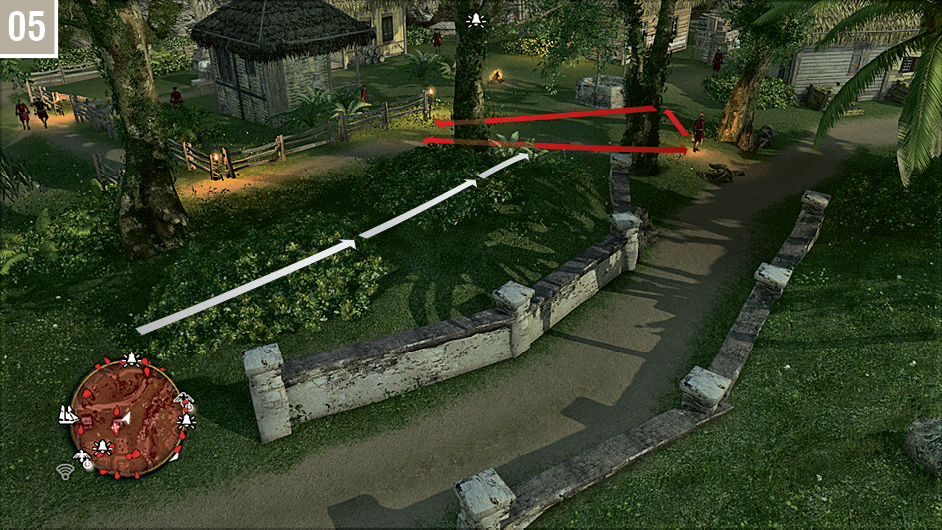
Move through the Stalking Zones to reach a position regularly passed by a patrolling guard. Whistle to entice him over, then dispatch him.
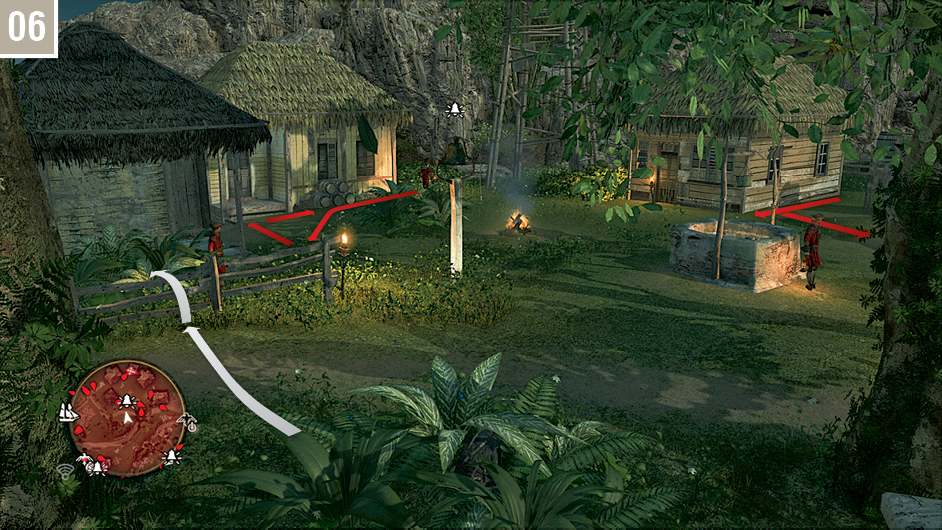
When no one is watching, make a quick sprint to the Stalking Zone just beyond the fence; hold  as you approach to make Kenway vault it cleanly. You can then assassinate the sentry standing right by you, then wait and lure the patrolling Scout into the undergrowth. Target the Gunner in the tower to the west, then fire a Sleep Dart to incapacitate him – and complete the second Optional Objective.
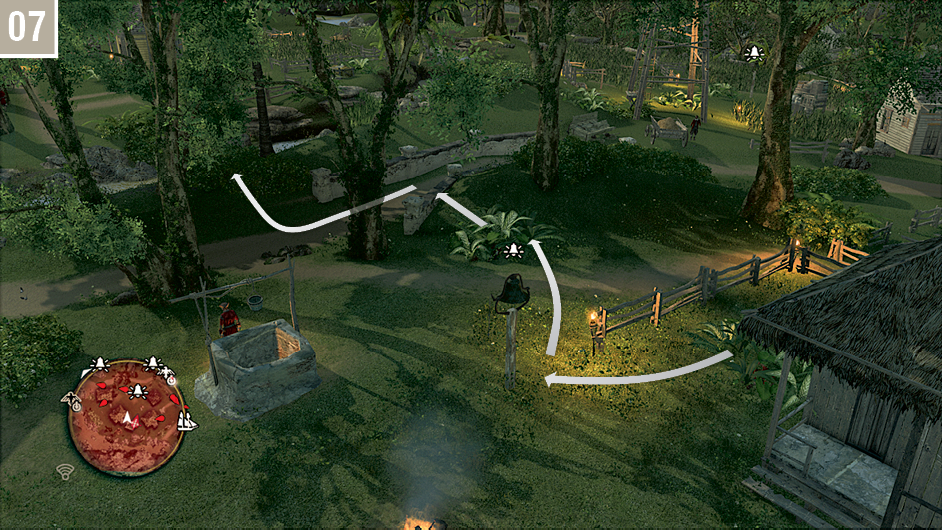
Check that no one is watching, then step out and disable the alarm; you can then make your way to a Stalking Zone beside a stream.
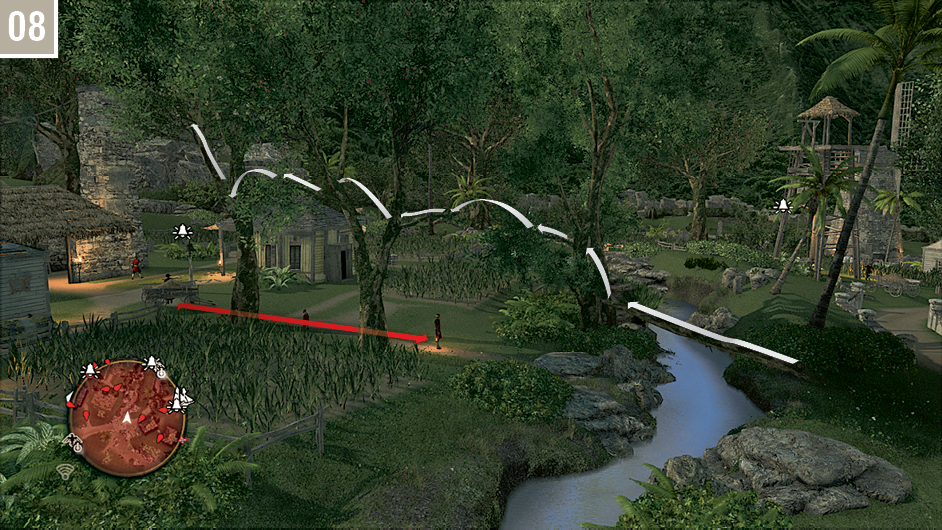
Sprint along the log to reach the V-shaped section of the tree. When you arrive, tap  to ascend before Kenway is spotted. You can then free run until you reach the last tree in line, then press
  again to reach a lofty branch. This vantage point is perfect for the chaos that you’re just about to wreak.
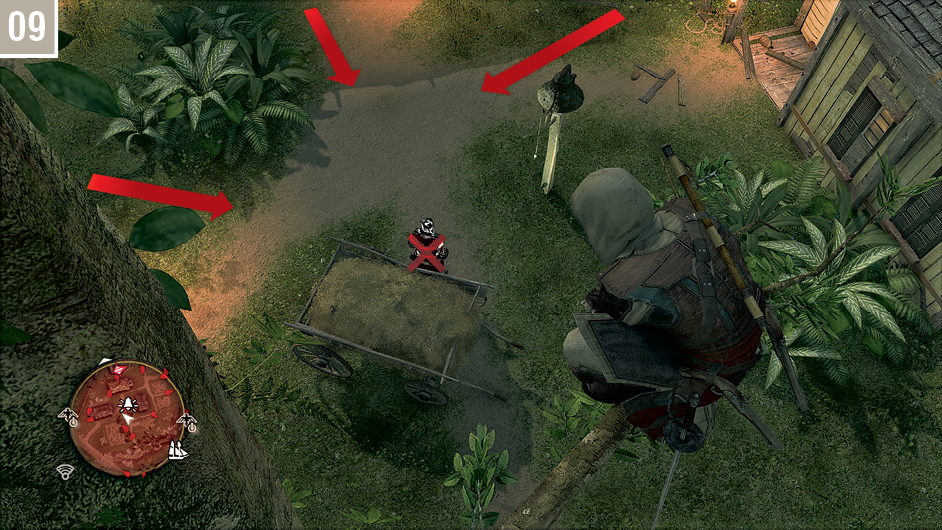
Hit the Brute stationed by the hay cart with a Berserk Dart, and the soldiers in the immediate vicinity run in to engage him. From your vantage point, watch the battle unfold. You should still have several darts available. Use these to incapacitate guards, starting with those that haven’t entered the battle. Be sure to keep at least one Berserk Dart in reserve to complete the second Optional Objective later. When the battle ends, the area should be clear of hostiles. Perform a Leap of Faith into the hay cart, then step out and disable the alarm bell. Move into the field of crops to the southwest and, from there, make the short jog to the waypoint by the gates.
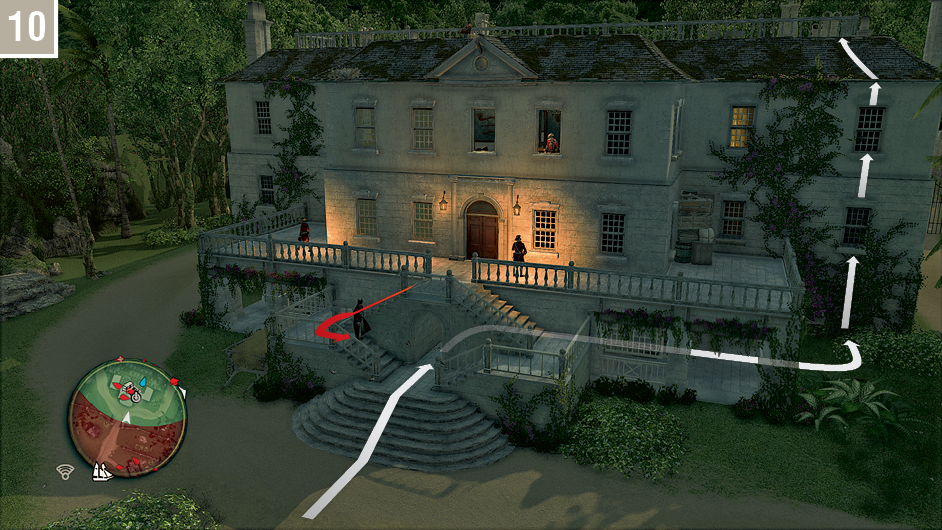
After the cutscene, follow Kidd through the gates. You will notice a Brute walking down the steps on the left. Hit him with a Berserk Dart as soon as you have a clear shot to complete the related Optional Objective, then sprint into the archway beneath the main entrance. Immediately perform a double assassination on the guards inside, then turn right and run until you emerge next to an outer wall covered in vines. Immediately scale the wall to reach the rooftop.
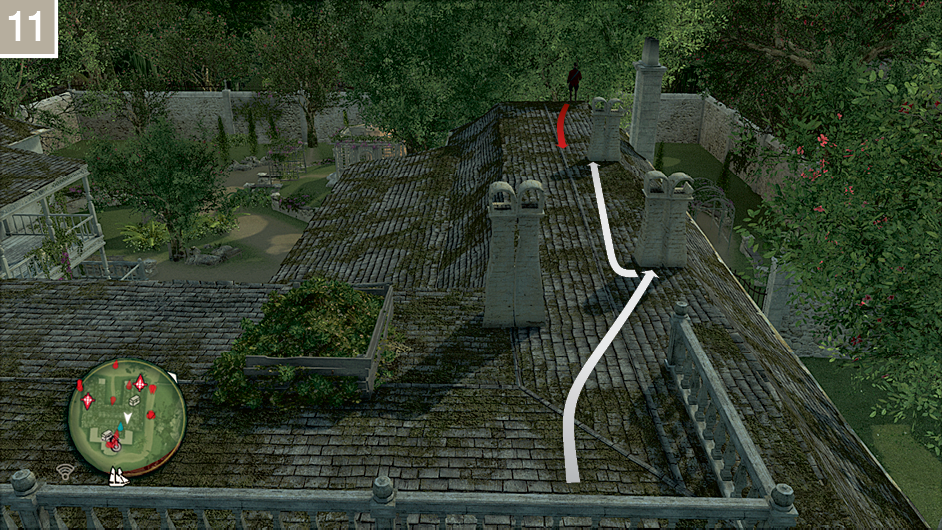
Using the chimneys as cover, move forwards and eliminate the Gunner. You can make a quick (and entirely optional) detour to the nearby Viewpoint if you wish.
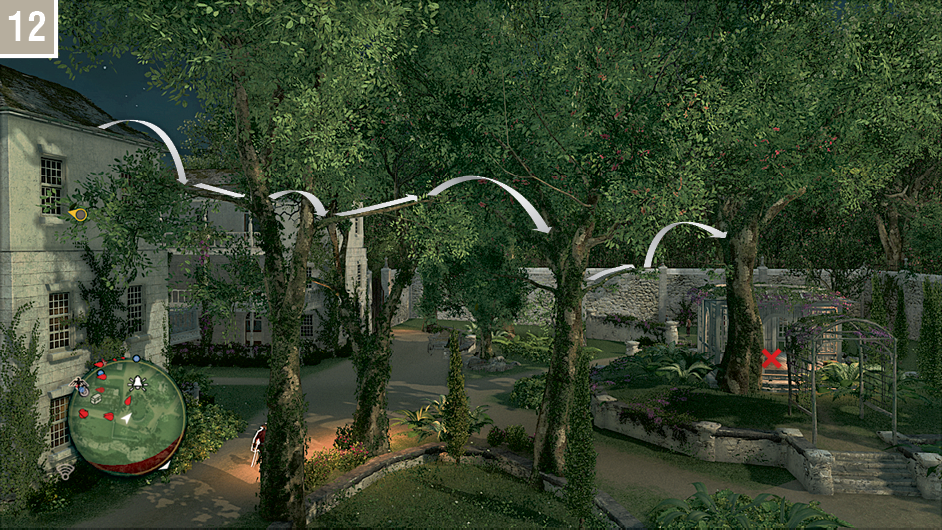
Free run through the tree course to the northwest to arrive in a V-shaped section above Prins. Wait until he walks beneath, then perform an air assassination.
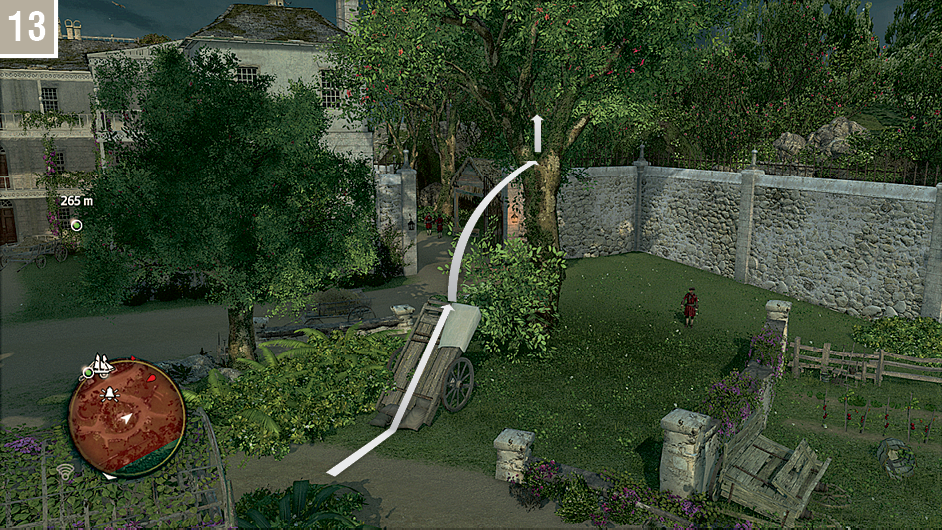
After the visit to the white room and a second cinematic interlude, Kenway must escape the area. With an intimidating number of soldiers in pursuit, utilizing free run courses is the best (indeed, only) way to make a clean escape without conflict. Start at the upturned cart, then free run through the trees.
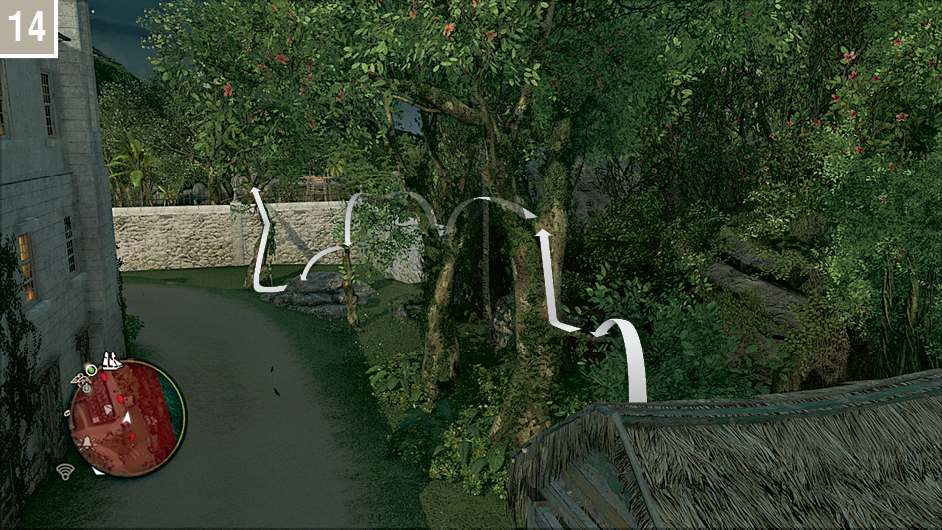
Just before you reach the outer wall of the mansion, you need to briefly return to ground level. Immediately steer Kenway towards the weathered, curved bough to leap into a tree on the opposite side of the wall. From here, continue through the trees until the free run course comes to an end; dive into the hay cart below.
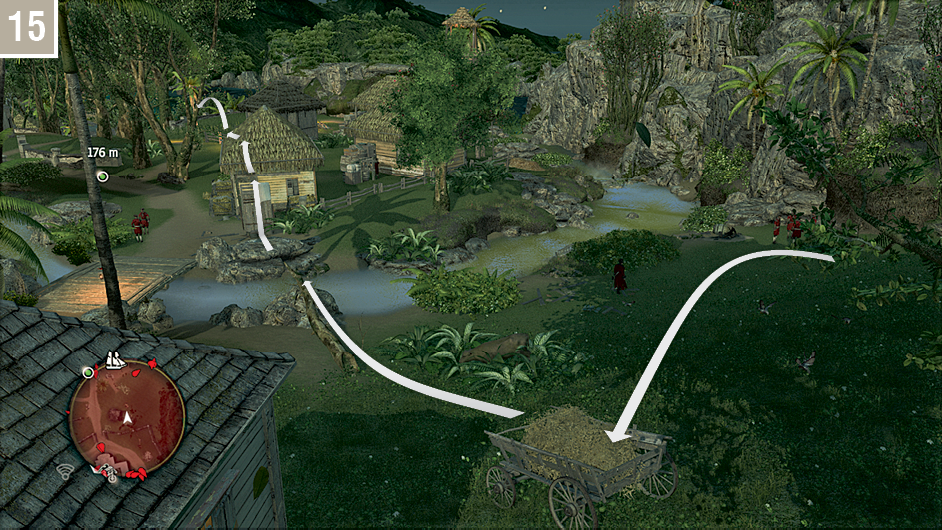
From the hay cart, cross the stream via the log and use the upturned cart to reach the rooftop. This provides access to another free run course through the trees. There is no time to delay here: those who tarry will find that Gunners will soon gain a clear shot at Kenway.
Sequence End
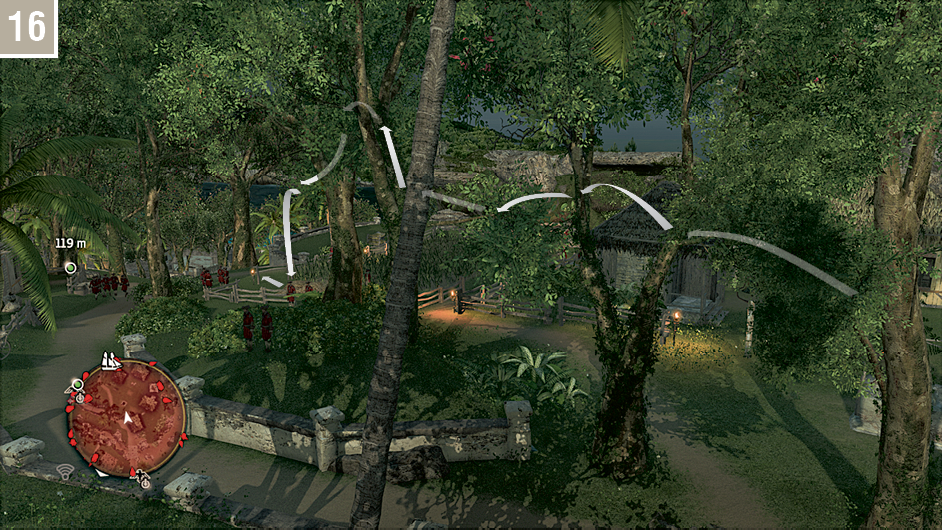
Free run through the trees until you reach a pile of straw for Kenway to leap into. If you find that you are inexplicably stuck in the trees, it may be that you need to ascend to a higher level; tap  to climb.
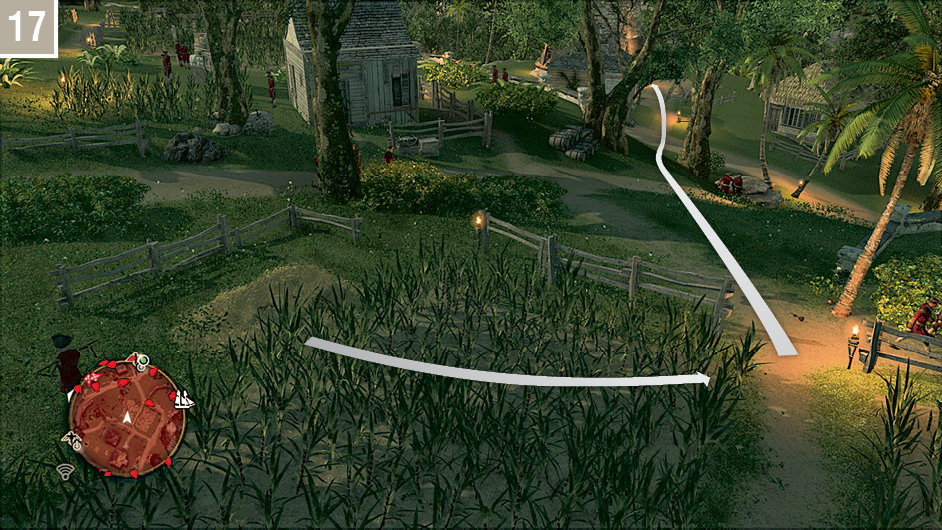
The final part of the chase takes place purely on foot. Sprint down the bank, dropping a few Smoke Bombs to deter the mob, and approach the right-hand side of the windmill. You should then run around the building, which will cause the pursuing soldiers to lose sight of Kenway.
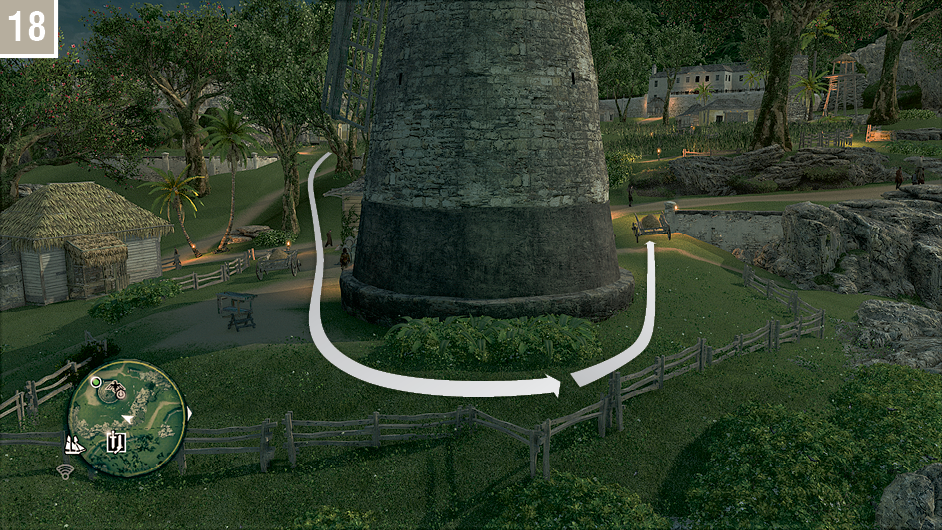
As you finish the U-turn, leap into the cart full of hay to reach safety, and end the Memory. In the event that you do not shake all combatants, use your remaining Smoke Bombs to end the fight easily.
You will need to have at least 5,000R to begin the first Memory of Sequence 06, so it makes sense to raise it before you set sail for Nassau. You could easily accumulate this sum in Kingston by completing Assassin Contracts, looting Treasure Chests and raiding local warehouses. As ever, you can always seek plunder at sea.
No matter which method you choose, players who have taken a relaxed attitude to raising capital and upgrading the Jackdaw so far are advised to begin undertaking optional activities in earnest at this stage. Story episodes that involve the Jackdaw will soon increase in difficulty, so improving Kenway’s ship will enable you to stay level (or, better still, ahead) of the difficulty curve. Study the Completion Timeline to learn of all activities available to you, and peruse the “Accumulating Wealth” section of the Reference & Analysis chapter to gain a better understanding of how to make reales with a minimum of effort.