
Assassin's Creed IV: Black Flag Guide Side Quests
Assassin Contracts
Assassin Contracts are action-oriented puzzles, in a sense, each one a unique arrangement of guards designed to prevent Kenway from administering a lethal blade, blow or Blowpipe dart to the specified target. They always take place in Restricted Areas, either temporary, or “borrowing” existing sites from militarized or off-limits areas throughout the Caribbean map. Experimenting with different approaches to find a pure and unadulterated solution, opening up the route to an easy assassination, is absorbing and rewarding. It is enormous fun to beat these missions with your own artifice and imagination, so we would suggest that you attempt to do so before consulting the walkthroughs in this section. Our approaches are designed for immediate, frustration-free success – and that, we’ll candidly admit, is rarely the most enjoyable way to experience these side quests.
Blowpipe darts of both varieties are phenomenally useful in these missions, so always ensure that you have a ready supply (plus a backup cache of bones to craft them). Sleep Darts, as ever, are the keys that so frequently unlock unobstructed passage to a favorable vantage point or direct assassination opportunity. Berserk Darts, however, are the absolute weapon of choice for kills, as they enable you to kill your target without initiating a post-assassination fight. Rather than struggling to extract yourself from a melee, you can leisurely watch one unfold before you take your leave. You should not, however, feel obliged to use this powerful tool on every occasion. Traditionalists may prefer the personal touch of a hidden blade after a bold leap, the artistry of a headshot on a moving target, or the chicanery of an infiltration that involves the services of dancers or drunken pirates. Everything, as they say, is permitted.
Contracts in most areas must usually be completed in sequence, with a successful assassination unlocking a subsequent challenge for that location if any remain. In the event that a target escapes, you can Fast Travel to a nearby Viewpoint to reset the side quest. Each fulfilled contract will provide you with 1,000R , plus an additional bonus if you do not trigger open conflict in the majority of instances. For easy reference, the order in which we cover them duplicates that of the Progress Tracker.
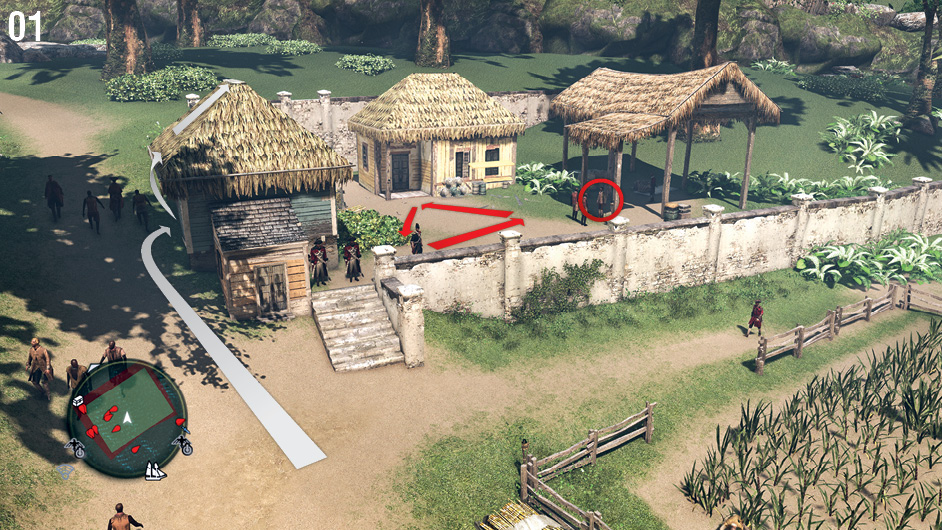
Kingston (Contract 01) – “The Plantation Master”: Approach from the path to the west that runs alongside the Restricted Area. Climb onto the rooftop and, after ensuring that the patrolling Captain is facing away, hit the marked target with a Berserk Dart.
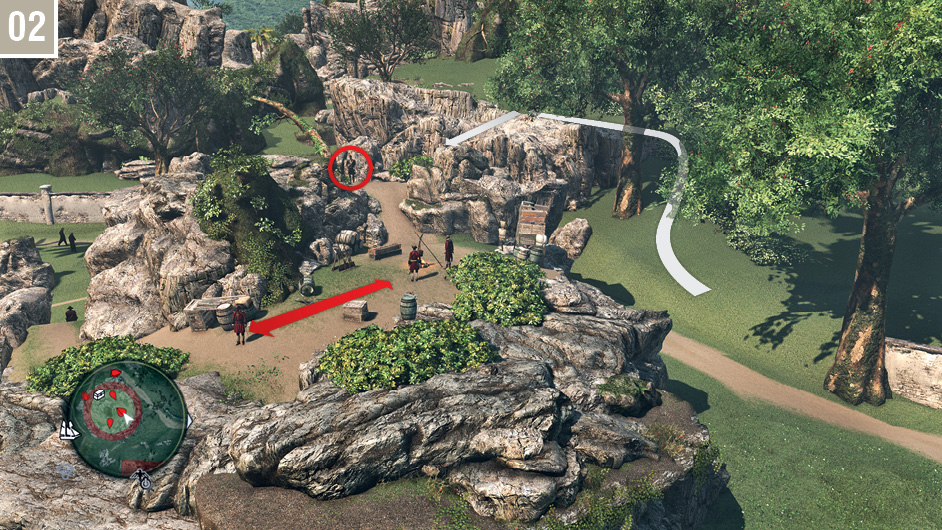
Kingston (Contract 02) – “The Guard Post”: This target stands on top of a rock outcrop, with the main path guarded by five soldiers. While you can incapacitate these with Sleep Darts, or potentially sneak to the target’s position via a climbing path on the north side, there is an even easier solution. From the cliff to the west, you can move within range for a precision head shot, or hit the Captain with a Berserk Dart.
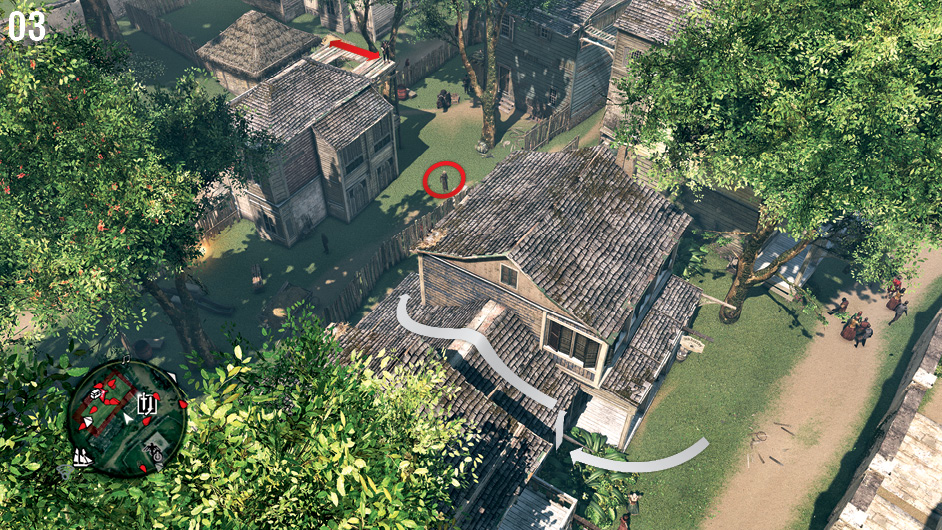
Kingston (Contract 03) – “The Slave Traders”: Approach from the east and climb the rooftop shown here to identify your target. You can achieve this without disturbing any of the sentries overlooking the area, though it’s usually sensible to hit the patrolling Gunner on the rooftop to the west. Shoot the target with a Berserk Dart, then watch the battle unfold.
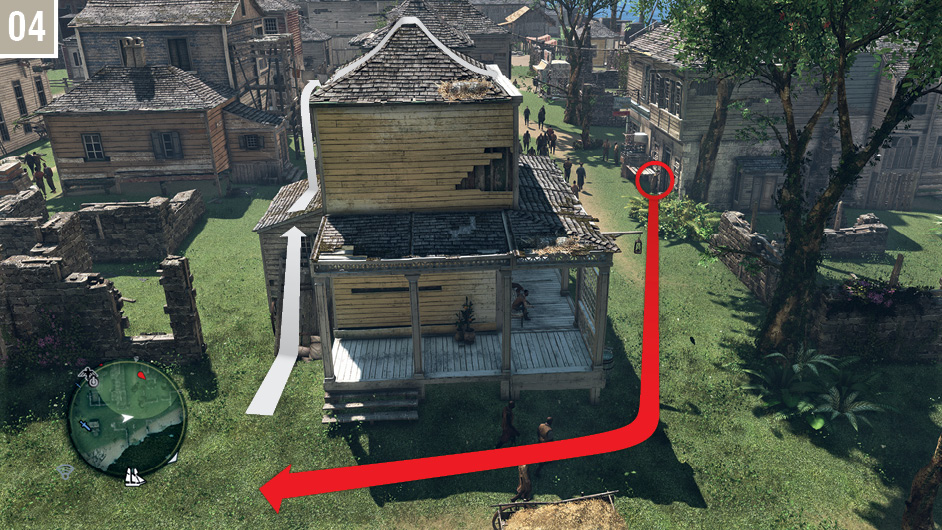
Kingston (Contract 04) – “The Judge”: This assassination takes place in Port Royal, to the south of Kingston; you will need to use one of the Fast Travel rowboats on the shore to reach this part of the map if this is your first visit to the area. Otherwise, Fast Travel to the nearby Viewpoint to begin. Approach from the southeast and climb the building shown here. Your target is the man shouting outside the door of a house on the opposite side of the street. While it is possible to air assassinate him, he will sprint to escape at the merest sight of Kenway, which begins a fairly complicated chase. For that reason, it’s wiser to shoot him with a pistol or a Berserk Dart from a safe distance.
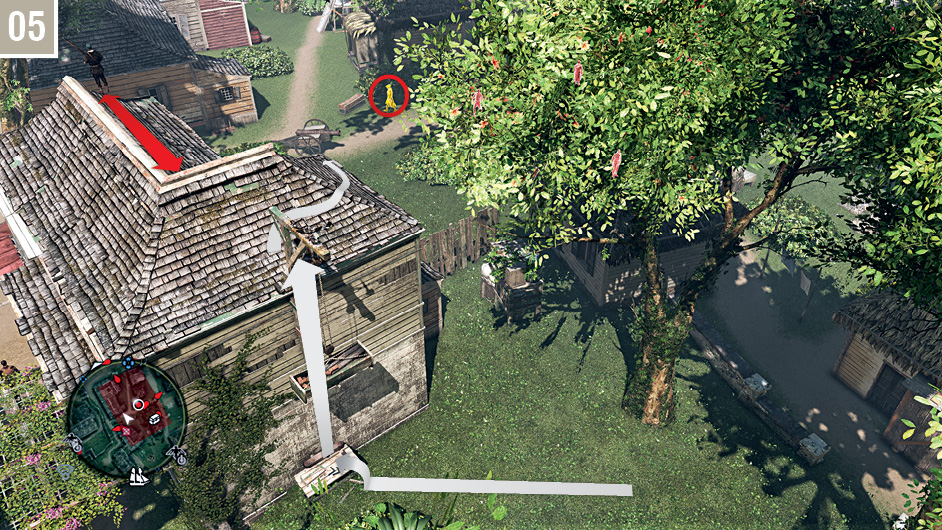
Kingston (Contract 05) – “The Weapons Smugglers”: Approach the Restricted Area from the south and ride the lift to reach the rooftop, then silence the patrolling Gunner. From here, you can identify the target (a Captain) and hit him with a Berserk Dart. For a change of pace, if you don’t mind a potential post-mission chase, you could alternatively use the musket dropped by the sentry.
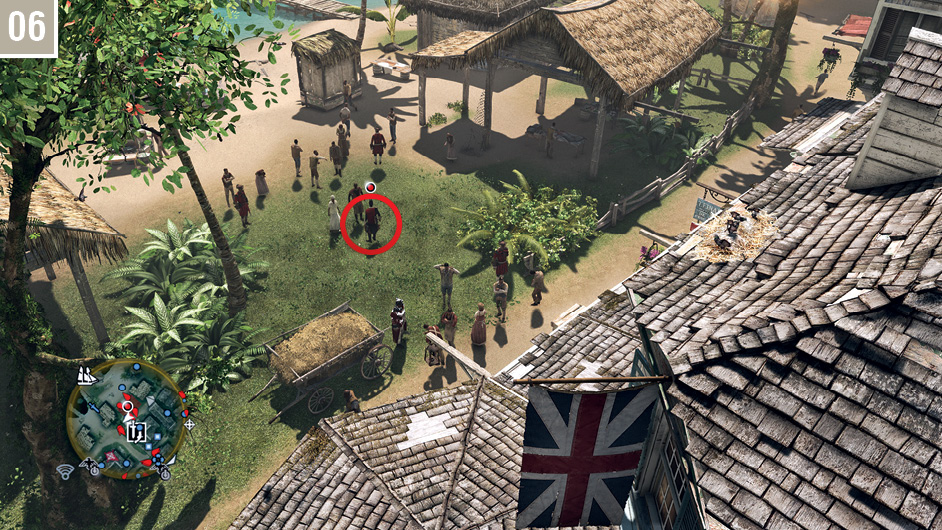
Kingston (Contract 06) – “The British Captain”: Your target stands at the center of a small Restricted Area, loudly remonstrating with citizens. A Berserk Dart is the cleanest solution, and can be administered from the rooftop to the north, or even from the beach to the southeast. An alternative solution is to employ the nearby drunken pirates and order them to attack him.
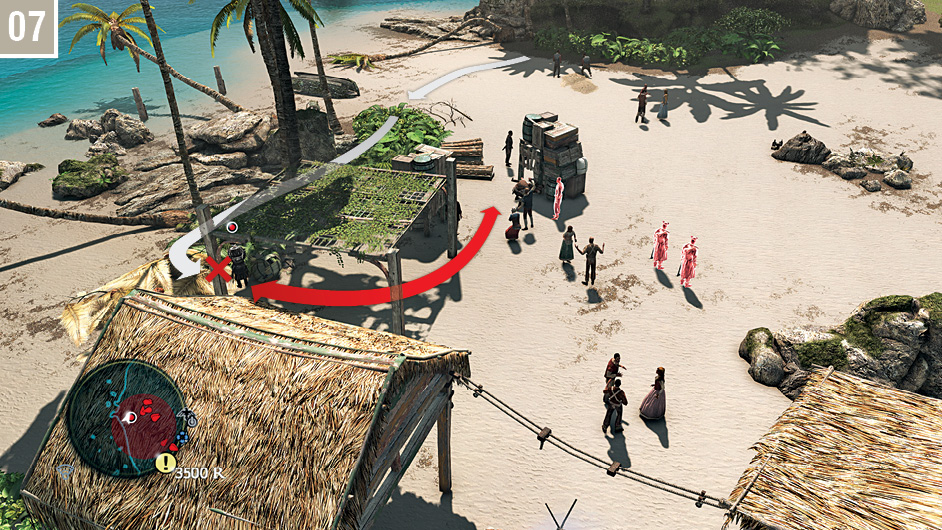
Havana (Contract 07) – “Beach Bonfire”: Approach the circular Restricted Area from the west and immediately enter the Stalking Zone. Your target walks a short patrol between the hiding spot and the brawling pirates. Transfer into the hiding spot when he is at the latter position, then assassinate him on his return.
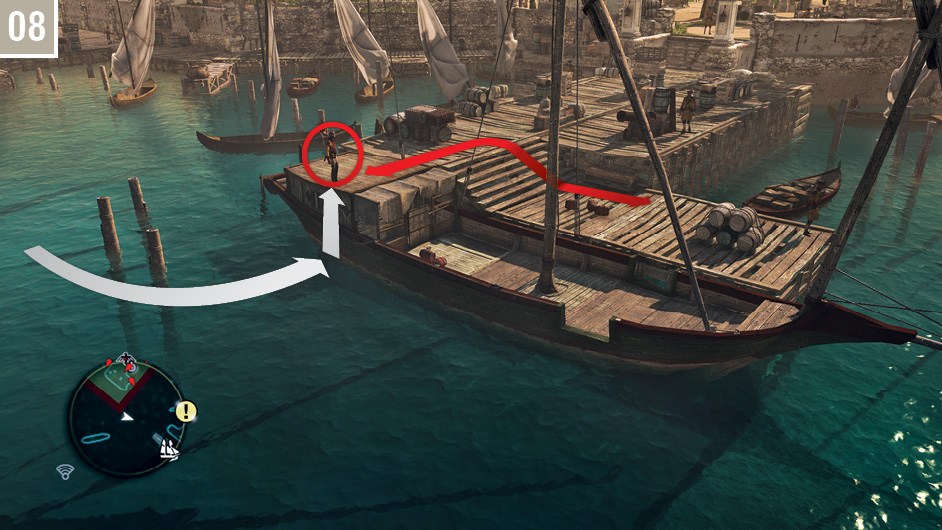
Havana (Contract 08) – “A Shipment of Powder”: From the dock to the south, jump into the sea and swim to the northeast edge of the Restricted Area. Your target, a Scout, walks the short patrol marked on the accompanying screenshot. Stealth swim to the side of the boat, then climb up and hang from the ledge. When he moves within range, perform a ledge assassination.
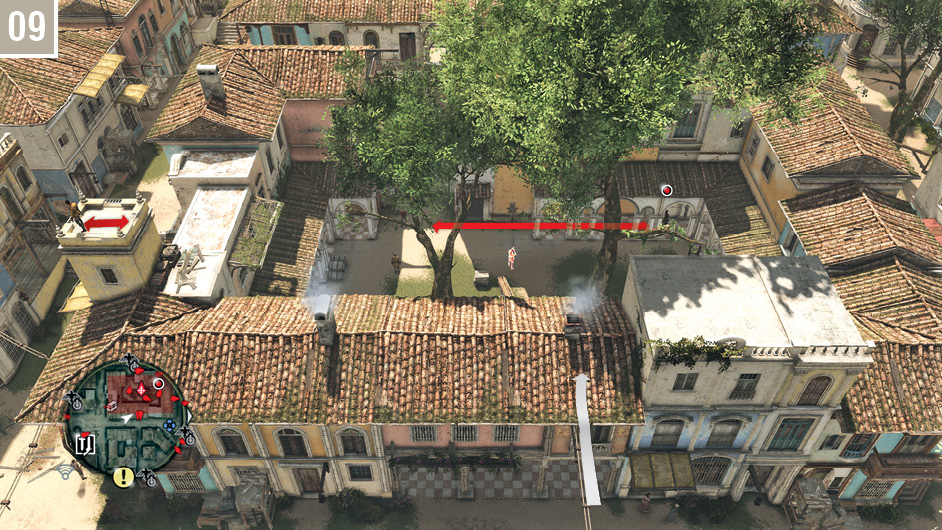
Havana (Contract 09) – “The Spanish Commander”: Approach from the rooftops to the east and, after tranquilizing any Gunners within range, look for the Captain as he walks his patrol. A single Berserk Dart will suffice; when he falls, you can retrace your steps to leave without complications. You could, alternatively, use the nearby dancers to distract guards stationed at the east or north entrance, then strike with a dart from a safe distance.
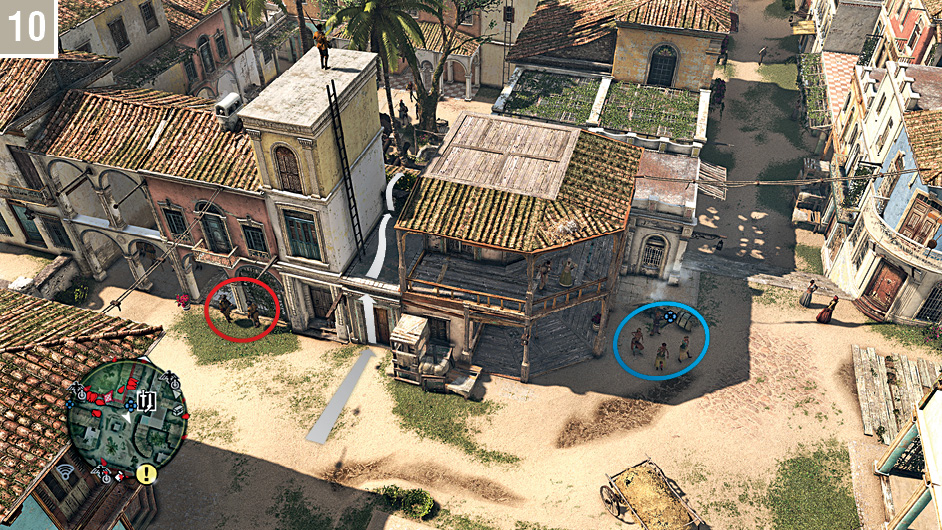
Havana (Contract 10) – “Unlicensed Dealer”: Make your way to the southeast corner of the Restricted Area and employ the group of dancers. Order these to distract the guards marked on the screenshot, then climb onto the low roof; this position is not overlooked by the many Gunners and Scouts on the upper rooftops. While being careful not to move too far forward, identify your target with Eagle Vision, then hit him with a Berserk Dart.
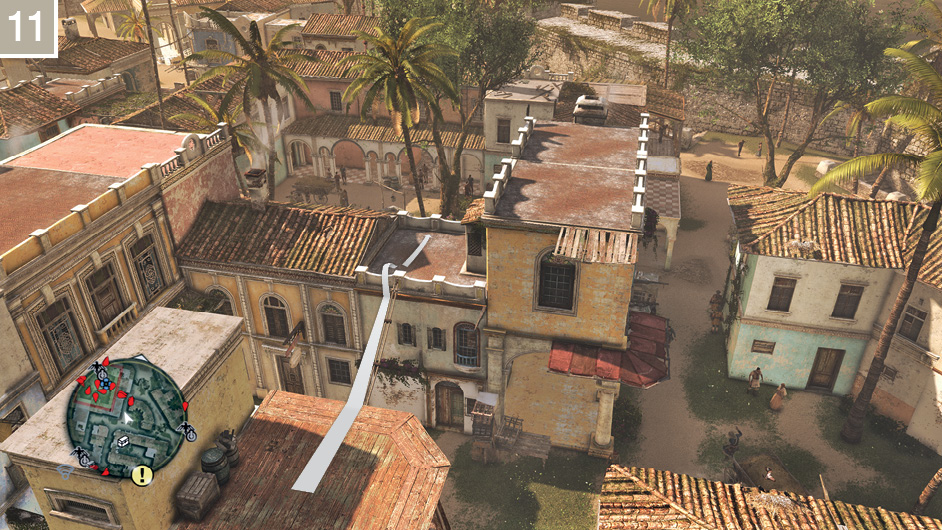
Havana (Contract 11) – “No More Taxes”: Approach from the rooftops to the south to avoid Gunners. From the very edge of the rooftop, look down to the left to see your target (a Captain). A Berserk Dart fired at any part of his body will end the mission without further exertion.
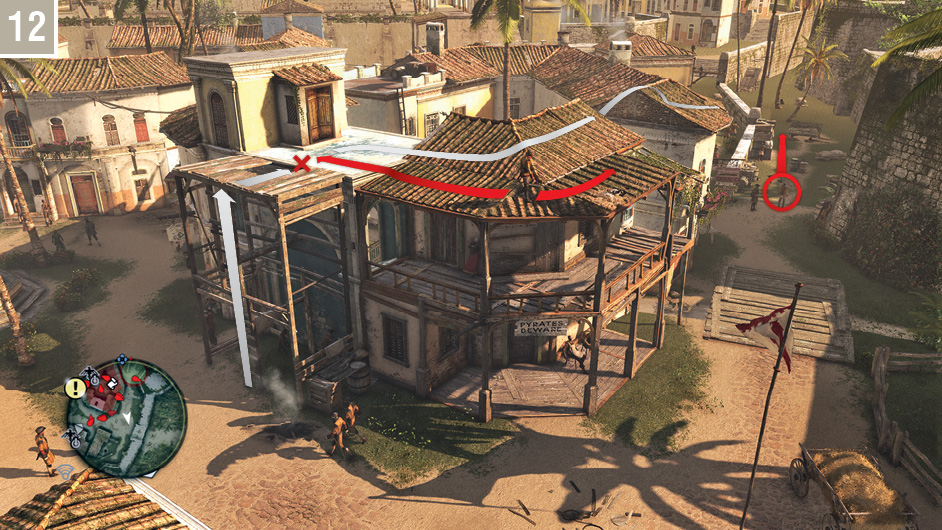
Havana (Contract 12) – “A Botched Escape”: Start your approach from the northeast. Climb the scaffold, then incapacitate the patrolling Scout. Move to the next rooftop to identify your target below. As soon as you set eyes upon him, he will enter into an altercation with the nearby guards – and his first instinct will be to flee. Stop his escape with a Berserk Dart.
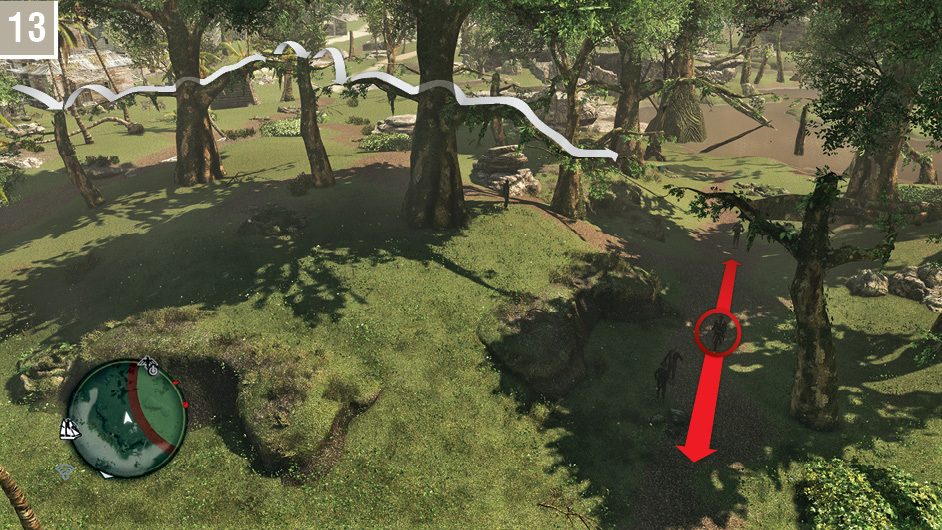
Nassau (Contract 13) – “The Pirate Captain”: Approach the Restricted Area from the east, through the lengthy tree-based free run course that begins behind the general store. From the safety of your vantage point, use Eagle Vision to identify the Captain, then hit him with a Berserk Dart.
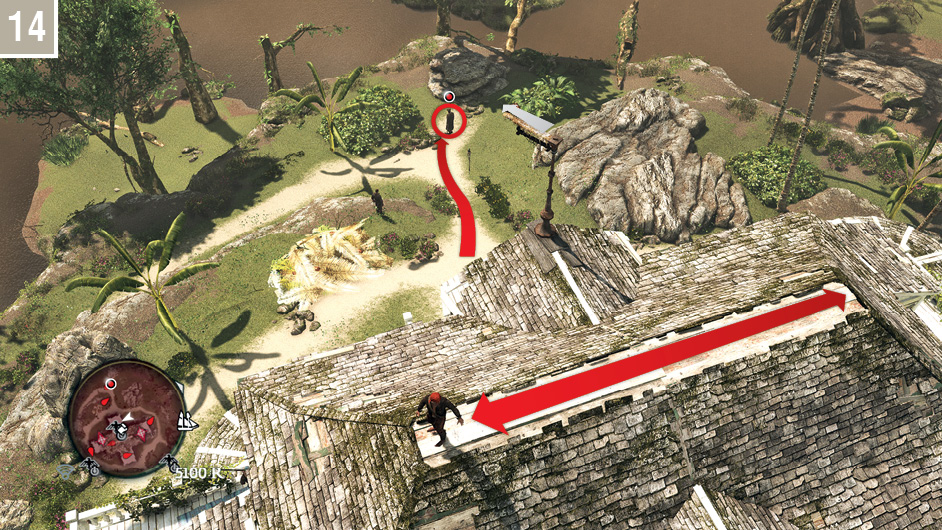
Nassau (Contract 14) – “The Outlaws”: If you have already Synchronized with the Viewpoint in the Restricted Area (and if not, you should do so before you begin), you can simply Fast Travel to the location. On arrival, immediately turn and hit the sentry on the rooftop behind you with a Sleep Dart, then identify the target below (a Brute) with Eagle Vision. Strike him with a Berserk Dart, then wait until he falls; it may be prudent to use this time to knock out the pirate that you tranquilized moments before.
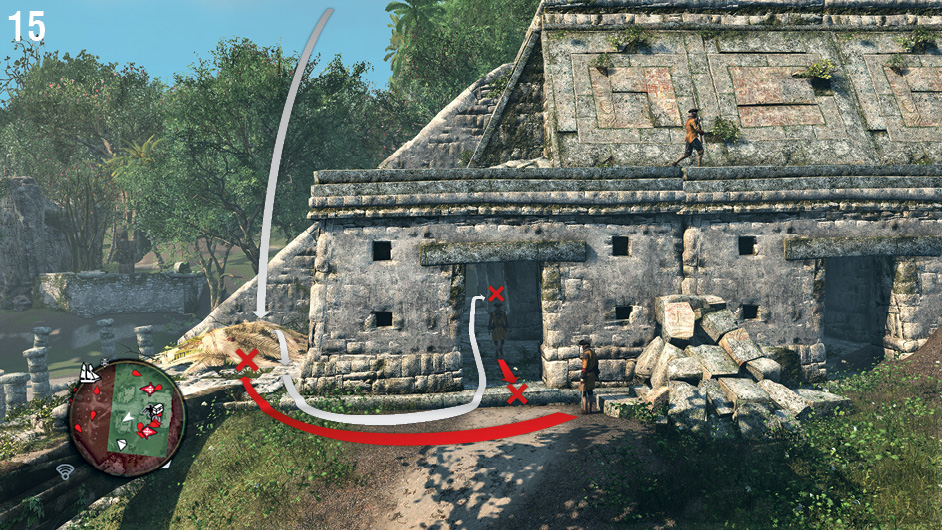
Arroyos (Contract 15) – “Tomb Raiders”: The target for this contract is found on Pinos Isle to the southeast. The Restricted Area around the ruins is very large, and the infiltration fairly complex if you move in from the southeast. If you have Synchronized with the local Viewpoint beforehand, however, you can Fast Travel directly to the very heart of the search zone. Perform a Leap of Faith into the hiding spot to your left, then whistle and execute a corner assassination on the guard outside the northeast entrance. Repeat this for the patrolling soldier who will emerge from the same door moments afterwards. Your target – a Captain – will set off on a patrol after you enter the ruins. For this reason, a direct approach works best. Sprint to the second door to the right, then press up against the edge and perform a third and final corner assassination. If things should go awry, you can Fast Travel to the Viewpoint above to reset the contract to its default state.
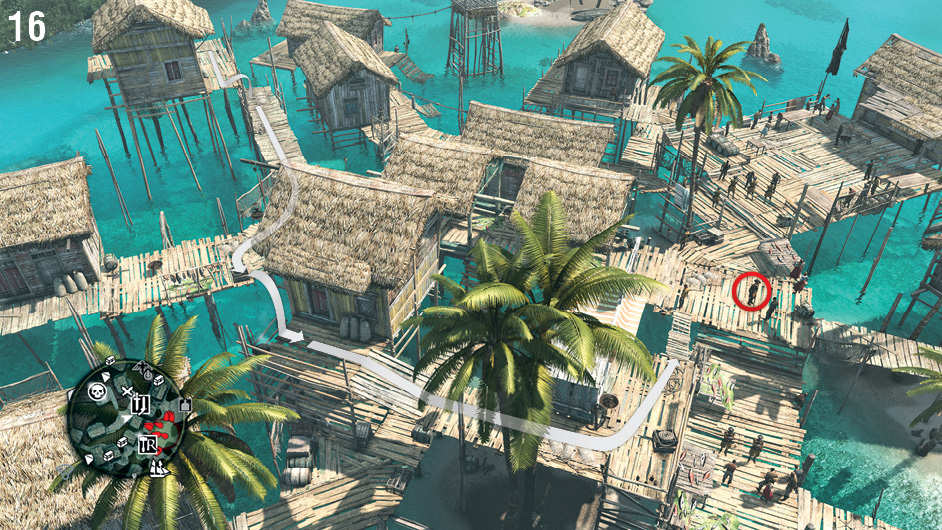
Arroyos (Contract 16) – “A Last Drink For The Road”: As soon as you accept the contract, sprint for the harbormaster stall. After remonstrating with a man, your target – a Captain – will kill him and run to his boat at the dock. Once on board, the vessel will sail away, necessitating a naval battle to complete the assassination. If you reach the harbormaster from the direction shown above, though, you have just enough time to identify your target with Eagle Vision and hit him with a Berserk Dart right after he performs the murder.
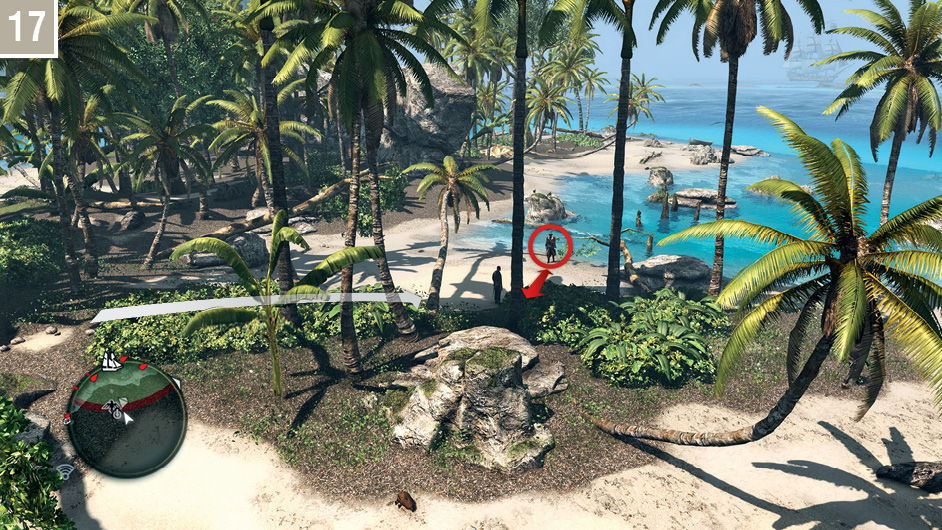
New Bone (Contract 17) – “Castaway”: This target is found on Cayman Sound, with the entire island a Restricted Area for the duration of the mission. Fast Travel to the Viewpoint to begin; you should be able to identify the Captain to the northwest from up here. Being careful to avoid patrolling pirates, enter either of the Stalking Zones close to the target’s position, and you can then easily hit him with a Berserk Dart.
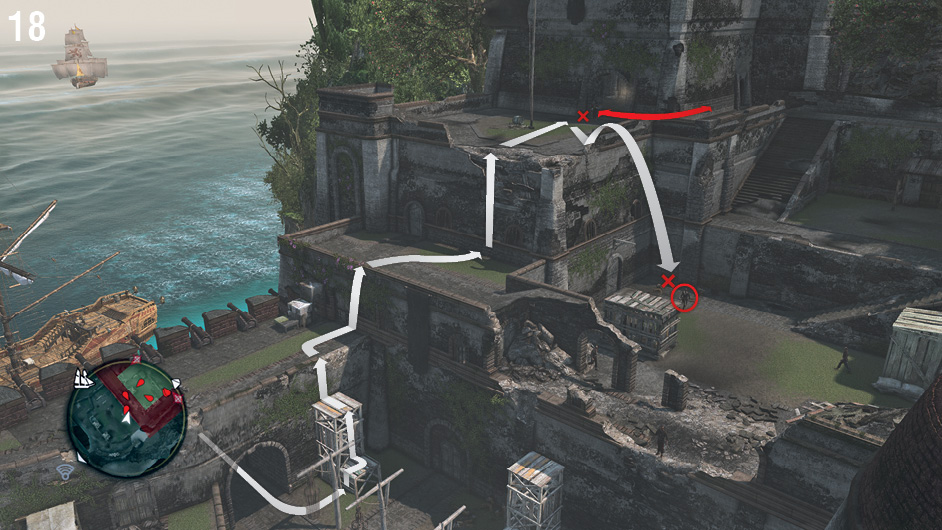
Corozal (Contract 18) – “The Unworthy Brother”: You must conquer the Chinchorro Naval Fort to complete this contract, which means that it is one that you will probably leave until you have the majority of Jackdaw upgrades later in the game. Once the fort is under pirate control, Fast Travel to the area. Climb up to the Fort Commander’s office (on the north side of the Restricted Area), then eliminate the Gunner patrolling there. If you listen carefully, you can hear the target make claims about what he might do in the event that Kenway arrives to take back the fort. An air assassination works as a worthy rebuttal, though a pistol headshot or Berserk Dart will also suffice.
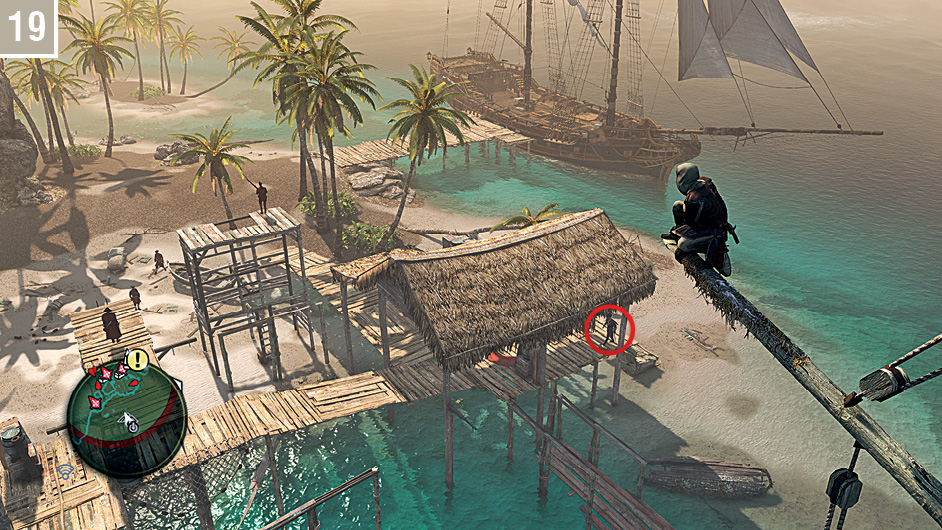
Crooked Island (Contract 19) – “The Poachers”: This contract is completed on Mariguana Island, so Fast Travel to the Viewpoint there after you accept it. Interestingly, the target – a Captain – is within range for a Berserk Dart shot, which makes this the easiest assassination of all.
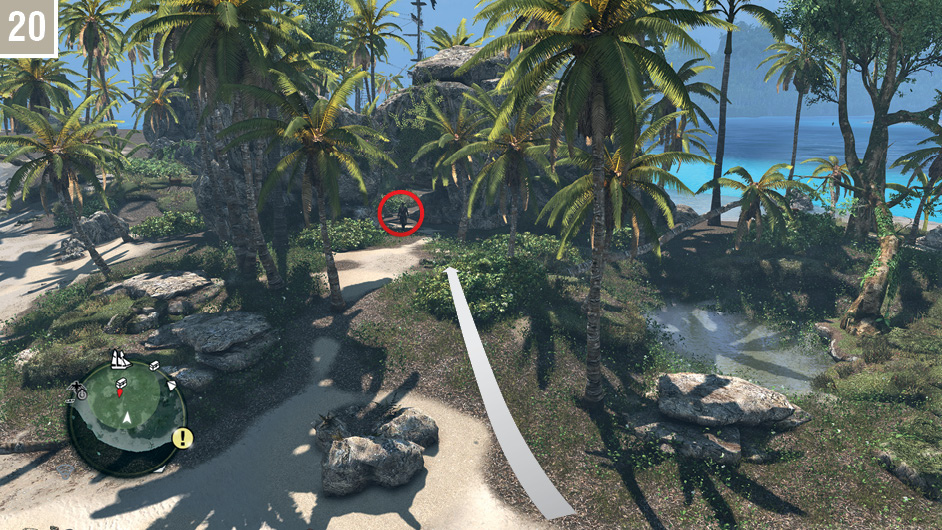
Crooked Island (Contract 20) – “The Deserter”: You must travel to Salt Lagoon to complete this contract. The target is found beneath the natural rock “archway” in the north of the island, and is completely alone. If he spots Kenway, he will run – but he’s actually not particularly fleet of foot, and can be caught after a short pursuit. For an easier kill, take a pistol headshot from a Stalking Zone or run up and assassinate him from behind when he turns away.
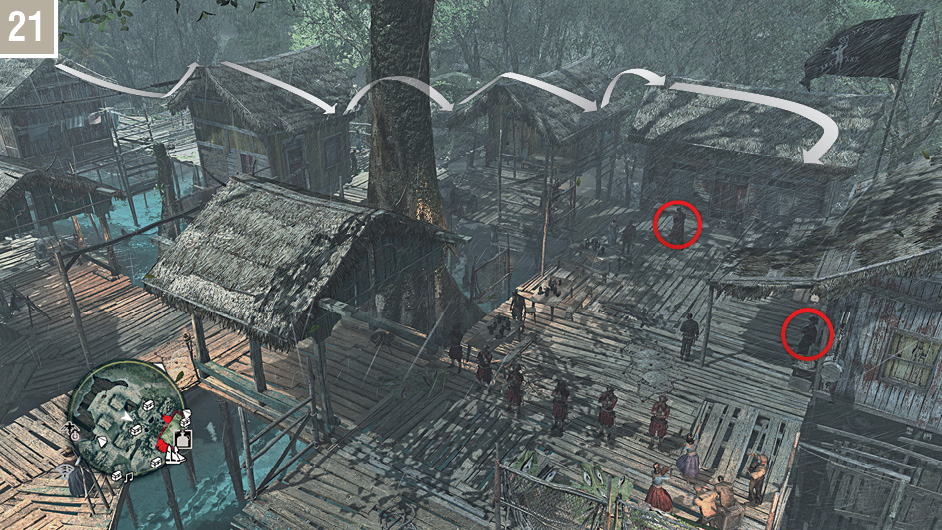
Grand Cayman (Contract 21) – “The Twin Dilemma”: After accepting the contract, climb to the rooftop above the coop and free run to the east to reach the position shown here, overlooking the local tavern. You have two targets to kill, with several soldiers in the general vicinity. The simplest solution is to hit both marked individuals with Berserk Darts.
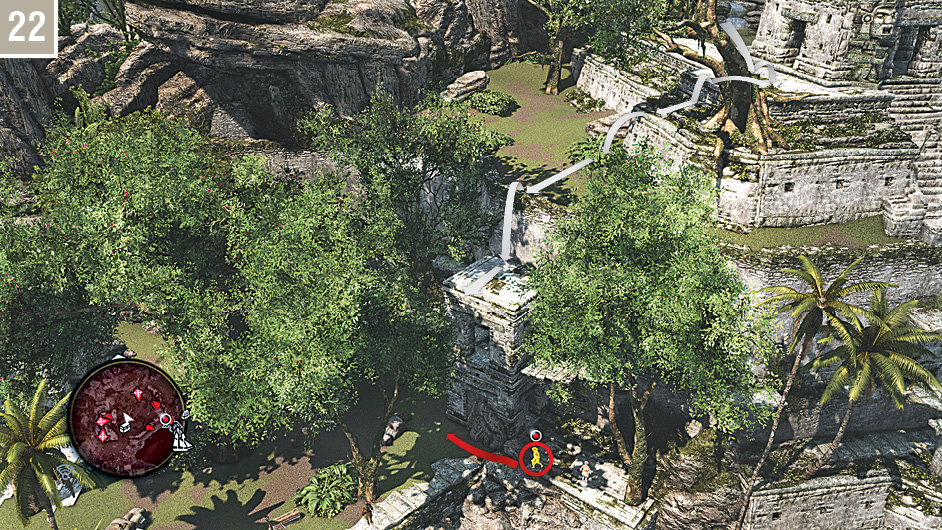
New Bone (Contract 22) – “The Dreaded Pirate”: This target is located in Misteriosa. Fast Travel to the Viewpoint in that location, and use Eagle Vision to identify your quarry far below. This Captain walks a short patrol between two points until you approach him, at which stage he will begin walking to the west. However, if you quickly run to the low tower, as shown on the screenshot above, you can easily hit him with a Berserk Dart before he moves out of range.
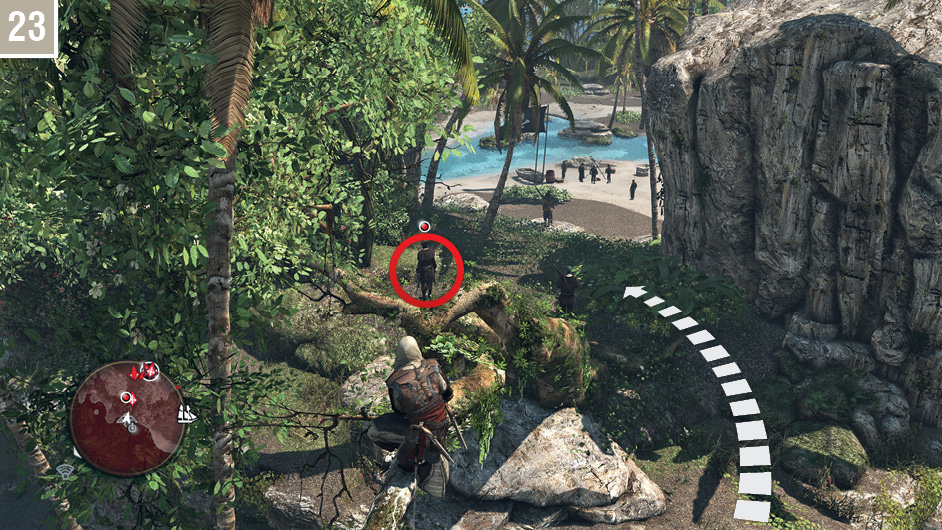
Île à Vache (Contract 23) – “The Expedition”: This assassination takes place on Cumberland Bay. Unless you have already dealt with it, this island is blockaded by a man o’ war (refer to Charts & Collectibles for advice on how to land without combat). As is so often the case, the best way to begin is to Fast Travel to the local Viewpoint. On arrival, turn to face the opposite direction immediately and fire a Berserk Dart at the target highlighted here. You can then take a Leap of Faith into the water below. Note that you can also perform this assassination by sneaking in from the beach to the west to reach the Stalking Zone, as depicted here with a segmented line.
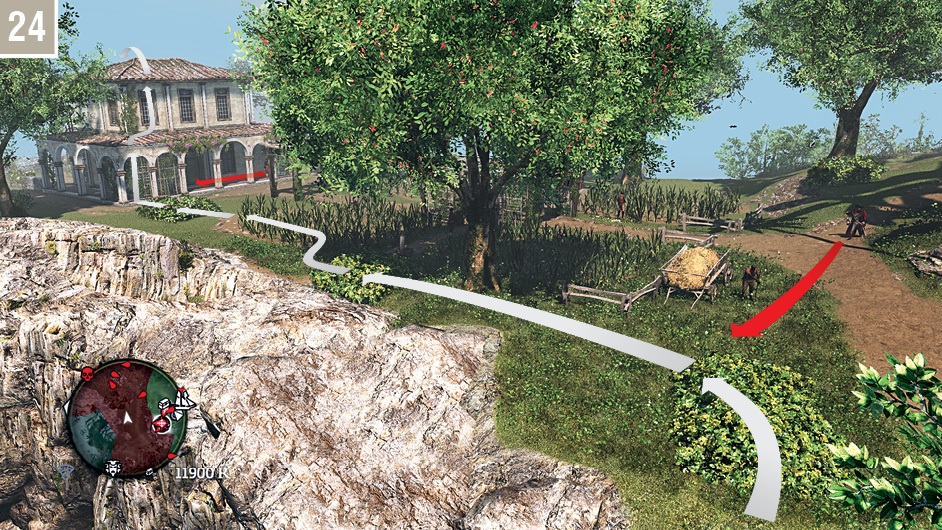
Île à Vache (Contract 24) – “The Slave Master”: This contract requires that you eliminate a target in Tortuga, which you may be able to combine with a warehouse raid (see Warehouses) for a highly profitable visit. Anchor just off the north beach to begin, then run up the slope to reach the first Stalking Zone marked here. Though the front grounds of the house are patrolled by an assortment of soldiers, your quarry is unattended at the rear of the building. Move through the Stalking Zones, avoiding patrols where possible, then climb the roof of the house. You can then complete the contract with a textbook air assassination.
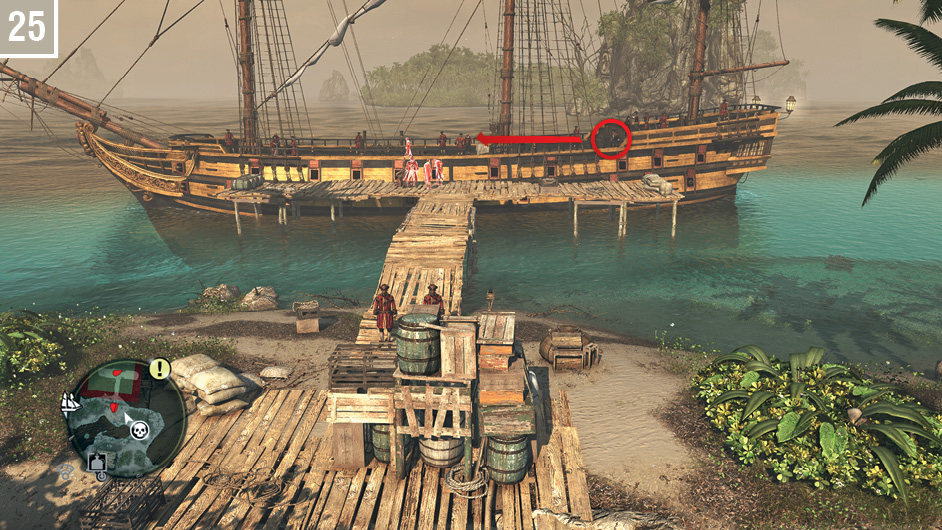
Andreas Island (Contract 25) – “A Slaver’s Business”: This is an unusual contract, as you will find no target at the Restricted Area surrounding the dock. If you wait for a short time, however, a ship will sail in. Your man is on board – and out of weapon range. There are several potential solutions here. If you favor showmanship, you can knock out all five guards on the dock with Sleep Darts before the ship arrives, then stand in wait – at a sensible distance – and calmly dispatch the target with a pistol headshot before Kenway is noticed. You could even swim to the back of the vessel and make your way up into the rigging, then finish with an air assassination. As this mission does not feature a stealth bonus, the quickest and easiest solution, however, is to sink the vessel with the Jackdaw before it even reaches the dock.
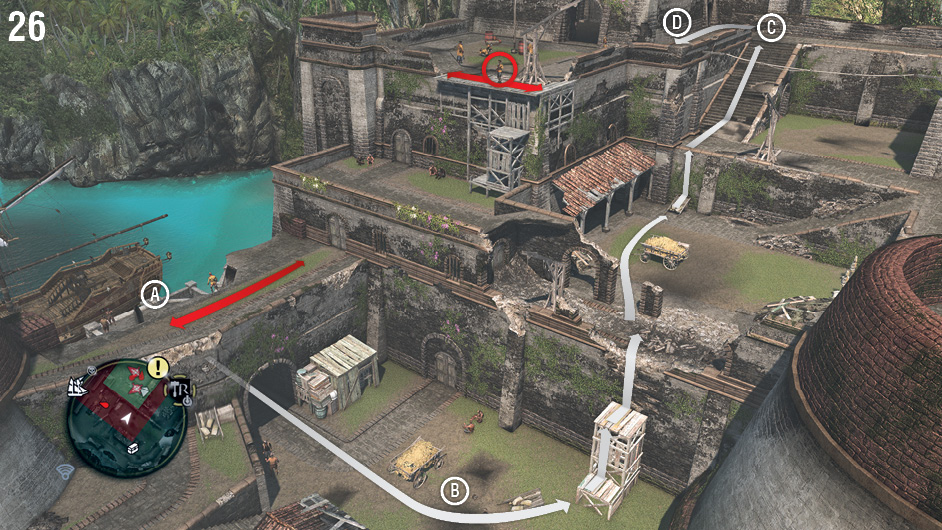
Salt Key Bank (Contract 26) – “The Informant”: If you have yet to conquer the Naval Fort at Dry Tortuga, you will need to do so before you can complete this contract. Once you are ready, Fast Travel to the fort and knock out the Scout above the gate with a Sleep Dart ( ). You can then follow the route shown here to sneak up to where the enemy forces are stationed (
 ). Traverse on the outer edge of the wall at the top of the steps (
 ) to identify your target, who is incautiously sitting next to a powder reserve. Equip the pistols, then climb onto the wall (
 ) and open fire at the explosives to complete the contract.
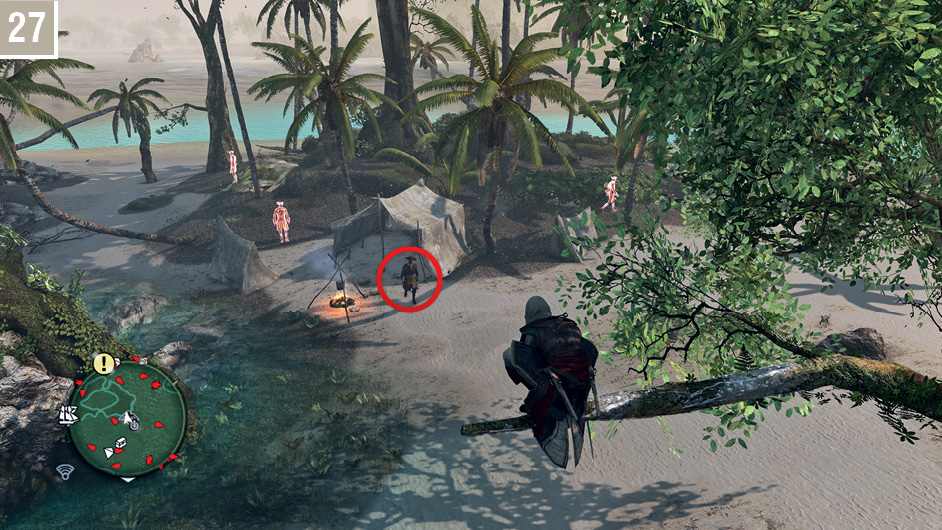
Andreas Island (Contract 27) – “The Treasure Hunter”: You must journey to Abaco Island to complete this contract. Fast Travel to the local Viewpoint, then turn to the south. Your target will walk into a tent, leaving a sufficient area of his body visible for a well-aimed Berserk Dart. Immediately turn to the north and perform a Leap of Faith into the hiding spot and wait until the commotion dies down.
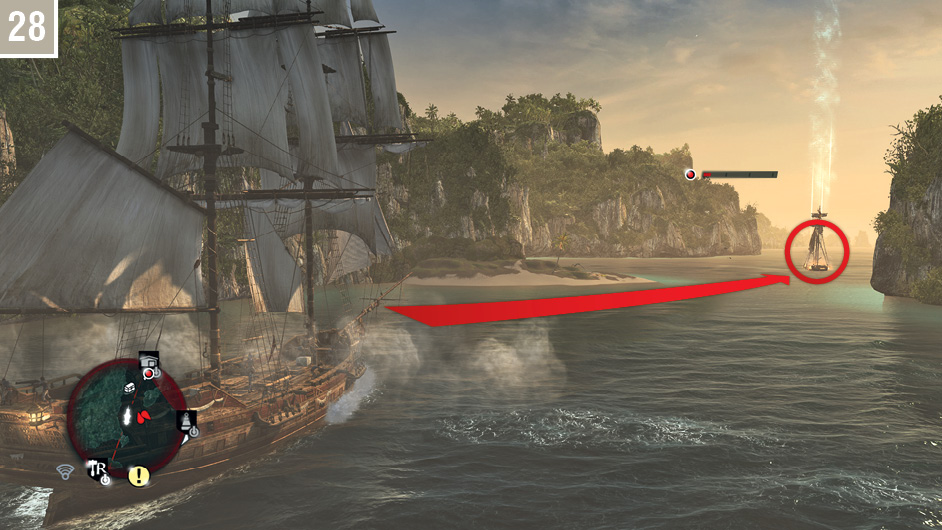
Salt Key Bank (Contract 28) – “Shady Business”: Ensure that you have a supply of mortar ammunition (and, ideally, the Advanced Mortars upgrade) before you begin. Return to the Jackdaw after accepting the contract and sail west to reach the waypoint marker. From the north of the search area, use the spyglass to identify the vessel (a schooner), then immediately set sail to the west in pursuit. Your target will sail close to the coast, but you should go around the outside of the island. Once you have a clear sight of the ship, fire a mortar barrage just ahead of her position; even a half-decent number of hits should incapacitate her immediately. If you are quick, you can then move in and board or just sink the vessel before its naval bodyguard (a slow-moving frigate) can come within range to necessitate further combat.
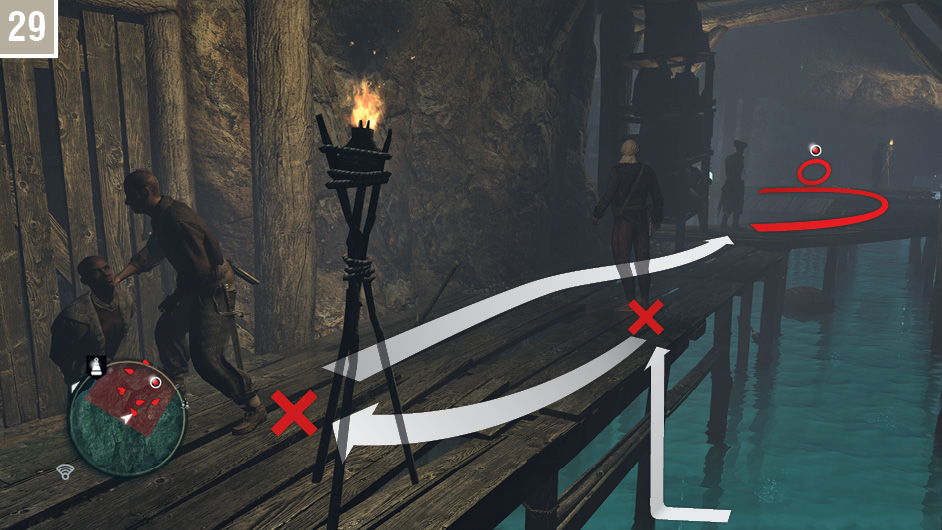
Grand Cayman (Contract 29) – “The Smuggler’s Squat”: This contract cannot be completed until after you obtain the diving bell early in Sequence 06, as it is required to access the location of your target: Anotto Bay. If you have yet to go there, see the Underwater Shipwrecks & Caves chapter for a walkthrough that explains how to negotiate the underwater maze to reach the cave where your target awaits. On arrival, watch the central cave area and wait for a patrol to pass by; you will see the target (a Captain) in the distance. When the patrol moves away, perform a ledge assassination on the pirate above your position, then immediately assassinate the second, who is brutalizing a prisoner. Fire a Berserk Dark at the Captain, and drop back into the water (and move under the walkway) to stay out of sight while his men resolve the matter to your satisfaction.
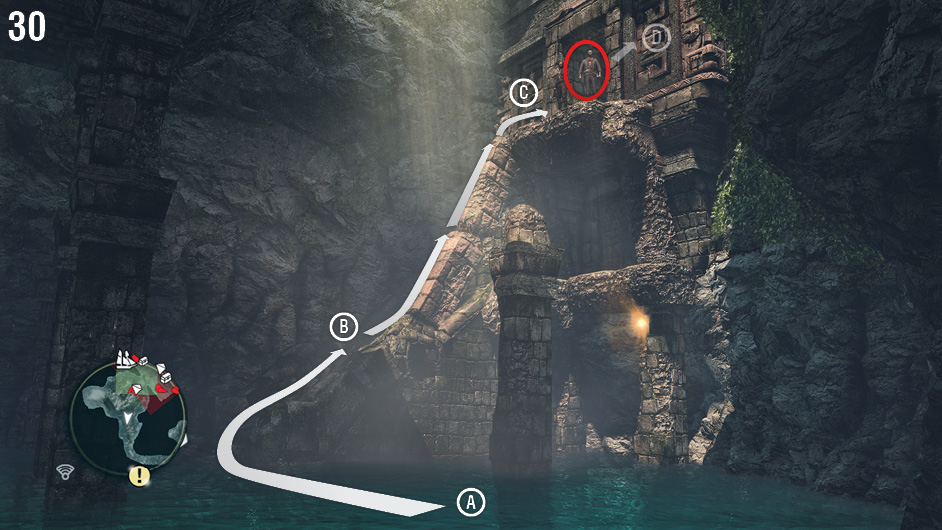
Corozal (Contract 30) – “The Outlaw’s Cave”: Note that you cannot complete this mission until you get the diving bell in Sequence 06. Acquire a dagger from a Scout anywhere in the world before you begin this contract, which necessitates a visit to Ambergris Key. Before you set off, you should also ensure that you collect the Treasure Map from Corozal, as this location also features a buried treasure. If you need a walkthrough of the approach to the cavern where the target can be found, see the Underwater Shipwrecks & Caves chapter. When you reach the end of the underwater tunnel and emerge to behold the ruins, look up to the northwest. There is a sentry far above, with a second patrolling pirate joining him briefly at regular intervals. Wait until the patrolling pirate walks away, then kill the sentry with the dagger ( ) – just move within range, below his position, then tap
  when he is highlighted. Now climb the ruined pillar (
 ) to reach the upper platform, and position Kenway for a corner assassination when the pirate returns (
 ). Pick up the nearby musket, carefully identify your primary target patrolling in the main chamber (
 ), then shoot him and brace yourself for the fight that follows.