
Assassin's Creed IV: Black Flag Guide Walkthrough
Sequence 03
PREVIOUSLY...
Under the guise of Duncan Walpole, Kenway travels to the mansion of Havana governor Laureano Torres, anticipating a large reward for completing the dead Assassin’s delivery. On arrival, he meets Woodes Rogers, Julien du Casse and Torres himself: Templars all, and Torres no less than a grandmaster of the Order. Though Torres takes possession of Walpole’s effects – documents and maps, and a curious crystal cube – Kenway does not receive the sizable reward he craves. Ordered to meet the Templars the next morning, he is introduced to a man known as a “Sage”. Though he distinguishes himself while repelling an Assassin attack on the Templar entourage, and by foiling an escape attempt by the Sage, Kenway is piqued by the nominal payment offered by Torres.
Seized by a singular notion that he alone might profit from the “Observatory” the Templars speak of, Kenway attempts to infiltrate the prison where the Sage is held… to find the guards slaughtered, the man himself long gone. Discovered at this delicate moment, his Walpole subterfuge exposed, Kenway is sent as a prisoner on a Spanish treasure fleet. There he meets Adewalé, a stout and imposing sailor, and the pair work together under cover of a terrible storm to steal a brig, the remarkably hardy El Dorado. After leaving both the chasing fleet and chaotic seas behind with the assistance of a small contingent of rescued pirates, Kenway and Adewalé consider their next move…
Memory 01 “This Tyro Captain”
Mission Overview
Optional Objectives
- Air assassinate an ocelot.
- Shoot an iguana.
Notes & Further Reading
- There is a Treasure Map here: be sure to collect it before you leave, as you will be visiting the location that it leads to during a forthcoming Memory.
- Though you only need to skin two of each animal type to craft the necessary upgrades, this doesn’t mean that the hunt must immediately end. If you use the pistol and walk around the edge of the island, activating Eagle Vision to identify the creatures from afar, you can skin approximately a dozen additional animals – worth almost 1,000 reales – in little more than five minutes. Should you need more bullets, open a Treasure Chest. If you would like to unlock the Feline Pelt Outfit, be sure to save one ocelot pelt when you sell your wares on arrival in Nassau.
Sail to the green waypoint marker to reach Abaco Island; step up to travel speed ( ) to speed up the journey. On arrival, steer close to the beach and drop anchor by holding
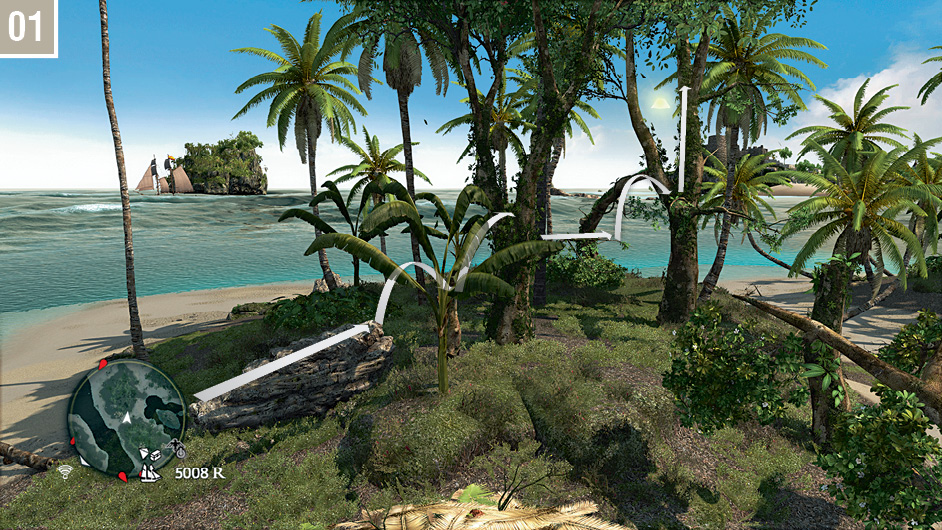
  . You can then dive into the water and swim to the shore. You now need to hunt two ocelots and two iguanas. There is an Optional Objective to kill an ocelot via an air assassination. Travel to the eastern edge of the island (their regional habitat) and follow the free run course to reach the position shown here. It’s a few steps to the east of the island’s inner pond. Once you are at the upper branch, activate Eagle Vision and wait for an ocelot to move within range; when the option appears in the upper right-hand corner of the display, press
  to strike.
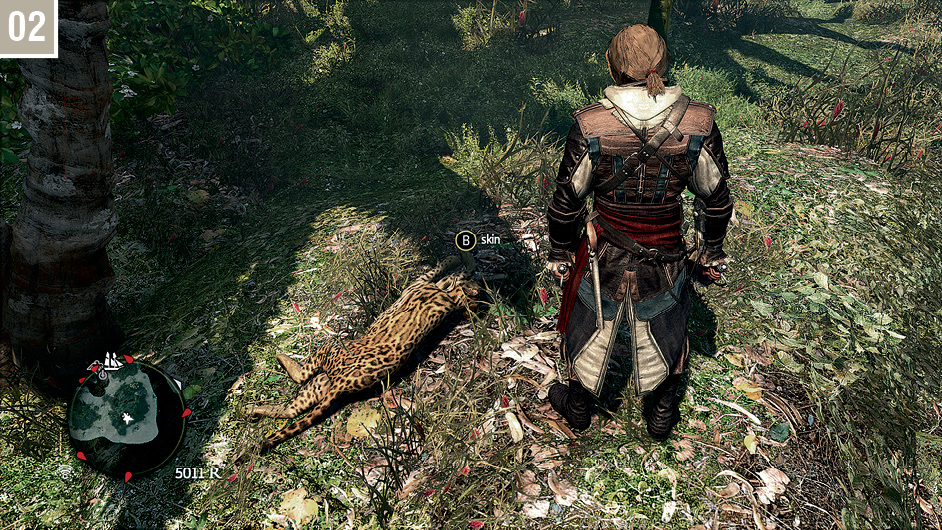
Stand above the animal and press  to skin it. You can repeat the process for the second required ocelot, or wait in a Stalking Zone, or even just shoot one with the pistol (note, however, that you will need at least one bullet to complete the second Optional Objective). It’s not wise to attempt to catch one on foot: they take fright easily, and can effortlessly outpace Kenway in a chase.
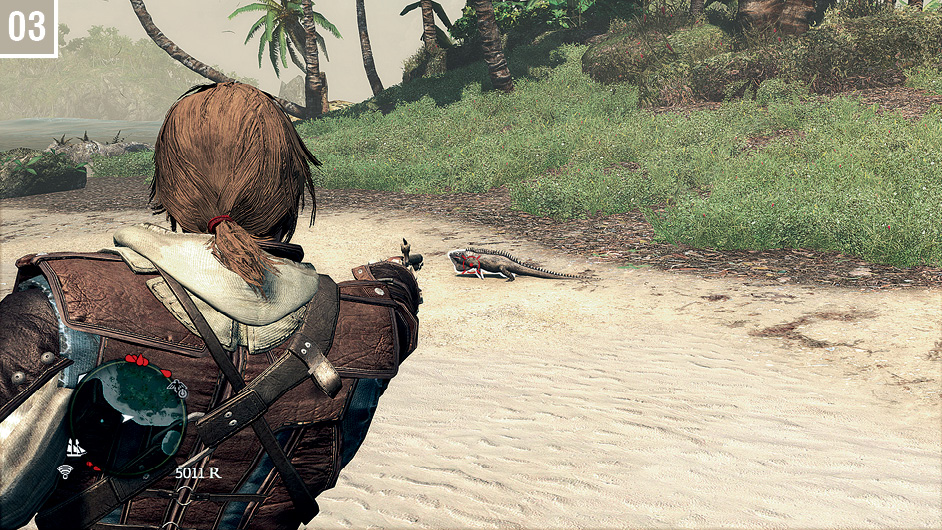
Once you have both ocelot pelts, Synchronize at the Viewpoint at the center of Abaco Island as you travel to the western beach, where iguanas are common. Though Kenway can outrun these creatures in a straight-line sprint, you should kill the first with a shot from the pistol to satisfy the second Optional Objective. As before, skin the animals to obtain their unique crafting resource – in this instance, iguana leather. You can now follow the onscreen prompts to unlock Pistol Holster II and Health Upgrade I.
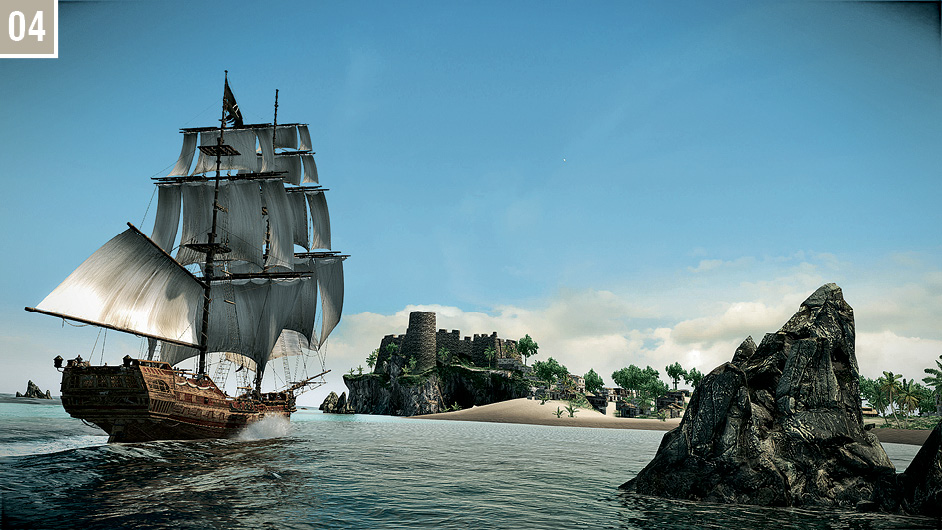
Return to Adewalé on the Jackdaw. You may find it slightly faster to take a rowboat: simply approach one, then press  to be returned to the deck of the ship immediately. Interact with the quartermaster to trigger a cutscene and end the Memory. Though you may have a yearning to explore the Caribbean in your new ship, it makes much more sense to set sail to Nassau and complete a few more Memories before you satisfy your wanderlust. Approach the beach shown here, and an option to travel to the town will appear; select “accept” to automatically dock.
Memory 02 “Now Hiring”
Mission Overview
Optional Objectives
- Disarm and kill three guards.
- Shoot the rope to save the pirate.
Notes & Further Reading
- You may wish to Synchronize with at least a few Viewpoints before you continue: you’ll spend a fair amount of time in Nassau over the hours that lie ahead.
- Rabbits and wild pigs can be found in the northwest of Nassau, with crocodiles in the water to the west. By shooting (by far the easiest method) and skinning two of each, you can acquire the Smoke Bomb Pouch II, Pistol Ammo Pouch I and Pistol Holster III crafting upgrades at the very first opportunity.
- This Memory introduces the concept of crew as a valuable resource that must be replenished (and, indeed, expanded) to make the Jackdaw more effective.
- Tackling couriers in Nassau is easier than everywhere else, as there are almost no guard patrols to speak of. If you see an easy opportunity, bowl them from their feet for a modest financial reward and large quantities of ammunition.
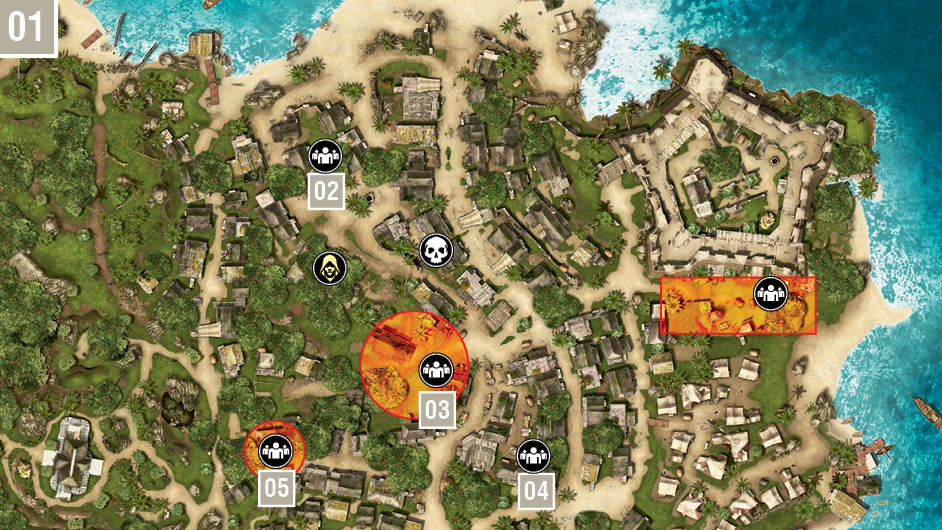
Make your way to the waypoint at the tavern and interact with Adewalé to begin. You must now head to positions marked with the  icon to free pirates from their Redcoat captors. We highlight the four optimal destinations in the accompanying map portion.
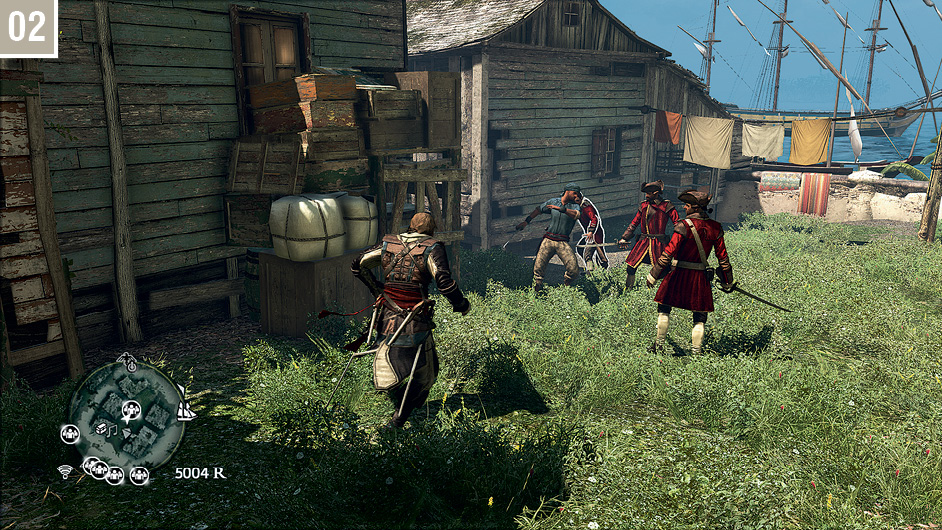
The location directly to the north of the tavern features a pirate fighting with three soldiers. Simply eliminate the latter to gain two crew members.
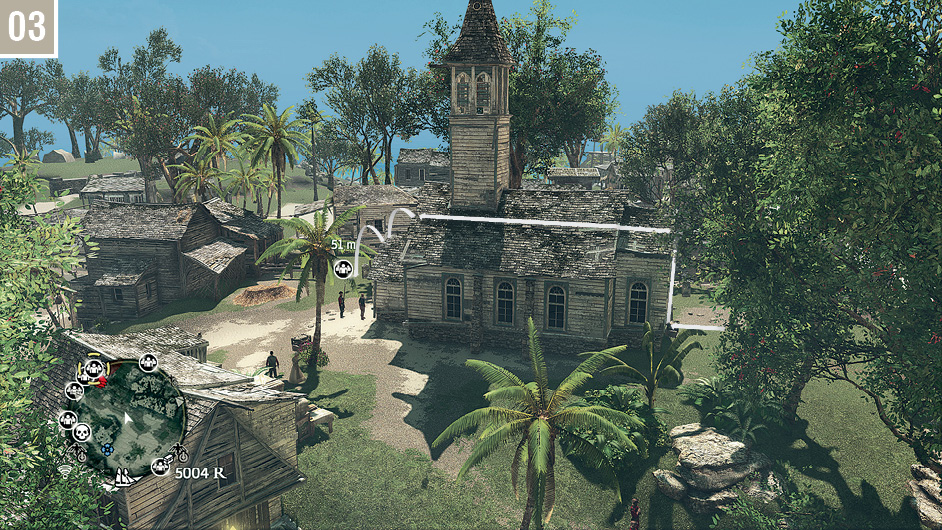
The location southeast of the tavern has pirates held at gunpoint in front of a church. This is temporarily a Restricted Area, with soldiers stationed on all obvious approaches. For an easy solution, approach from the tavern and climb the rear of the church; from the southeast edge, you can perform a double air assassination on the two armed guards. After freeing the pirates, you may wish to antagonize and fight the groups of Redcoats standing watch to complete (or work towards) the “Disarm and kill three guards” Optional Objective.
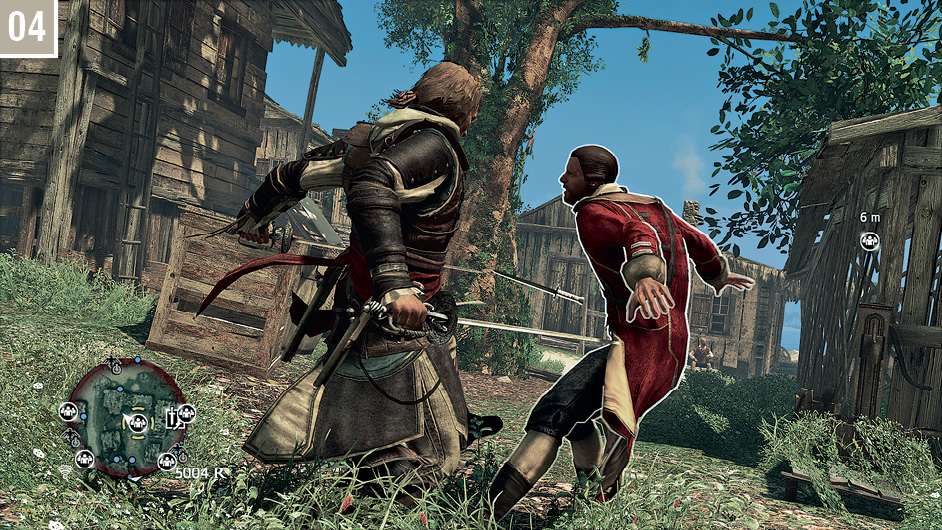
If you wish to complete the Optional Objective to disarm and kill three soldiers, you should scour the streets for Redcoats to brutalize and satisfy the secondary task before you continue. This location, a short jog to the southeast of the previous fight, is another battle where three soldiers are fighting a solitary pirate. Once again, this offers two crew members if completed successfully.
Head to the west to reach the next recruitment opportunity. Here, a solitary soldier can be found standing over his pirate captives. Approach from the west side of the building, behind his position, and you can perform an easy ledge assassination to avoid unwanted casualties. If you have yet to reach the required total, return to any one of the previous sites to enlist additional able bodies in the same manner as before.
With the completion of the quota, all other pirate markers are replaced by a single destination: a pirate due to be hanged just outside the fortress in the northeast area of the city. This challenge (and its related Optional Objective) is much easier to complete if you skirt around and approach from the northwest. From here, you can shoot the rope to prevent the hanging, then fight the guards as they rush to your position. This includes a Captain, but a Smoke Bomb (or, if you picked up the Pistol Holster III upgrade suggested earlier, three quick pistol shots in rapid succession) will enable you to defeat him without too much difficulty. After freeing the pirate make your way to the waypoint at the tavern to end the Memory.
Memory 03 “Prizes And Plunder”
Mission Overview
Optional Objectives
- Use a swivel gun to kill three sailors.
- Plunder 20 rum.
Notes & Further Reading
- Memories 03 and 04 occur in immediate succession.
- If you would like to accumulate a tidy sum of reales and exploit a minor loophole, we suggest that you embark on something of a rampage before you complete the journey to Salt Key Bank. As the concept of the Wanted Level (and the Hunter ships that enforce it) is not activated until late in the next mission, there is currently no consequence for acts of piracy. If you board as many weak schooners as you can find (though avoid gunboats: they carry no cargo), you can bankroll a big round of Jackdaw upgrades at the end of Memory 04. Power gamers prepared to accumulate the maximum 500 units of both sugar and rum could potentially sell these for a five-figure sum... though it’s probably enough to just spend 10 or 15 minutes at this activity to fund inexpensive but useful upgrades after Memory 04. Moreover, if you can accumulate at least 30 sugar, you can complete the Optional Objective for Memory 04 before you even start it.
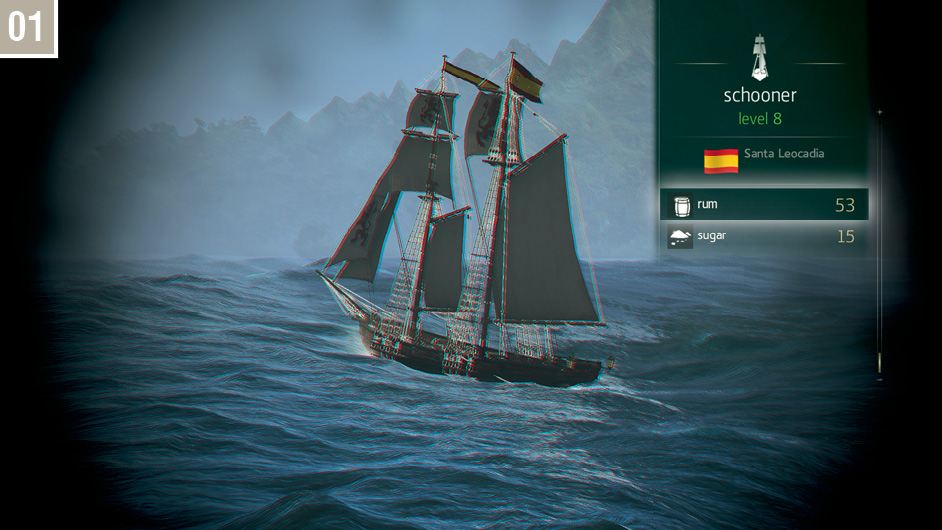
Travel to the beach where Ed Thatch and Ben Hornigold await and interact to begin the first of two connected Memories. Sail south of Nassau, then hold the Collectibles Button (look around with  ; adjust zoom with
  ; set a marker on the vessel with
  ) to identify a suitable schooner: there are plenty in the area. If you take the time to find one carrying rum, and ideally in a quantity of 20, choose that one: this will cut the time required to complete the Optional Objective.
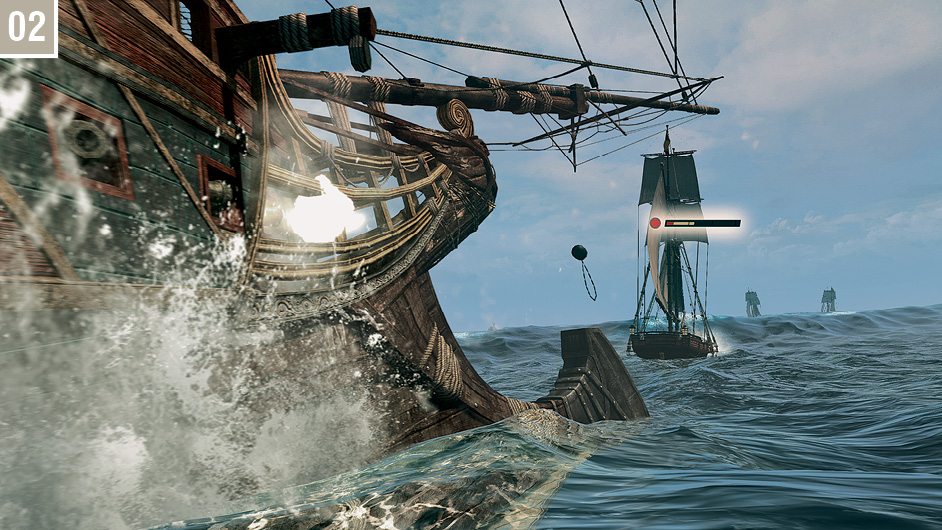
This tutorial mission is actually a very gentle introduction to naval combat. Once you have settled on a target, follow the onscreen instructions and suggestions to weaken the schooner.
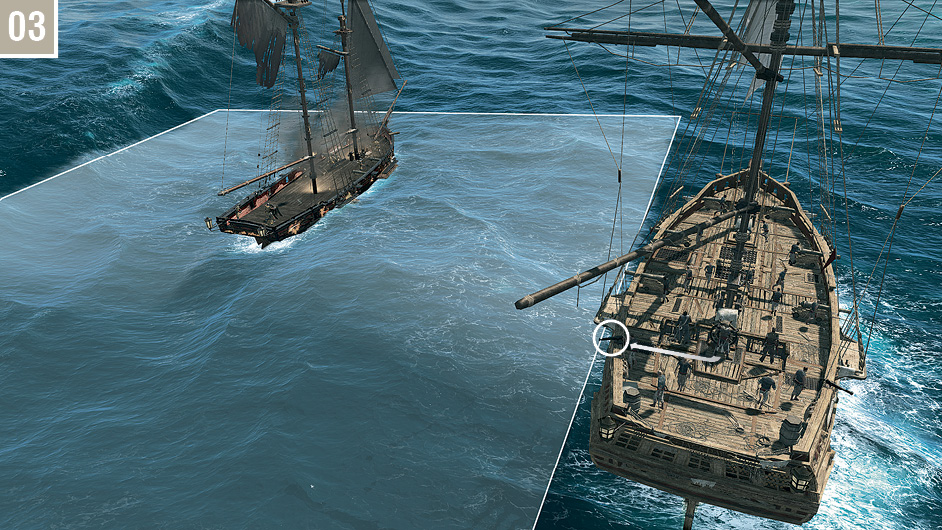
When you are prompted to initiate boarding, try to do so at the very edge of the highlighted area: this will give you more time to use the swivel gun to shoot enemy soldiers. After Kenway automatically relinquishes control of the Jackdaw, move to the gun position just to the left or right of the ship’s wheel, as appropriate. You can then hold  to take control of the weapon; aim with
  , and fire with the High Profile Button. While you may note that the target turns red when a direct hit on a member of the enemy crew is possible, you will find that the “splash damage” of each blast removes the need for pixel-perfect precision.
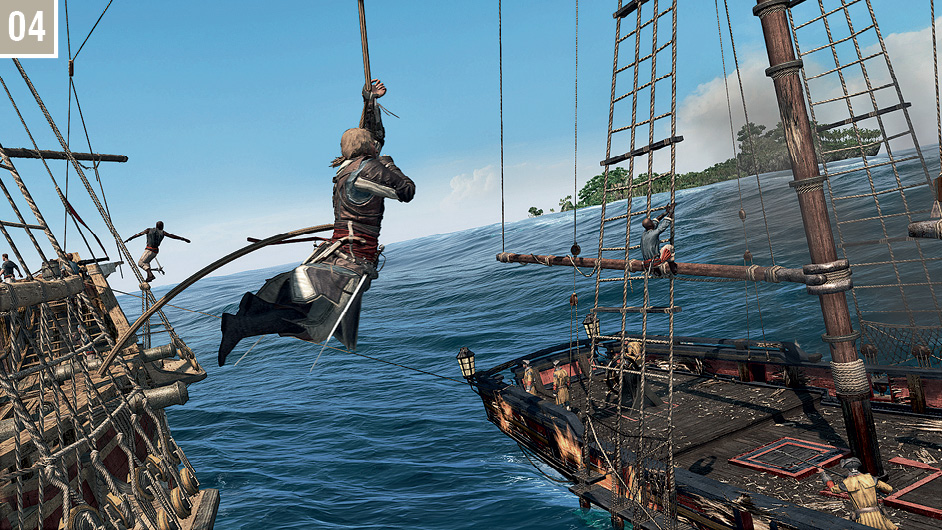
You need to attack and plunder at least one more ship to reach the specified cargo total. Once again, reduce the target vessel’s health bar until only the red portion remains, then move in and hold  to board when the prompt appears. If other vessels are involved in the battle, initiating the boarding sequence will cause them to cease their attack. Schooners are rarely difficult to conquer: indeed, keen marksmen will note that causing five deaths with manual swivel gun shots during the boarding approach will negate the need for a fight on the decks. If boarding does take place, swing or jump over to the enemy vessel and kill the specified number of enemy crew to continue.
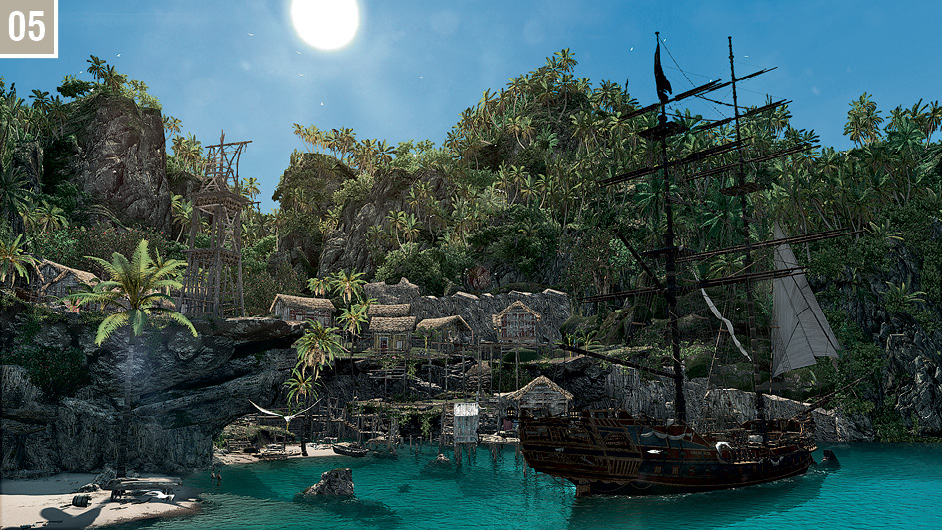
If you do not yet have the required swivel gun kills or rum cargo to meet the Optional Objectives, you may wish to continue hunting for a time (or embark on a profitable grind for cargo – see “Notes & Further Reading”). You can then sail to the waypoint at Salt Key Bank. Approach the docking circle, enter, slow down and hold  to bring the Jackdaw to a halt and release the wheel. Visit the harbormaster and purchase the Intermediate Hull upgrade as directed, then leave the menus to proceed straight to “Raise The Black Flag”.
Mission Overview
Optional Objectives
- Plunder a Hunter ship.
- Plunder 30 sugar.
Notes & Further Reading
- This mission introduces (and formally unlocks) the Wanted Level concept, the Hunter ships that punish transgressions, and the two methods that you can use to reset the Jackdaw’s “notoriety” back to zero.
- When the Jackdaw has a Wanted Level of one or above, Hunters can arrive any time after an eight-and-a-half-minute “cooldown” period. If you choose to complete the Optional Objective to board the one that arrives in this Memory, you can profit by plundering another couple of brigs before you sail back to Salt Key Bank: the Wanted Level is reset to zero in a mandatory step when the mission ends. Metal, cloth and wood are priority cargos here.
- Once you complete this Memory, you gain the ability to upgrade the Jackdaw and shop with harbormasters, where you can order new ship features and sell cargo not needed for other purposes.
Memory 04 “Raise The Black Flag”
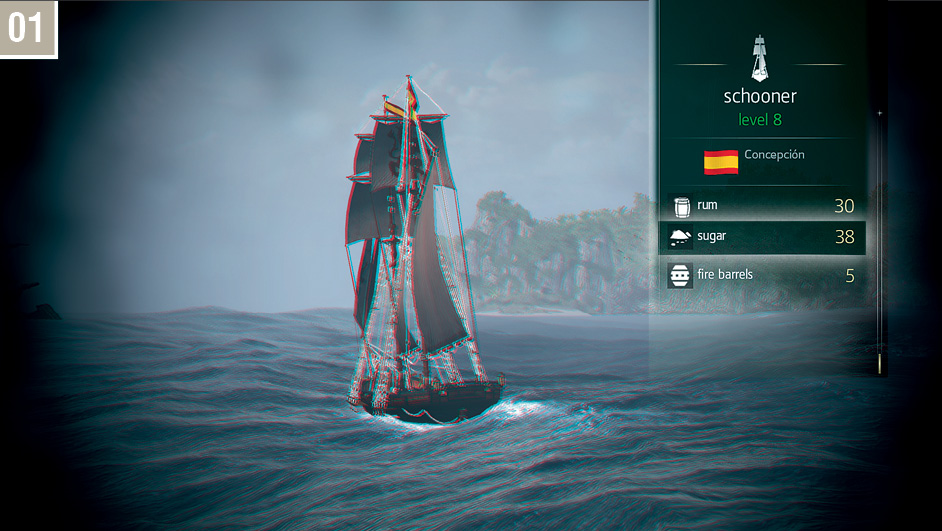
While the schooners that populated the ocean for the previous Memory were little more than cannon fodder, you now also encounter more dangerous brigs during this instructive mission. If you didn’t follow our advice to gather 30 units of sugar from schooners during the previous Memory, you may wish to make this your priority before you begin the hunt for metal.
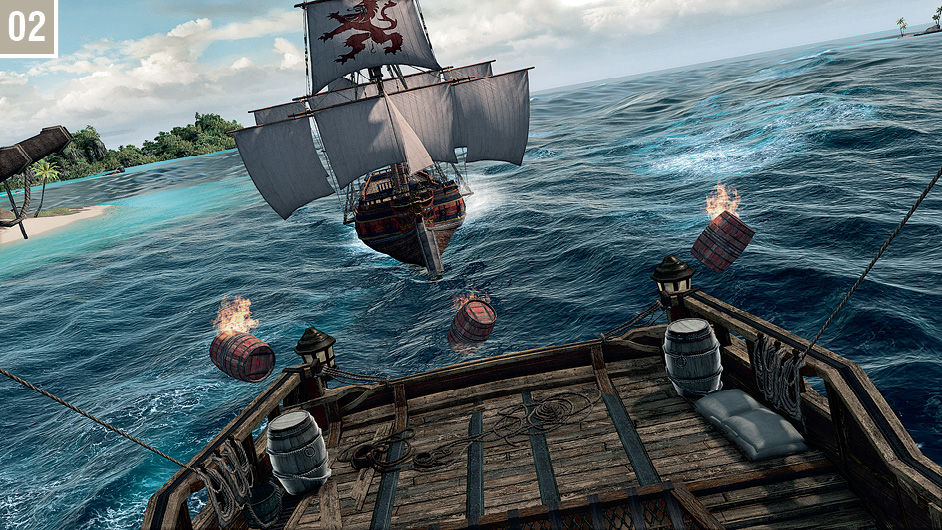
Use the spyglass to identify a brig carrying a large quantity of metal. Try to pick a vessel sailing alone, with no other ships of the same nationality nearby: engaging groups is a complication that you should probably avoid for now. In addition to standard broadside attacks, enemy brigs will sail hard towards the Jackdaw to cause massive damage with the ram extension at the front of their hulls. To avoid this, steer away from their advance, rotate the camera to face the aft section of the Jackdaw, then drop fire barrels to either deter their advance (medium distance) or punish it severely (close range). As before, cease your bombardment and move in close to board the enemy vessel once its health bar falls into the red zone.
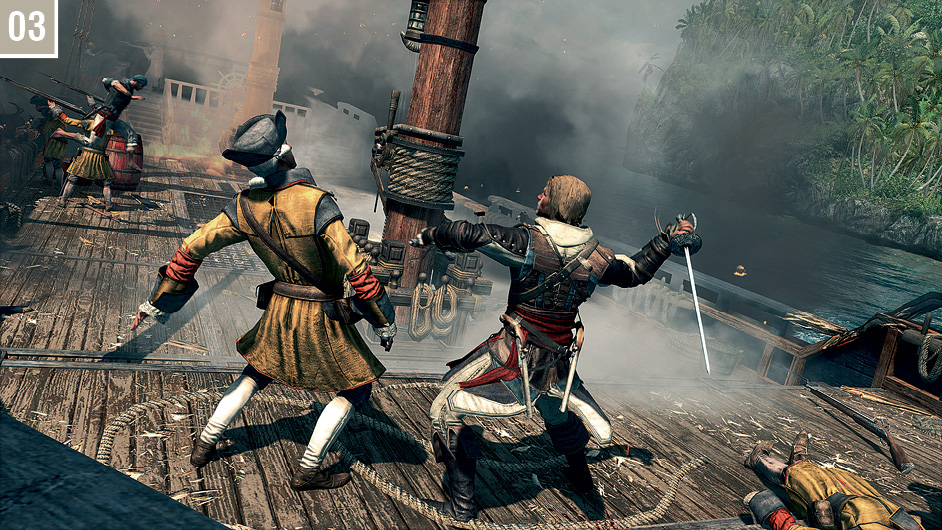
Unlike schooners, it’s a little harder to eliminate the specified total of 10 crew members with the swivel gun before boarding actually begins, so you’ll usually need to engage the opposing crew in close combat. In addition to generic soldiers, you will encounter Scouts, Brutes and even occasional Captains on brigs. As a rule of thumb, try to identify a Captain in advance (he’s usually close to the wheel) and then exercise a little pragmatism: board the opposite end of the vessel, and fight his weaker subordinates to meet the kill quota.
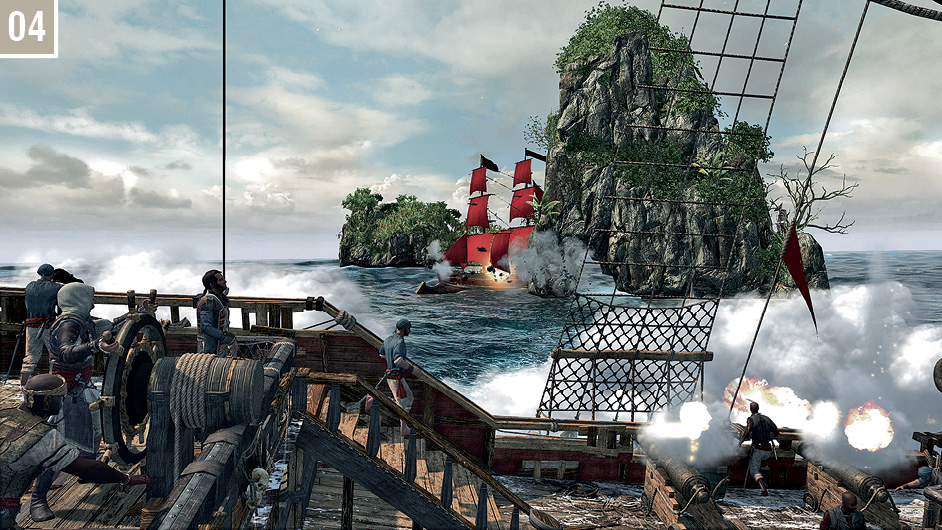
You now need to find a second ship carrying metal to meet the required total. Once you have acquired the cargo, a Hunter vessel will arrive in the area to engage the Jackdaw. If you would like to complete the second Optional Objective, you must disable and board this powerful brig before you return to Salt Key Bank. The process is the same as with standard vessels of this class, but rather more fraught and protracted due to their superior hull strength and power of their weapons. If straight combat seems too difficult, try playing a game of cat-and-mouse around an island that offers cover, as pictured here: this can be surprisingly effective with practice.
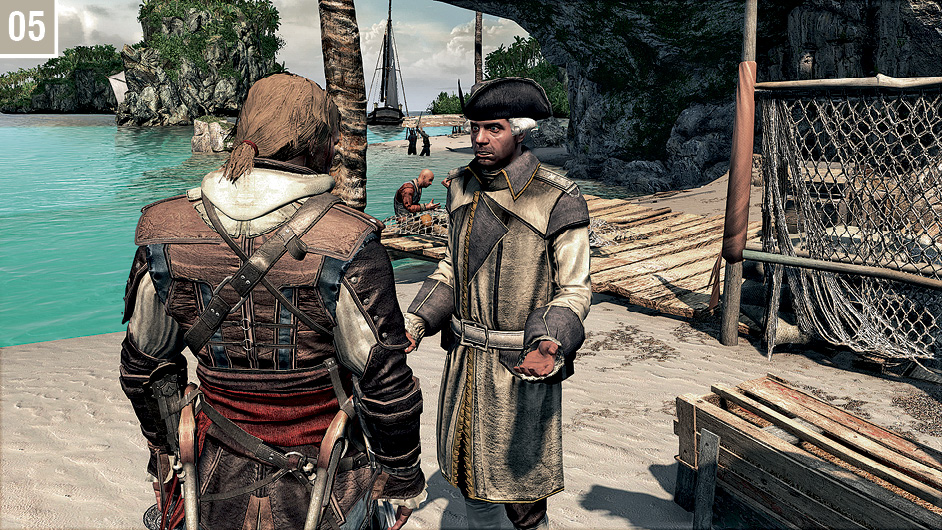
When you arrive back at Salt Key Bank, approach the Local Officer at the waypoint marker. Press  to bribe him, immediately removing the bounty on the Jackdaw. Return to the Captain’s Cabin to purchase the Small Broadside Cannons upgrade, then exit to complete the Memory.
Memory 05 “Sugarcane And Its Yields”
Mission Overview
Optional Objectives
- Sabotage two alarm bells.
- Stay out of combat.
Notes & Further Reading
- This Memory introduces a major new feature: warehouses, which can be raided to obtain cargo and reales.
- You will also encounter naval Restricted Areas for the first time. When you enter these (either in story-related areas, or the environs surrounding Naval Forts ) the Jackdaw may be attacked if you move into the field of vision of an enemy ship. This is marked by a yellow highlight on the mini-map. The detection meters that appear work in the same way as those that you see on land. When fully red, the vessel in question (and all allied ships in the immediate vicinity) will move to assault the Jackdaw until you escape or destroy them.
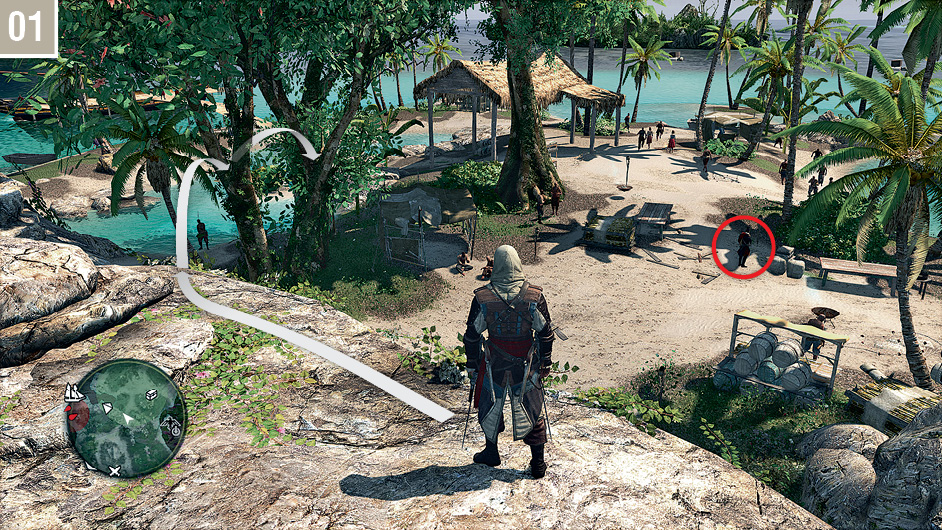
Set sail for the waypoint on Andreas Island, then drop anchor and swim to shore to meet with James Kidd on the beach to the north. After a short walk with Kidd, scale the rock outcrop at the center of the island. From here, identify the agent with Eagle Vision, then jump into the nearby trees to hear his conversation.
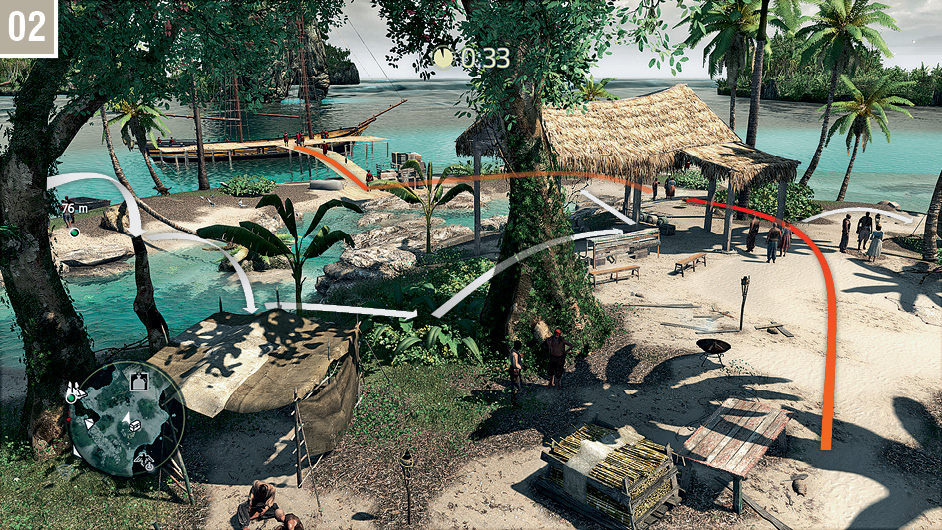
When the agent walks to the south, watch him from the trees at first, then hop down into the Stalking Zone. When he turns to the east, towards the dock, transfer into a Blend with the civilians further south. There is actually no need to enter the Restricted Area: you can take a few steps down towards the water to keep the agent in detection range when he approaches his ship. When you are prompted to return to the Jackdaw, sprint to the rowboat to the south for a near-immediate transition to reach the wheel before the timer expires.
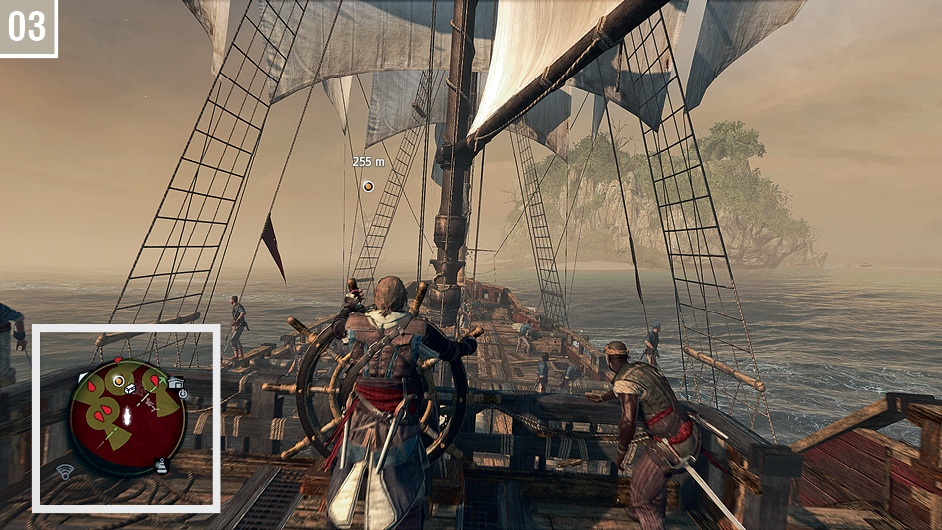
The agent’s ship moves a little faster than the Jackdaw at half sail, but slower than its full sail speed. Alternate between these two settings, using brief periods of full stop where required, to maintain a distance of between 250 to 300 meters. Once you reach the Restricted Area, you can remain undetected by trailing in the wake of the agent’s vessel at this approximate range. Note that the “Stay out of combat” Optional Objective applies exclusively to this stretch of the tail. Watch your mini-map to see fields of vision (yellow highlights), and be careful to steer to avoid these. With most of the early ships, you can simply power through the edge of the cones that represent their forward field of vision before their detection meters fill completely.
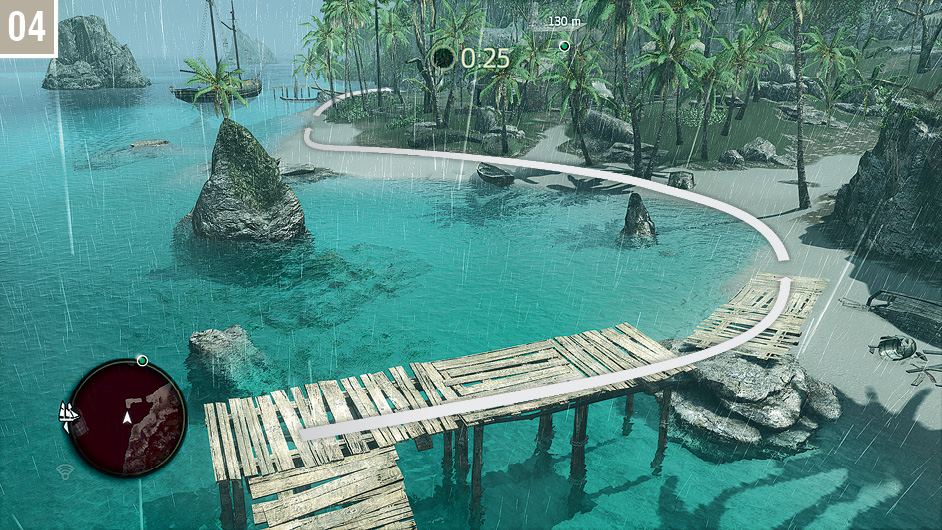
The final section of the journey, outside the naval Restricted Area, is entirely uneventful. When you approach a highlighted area, follow the prompt to hold  to dock. You then have 50 seconds to reach the Stalking Zone at the waypoint marker. As long as you follow the path shown here, sticking to the beach for the majority of the sprint, no one will react to Kenway’s presence. At the end, there is a short sequence of Stalking Zones that enable you to safely reach the waypoint marker close to your target.
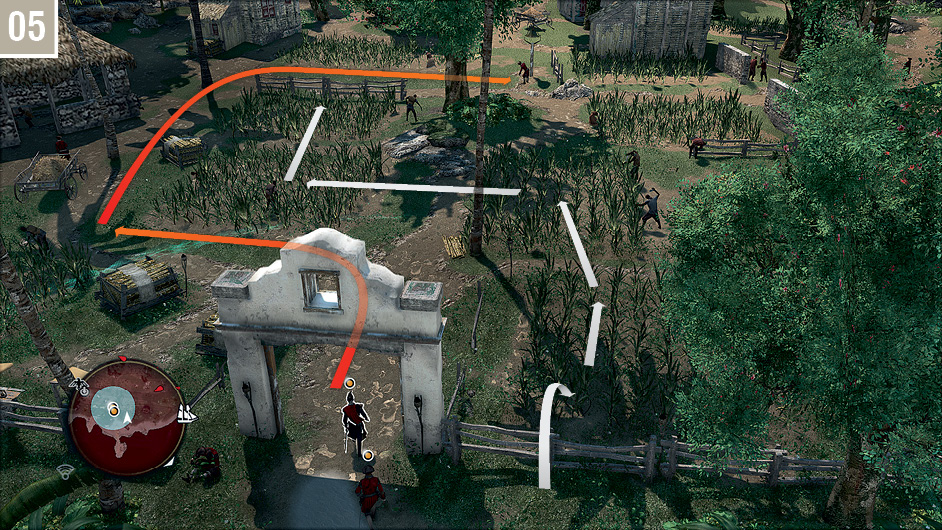
When the eavesdrop begins, start by following the route shown here, delaying your transitions between Stalking Zones to coincide with moments when the agent (and any other potential hostiles) are facing away. As long as you remain within the eavesdrop boundaries, it’s not as complicated as it might initially seem.
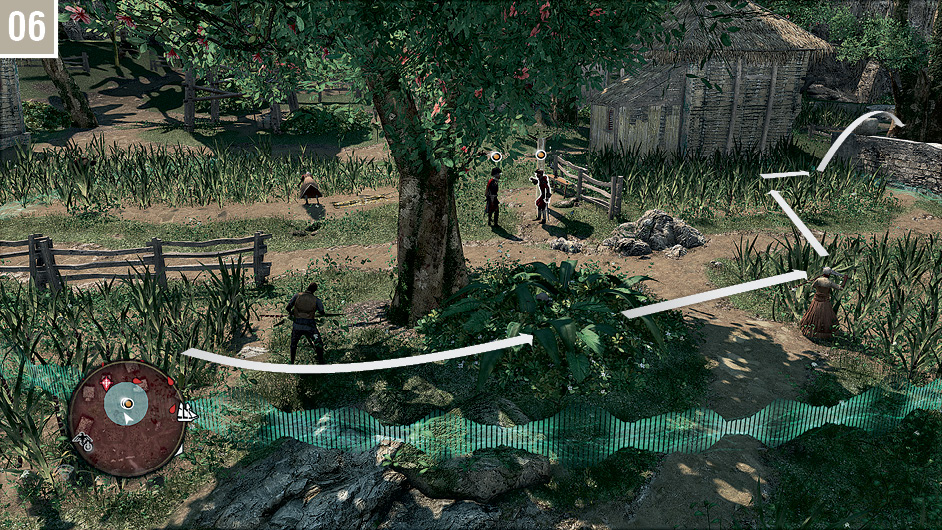
After the agent stops to remonstrate with a guard manning the alarm bell, wait for him to resume walking, then move between the Stalking Zones to reach a wall. You can hop over this to reach another Stalking Zone on the opposite side.
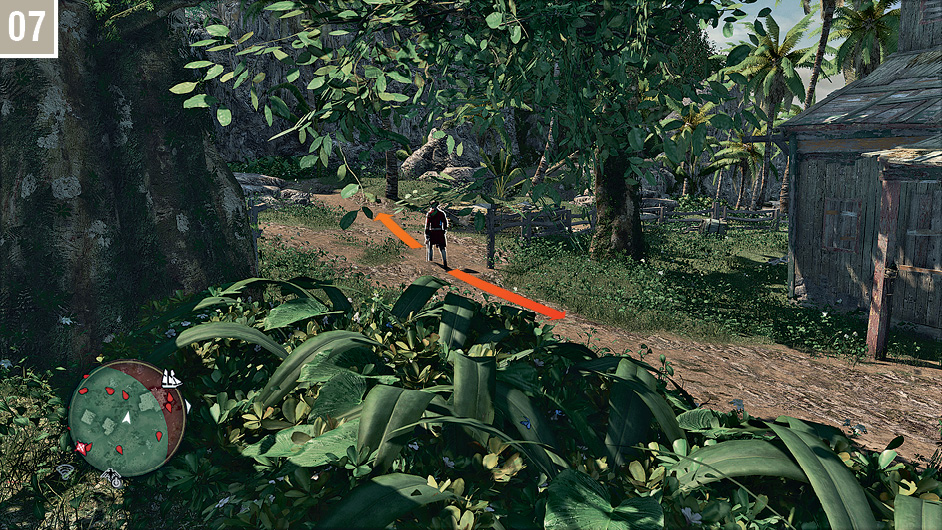
The agent will now call for the warehouse key holder. At this point, the restriction on detection is lifted: you only technically need to acquire the key and reach the warehouse door while not in active combat to complete the Memory. However, even if you are ambivalent about completing the two Optional Objectives, stealth still makes sense here: there are a lot of guards in the vicinity. As soon as the agent walks to the north, attract the guard pictured above with a whistle and eliminate him.
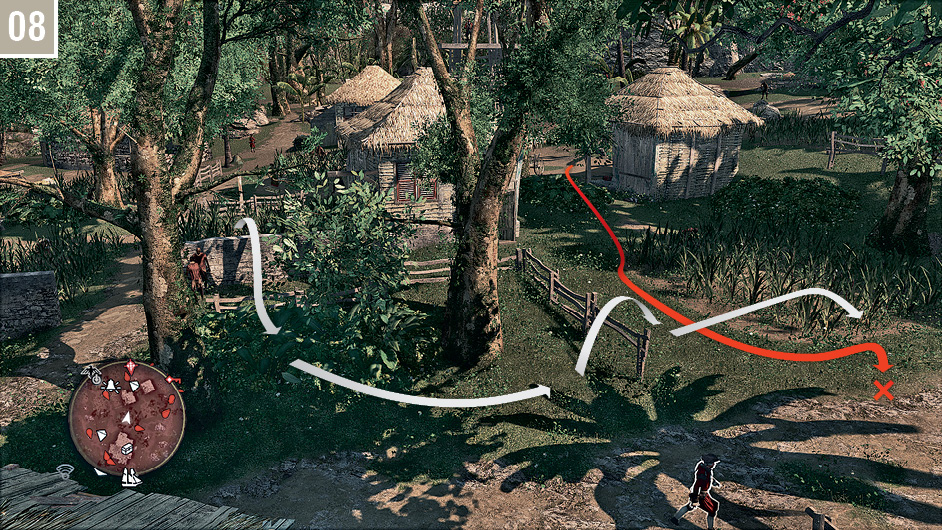
Move to the next Stalking Zone and watch to the southeast with Eagle Vision active. The key holder and another guard walk a long patrol around the area, but this will soon bring them close to your position. When they reach the spot marked on the accompanying screenshot, they will pause, facing away from Kenway. When this happens, step out of concealment and kill them both with a double assassination. Their bodies will lie just out of detection range of other guards. You can, technically, pickpocket the key holder instead, then slip back into cover before the men turn to resume their walk.
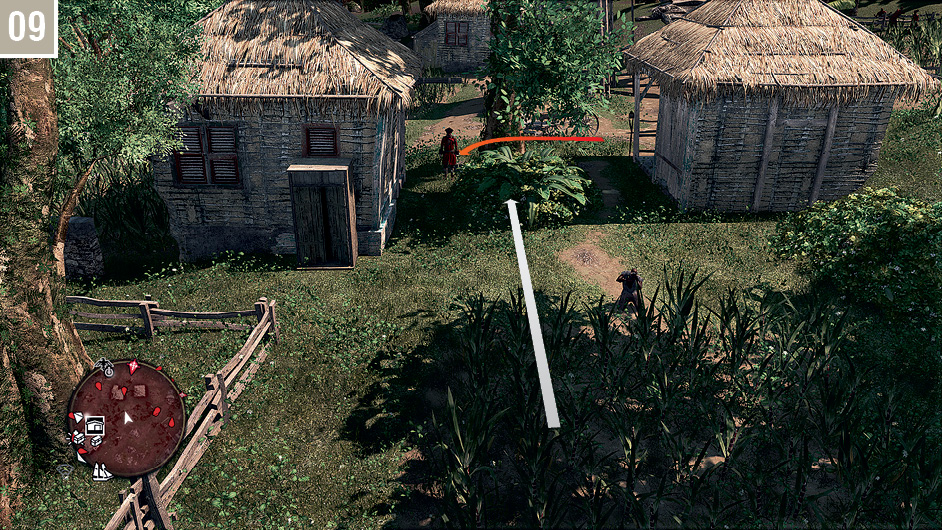
If you do not wish to complete the Optional Objectives, you can take a short stroll to the nearby warehouse door (now marked by the  icon on the mini-map) and press
  to end the Memory. Those who aspire to a 100% Synchronization rating have a little more work to do. Move into the Stalking Zone to the southeast and wait for a patrolling guard to arrive, then entice him to your position for a quiet kill.
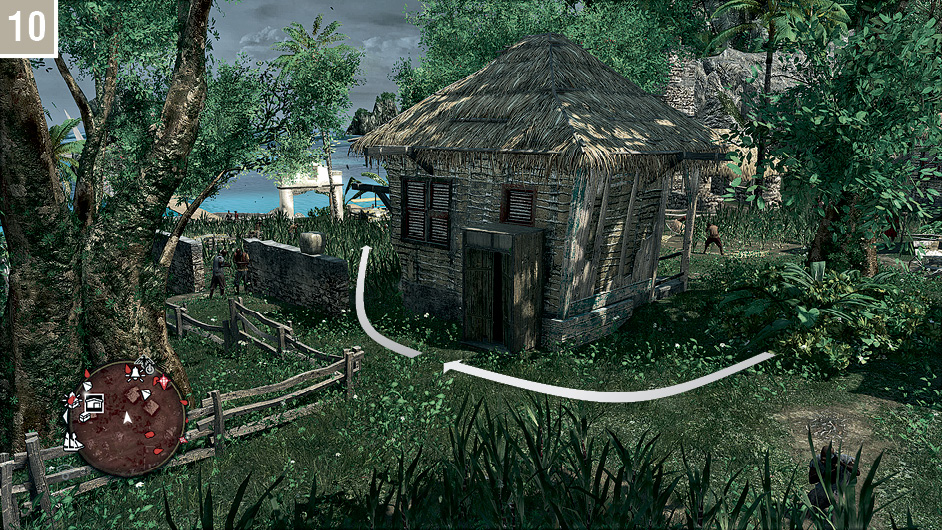
With the previous potentially troublesome witness dealt with, retrace your steps to arrive back at the alarm bell that you passed earlier.
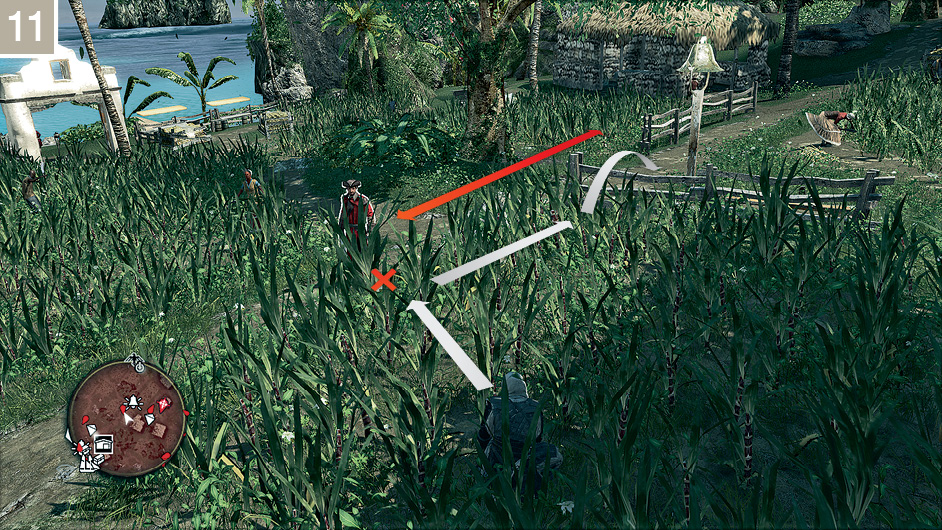
Lure the patrolling soldier to his doom, then observe the watchtower carefully. When the Gunner turns away, quickly emerge from cover, vault over the fence and press  to disable the alarm, then swiftly return into cover before Kenway is noticed. Run to the back of the warehouse until you reach the north side of the building.
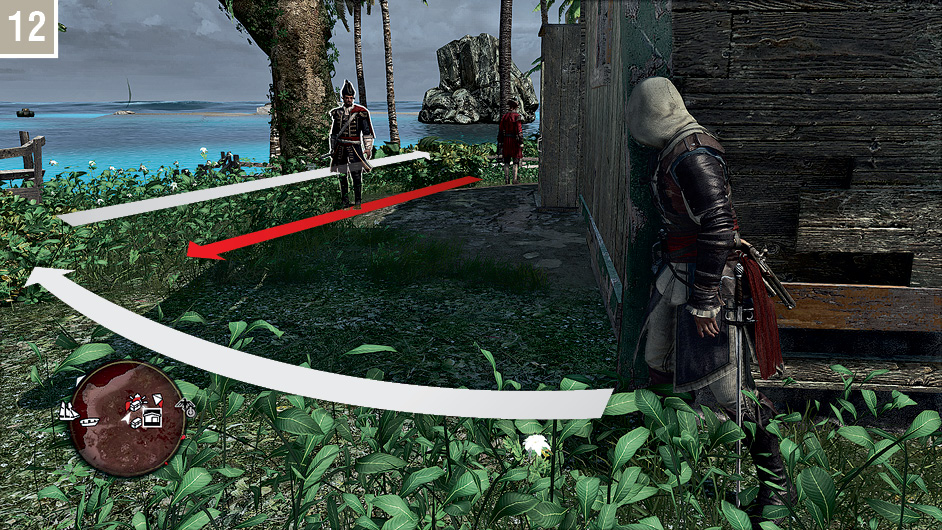
From here, hide in the nearby pile of leaves. When the agent you tailed earlier approaches your position, assassinate him. You can then move up and kill the stationary soldier from the Stalking Zone next to his position. When the patrolling guard faces away, quickly disarm the alarm bell. You can now interact with the nearby warehouse door to bring the mission to a close – and with a 400 bonus for doing so without being discovered. You will find a rowboat to the northwest that you can use to quickly return to the Jackdaw.
Memory 06 “Proper Defenses”
Mission Overview
Optional Objectives
- Use one broadside to sink two boats.
- Use heavy shot to sink two ships.
Notes & Further Reading
- You must purchase the Standard Heavy Shot Strength upgrade (and, if necessary, buy ammunition) before you begin this Memory to complete a related Optional Objective. It’s 900R to buy from the Captain’s Cabin of the Jackdaw or a harbormaster. If you’re seriously short on funds, this can be raised by opening a handful of Treasure Chests at Salt Lagoon before you set sail after meeting with Thatch and Kidd.
- You can find deer on Salt Lagoon. If you hunt and skin two before you depart, you can continue your journey with Health Upgrade II.
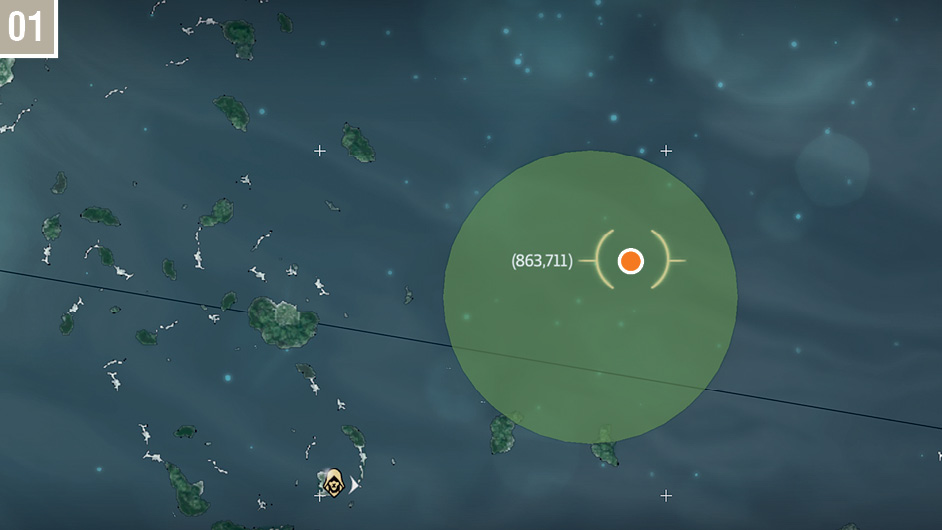
Leave Cat Island and head for the marker at Salt Lagoon, where Ed Thatch and James Kidd await Kenway’s arrival. After the introduction, return to the Jackdaw and sail to the northeast to begin the search for the El Arca Del Maestro. The vessel can usually be found near the position marked on the accompanying screenshot; use the spyglass to identify it from a safe distance.
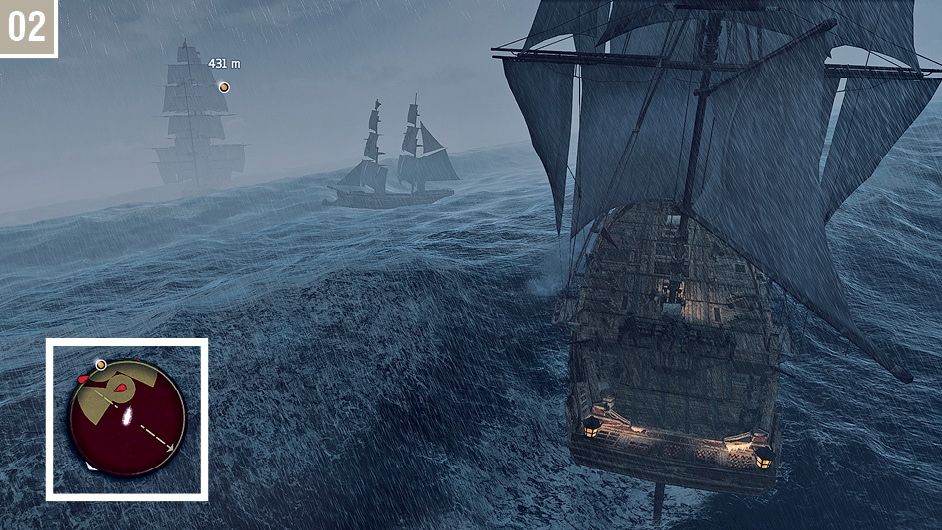
Follow the El Arca Del Maestro at a range of approximately 450-500 meters, which is perhaps dangerously close to losing the target at the outer edge, but makes for an unremarkable pursuit. You’ll need to swerve quite hard to avoid incoming ships and sharp turns by the galleon, but it’s otherwise a relatively easy tail. After you pass a small island to the left, there’s a checkpoint just before a small group of vessels move to engage your target.
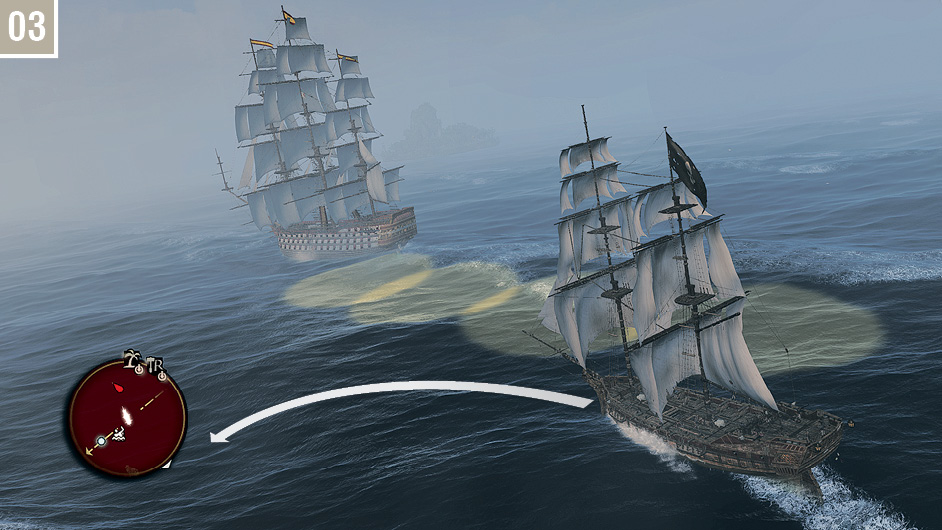
After the galleon opens fire on the vessels, you participate in a crash-course in dodging mortar fire. There’s no benefit in moving too close to the mighty vessel, so focus on evading its long-distance barrages. The best technique is to bank in one direction until the target markers appear, then quickly swerve when they do: from the right to the left, for example.
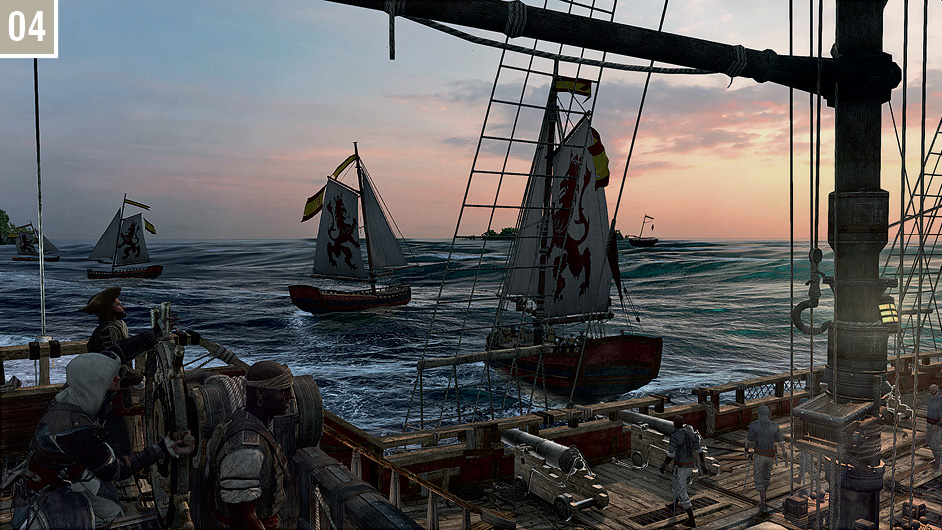
After a predefined delay, eight gunboats move in to engage the Jackdaw. The start of the battle is the perfect time to complete the two Optional Objectives. Using heavy shot, align the Jackdaw with two targets at reasonably close range and, without holding the Manual Aim Button, open fire to sink two vessels simultaneously with a broadside. If you don’t succeed during the initial charge, you can alternatively weaken ships individually, then deliver the coup de grâce after maneuvering until you have two in alignment. If you wish to complete this Optional Objective, but have yet to do so after four or five ships have been sunk, you may wish to pause and return to the previous checkpoint to try again.
Memory 07 “A Single Madman”
Mission Overview
Optional Objectives
- Stay out of combat.
- Air assassinate du Casse.
Notes & Further Reading
- You’ll have plenty of time to explore the island of Great Inagua later, but we highlight a handful of collectibles that can be picked up now to save extensive backtracking in future.
- The White Jaguar, a ferocious predator, may be encountered in the jungle at the center of the island if you wander from our suggested path. An attack leads to a QTE-style battle, where you have to quickly react to onscreen button prompts: be ready to respond to these if cupidity leads you astray.
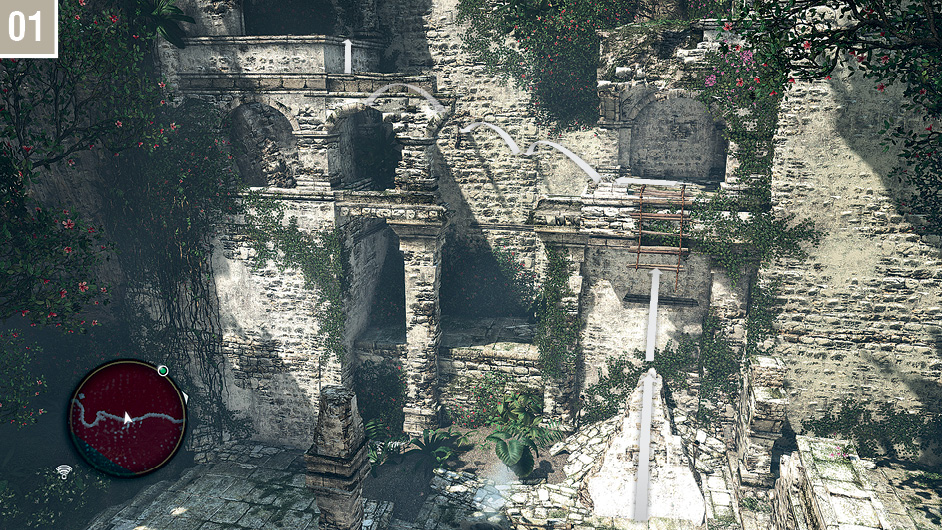
Begin the climb by following the route shown here.
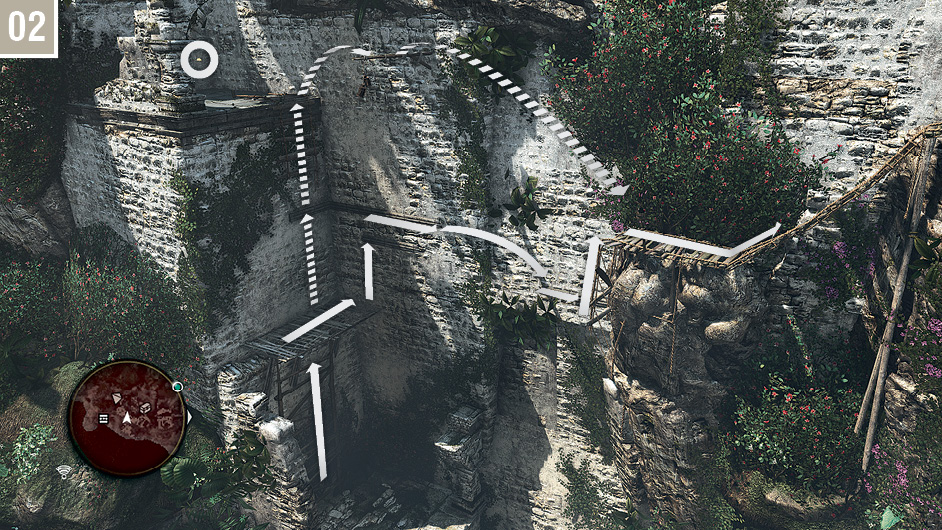
After you scale the wooden scaffold, you can make a short optional detour to collect an Animus Fragment. When you reach the suspended portion of the rope bridge, run straight ahead: it will collapse, with Kenway grasping a lower rung. Climb up.
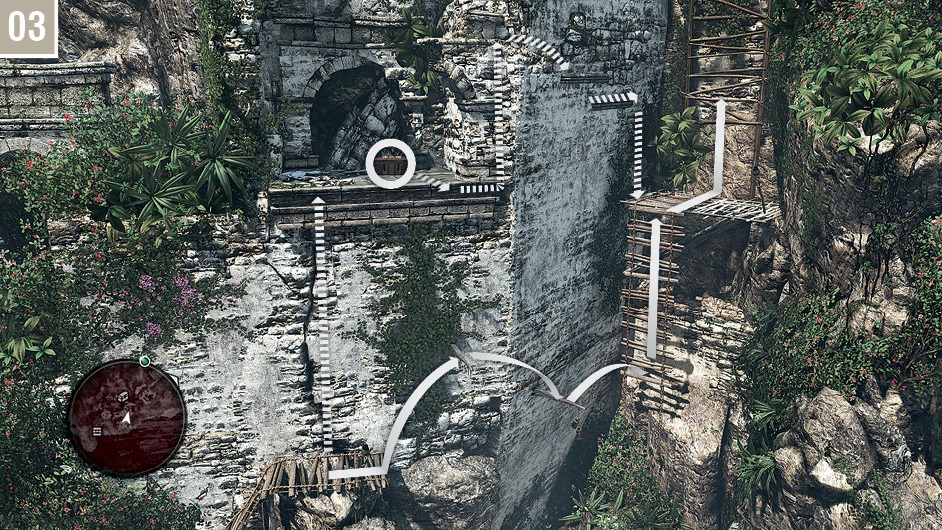
The alternative route here necessitates two bouts of climbing, but offers a Treasure Chest as recompense. Climb the wooden beams.
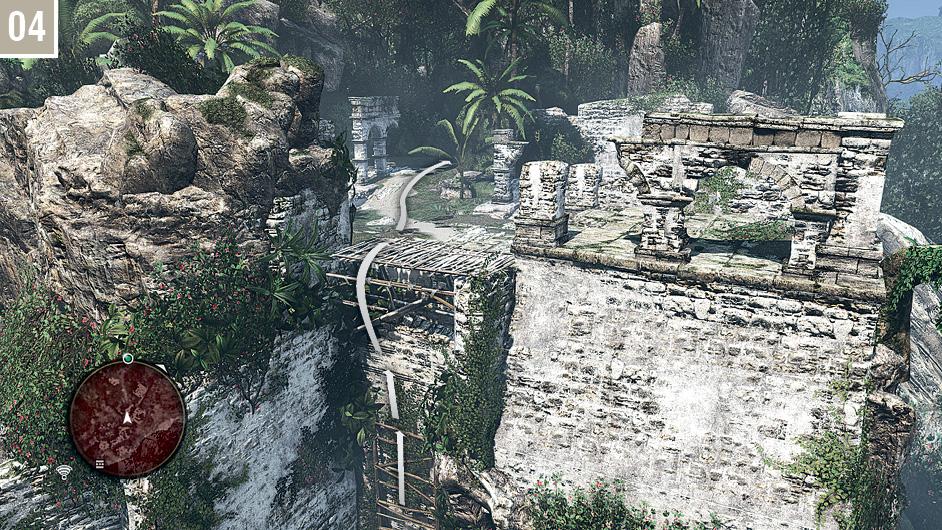
Continue your vertical ascent until you reach the top of the cliff, then – after taking a moment to enjoy the view – make your way to the path leading to the island interior. The jungle features several groups of Spanish soldiers, so we’ll document the best way to avoid them without open conflict. You can, if you wish, opt to fight or run through instead.
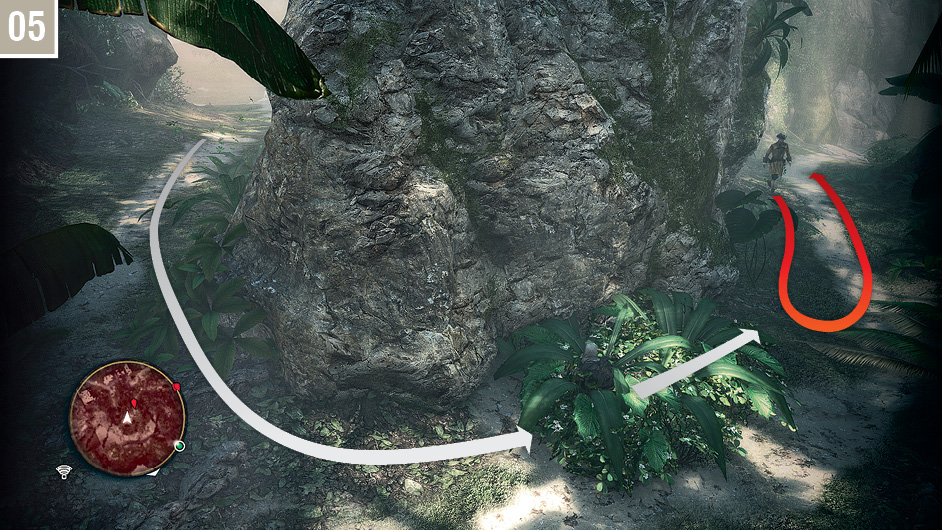
This first sentry walks a lonely patrol that brings him into contact with two small Stalking Zones: easy prey for a silent assassination when his back is turned. When you reach the end of this path, the jungle briefly becomes a warren of interlinked paths. It’s easy to lose your bearings, so we’ll cover the most direct and least complicated route. You can return here later to explore and pick up collectibles once du Casse’s men have left the area.
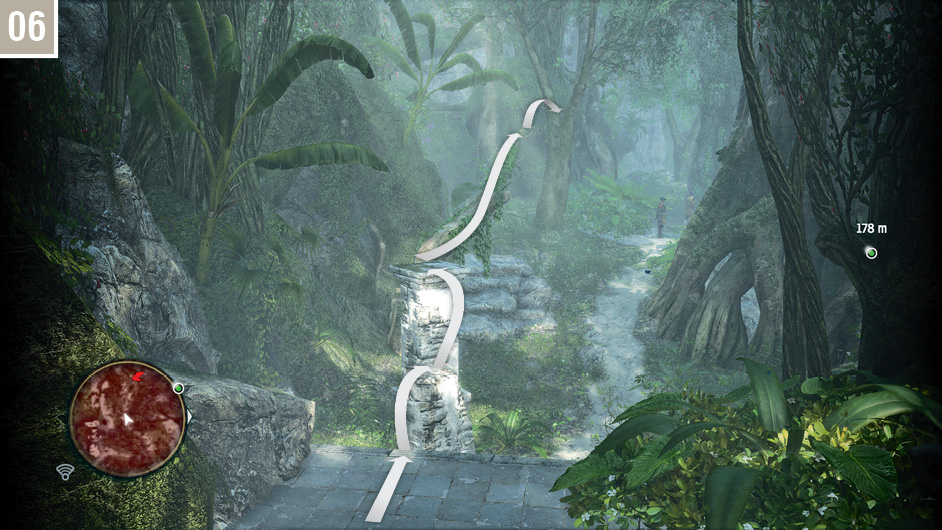
It’s important to move purposefully here, as the two guards in the distance are momentarily distracted when you arrive. Free run up the horizontal bough to reach the V-shaped section in the tree.
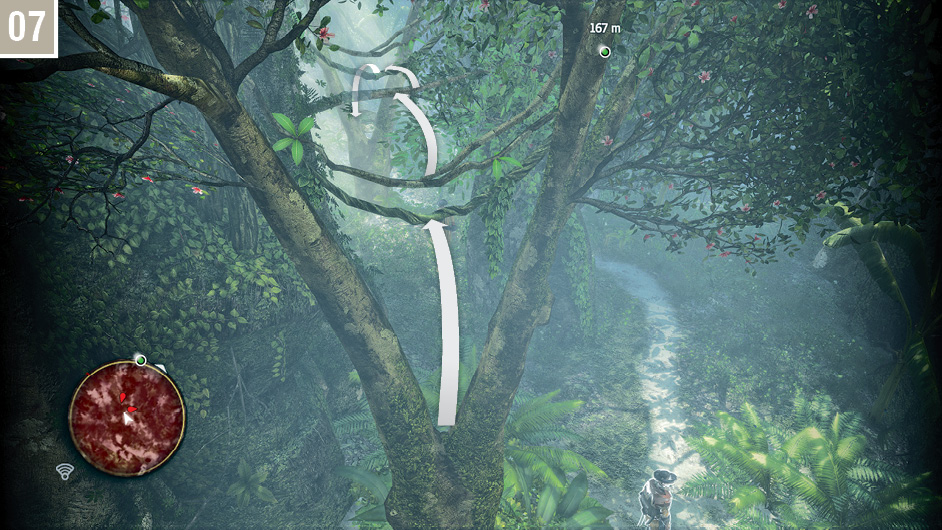
From the V-shaped section of the tree, quickly jump and swing to the solid branch directly ahead, then climb up. Jump and swing to the next V-shaped tree section, then run down the log just beyond it and follow the path to the north.
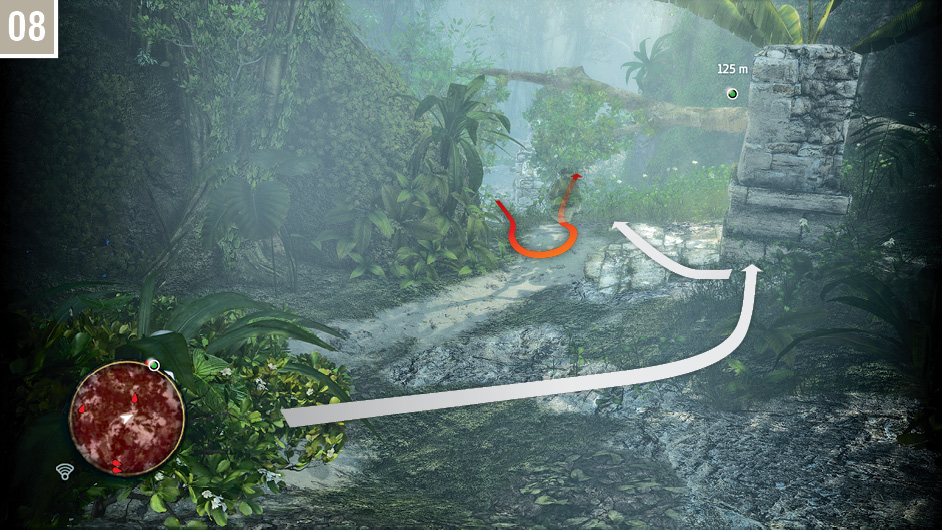
As you reach the bottom of the sloped path, be careful as you approach the base of the ruined pillar: there is a soldier patrolling off to the left. Wait until he climbs the bank and turns away, then sneak up behind him for an easy assassination.
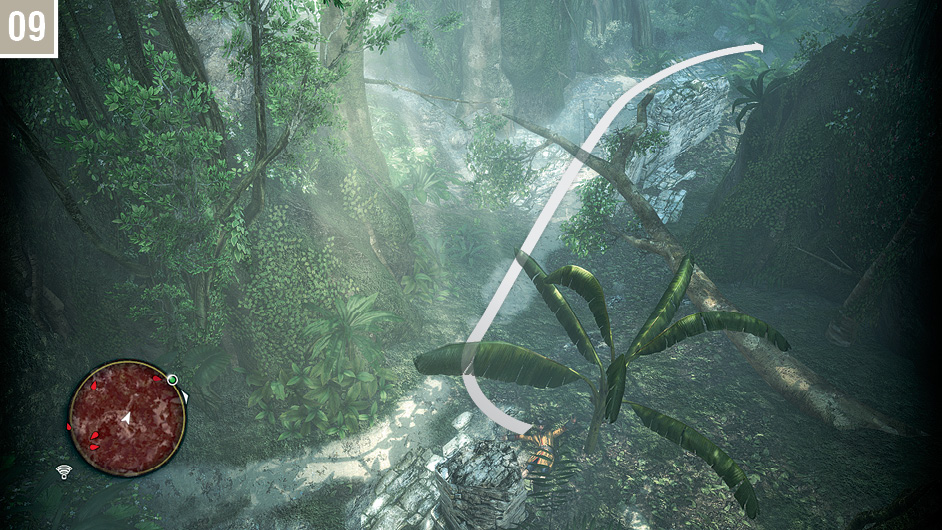
Follow the path that curves back to the north past a broken wall. You will encounter a soldier on the way, but he is facing away from Kenway: silence him with the Hidden Blades.
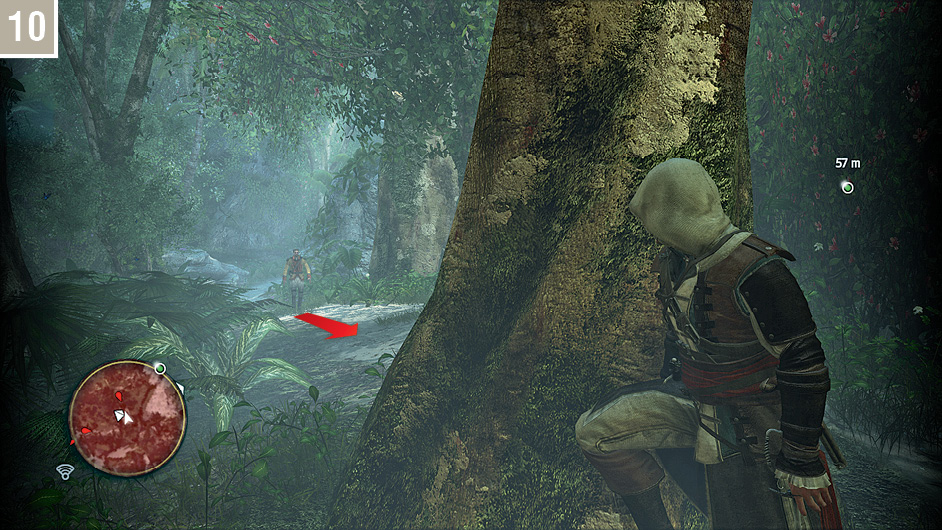
When the path curves to the west, there is one further soldier to slay; once again, stay out of sight until he turns away from you, then move in quickly to assassinate him. The remaining section of this (now strictly linear) course is free of further dangers, so continue until you reach a cliff.
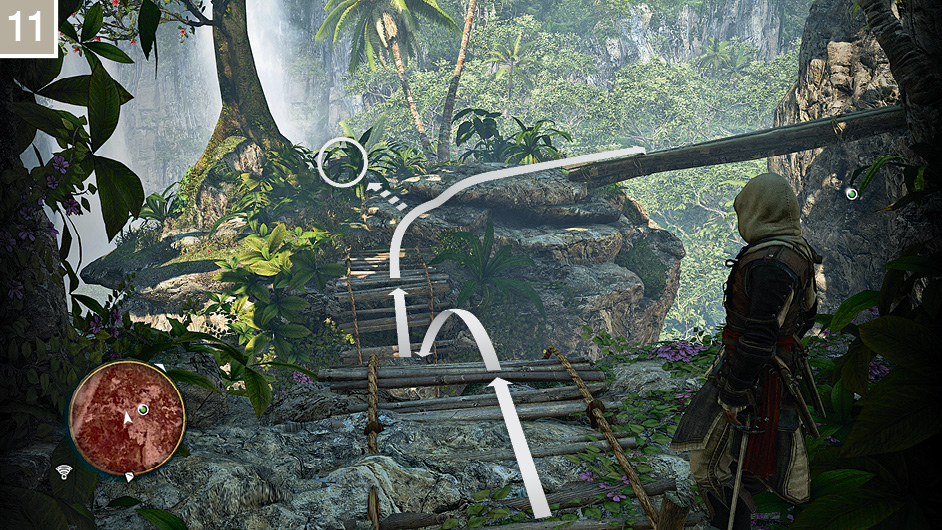
The jump looks a little long, but it’s within Kenway’s reach. Take a moment to admire nature in all its splendor (and loot the nearby Treasure Chest, if the fancy takes you), then head over the log bridge to the waypoint.
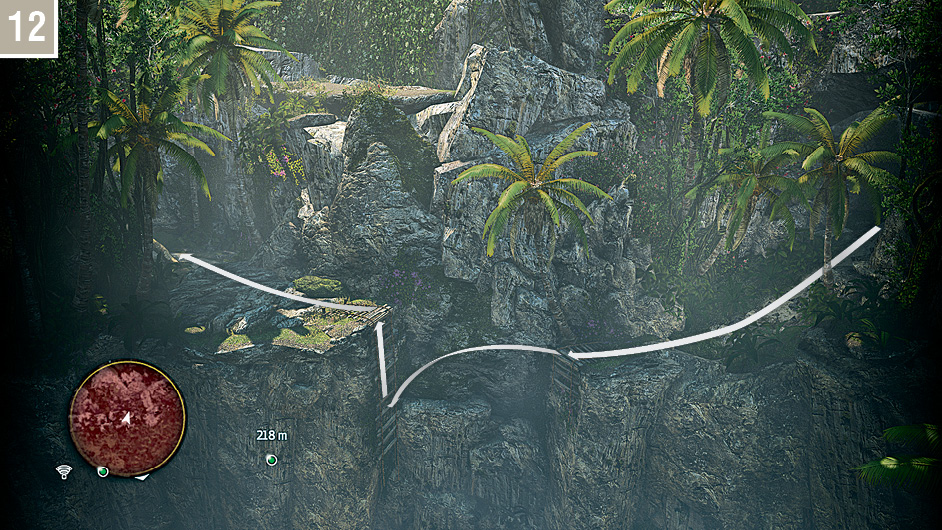
Though you can see the next waypoint in the distance, you’ll need to return to the jungle to reach it. Continue along the path as pictured here until you reach a natural stone arch, with soldiers clearly visible on the opposite side.
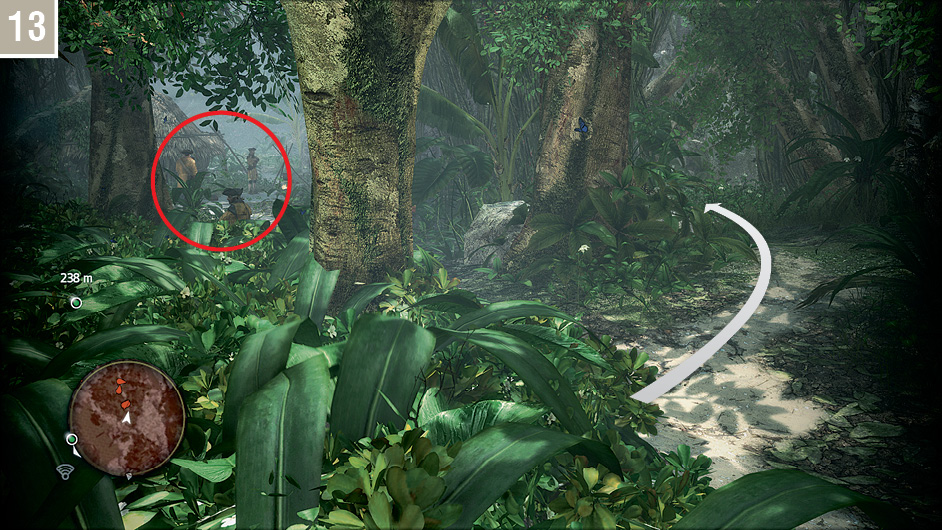
Walk through the stone arch and enter the Stalking Zone on the left. Take a moment to clearly identify the path to the right, then sprint along without hesitation. One of the stationary soldiers may catch a brief sight of Kenway, but you can easily be out of range before he can react.
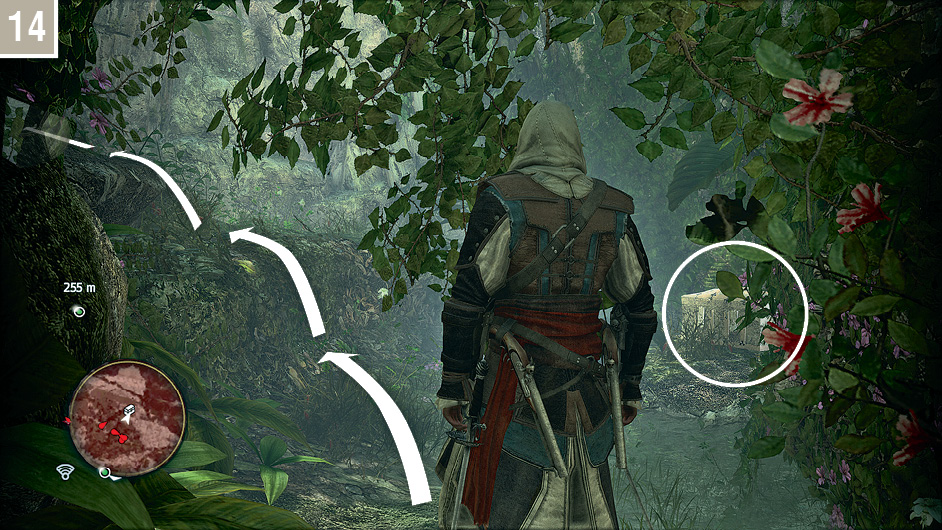
You will find a Treasure Chest en route to the next area. Once you have opened it, climb up the slope to your left.
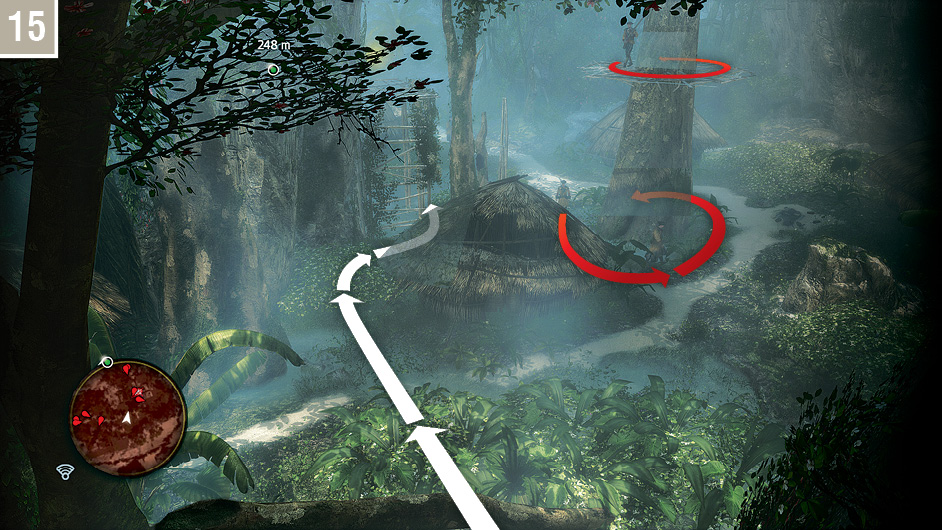
When you reach the area with the huts, and a Gunner on the walkway above, quickly transition between Stalking Zones to move behind the hut to the north, right in front of you. You can then transfer to the Stalking Zone in the pool of water for the next stage.
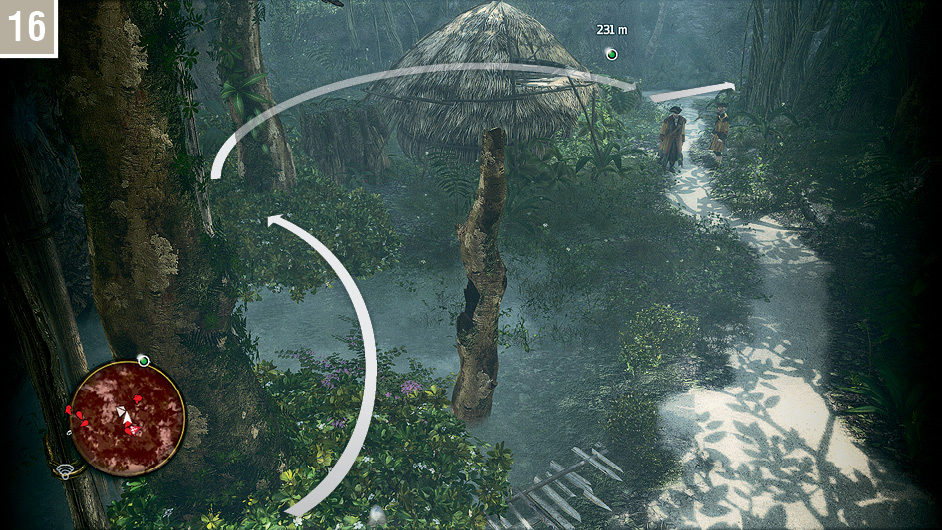
There are two further soldiers in this area, but you can easily bypass them by circling round the back of the final hut. One of them may espy Kenway for a second as you make the initial transition between Stalking Zones, but this isn’t a problem. From behind the hut, continue along the path.
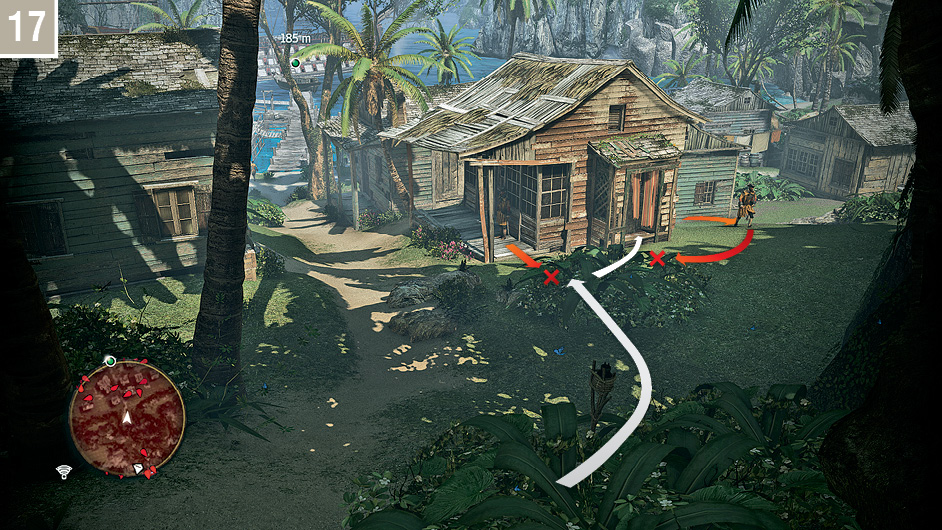
Run along the linear path until you arrive at the opening pictured above. The small village is occupied by du Casse’s men, so you’ll need to thin their numbers with a few choice assassinations to reach the Templar without anyone raising the alarm. Watch the movements of the soldiers directly ahead, then move into the far edge of the Stalking Zone close to the building on the right. Whistle to attract the stationary guard, then kill him. You can then hide in the outhouse and whistle again to attract a patrolling soldier as he passes in front of the door.
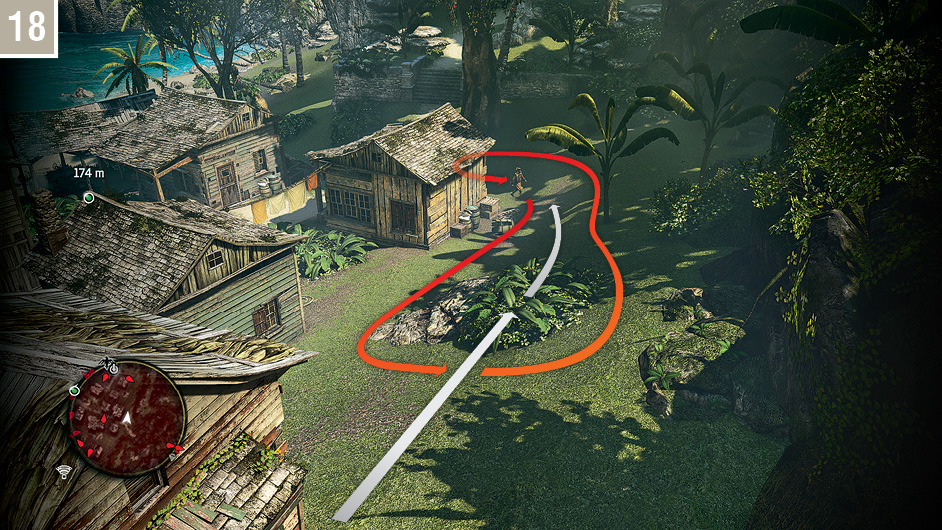
You can now transfer from the outhouse to this Stalking Zone, where you can dispatch the next patrolling soldier. Once he has been dealt with, continue to the edge of the final building on the right.
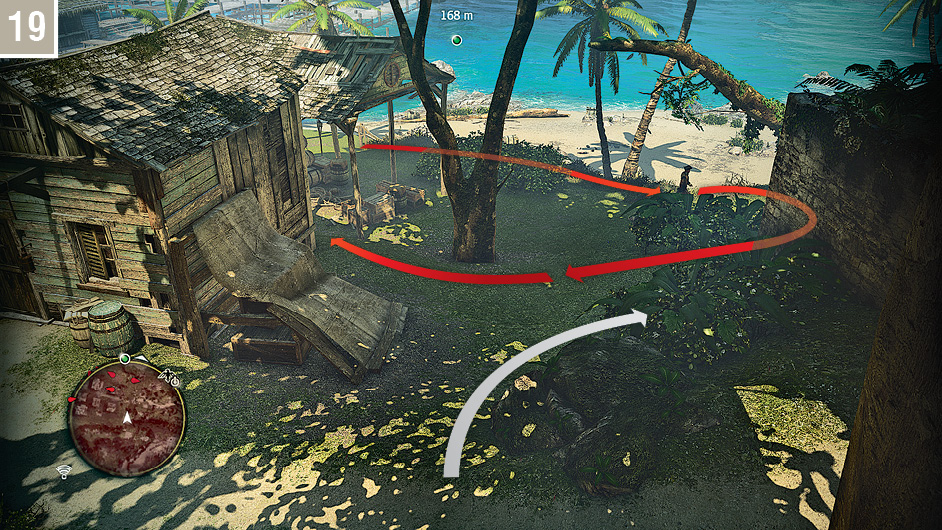
Watch to the north: there is a soldier close to the beach (and, more importantly, the Powder Reserve), whose patrol leads him past a collection of Stalking Zones. Sneak into one of these and assassinate him as he passes. By setting off the Powder Reserve, you can cause du Casse and his men to be positioned in very specific locations on the deck of their ship when you arrive, which makes the final assassination rather easier.
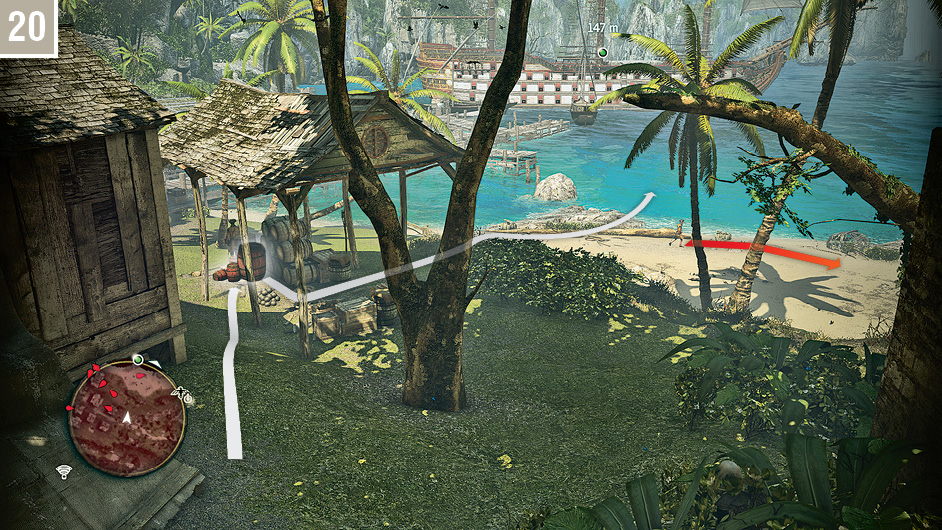
Watch the soldier on the beach. When he turns to the east, you can quickly dash to the Powder Reserve and, being careful not to disturb the nearby guard, hold  to set a fuse. Quickly sprint for the beach and dive into the sea, directing Kenway towards the right-hand side of du Casse’s ship.
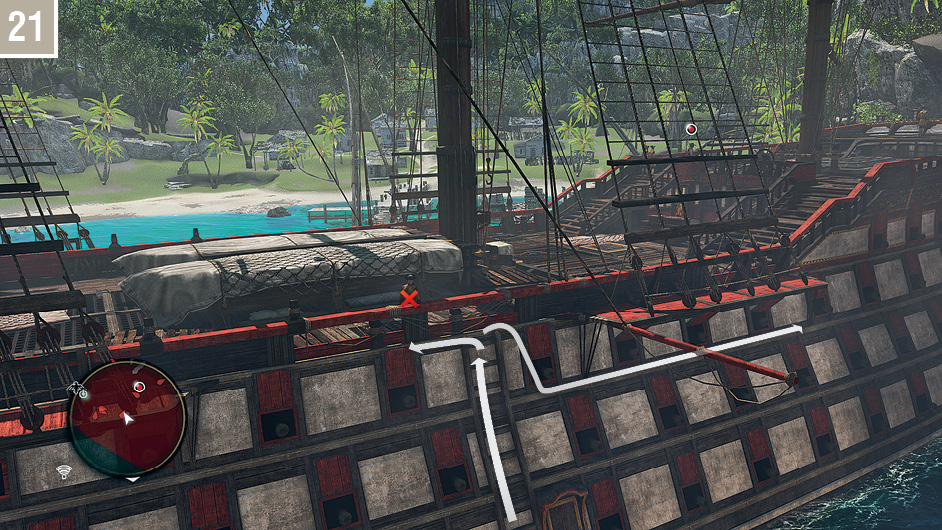
Swim to the far side of the ship and climb the ladder: there is one troublesome sentry to eliminate before you can successfully complete the Optional Objective related to the assassination of du Casse. Ensure that no one is watching (study the mini-map carefully to find your cue), then perform a ledge assassination. You can now traverse, out of sight, to the rear of the ship.
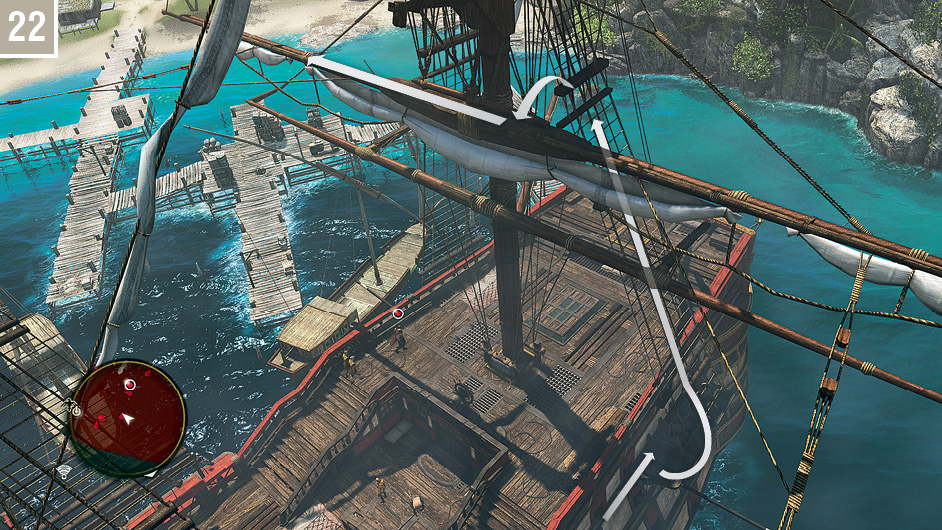
When the patrolling soldiers are both facing away, follow the route shown above to reach a position above du Casse, who will be stationed here permanently after the explosion of the Powder Reserve. If you neglected that step, you will find that he makes a slow patrol of the entire deck.
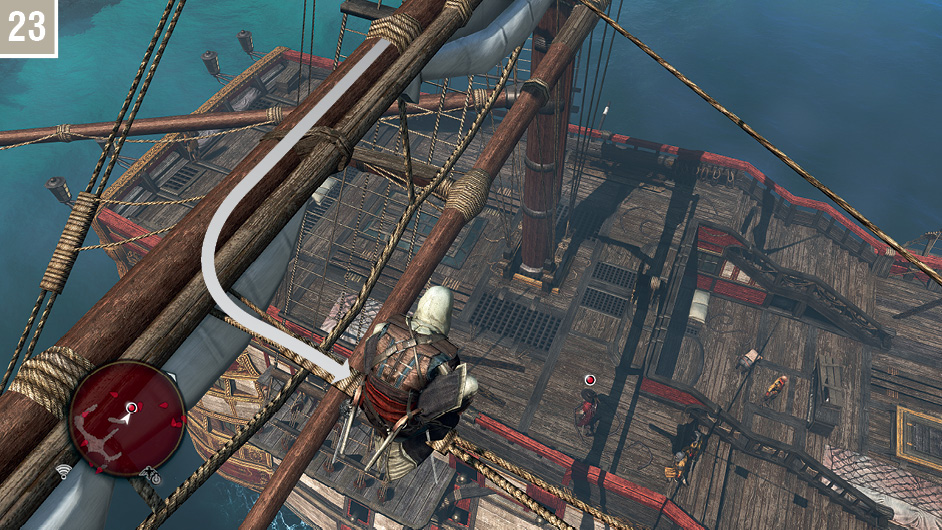
Last, but by no means least, be careful in your positioning of Kenway before you commit to the assassination: ensure that du Casse is highlighted for the aerial assault, and not the nearby soldiers. If you prevented the Templar from patrolling by destroying the Powder Reserve, the position illustrated here is just about perfect.
Sequence End
Though you now have the means, and doubtlessly the will, to explore the Caribbean, it makes much more sense to complete the next four Memories (leading to the start of Sequence 05) before you begin to focus on optional activities. By doing so you will unlock new features, including a vital new piece of equipment that improves Kenway’s ability to infiltrate heavily guarded areas.
If you wish to embark on piratical endeavors close to known destinations such as Nassau, however, feel free to do so once you complete the first Memory of Sequence 04. Reales acquired at this stage in the story can be used to upgrade the Jackdaw beyond the natural difficulty curve, which can make a real difference.
Present Day: Part Two
Once again, this intermission in the Abstergo Entertainment office is entirely straightforward… at least until you leave the CCO’s office. Follow the directions from John from IT and your communicator to reach a workstation, then interact with it. This initiates a hacking minigame, where you must move the data to reach one of the two green lines on the sphere, which are “infinite loops”: lines where it is impossible to change direction once movement begins. At that point, you only need to move along the axis of the green line to complete the puzzle.
Press  to read the in-game tutorial at any time. The controls are simple: use
  to move the data and
  to rotate the sphere. You can also press
  to leave the workstation. This resets the puzzle to its original state. Each one of these challenges can be completed in a variety of ways, but this first instance can be solved with the following solution from the start: down, right, up, left, down, and then either left or right to finish.
The ability to access workstations and private (even restricted) files opens up a new dimension to each visit to Abstergo Entertainment. Though you can only access open areas and those with Security Level 1 at present, your access to the office will expand later in the story. If you would like to begin hacking available workstations immediately – and collecting the mysterious “sticky notes” left around the office – view the Side Quests chapter for a spoiler-free guide.
After visiting the courier in the lobby, you may wish to check your communicator for new information before you return to your workstation. There are several new messages to read.