
Assassin's Creed IV: Black Flag Guide Side Quests
Underwater Shipwrecks & Caves
These varied destinations range from forgotten galleons visited via the diving bell, to secret caves where Kenway can appropriate cargo from smugglers. Most notably, however, they are also the locations where many of the best Elite-grade design plans for the Jackdaw are found – but be warned that these grand rewards come at a price, as underwater locations have a particularly high difficulty level. Our walkthroughs are designed for 100% completion, and offer practical routes through each area that minimize danger. That said, there is no reason why you can’t just use them to identify the chest containing the design
plan that you require, then make a “suicide swim” to collect it. Remember: while the act of picking up a collectible is permanent, Desynchronization is not.
All dive sites ( ) are locked until you complete “Diving For Medicines” at the start of Sequence 06. This debut dive involves the San Ignacio Wreck, which is covered in full in the Walkthrough chapter. The two destinations marked by a cave icon (
 ), Jiguey and Petite Caverne, can be accessed from Sequence 03 and Sequence 04 respectively.
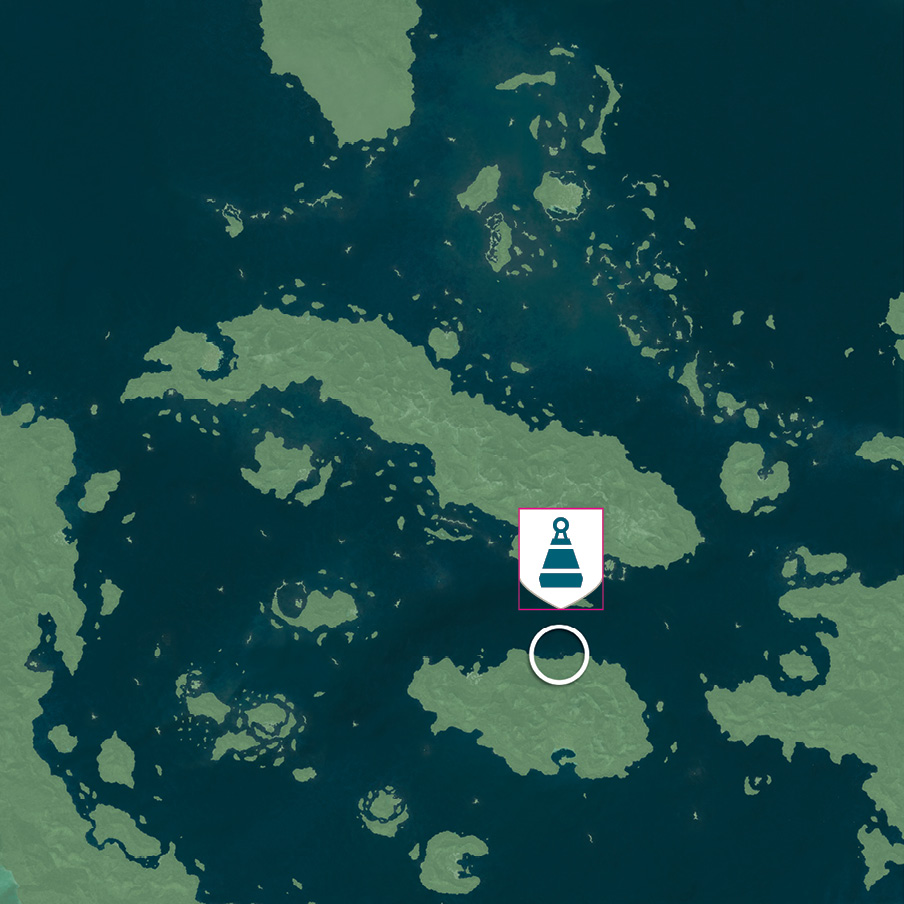
Petite Caverne (901,263)
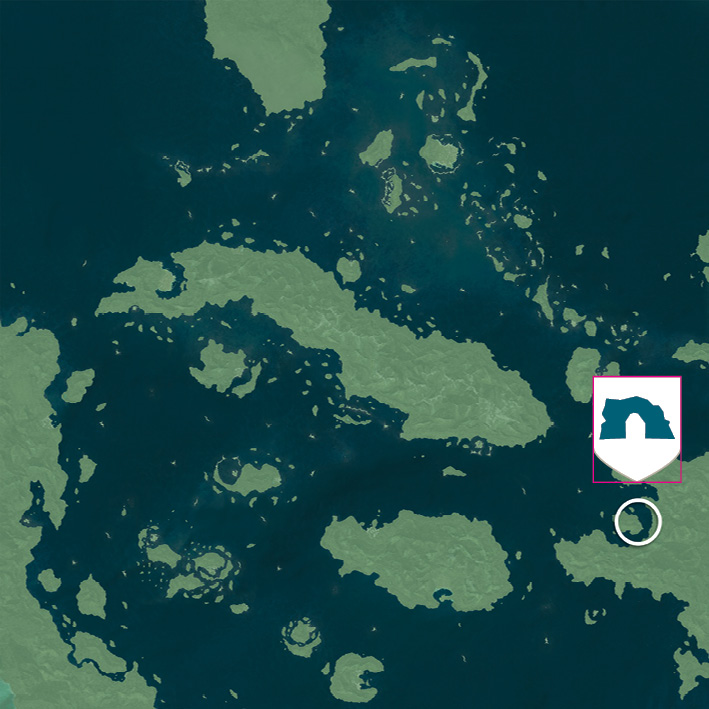
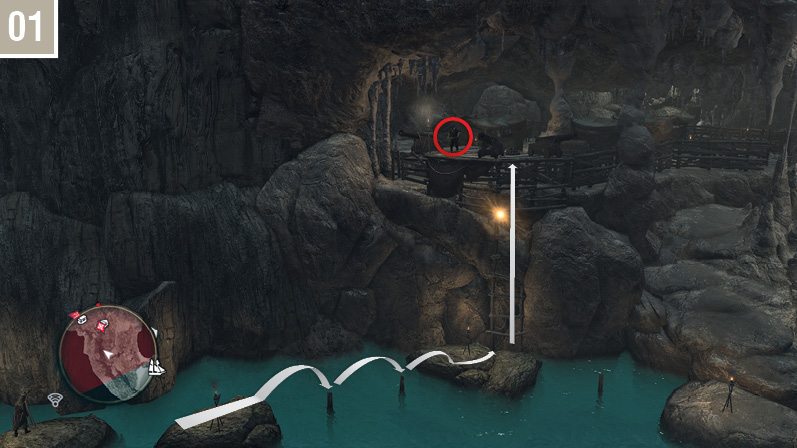
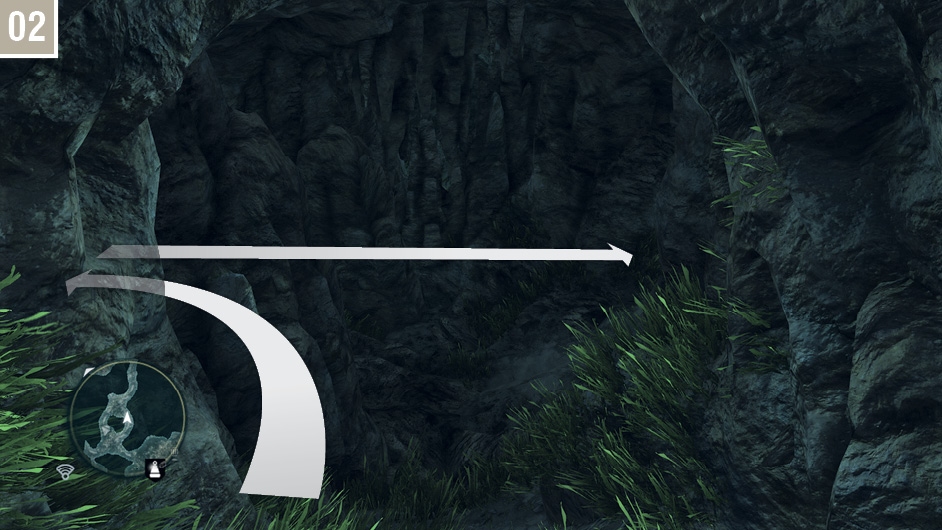
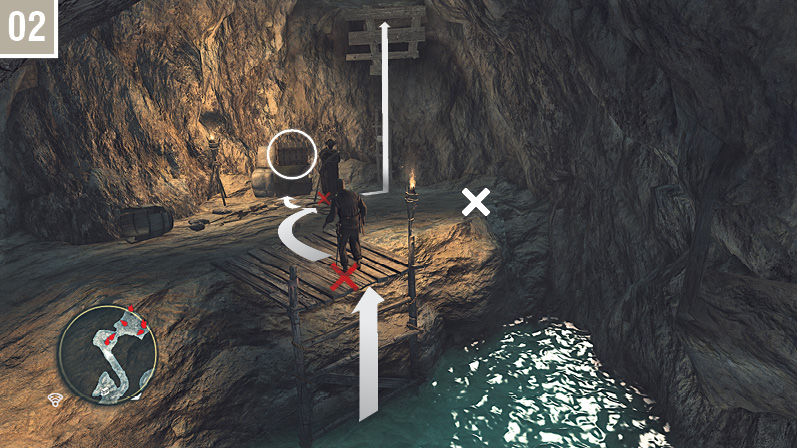
A cave that you can enter on foot after anchoring the Jackdaw outside, Petite Caverne is guarded by a dozen pirates. A Gunner watches the entrance tunnel from the position marked on the accompanying screenshot, so it’s prudent to hit him with a Sleep Dart as soon as he is within range. With no direct requirement for stealth, it’s probably more efficient to simply defeat everyone in a series of localized battles – or just have fun with the Blowpipe. When the dust settles, you can methodically make your way around the cavern to pick up all collectibles. The Treasure Map found on the west side of the cavern leads to a dig site in Tulum.
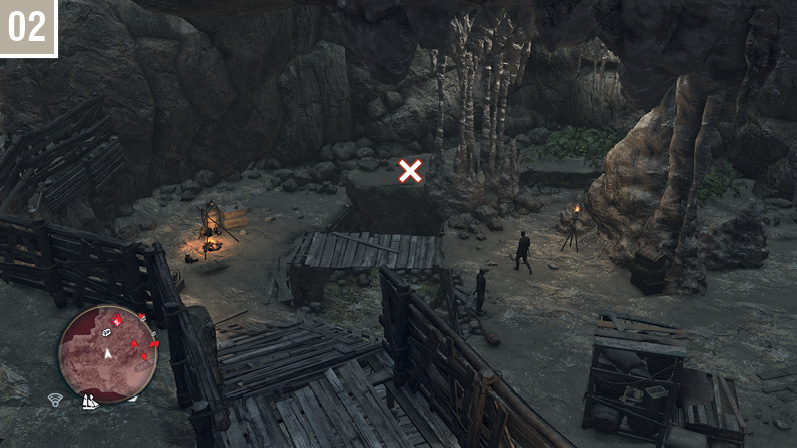
The Treasure Map from Cayman Sound leads to this position, in the southwest corner of the smuggler’s den. The buried chest contains the Elite Heavy Shot Storage design plan and 3,000R
Jiguey (565,539)
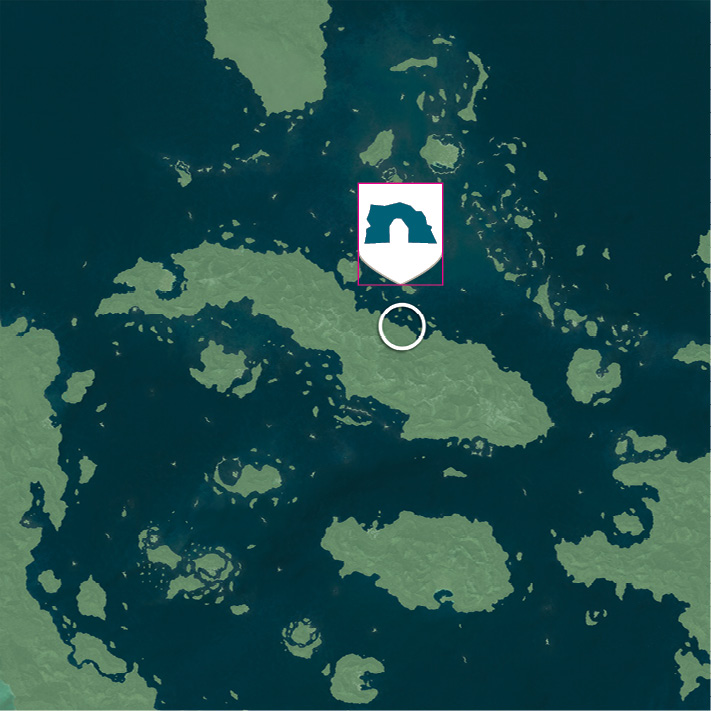
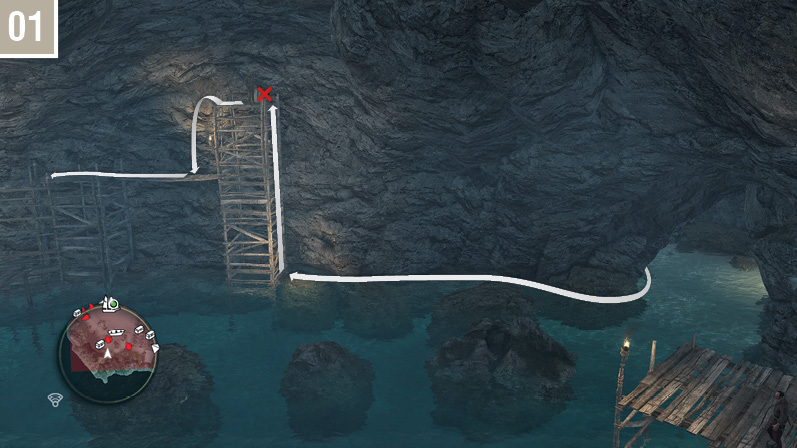
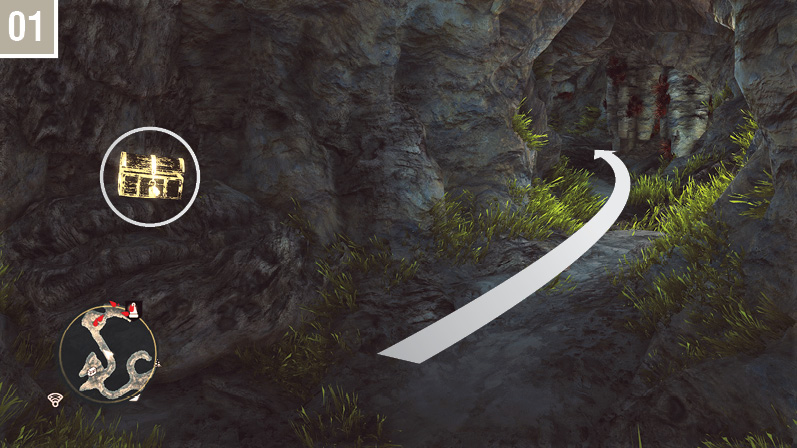
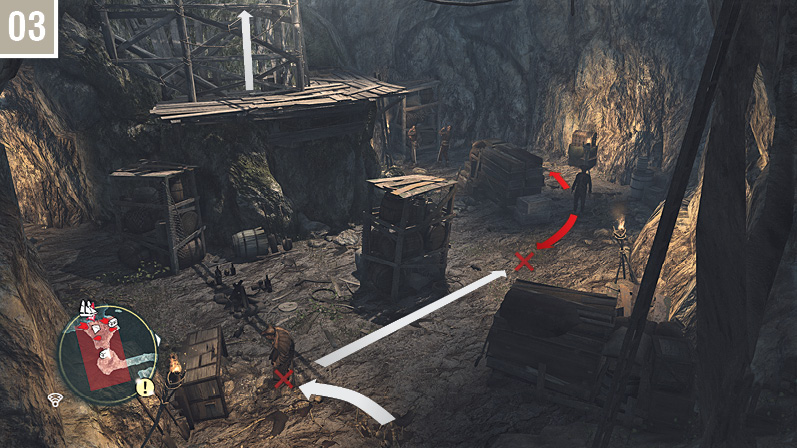
Kenway can enter this smuggler’s den on foot after anchoring the Jackdaw outside the entrance. The tunnel leads to a large natural cavern where, should you visit during the day, glorious natural light streams in from an opening in the ceiling. Guarded by only nine pirates, mostly of the basic soldier class, it’s easy to clear the area with a sequence of short, decisive battles. You may wish to do this in a counterclockwise progression, starting with the sentry on the tower shown here (just to your right as you enter). It’s then a trivial task to plunder this location of its collectibles.
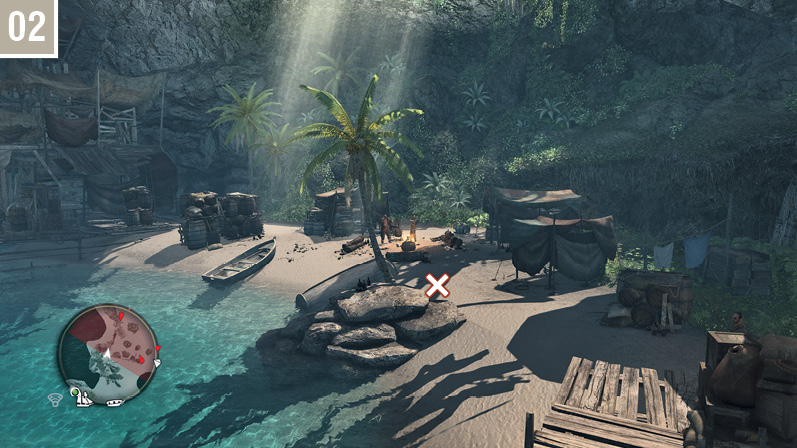
The Treasure Map from Île à Vache leads to this position, by the coconut tree. It contains 4,000 R.
Kabah Ruins (769,145)
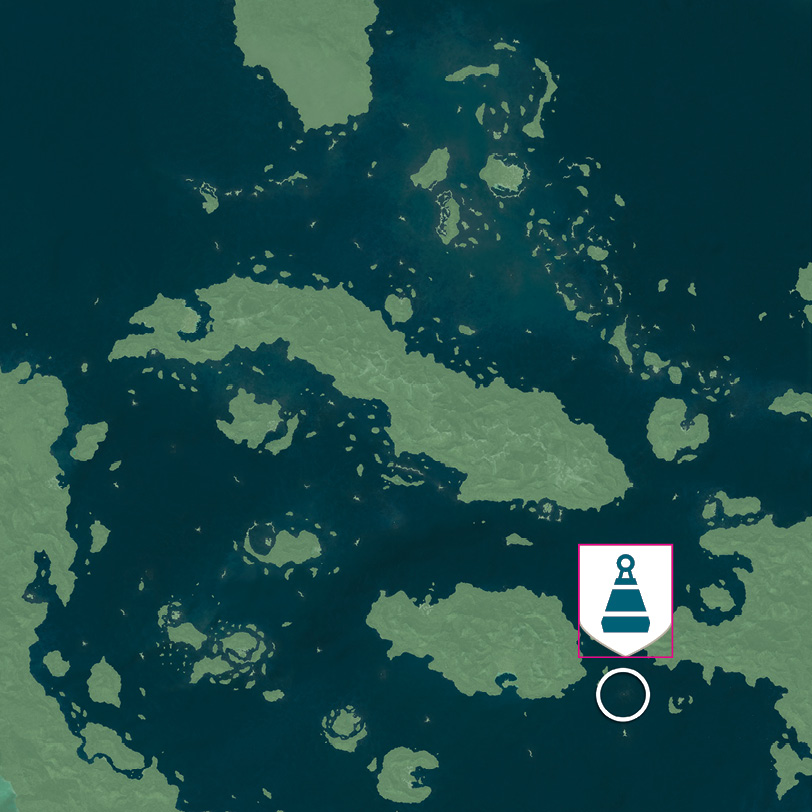
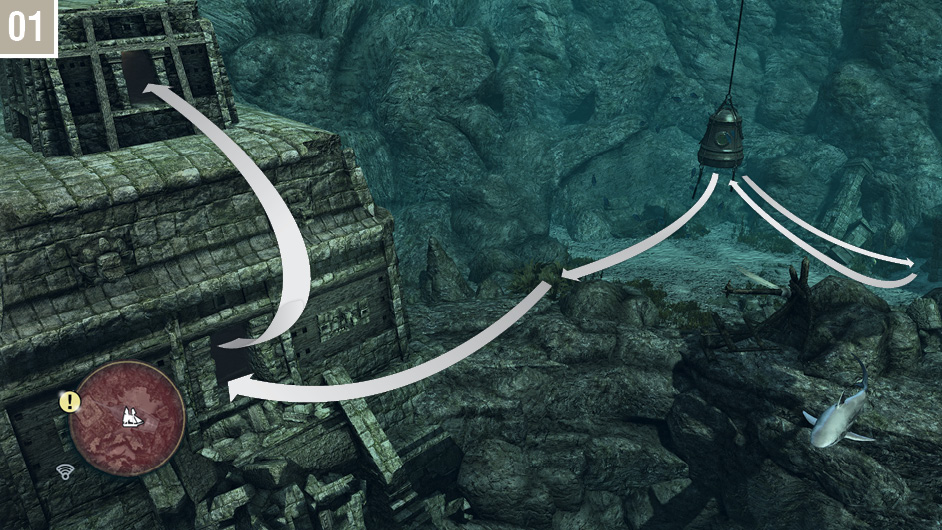
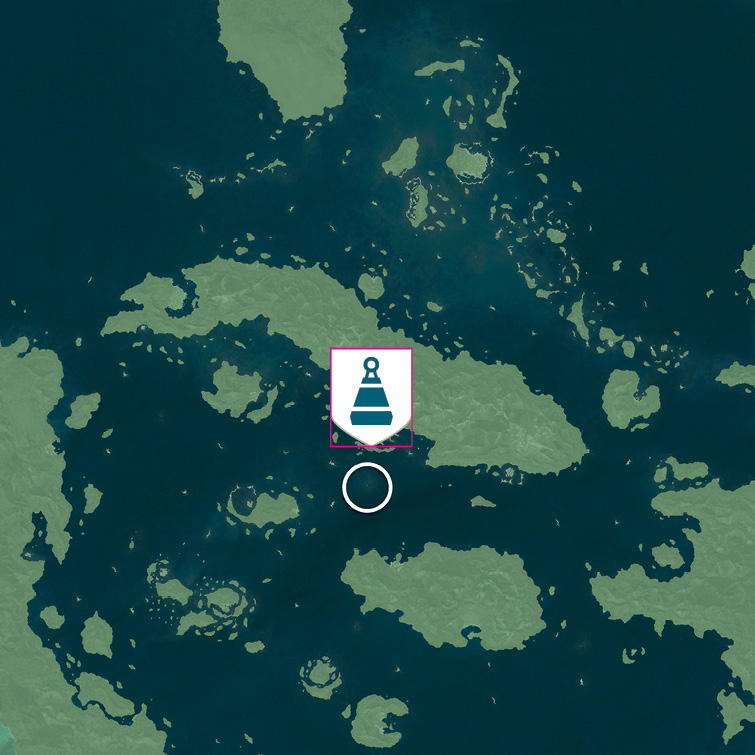
From the diving bell, swim to the chest to the south (your left when you begin), then back to the bell. Now swim through the patch of seaweed to reach the lower entrance to the ruins, where you will find a second chest, guarded by a moray eel. It contains the design plan for the Jackdaw’s Elite Round Shot Strength upgrade. Now turn around and quickly swim to the upper entrance of the ruins, where an Animus Fragment awaits.
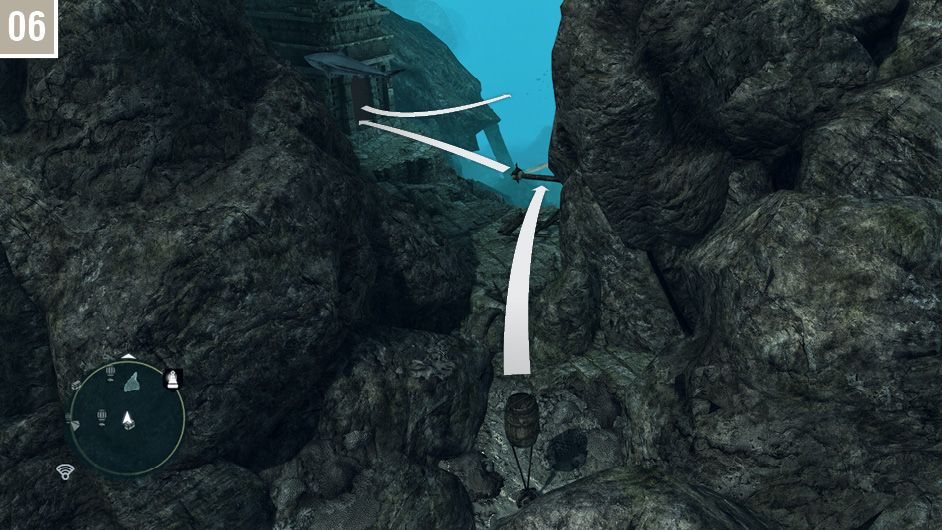
From the upper entrance, swim to the air barrel. Carefully inch around the eel as shown here, open the chest, then swim further down the tunnel. Catch your breath at the first air pocket, and take a right when you reach a crossing. You are now in a long, straight corridor. The only difficulty here is that a powerful undersea current will propel you backwards at regular intervals. This event is foreshadowed by what feels like an earthquake: whenever you see the camera shake, quickly swim into an opening on the right-hand side, and remain there until the current subsides. You will find a chest in the first path to your right, and an Animus Fragment along with an air pocket at the end of the second path to your right. Use the two burst beams on the way to propel Kenway forwards. After replenishing the breath meter, swim all the way back to the tunnel entrance.
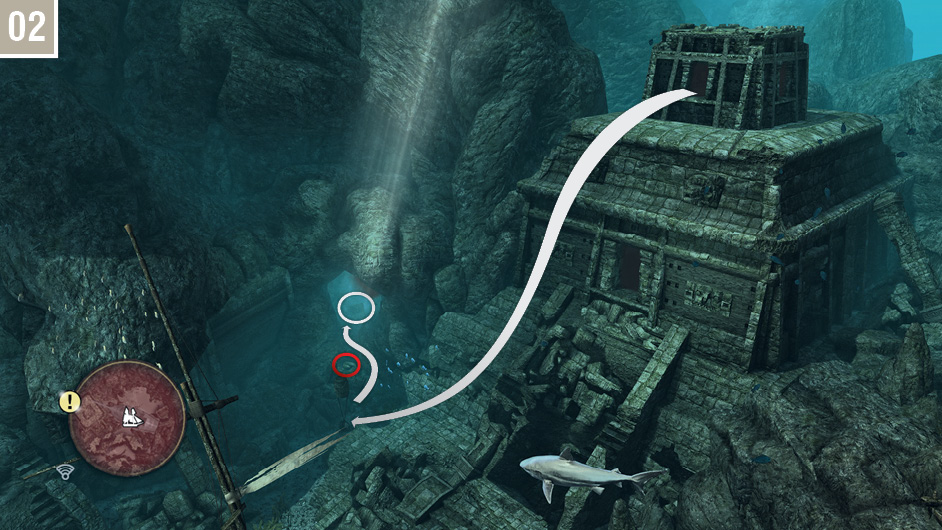
Once you’re back outside, swim to the patch of seaweed. As soon as the nearby shark turns away from you, swim to the wreckage where you will find a chest. Exit from the other side and replenish your breath meter with the air barrel. When you are ready to proceed, swim to the narrow corridor to the southwest.
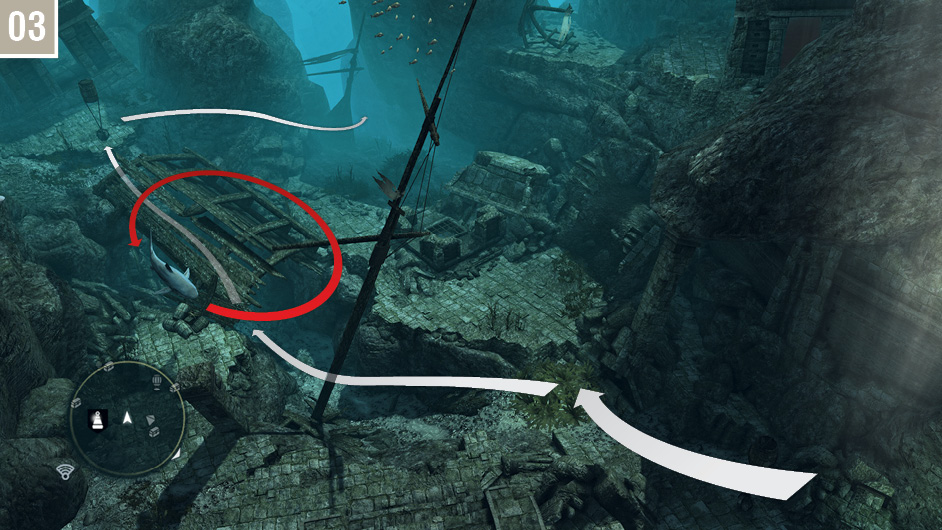
Swim along the ocean floor, and use the burst beam to quickly reach the patch of seaweed. As soon as the shark loses interest in you, swim to the fifth chest in the shipwreck (paying the moray eel and the urchins a wide berth), then to the air barrel. Go through the seaweed once again, but this time swim to the back of the wreck. You can access an Animus Fragment via an opening on the other side. Catch your breath using the nearby air barrel.
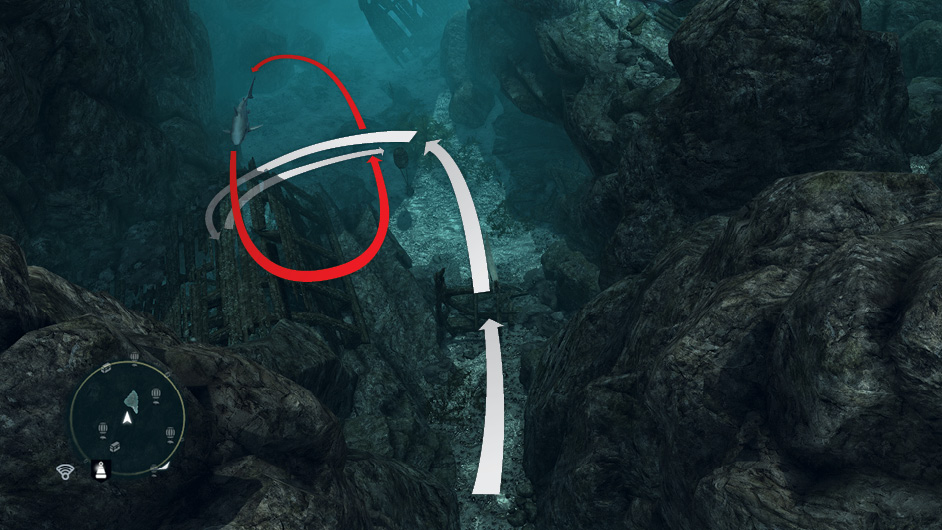
Keep swimming in the same direction to find the seventh chest just a few strokes away. Wait for a shark to move past the exit, then swim to the next air barrel.
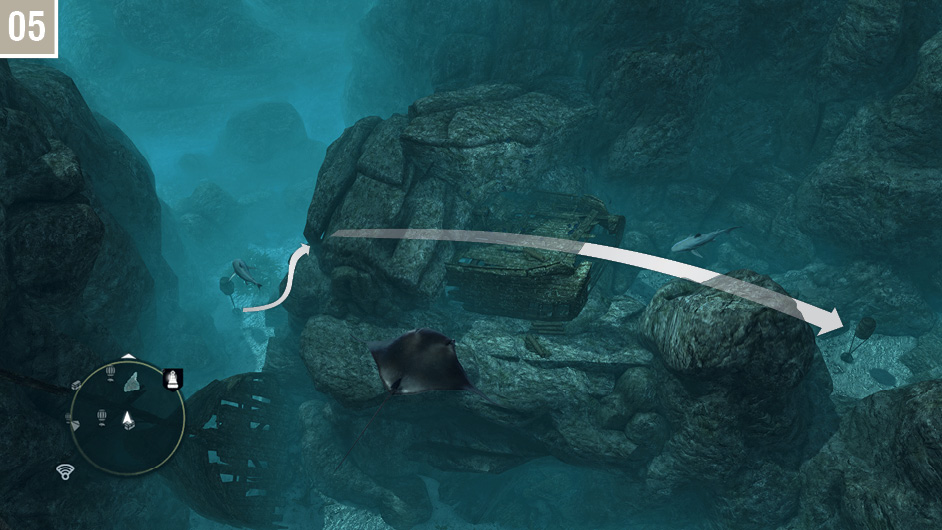
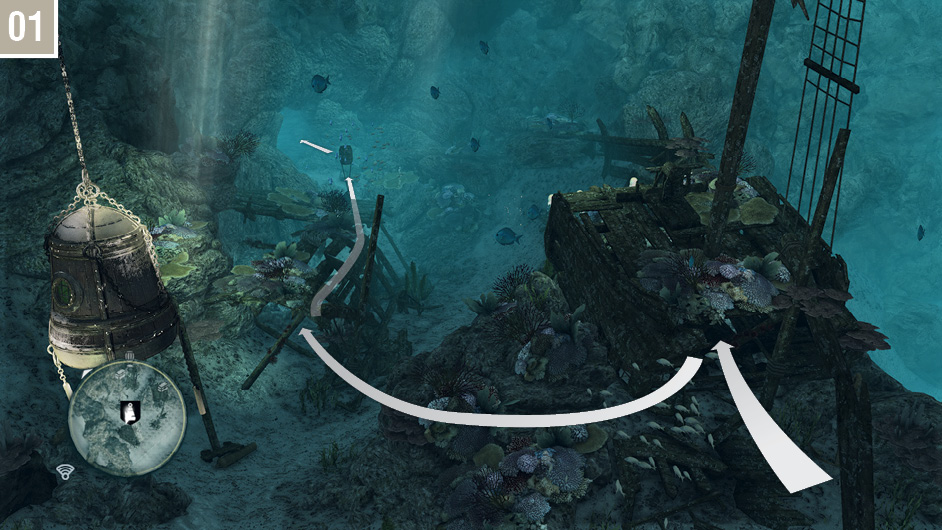
From the air barrel, swim towards the burst beam and propel yourself to the door pictured here. You will find the final chest at the end of the path, past a moray eel. Once you have opened it, return to the diving bell. Note that you can refill your breath meter at the air barrel on top of the ruins.
Devil’s Eye Caverns (487,357)
In an area mercifully free of sharks, the first two Treasure Chests can be collected with ease from inside the wreckage on the sea bed. After the second, replenish Kenway’s air at the barrel before you swim into the tunnel.
After you swim along the initial tunnel section, you will come to an opening where you can see an Animus Fragment obscured by an impassible barrier, and a strong undersea current flowing to the right. Move into this current, but try to keep the camera aligned to face approximately north. When you reach the position shown here, with an urchin-covered stalactite directly ahead, immediately use the High Profile Button and d to steer Kenway to the tunnel to the left; a glance at the mini-map will help you with the timing. Pick up the Animus Fragment, then return to the fast-moving water and swim to the end of the tunnel.
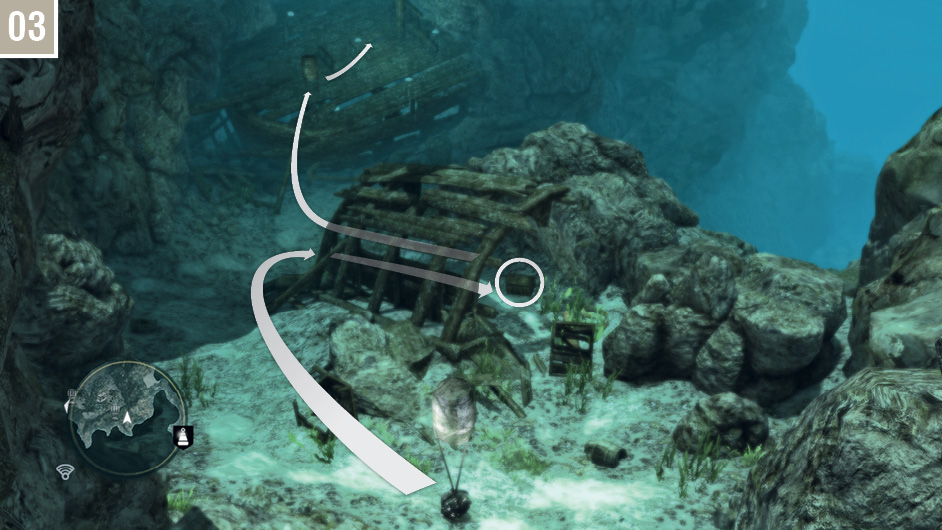
Stop at the air barrel to refill the breath meter, then loot the Treasure Chest directly ahead by swimming in from the rear of the debris to avoid the moray eel at the front. Swim to the wreck in the distance and use the air barrel, then avoid the jellyfish as you approach the glowing hatch. Press  to open it, then swim inside and loot the fourth Treasure Chest of this dive so far. Move into the tunnel, and Kenway will be caught in another underwater current. Swim with this, watching the mini-map as you approach an air pocket. When you arrive in that position, use
  to ascend and grab more air.
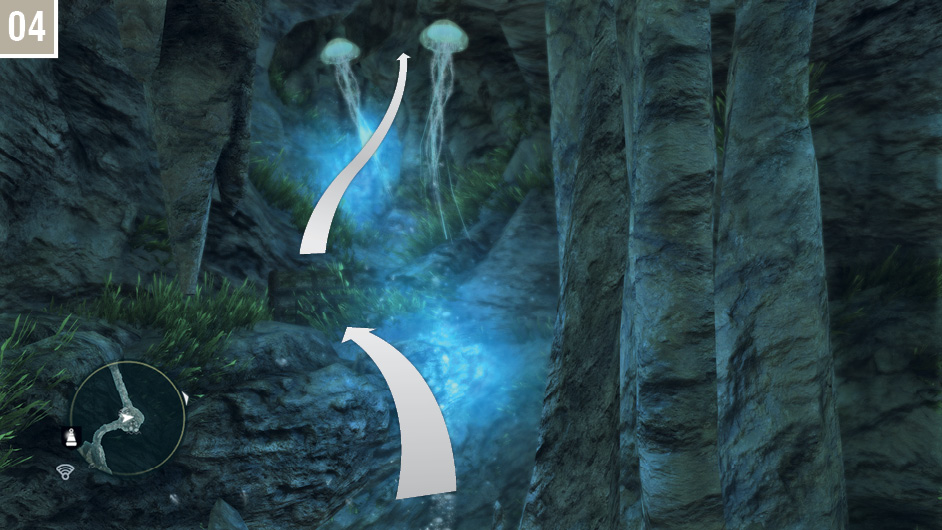
From the air pocket, face to the west then submerge. Loot the Treasure Chest, then avoid the jellyfish as you follow the tunnel to the west, often in an upwards trajectory. This soon swings to the south. Watch the mini-map closely. When you approach the Animus Fragment marker, you can find the collectible in a small alcove to your left. After you grab this, continue south to reach the next air pocket.
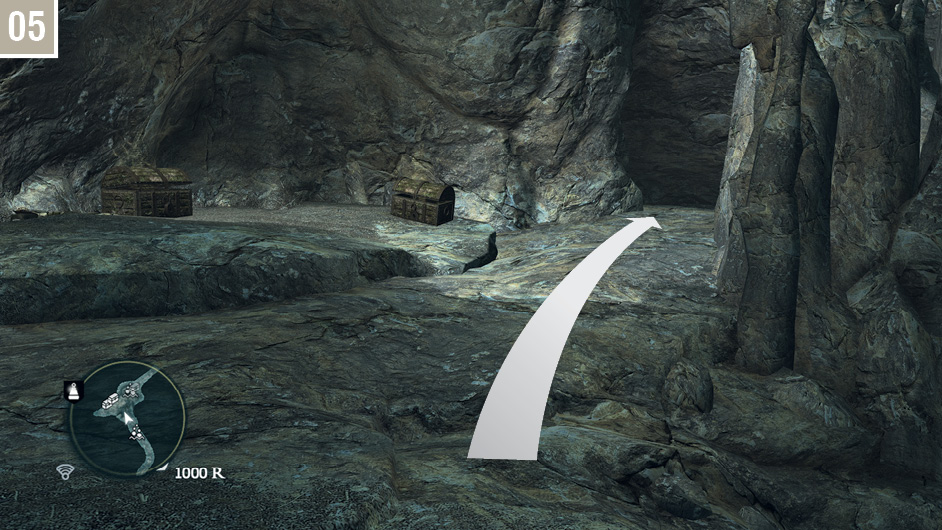
Leave the water and run up the slope to find two Treasure Chests. The one on the left contains the design plan for the Elite Swivel Guns, a mighty prize for a relatively routine dive. Once you have opened both containers, dive from the ledge to the right, facing west.
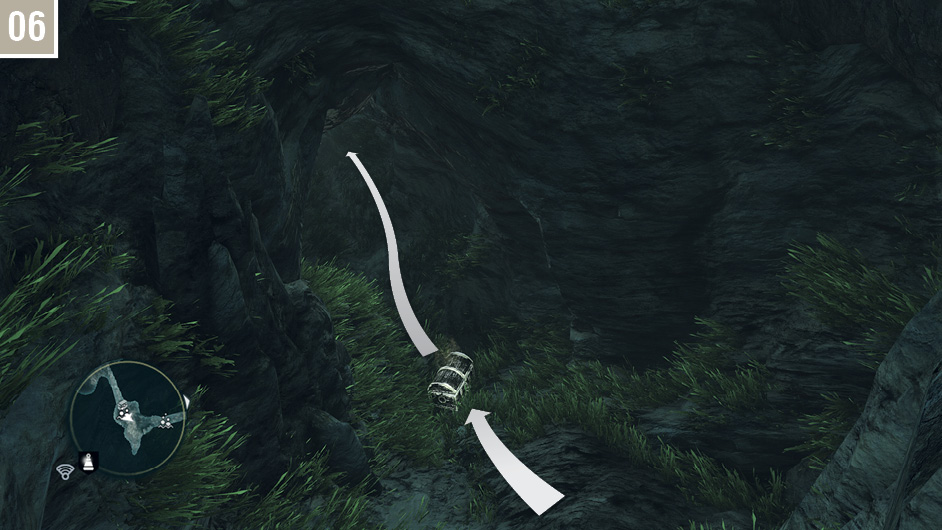
Swim to the bottom of the pool and loot the final Treasure Chest. You can then swim to the west, where Kenway will be propelled by high-speed currents; use d to steer him away from collisions. When this sequence ends, ascend to the surface for air, then enter the tunnel to the northeast. Take the first right to return to the area where the diving bell awaits.
The Blue Hole (471,170)
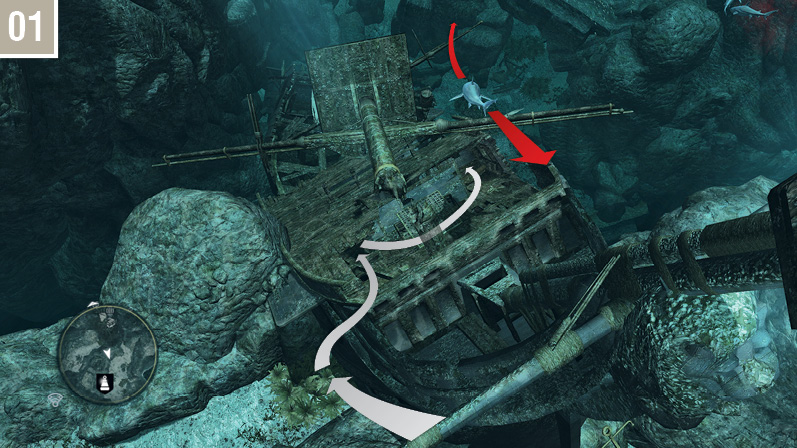
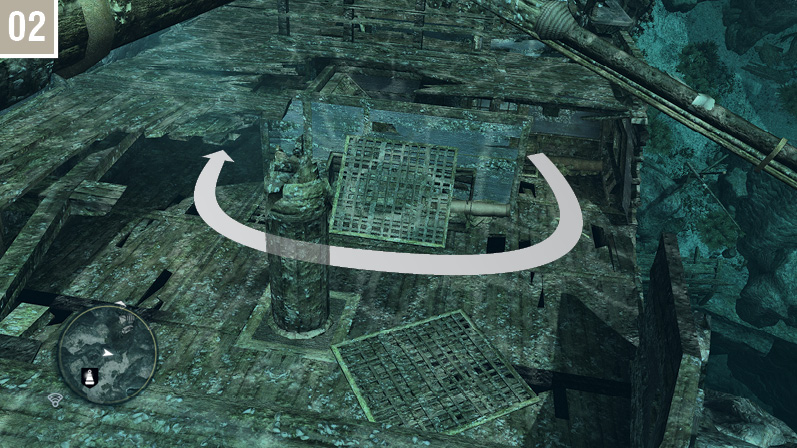
Reaching the first Treasure Chest on this dive is complicated by a shark that moves in a regular pattern along the length of the shipwreck. Though it is possible to reach the small doorway in one daring, lunging swim, it’s safer to stagger it into three stages: the seaweed patch to the left of the hull, then the covered area on the deck, then make a break for the opening.
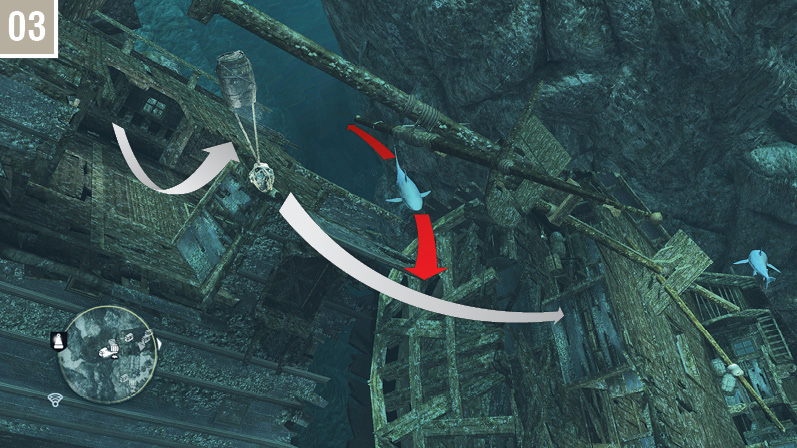
Once you have looted the chest, backtrack to the covered area on the left side of the shipwreck and swim north through the doorway. Immediately turn right to cast eyes on an air barrel.
Swim to the air barrel and look down into the depths ahead to see your destination. You are just about to embark on the most difficult section of this dive. When the shark turns away, swim for the opening in the next portion of the ship.
Open the nearby Treasure Chest, then swim through the doorway to the east and turn left to reach wooden stairs – and, more pertinently, an opening to the deck above.
Wait for a second or two (time being of the essence here), then swim past the shark to reach the captain’s cabin, where the third Treasure Chest of this dive can be found. Immediately turn and swim to the left side of the ship, where a hole in the hull provides a safe route to the sea bed below.
Swim through the opening to the right, just beyond the wall, to collect the first Animus Fragment. The breath meter should be approaching the halfway mark at this point.
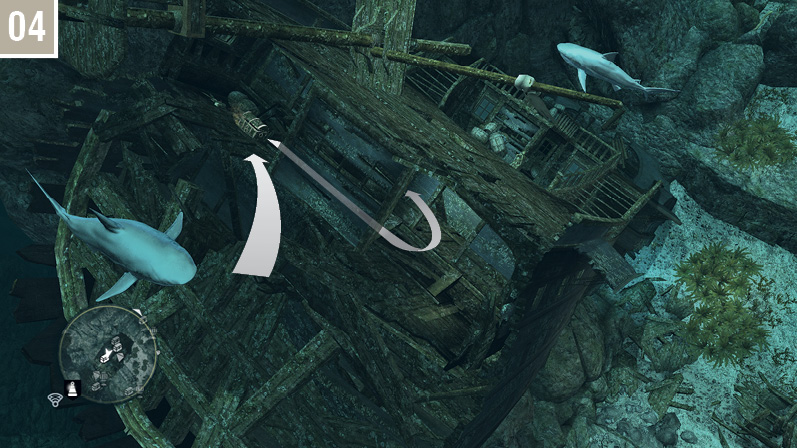
Turn and swim to the north to loot this Treasure Chest, then swim out of the hole on the east side of the ship to reach the sea floor.
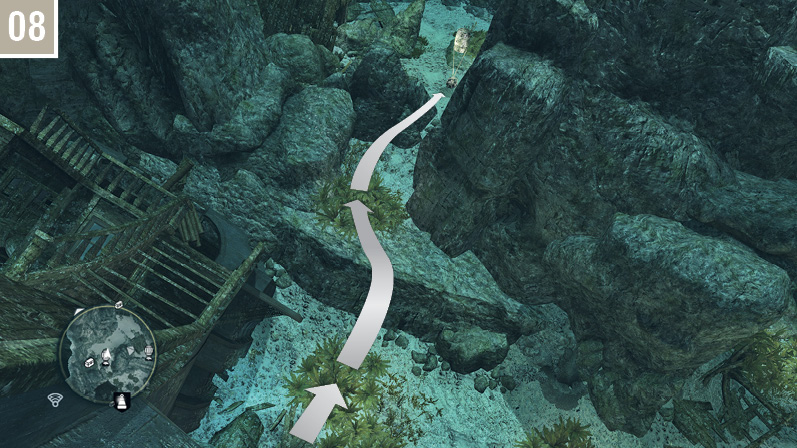
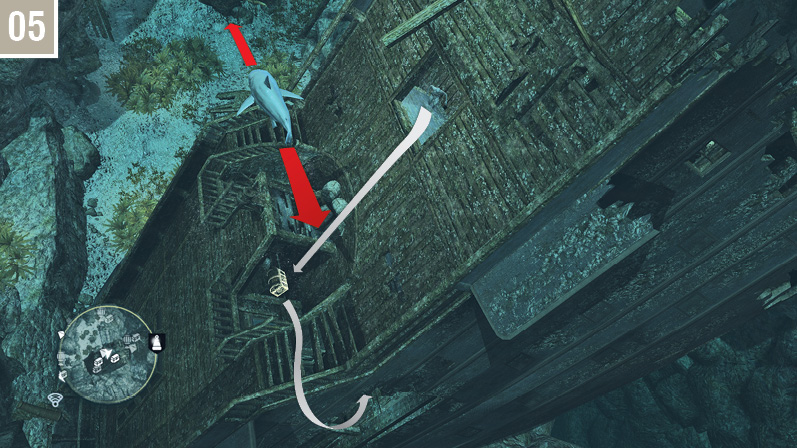
You emerge into a patch of seaweed, and oxygen will by now be a very pressing concern. Swim to the north to reach an air barrel.
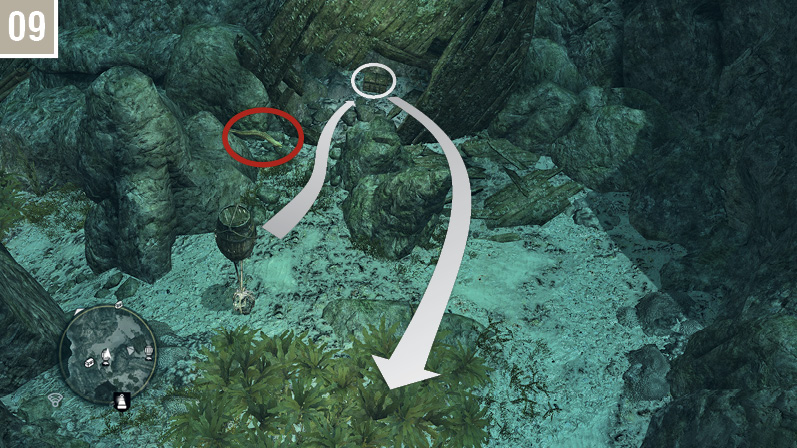
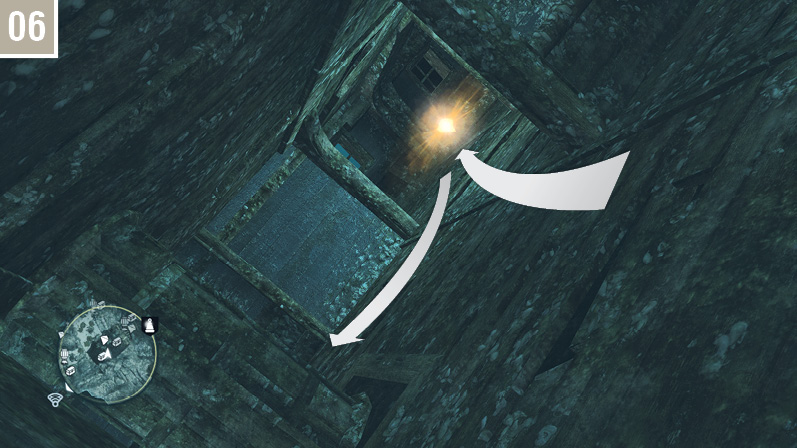
The next Treasure Chest is to the west of the air barrel. Angle your approach carefully to avoid a moray eel, claim the contents of the chest, then swim to the east.
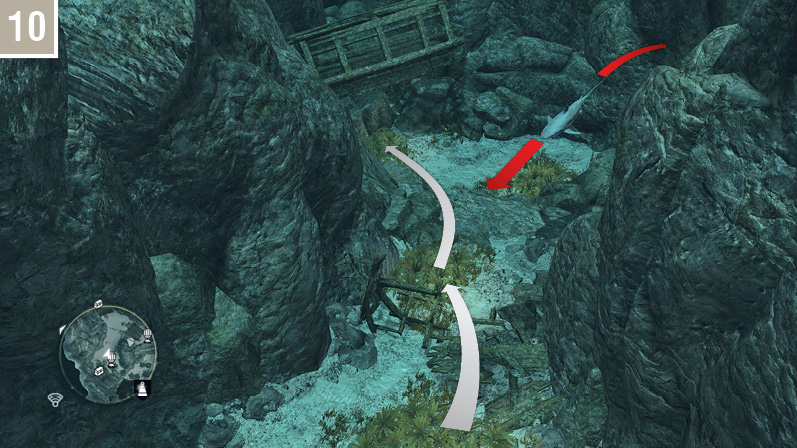
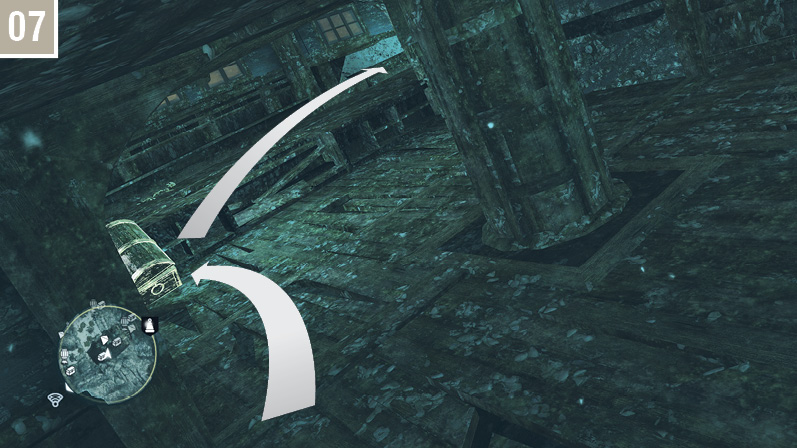
Follow the route shown here to avoid the shark and reach a specific patch of seaweed.
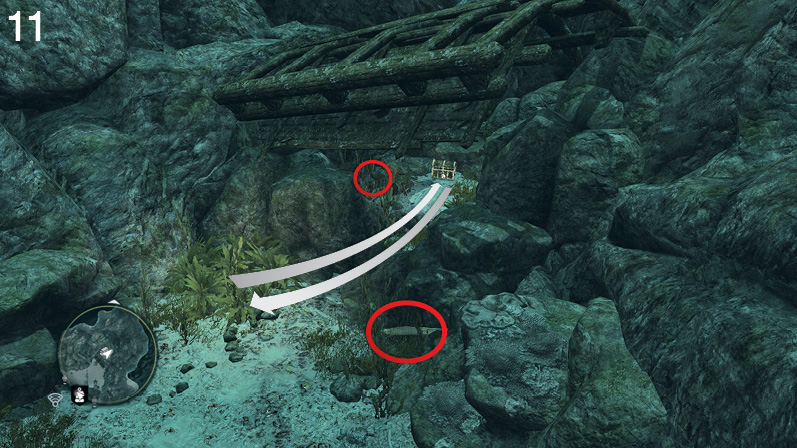
There are two moray eels to avoid before and after you claim the contents of this Treasure Chest (the design plan for the Elite Broadside Cannons Set upgrade): one to the right of the opening, and another behind a rock to the left. Angle your swim as shown in the screenshot to avoid both. After you empty the Treasure Chest, return to the patch of seaweed.
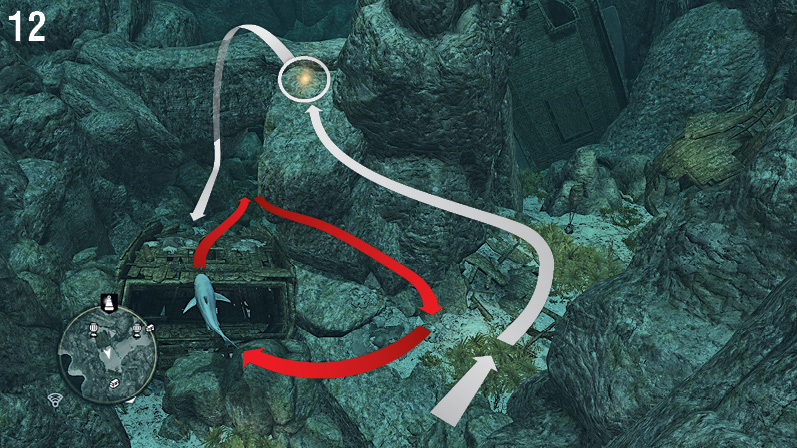
This Animus Fragment is awkwardly placed, as it exposes you to the nearby shark for a fairly lengthy period of time. Wait until the shark swims away, then follow the approximate route shown here to reach it. From there, swim to the opposite side of the rock and downwards to reach an air barrel before the shark moves in to attack; watch out for a moray eel close to the adjacent seaweed patch.
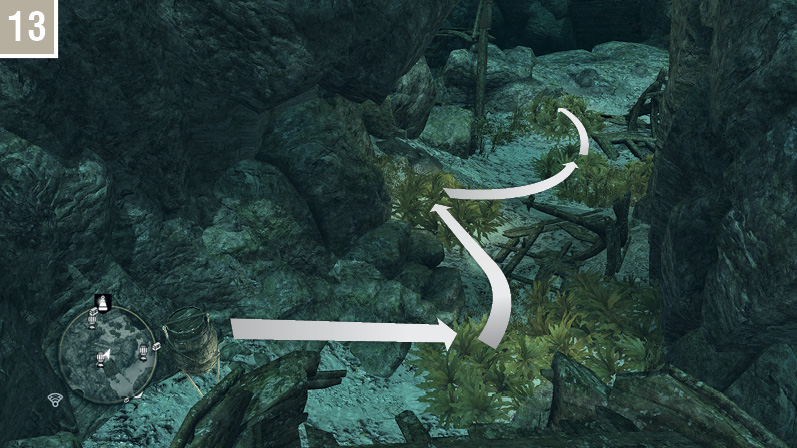
From the air barrel, swim to the southwest through the seaweed patches.
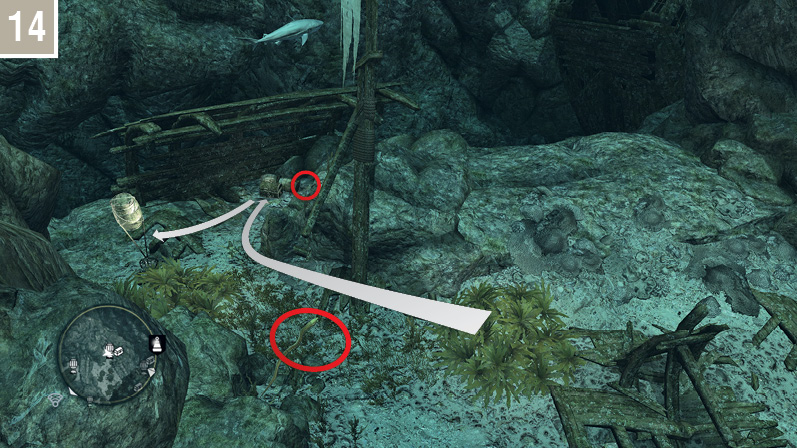
The final Treasure Chest is located here. Be careful to avoid a moray eel to your left as you leave the seaweed patch, and a second to the right of the chest itself. Take a few breaths from the air barrel.
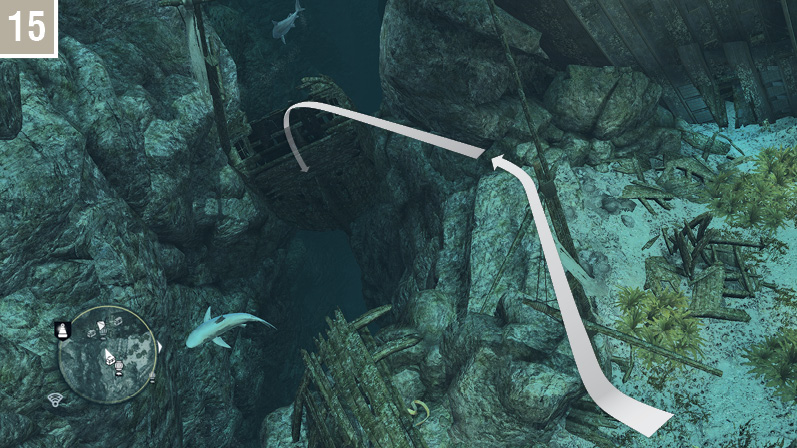
The last collectible is an Animus Fragment in the hull section to the west. Watch the sharks closely, then use the burst beam to reach the opening at the top. Retrieve the Animus Fragment, then swim through the bottom opening and head west in a flat trajectory for approximately five seconds. You can then turn to the south and swim upwards to reach the diving bell beneath the Jackdaw without further encounters with sea life.
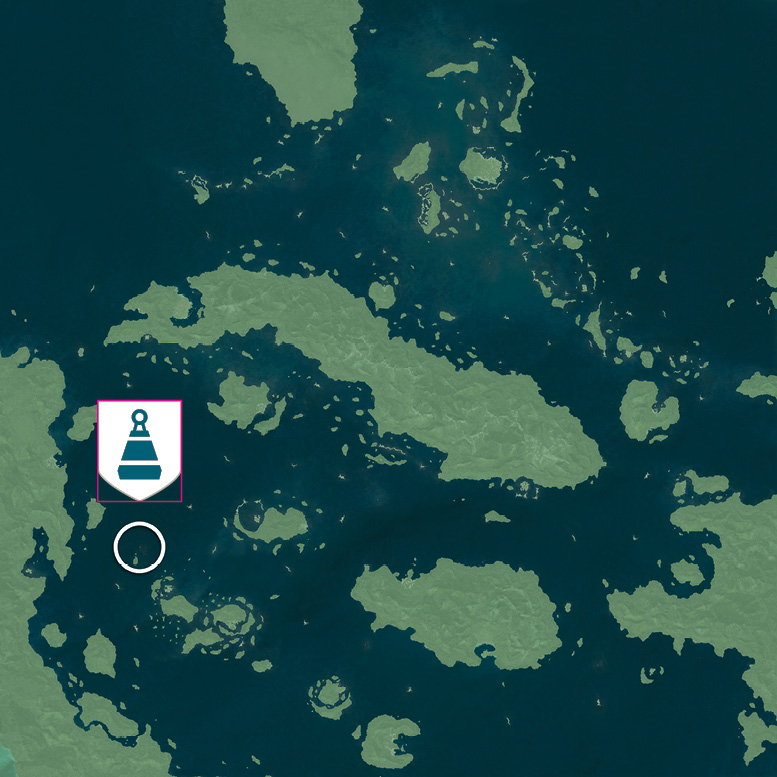
La Concepcion Shipwreck (181,296)
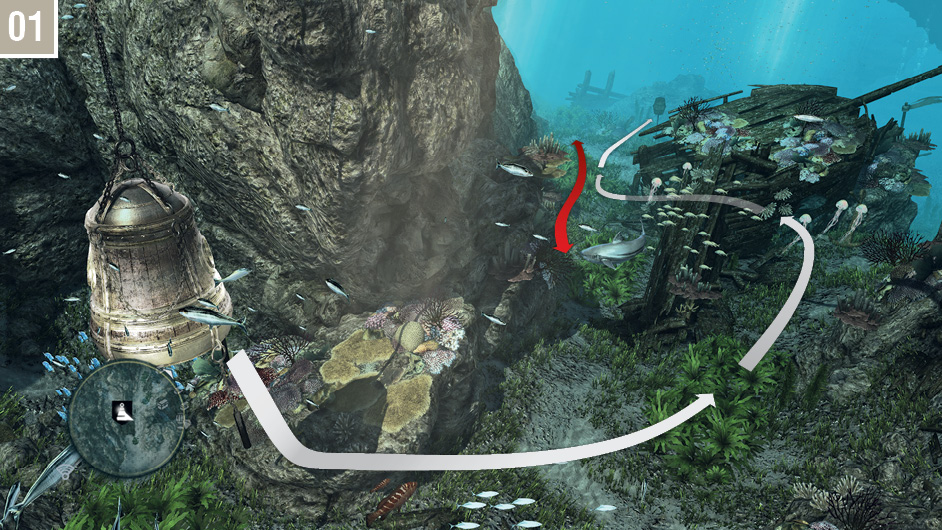
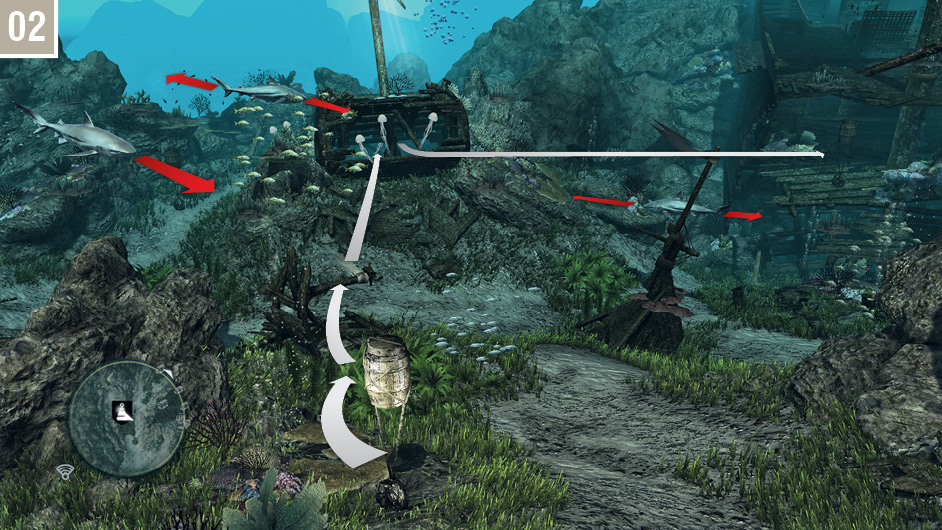
From the diving bell, swim down to the sea bed, through the patch of seaweed, and enter the first shipwreck after carefully negotiating the jellyfish. Once you’ve looted the chest inside, exit via the other opening. Conceal yourself in the seaweed to remain unseen by the shark while you swim towards the air barrel.
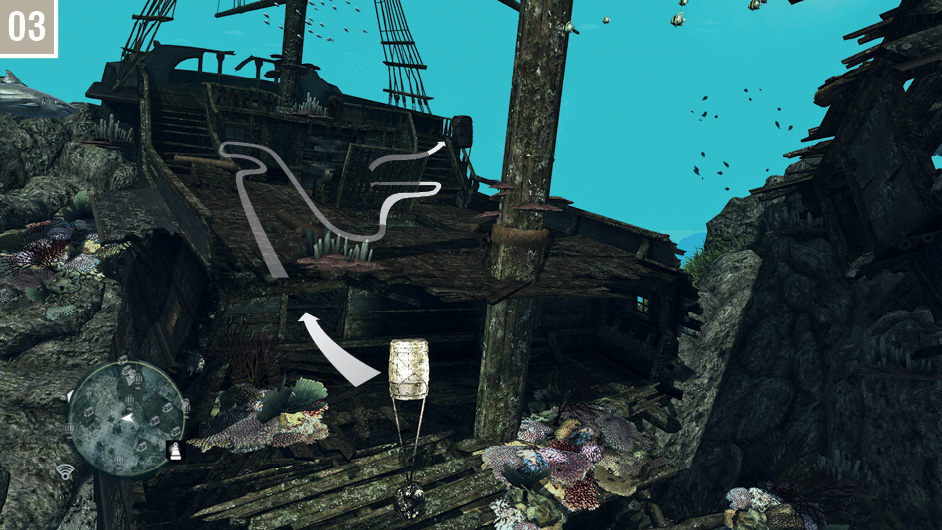
From the air barrel, swim through the seaweed and wait until all nearby sharks move away before you propel yourself from the burst beam to reach the next wreckage. Steer clear of the jellyfish, open the chest inside, then retrace your steps. Wait for another opportunity where the sharks move to the far end of their patrols to quickly swim to the next air barrel.
Enter the shipwreck through the nearby opening, and swim straight until you reach a wall. Open the chest on the other side of that wall, then turn around and pick up the Animus Fragment. Keep going in the same direction and you will leave the wreck via the trapdoor pictured here. Empty the chest behind the trapdoor, then replenish your breath meter with the air barrel.
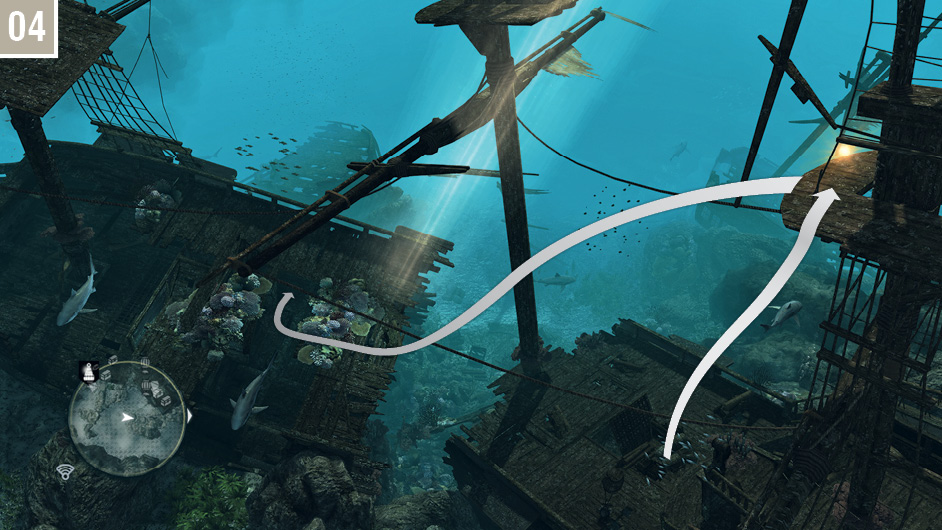
Lunge up as quickly as you can to collect the Animus Fragment on the mast platform. Hide behind the structure if a shark follows you, then swim straight inside the final shipwreck. You will find a chest right in front of you as you enter it from the position shown here.
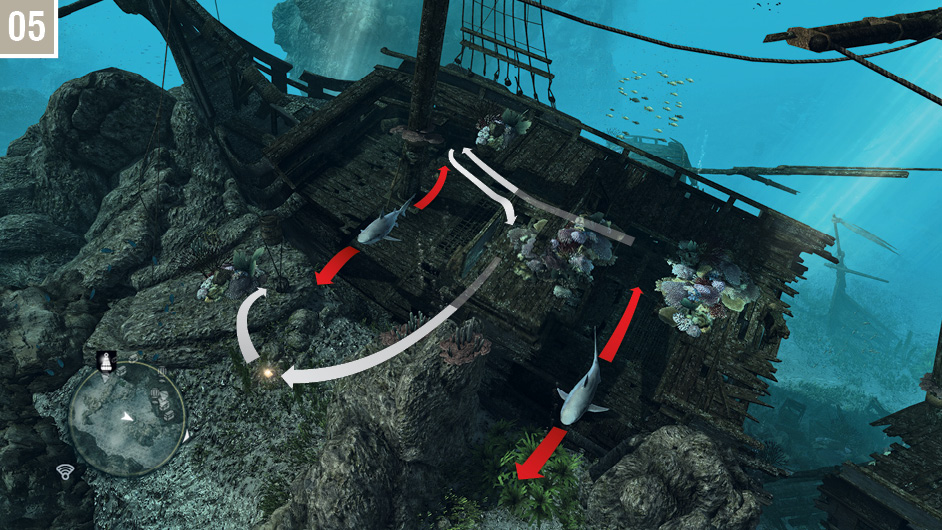
Go through the wreck and open the chest next to the mast. Now turn around, lunge up once and swim down the small staircase, where you will find the final chest, which contains the design plan for the Jackdaw’s Elite Ram upgrade. Watch the nearby shark, and rush towards the Animus Fragment the moment its patrol takes it in the opposite direction. Use the air barrel to catch your breath.
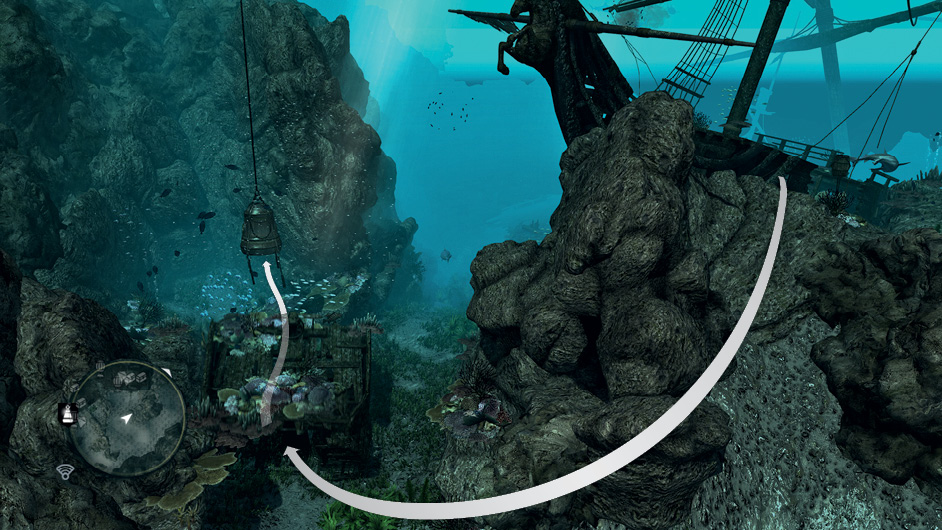
You can go back to the diving bell by swimming around the rock cliff. If a shark is following you, swim through the wreckage on the way to break its line of sight.
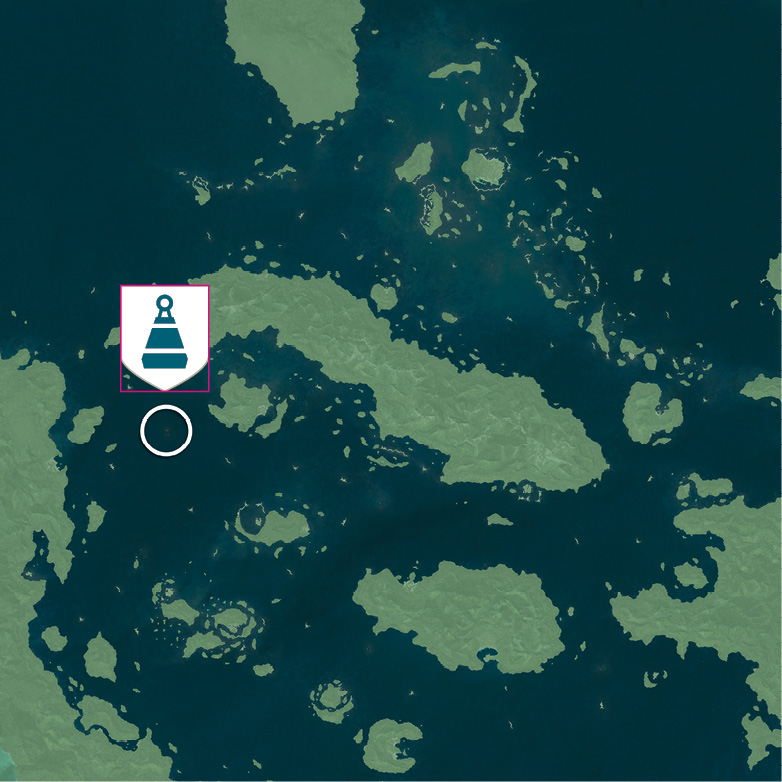
The Black Trench (215,449)
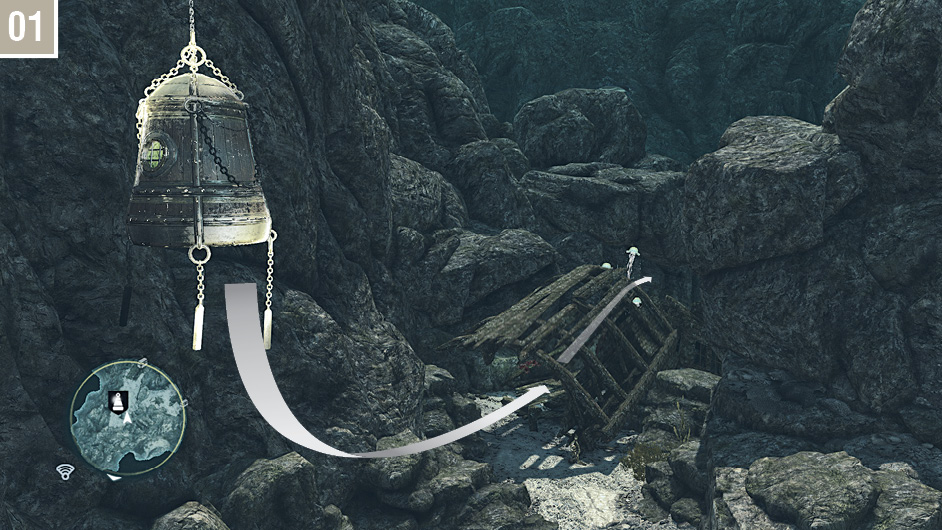
From the diving bell, swim to the wreck to the south. Open the chest to your right, then keep going forward, dodging the jellyfish and urchins, until you reach a patch of seaweed at the end.
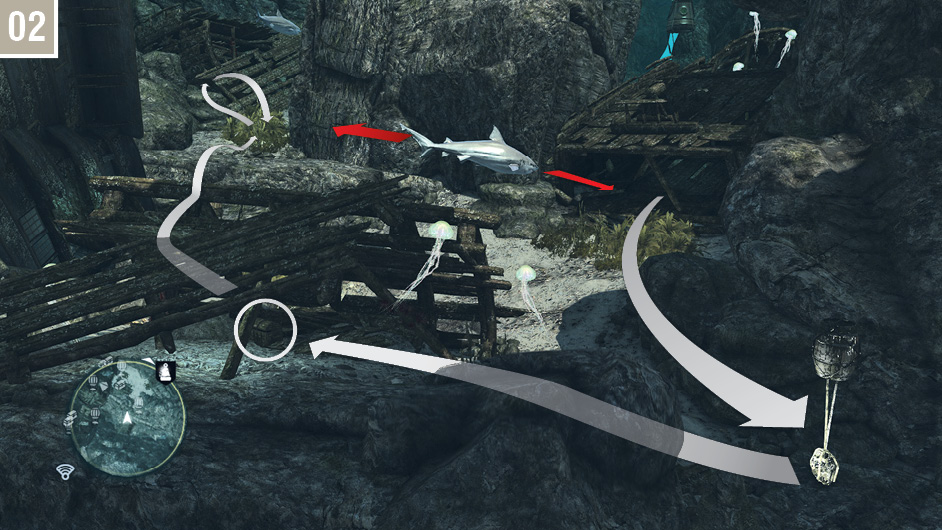
When the shark moves away, swim to the air barrel, then on to the next pile of wreckage where you will find a second chest. Keep going in the same direction, leaving the air barrel untouched, until you reach another seaweed patch. From here, make a quick visit to the nearby wreck to loot the third chest, before concealing yourself again in the same patch.

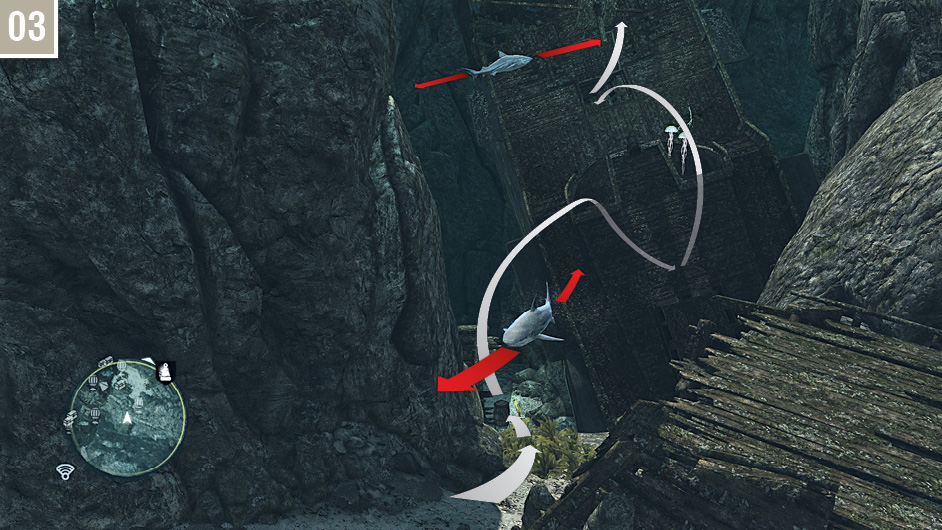
Refill your breath meter with the air barrel you previously left alone, then swim into the wreck’s captain’s cabin. You will find two chests inside: one immediately in front of you, and the other just below, accessible from an opening in the floor. Once you’re done, swim back outside, squeezing through the trapdoor pictured here as the shark is looking away, to obtain an Animus Fragment. You can now lunge up to the air barrel just above.
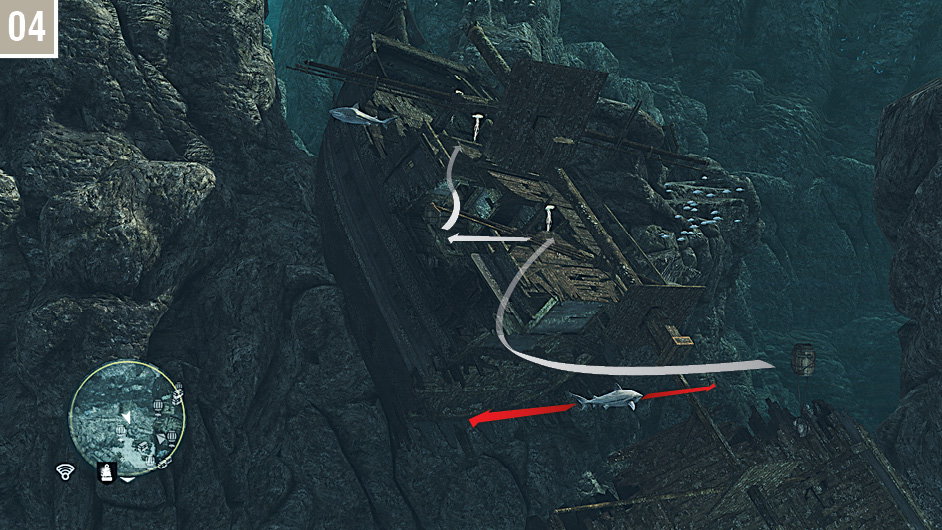
Watch the shark below your position. The moment its patrol route takes it to your right, swim inside the second half of the shipwreck. After opening the chest to your right, use the air barrel on the opposite side, then go through the door next to it, and up the small stairway behind this.
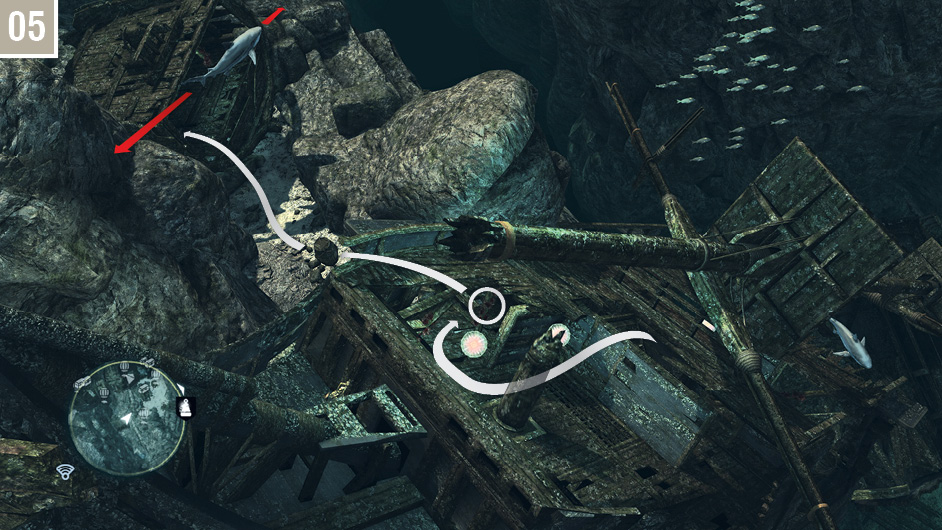
Take a left as you come out of the stairway and loot the chest in the small room on the side of the ship. This contains the design plan for the Flower Sails, an appearance upgrade for the Jackdaw. Swim through the hole in the wall, make a stop at the air barrel if required, then, when the shark moves away, rush to the final collectible, an Animus Fragment, in the next shipwreck. From here, you can swim all the way back to the diving bell in a single, straight-line journey: any sharks that spot you will eventually give up, and you should have sufficient oxygen to complete the trip.
Antocha Shipwreck (630,660)
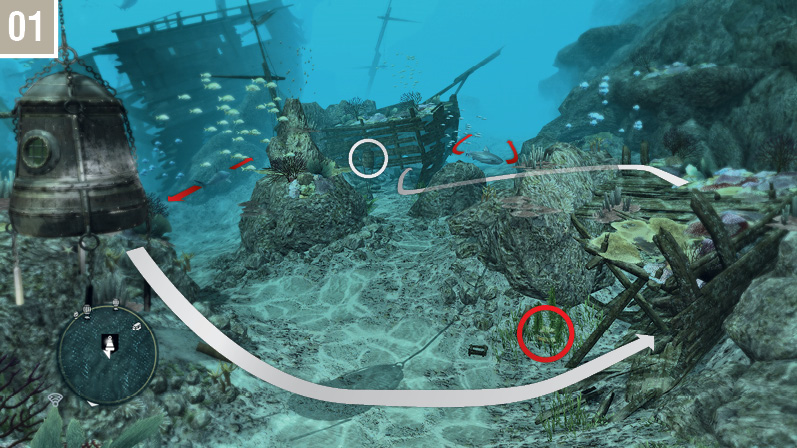
From the diving bell, swim into the wreckage to the right to find the first Treasure Chest; be careful to steer clear of the eel to the left as you enter. Exit from the back of the wreckage. Use the two patches of seaweed to avoid the nearby sharks as you swim through the gap in the ruined fore section of a ship to reach a second Treasure Chest.
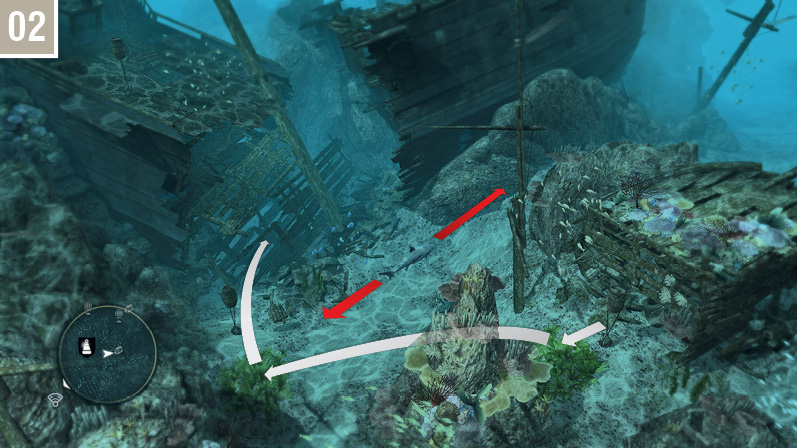
Replenish the breath meter with the air barrel outside before you continue, then move into the seaweed patch. The nearby shark makes a short patrol. Wait until it moves to the right, then swim to the next patch of seaweed; the burst beam will propel Kenway a little faster. From the seaweed, swim into the hull section to find the third Treasure Chest. Be extremely careful: there is a moray eel very close to your position here.
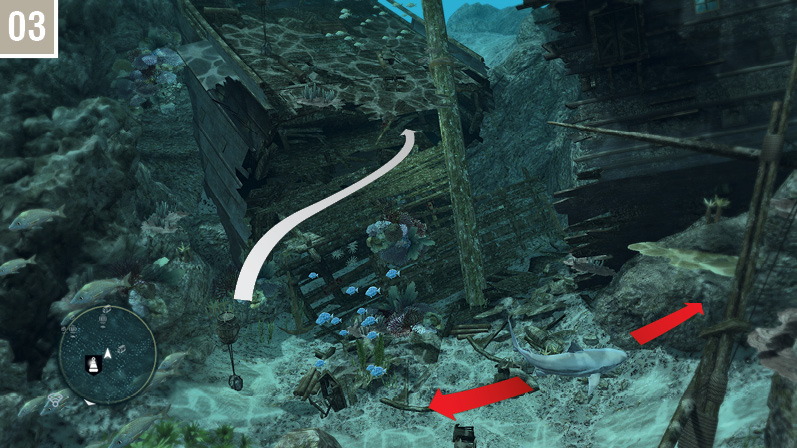
Move back to the seaweed patch and grab air at the barrel. You are now going inside the wreck for the most complicated section of this dive. When the shark moves to the far extent of its patrol, swim up and through the entrance shown here.
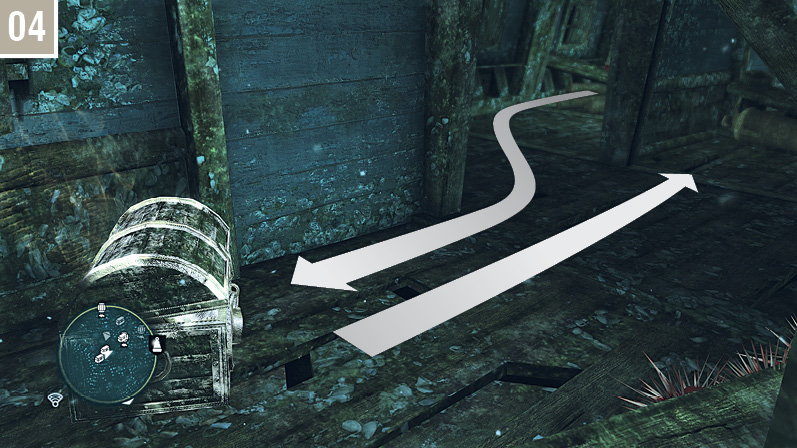
Swim along the corridor, to the northeast, to reach the fourth Treasure Chest. After opening it, perform a U-turn and swim through the doorway behind you.
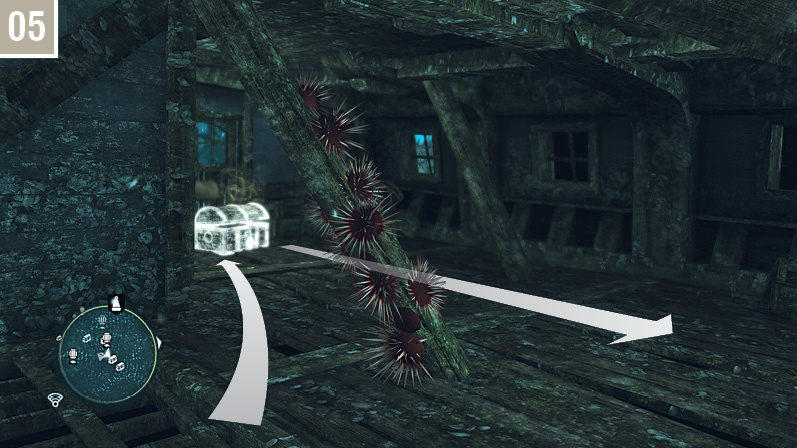
In this short corridor, turn to the left to find the fifth Treasure Chest. Once again, turn 180 degrees and swim through the doorway.
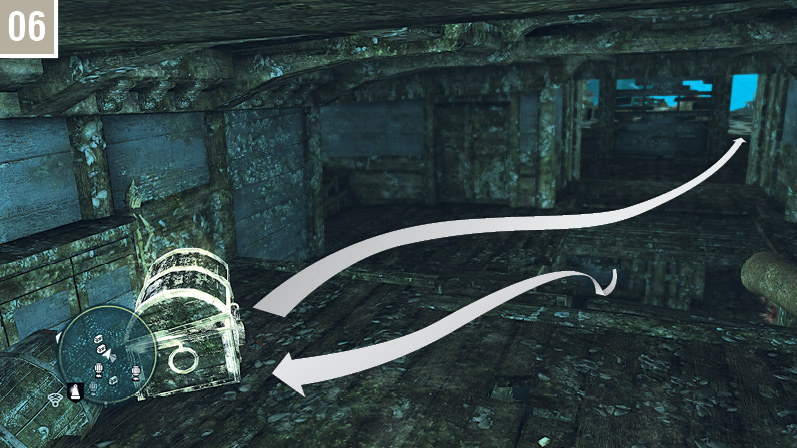
Swim to the northeast, then up through an opening to reach the sixth Treasure Chest. This contains the Elite Mortars design plan. Kenway will be short on air now, so turn immediately and swim to the air barrel outside.
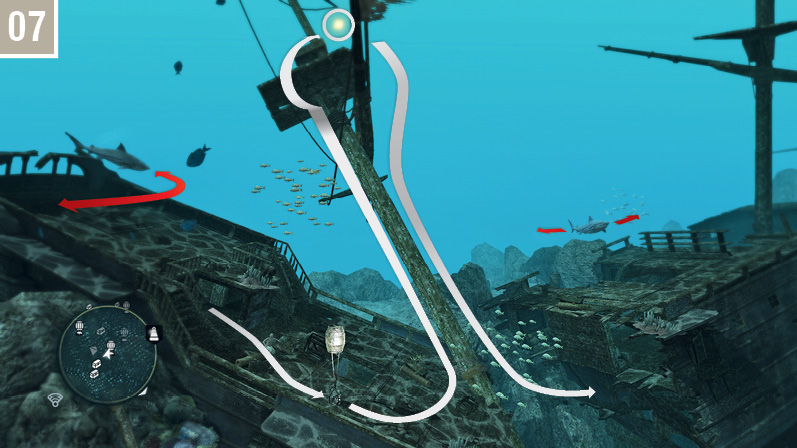
From the air barrel, you have a risky swim to reach the Animus Fragment above. Swim close to the mast to break the line of sight between the patrolling shark and Kenway. After retrieving the Animus Fragment, swim down to the opening shown above.
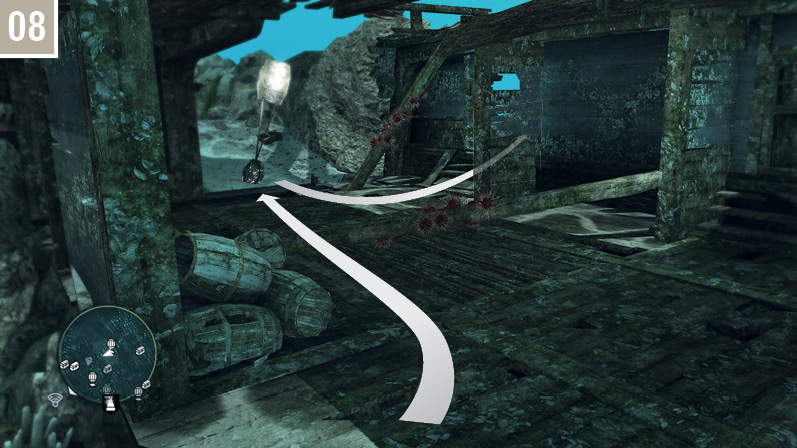
Replenish Kenway’s oxygen level at the barrel, then swim through the nearby doorway.
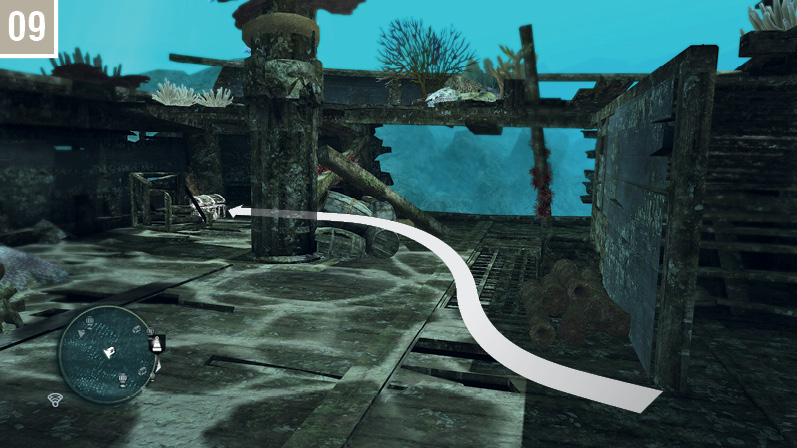
When you reach the wooden steps, look for the shark outside. When it turns away, quickly swim to the right and collect the last Treasure Chest.
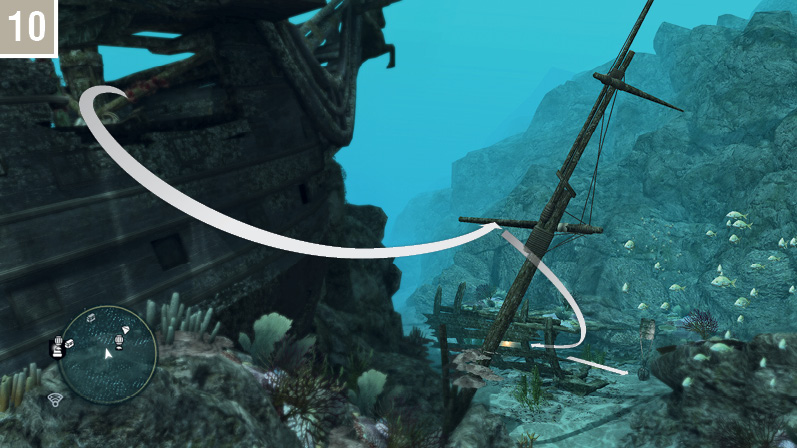
Finally, swim through the opening on the west side of the hull. Swim to the burst beam, and from there to the small wreck where you will find an Animus Fragment inside; watch out for the moray eel to the right. You can then grab a breath at the air barrel before you swim back to the diving bell to end this excursion.
San Juan (479,487)
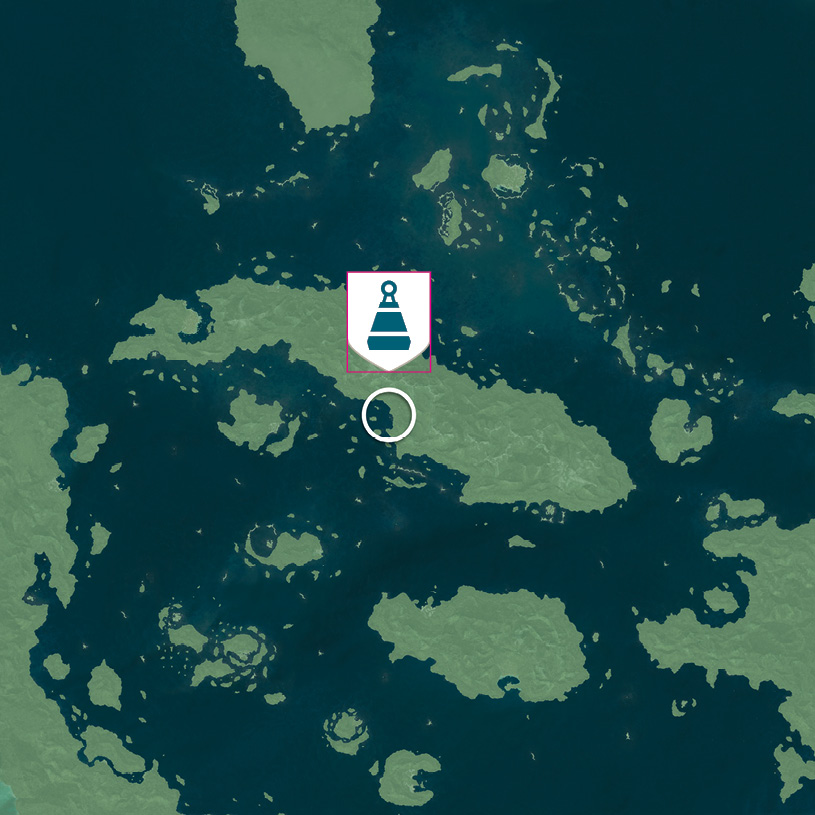
Collect the Treasure Map from Santanillas before you begin this dive. From the diving bell, the swim through the tunnel leading to the main cave is largely routine: there are urchins to avoid, and one moray eel that is easy to see from a distance. When you approach an Animus Fragment on the mini-map while rounding a corner to the left, however, swim close to the roof of the tunnel: there is an awkwardly placed moray eel below. Grab the collectible and continue to reach an air pocket. As you swim to the east, Kenway will be caught in a strong underwater current, which deposits him in the position pictured here. Loot the Treasure Chest, then continue along the tunnel.
When you reach a cavern, two pirates can be found facing away from Kenway: easy prey for a ledge assassination and a silent takedown from behind. The dig site for the Treasure Map found in Santanillas is just to the right of the opening that leads to the next chamber. It contains the design plan for Elite Fire Barrel Strength and 3,000R. Loot the Treasure Chest before you continue through the opening.

There is a dead body with a sword and a musket nearby as you consider the pirates in the next area, so Kenway can certainly arm himself for a fight. If you would like to avoid open conflict in the next room, you only need to eliminate two targets in the lower area. Watch the pirate to the right. When he turns to walk towards the Treasure Chest, perform an air assassination on the Brute, then silently take down the patrolling pirate before he turns. You can then loot the chest, collect the Animus Fragment as you approach the cave exit above, and then deal with the two Gunners looking out at the ocean as you see fit.
Anotto Bay (621,277)
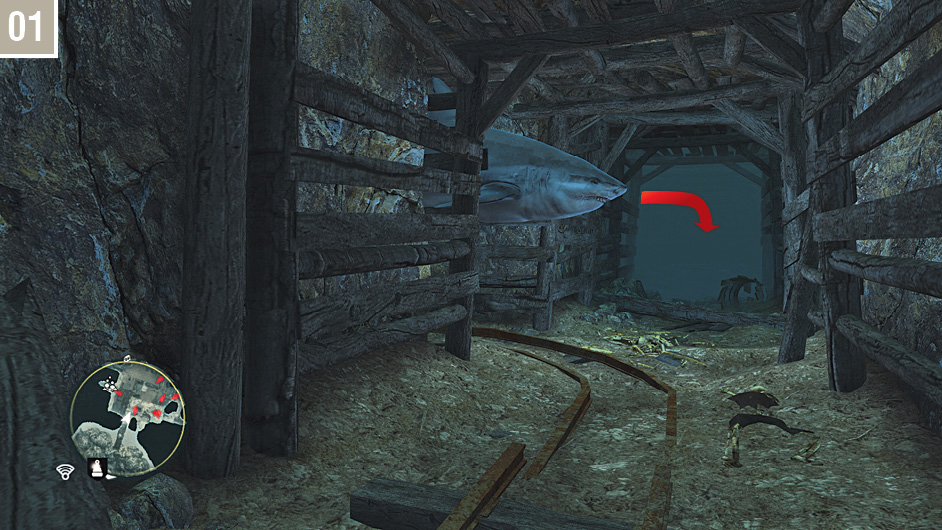
We strongly advise that you leave this expedition until you obtain a Treasure Map that leads to this location from the Kenway’s Fleet metagame, then accept the Assassin Contract called “The Smuggler’s Squat” from Grand Cayman. This will enable you to complete all potential tasks here in one visit, removing the need to repeat the journey through its underwater maze. From the diving bell at the start, swim through the opening to the south and move along the submerged mine tunnel until you reach a ladder; at that point, swim up to continue. When you reach the junction shown here, pause and wait for a shark to pass.
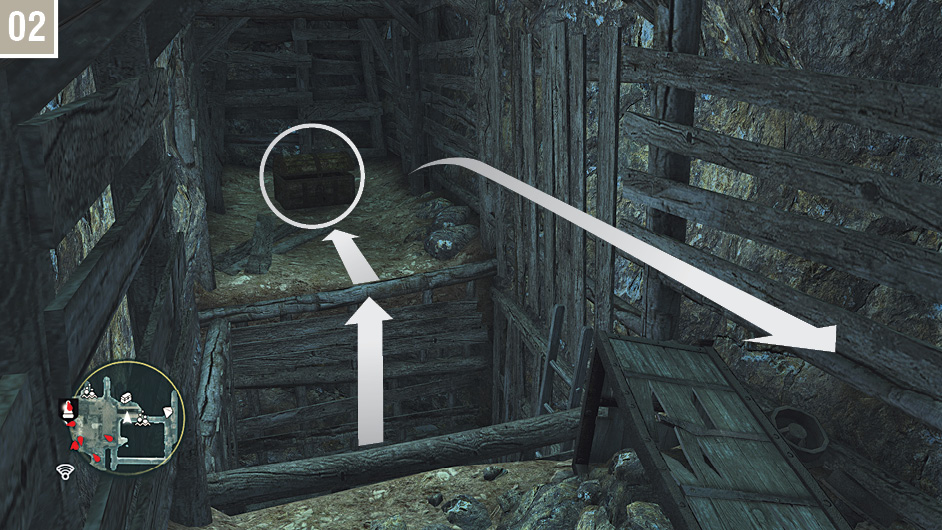
The shark swims a counterclockwise circuit of the tunnels here, but you will need to move into its territory to replenish the breath meter and open a Treasure Chest. As soon as it passes, take the tunnel to the left, leading east. Follow this until you reach another tunnel to the left, then follow this to reach an air pocket. Return to the corridor and, once again, wait for the shark to swim by. Turn left and swim to the south until you reach a ladder, then swim up. At the top, open the Treasure Chest in the dead end to the east, as pictured here. You can then make a U-turn and follow the tunnel to reach the air pocket to the southwest.
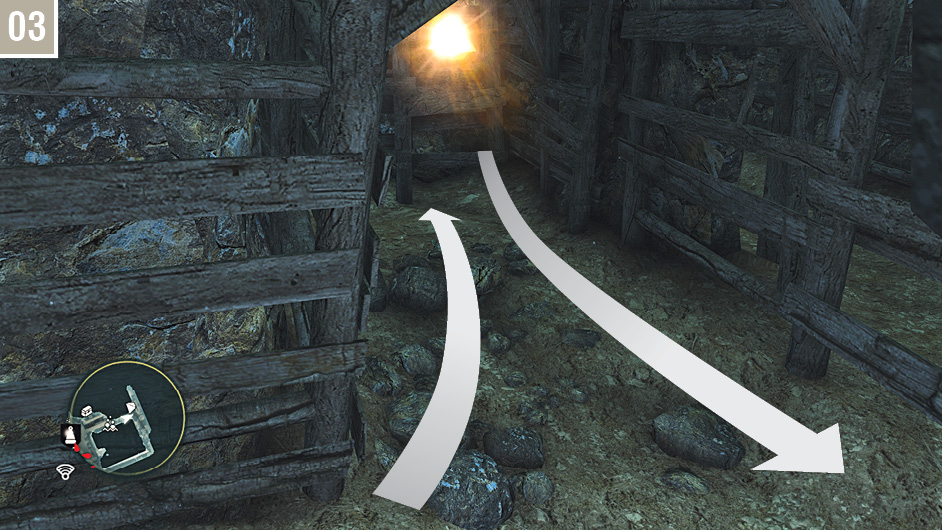
Continue south along the tunnel until you reach a junction, then turn left to find an Animus Fragment in the dead end shown here. Once again, make a U-turn and swim to the west until you reach a ladder, then lunge up to the surface and climb up. You will need to make one last swim through submerged tunnels to reach the main area where the smugglers await, but this is entirely linear.
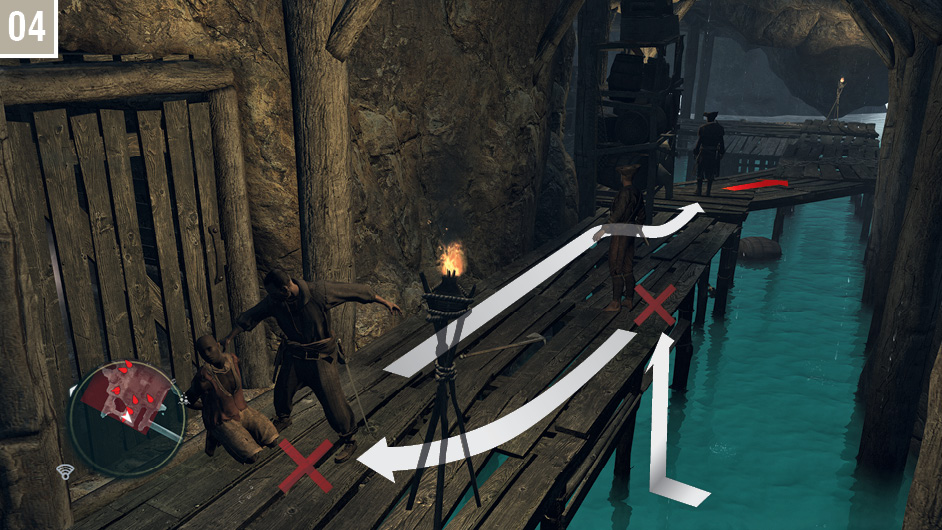
When you surface, climb to the platform above to perform a ledge assassination on the guard above, then incapacitate his companion to the left from behind. You should have just enough time to move behind the shelves to the east to coincide with the arrival of a patrolling Captain. Whistle to attract his attention, then strike when he moves within range. If you are in need of a weapon, you could do much worse than the axe embedded in the wooden boards close to the prisoner. This leaves five remaining hostiles, so you might just as well eliminate them in a quick brawl.
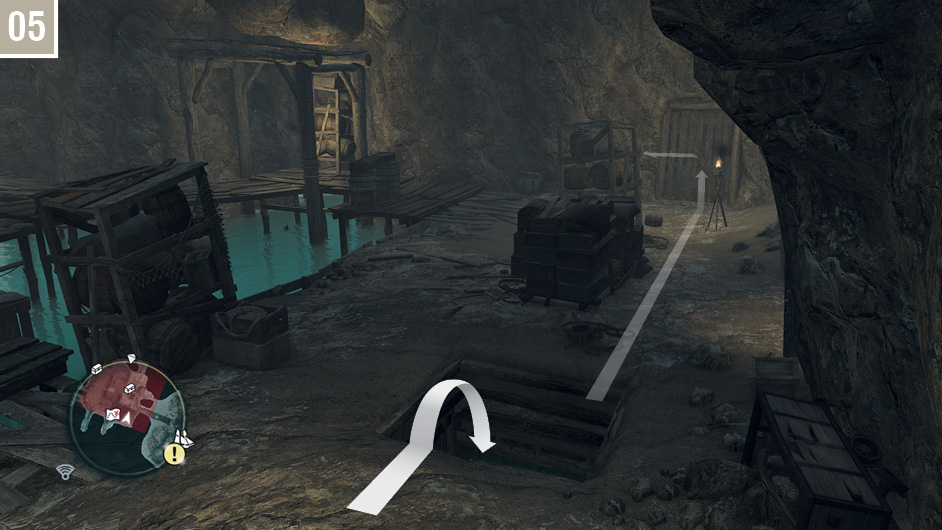
The two remaining Treasure Chests and a Treasure Map (which leads to 992,442 – or, more specifically, Principe) are easy to collect, but the Animus Fragment is a puzzle. It lies at the end of a corridor blocked by two closed doors. To reach it, dive into the hole shown here, then follow the tunnel to the west. Swim up at the end of the tunnel to reach the corridor and claim the Fragment.
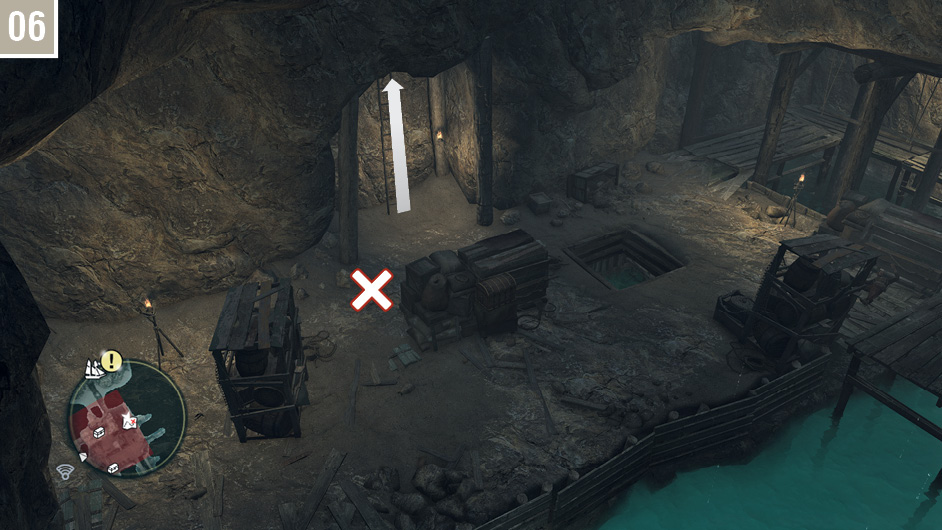
The dig site for the Treasure Map obtained via the Kenway’s Fleet metagame is found in this spot here, two steps away from the ladder leading to the cave’s exit. It contains 4,000R.
Ambergris Key (55,178)
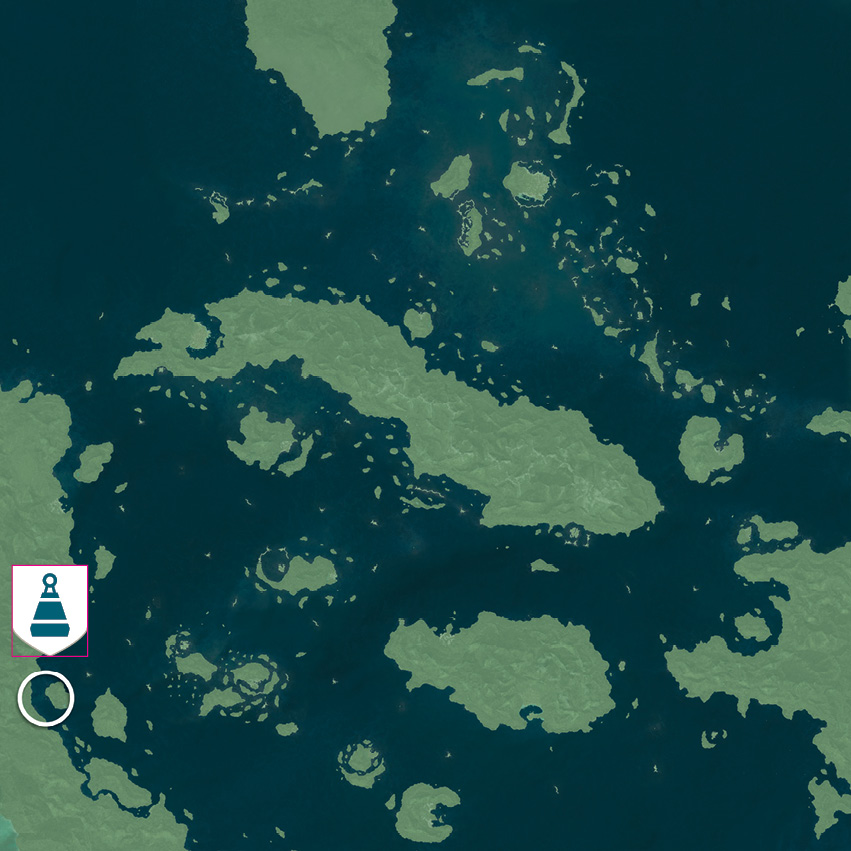
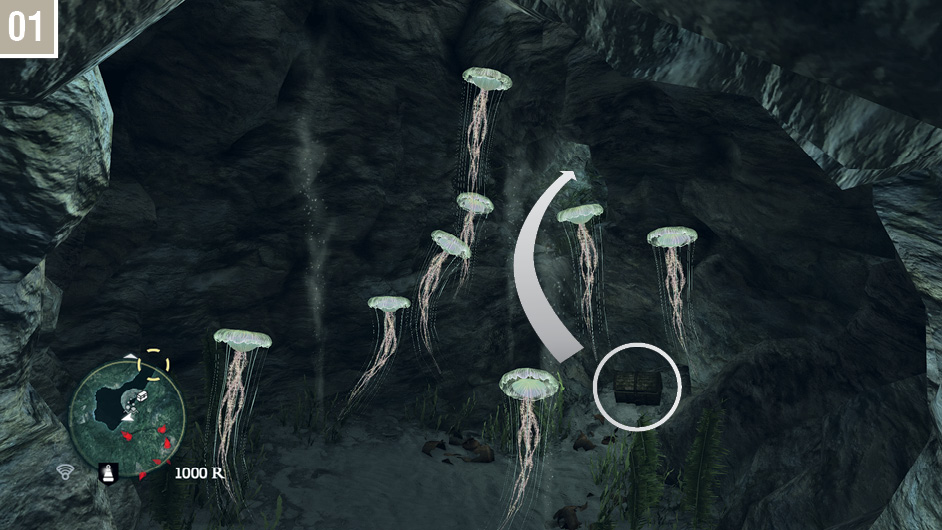
To avoid repeat journeys, collect the Treasure Map from Corozal before you begin this dive. The second Assassin Contract in Corozal also necessitates a visit to this area – but as the first contract entails conquering the fort at Chinchorro, it may not be plausible to do so in early Sequences. To reduce the difficulty of an inevitable combat situation here, we strongly advise that you acquire a dagger from a Scout anywhere in the world before you begin. From your start position, swim through the group of jellyfish to enter the cave. Avoid further jellyfish and urchins until you reach an air pocket. Grab a lungful of air, then collect the Treasure Chest shown here before you continue.
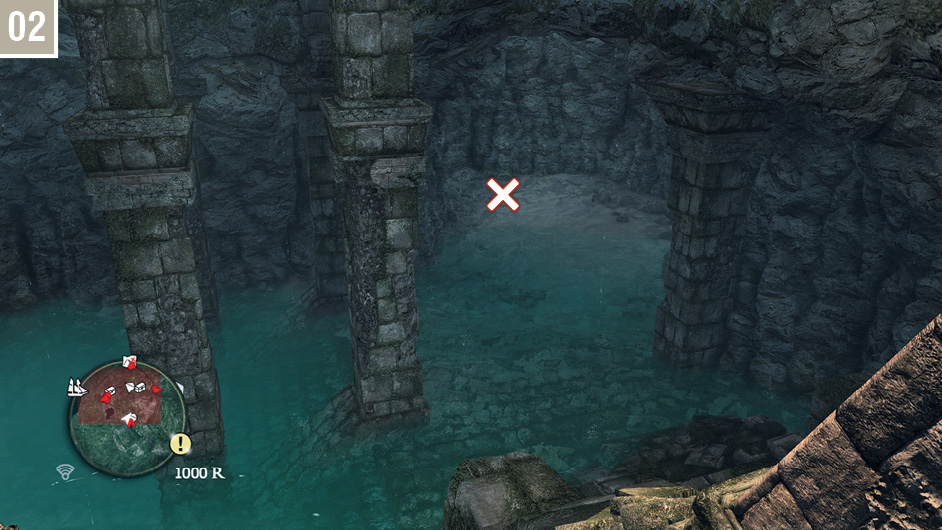
Head along the linear tunnel, avoiding hazards as before, until you reach a chamber containing ancient ruins. Before you begin the climb to the upper levels, investigate this sandy area to the south to find the dig site for the Treasure Map found at Corozal. This contains 4,000 R.
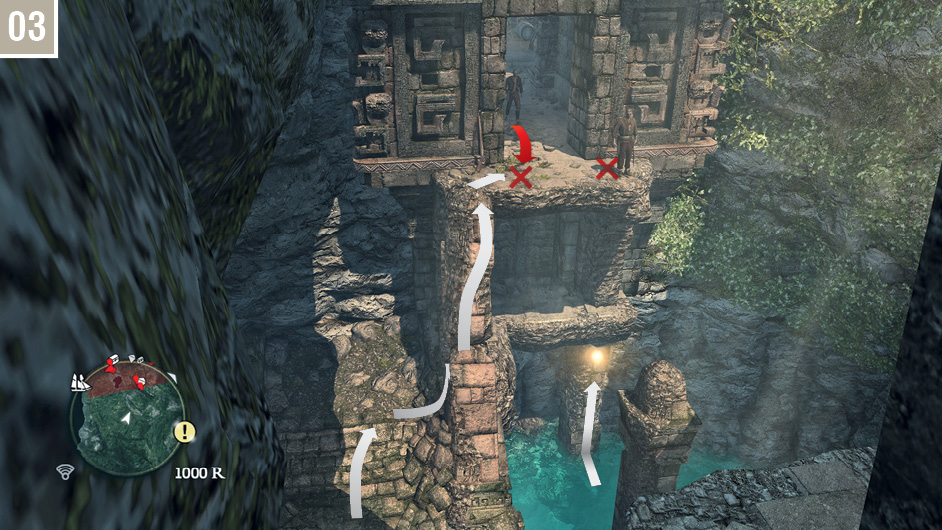
Collect the Animus Fragment, then move close to the bottom of the ruined pillar. Wait until the patrolling pirate arrives and then moves away. If you followed our advice to bring a dagger, you can now kill the stationary sentry (tap  when he is highlighted for a one-shot kill). Climb the pillar and press Kenway against the edge of the doorway, then perform a corner assassination when the patrolling pirate returns.
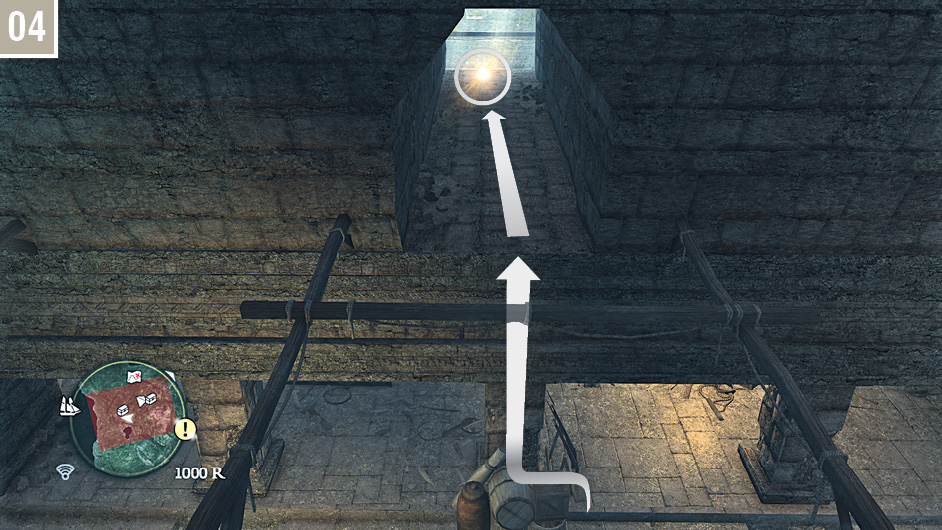
The configuration of guards in the main chamber of the ruins (not to mention your limited tools) means that stealth isn’t possible here: only combat will suffice. The musket to the left of the doorway where you eliminated the first two pirates is perfect for this purpose. Once the battle ends (and be prepared for multiple Brutes and Captains), you can loot the two remaining chests. The Treasure Map found on the northwest side of the chamber leads to 307,195: Misteriosa. Don’t neglect to pick up the Animus Fragment hidden in a tunnel above the central area – you can easily reach it by climbing the wall in front of the doorway you arrived from. When you are ready to depart, walk the ramp to the southwest and dive into the sea where the Jackdaw awaits.