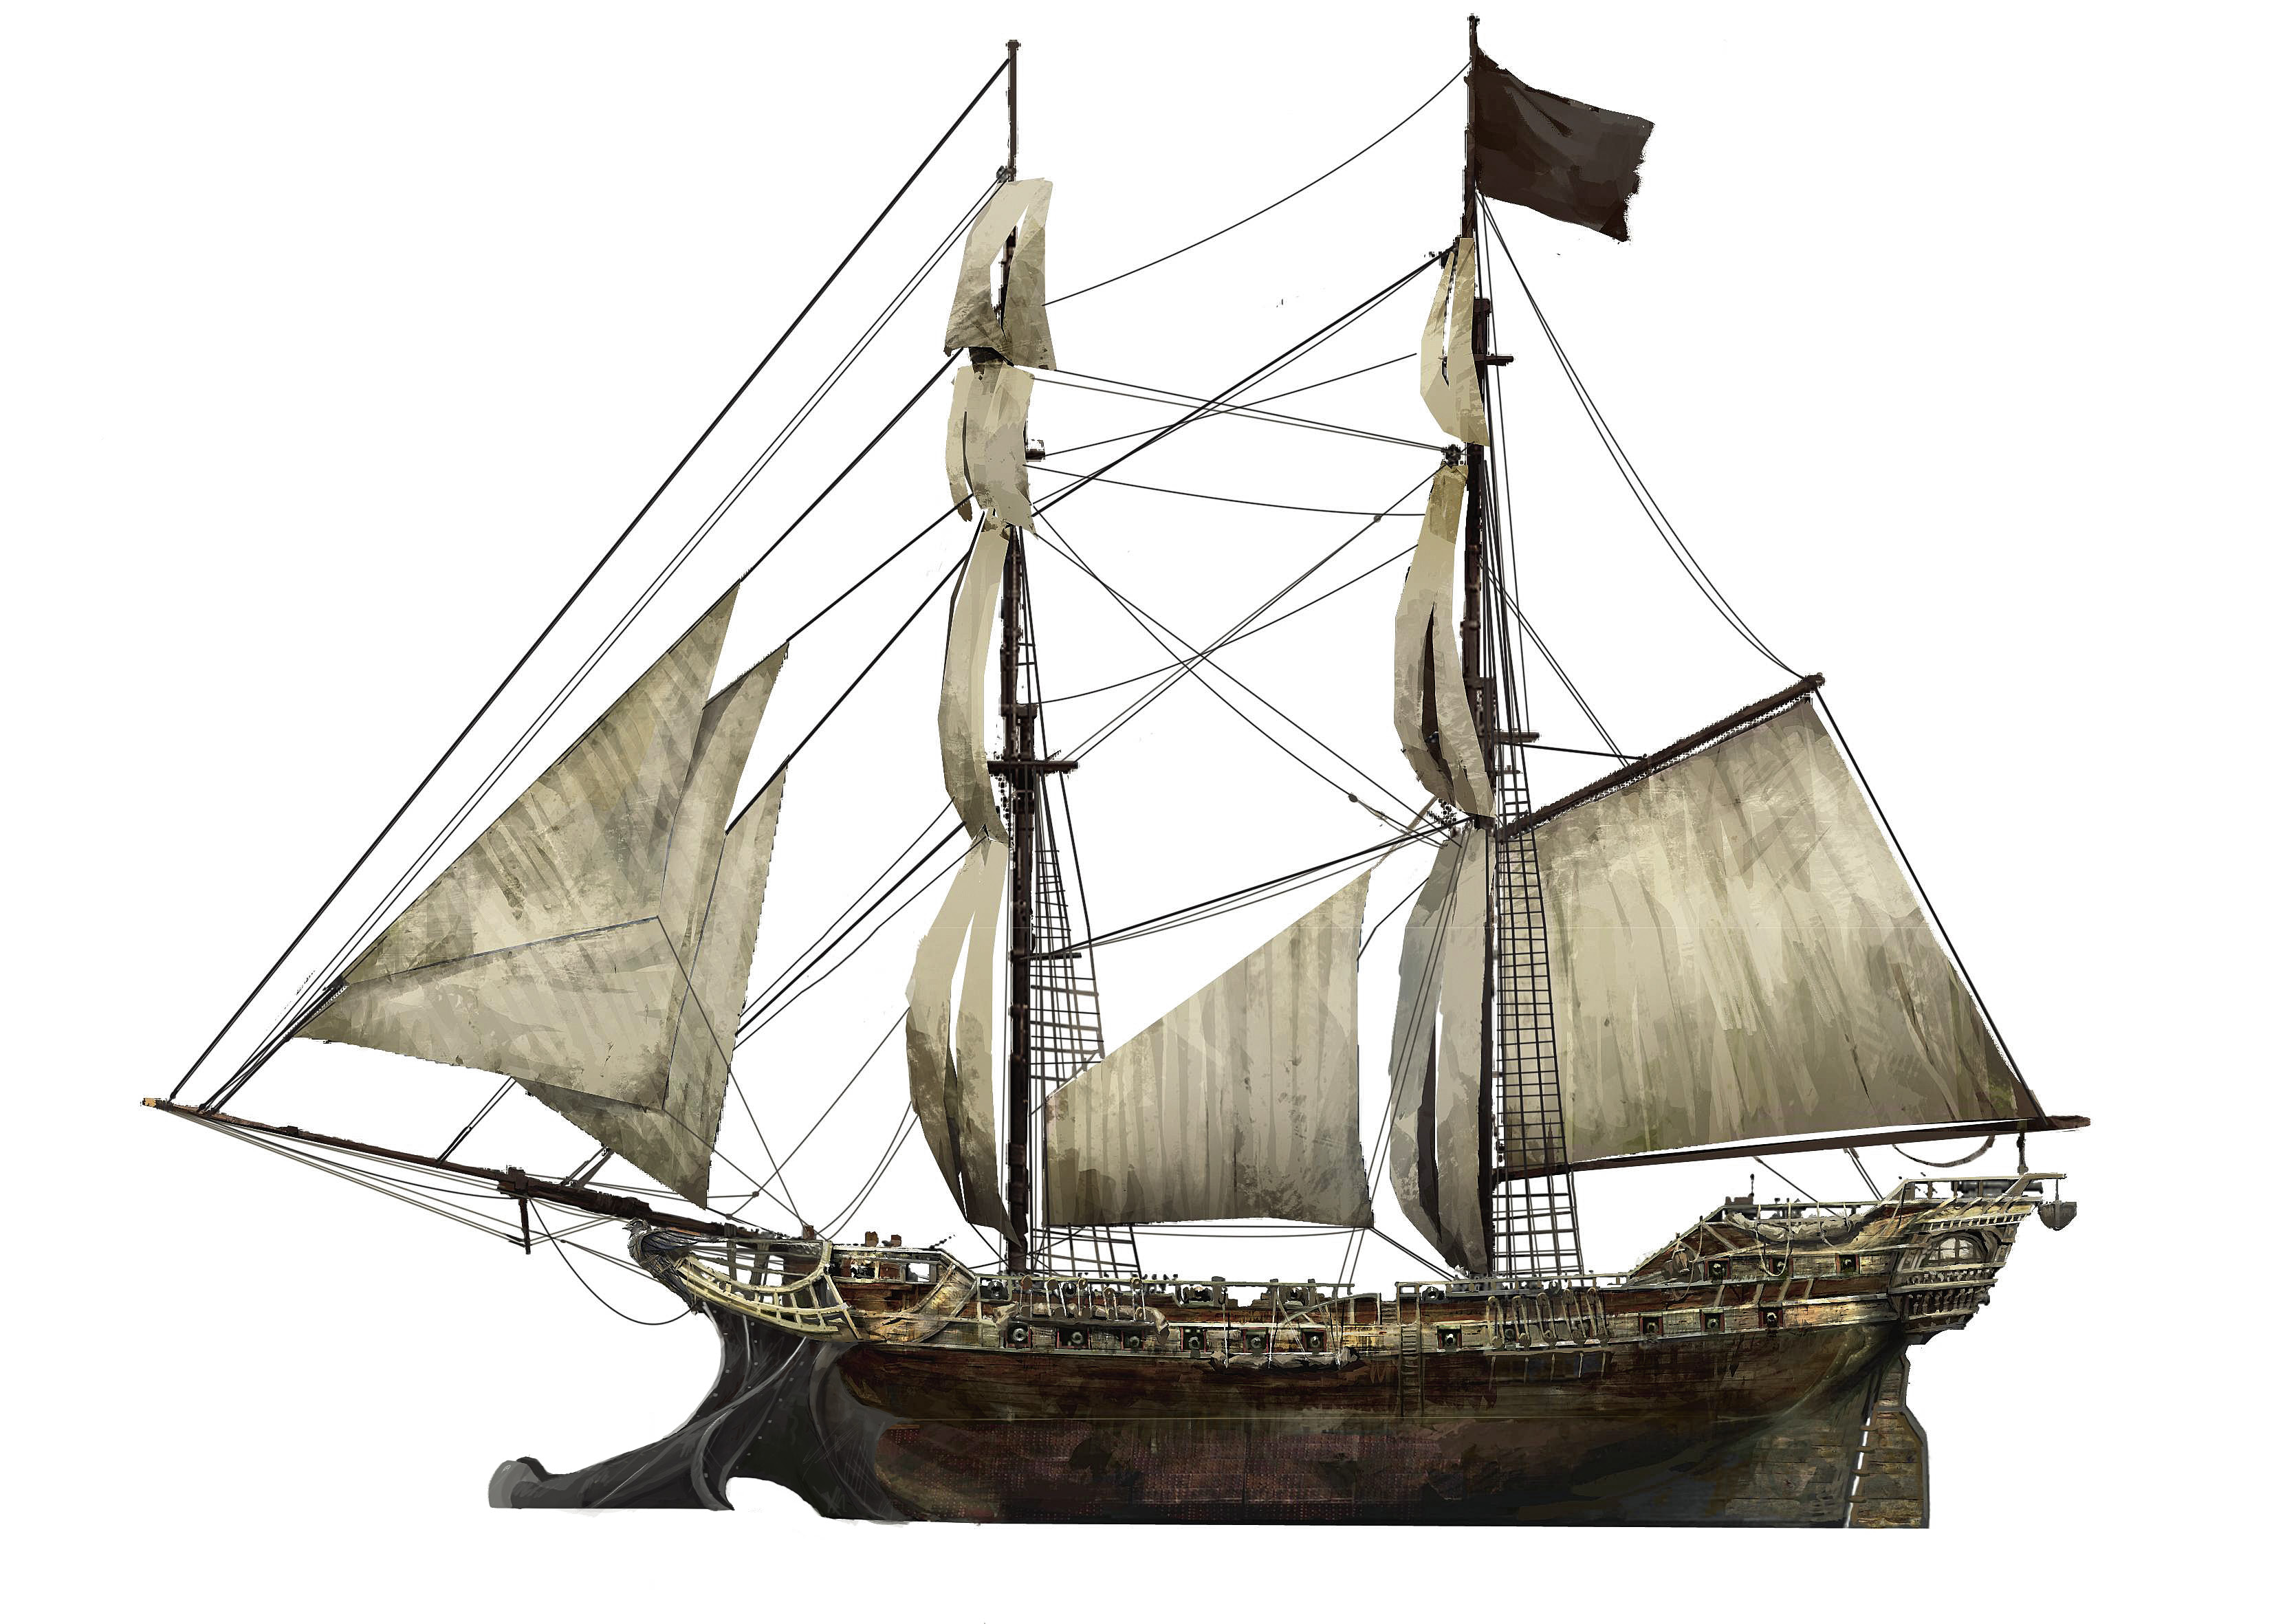
Assassin's Creed IV: Black Flag Guide Reference & Analysis
Naval Guide
SPOILER WARNING: We suggest that you delay your use of this chapter until you have reached Sequence 03 in the main storyline. Any challenges that Kenway faces before that stage are covered by the advice and instructions we offer in the Primer, or the appropriate sections of the Walkthrough chapter.
In this chapter we offer an advanced guide to the naval concepts, and take a more in-depth look at many of the systems that lie beneath the surface of the Assassin’s Creed IV experience. We also offer a breakdown of the steps required to obtain all Achievements/Trophies for players looking to master the entire game.
In this section we offer a variety of valuable explanations, tips and insights that will enable you to act as a more effective captain. For a comprehensive guide to locations throughout the Caribbean, see the Charts & Collectibles section.
Naval Primer

 Health Bar
The yellow meter in the top-left corner of the screen represents the Jackdaw’s structural integrity, divided into three segments. Collisions, enemy gunfire and the effects of stormy weather (more specifically, rogue waves and waterspouts) will all result in damage that will cause this meter to shrink. Though the Jackdaw’s health bar cannot be refilled during active combat, partially depleted segments will regenerate outside battles. Missing segments can be replenished by paying for an overhaul at a harbormaster, or – more commonly – by stripping an enemy vessel before scuttling her to repair the Jackdaw after a successful boarding.
 Crew Meter
The white meter below the health bar corresponds to the size of the Jackdaw’s crew. Your crew is an essential resource that increases your overall strength and efficiency while boarding enemy ships, and upgrades to the Jackdaw’s capacity are necessary in order to engage larger vessels. Maintaining a large crew at all times is an important part of your role as a captain.
 Wanted Meter
Sword icons ( ) reveal how high your current Wanted level is, with the number determining the strength of the Pirate Hunters who will pursue and engage the Jackdaw to claim the bounty.
 Audio Cues
Comments made by your crew (particularly your quartermaster) offer important information on pertinent events, including weather conditions, nearby cargo and survivors, opportune moments to brace to reduce damage, and strident warnings on potential collisions. They will even offer tactical advice during combat, such as notifying you when a brig is preparing to ram the Jackdaw. Listening to your crew provides vital information, and is much more than an ambient soundscape. Even when your attention is arrested by a specific target, your crew always has a full 360-degree view of the dangers surrounding the vessel.
 Sailing Speed
You can increase your ship’s speed with  , and reduce it with
  . Moving at Full Sail
( ) makes your vessel faster, but at the cost of reduced maneuverability. Sailing at Half Sail (
 ) is slower, but enables you to steer the Jackdaw more efficiently. Your speed is also determined by the direction of the wind, which is represented by a long, thin arrow on the mini-map. Strong winds will push you in the prevailing direction of the gust, and make it very hard to steer into the wind at full sail. To counteract the effects of temporary gales, call for half sail. If speed is of the essence, alternating between the two movement speeds can offer a compromise of maneuverability and forward momentum.
While roaming the seas, it usually makes sense to navigate at the fastest possible pace, called “Travel Speed”. This Animus-assisted feature enables you to reduce journey times significantly, but disables the onscreen display and the majority of ship functions (though you should note that you can still pick up crew and cargo with  when they are within range). Travel Speed is deactivated automatically if the Jackdaw is on course for an imminent collision, and is often disabled entirely in heavy storms or combat, and during certain missions and side quests.
 Waves and Weather
Harsh weather conditions lead to mighty waves, which makes the process of both sailing and combat much more complicated. With waves potentially breaking your field of vision and the path of targeting lines, you’ll need to adjust the curve of your shots with  while aiming. During storms, you will occasionally encounter huge rogue waves. The only way to negotiate these without incurring damage to the Jackdaw and the loss of crew members swept overboard is to steer directly into them, and brace just before they strike.
Another hazard is waterspouts, which are marked by an orange circle on your mini-map. Make sure you steer well away from these, or the Jackdaw may sustain severe damage. If you are pulled inside their area of effect, slow down to half sail to improve your ability to maneuver; brace to reduce damage if the Jackdaw is pulled into the center.
Other ships can sustain damage during adverse weather conditions as well, and may sink during more extreme storms. In such instances, the cargo and crew dropped by vessels traveling to the depths is often worth the risk of a detour.
If you pay close attention, it’s possible to spot storm fronts in the distance by noting the presence of a “thunderhead” in the skies. This may enable you to pick an alternative route to skirt the borders of the storm, or perhaps Fast Travel to your destination instead.
Naval Controls
| Xbox 360 & Xbox One | PS3 & PS4 | Wii U | Standardized Term | Summary |
|---|---|---|---|---|
|
|
|
|
|
Used to steer the ship. |
|
|
|
|
|
Used to control the game camera. |
|
|
|
|
|
Used to change or mute shanties. |
|
|
|
|
|
Used to increase the speed of the ship. |
|
|
|
|
|
Used to decrease the speed of the ship. |
|
|
|
|
|
Brace: Kenway and his crew take cover from enemy gunfire or hang tight to survive rogue waves and water spouts. |
|
|
|
|
|
Swivel Gun: Hold to aim, release to fire. |
|
|
|
|
High Profile Button |
Fire Cannons: The cannons used depends on the camera’s direction – broadsides (with the camera looking to either side), chase cannons (with the camera facing forwards), fire barrels (with the camera facing the rear of the ship). |
|
|
|
|
Manual Aim Button |
Targeting lines: Hold to focus, use |
|
|
|
|
Collectibles Button |
Spyglass: Hold the button, then look around with |
|
|
|
|
Reload Button |
Mortar: Hold the button, then aim with High Profile Button. |
|
|
|
|
|
Center the game camera to face the front of the Jackdaw. |


 (PS3)
(PS3) (PS4)
(PS4)

 (PS3)
(PS3) (PS4)
(PS4)
 to aim.
 (PS3)
(PS3) (PS4)
(PS4)
 , zoom with
  , and mark targets with
  .
.
 (PS3)
(PS3) (PS4)
(PS4)
 , fire with


The Spyglass

The spyglass is a phenomenally useful tool for surveying potential destinations, and acquiring information on ships that you encounter. Hold the Collectibles Button then look around with  , and zoom in or out as required with
  . Whenever you point the spyglass at a ship within range a window will appear on your screen, revealing the following key facts:
- Its type and level (for example, Level 4 schooner). You can use this to assess if you can safely attack the ship. As a broad guideline, vessels that pose a significant danger to the Jackdaw will have their level displayed in red.
- The name of the vessel and its allegiance: British, Spanish, Portuguese, pirate or civilian.
- Details on what the ship is carrying. This can include ammunition, potentially three of five cargo types in variable quantities and, with much larger vessels or the lead ship in a convoy, a sum of reales. These are the rewards that you can gain by successfully boarding the ship.
“Tagging” Ships
In larger battles, it’s very useful to “tag” the most dangerous enemy vessels. You can achieve this either by setting a Custom Marker on the in-game map, or by viewing them through the spyglass and pressing  . A marked ship is highlighted at all times with the
  icon, both directly on your screen and on the mini-map. The icon remains on the main screen even if the target is obscured from your view or lies outside of your current field of vision. It is also accompanied by a distance measured in meters.
This greatly simplifies the process of always keeping track of the most threatening vessels in any given fleet, giving you a clear sense of their relative position and distance. You can use this knowledge to stay out of their range (particularly useful against frigates and men o’ war) until you sink all smaller ships, or to ensure that you remain in a position that enables you to hit vessels with broadsides and mortar shots.
Mini-Map Legend
|
|
The Jackdaw |
|
Wind Direction |
|
|
Main Story Mission |
||
|
|
Ally |
|
Wind Gust |
|
|
Target |
|
Floating Survivor |
|
|
Destination |
|
Floating Cargo |
|
|
Enemy Vessel (the icon’s tip corresponds to the ship’s bow) |
|
Waterspout |
|
|
Boarding Opportunity |
|
Rogue Wave |





Weapons
Though the Jackdaw initially has few weapons and very limited firepower, you can gradually purchase new armaments and improve all aspects of your ship to transform it into a redoubtable floating fortress.
The Jackdaw’s Weapons
|
Name |
Icon |
Usage Notes |
Availability |
Ammo |
Range (m) |
|
Broadside Cannons |
|
Round Shot: Rotate the camera to either side of the Jackdaw, hold the Manual Aim Button to adjust the targeting lines and focus your shot, then fire with the High Profile Button. This will be your primary weapon in most battles, offering a solid damage output and aiming flexibility. |
From the start |
Unlimited |
0-250 |
|
|
Heavy Shot: This is used automatically instead of round shot when you fire broadsides without displaying the targeting lines (that is, “blind firing” without holding the Manual Aim Button). Heavy shot deals tremendous damage, but is only efficient at close range.Use it with a simple tap of the High Profile Button when you pass in close proximity to an enemy ship. |
Must be purchased via the upgrades menu (900) |
Limited |
0-150 |
|
|
Swivel Gun |
|
Used to hit at weak points revealed when damage is inflicted by other weapons. Hold to align the aiming reticle with the weak point, then release to fire. A staple tactic to increase damage output is to alternate between broadsides and swivel gun shots at exposed vulnerabilities while the cannons are reloaded. |
From the start |
Unlimited |
0-300 |
|
Chase Cannons |
|
Chain Shot: Rotate the camera forwards, hold the Manual Aim Button to adjust the targeting lines and focus your shot, and fire with the High Profile Button. This weapon isn’t especially powerful, but has a “stun” effect. It proves very useful while attempting to move to an optimal position against vessels that might otherwise pose a threat with broadsides. |
From the start |
Unlimited |
0-350 |
|
Mortar |
|
This very powerful weapon has an extremely long potential range. Hold the Reload Button to align your shot (note how the target area turns red as it overlaps viable targets), and fire with the High Profile Button. |
Must be purchased via the upgrades menu (800) |
Limited |
150-500 |
|
Fire Barrels |
|
Rotate the camera toward the rear of the ship, hold the Manual Aim Button to adjust the targeting circles, and drop the barrels with the High Profile Button. The barrels will explode automatically on contact with any vessel (including the Jackdaw), though you can also detonate them manually with the swivel gun to exploit “splash damage” when an enemy ship is within range. |
From the start |
Limited |
40-55 |
|
Ram |
|
Simply sail directly into a target to inflict damage. The greater your speed before the impact, the more damage you will cause. |
Must be purchased via the upgrades menu (500 and 25 wood) |
- |
- |


Ammunition
Heavy shot, fire barrels and mortar barrages are only available if you have the requisite ammunition types on board. There are multiple ways to replenish your stocks:
- Plunder enemy ships (you can ascertain if they carry ammo in advance with the spyglass).
- Collect floating crates dropped by other vessels.
- Buy them from harbormasters (for a price of 50 per unit).
- Open Treasure Chests in caves/smuggler’s dens and underwater shipwrecks.
Targeting Lines & Aiming Range
Each weapon type can fire within a set range, and in a specific direction:
Broadside cannons fire from the port and starboard sides of the Jackdaw.
Chase cannons fire forward.
Fire barrels are dropped from the ship’s stern.
The mortar and the swivel guns can fire in all directions around the Jackdaw.
While you hold the aiming button (Reload Button for the mortar, Manual Aim Button for all other weapons), you will see targeting lines appear on the screen. These represent the path of the projectiles you’re about to fire. You can adjust the targeting lines with  , though steering the ship with
  will also make them move in relation to the Jackdaw. With cannons, the longer you hold the aiming button, the more the targeting lines will focus, and therefore the more accurate your volleys of projectiles will be once fired. This is particularly important when you are lining up a broadside on the front or rear of an enemy ship, which is an important tactic when you are battling a frigate or a mighty man o’ war.
Broadside cannons fire round shot when you display the targeting lines, but the more powerful heavy shot instead if you “blind fire” without holding the Manual Aim Button. In the accompanying diagram, we illustrate the aiming range of each weapon type.

Damage Calculation
The damage dealt by all ships is calculated for each individual projectile fired. In the case of a broadside, for example, all available broadside cannons launch a projectile, and each of these hitting its target deals a set damage value as specified in the table. If you are using the Intermediate set (13 cannons) with Intermediate Round Shot Strength (50 damage), every volley will consist of 13 projectiles that can each deal 50 damage.
To keep things simple, remember the following facts:
- Aim your shots at the enemy ship’s hull, as this is where you can deal the most damage by ensuring that all shots hit home. Volleys fired above the hull will mostly miss, with the exception of those that hit the masts. This can, however, be tactically viable if there is an enemy vessel directly behind.
- At close range, blind fire without displaying the targeting lines to use heavy shot, which is far more powerful than round shot.
- From a distance, focus your shots using the targeting lines until they fit comfortably within the width of your target’s hull for maximum efficiency.
- The mortar is an extremely powerful weapon (incredibly so after obtaining most upgrades), and has the longest range. However, the delay before the projectiles land means that you need to aim carefully (usually the front of the ship) to hit moving vessels. These are most effective against frigates and men o’ war, as their larger decks present a more substantial target area.
- The more cannons you have (through cannon set upgrades), the more projectiles are fired.
- The more powerful your shot (through strength upgrades), the more damage each projectile deals individually.
Naval Warfare
Naval Warfare Staples

Optimal Approach: Approaching enemy ships head-on is not always an efficient solution, as it limits your offensive options to chase cannons and mortar fire. Instead, try to make circular approaches that will enable you to fire more powerful broadsides. In many battles, you should ensure that all enemy ships are on one side of the Jackdaw. Being pounded by multiple vessels from both sides can be disorienting and, as a consequence, devastating. Whenever it is possible to do so, circle around enemy fleets in a wide arc.

Focus Fire: When you adjust a broadside, holding the Manual Aim Button before you fire will gradually narrow the targeting lines that indicate the direction of fire. This can lead to a significant increase in accuracy over medium-to-long range. Ideally, the targeting lines should always be comfortably narrower than the width of your target to ensure maximum efficiency. When the Jackdaw is extremely close to an opposing vessel, there is no need to focus the cannons. Just fire away immediately; this can save precious seconds, and will launch powerful heavy shot instead of the usual round shot. If you wish to conserve heavy shot (or do not wish to risk destroying a vessel), you can briefly hold the Manual Aim Button before you fire.
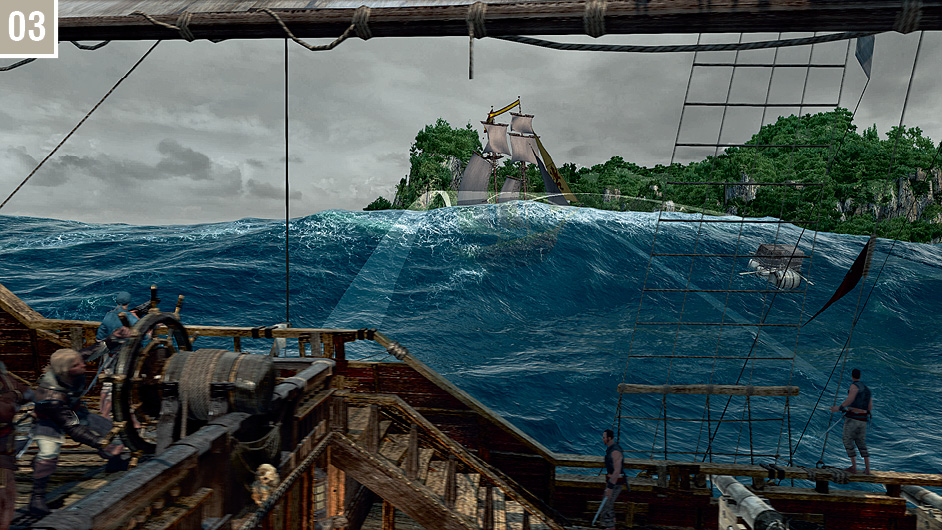
Curved Shots: When aligning shots, you can steer the Jackdaw to put it in a suitable shooting position, but you can also adjust the targeting lines with  , both laterally and vertically. This feature is essential to ensure that your shots will actually hit home. Most notably, you can use it to fire curved volleys above obstacles such as waves.

Bracing: Bracing is a defensive technique that enables you to reduce the damage you take from enemy attacks, rogue waves, water spouts and collisions. As this prevents you from aiming and firing, and causes the Jackdaw to continue in the last specified direction while Kenway as his crew take cover, it’s prudent to employ it only when necessary. To brace, simply hold  until the danger (such as an incoming volley) has passed. Imminent enemy attacks are always signified by a flashing red reticle icon, with a red highlight indicating the direction of fire. With practice, you will hone your ability to judge when an enemy will open fire, and either launch a broadside or steer the Jackdaw in a particular direction just before you brace.

Swivel Gun & Weak Points: The swivel guns are primarily employed to hit weak points (as marked by  icons) that are exposed by other weapons. Whenever you spot one, hold
  and release once the moving reticle is aligned with the icon marking the vulnerability. Both swivel guns combined have a full 360-degree field of fire around the Jackdaw, but you should note that weak points must be visible onscreen for you to fire at them. If a vessel with exposed vulnerabilities sails out of view, adjust
  to bring the targets back into range. As you become more proficient in naval combat, you will find that the swivel guns are a great tool for maintaining “combos”, enabling you to chip away at health bars while other weapons reload. Note that weak points will vanish after a while, so try to hit them quickly once they appear.

Mortar Openings: The mortar is a fantastic weapon to initiate hostilities with, especially against larger vessels. Not only is it incredibly powerful after an upgrade or two, but it also has the advantage of the longest potential range. You can exploit this during ambushes where you position the Jackdaw in an optimal position for an assault (behind a target, for example), and launch an opening barrage before you immediately follow up with other weapons. Though it’s a little wasteful to squander ammunition against gunships, schooners and perhaps even brigs (their small size means that most shots miss), mortar fire is deadly when employed against frigates and men o’ war. Though the latter are inclined to reply in kind, you should note that frigates cannot damage the Jackdaw if you stay out of their cannon range while raining projectiles from above…
Bespoke Tactics

Dual Heavy Shot Broadsides: Your port and starboard cannons can be fired independently, and are subject to separate reload timers. In situations where you have enemies on both sides, this means that you can fire broadsides at twice the usual rate, alternating between one side then the other by rotating the camera accordingly. Though usually impractical against larger vessels (save, perhaps, for daring headlong dashes between two ships sailing in alignment when an opportunity arises), this is particularly useful when you need to clear the surrounding waters of multiple fast-moving gunboats and schooners attacking from assorted angles.

Blind Spot: Whenever you can launch a surprise attack on an enemy from behind, this puts you in an ideal position – not only because the enemy ship cannot immediately return fire, but also because it will take time for her helmsman to steer back in your direction and bring the cannons to bear. If you can use the Jackdaw’s speed (and, if possible, slight feints and the prevailing wind) to maintain an alignment where you can fire focused broadsides at the stern, a battle can become ridiculously one-sided. As a point of interest, the area behind the stern of hostile ships is also their major blind spot when you are sailing inside Restricted Areas. If you decide to ambush a patrolling vessel, this is usually the best place to start.

Naval Human Shield: Enemy ships will not generally open fire if they have an ally in their field of fire – and even if they do, this broadly works in your favor. You can exploit this by putting a weaker opponent between you and a more dangerous vessel. The smaller ship will be the only one attacking you – a negligible threat – while the larger one will be temporarily neutralized, until her line of fire is clear again. You can then fire volleys above your improvised shield to reach your primary target.

Maximum Damage Output: There is a delay between the time you fire the mortar and the point when its projectiles reach their target. This means that this weapon isn’t ideal against small, nimble ships, but it is extremely effective against forts and the larger warships. These can all be hit by the full rain of mortar projectiles, taking huge amounts of damage in the process. You can maximize your damage output by using a combo of mortar fire, broadside and swivel gun follow-ups in succession; by the time you hit the weak points, the mortar will be ready to fire again.

Pinning Down Targets During Headlong Approaches: When you are racing headlong at other ships – or they’re racing towards you – you can use the chase cannons to pin your opponent down with chain shot, making it a prime target for your most lethal weapons. The mortar  chain shot
  swivel gun combo is completely fluid. You can follow this with another burst of chain shot, and bring the Jackdaw around for a broadside while the target is still “stunned”. At this point, you have two options: you can either complete a U-turn and drop fire barrels at close range, or sail to the rear quarters of the enemy vessel, out of their broadside range, to hit them from behind with heavy shot at very close range.
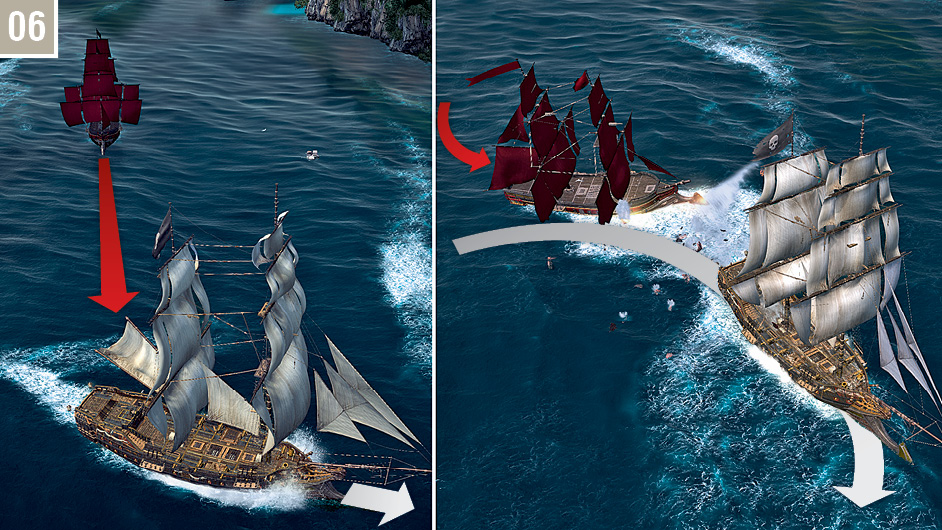
Countering a Ram Charge: Leaving fire barrels in your wake is a powerful deterrent when enemy ships are chasing you, or when you are notified that a brig’s helmsman intends to attack you with her ram. The optimal tactic for countering a ramming charge is risky, but the damage inflicted is significant. Moments before the incoming brig makes contact, reduce your speed to half sail and steer in the direction that will align you with the brig. Your goal is to have the brig’s bow just behind your own stern. At this precise moment, drop fire barrels: the ship will be so close that it won’t have a chance to evade the explosives. With perfect timing, all deployed barrels will hit the target. If you don’t have fire barrels available, or aren’t in a position where you can drop any, you can still escape the charge by dodging it: simply steer away at full speed perpendicularly from the course of the incoming vessel. The most daring strategy is to sail headlong for the brig when it first prepares to ram, then scrape past its hull as you unleash a heavy shot broadside.
Boarding

Once you have sufficiently weakened an enemy ship and its health bar is reduced to the final red portion ( ), it is effectively removed from the battle. In this passive state, it cannot move, nor can it use its weapons. At this point, you have two options:
1. You can finish it off with additional shots to sink it. This is the fastest option, but you will only have access to half of the resources available on that ship. These will appear for collection after the ship sinks below the surface. Once the Jackdaw is sufficiently powerful, you can use this tactic to cut a swath through merchant shipping (usually weak schooners that can be sunk within seconds in the north of the map) during a journey to a port.
2. Alternatively, you can board the ship, which leads to the reward of the full cargo total. Though it is more time-consuming, usually entails a frantic battle on the deck and may take a toll on your crew levels, this option has a number of very significant benefits. Of particular interest, initiating the boarding process leads to an immediate cessation of hostilities with all other ships in a battle. Though your adversaries will be waiting afterwards, you can choose to salvage materials from the boarded ship to repair the Jackdaw in anticipation of this. In battles against fleets and convoys, you can essentially incapacitate ships and then use them as “health packs” when required.
To board a weakened ship (marked by the  icon on the mini-map), sail inside the white boundary that surrounds it (
 ), then hold
  . To complete the boarding, you need to fulfill any objectives listed on your screen – see “Boarding Objectives” for details.
Crew Management
As explained in the “Naval Primer” section, the white meter in the top-left corner of the screen represents your crew. During the boarding process, time is key – essentially, the crew meter effectively works as a virtual sandglass. Once the two crews clash, the gauge will gradually deplete, with each reduction corresponding to the death of one of your sailors. If your entire crew dies, you will be Desynchronized and the boarding will fail. Perhaps more significantly, you will need to embark on a major recruitment drive for new sailors, which can be time-consuming or expensive.
There are various ways to recruit new crew members:
You can save floating survivors ( ) – simply press
  when sailing past them. This serves to provide a gradual “topping up” of crew levels during voyages.
You can free pirate prisoners from their captors, assist pirates fighting soldiers before they are slain, or save individuals from execution ( ) in many locations throughout the three major cities, and occasionally at set positions in other locations (particularly islands).
You can choose to repair the Jackdaw after a successful boarding to obtain a minimum of one crew member.
You can hire sailors in taverns ( ), which costs 200
 per recruit. This is the fastest way to restore depleted ranks if you are in a hurry. You can find taverns in Havana, Nassau, Kingston, Long Bay, Great Inagua, Arroyos, Salt Key Bank, Crooked Island, Grand Cayman, Andreas Island, Corozal and Île à Vache.
Crew management is an essential aspect of the naval system. The more crew
you have, the stronger you will be during boarding sequences, which is why the (eminently affordable) crew capacity upgrades are worth every last reale. Keeping a high crew count actually leads to a virtuous circle: your men will kill opponents for you during a boarding sequence, which will enable you to focus on other objectives – and, as a consequence, shorten the overall boarding time, which exposes you to fewer casualties.
Boarding Tactics
When you begin a boarding sequence, there are multiple tools or strategies that you can use:
A few steps away from the wheel ( ), you can man a swivel gun on the appropriate side of the ship by pressing
  . Use
. Use  to aim, zoom with the Manual Aim Button if required, and fire with the High Profile Button. The pitching of the waves will challenge your ability to aim with precision, but you have up to five shots before Kenway automatically relinquishes control. Wait until a wave puts the Jackdaw in a suitable position, then aim for key targets: powder reserves, groups of enemies, or even specific individual targets. Note that swivel gun shots cause friendly fire, and are very likely to kill your own crew if you don’t aim correctly (or if they are caught in a powder reserve explosion).
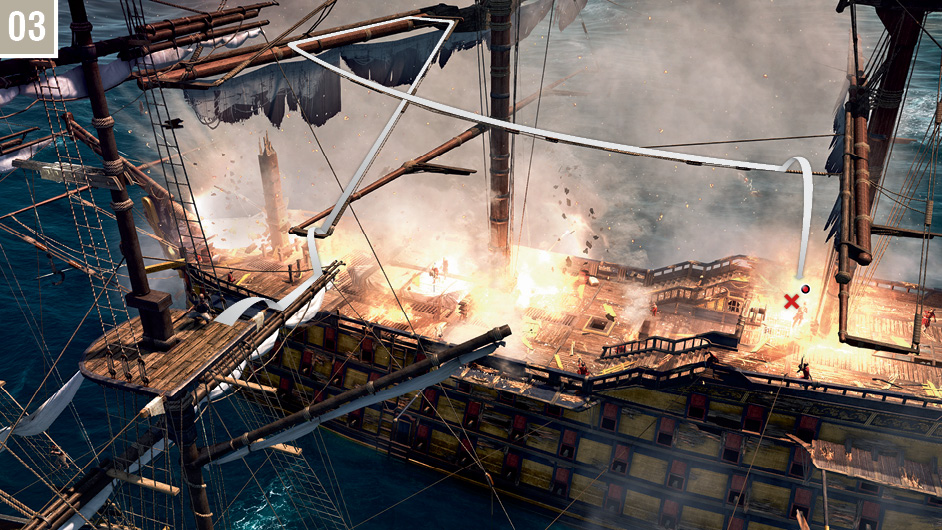
A few purposeful steps in front of the wheel ( ), you can use a lift to gain rapid access to the rigging of both the Jackdaw and the adjacent ship. Once there, you can move to a suitable vantage point to fire ranged weapons, or even perform air assassinations (
 ). This is actually a very efficient way to complete objectives that require you to kill enemy scouts (see “Boarding Objectives”).
The most direct way to reach the enemy ship is simply to jump across from the Jackdaw or swing over via a rope. You should always attempt to begin your onslaught by performing an air assassination. Be clever in your choice of targets: aim to engage weaker soldiers and eliminate them with Kill Streaks, and avoid Brutes or Captains. An interesting trick, suitable for brigs and bigger, is to hold the High Profile Button and repeatedly tap  as you sprint around the deck near enemy soldiers who are not actively engaging Kenway. Whenever you catch them from behind, you can accumulate easy assassinations (even spectacular doubles) with this technique.
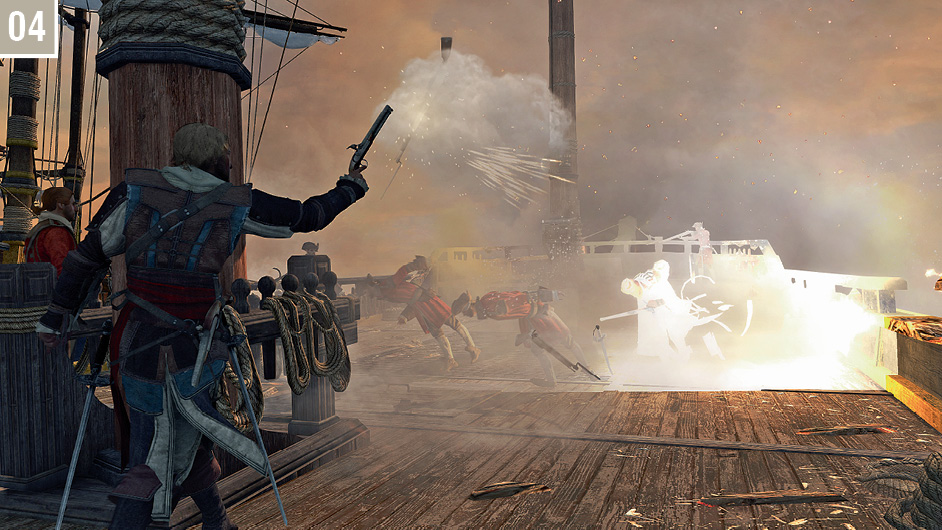
Many ships feature red barrels that are known as powder reserves. If you fire at these with the swivel gun or a pistol they will blow up, killing any sailor nearby ( ). These explosions cause friendly fire, so think carefully before you trigger one if you have crew members nearby.
At the beginning of every boarding sequence, there’s a delay before the Jackdaw is properly aligned with the enemy ship. The farther away you are within the highlighted zone when you initiate the boarding, the longer it takes before you and your crew can reach the deck of the vessel. By deliberately starting far away, you can put this time to use – for example, to align precision hits with the swivel gun. Against larger vessels, initiating the boarding at maximum possible distance, and from the front, enables you to shoot “scouts” in the rigging during the approach. You can also just stand at the edge of the Jackdaw and shoot enemy soldiers with pistols. By employing these tactics, it’s usually possible to complete boarding sequences against schooners and brigs before a single crew member sets foot on the enemy vessel.

Boarding Objectives
To end a boarding sequence, you need to complete the objectives that appear on your screen. The larger the vessel you attempt to plunder, the more objectives you will need to fulfill. You always have to kill a certain amount of enemy crew members; additional objectives are selected randomly from the activities listed in the table below.
Boarding Objectives Overview
| Objective | Notes |
|---|---|
|
Kill enemy crew |
Use the swivel gun to thin enemy numbers, then sprint to the enemy ship’s deck or stand at the edge of the Jackdaw and take down opponents with pistols. Prioritize basic soldiers – they’re much easier to kill than more robust adversaries such as Brutes. |
|
Kill enemy officers |
These officers are usually of the Scout archetype, so they’re not problematic targets. Use counterkills or Kill Streaks to defeat them swiftly. |
|
Destroy enemy ship’s powder reserves |
This can be done very quickly from the Jackdaw with the swivel gun. If you cannot do so, you will have to manually aim at the reserves with your pistol. This is easier from an elevated position, and ideally before your crew leap over. |
|
Kill enemy captain(s) |
Attempt to kill the targets with the swivel gun. If you fail, you can air assassinate them, or simply attack them head on. Parry their attacks, then finish them off with a Combo Kill or during a Kill Streak while they recover from the automatic kick. As ever, Smoke Bombs offer the easiest resolution to any battle. |
|
Kill enemy scouts |
Whenever you board larger ships, you will usually find marksmen on the mast platforms – your targets for this objective. Use a lift to reach them quickly, but be ready to parry or counter an attack as you land. You can kill the first one by kicking him from the platform, then eliminate the other with a ranged weapon. These targets usually require two pistol shots to the body or a single, rather difficult, headshot to kill. |
|
Destroy enemy ship’s flag |
Take care of this objective last when boarding larger vessels, as reaching the flag at the top of the main takes a little time – and the descent can be problematic. Once you’re done with other objectives, start your ascent with a lift on the mainmast, then quickly dispatch any Gunners at this level: a single shot can cause Kenway to fall if you neglect this step ( |
 ). When you reach the top of the mast, press
  to complete the task.
Rewards
After a successful boarding, you have three options. Whatever your selection, you will always receive the full stock of cargo and ammo from the ship.
Repair the Jackdaw: This restores one fully depleted segment of the Jackdaw’s health bar, and gives you crew members as a bonus.
Lower Wanted Level: This lowers your Wanted level by one.
Send to Kenway’s Fleet: Only available from Sequence 04. This will add the vessel to your fleet in the online-only metagame.
Boarding Stationary Ships
You will occasionally happen upon vessels that are heavily damaged, their decks ablaze, and their crew long dead or departed. You cannot board these in a traditional manner, but you can manually swim and climb into the ships, or jump over from the Jackdaw. As soon as you hit the deck (or its outer edge while climbing), a timer will appear. You must then loot the cargo containers on board ( ) and escape before the ship sinks. The resources you gain by doing this are often negligible, but you can also loot the bodies on the deck – the Captain will usually carry a hefty sum, in the range of what you would find in a Treasure Chest.
There is another way to use “manual boarding” – but this is more of a sneaky exploit. Various locations in the Caribbean (such as plantations with warehouses) are guarded by stationary sentry ships that are designed to prevent you from docking until the Jackdaw is strong enough to defeat them. Release the wheel of the Jackdaw once you are just outside of a sentry ship’s detection range, then jump overboard and swim to the vessel. You can then scale its hull and take down the entire crew in open conflict. With this accomplished, swim back to the Jackdaw and quickly weaken the (now inactive) ship until you can board it. The boarding process will still feature an enemy crew, but this can nonetheless be an easy way to conquer powerful ships. This will also enable you to claim them for Kenway’s Fleet before the Jackdaw is up to the task via a conventional approach.
Boarding: Summary
- 1. To board a ship, you must first weaken it until its health bar is reduced to the final red portion.
- 2. When you begin the boarding process, all combat with other vessels is temporarily suspended. This feature can be exploited to gain brief respite in difficult battles and repair the Jackdaw before the onslaught resumes.
- 3. The moment a boarding sequence begins, your crew meter acts as a timer: the more time you take to complete the boarding, the more crew you will lose during the process. Try to maintain a near-full crew complement at all times.
- 4. To complete a boarding, you need to fulfill the objectives that appear on your screen. There are multiple tools or strategies that you can use to simplify and speed up the process. These include: the swivel gun during the initial approach, ranged pistol fire afterwards, use of the lift close to the Jackdaw’s wheel to quickly ascend to the rigging if required, and the careful prioritization of your targets.
- 5. Successfully boarding a ship rewards you with all of its cargo, but entails an investment of time and an acceptance of risk that you might fail. Sinking a ship rewards you with only half of its cargo (and you lose the ability to choose one of three additional completion perks), but is much faster.
Upgrades
You can upgrade the Jackdaw at any time from the captain’s cabin, just below the wheel, or by visiting any harbormaster ( ).Upgrading the Jackdaw is an indispensable step as you progress in the main storyline, with some of the later main missions and secondary challenges pitting you against powerful opponents, such as men o’ war and four fearsome Legendary Ships. Without the best upgrades at your disposal, the seas will become ever more perilous as the storyline leads you to the more dangerous southern regions.
All upgrades must be purchased with reales, but many of them require an additional investment of cargo.
Cargo can be obtained by plundering ships and convoys, looting warehouses, collecting floating crates (or opening those occasionally found on land), and opening chests found in caves and shipwrecks.
There are five categories of cargo: see the table on the right for details.
The amount of cargo you can carry is limited to a specific “capacity” value covering all five categories of cargo. Once you’ve reached your current maximum capacity, you cannot collect more. This storage capacity can be improved through upgrades.
The powerful Elite upgrades require specific design plans before you can unlock them. These blueprints are found in special Treasure Chests hidden underwater in shipwreck sites or in buried chests.
Note that buying any upgrade fully repairs the Jackdaw.
CARGO DETAILS
| Icon | Type | Resale Price Per Unit (R) | Use |
|---|---|---|---|
|
|
Cloth |
5 |
Required for certain upgrades, including storage and hull. |
|
|
Metal |
5 |
Required for certain upgrades, including weapons and hull. |
|
|
Wood |
5 |
Required for certain upgrades, including ram, rowboat and hull. |
|
|
Rum |
15 |
Can be sold via the Jackdaw’s cabin, or harbormasters and general stores. |
|
|
Sugar |
20 |


The table below features all upgrades available for the Jackdaw. The following guidelines will help you to make the most of it:

 Upgrade Category: This defines what part or feature of the Jackdaw is improved.
 Upgrade Level: Within each category, there are several upgrade levels that can be purchased sequentially, from Standard to the maximum Elite upgrades. The higher the level (in other words, the further you advance towards the right of the table), the more expensive the upgrades become.
 Upgrade Cost: Each upgrade can cost you reales (R), Metal (
 ), Wood (
 ), and Cloth (
 ). The figures below each upgrade name reveal the values required to purchase it. In the example above, this shows you that the “small” broadside cannons set costs 0, 70 Metal, 0 Wood and 0 Cloth.
 Upgrade Effect: This reveals what feature the upgrade improves. This can be anything from additional cannons, to the damage caused by each shot, to the amount of ammo or cargo your ship can carry.
 Damage/Cost Ratio: These ratios give an indication of each upgrade’s overall cost-efficiency compared to the lower level. The higher the percentage, the greater the benefits. We’ve included a color code to help you immediately identify which upgrades you can prioritize when spending your hard-earned resources, from green (best ratio) to orange and then red (lowest ratio). Whenever you have funds to spend, check the contents of the column corresponding to your current level of progression (for example, “reinforced” level) and you can use the percentages and/or color codes to decide which upgrades you should favor.
Upgrade List & Analysis
|
WEAPON UPGRADES |
BROADSIDE CANNONS |
Standard |
Small |
Intermediate |
Reinforced |
Advanced |
Ultimate |
Elite |
|||||||||||||||||||||
|
|
- |
- |
- |
- |
0 |
70 |
- |
- |
2,000 |
150 |
- |
- |
4,000 |
300 |
- |
- |
8,000 |
350 |
- |
- |
12,000 |
500 |
- |
- |
20,000 |
650 |
- |
- |
|
|
Amount of cannons |
7 |
10 |
13 |
16 |
19 |
21 |
23 |
||||||||||||||||||||||
|
Damage/Cost Ratio |
- |
57.4% |
7.3% |
3.7% |
2.1% |
0.9% |
0.6% |
||||||||||||||||||||||
|
ROUND SHOT STRENGTH |
Standard |
Intermediate |
Reinforced |
Advanced |
Elite |
||||||||||||||||||||||||
|
|
- |
- |
- |
- |
900 |
- |
- |
- |
4,000 |
- |
- |
- |
12,000 |
- |
- |
- |
35,000 |
- |
- |
- |
|||||||||
|
Damage |
40 |
50 |
65 |
80 |
100 |
||||||||||||||||||||||||
|
Damage/Cost Ratio |
N/A |
17.3% |
5.8% |
1.9% |
0.9% |
||||||||||||||||||||||||
|
HEAVY SHOT STRENGTH |
Standard |
Advanced |
Elite* |
||||||||||||||||||||||||||
|
|
900 |
- |
- |
- |
6,000 |
- |
- |
- |
25,000 |
- |
- |
- |
|||||||||||||||||
|
Damage |
120 |
180 |
260 |
||||||||||||||||||||||||||
|
Damage/Cost Ratio |
138% |
15.6% |
5.0% |
||||||||||||||||||||||||||
|
CHASE CANNONS |
Standard |
Reinforced |
|||||||||||||||||||||||||||
|
|
- |
- |
- |
- |
3,000 |
60 |
100 |
- |
|||||||||||||||||||||
|
Amount of cannons |
2 |
4 |
|||||||||||||||||||||||||||
|
Damage/Cost Ratio |
- |
2.7% |
|||||||||||||||||||||||||||
|
CHAIN SHOT STRENGTH |
Standard |
Reinforced |
Advanced |
||||||||||||||||||||||||||
|
|
- |
- |
- |
- |
2,500 |
- |
- |
- |
6,000 |
- |
- |
- |
|||||||||||||||||
|
Damage |
40 |
50 |
65 |
||||||||||||||||||||||||||
|
Damage/Cost Ratio |
- |
1.2% |
0.8% |
||||||||||||||||||||||||||
|
SWIVEL GUNS |
Standard |
Reinforced |
Advanced |
Elite |
|||||||||||||||||||||||||
|
|
- |
- |
- |
- |
700 |
25 |
- |
- |
5,000 |
200 |
- |
- |
15,000 |
400 |
- |
- |
|||||||||||||
|
Damage |
200 |
300 |
400 |
500 |
|||||||||||||||||||||||||
|
Damage/Cost Ratio |
- |
12.1% |
1.7% |
0.6% |
|||||||||||||||||||||||||
|
Max Weak Points |
1 |
3 |
5 |
10 |
|||||||||||||||||||||||||
|
FIRE BARREL STRENGTH |
Standard |
Advanced |
Elite |
||||||||||||||||||||||||||
|
|
- |
- |
- |
- |
3,000 |
- |
- |
- |
8,000 |
- |
- |
- |
|||||||||||||||||
|
Damage |
200 |
400 |
600 |
||||||||||||||||||||||||||
|
Damage/Cost Ratio |
- |
6.7% |
2.5% |
||||||||||||||||||||||||||
|
MORTARS |
Standard |
Reinforced |
Advanced |
Elite |
|||||||||||||||||||||||||
|
|
800 |
- |
- |
- |
3,500 |
200 |
- |
- |
8,000 |
300 |
- |
- |
25,000 |
650 |
- |
- |
|||||||||||||
|
Damage |
1,000 |
2,100 |
3,300 |
3,900 |
|||||||||||||||||||||||||
|
Damage/Cost Ratio |
125% |
24.4% |
12.6% |
2.1% |
|||||||||||||||||||||||||
|
RAM* |
Standard |
Reinforced |
Advanced |
Elite |
|||||||||||||||||||||||||
|
|
500 |
- |
25 |
- |
2,000 |
- |
75 |
- |
5,000 |
150 |
250 |
- |
15,000 |
200 |
600 |
- |
|||||||||||||
|
Damage |
600 |
1,200 |
2,000 |
4,000 |
|||||||||||||||||||||||||
|
Damage/Cost Ratio |
96% |
25.3% |
11.4% |
10.5% |
|||||||||||||||||||||||||
|
HULL |
HULL ARMOR |
Standard |
Intermediate |
Reinforced |
Advanced |
Elite |
|||||||||||||||||||||||
|
|
- |
- |
- |
- |
1,000 |
- |
- |
- |
4,000 |
100 |
200 |
- |
15,000 |
200 |
500 |
- |
30,000 |
400 |
750 |
- |
|||||||||
|
Armor/Cost Ratio |
- |
600% |
145% |
65% |
50% |
||||||||||||||||||||||||
|
STORAGE UPGRADES |
HEAVY SHOT STORAGE |
Standard |
Reinforced |
Advanced |
Elite |
||||||||||||||||||||||||
|
|
- |
- |
- |
- |
500 |
- |
- |
- |
1,500 |
- |
- |
- |
4,000 |
- |
- |
- |
|||||||||||||
|
Capacity |
15 |
20 |
25 |
40 |
|||||||||||||||||||||||||
|
MORTAR STORAGE |
Standard |
Reinforced |
Advanced |
Elite |
|||||||||||||||||||||||||
|
|
- |
- |
- |
- |
800 |
- |
- |
- |
2,000 |
- |
- |
- |
5,000 |
- |
- |
- |
|||||||||||||
|
Capacity |
5 |
10 |
15 |
20 |
|||||||||||||||||||||||||
|
FIRE BARREL STORAGE |
Standard |
Reinforced |
Advanced |
Elite |
|||||||||||||||||||||||||
|
|
- |
- |
- |
- |
500 |
- |
- |
- |
1,500 |
- |
- |
- |
4,000 |
- |
- |
- |
|||||||||||||
|
Capacity |
10 |
15 |
25 |
40 |
|||||||||||||||||||||||||
|
CREW’S QUARTERS |
Standard |
Reinforced |
Advanced |
||||||||||||||||||||||||||
|
|
- |
- |
- |
- |
800 |
- |
- |
50 |
3,500 |
- |
- |
350 |
|||||||||||||||||
|
Capacity |
20 |
30 |
40 |
||||||||||||||||||||||||||
|
CARGO STORAGE |
Standard |
Reinforced |
Advanced |
||||||||||||||||||||||||||
|
|
- |
- |
- |
- |
2,000 |
- |
- |
- |
6,000 |
- |
- |
- |
|||||||||||||||||
|
Capacity |
500 |
1,000 |
2,000 |
||||||||||||||||||||||||||
|
HARPOONING |
HARPOON STRENGTH |
Standard |
Advanced |
Elite |
|||||||||||||||||||||||||
|
|
- |
- |
- |
- |
1,000 |
- |
- |
- |
4,000 |
- |
- |
- |
|||||||||||||||||
|
Damage |
100 |
200 |
300 |
||||||||||||||||||||||||||
|
ROWBOAT ARMOR |
Standard |
Reinforced |
Advanced |
||||||||||||||||||||||||||
|
|
- |
- |
- |
- |
600 |
- |
50 |
- |
1,800 |
- |
200 |
- |
|||||||||||||||||
|
Resistance |
100 |
200 |
300 |
||||||||||||||||||||||||||
|
HARPOON STORAGE |
Standard |
Reinforced |
Advanced |
||||||||||||||||||||||||||
|
|
- |
- |
- |
- |
500 |
- |
- |
- |
1,500 |
- |
- |
- |
|||||||||||||||||
|
Capacity |
15 |
20 |
30 |
||||||||||||||||||||||||||


* If you defeat all four Legendary Ships, you unlock a special attack. Hold the Manual Aim Button and press  as you’re about to ram a target: this triggers a powerful charge (6,000 damage).
If this seems too much like work, we’ve also prepared the “Upgrade Priorities” table as a simple, linear guide. The “Recommended Progression” column gives you an indication of what upgrades you should purchase to complete all main story objectives (and, usually, exploration and most naval side quests) without experiencing awkward difficulty spikes. The “Power Progression” column is meant for gamers who will seize every opportunity to explore the world, acquire all collectibles and grind for the requisite cargo and design plans.
Upgrade Priorities
| Step | Upgrade | Recommended Progression | PowerProgression |
|---|---|---|---|
|
1 |
Intermediate Hull Armor |
||
|
2 |
Broadside Cannons – Small Set |
||
|
3 |
Standard Mortars |
||
|
4 |
Standard Heavy Shot Strength |
||
|
5 |
Standard Ram |
||
|
6 |
Intermediate Round Shot Strength |
||
|
7 |
Reinforced Cargo Storage |
||
|
8 |
Reinforced Crew’s Quarters |
||
|
9 |
Reinforced Swivel Guns |
||
|
10 |
Reinforced Heavy Shot Storage |
||
|
11 |
Reinforced Mortar Storage |
||
|
12 |
Broadside Cannons – Intermediate Set |
||
|
13 |
Advanced Heavy Shot Storage |
||
|
14 |
Advanced Mortar Storage |
||
|
15 |
Reinforced Hull Armor |
||
|
16 |
Advanced Cargo Storage |
||
|
17 |
Reinforced Mortars |
||
|
18 |
Advanced Crew’s Quarters |
||
|
19 |
Broadside Cannons – Reinforced Set |
||
|
20 |
Reinforced Round Shot Strength |
||
|
21 |
Reinforced Ram |
||
|
22 |
Reinforced Chase Cannons |
||
|
23 |
Reinforced Chain Shot Strength |
||
|
24 |
Advanced Fire Barrel Strength |
||
|
25 |
Advanced Heavy Shot Strength |
||
|
26 |
Advanced Mortars |
||
|
27 |
Advanced Hull Armor |
||
|
28 |
Advanced Swivel Guns |
||
|
29 |
Broadside Cannons – Advanced Set |
||
|
30 |
Advanced Round Shot Strength |
||
|
31 |
Advanced Ram |
Sequence 11-12 |
|
|
32 |
Advanced Chain Shot Strength |
||
|
33 |
Elite Upgrades |
Jackdaw Appearance
Appearance Items
| Upgrade | Cost (R) | Cost (Cargo) | |
|---|---|---|---|
| Quantity | Type | ||
|
Jackdaw’s Figurehead |
0 |
0 |
- |
|
Aries Figurehead |
500 |
25 |
Wood |
|
Phoenix Figurehead |
800 |
75 |
Wood |
|
Mermaid Figurehead |
1,250 |
150 |
Wood |
|
Gargoyle Figurehead |
2,000 |
300 |
Wood |
|
Serpent Figurehead |
3,500 |
400 |
Wood |
|
Queen Anne’s Figurehead |
5,000 |
500 |
Wood |
|
Ranger Figurehead |
0 |
0 |
- |
|
Royal Fortune’s Figurehead |
0 |
0 |
- |
|
El Impoluto’s Figurehead* |
0 |
0 |
- |
|
Aquila’s Figurehead** |
0 |
0 |
- |
|
Elite Figurehead (Uplay) |
0 |
0 |
- |
|
Jackdaw’s Wheel |
0 |
0 |
- |
|
Bronze Wheel |
500 |
25 |
Metal |
|
Flower Wheel |
800 |
75 |
Metal |
|
Phoenix Wheel |
1,250 |
150 |
Metal |
|
Eye of the Sea Wheel |
2,000 |
300 |
Metal |
|
Blackwood Wheel |
3,500 |
400 |
Metal |
|
Aquila’s Wheel |
5,000 |
500 |
Metal |
|
El Impoluto’s Wheel* |
0 |
0 |
- |
|
Gilded Wheel |
0 |
0 |
- |
|
Queen Anne’s Wheel |
0 |
0 |
- |
|
Elite Wheel (Uplay) |
0 |
0 |
- |
|
White Sails |
0 |
0 |
- |
|
Crimson Sails |
500 |
25 |
Cloth |
|
Red-Stripped Sails |
800 |
75 |
Cloth |
|
Tattered Sails |
1,250 |
150 |
Cloth |
|
Leather Sails |
2,000 |
300 |
Cloth |
|
Flower Sails |
3,500 |
400 |
Cloth |
|
Grey Sails |
5,000 |
500 |
Cloth |
|
Black and Red Sails* |
0 |
0 |
- |
|
Diamond Sails |
0 |
0 |
- |
|
Gilded Sails |
0 |
0 |
- |
|
Elite Sails (Uplay) |
0 |
0 |
- |
* Unlocked by completing (online-only) community challenges. ** Unlocked by destroying three (online-only) royal convoys.
Cargo Grinding Tips
The amount of resources required to purchase all upgrades for the Jackdaw is immense, and gathering such quantities can be incredibly time-consuming. However there are various ways to speed up the process:
Study enemy ships with the spyglass: The spyglass reveals two essential pieces of information about enemy ships – their level, and their cargo. You should generally only attack vessels within your level range, and focus on those that carry the most enticing quantities of required cargo.
Purchase cargo storage upgrades: If your goal is to acquire large quantities of cargo, you will need to be able to carry it on the Jackdaw. Make sure you unlock the best storage upgrade you can afford at any given time. This is a necessary step, as the standard capacity will only enable you to carry a maximum of 500 units of each cargo type, which may lead to wastage as surplus cargo is discarded.
Plunder cargo in the south part of the Caribbean: On average, the ships in the southern Caribbean regions yield far greater quantities of cargo. With a decently upgraded Jackdaw, you can embark on voyages of wanton plunder, attacking individual ships and even convoys until you reach your cargo limit.
Define your strategy – sinking or boarding: When you successfully board a ship, you automatically obtain all of its cargo. If you decide to sink the ship without boarding it, you can obtain half of its resources, taking the form of a floating crate that you can collect. As boarding can be a time-consuming process, this more aggressive approach is worth considering when cargo grinding is your sole objective. Target ships that you can sink without effort, ideally in areas where they are plentiful, and only take the time to board vessels that carry large quantities of a resource that you want
or need; this will also provide an opportunity to address your Wanted level or make repairs. If you find a good spot where you become familiar with the local shipping routes, you can Fast Travel to a nearby location to “reset” its state and begin again.
Instantly sink smaller ships with ram charges: The ram, especially in its upgraded variants, is a very powerful tool that you can use to charge into gunboats and even schooners, instantly cracking their hulls – and leaving you to claim half of their contents as they descend to the depths.
Embark on multiple warehouse raids in succession: Once you have visited each warehouse site and Synchronized at the local Viewpoint, you can raid these locations in sequence. With practice (and sound strategy) this is a swift way to amass cargo and reales.
Take advantage of storms: During storms, many smaller ships are claimed by winds or waves. Be sure to loot the flotsam and jetsam that they leave behind.
Take advantage of tripartite battles: You will often encounter situations where ships are engaged in combat when you arrive – for example, a British frigate facing a small Spanish brig and two schooners. In such situations, enemy ships will ignore you as long as you do not intervene (though you may be hit by stray fire if you move incautiously close). You can either circle like a vulture, waiting for cargo and crew to claim, or directly intervene. It’s usually best to engage the side that has the upper hand, as the losing party will continue to draw attention and fire. After you have incapacitated the aggressors, you can turn your cannons on the side that briefly regarded you as a savior for added profit (and, moreover, amusement).
In addition to upgrades, you can also acquire items to customize the appearance of the Jackdaw. These have no effect whatsoever on its performance, and are purely cosmetic alterations.
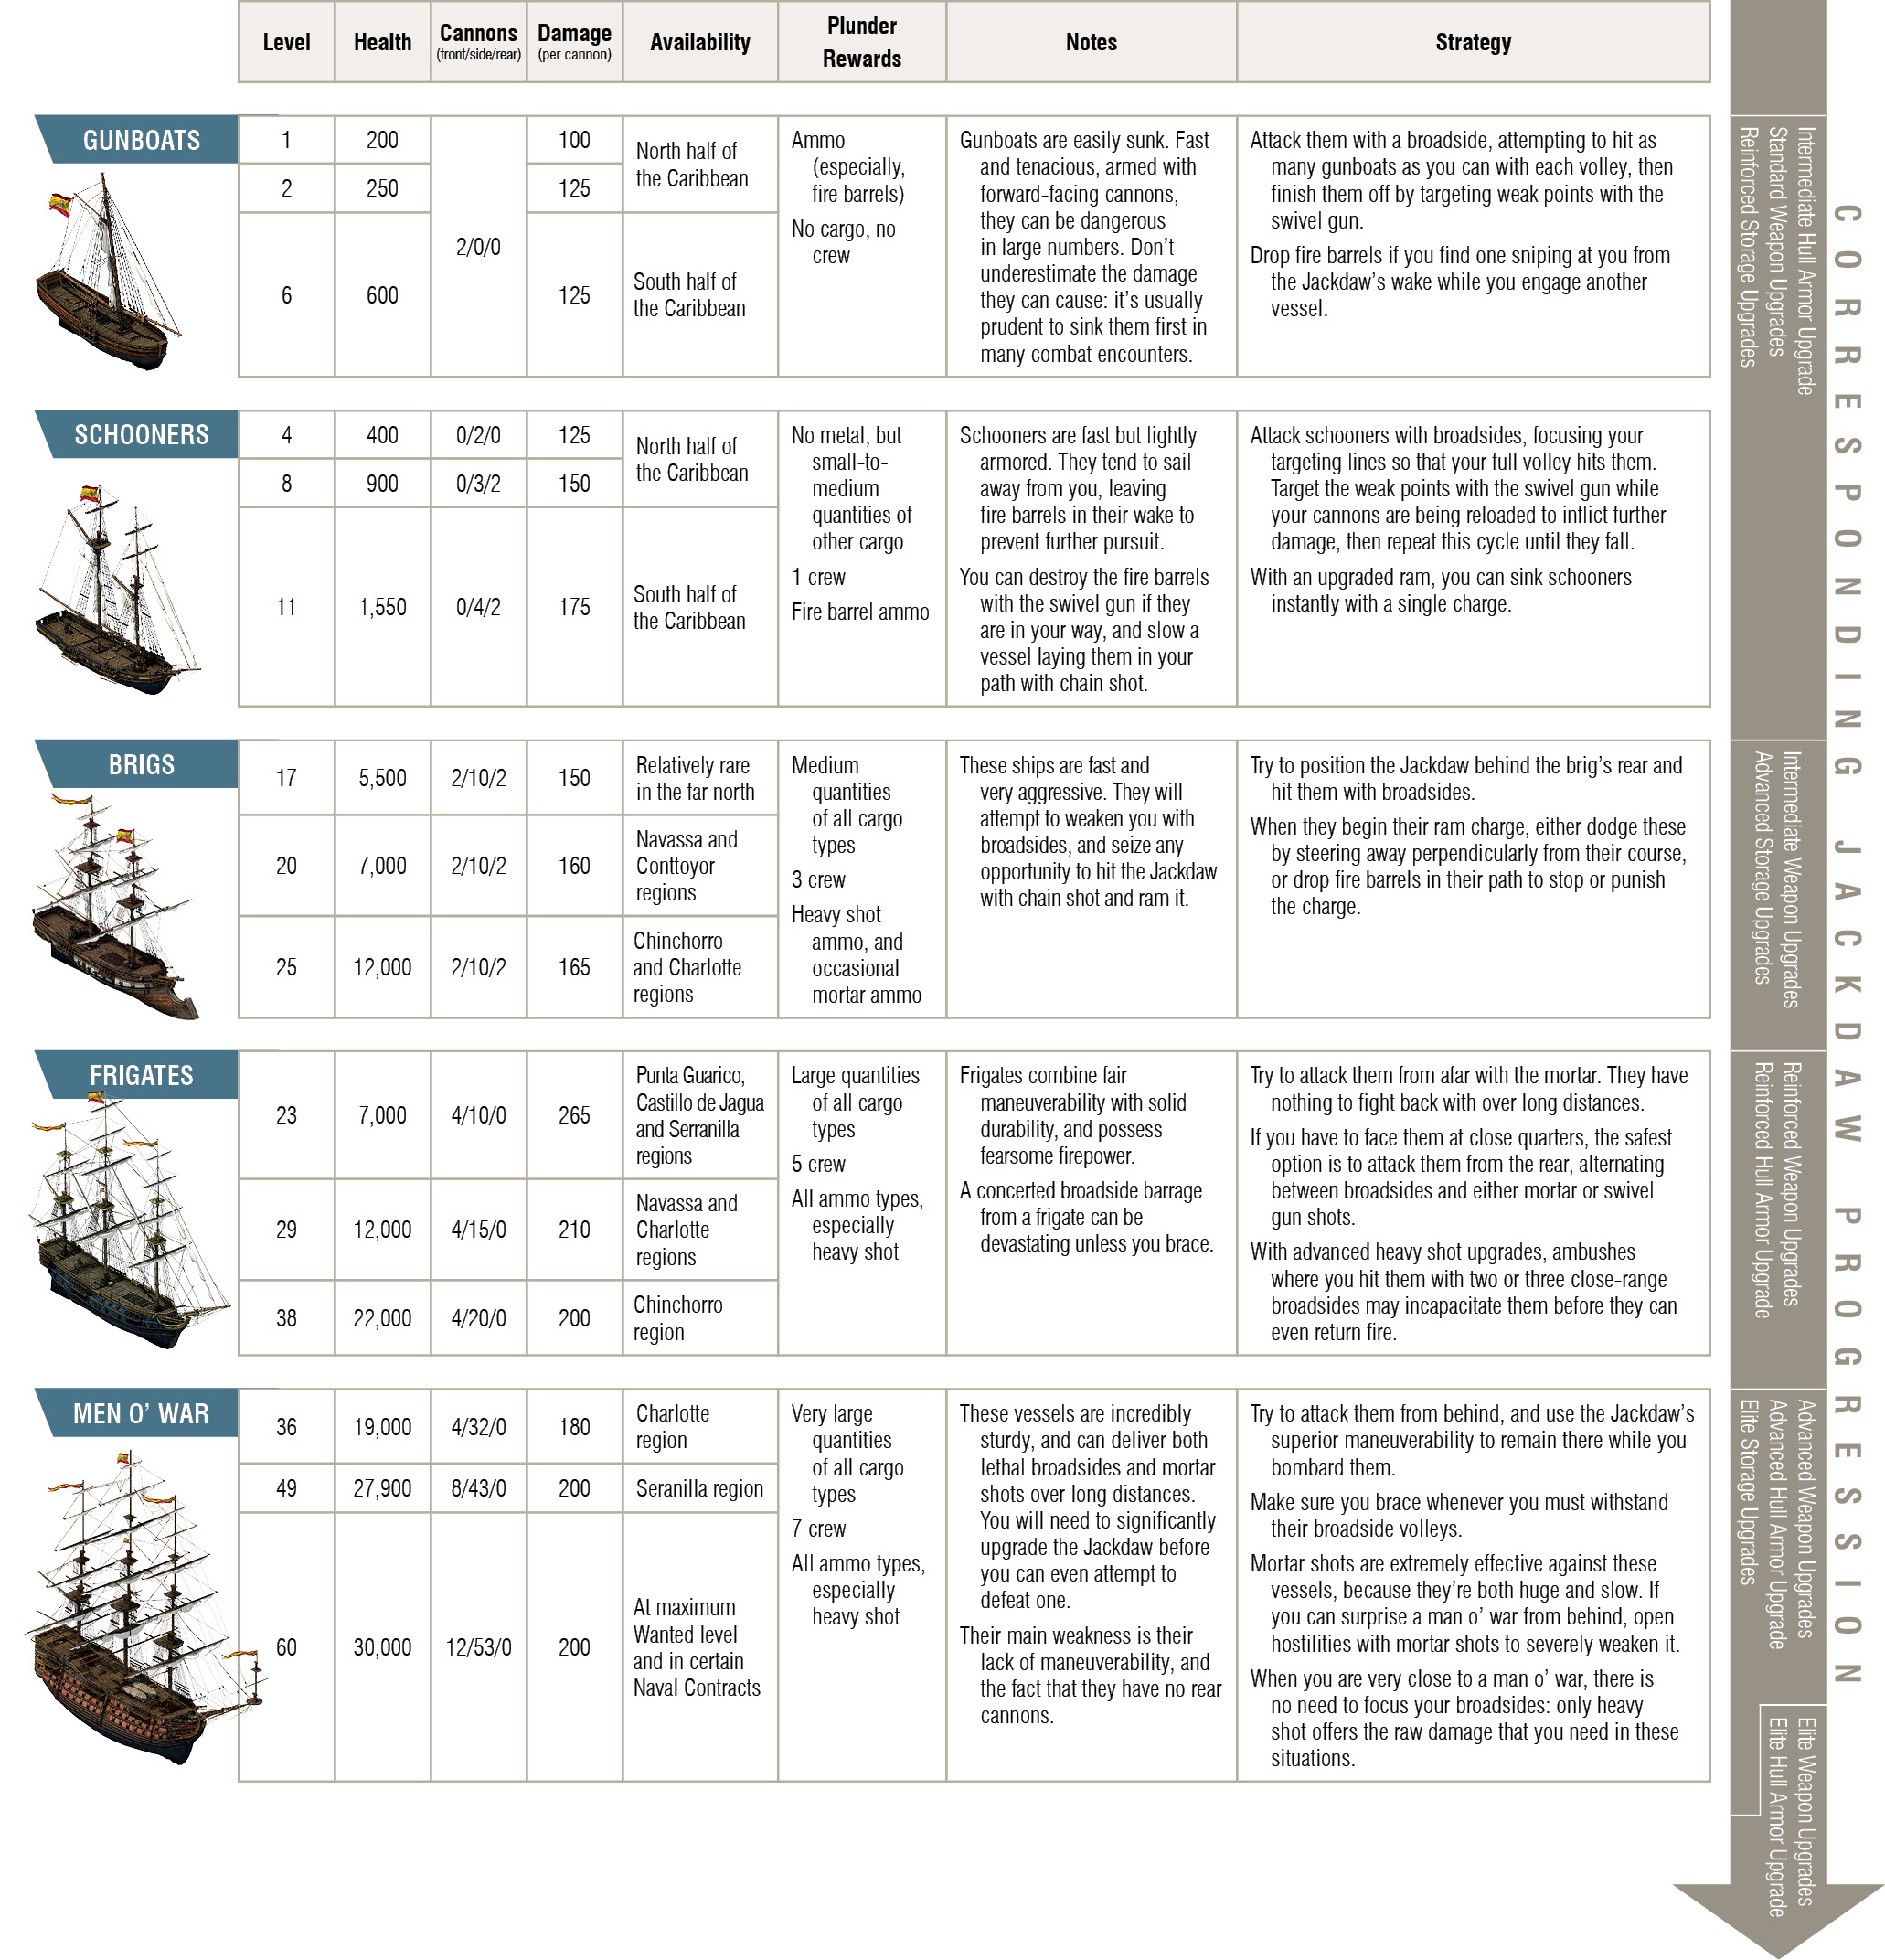
Enemy Ship Archetype Analysis