
Assassin's Creed IV: Black Flag Guide Walkthrough
Sequence 10
PREVIOUSLY...
Kenway’s pursuit of the Sage leads him to Kingston, where he finds former Nassau associate Ben Hornigold consorting with Woodes Rogers. Tailing them across the city to a meeting with Grandmaster Torres, he is exposed when Hornigold calls him out, having espied the Jackdaw anchored further along the coast.
After extracting himself from this situation, and now armed with the knowledge that his man can be found in Principe, Kenway sets a course to find the elusive Bartholomew Roberts. Their meeting, once again, is tense – but by extending the favor of assassinating Burgess and Cockram, two Templars assigned to retrieve the Sage, he gains the grudging respect of his fellow Welshman. After long years of pursuit, they agree to an informal alignment of interests. The Observatory – so long a dream for Kenway, and a source of ridicule for others – is apparently a reality that Roberts appears willing to share…
Memory 01 “Black Bart’s Gambit”
Mission Overview
Optional Objectives
- Stay out of combat.
- Use a rope swing to kill the captain.
Notes & Further Reading
- You definitely need to stock up on Sleep Darts if you are aspiring to complete this Memory’s core Optional Objective.
- Players who have acquired most Jackdaw upgrades can remove a potential nuisance during forthcoming Memories by liberating the trio of Level 3 Naval Forts before they continue. As enemy vessels are stronger in the south, and many of your activities may take you through the Restricted Areas that surround the forts, this is a practical (and profitable) act of preparation.
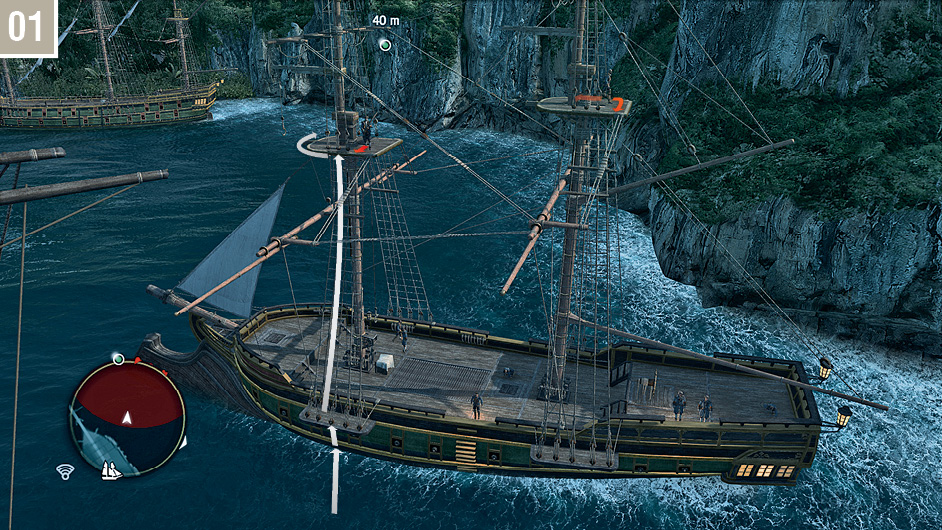
Kenway begins on Misteriosa after his sojourn in Principe, with the  position for this Memory located to the southwest. Once you begin, sail into the narrow channel shrouded in fog, then continue until you reach a Portuguese ship. The wind is strong, so only use bursts of full sail. When Kenway is charged to acquire the ship’s flag, dive overboard and swim in the direction of the mainmast on the left-hand side of the vessel; use stealth swim (hold
  ) inside the Restricted Area to avoid detection. Immediately climb the cordage, ascending without pause: this will enable you to pass out of detection range of the soldiers on the deck before Kenway is identified. When you reach the platform, traverse to the left to move out of sight of the sentry stationed on the other mast.
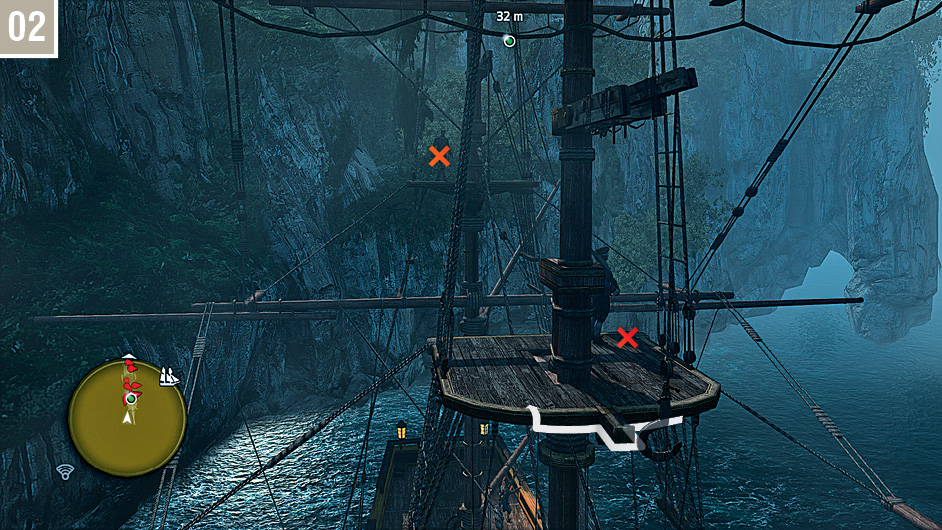
Neutralizing the two sentries before you make the final ascent to the flag is a little technical, so warrants further scrutiny. Select Sleep Darts, traverse to the left-hand side of the platform, then climb up. Immediately hit the more distant lookout with a dart. You can then neutralize the closer guard. Ensure that you don’t press the High Profile Button as you assassinate or knock him out: if his body is propelled to the deck below, this will cause problems. Quickly climb to the top of the mast, then press  close to the flag to trigger a cutscene. You can then perform a Leap of Faith into the sea, submerging to avoid detection where required, as you return to the Jackdaw’s wheel.
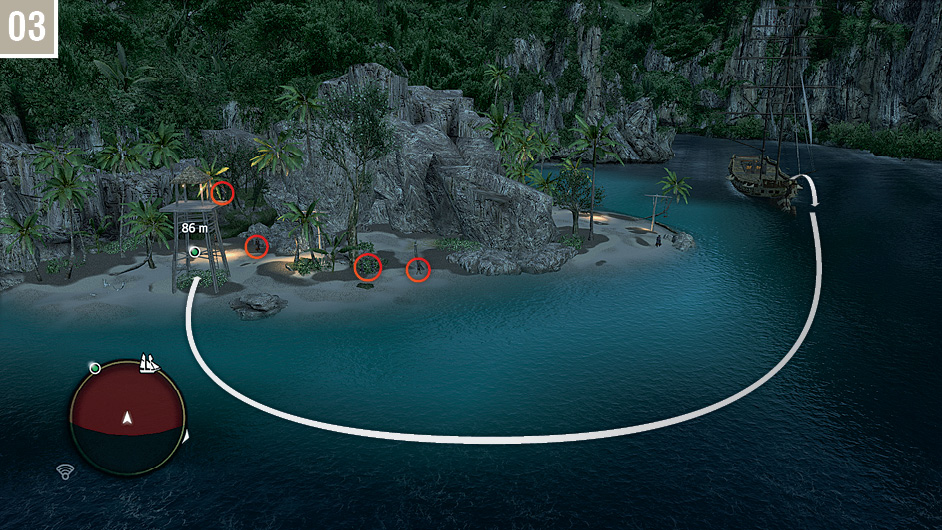
Continue sailing along the channel, remaining at half sail to avoid mishaps, until you reach the Nosso Senhor and another cutscene. To circumvent a fairly intricate infiltration via land, you can simply swim around to the far beach, where the chest awaits. When you approach the tower, ensure that the Gunner and nearby soldiers are facing away, then quickly move into the Stalking Zone beneath it.
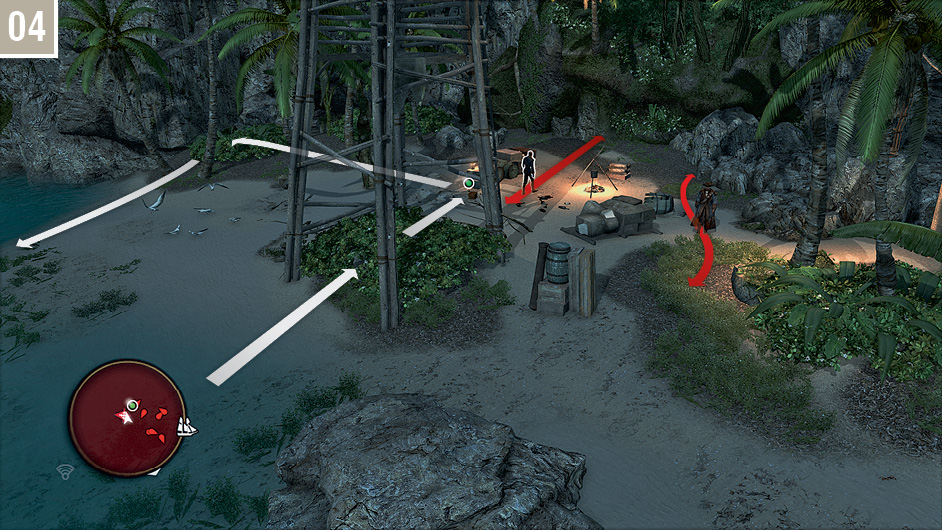
Wait until the two guards move to the most distant extents of their patrols, close to the rock wall, then hit them both with Sleep Darts. Emerge from hiding and press  to loot the chest, then move into the Stalking Zone at the far south of the beach. From here, you can hit the Gunner in the tower with another soporific dart before you swim back to the Jackdaw.
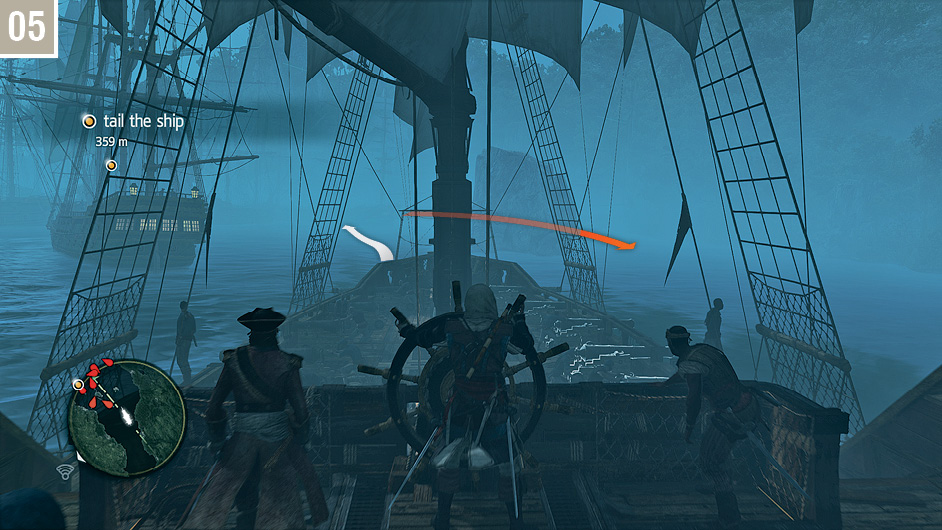
Continue the journey through the channel. There is one point, as you approach the rock shown here, where it seems logical to move to the right of it. Don’t do this: sail to the left instead, which will enable you to avoid a Portuguese frigate moving at a fair clip. After this, navigate past the stationary vessels until you reach another brief cutscene.
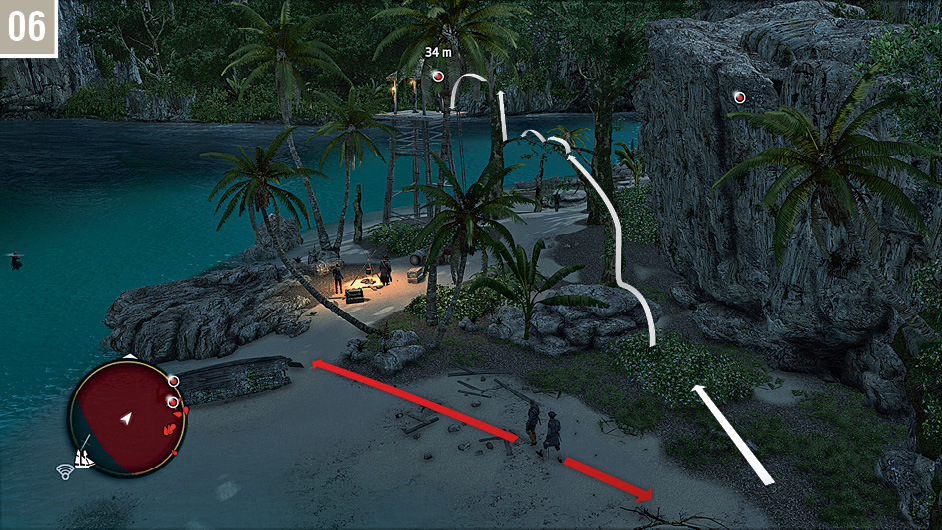
Swim to the very south of the beach, keeping a watchful eye on the two-man patrol, then slip into the Stalking Zone. When the two guards move to the west, quickly follow the free run course shown here to reach a tree adjacent to the highlighted guard tower. Tap  to ascend to the upper branches, then hit the two sentries with Sleep Darts. You can then safely jump to the tower and knock both out.
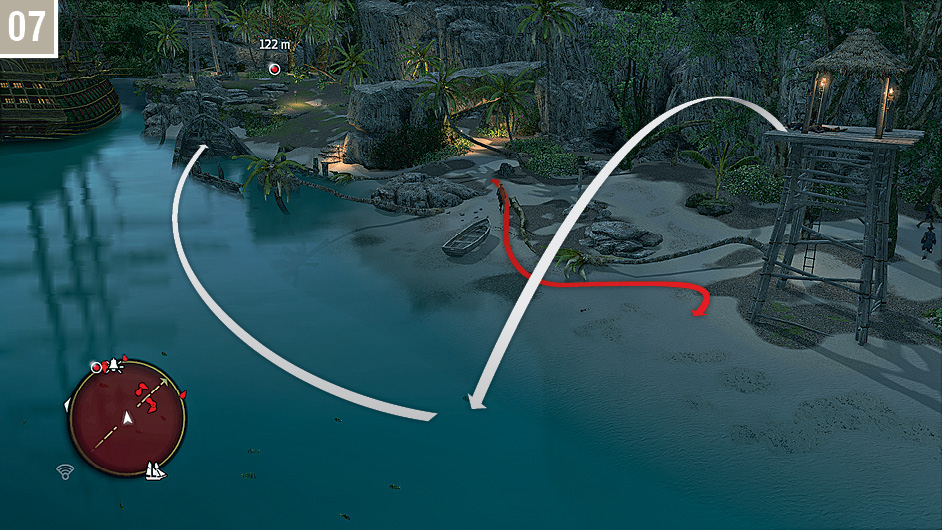
Ensure that the two-man patrol shown on the accompanying screenshot is walking to the east, then make a running jump into the sea. Though it’s not a textbook dive, Kenway will not sustain any degree of injury. You can now swim to the wreck to the east and climb its bowsprit.
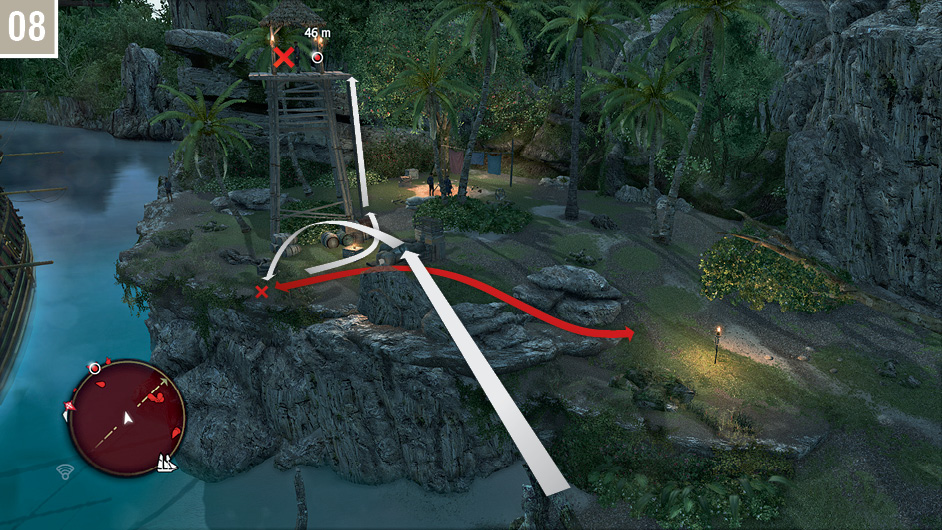
Wait until the patrolling Scout reaches the left-hand limit of his patrol, then perform an air assassination; alternatively, hit him with a Sleep Dart. You can now approach the tower’s ladder and climb to assassinate the Gunner. As soon as you kill him, look at the ship directly ahead.
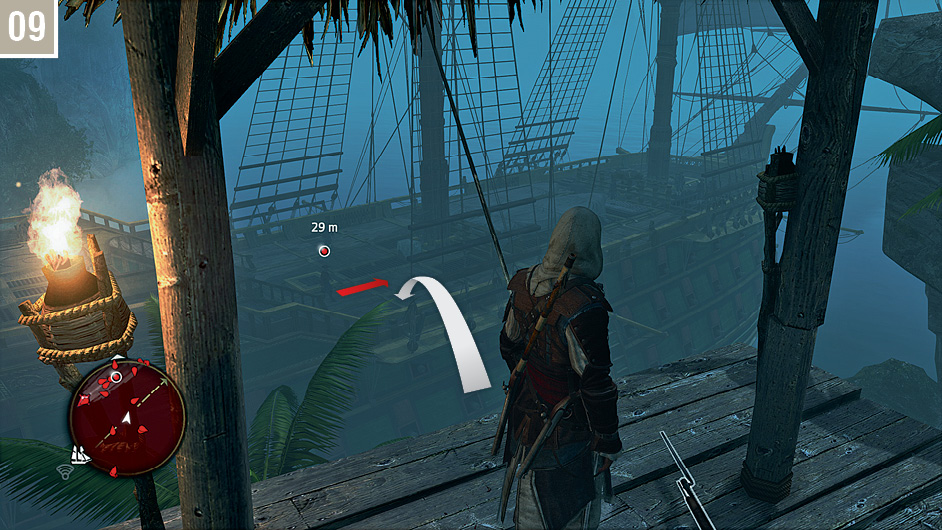
To complete the second Optional Objective, you must kill the Captain by performing an air assassination via the nearby rope. Wait until he emerges onto the deck, then sprint towards the rope to begin your swing. Use  to keep the Captain in your field of vision; when he is highlighted, press
  to make the required kill.
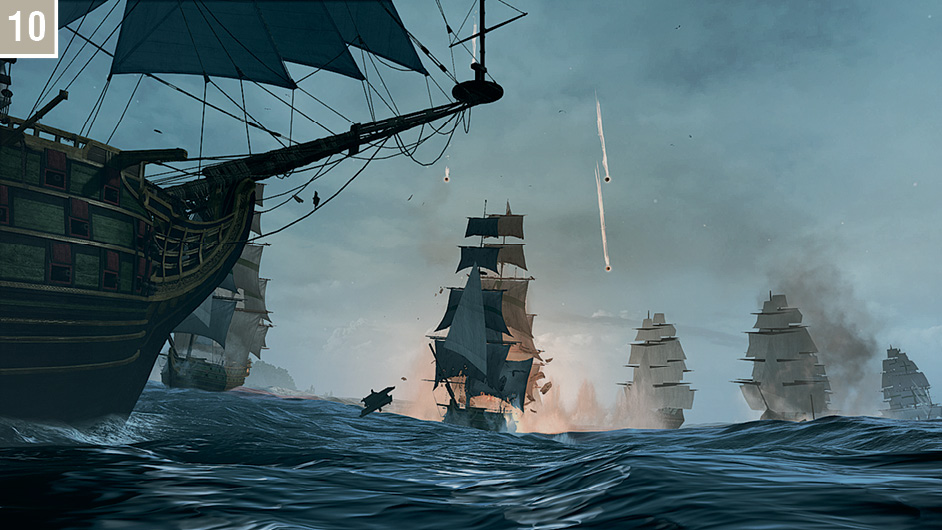
The Portuguese flagship that Kenway controls is incredibly well armed. Though you are advised to escape to the waypoint, you will need to destroy all enemy ships in the vicinity before the Memory will actually end. Start with mortar attacks, as a direct hit will destroy most vessels in a single barrage. Once you have sunk most of the ships directly ahead, use broadsides (and the incredibly fast and efficient swivel guns) to finish off the initial wave of vessels. For the ships that pursue from behind, it’s worth experiencing the novelty of firing rear-facing cannons just once – but after that, resume your use of the flagship’s mortar to exploit its unparalleled destructive potential. When all ships have been consigned to the ocean depths, sail to the waypoint.
Memory 02 “Murder And Mayhem”
Mission Overview
Optional Objectives
- Stay out of combat while finding Hornigold.
- Air assassinate Hornigold.
Notes & Further Reading
- Mortar and heavy shot ammunition are useful for a naval battle in this Memory, though not strictly essential.
- If you have yet to reach it while exploring, this is the first time that the story leads Kenway to the island of Santanillas.
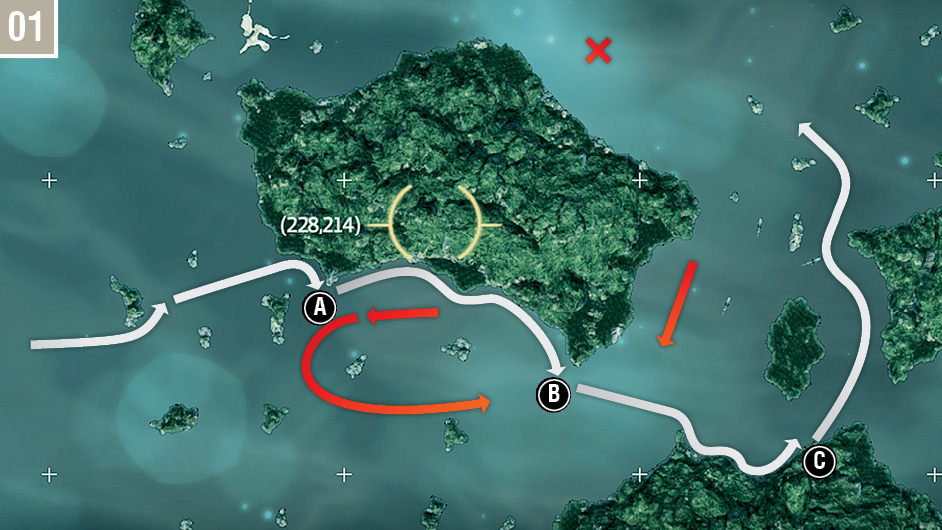
Set sail for the  marker, southwest of Santanillas, where Roberts awaits in the Royal Fortune. Once you begin, you must sail east, then swing to the north, to locate Hornigold’s vessel; note that all other routes are blocked by Desynchronization boundaries. The first Optional Objective challenges you to reach the target ship without being detected by the patrols in the area. Move at full sail until you reach the coast of the west island, then stop briefly behind the “point” in the southwest (
 ) – no more than five seconds – to allow a patrolling vessel to the east to turn south. Go to full sail immediately and follow the outline of the coast. When you reach the southeast tip (
 ), sail over to the south island; if you are making good time, you will avoid both the ship behind the Jackdaw and another approaching from the north. Once you sail behind the small island (
 ), the danger is effectively over. Continue north, then use the Spyglass to identify the Benjamin in the position marked on the map above.
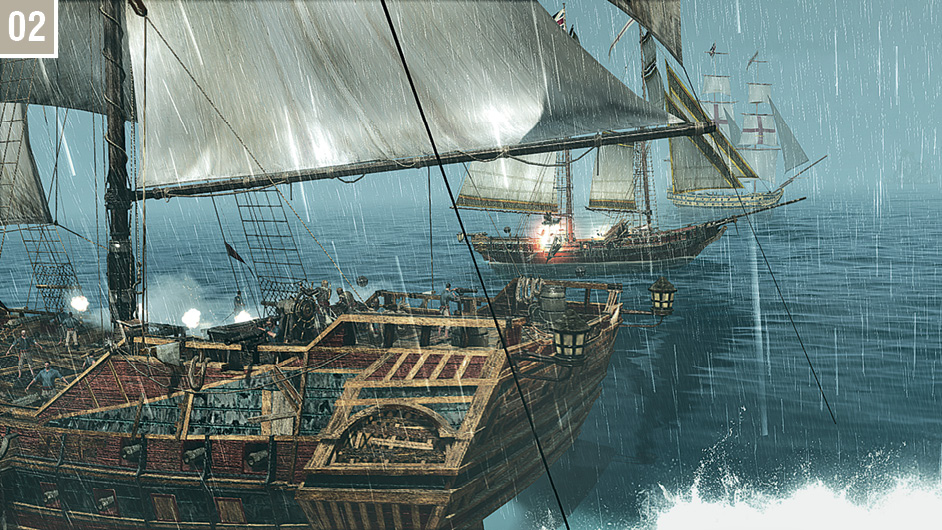
Once you espy the Benjamin, a short but intense naval battle begins. Ignore other ships: Hornigold’s swift schooner should be your only target. Use mortar fire and chain shot as you move within range, then angle your approach to the far side of the Benjamin, and try to remain there; this takes the nearby frigate out of the equation. Heavy shot will make for a quick end to the battle. The schooner will attempt to steer in front of the Jackdaw and drop explosive barrels after a time, but these are easily avoided or destroyed. Once you inflict sufficient damage, a cutscene will begin.
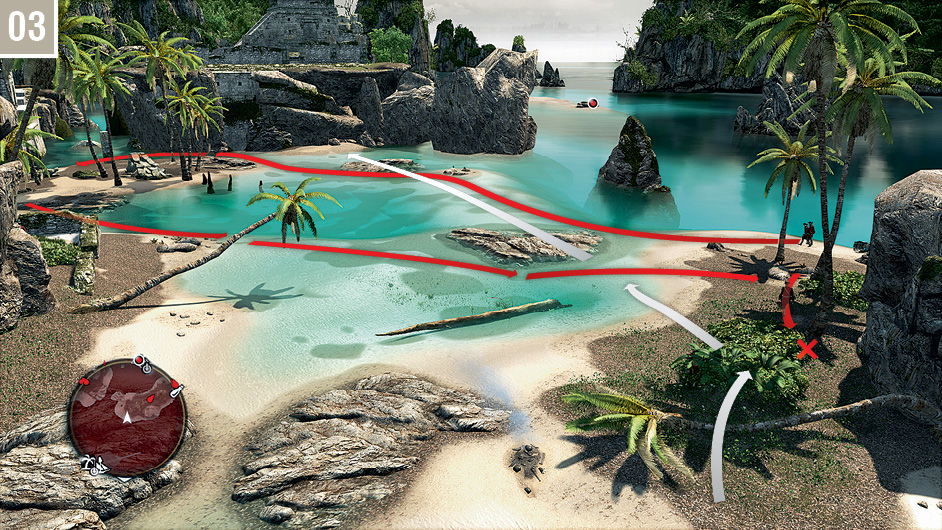
There is no penalty for combat or detection as you make your way to Hornigold’s position. As long as you don’t start a fight in range of your target (which would effectively ruin your opportunity to complete the second Optional Objective), stealth is purely at your discretion. Disembark the Jackdaw and move onto the beach to the south. There is a solitary guard to your right, who you can kill easily from the nearby Stalking Zones, while two soldiers walk a long patrol through the shallow waters. You can either eliminate or avoid them as you make your way to the cliff south of your start position.
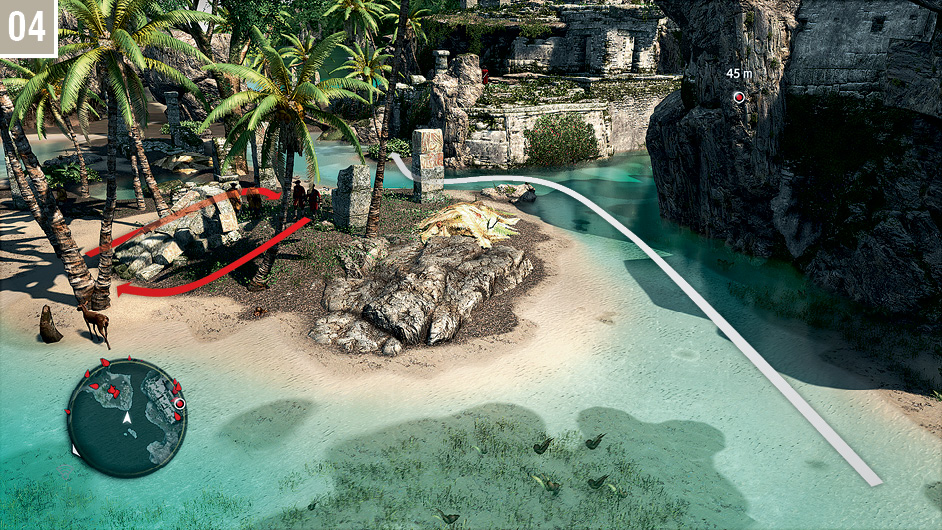
While being mindful of the nearby two-man patrol, run to the Stalking Zone shown here.
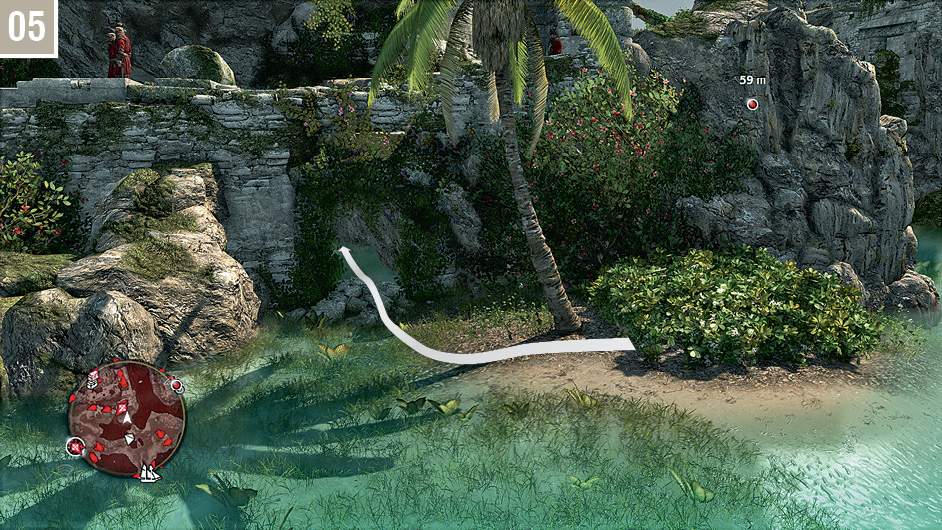
There is a concealed entrance leading to a cave just to the left of the Stalking Zone. Enter this and make your way to the south.
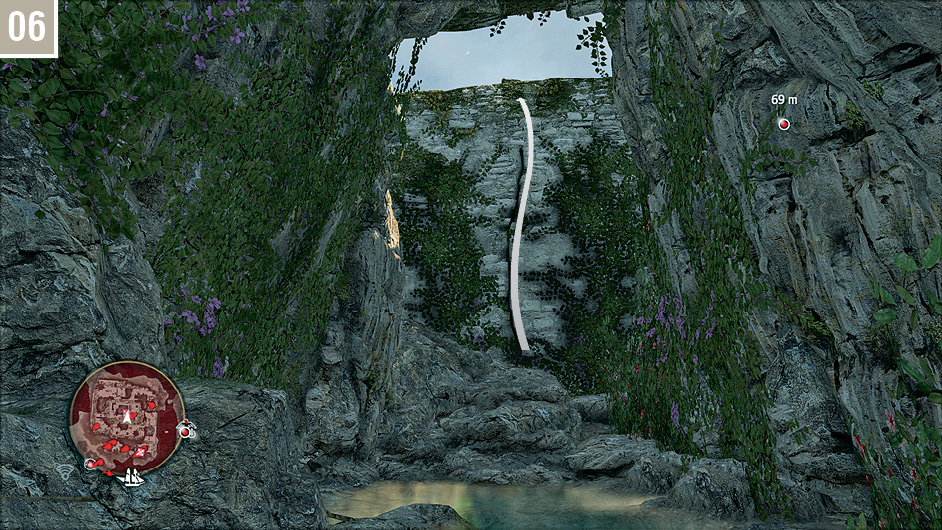
There are two Treasure Chests to loot before you climb the wall at the far south of the cave.
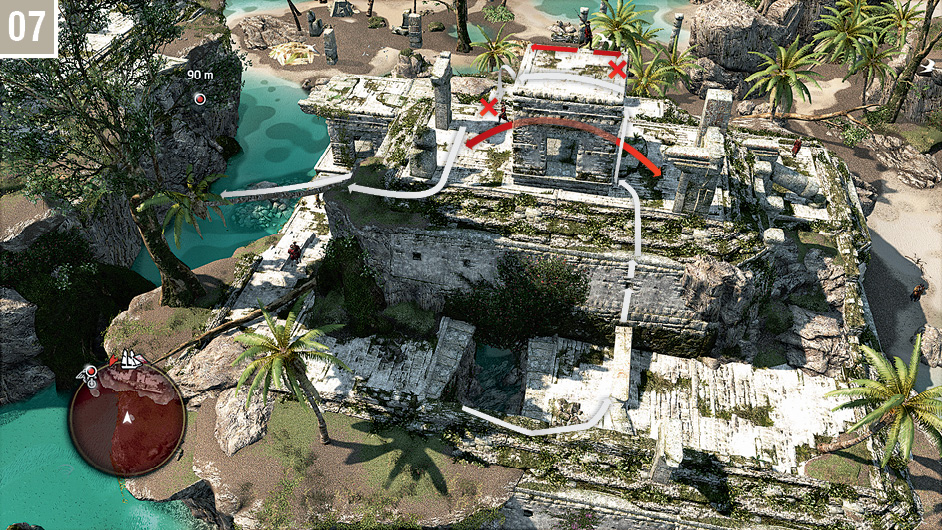
Climb up and eliminate the Gunner on the rooftop. The patrolling guard on the level below can then be silenced with an easy air assassination before you approach the free run course through the trees that leads to Hornigold’s position.
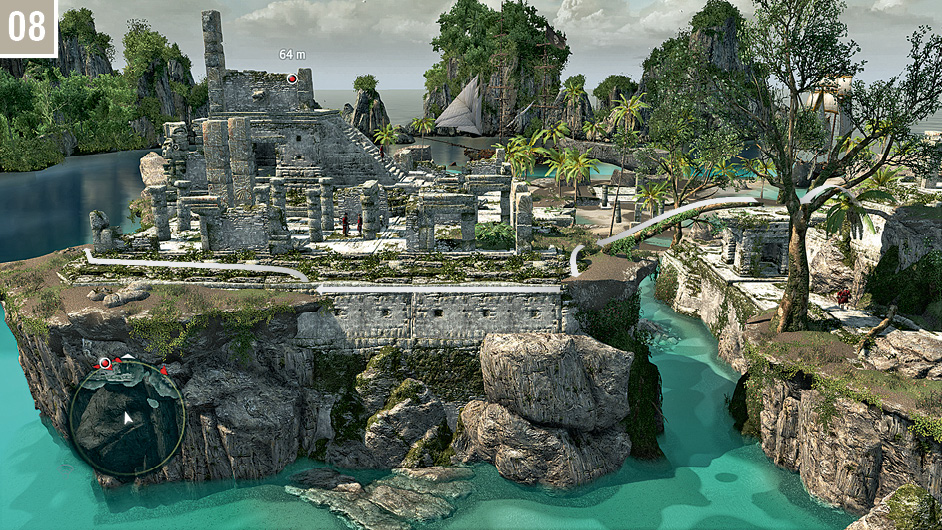
When you reach the ruins, traverse along the ledge as illustrated here to avoid detection. Once at the end of the ledge, quickly climb up and run to the pillar at the very end. In the event that a guard sees enough of Kenway to warrant further investigation (which can happen on occasion), you can either wait and perform a corner assassination from this position, or continue running to reach the climbing position detailed in entry  .
.
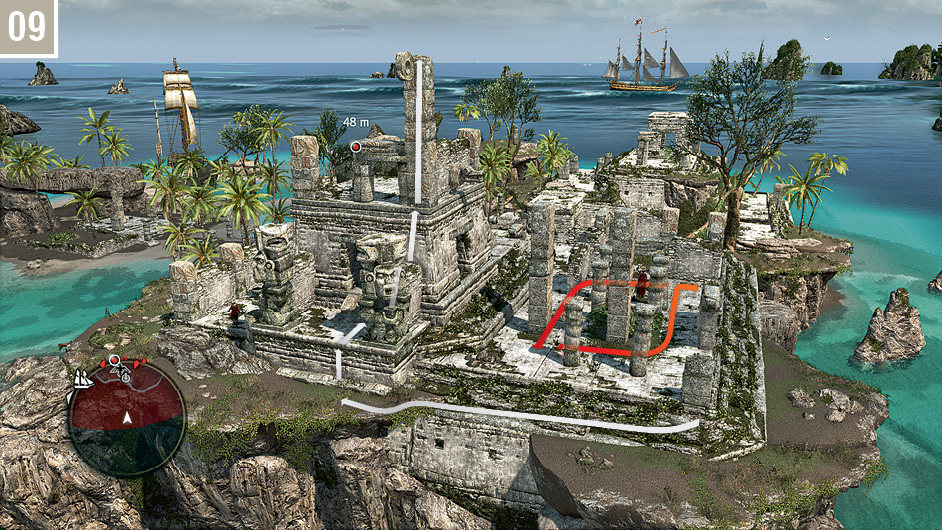
There is a Scout walking an anticlockwise patrol when you reach the west side of the ruins. Wait until he faces away, then follow the route shown here to reach the Viewpoint. Synchronize, then face Hornigold below and perform an air assassination.
Memory 03 “The Observatory”
Mission Overview
Optional Objectives
- Incapacitate all Guardians while unarmed.
- Incapacitate five Guardians from Stalking Zones.
Notes & Further Reading
- This is the start of a three Memory chain (and, moreover, a visit to the present day) where it is not possible to free roam.
- Your arrival at Long Bay marks the point at which every location in Assassin’s Creed IV is now accessible via sailing or Fast Travel – and, therefore, you can potentially complete all collectible-based challenges. While this will be an implausible feat for most players (but for those who have already cleared available Animus Fragments and Treasure Chests elsewhere: we salute you), you can definitely complete the final Mayan Stela puzzles and claim your prize from Tulum later during Sequence 11.
- A full stock of Sleep Darts (and an ammunition capacity of at least 10 via a Dart Pouch upgrade) will reduce the difficulty of this mission considerably. You can loot incapacitated Guardians to replenish your stock as you clear each area.
- To make the process of returning to pick up collectibles a little more efficient when you revisit later, turn and head back down the beach to Synchronize with the Viewpoint before you venture along the jungle path at the start of the Memory. You can also find hutia on the beach which, if you have yet to hunt them, can be skinned to create the Smoke Bomb Pouch I upgrade.
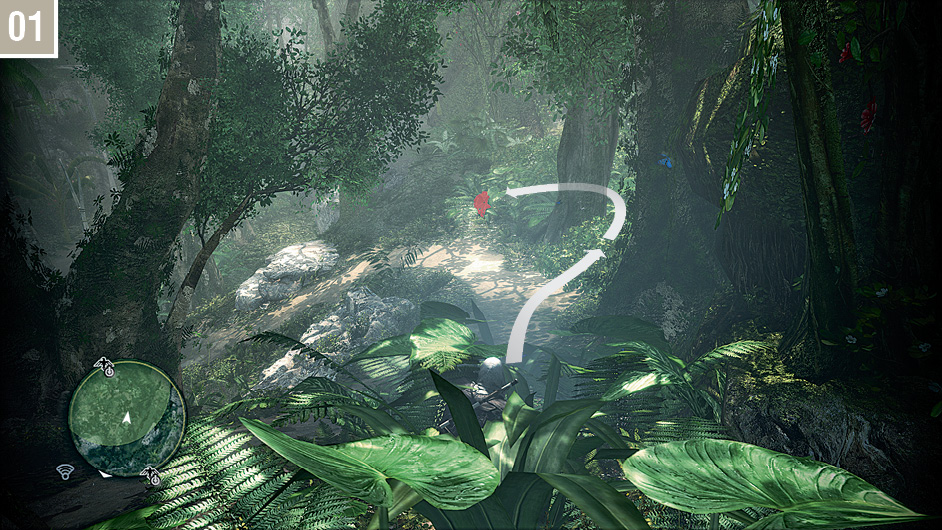
Set sail for Long Bay, an entirely new location in the south of the map. This destination is a short sail from the Charlotte Naval Fort to the west. If you have yet to liberate that location, Anotto Bay to the east or Cabo de Cruz to the north are the convenient Fast Travel destinations. Once the Memory begins, ensure that you have selected unarmed combat if you intend to complete the related Optional Objective. When the path opens into a clearing as pictured here, enter the Stalking Zone on the slope to the right and use Eagle Vision to identify the first Guardian hidden in the undergrowth to the south. Hit him with a Sleeping Dart, then run over and knock him out; you can optionally flank and approach him from behind for an unarmed takedown if you wish.
Guardians
Long Bay features a unique type of opponent indigenous to this area: the Guardians. These assailants are defined by their propensity for hiding in Stalking Zones, and their ability to fire hugely damaging Blowpipe darts. That said, their close-range fighting skills are unremarkable – comparable to a standard soldier, and with no resistance to staple hand-to-hand techniques.
The Guardians behave in a distinct manner in the initial jungle areas of Long Bay. They crouch in Stalking Zones, practically invisible unless detected with Eagle Vision, and will periodically stand to briefly survey the area, slightly adjusting the position that they are facing in as they return to a crouching position. This latter point is important if you are to attempt to complete the second Optional Objective to incapacitate opponents from Stalking Zones: Guardians can see Kenway at close range if they are facing him. If they espy Kenway in the open, they will immediately hit him with a Blowpipe dart; at close range, they will then move in to engage him in combat. As their projectiles are enormously damaging, a cautious approach based on liberal use of Sleep Darts and advance planning is essential.
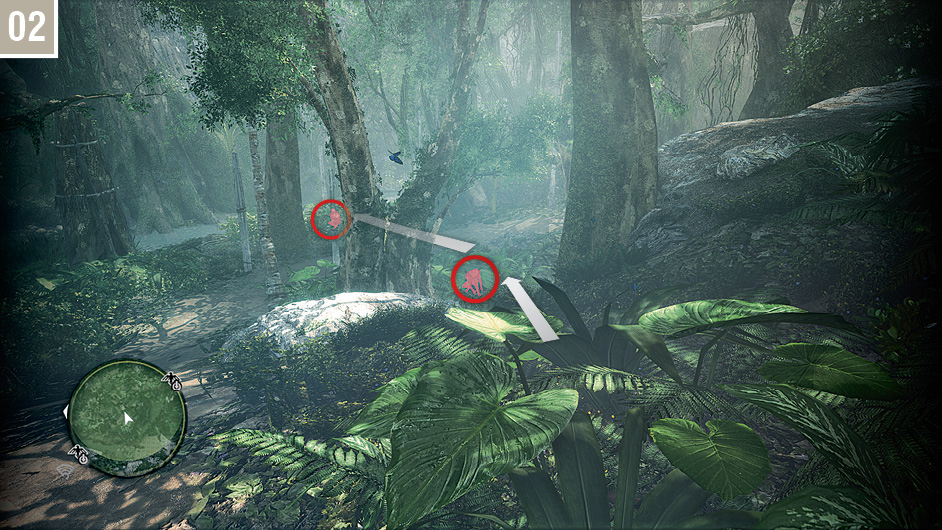
From the position of your first takedown, safely concealed in the Stalking Zone, turn to the northeast and activate Eagle Vision to identify the two Guardians shown here. As these are usually facing in Kenway’s direction when you first arrive, use Sleep Darts to facilitate an easy approach, then knock them out before they awake.
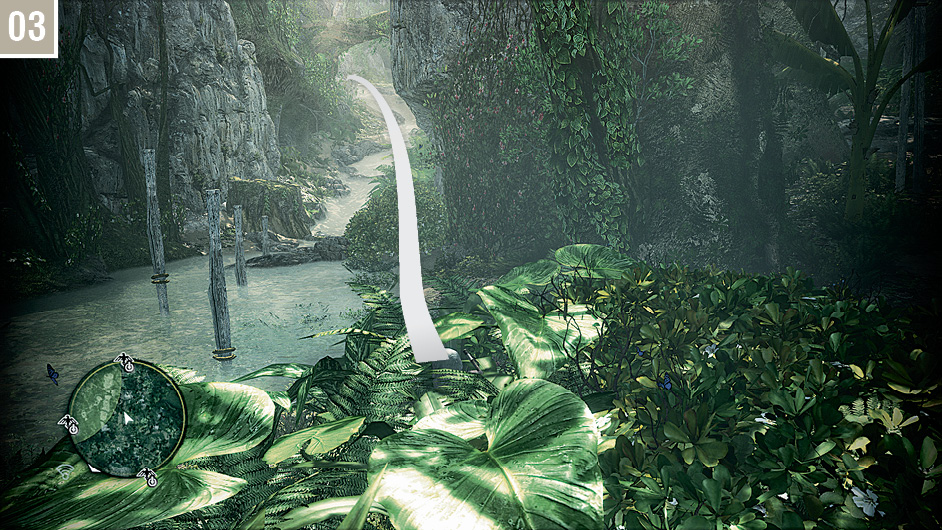
There are two Guardians on the two (converging) paths to the south, but these will retreat shortly after you knock out the second of the two previous targets. Loot unconscious Guardians for potential ammunition, then continue to the next search zone.
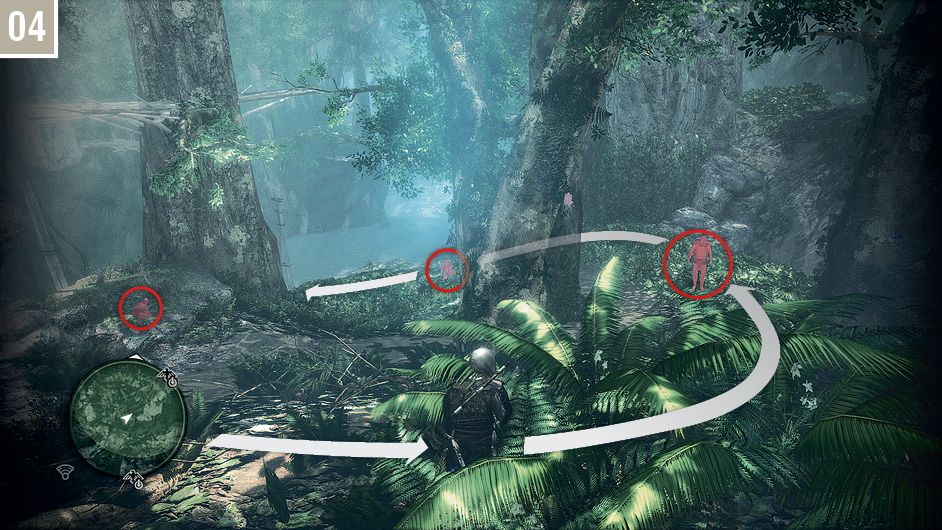
When you enter the next clearing, move into the Stalking Zone on your right, then eliminate the three closest Guardians in the order shown here to clear the second zone.
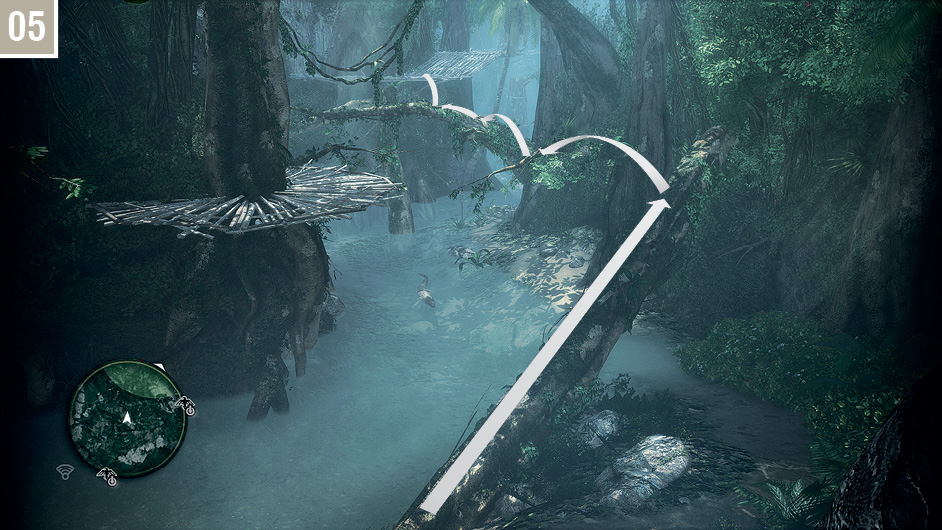
There is a crocodile in the water, so use the free run course illustrated above to reach a wooden platform in the trees to the northwest.
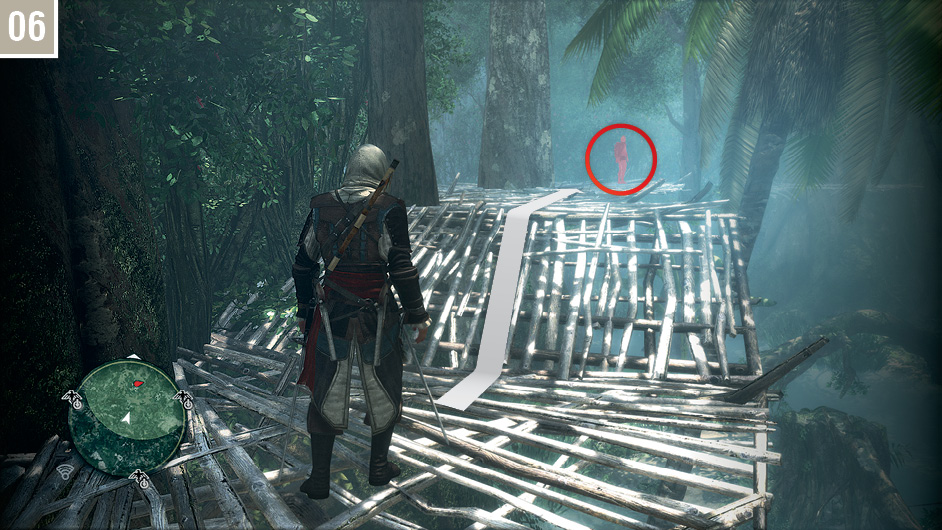
As soon as you reach the platform, turn to the north and hit the distant sentry with a Sleep Dart. You can then safely approach and knock him out.
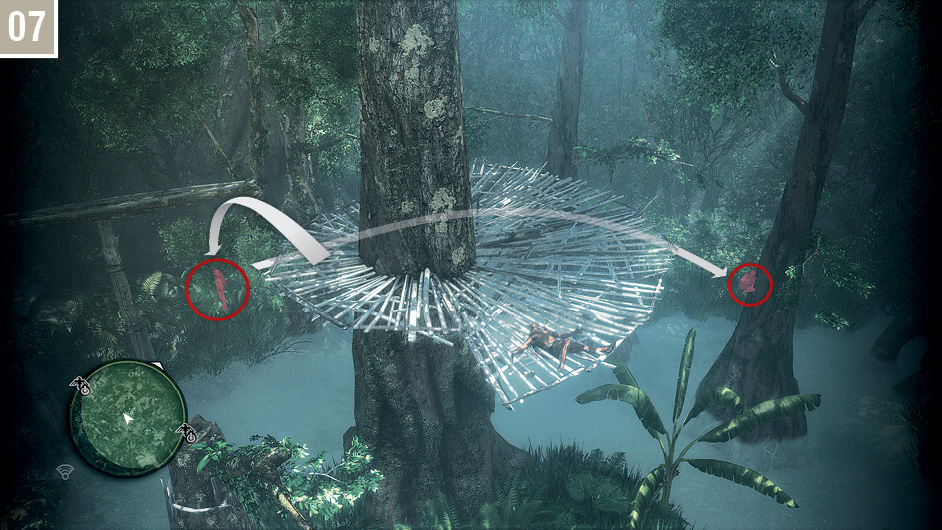
From your position on the platform, look to the north and west to find your next two targets. Start with the target to the west; from the wooden beams, you can perform an air knockout (much the same as an air assassination in execution, but with a marked reduction in fatal puncture wounds). Be careful as you cross the water to the second Guardian: there is a crocodile in this area.
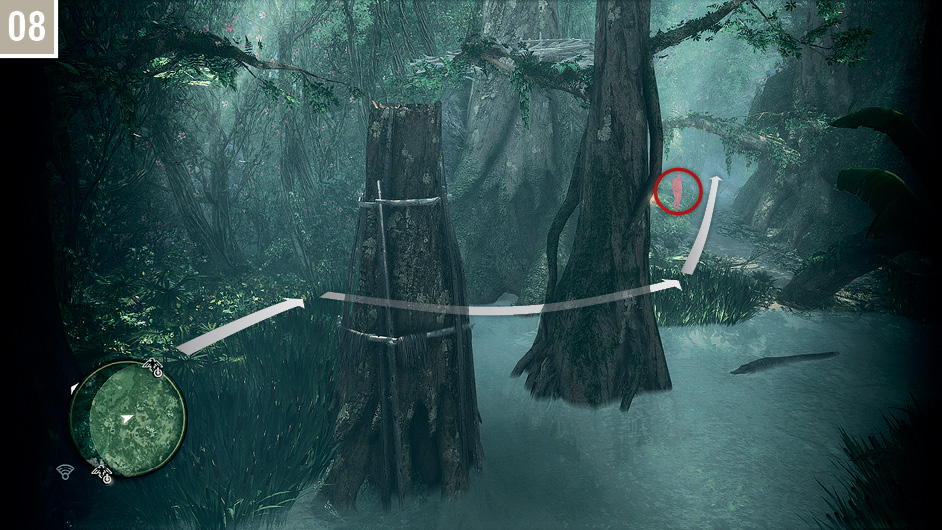
Cross the water to reach a Stalking Zone to the east and identify (then pacify) the final target for this zone. Unless you already have two pieces in your inventory, it’s worth your while to backtrack and kill two nearby crocodiles: their leather can be used to craft an upgrade for a weapon that becomes available during Sequence 11. When you are ready, follow the path to the east to emerge from the jungle.
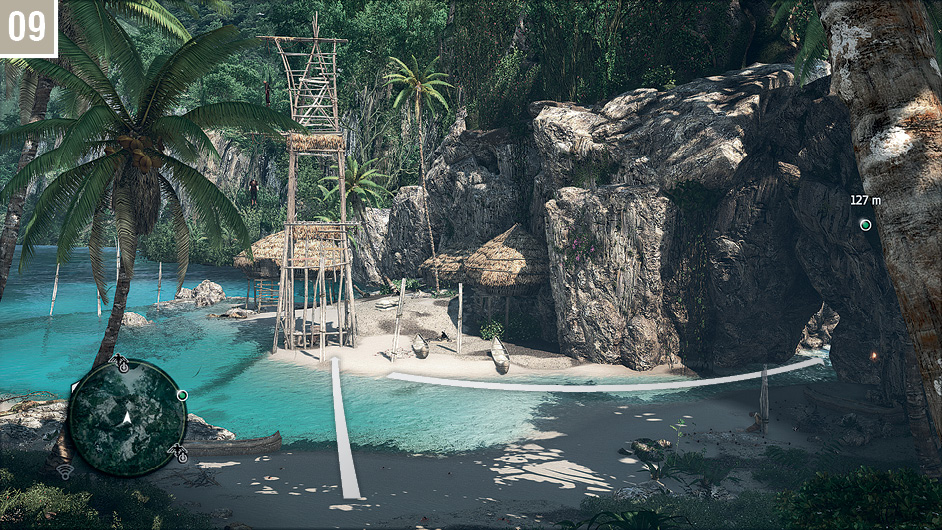
Synchronize at the Viewpoint if you wish, then enter the cave to continue. In this next area, the Guardians move clearly in the open. You must neutralize all of them to progress.
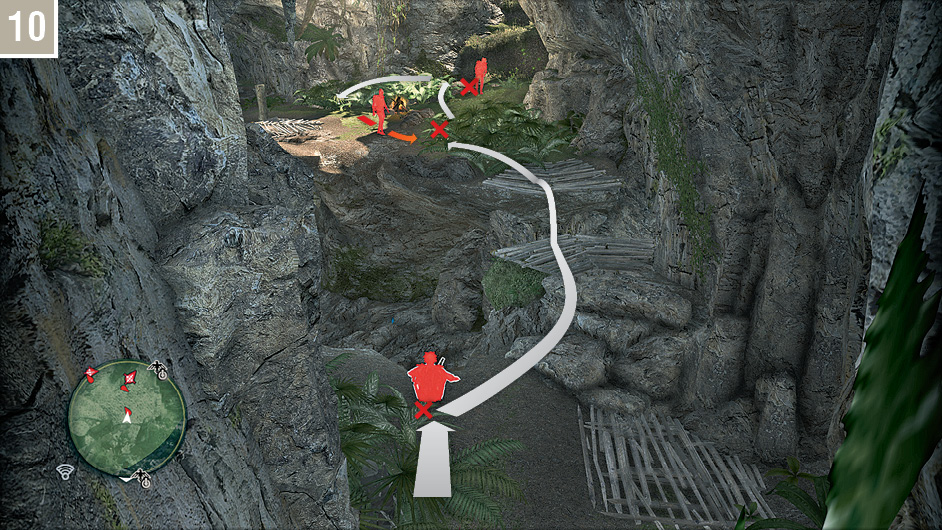
At the top of the sloped path, enter the Stalking Zone to your left. If you have yet to do so, you should begin to make progress with the “Incapacitate five Guardians from Stalking Zones” Optional Objective here, starting with the target directly ahead. If you time your approach to wait until the patrolling Guardian moves away, you can neutralize him and his stationary companion in the same fashion before you continue south on the upper level.
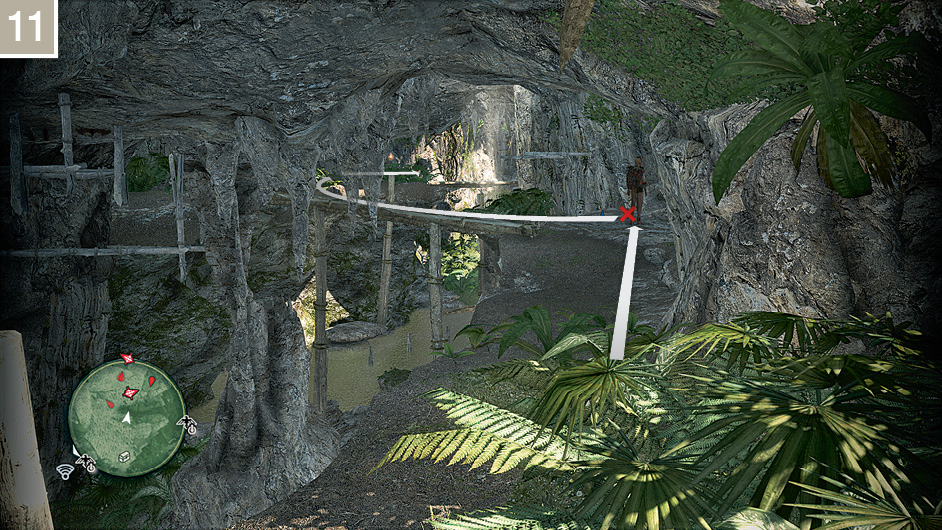
Take out the Guardian sharpshooter, then cross the log bridge. On the opposite side, move carefully between the two Stalking Zones: there is another marksman patrolling on the opposite ledge.
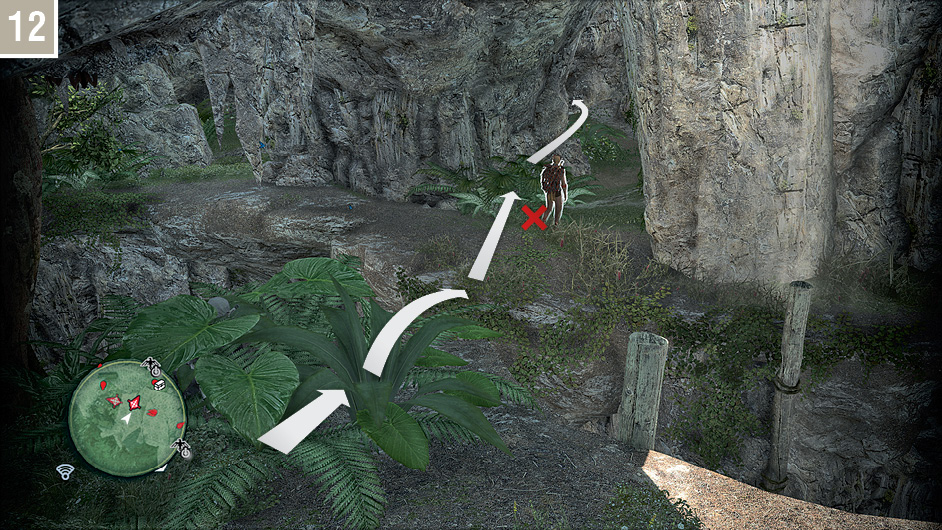
Once you are in position, hit the Guardian on the opposite side of the gap with a Sleeping Dart before you cross to render him unconscious. Run along the tunnel and enter the Stalking Zone to the left.
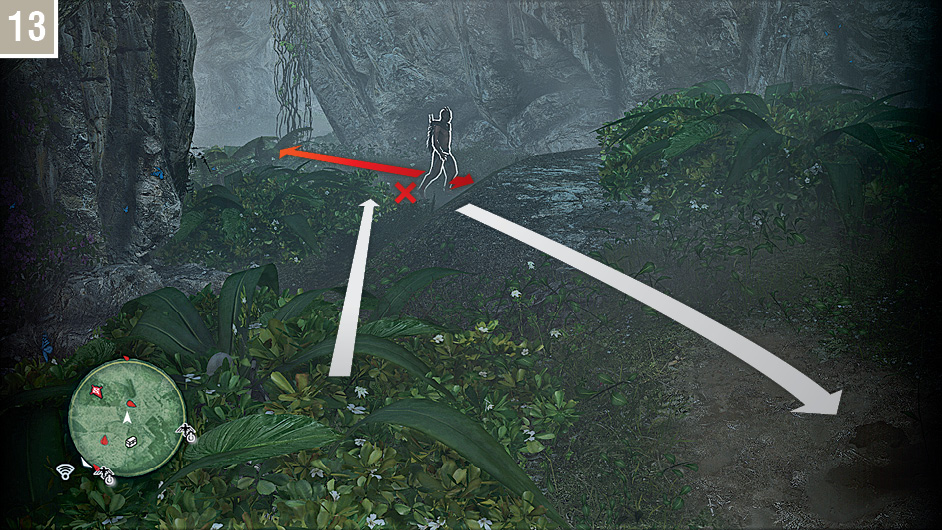
The patrolling Guardian here presents another opportunity for an easy Stalking Zone takedown. Once he is unconscious, turn and enter the small area to the northwest, where a Guardian is sitting by a fire. Knock him out.
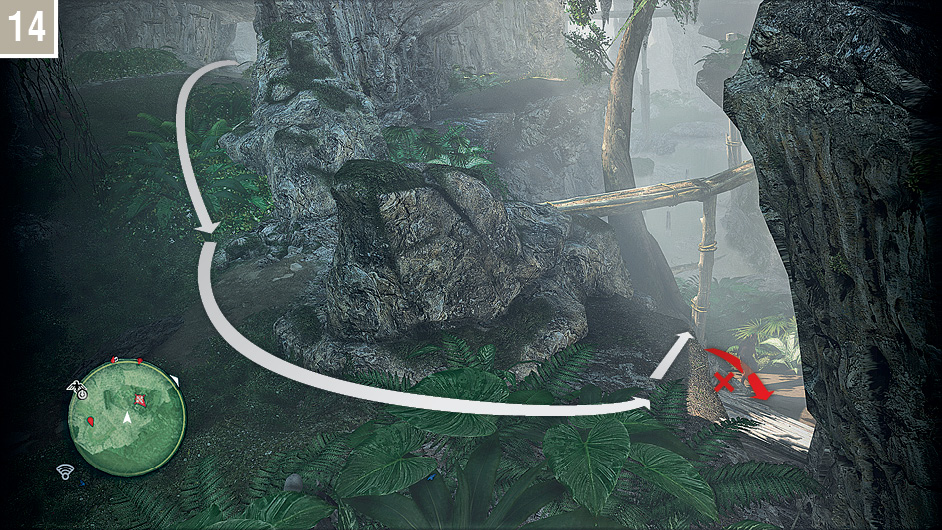
You now need to clear the lower level of the caves. The first Guardian on this level can be easily dispatched with a knockout blow delivered from above; you can optionally sneak into a Stalking Zone to perform the takedown if you prefer.
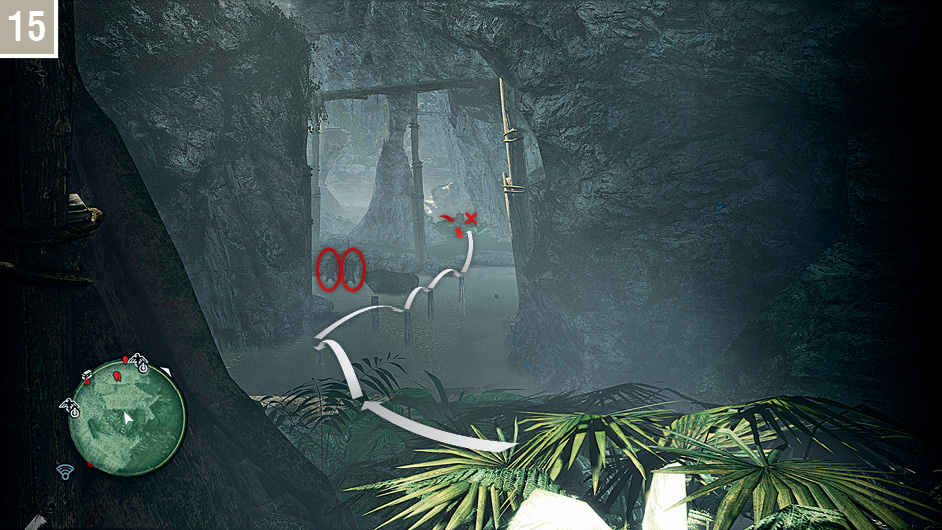
There are three more Guardians to the northwest: two stationary, and in close proximity, and a third patrolling further away. Use Sleep Darts to incapacitate the pair when the patrolling Guardian moves away, and you can knock them out before moving into a Stalking Zone for the final assault.
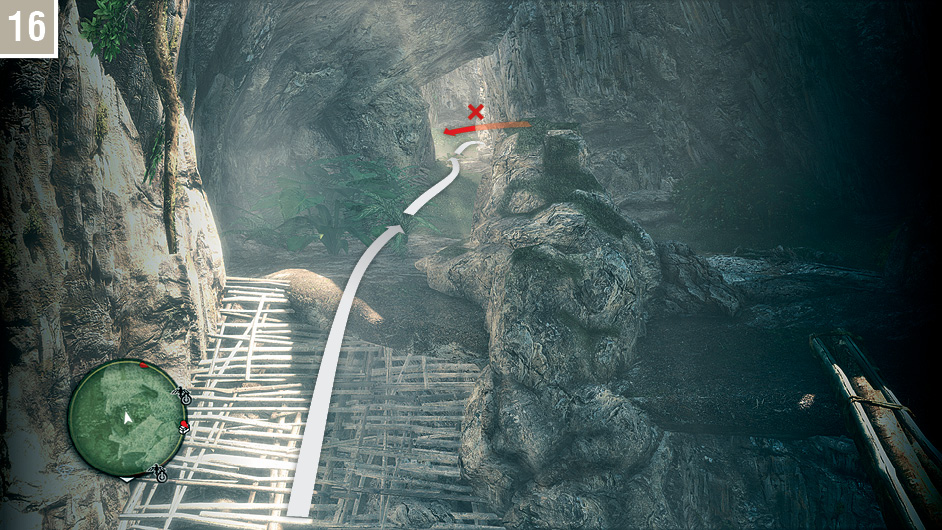
Backtrack to the very south of the cave and return to the upper level, then enter the tunnel shown here. This leads to the exit of the caves zone; the final Guardian that must be incapacitated can be found patrolling here.
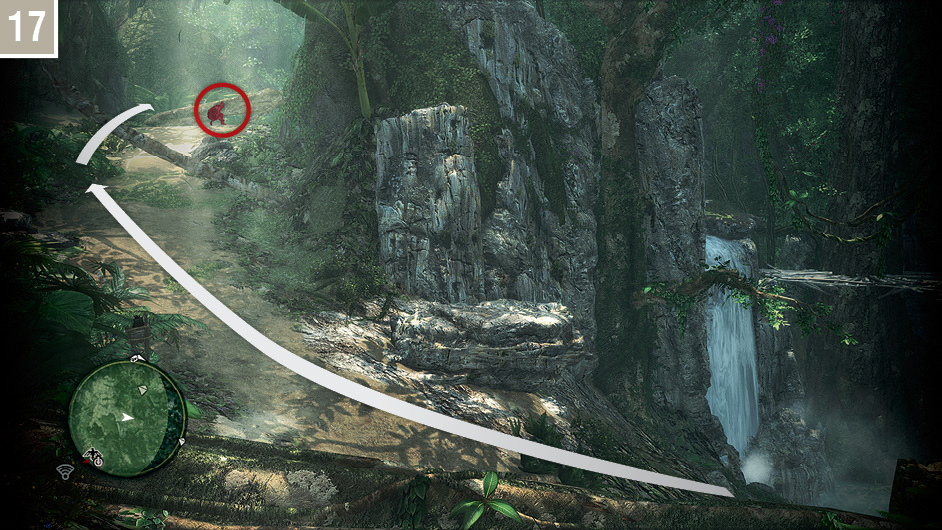
When you emerge back into the jungle, head west until you reach a path that curves around to the north. There is a Guardian in a Stalking Zone at the top of this slope.
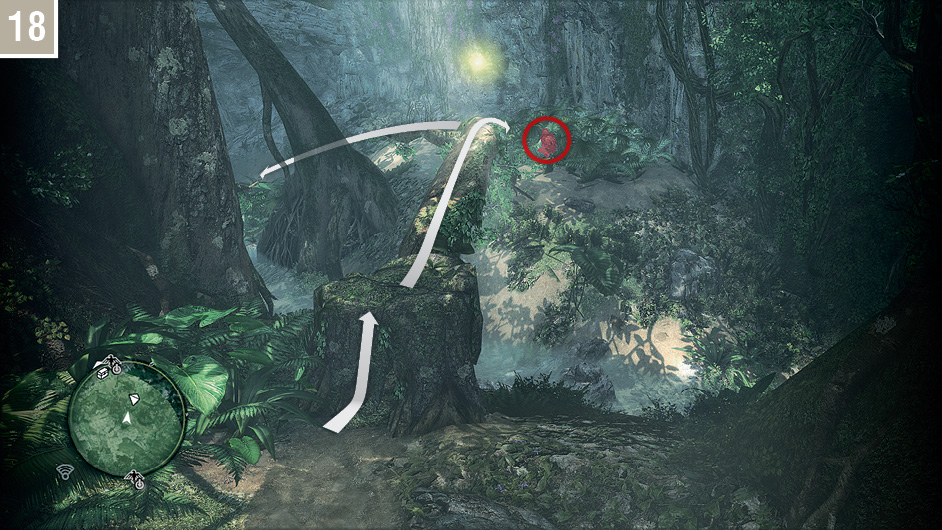
Before you cross the water via the bough, hit the Guardian hidden on the opposite side with a Sleep Dart. After knocking him out, follow the path past the waterfall to reach the final search zone.
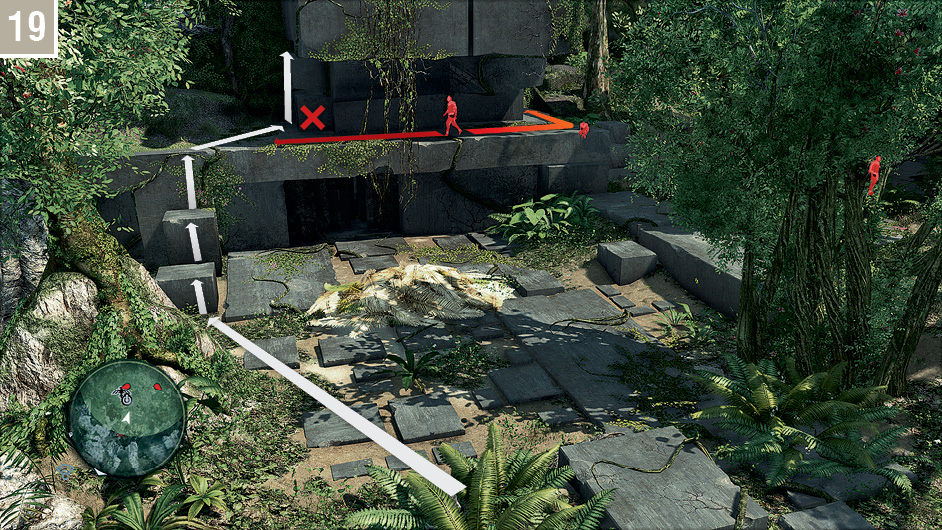
There are three Guardians outside the imposing and strangely anachronistic buildings: one patrolling on a walkthrough directly ahead when you arrive, and two to the southwest. Dispatch the former first, then climb up to the Viewpoint to Synchronize.
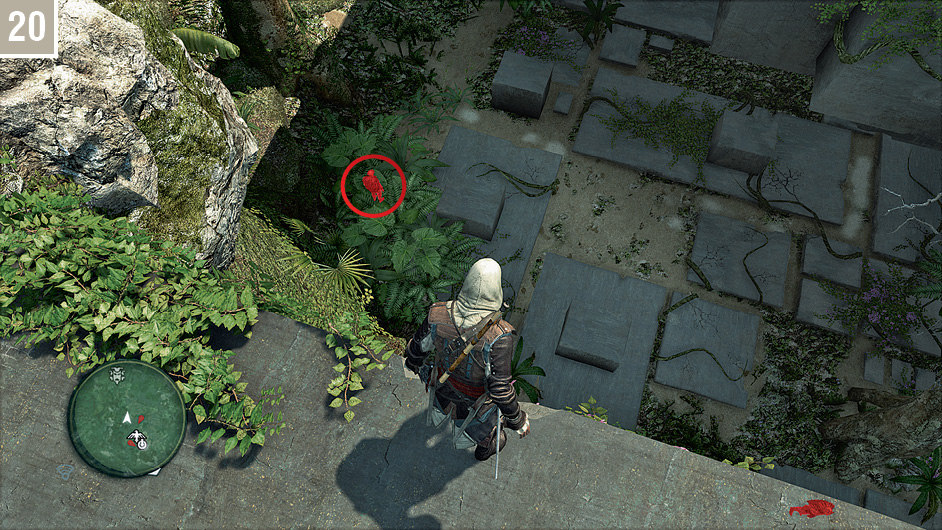
From your position far above, you can easily find this Guardian hidden in a Stalking Zone and knock him out with a flying leap. After you silence his final patrolling companion, Roberts and his crew will approach. Once the door is open, pick up the crate ( ) and follow as directed. When you arrive at the destination, move to the waypoint and press the same button again to drop the crate in the specified position.
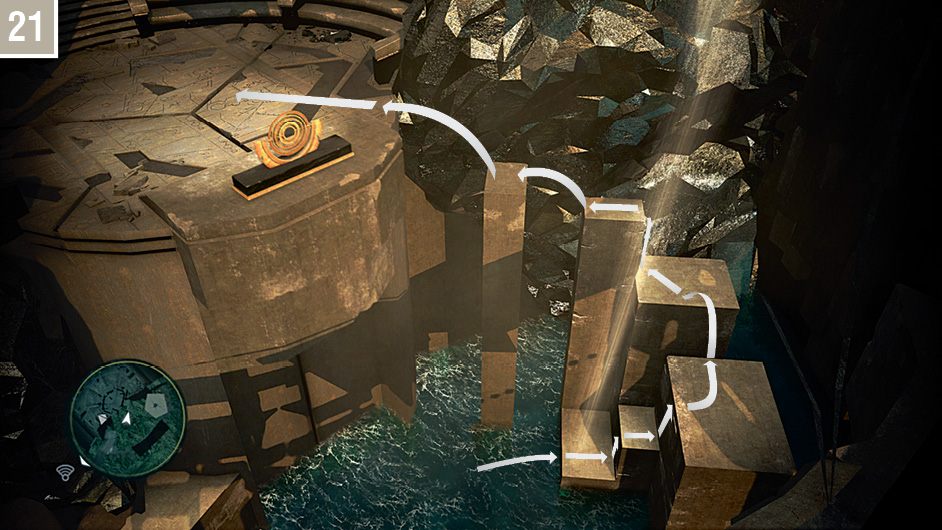
After the cinematic, follow the route shown here to return to the upper level.
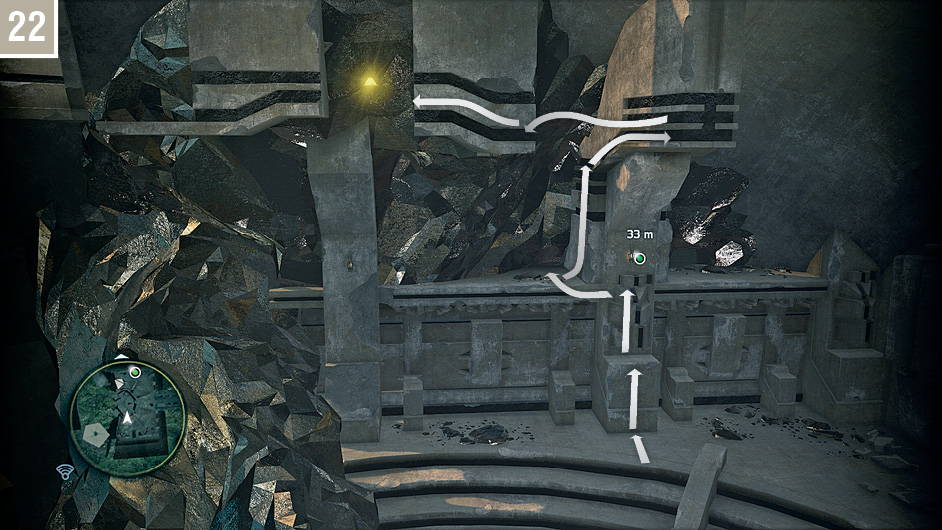
The path that you arrived by is sealed, so you’ll need to climb to escape. Follow the route shown here. One jump requires a special climbing technique known as a Back Eject; follow the onscreen instructions to perform it.
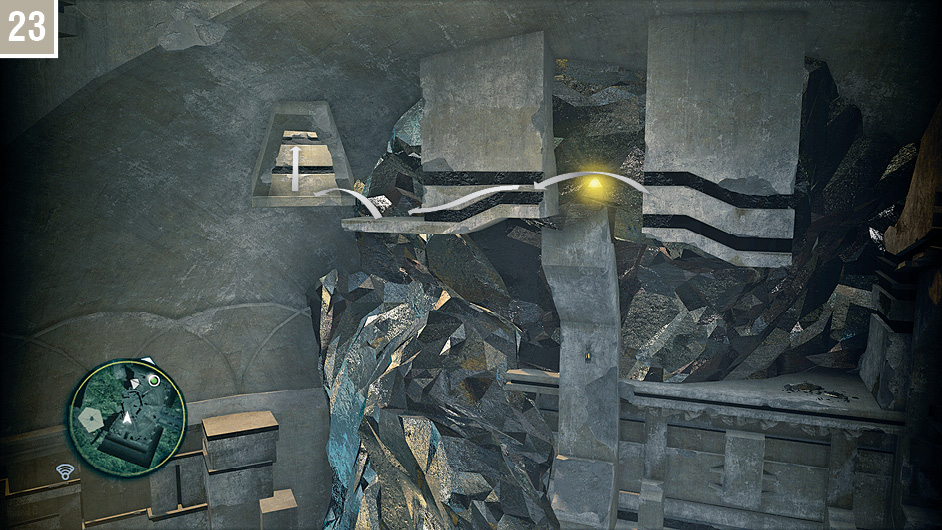
Traverse to the small platform, then leap to the opening on the wall. You should then run through the cave until you reach a slope far above the beach. Walk into this to slide down, steering Kenway with  . You should then approach the pirates on the beach. The remaining moments of this Memory are purely story-driven, so we’ll leave you to discover the conclusion for yourself.
Present Day: Part Four
As with all other visits to the present day, the steps required to advance the narrative are entirely straightforward: it’s all about enjoying the unfolding story. Note that you cannot leave this new floor during your stay (the elevator is inactive), though players seeking all hacking opportunities and collectibles can find a computer and sticky notes before they return to the Animus.
The solutions to the numerical hacking puzzles, should you need them, are 3-5-7-7 and 3-7-7-7.