
Assassin's Creed IV: Black Flag Guide Side Quests
Templar Hunts
There are four Templar Hunts to complete, with each story consisting of four individual missions. Each mission fulfilled will grant a modest sum of reales (350 R, 500 R, 700R, and 1,500 R for the final one) leading to a total reward of 3,050 R for each complete set of four missions. Once you have finished all four Templar Hunt side quests, you will obtain the keys required to unlock the Templar Armor in the Great Inagua hideout. This special outfit reduces the damage taken by Kenway by 25%.
Templar Hunt 01 – Opía Apito
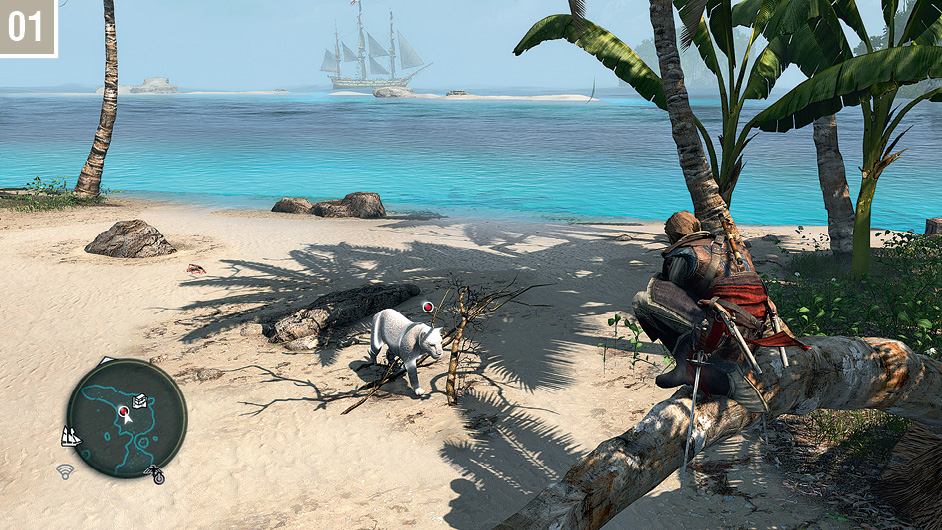
Mission 01 – “The Taino Assassin”: You will find Opía Apito in Cayman Sound. Talk to her to begin the mission. She challenges you to skin more prey than she can. Don’t try to follow her for the first kill, as she will get it before you no matter what. Instead, run to the beach to the northwest and take down your first hutia with a pistol snap shot. Skin it, then sprint back to the south. When you reach the search zone at the waypoint, use Eagle Vision to spot another hutia and forcibly separate the animal from its skin. Repeat this until a white jaguar automatically attacks you. React swiftly to the onscreen button prompts, then run to the safety of the tree, as pictured. The predator cannot reach you from such a vantage point. Patiently aim at it with your pistol, then fire when you have a clear shot.
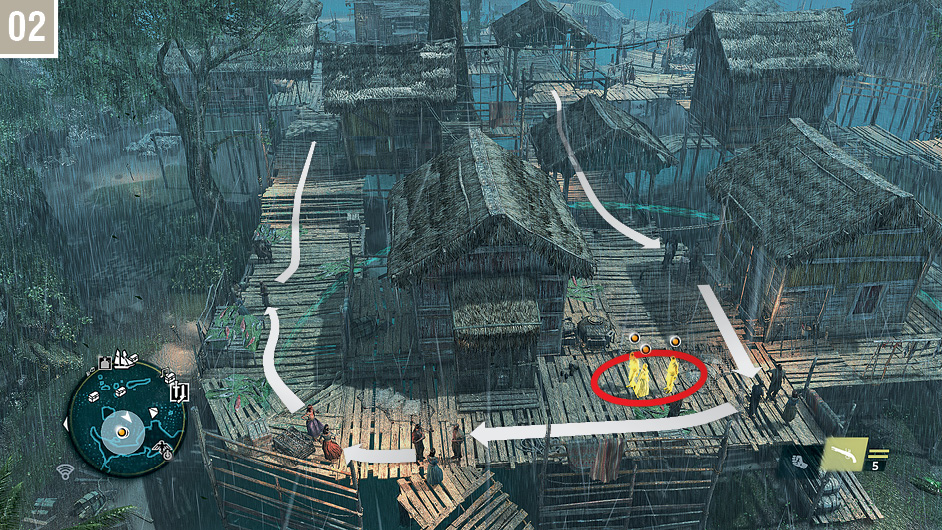
Mission 02 – “Templar Ships”: Sail to the nearby Grand Cayman to meet with Opía on the dock. Follow her, then move to the eavesdrop zone to the west. Throughout this short section, simply dash from one blending opportunity to the next until your targets stop. Now follow the marked man, using Fast Walk to close the distance, and pickpocket him.
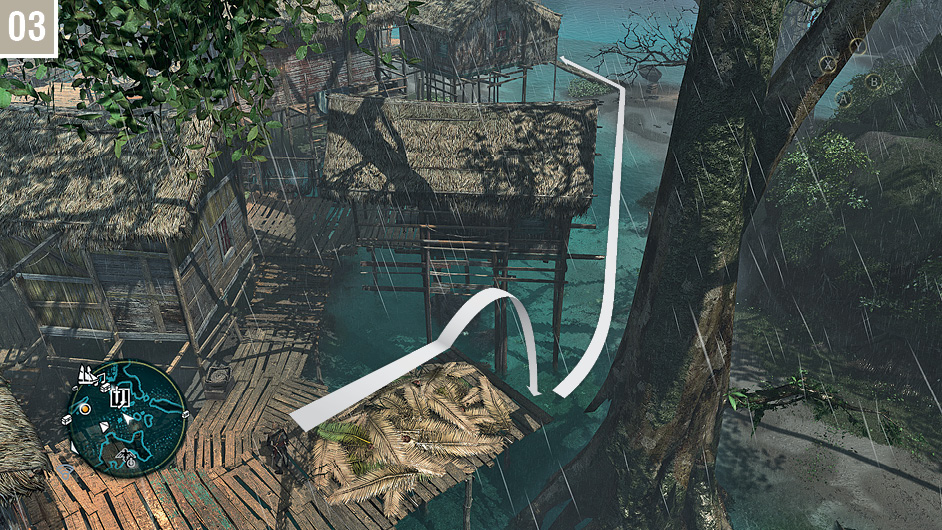
Mission 03 – “Right-Hand Man”: Opía is only a short walk away from where the previous mission ended. After you begin, follow her until she asks you to hide. Do so in the hiding spot literally one step away from Kenway. As the cutscene ends, a chase begins. Following your target can be confusing in the maze of wooden platforms, so simply turn around, sprint past the hay pile and jump in the shallow water below. Run all the way to the crooked tree, as shown here, to trigger another cutscene. Free run via the wooden poles to quickly reach the Jackdaw, then use travel speed to catch up with Vargas. Mark his ship with a Custom Marker and, using the distance meter as a guide, launch a mortar volley as soon as you are within 500m. Once the vessel is sufficiently weakened, board it. A precise swivel-gun shot at Vargas himself is all it takes to complete the mission, without even setting foot on his ship’s deck.
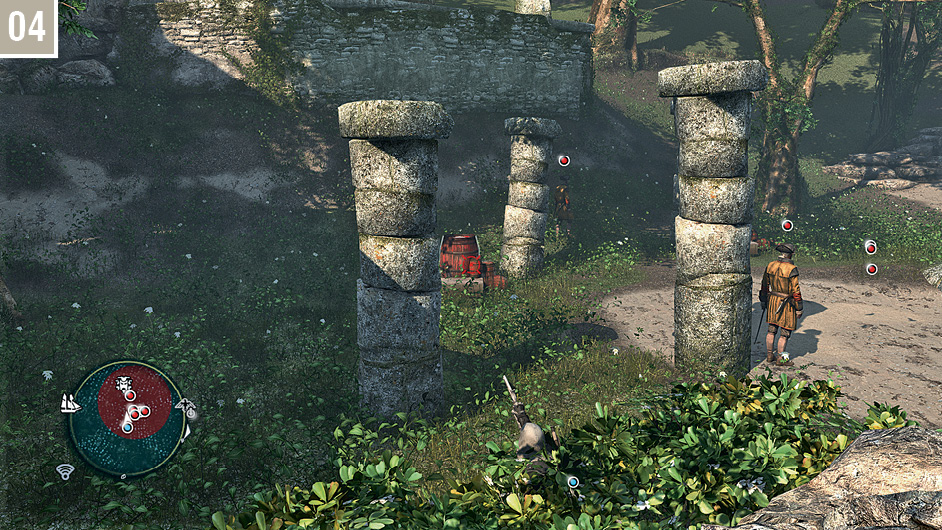
Mission 04 – “The Trail of Lucia Márquez”: The final mission in this Templar Hunt begins on Pinos Isle to the north. See Charts & Collectibles if you haven’t been to this location before for tips on how to best to reach it. Use the obvious path through Stalking Zones to tail your target until you reach an opening where you are requested to kill a group of guards. For an easy outcome, blow up the powder reserves with your pistol, as shown here. Dispose of any survivors as you see fit. Another wave of enemies will arrive from the west. Use of Smoke Bombs is the shortest way to victory. Your only real priority is to protect your ally, so drop each bomb close to her. Once all combatants are down, chase Márquez and assassinate her as she turns around to shoot you.
Templar Hunt 02 – Rhona Dinsmore
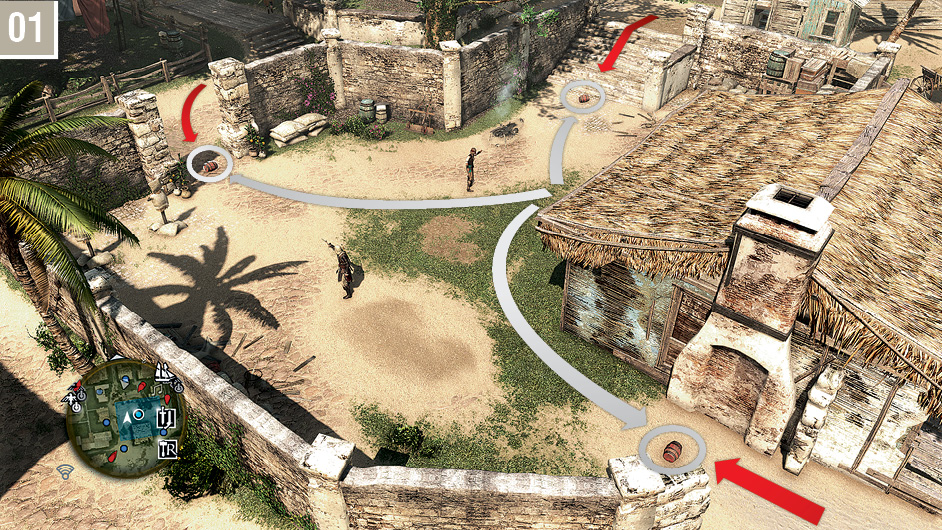
Mission 01 – “Bureau Under Attack”: This chain of quests begins in the south of Havana. Your goal is to survive a long battle where several waves of enemies will attack you from three different entry points. Though you can defeat them in conventional combat, you can make the whole process much easier by dropping powder kegs at the three choke points pictured here. You have ample time to do so between each wave. Blow up the kegs as soldiers run by them (you can see them coming on the mini-map), then deal with the survivors. Don’t forget to reload your pistols before each new wave arrives.
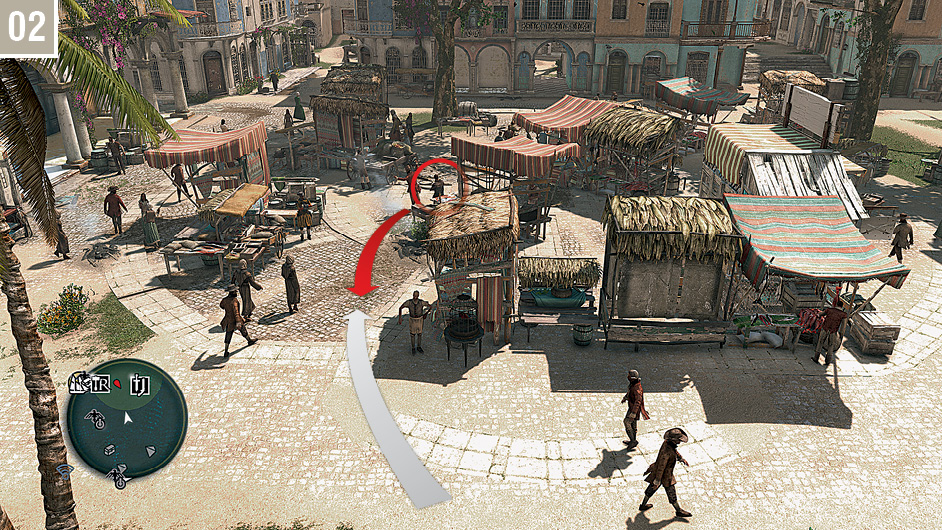
Mission 02 – “A Thief in the Market”: The previous mission leaves you right in front of Rhona. Talk to her if you’re ready to proceed. Your objective is to catch a thief in the market at the steps of the cathedral to the north. Skirt around the search zone and locate your target from the north, as shown here. The man will run straight towards you. Simply hold the High Profile Button, tilt d in his direction and press  when he is within tackle range for an immediate finish.
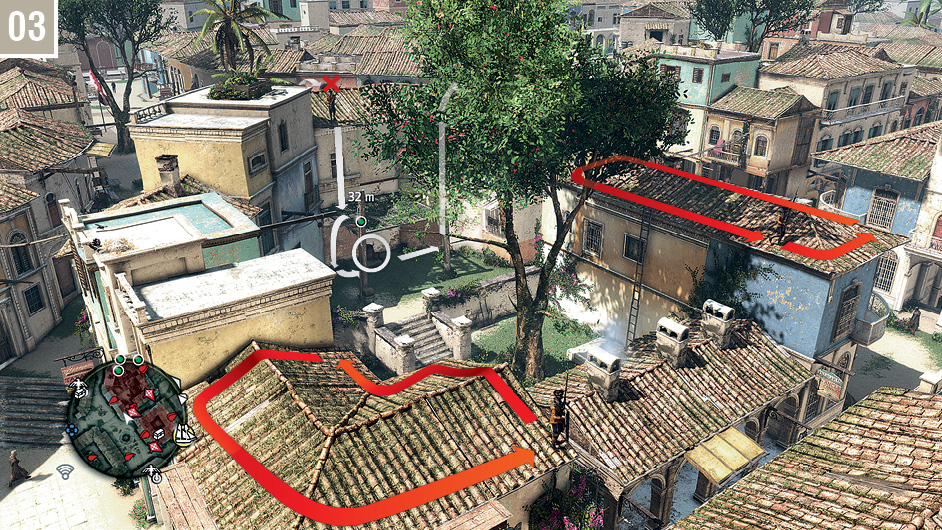
Mission 03 – “Arms Race”: This mission starts in Havana’s Assassin’s Bureau, and your goal is to ignite three powder reserves. You are free to use any method you prefer; our walkthrough offers a stealth solution. You should begin with the closest waypoint, to the north. Approach the Restricted Area from the west, and quietly take down the nearby soldier when he’s at the far extent of his patrol. You can hide in the nearby hay pile if this helps. Now wait until the other two rooftop sentries walk away, towards the east. You have ample time to drop down, ignite the powder reserve, and leave the area the same way you entered.
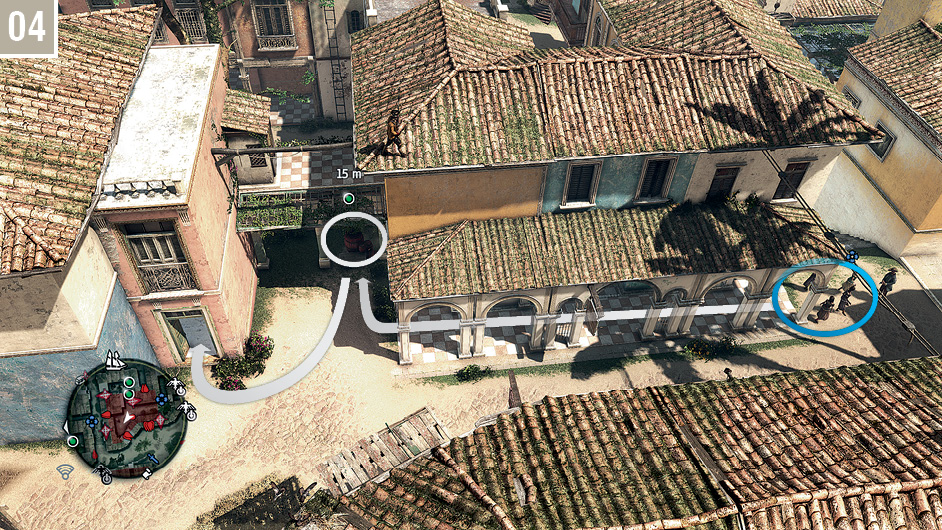
The second powder reserve is found in a Restricted Area to the northwest. Approach the zone from the south, and hire the dancers. Calmly walk to the powder reserve, ignite it, then leave the premises via the nearby doorway.
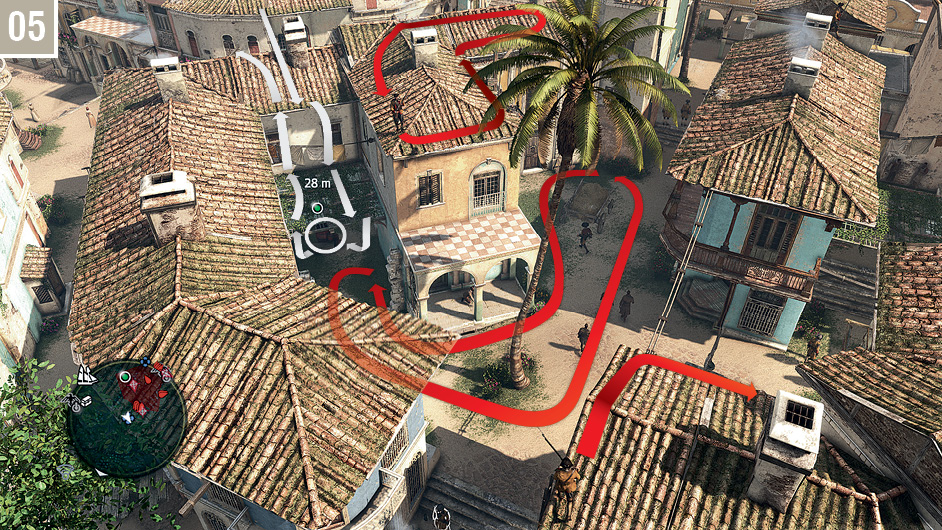
The third powder reserve lies directly to the north. Approach the Restricted Area from the southeast rooftops. Silence the sentry to your left (highlighted here) with a Sleep Dart then, after ensuring that the Captain patrolling in the courtyard and the other rooftop sentry are looking away, quickly drop down to the reserve and ignite it. Feel free to incapacitate these enemies with Sleep Darts too if they make you nervous, but the length of their patrol routes gives you ample time to proceed. The mission ends immediately after the explosion.
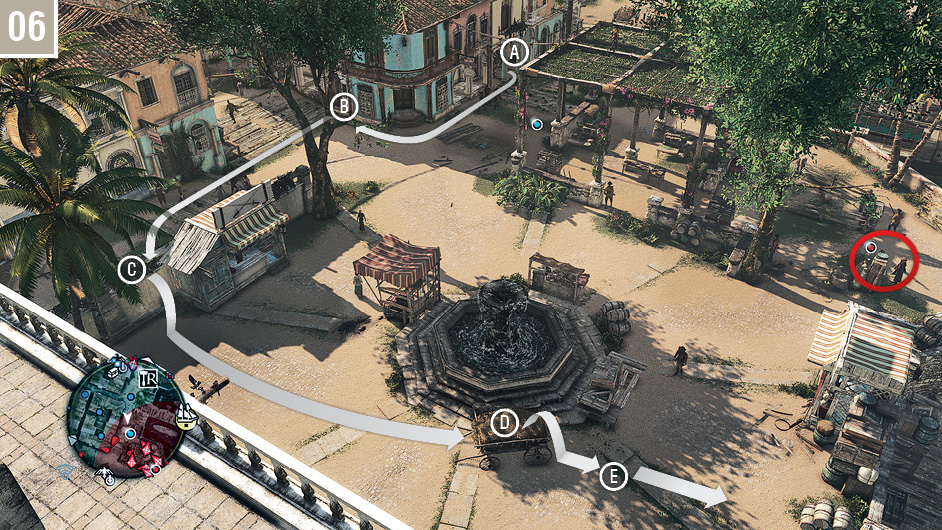
Mission 04 – “Flint’s End”: Meet Rhona in the center of Havana for this final mission. Follow her until you reach the Restricted Area ( ). Though opting for violence is definitely a possibility, this leads to a difficult battle, with enemies surrounding you (and Rhona likely to expire in the melee). For a swift conclusion, do not enter the Restricted Area with Rhona, and instead sprint along the houses until you’re out of the zone (
 ). Now run around the Restricted Area and enter it from the southwest (
 ). Sprint to the hay cart and hide to allay any suspicion (
 ). You can now calmly move out of your hiding place and align a headshot on Hillary Flint (
 ), then escape by swimming away.
Templar Hunt 03 – Anto
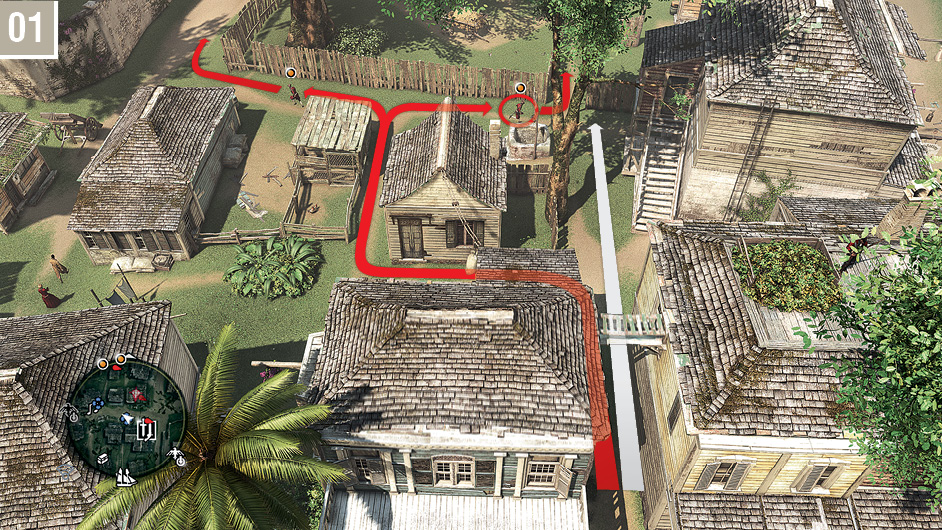
Mission 01 – “The Maroon Assassin”: Meet Anto at the Bureau in the south of Kingston. When the mission begins, run straight to the west, towards the waypoint, only briefly stopping to hire the dancers directly to your right. As they keep you concealed from scrutiny, you only need to remain within the eavesdrop circle. Use brief bursts of Fast Walk to ensure that you are not outpaced. Once the sequence ends, run to the next waypoint and hire a new group of dancers located a short walk from the marker. Once again, follow your targets while blending among the dancers. When a chase begins, pursue your prey into the alleyway to your right, then use the shortcut pictured here to easily tackle one of the fugitives (hold the High Profile Button and press  ).
).
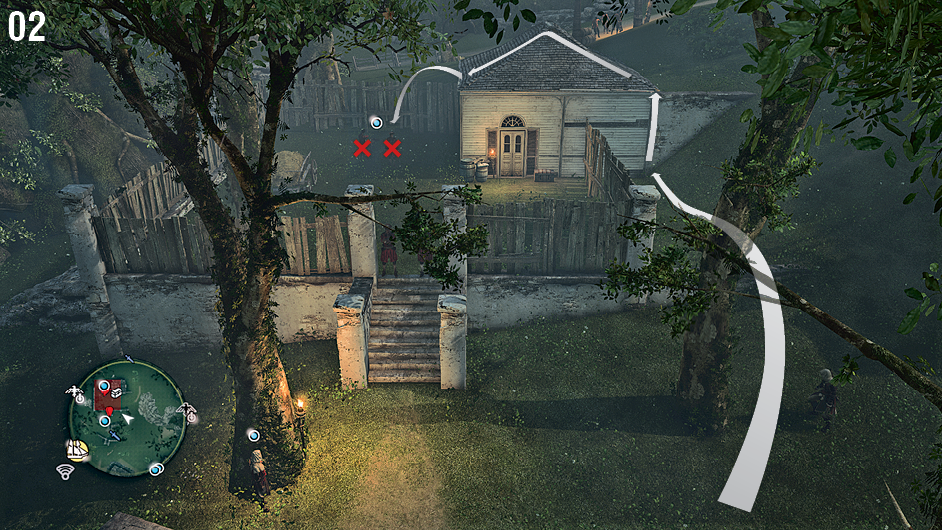
Mission 02 – “Recruiting Maroons”: Go talk to Anto at the mission start position. Your goal here is to free three slaves held captive (and at gunpoint) inside small Restricted Areas. For the first site, a short walk to the west of your starting position, simply perform a double air assassination as pictured here, then free the slave.
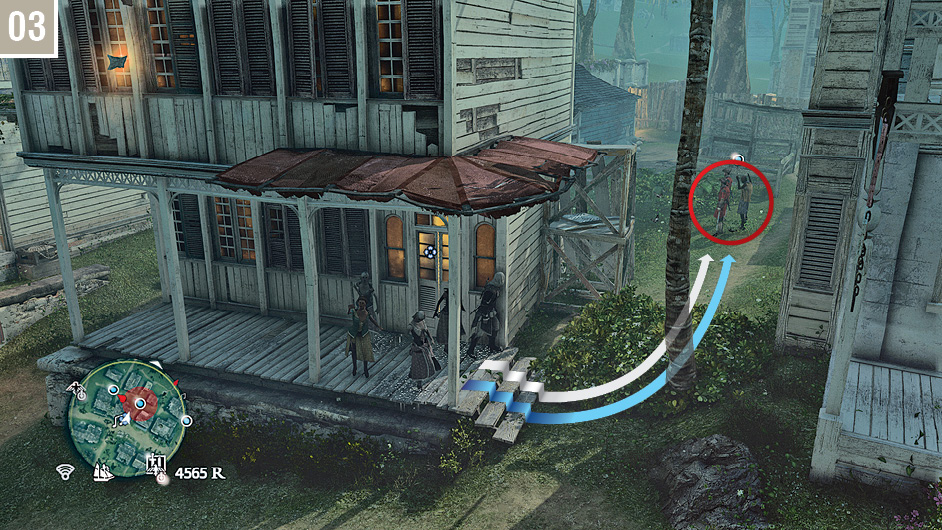
Run to the second site to the northeast. A group of guards are taking the slave behind the house pictured here. Hire the dancers under the canopy and use them to distract the two soldiers close to the slave, then casually free the prisoner.
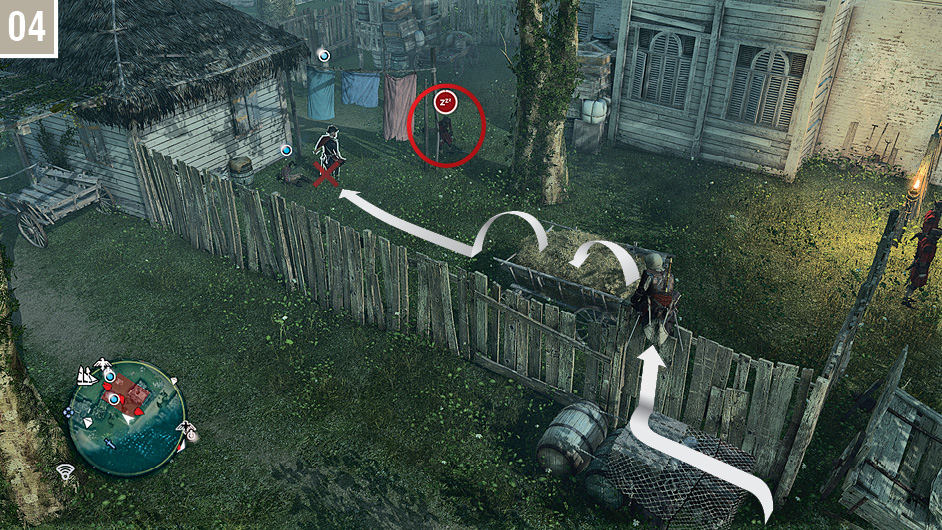
The third and final Restricted Area is further to the northeast. Approach the wooden fence from the northeast corner. Stand on it in the position shown here, then put the soldier to the northwest to sleep, and backstab the Captain before you free the slave.
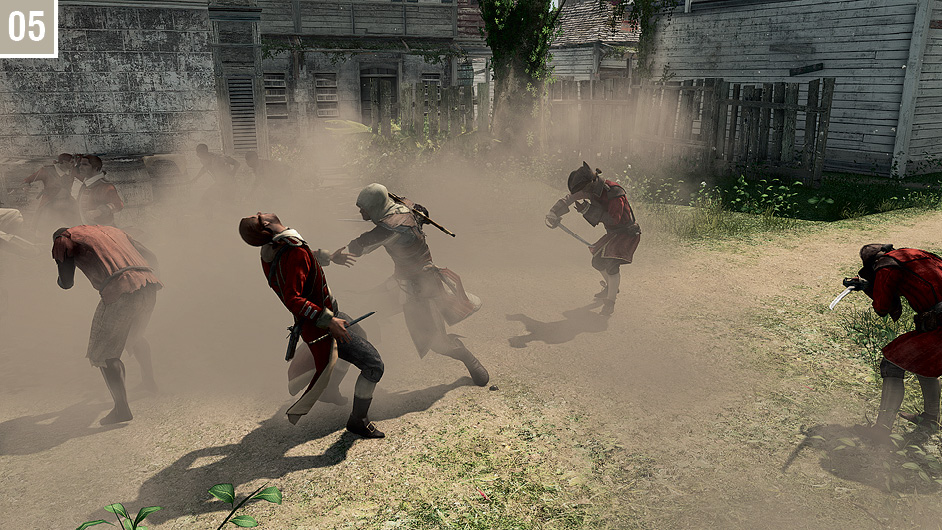
Mission 03 – “Under Attack”: You will find Anto back at the Bureau. Your mission here is simply to protect your allies from several waves of opponents. In between waves, you can optionally run to nearby sites where ambushers are gathering, though this is by no means mandatory or efficient. Your priority here is to make sure that Anto survives, so simply stay with him all along. Your opponents are all basic soldiers or Scouts, so Kill Streaks prove very efficient. Whenever you are outnumbered, drop a Smoke Bomb, assassinate one of the incapacitated men and follow up with a long Kill Streak. After a few waves, the mission ends.
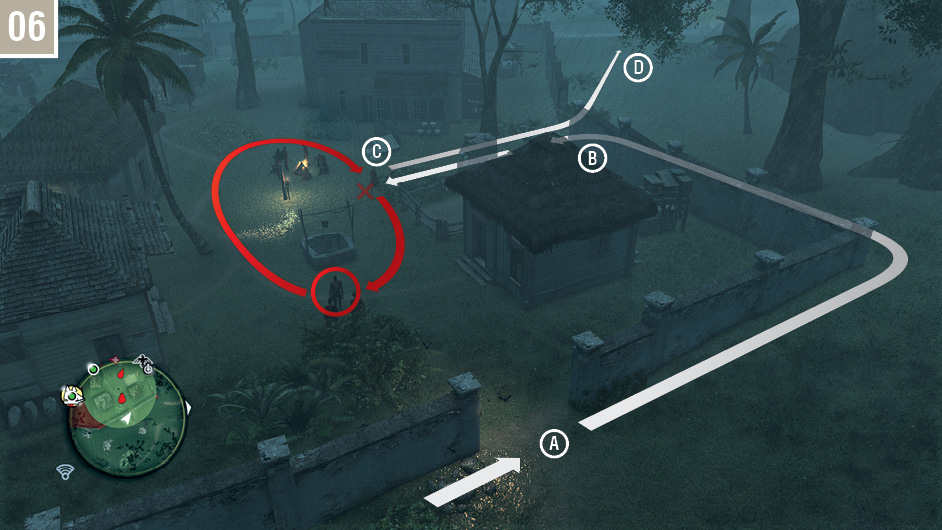
Mission 04 – “The Commander’s Ruse”: For the final assignment, Anto waits for you in the center of Kingston. This begins with a simple tail, where all you have to do is tag your targets with Eagle Vision, then follow Anto – who will both show you the way, and do the dirty work for you. Once you reach the large Restricted Area where Abraham is hiding, stop following Anto, and run to the northeast corner of the zone, where you will find an opening in the wall ( ). You are in no danger here as you are still outside the Restricted Area. Identify the Captain as Abraham with Eagle Vision and he will make a short patrol around the well behind him. While he does so, sprint to the opening in the north wall (
 ). This is the first time you must enter the Restricted Area, but fortunately you have Stalking Zones to conceal you. Quickly run to the one close to the well (
 ), and either hit Abraham with a Berserk Dart, or whistle and quietly assassinate him. Complete the mission, and this Templar Hunt, by sprinting out of the Restricted Area through the opening to the north (
 ).
).
Templar Hunt 04 – Vance Travers
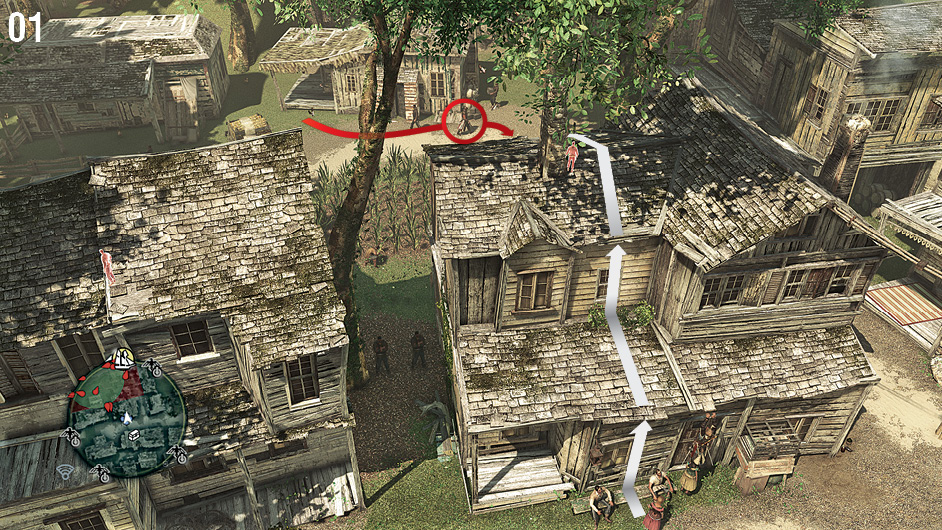
Mission 01 – “Oh Brother…”: You can find Vance Travers in the center of Nassau. After your introduction, run to the search zone to the north and hire the dancers, then identify your target with Eagle Vision. All you have to do now is keep inside the eavesdrop circle while remaining blended. When the eavesdrop ends, climb on the rooftop of the building to your right (pictured here), identify Upton with Eagle Vision, then take him down from your vantage point with a Berserk Dart, a Pistol headshot, or even a standard air assassination.
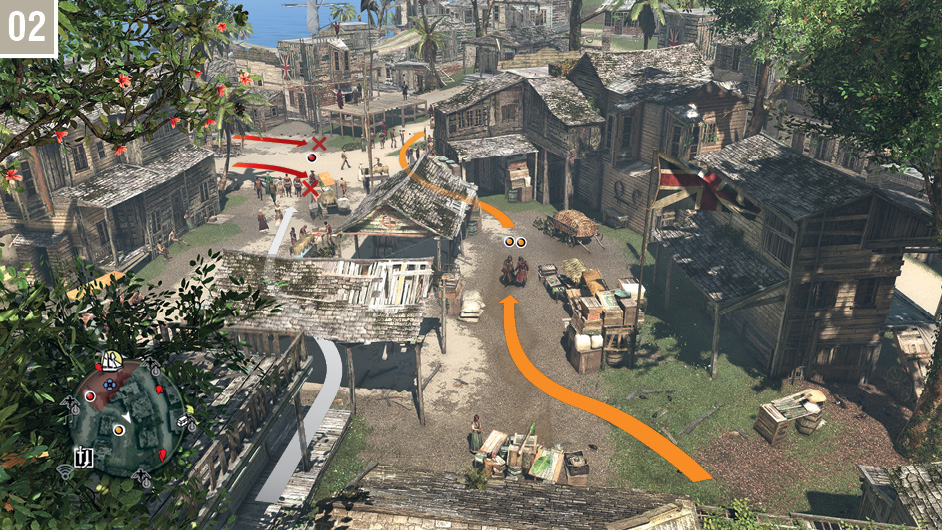
Mission 02 – “The Other Brother”: You will begin this mission by speaking to Upton, in the west part of Nassau. After a short walk, Upton asks you to tail him and protect him from thieves. Hide in the nearby Stalking Zone as requested, then tail the two brothers from a safe distance after you have marked them with Eagle Vision. Follow the path shown here to stealthily assassinate the first two thieves from behind when they arrive from the northwest.
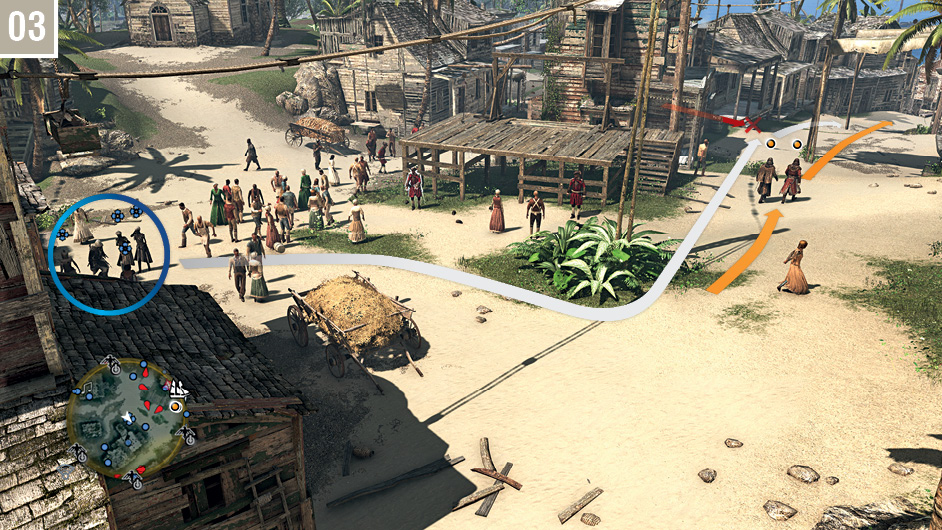
Hire the dancers in front of the gallows, enabling you to follow the two brothers closely, as pictured here. When the third and final thief approaches, assassinate him while blended among the dancers. Keep following Upton with the dancers surrounding Kenway. After a short eavesdrop sequence, you will have one minute to reach a search zone to the southwest, clearly marked by a waypoint.
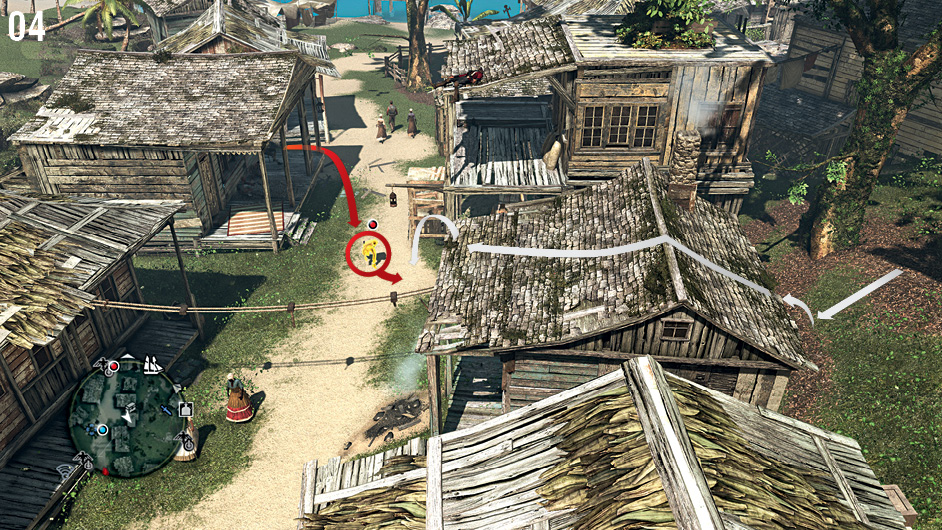
Once inside the search zone, climb on the rooftop of the house in front of you and identify the target: he arrives from the north. An air assassination as he passes below you is all it takes to complete the mission.
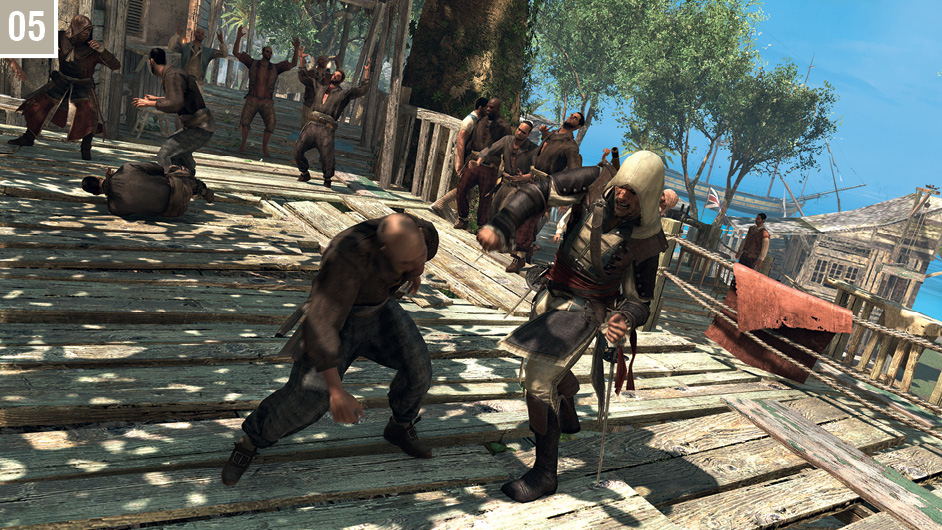
Mission 03 – “Upton’s Sorrow”: Go talk to Upton at the tavern. Your objective here is to protect Upton and escort him to safety. You are unarmed during the initial brawl, so use Counter Kills and Kill Streaks to rapidly take down your opponents. Hire the dancers you encounter and send them away. Three guards will attack Upton after he relieves himself in the middle of the street. As you now have your weapons, double assassinate two from behind to get a head start, or drop a Smoke Bomb and eliminate them all in a single Kill Streak.
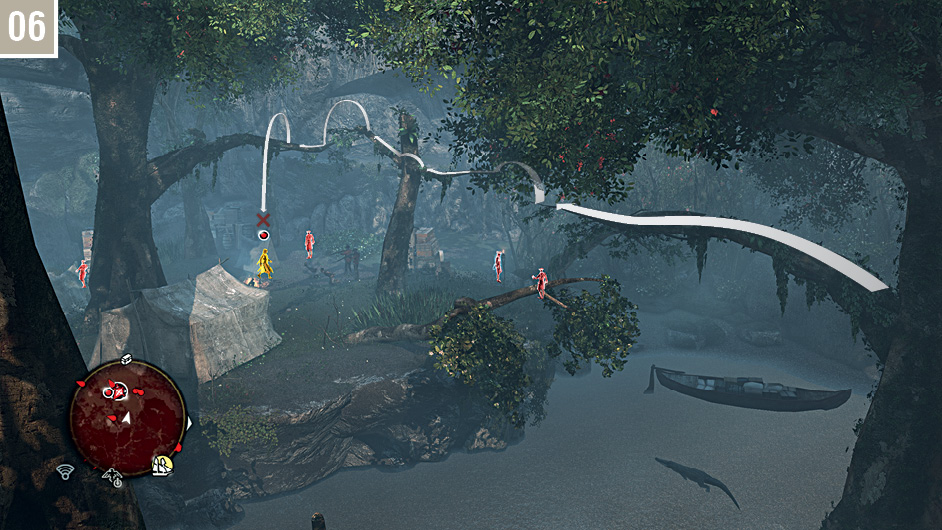
Mission 04 – “Queen of Pirates, King of Fools”: The final mission start point is on the east side of Nassau. Ensure that your pistols are loaded before you begin. The waypoint soon leads you to a large search zone, which is also a Restricted Area. Free run through the trees to cross the entire zone, all the way to its west edge. From one of the branches, identify Vance with Eagle Vision, then air assassinate him as pictured here. A chase immediately begins, but you can end it in mere seconds: sprint after Jing Lang and hit her with two pistol snap-shots for an instant finish.