
Mafia III Guide Story Missions
DOWNTOWN: Compromised Corruption
Mission: “Compromised Corruption”
Prerequisite: Complete “An Emotional Attachment”
Meet with Donovan
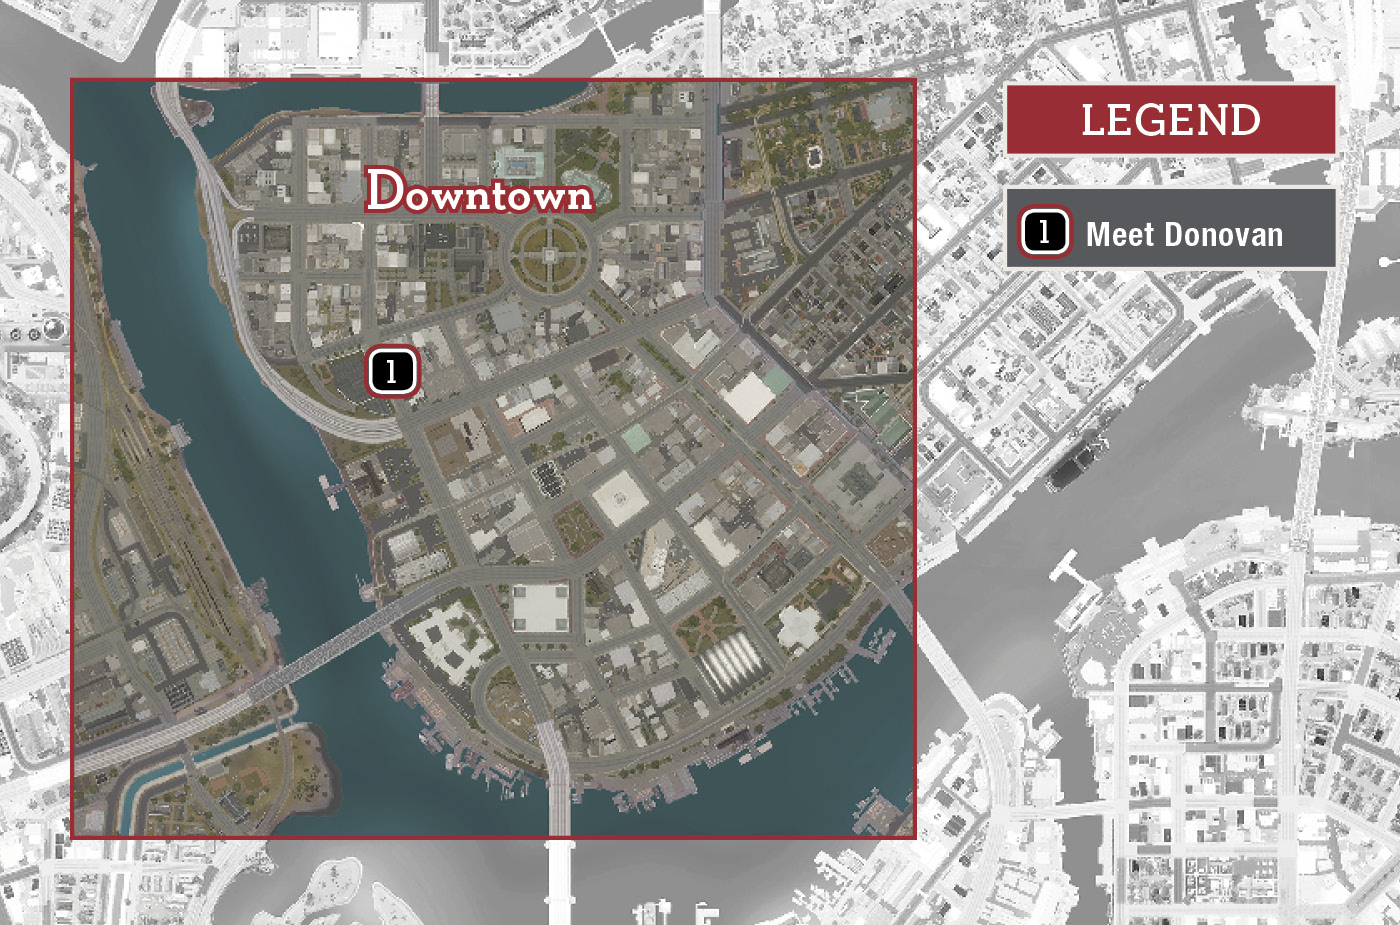
Activate this objective and travel to the bus bench across the street from The Royal Hotel (1). Sit on the bench to trigger Donovan’s arrival. The partners discuss Tony Derazio, the lieutenant who runs the Downtown district for his capo, Sal’s brother “Uncle Lou” Marcano. Derazio handles Lou’s books, money-laundering, and bribery activity. Getting to Tony won’t be easy. He lives in a fortress-like penthouse atop The Royal Hotel.


Unlocks: “Construction” Racket
Unlocks: “Blackmail” Racket
RACKET: Construction
Prerequisite: Complete “Meet with Donovan” (Downtown)
Talk to Lennie Davis
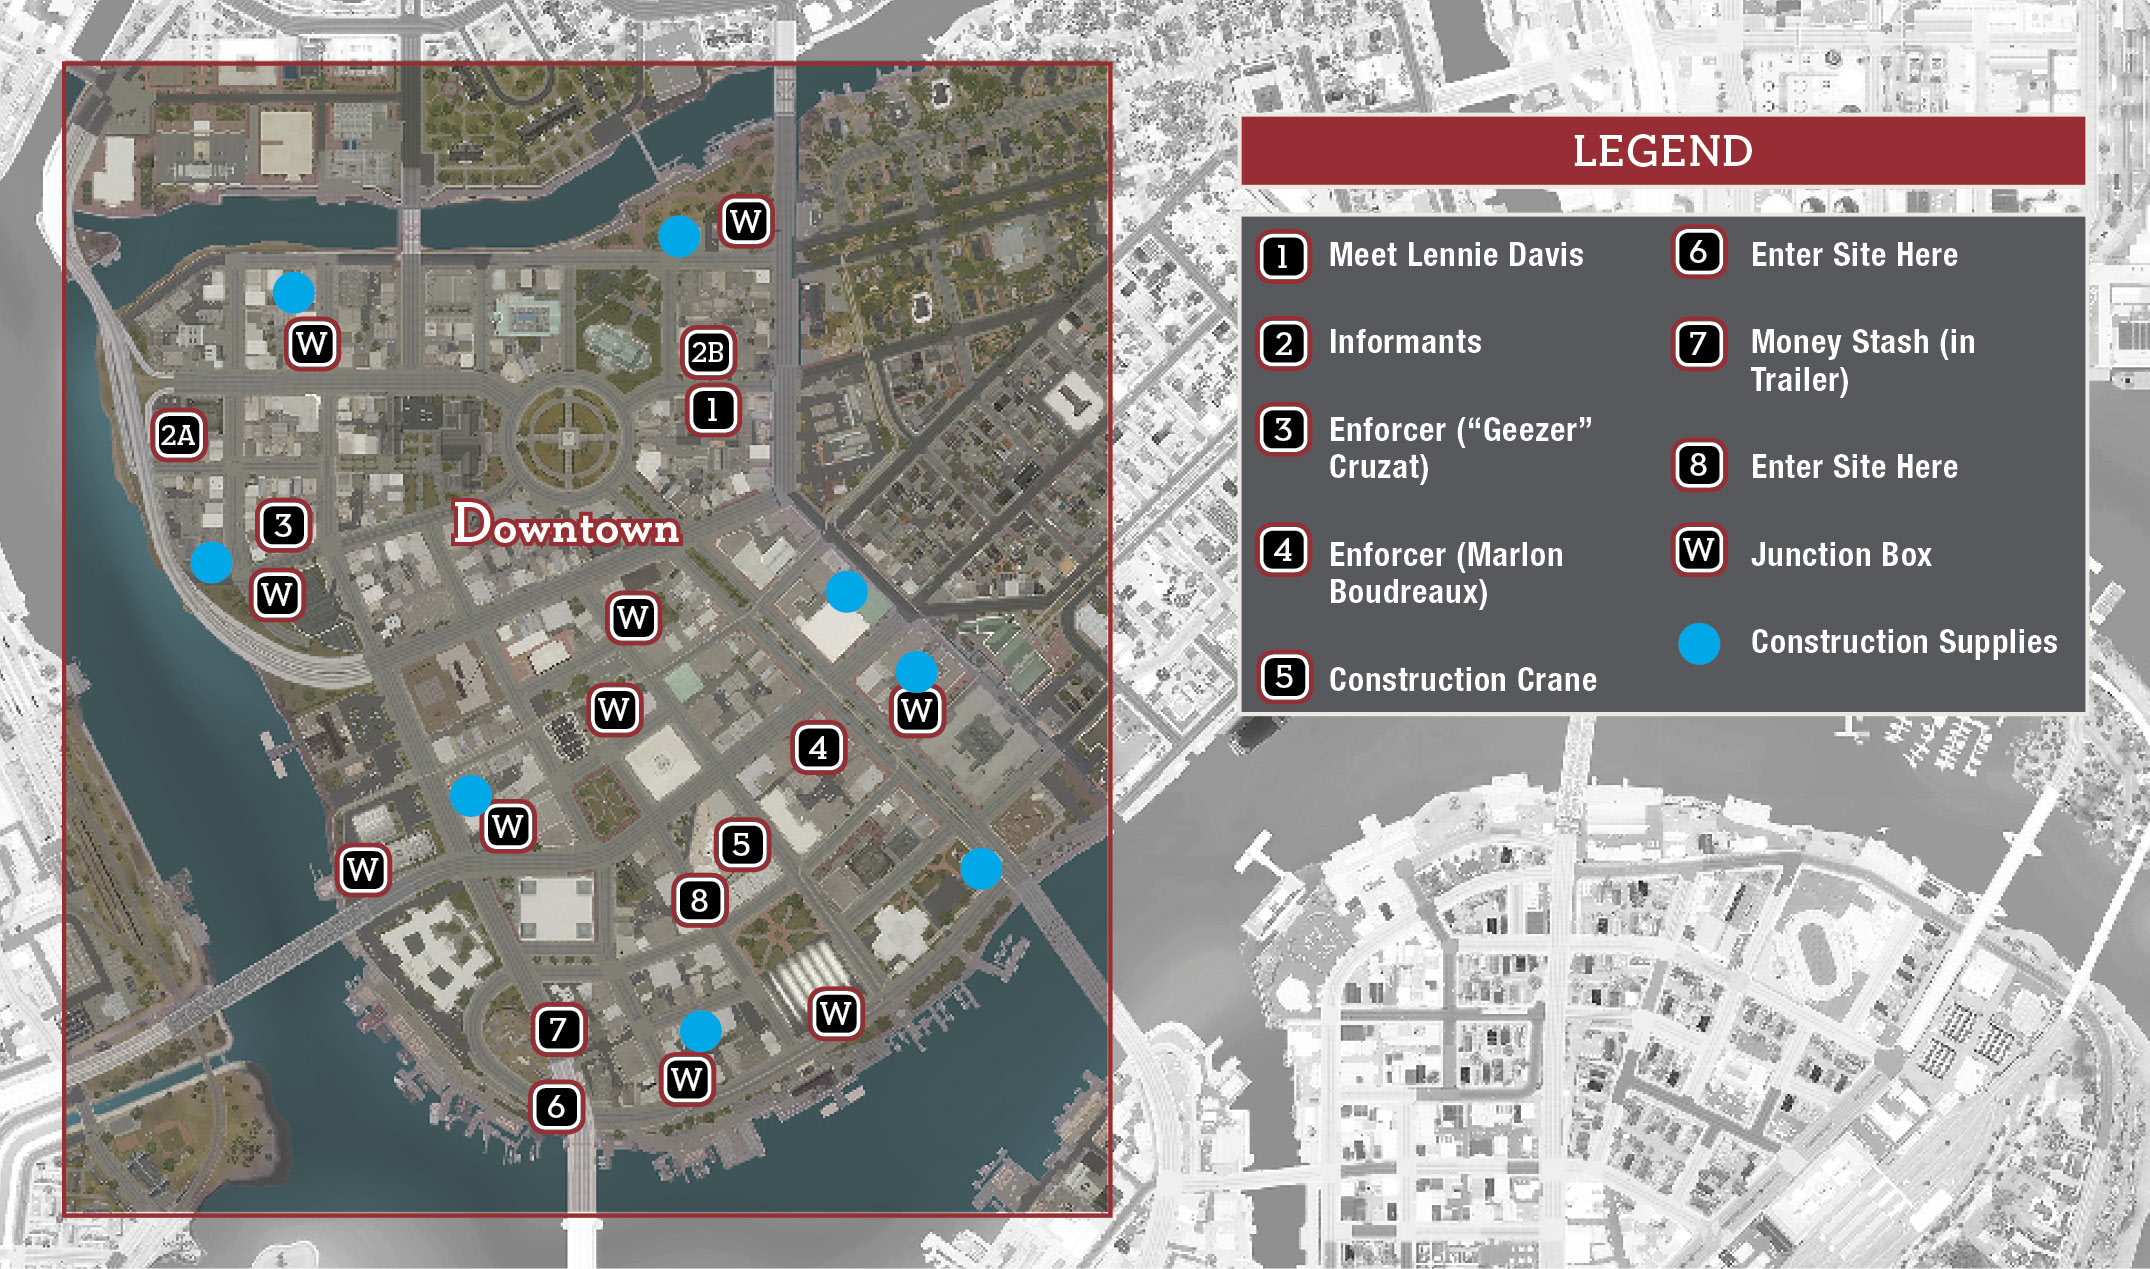
Find Lennie sitting at the bar in a Downtown dive called Swoosh (1). Lennie’s a city clerk who made a mistake, and now a thug named Jimmy Cavar is making him pay. Cavar has blackmailed Lennie into approving phony building permits that benefit Jimmy’s construction racket.


Unlocks: Interrogate Cavar’s Foremen
Unlocks: Find and Destroy Construction Supplies
Unlocks: Bring Down Cavar’s Construction Crane
Interrogate Cavar’s Foremen
Prerequisite: Complete “Talk to Lennie Davis”
An Informant will appear on your map in one of these two locations (2a, 2b). If the Informant escapes and you don’t catch him, he ends up at the other Informant location.
Max Ardizzi
Max and his crew are posted in an alley (2a) with two loads of stolen construction supplies. (First, wiretap the sector Junction Box a couple of blocks to the northeast, under the Cinema sign.) Sneak down the alley from the east and take cover at the striped girder on the right. Lure over thugs then sneak up to the crate behind Max and take him down.

Your interrogation reveals that Jimmy Cavar recently sold lots of stolen equipment and has a big money stash now. Before you leave, destroy both destructible piles of construction supplies (find them in Intel View) and blow up the Cavar delivery truck for more damage.

Unlocks: Steal Cavar’s Money Stash
Virgil Gauthier
Virgil and his boys infest an alley (2b) not far from where you met Lennie Davis at Swoosh. Approach down the alley from the west, moving past the Cavar truck to the brick wall. Duck into cover behind covered crates where the money bag sits and snag it. Then lure over Virgil and his men for takedowns.

Interrogate Virgil to learn that Jimmy Cavar has a big stash of cash from his illegal sales. Before you leave, destroy both destructible piles of construction supplies (find them in Intel View) and blow up the Cavar delivery truck for more damage.

Unlocks: Steal Cavar’s Money Stash
Find and Destroy Construction Supplies (8)
Prerequisite: Complete “Talk to Lennie Davis”
Cavar has stockpiles of stolen city construction supplies stashed all around the Downtown district, stored in Cavar crates and ready for illegal resale. Once you wiretap a sector, any supply site in that sector appears on your map. Each site is guarded by a small handful of Cavar’s goons including a Sentry. Take out these guards, and then destroy the multiple supply stashes and the Cavar delivery truck for more damage. Don’t miss any stashes in each site! Use Intel View to find them all.


Destroy Cavar’s Construction Vehicles
Prerequisite: Complete “Talk to Lennie Davis”
Keep an eye out for Cavar trucks hauling illegal supplies around the Downtown district. Each is marked with a “Destroy” icon overhead. If you’re driving, stay on its tail and keep a continuous stream of gunfire hitting the truck until it explodes. Or you can try to cut it off then hop out and toss a grenade under it.

Kill Cavar’s Enforcers
Prerequisite: Complete “Talk to Lennie Davis”
“Geezer” Cruzat


Geezer hangs out in a back alley lot (3) on the western side of the Downtown district. Wiretap the sector’s Junction Box first. Then approach down the alley from the north and climb the exterior stairs to the roof overlooking the goons. From here you can toss a Screaming Zemi into their midst to gather them all together (including even Geezer), then follow with a Molotov or two.
Pick off any survivors with a gun. Geezer’s death is worth racket damage. When the area is clear, you can descend from the roof to destroy supplies and the Cavar delivery truck for more racket damage. Be sure to scoop up any piles of cash too.
Marlon Boudreaux

Marlon Boudreaux is at a south-central Downtown construction site (4) behind the Red Bar. First, wiretap the sector’s Junction Box; it’s nearby, behind the Les Trois Pattes Bar (by a construction supply site you can destroy). Then approach Marlon down the alley between Steinberg Family Clothiers and the Red Bar. Sneak along the high fence topped with barbed wire on the right, and take cover at the end.
Whistle to lure the first guard for a silent takedown, and then move to the stacked pallets not far from the Cavar truck. Toss a Screaming Zemi next to the truck to draw Marlon and his boys to investigate. As they do this, toss a grenade under the truck. The truck’s explosion should take out Marlon and his curious crew. You inflict racket damage for killing Marlon plus more for the truck! Be sure to scour the site for cash, and destroy any supply stacks for additional damage.

Bring Down Cavar’s Construction Crane
Prerequisite: Complete “Talk to Lennie Davis”
Here’s where you put the big hurt on Jimmy Cavar. Start by calling your Arms Dealer and selecting a high-power sniper rifle. Then travel to the high-rise construction site (5) that features two cranes. (Make sure you wiretap the sector first; Intel View really helps here.) Find the site entrance, take cover, and survey the area. Spot the Sentry and move to the stacks of wood by the ZAVI shipping container. Whistle for the Sentry and take him down.

Now if you move rightward, you can head up the stairs to the crane platform to find a great Sniper Point. Take cover here and wreak havoc on the mob muscle below. Pick off as many of the site goons as you can, but be ready for gunmen to rush your position up the stairs.

Attach Detonator
When the area is clear, head downstairs to ground level, following your objective marker around the shipping container to the big blue Cavar fuel tank at the base of the crane. Attach the detonator to get a new, fairly obvious objective.

Clear Out. Now.


Hustle around the ZAVI container and through the curving tunnel to the staircase. Run up the stairs to the top then veer rightward to the chain-link gate (marked as an Entrance in your Intel View) and hop over to exit the site. Then watch the spectacular show. If you want, you can explore the site after the crane falls and pick up any loose cash still lying around.
Steal Cavar’s Money Stash
Prerequisite: Interrogate Cavar’s Foremen
Jimmy Cavar has made some good scratch selling construction materials he’s boosted from the city. Activate the objective and travel to the fenced-in Cavar construction site that runs under the River Row bridge. A quick route to the stash: start on the road under the bridge (6) and slip in via the gap between the fence and the bridge on the left (west) side.
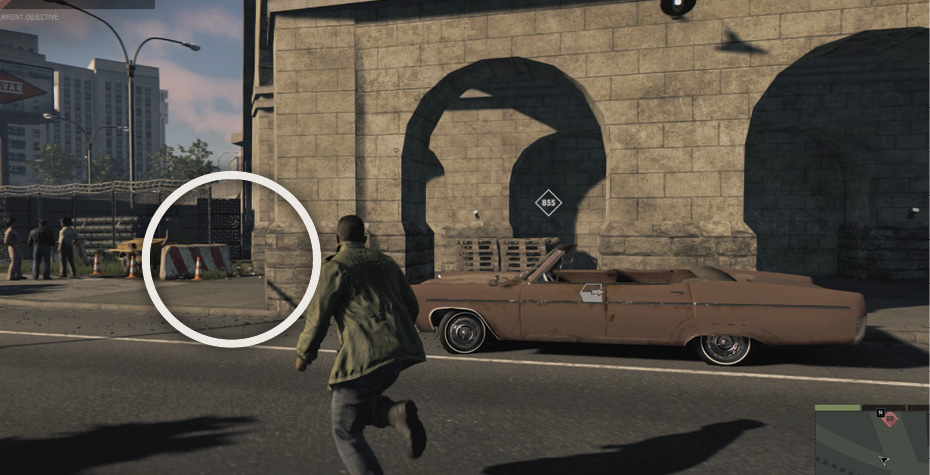
Move along the bridge support to the opening where you can cross underneath the bridge. Take cover and spot the construction trailer (7) on the other side. Use Intel View to scout ahead: one guard moves away and another takes up a post with his back to you. Sneak up and take down this guard. Now you can just step into the unguarded trailer and grab Jimmy’s stash of $10,000!


Return to Lennie Davis
Travel back to Lennie (1) to learn that Jimmy Cavar has emerged at the big construction site where you destroyed his crane.
Confront Jimmy Cavar
Head to the site and go to the locked door (8) on the southwest perimeter. Jimmy is in a makeshift office on the third floor (circled in our shot) of his work-in-progress. It takes some work to get up there. But you can reach Jimmy fairly quickly and painlessly (for you, anyway) if you go stealth all the way.


Unlock the door, sneak downstairs to the first landing, ducking into cover at the railing. Listen to the thugs below you. When they turn to walk away, hop over the railing and take them down silently from behind, one at a time. Sneak down the walkway to the stairs and climb to the next level.


At the top, turn right to see another guard pacing away from you. Take him down from behind silently, and grab the Tac-Vest from the nearby Weapon Locker. Continue across the floor, sticking to the brick wall on your left.
When the brick wall ends, circle around it to the left and sneak up behind the Sentry standing with his back to you at a low wall. Silence the fool, then climb the stairs just past him.
These stairs climb two levels. The top level leads to a Sniper Point with a scoped rifle that gives you an advantage if you want a shootout. But the easier route is to climb just one level and take cover. Use Intel View to survey the floor—again, a few mob goons are interspersed amongst harmless working men. Sneak forward along the left side of the floor to the big crate and take cover. Whistle to lure each successive mobster for silent takedowns. Work your way to the far end of the floor, using Intel View to make sure the way is clear.

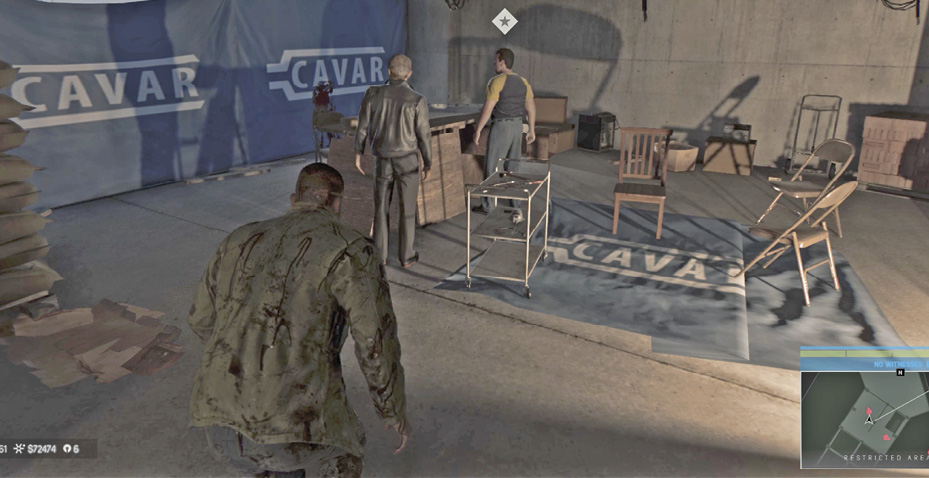

Climb the stairs to the third level. Jimmy Cavar and an associate are up here facing away from you. Sneak up to take down the other guy first, then incapacitate Cavar. Grab him and kill or recruit him to take control of the Construction racket. Award the racket to an Underboss.
RACKET: Blackmail
Prerequisite: Complete “Meet with Donovan” (Downtown)
Talk to Harold Cauley
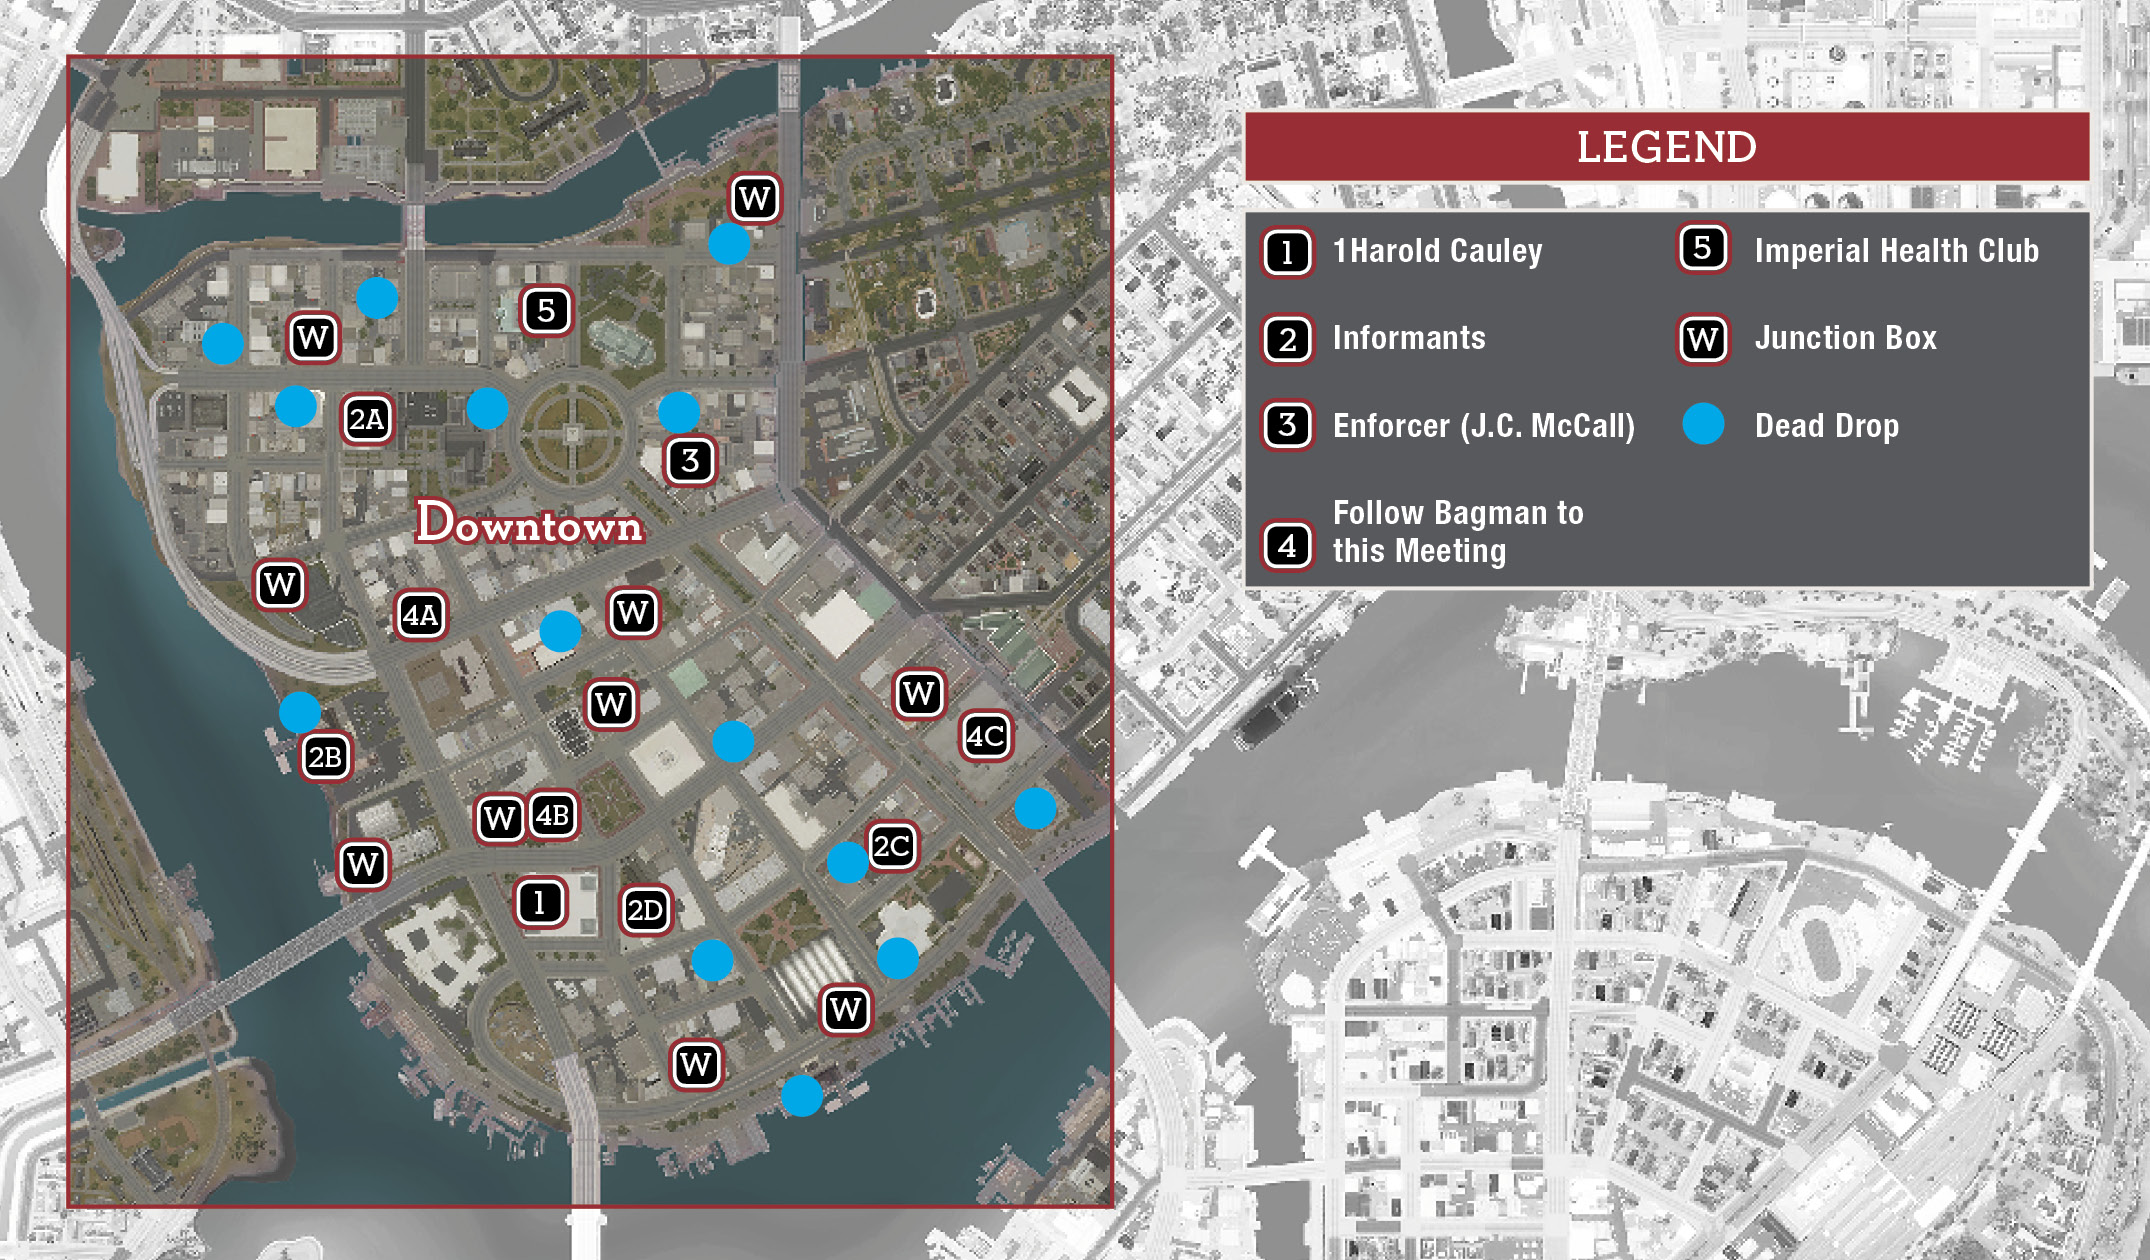
Activate this objective and follow the trip route into the underground Public Parking garage (1). At the gate, get out and go through the nearby door. Talk to the fellow standing at the elevators, Harold Cauley, a reporter for The Tattler who says he’s covering Tony Derazio’s corruption racket. He points Lincoln toward Frankie Bernard, the man running Derazio’s bribes and blackmail operation. Cauley also knows where Frankie’s couriers make their “dead drops,” and where Frankie stores his stash of blackmail cash.


Unlocks: Interrogate Blackmail Couriers
Unlocks: Find and Steal the Dead Drops
Unlocks: Kill Frankie’s Enforcer
Interrogate Blackmail Couriers (2)
Prerequisite: Talk to Harold Cauley
Informants will appear on your Downtown map at four locations (2a, 2b, 2c, 2d). After you visit two of them, you have what you need and the other two disappear from the map. From the first Informant, Lincoln learns that Frankie’s mobile bagmen deliver cash to dirty officials; from the second Informant, he learns that Frankie is running his Blackmail racket out of the Imperial Health Club.
First Interrogation Unlocks:Find and Follow the Bagmen
Second Interrogation Unlocks: Steal Frankie’s Blackmail Stash
Glenn ”Dimples” Tanzi

“Dimples” Tanzi and his crew hang out in the alley behind the Backwoods Lounge (2a) in northwest Downtown. Use the front entrance of the lounge, take cover at the back exit, and open the door. Dimples and his guys are right there! Whistle them over one by one or toss a grenade or Molotov in their midst to incapacitate Tanzi and kill his crew. Interrogate Tanzi for information.

Manny Forcella
Manny chats with an associate in an outdoor patio (2b). A good approach is along the low wall on the waterfront side of the patio. Incapacitate Manny and eliminate his goons. Then interrogate him for information.

Gianni Amici
Gianni and his boys loiter next to their car at the head of an alley (2c) just off the main street. Their proximity to the vehicle makes this an easy mark; just toss a grenade under the car. The explosion incapacitates Gianni and wipes out his entourage. (If any survive, take them out quickly.) Interrogate Gianni for information about Frankie’s racket.

Willy Jovino
Willy Jovino and his crew wait for a pickup in a loading lot (2d) behind a row of businesses in the southern sector of the Downtown district. Approach down the alley from the west (past the “Make Love Not War” wall graffiti).

Jovino’s men are spread out, so lure a couple over for silent takedowns before you rush Willy and incapacitate him. Don’t let him escape! Interrogate Willy to learn what he knows. Be sure to snag the $875 bag of cash next to the generator enclosure before you leave the lot.

Find and Steal the Dead Drops (15)
Prerequisite: Talk to Harold Cauley
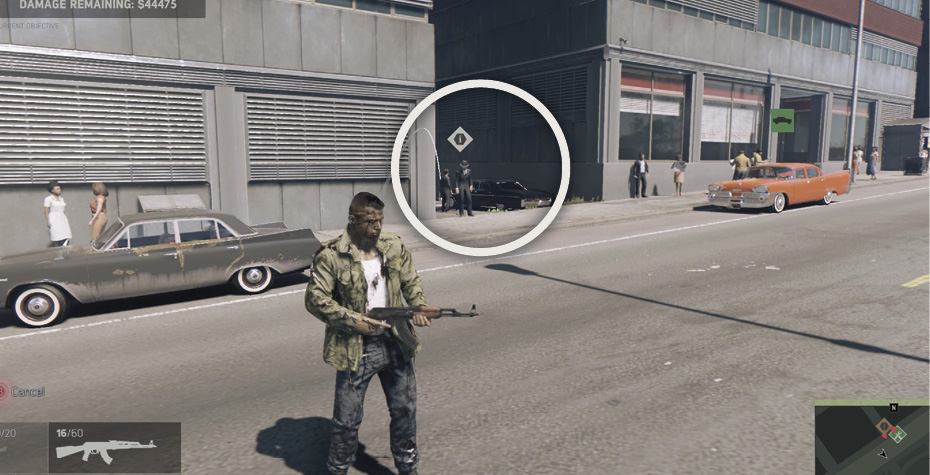
Frankie Bernard pays off local politicians at 15 secret locations called “dead drops” where he leaves cash for pickup. These drop spots appear as icons on your in-game map, but only in sectors you’ve wiretapped. (We marked them as blue dots on our district map.) In the game world, Frankie marks each location with his maze-like stamp (see our shot).

Approach the mark carefully—a mob courier often lurks at the site guarding the drop until pickup. Take him out, find the cash bag, and snag it for racket damage. You also find a note for the intended recipient near the bag.


Kill Frankie’s Enforcer
Prerequisite: Talk to Harold Cauley
J.C. McCall
J.C. McCall is a nasty brute. When you find him, J.C. is watching two of his gorillas dangle a poor snitch off the rooftop of a seedy building (3) in central Downtown. One tactic is to approach from the north with a sniper rifle and set up at the railing of the driveway directly across from the incident. Target McCall’s head for a one-shot kill worth racket damage.
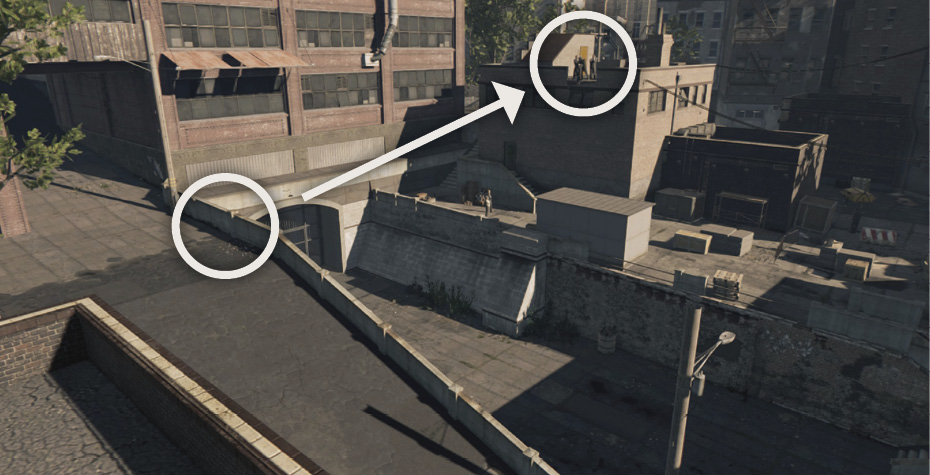

Another approach is to work your way around the building, stealthily (or noisily) taking out the ground-level goons. Then you can go inside and use the stairs to the roof; or you can climb atop the air conditioner unit and climb a pair of ladders to the roof. If you use the doorway, watch out for a gunman just inside, and don’t miss the Album Cover collectible in the hallway.

If J.C. knows you’re coming, he may rush downstairs to meet you. If not, sneak upstairs to the roof and take him down from behind. Then grab the $875 bag of cash.

Find and Follow the Bagmen (3)
Prerequisite: Interrogate Blackmail Couriers
As you learned from the Informants, Frankie has a crew of bagmen who deliver cash to dirty city officials. Each of the three bagmen drives a dark Potomac Gallant marked with an overhead “Follow” icon. When you see one, follow him to the meeting site (4a, 4b, 4c) to gun down the target (marked with a “Kill” icon overhead) and find a fat stack of cash.


Steal Frankie’s Blackmail Stash
Travel to the Imperial Health Club (5). Make sure the sector is wiretapped. The gleaming white Imperial has several rooms with lots of customers mixed with Frankie’s men, so you want the full Intel View as you navigate through the club.

The stash you seek is upstairs off the executive office suite. Enter the Imperial via the back entrance and proceed into the room with two small pools. Exit that room to the main pool area and veer left to climb the stairs. At the first landing (where you see a steamy hot tub directly ahead), take the left staircase up to the door marked “Personnel Only.” Enter to see laundry baskets and more stairs.


Climb the stairs to the roof and use Intel View to scan around. As you move across the roof, try to avoid guards, or else maneuver with stealth for silent takedowns. Enter the doorway at the roof’s back-right corner (it’s around a corner) and drop down through the trap door.

You land in a secret darkroom. A camera is set up to take photos through a one-way mirror of some steamy hot tub activity in the next room. Illicit photos are hung over the counter. Grab the blackmail log book sitting there to inflict a hefty damage to the Blackmail racket.

There’s more good stuff to grab before you go. The door from the darkroom leads to an office suite. Scout ahead with Intel View then take cover at the door and open it. Whistle to lure as many of Frankie’s men as you can for silent takedowns. Then move left past the gaming table and private bar to the well-appointed executive office and snag the $3000 pile of cash on the desk.
Here you can retrace your route up to the roof and back down to the club’s rear entrance to escape. Or you can work your way through the entire health club if you want, where you’ll find a lot of cash and quite a few goons.
Talk to Harold Cauley
Return to Cauley in the underground parking garage (1). He reports that an angry Tony Derazio has ordered Frankie Bernard to personally oversee the action at the Imperial Health Club.
Confront Frankie Bernard


Return to the Imperial Health Club (4). Frankie is up in the executive office you visited earlier. So you can reprise the route via roof and darkroom that you used in your previous visit. (See the “Steal Frankie’s Blackmail Stash” objective.) Guards will be deployed differently, but the route and basic approach remains the same. Just rely on Intel View to see what lies ahead, and react accordingly.
When you finally reach the office, Frankie will take cover behind his desk or palm planter. Incapacitate him and then seize him for a kill-or-recruit moment. Lincoln now takes control of the Downtown Blackmail racket. Assign it to one of your Underbosses. Time to go get Tony Derazio.