
Fallout 76 Guide Training Special Attributes and Perks
What Makes You SPECIAL?
Your Strength, Perception, Endurance, Charisma, Intelligence, Agility, and Luck, of course! These primary statistics, also known as attributes, are the bedrock from which you’re chiseled. They range in value from 1 (woefully inadequate) to 15 (godlike). Each affects a different aspect of you and allows you to use a specific number of Perk Cards. This chapter provides advice on leveling up, and covers the other active effects that can affect your attributes. We also give a comprehensive tactical analysis of every one of the 211 perks you can acquire.
Attributes Overview
Strength: Measures your raw physical power. It affects how much you can carry and determines the damage of all melee attacks.
Perception: Your sense of environmental awareness. It affects your hit chance in V.A.T.S. and the distance that hostiles will show up on your compass.
Endurance: Measures your overall physical fitness. It affects your total Health, Action Point (AP) drain from sprinting, and chance to get a disease.
Charisma: Your ability to work with others. It affects which perks you can share with your team, the rewards from completing group quests, and the prices you get when buying from and selling to vendors.
Intelligence: Measures your overall mental acuity. It affects the condition and durability of crafted items, the amount of material gained from scrapping, and the difficulty of hacking.
Agility: Measures your overall finesse and reflexes. It determines your AP in V.A.T.S. and your ability to sneak.
Luck: Measures your general good fortune. It affects the recharge rate of Critical Hits and the condition and durability of items you loot.
Experience, Leveling up, and Perks
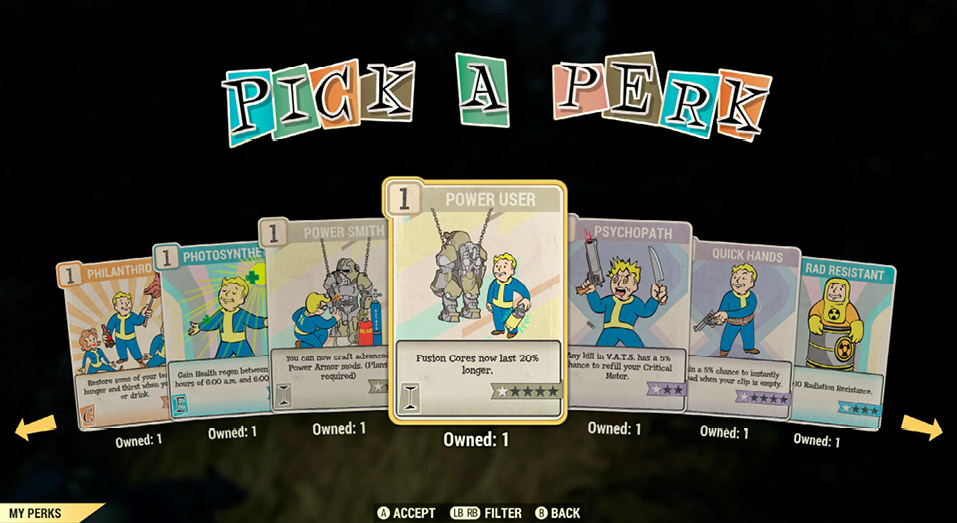
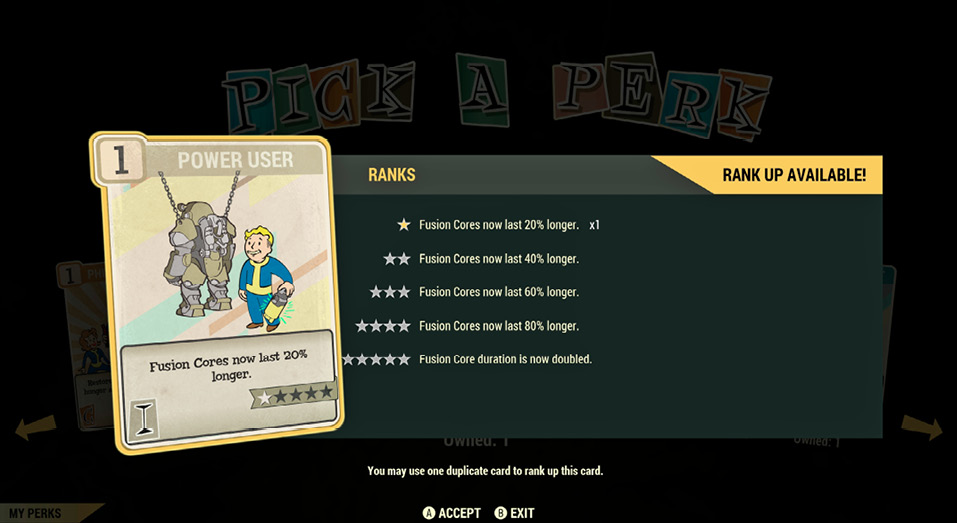
Leveling up allows you to increase one of your SPECIAL stats, gives you a choice of a new perk (from the Card Packs you’ve opened), and helps you meet the level requirements for certain equipment.
As you complete quests, defeat enemies, and explore the world, you’ll earn Experience Points (XP). Once you’ve gained sufficient XP, your level will increase.
Open your Pip-Boy and access the Level Up menu. Choose one of your SPECIAL stats to increase. Also choose a new perk associated with the SPECIAL stat you chose.
(Note: You will stop receiving SPECIAL increases once your level is higher than 50, but you will keep receiving new perks).
After selecting a SPECIAL stat to level up, you don’t have to choose a perk card related specifically to that attribute: Instead, you can swap to a different Attribute to choose your perk.
Perk Up!
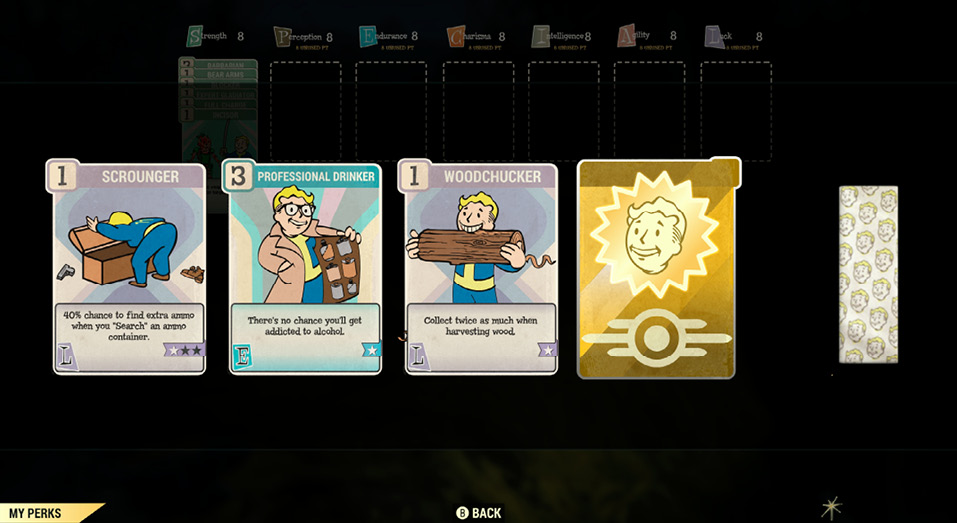
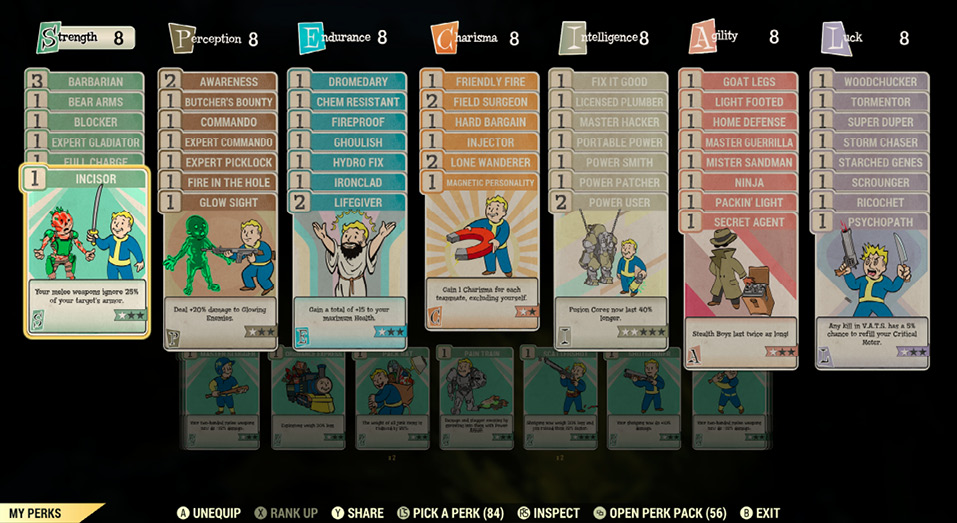
After you make your selections, you’ll enter the Perk menu. Perks are special abilities that can affect everything form the damage you deal in combat, to your ability to help your teammates, to being able to open locks and hack terminals. You can reassign all your perks from the Perk Menu. The bottom row of cards are your available perks, and the top row of cards are all the perks you have equipped.
When you equip a perk, it is assigned to its associated SPECIAL stat. For example, the Gladiator perk is a Strength perk, and goes into your Strength slot when you equip it.
There is a limit to the number of perks that each SPECIAL stat can hold. Every perk has a number in the upper-left corner. This is how many points the perk is worth. Your total number of perk points can’t exceed the associated SPECIAL stat. For example, if your Strength is 3, then you cannot have more than 3 points’ worth of Strength perks. Whether you choose to equip several low-point perks or one high-point perk is up to you.
Also make sure you add Perk Cards to every attribute, not just the ones you’re interested in. Every one of your attributes should have one or more Perk Cards active, or you’re wasting the power of your perks!
Level Requirements for Items
Some weapons, armor, and Power Armor pieces have a minimum level requirement to use them. You can’t equip an item if you aren’t the appropriate level or higher. You can see the minimum level of an item by going to the Items category in the Pip-Boy and selecting the item.
Perk Ranks
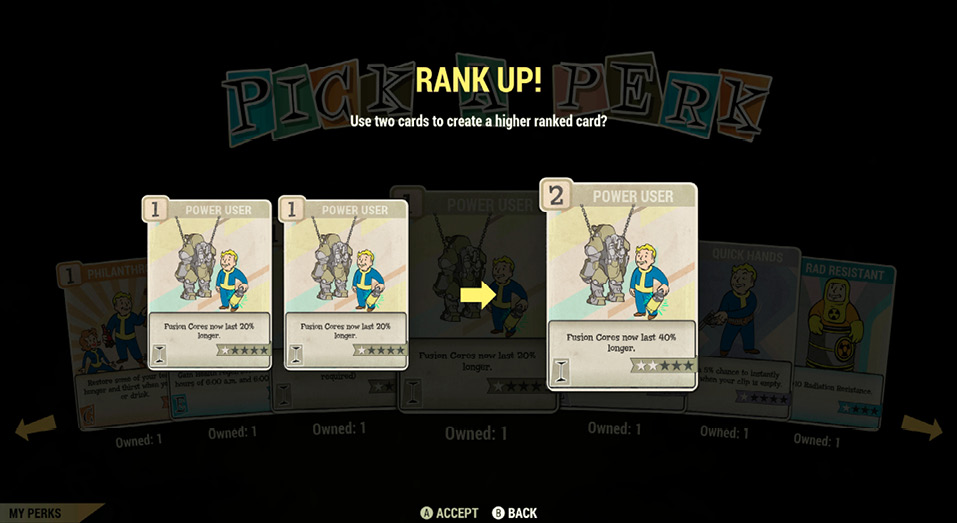
Some perks have multiple ranks. You can rank up a perk by combining it with a duplicate. For example, two Gladiator rank 1 perks can be combined to produce one Gladiator rank 2 perk.
To rank up a perk, first equip the perk and then consume the duplicate perk.
Sharing Perks
You can elect a perk to share with all members of your team. Enter the Perk Menu, select an equipped perk, and share it. In order to share perks, your Charisma must be greater than or equal to three times the point value of the point card you are trying to share. (for example, 3 CHA for a 1-point card, or 9 CHA for a 3-point card).
Building Character: Perk Availability by Level
As you continue to level up, more potent and additionally interesting perks become available to add to each of your attributes. Remember, Perk Card packs are random, with a selection of Common, Uncommon, and (possible) Rare cards in them. While you can always select a perk card when levelling up, you aren’t always guaranteed to receive a Perk Card by the indicated level (you could obtain it much sooner or even later!). The following chart lists all the available perks and the player level at which they become available. Check later in this chapter for detailed descriptions of every Perk card!
Perk Cards Available (Cost per Rank)
| Level | STRENGTH | PERCEPTION | ENDURANCE | CHARISMA | INTELLIGENCE | AGILITY | LUCK |
|---|---|---|---|---|---|---|---|
|
Level 2 |
Iron Fist (1, 2, 3, 4, 5) |
Concentrated Fire (1, 2, 3) |
Lead Belly (1, 2, 3) |
Inspirational (1, 2, 3) |
First Aid (1, 2, 3, 4) |
Action Boy/Girl (1, 2, 3) |
Pharma Farma (1, 2, 3) |
|
Thru-Hiker (1, 2, 3) |
|||||||
|
Level 3 |
Traveling Pharmacy (1, 2, 3) |
Butcher's Bounty (1, 2, 3) |
Dromedary (1, 2, 3) |
Happy Camper (1, 2) |
Makeshift Warrior (1, 2, 3) |
Born Survivor (1, 2, 3) |
Scrounger (1, 2, 3) |
|
Level 4 |
Bandolier (1, 2, 3) |
Green Thumb (1) |
Iron Stomach (1, 2, 3) |
Lone Wanderer (2, 3, 4) |
Hacker (1) |
Gun Runner (1, 2) |
|
|
Level 5 |
Gladiator (1, 2, 3) |
Picklock (1) |
Slow Metabolizer (1, 2, 3) |
Bodyguards (1, 2, 3, 4) |
Licensed Plumber (1, 2, 3) |
Moving Target (1, 2, 3) |
Serendipity (1, 2, 3) |
|
Level 6 |
Pack Rat (1, 2, 3) |
Thirst Quencher (1, 2, 3) |
Pharmacist (1, 2, 3) |
Gunslinger (1, 2, 3) |
|||
|
Level 7 |
Slugger (1, 2, 4) |
Crack Shot (1, 2, 3, 4) |
Hard Bargain (1, 2, 3) |
Can Do! (1,2,3) |
|||
|
Level 8 |
Rifleman (1) |
Good Doggy (1, 2, 3) |
Exotic Weapons (1, 2) |
Dead Man Sprinting (1, 2) |
|||
|
Level 9 |
E.M.T. (1, 2, 3) |
Packin’ Light (1, 2, 3) |
Good With Salt (1, 2, 3) |
||||
|
Level 10 |
Shotgunner (1, 2, 3) |
Skeet Shooter (1, 2, 3, 4) |
Natural Resistance (1, 2, 3) |
Demolition Expert (1, 2, 3, 4, 5) |
Guerrilla (1, 2, 3) |
Junk Shield (1, 2, 3) |
|
|
Level 11 |
Basher (1, 2) |
Bloodsucker (1, 2, 3) |
|||||
|
Level 12 |
Pannapictagraphist (1) |
Hydro Fix (1, 3), Rejuvenated (1, 2) |
Mystery Meat (1, 2, 3) |
||||
|
Level 13 |
Sturdy Frame (1, 2) |
Magnetic Personality (1, 2) |
Scrapper (1) |
Marathoner (1, 2, 3) |
|||
|
Level 14 |
Barbarian (1, 2, 3) |
Exterminator (1, 2, 3) |
Cola Nut (1, 2) |
Luck of the Draw (1, 2, 3) |
|||
|
Level 15 |
Commando (1, 2, 3) |
Field Surgeon (2) |
Armorer (1, 2, 3) |
Ninja (1, 2, 3) |
|||
|
Level 16 |
Martial Artist (1, 2, 3) |
Percepti-Bobble (1) |
Vaccinated (1, 2, 3) |
Exotic Weapons Expert (1, 2) |
Cap Collector (1, 2, 3, 4) |
||
|
Level 17 |
Munchy Resistance (1, 3) |
Happy-Go-Lucky (1, 2) |
Evasive (1, 2, 3) |
Woodchucker (1) |
|||
|
Level 18 |
Scattershot (1, 2, 3, 4) |
Ground Pounder (1, 2, 3, 4) |
Contractor (1, 2) |
Modern Renegade (1, 2, 3, 4) |
|||
|
Level 19 |
Expert Picklock (1) |
Homebody (1, 2) |
Injector (1, 2, 3) |
Curator (1) |
|||
|
Level 20 |
Expert Gladiator (1, 2, 3) |
Expert Rifleman (1, 2, 3) |
Team Medic (1, 2, 4) |
Science (1, 2) |
Sneak (1, 2, 3, 4, 5) |
||
|
Level 21 |
Blocker (1, 2, 3) |
Adamantium Skeleton (1, 2, 3, 4, 5) |
Psychopath (1, 2, 3) |
||||
|
Level 22 |
Fortune Finder (1) |
Solar Powered (1, 2, 3) |
Quack Surgeon (1) |
Expert Hacker (1) |
Home Defense (1, 2, 3) |
||
|
Level 23 |
Expert Shotgunner (1, 2, 3) |
Chem Fiend (1, 2, 3) |
Gunsmith (1, 2, 3) |
Dry Nurse (1, 2, 3) |
|||
|
Level 24 |
Expert Slugger (1, 2, 3) |
Night Person (1, 2, 3) |
Party Boy/Girl (2, 3) |
Expert Gunslinger (1, 2, 3) |
Lucky Break (1) |
||
|
Level 25 |
Expert Commando (1, 2, 3) |
Cannibal (1, 2, 3) |
Exotic Weapons Master (1, 2) |
Expert Guerilla (1, 2, 3) |
|||
|
Level 26 |
Strong Back (1, 2, 3, 4) |
Aquaboy (1) |
Travel Agent (1) |
Mysterious Stranger (1, 2, 3) |
|||
|
Level 27 |
Awareness (2) |
Fireproof (1, 2, 3) |
Fix It Good (1, 2, 3) |
Covert Operative (1, 2, 3) |
Last Laugh (1) |
||
|
Level 28 |
Sniper (1, 2, 3) |
Healing Hands (1, 2, 3) |
Batteries Included (1, 2, 3) |
||||
|
Level 29 |
Nocturnal Fortitude (1,2) |
Wrecking Ball (1,2,3) |
Light Footed (1) |
Four Leaf Clover (1,2,3,4) |
|||
|
Level 30 |
Heavy Gunner (1, 2, 3) |
Tank Killer (1, 2, 3, 4) |
Ironclad (1, 2, 3, 4, 5) |
Animal Friend (1, 2, 3) |
Enforcer (1, 2, 3, 4) |
Starched Genes (1, 2) |
|
|
Level 31 |
Ordnance Express (1, 2, 3) |
Science Expert (1, 2) |
One Gun Army (1, 2, 3, 4) |
||||
|
Level 32 |
Refractor (1, 2, 3, 4) |
Revenant (1, 2) |
Overly Generous (1, 2) |
Goat Legs (1, 2) |
|||
|
Level 33 |
Full Charge (1, 2) |
Glow Sight (1, 2, 3) |
Grease Monkey (1, 2) |
Grim Reaper's Sprint (1, 2, 3) |
|||
|
Level 34 |
Incisor (1, 2, 3) |
Rad Resistant (1, 2, 3, 4) |
Anti-Epidemic (1, 2) |
Chemist (1, 2) |
Ammosmith (1, 2, 3) |
||
|
Level 35 |
Bear Arms (1, 2, 3, 4) |
Grenadier (1, 2) |
Escape Artist (1) |
Storm Chaser (1, 2) |
|||
|
Level 36 |
Ghoulish (1, 2, 3) |
Spiritual Healer (1, 2, 3) |
Stabilized (1, 2, 3, 4) |
||||
|
Level 37 |
Lock and Load (1, 2, 3) |
Long Shot (1, 2, 3, 4) |
Squad Maneuvers (1, 2) |
Mister Sandman (1, 2) |
Tormentor (1, 2, 3, 4) |
||
|
Level 38 |
Fire in the Hole (1, 2, 3) |
Radicool (1) |
Master Hacker (1) |
Ricochet (1, 2, 3, 4) |
|||
|
Level 39 |
Bullet Shield (1, 2, 3, 4) |
Professional Drinker (3) |
Philanthropist (1, 2, 3) |
White Knight (1, 2, 3) |
|||
|
Level 40 |
Expert Heavy Gunner (1, 2, 3) |
Master Picklock (1) |
Suppressor (1, 2, 3) |
Weapon Artisan (1, 2, 3) |
Quick Hands (1, 2, 3, 4, 5) |
||
|
Level 41 |
Pain Train (1, 2, 3) |
All Night Long (1, 2, 3) |
Power Smith (1, 2, 3) |
Master Gunslinger (1, 2, 3) |
|||
|
Level 42 |
Master Rifleman (1, 2, 3) |
Strange in Numbers (1) |
Bloody Mess (1, 2, 3) |
||||
|
Level 43 |
Master Gladiator (1, 2, 3) |
Chem Resistant (1, 2) |
Science Master (1, 2) |
Master Guerrilla (1, 2, 3) |
|||
|
Level 44 |
Rad Sponge (1, 2, 3) |
Power Patcher (1, 2, 3) |
Critical Savvy (1, 2, 3) |
||||
|
Level 45 |
Master Shotgunner (1, 2, 3) |
Master Commando (1, 2, 3) |
Sun Kissed (1, 2) |
Dodgy (1, 2, 3) |
|||
|
Level 46 |
Tenderizer (1,2,3) |
Nerd Rage! (1,2,3) |
Class Freak (1,2,3) |
||||
|
Level 47 |
Night Eyes (2) |
Photosynthetic (1,2) |
Secret Agent (1,2,3) |
Better Criticals (1,2,3) |
|||
|
Level 48 |
Master Slugger (1,2,3) |
Friendly Fire (1, 2, 3) |
Robotics Expert (1, 2, 3) |
||||
|
Level 49 |
Portable Power (1, 2, 3) |
Adrenaline (1, 2, 3, 4, 5) |
Mysterious Savior (1, 2, 3) |
||||
|
Level 50 |
Master Heavy Gunner (1, 2, 3) |
Penetrator (1 ,2, 3) |
Lifegiver (2, 3, 4) |
Wasteland Whisperer (1, 2, 3) |
Power User (1, 2, 3, 4, 5) |
Gun Fu (1, 2, 3) |
Super Duper (1, 2, 3, 4) |
Tips: Pertinent Perk Planning and the Right Attribute Attitude
Effectively using perks with your attribute bonuses and other bonuses bestowed on you by items, weaponry, and other effects is the key to thriving, not just surviving. Make sure you understand how perks can benefit you.
Attributes: No Substitutes!
You have a maximum of 50 attribute points to allocate. These are much more important than your Perk Card choices, as allocating attribute points is permanent. With each attribute having a theoretical maximum of 15, you’d need 105 attribute points to max all of them out. With only 50 total, you need to specialize, so figure it out early (look to our Archetypes section for quick advice). If you want a “flat” attribute, gradually bring each attribute up to 7, with one at 8 (which equals 50).
Attributes: Over the Maximum!
As the Archetypes section demonstrates, the example Level 50 characters actually have attribute points that add up to 56. How so? Because Attribute-increasing perks, chems, armor, weapons, Bobbleheads, and Magazines were all used to achieve this (though you can’t equip perks with SPECIAL bonuses provided by magic effects). If you need an extra boost, check your inventory for items that can do the job.
Early Learning
Look at the levels of every perk and single out the ones you can use early, along with the associated items or weapons with those perks. For example, look to specialize your one-handed melee weapons at Level 5 with the Gladiator perk, rather than heavy guns (as Heavy Gunner perk requires you to be Level 30). The same is true for many other items, like Power Armor.
Grouping Perks
One of the benefits of the Perk Card system is that you can swap out your active Perk Cards at any time. Have a group of perks for your different styles of play, and only have them active when they are actively benefiting you. For example, remove (or “shelve”) the Luck perk Woodchucker until you’re focusing only on collecting wood and want higher yields.
Stacking Perks
Stacking is usually available in most situations, allowing you to add additional benefits in the following ways:
- Utilizing multiples of the same perk: For example, Gladiator Ranks 1, 2, and 3, and Expert Gladiator Ranks 1, 2, 3.
- Utilizing related bonuses of two different perks:For example, using the Strength perk Strong Back, which adds to your Carry Weight; and using the Endurance perk Radicool, which adds Strength Attribute points if you’re irradiated, and more Strength also adds to your Carry Weight.
- Utilizing related bonuses of a perk and other item:For example, the Endurance perk Radicool, which adds Strength Attributes if you’re irradiated, and the Strength Bobblehead, which adds Strength Attribute points for a limited time.
Weapon Specialization Perks Across Attributes
You may be focusing on strength and looking to specialize in melee, shotguns, and (eventually) heavy weapons. But there are similar, damage-increasing Perception perks such as Commando (auto rifles) and Rifleman (nonauto rifles), and the Agility perks Guerrilla (auto pistols) and Gunslinger (nonauto pistols). Why are these important? Because you can specialize in, say, auto rifles, freeing your Strength points up for other, non-weapon-related perks.
SUPER-SPECIALIZATION: A WARNING
It really pays not to super-specialize your SPECIALs; if you choose one attribute and go deep with just that, then spread out your level ups evenly, it allows you to choose Perks late into the game that suit the challenges you’re facing. But if you (for example) have three SPECIALs at 15, you’ll have very little ability to pick up key Perks you decide you need later, related to the other attributes.
Other Active Effects
Before we delve into the world of Perk Cards, be sure you’re aware of other effects that can penalize or increase your statistics and general well-being. While effects that are item-related (like chems) are listed in the Inventory chapter, the following details environmental and collectible effects:
Resting and Instruments
Rest on a bed away from the ground (or you risk a disease), and/or play a musical instrument to receive the following:
| Effect | Description | Bonus or Penalty |
|---|---|---|
|
Well Rested |
Sleep in a mattress or bed |
+10% to your XP (limited time) |
|
Well Tuned |
Play a musical instrument |
+25 AP Regeneration (limited time) |
Diseases
Diseases are entirely negative penalties to the player. They only last for a specific amount of time. They can be acquired from diseased creatures or from the environment (airborne, waterborne, from traps, and from beds).
| disease | Penalty |
|---|---|
|
Blight |
-1 to all SPECIAL stats for 15 minutes |
|
Blood Worms |
Take 25% more damage for 15 minutes |
|
Bone Worms |
Take 50% more limb damage for 15 minutes |
|
Buzz Brain |
-2 Intelligence for 15 minutes |
|
Dysentery |
Periodic water loss for 15 minutes |
|
Fever Claw |
-25% Damage with Ranged Weapons for 15 minutes |
|
Flap Limb |
-2 Strength for 15 minutes |
|
Glowing Pustules |
Bleed radiation from wounds for 15 minutes |
|
Heat Flashes |
-2 Endurance for 15 minutes |
|
Jelly Fingers |
+50% Ranged VATS AP Cost for 15 minutes |
|
Lock Joint |
+50% Melee VATS AP Cost for 15 minutes |
|
Needle Spine |
-10 Carry Capacity for 15 minutes |
|
Parasites |
Periodic food loss for 15 minutes |
|
Rad Worms |
Take 50% more Radiation Damage for 15 minutes |
|
Rattle Hands |
-25% Damage with Ranged Weapons for 15 minutes |
|
Shell Shock |
Action Point drain from wounds for 15 minutes |
|
Sludge Lung |
-50% Action Points and AP regeneration for 15 minutes |
|
Snot Ear |
-2 Perception for 15 minutes |
|
Swamp Gas |
-2 Charisma for 15 minutes |
|
Swamp Itch |
-2 Agility for 15 minutes |
|
Weeping Sores |
Bleed from wounds for 15 minutes |
|
The Woopsies |
-2 Luck for 15 minutes |
Mutations
Mutations are permanent effects (though they can be cured). They bring both positive and negative aspects that alter a player’s gameplay. Players will consider these desirable or undesirable depending on their chosen build.
Mutations are not related to diseases. Players obtain mutations by being exposed to Radiation. The higher a player’s current Rads, the more likely it is that they will gain a mutation. Mutations can be cured with RadAway, Diluted RadAway or decontamination arches found in the world. The lower a players’ Rads, the more likely that a mutation will be cured.
The Starched Genes perk can remove the player’s chance to mutate and also prevent mutations from being cured, allowing players to lock in the mutations that they may want, and/or not engage further with mutations at all.
| Mutation | Positive Effects | Negative Effects |
|---|---|---|
|
Adrenal Reaction |
Increased damage output at low health |
-50 Health |
|
Bird Bones |
+4 Agility, fall more slowly, and take less damage from falling |
-4 Strength |
|
Carnivore |
Gain double benefits from eating meat with no risk of disease |
Gain no benefits from eating vegetables |
|
Chameleon |
Invisible in combat if unarmored and stationary |
Must be unarmored and stationary for effect to work |
|
Eagle Eyes |
+4 Perception and +25% V.A.T.S. Critical Damage |
-4 Strength |
|
Egg Head |
+6 Intelligence |
|
|
Electrically Charged |
Chance to shock enemies in a radius when you are struck by melee attacks |
Small damage to yourself when this occurs |
|
Empath |
Your teammates receive 25% less damage |
You receive 33% more damage |
|
Grounded |
+100 Energy Resistance |
-50% Energy Weapon damage |
|
Healing Factor |
Permanent health regeneration |
Chem effects (including healing) reduced by 55% |
|
Herbivore |
Gain double benefits from eating vegetables with no risk of disease |
Gain no benefits from eating meat |
|
Herd Mentality |
+2 to all SPECIALs when in a group |
-2 to all SPECIALs when solo |
|
Marsupial |
+20 carry weight, and you can jump much higher |
-4 Intelligence |
|
Plague Walker |
Gain an aura of poison damage, scaling with the number diseases you are suffering (up to a ceiling of 4) |
You must be diseased |
|
Scaly Skin |
+50 Damage and Energy Resistance |
-50 Action Points |
|
Speed Demon |
+20% run and sprint speed, +30% faster reload speed |
Gain hunger and thirst 50% more quickly while moving |
|
Talons |
+25% Fist Damage, and fist attacks cause 25 additional bleed damage over 5 seconds |
-4 Agility |
|
Twisted Muscles |
+25% Melee Damage, and a small chance to cripple your opponent |
Gun accuracy reduced by 50% |
|
Unstable Isotope |
Chance to blast enemies in a radius with radiation when you are struck by melee |
Small damage to yourself when this occurs (and many enemies are immune to radiation) |
Bobbleheads

Should you acquire a Bobblehead on your travels (which appear in the same places but randomly and not every time you visit), keep it until you wish to utilize it, as it only lasts for a short time (though if you leave and return to the game, the effect still continues). Use the Luck perk Curator to increase the time a Bobblehead lasts.
| Bobblehead | Description |
|---|---|
|
"Never be afraid to dodge the sensitive issues." Gain +2 Agility for 10 hours. |
|
|
Big Guns |
"The best way to win an argument is to be the loudest." Gain +20% damage with heavy guns for 10 hours. |
|
Caps |
"Never forget to walk away with more than you've bought." You are twice as likely to find better Caps Stashes for 10 hours. |
|
"Nothing says pizzazz like a winning smile." Gain +2 Charisma for 10 hours. |
|
|
"Always be ready to take one for the team." Gain +2 Endurance for 10 hours. |
|
|
Energy Weapons |
"Arrive at peaceful resolutions by using superior firepower." Gain +20% damage with energy guns for 10 hours. |
|
Explosives |
"The best way to solve a problem is to make it go away." Gain +30% damage with explosives for 10 hours. |
|
"The smartest individuals realize there's always more to learn." Gain +2 Intelligence for 10 hours. |
|
|
Leader |
"Lead by example." Gain 5% more experience for 10 hours. |
|
Lockpicking |
"Always strive for the unobtainable." Gain a 30% wider "sweet spot" when lockpicking for 10 hours. |
|
"There's only one way to give 110%." Gain +2 Luck for 10 hours. |
|
|
Medicine |
"The smart man knows a bandage only hides his wounds." Heal 30% more with Stimpaks for 10 hours. |
|
Melee Weapons |
"It's important to do business up close and personal." Gain +20% damage with melee weapons for 10 hours. |
|
"Only through observation will you perceive weakness." Gain +2 Perception for 10 hours. |
|
|
Repair |
"Why go down with the ship when you can try to fix it?" Fusion Cores last 30% longer for 10 hours. |
|
Science |
"Always be prepared to explain the hows and the whys." For 10 hours get one extra guess when hacking terminals. |
|
Small Guns |
"Because it's easier to have courage from a safe distance away." Gain +20% damage with ballistic guns for 10 hours. |
|
Sneak |
"The safest distance between two points is a shadowy line." You are 30% harder to detect for 10 hours. |
|
"It's essential to give your arguments impact." Gain +2 Strength for 10 hours. |
|
|
Unarmed |
"When words fail, there's always fists." Gain +25% damage with unarmed attacks for 10 hours. |
Magazines

Also keep a lookout for various reading materials throughout your travels. Like Bobbleheads, these, too, appear in the same places but randomly, and not every time you visit. Keep the Magazine until you wish to utilize it, as it lasts for only a short amount of time (though if you leave and return to the game, the effect still continues). Use the Luck perk Curator to increase the time a Magazine lasts.
| Magazine | Description |
|---|---|
|
Astonishing Tales 1 |
For 2 hours, do +15% damage against Mothmen. |
|
Astonishing Tales 2 |
For 2 hours, do +15% damage against the Grafton Monsters. |
|
Astonishing Tales 3 |
For 2 hours, do +15% damage against the Snallygasters. |
|
Astonishing Tales 4 |
For 2 hours, do +15% damage against Flatwoods Aliens. |
|
Astonishing Tales 5 |
For 2 hours, do +15% damage against the Wendigos. |
|
Astoundingly Awesome Tales 1 |
For 2 hours, do 15% more damage to Mirelurks. |
|
Astoundingly Awesome Tales 2 |
For 2 hours, do 15% more damage to Super Mutants. |
|
Astoundingly Awesome Tales 3 |
For 2 hours, swim twice as fast. |
|
Astoundingly Awesome Tales 4 |
For 2 hours, do 25% more damage with the Alien Blaster. |
|
Astoundingly Awesome Tales 5 |
For 2 hours, do 25% more damage with the Cryolator. |
|
Astoundingly Awesome Tales 6 |
For 2 hours, regenerate 20 points of health per minute. |
|
Astoundingly Awesome Tales 7 |
For 2 hours, gain 5 maximum AP. |
|
Astoundingly Awesome Tales 8 |
For 2 hours, take 25% less damage from robots. |
|
Astoundingly Awesome Tales 9 |
For 2 hours, gain 15 Poison Resistance. |
|
Astoundingly Awesome Tales 10 |
For 2 hours, do +15 more damage with scoped weapons. |
|
Astoundingly Awesome Tales 11 |
For 2 hours, do +15 more damage to Ghouls. |
|
Astoundingly Awesome Tales 12 |
For 2 hours, you are 30% less likely to catch a disease. |
|
Astoundingly Awesome Tales 13 |
For 2 hours, RadAway will heal 30% more radiation damage. |
|
Backwoodsman 1 |
For 2 hours, collect extra meat when you search dead animals. |
|
Backwoodsman 2 |
For 2 hours, do 25% more damage with tomahawks. |
|
Backwoodsman 3 |
For 2 hours, crafting weapons costs fewer materials. |
|
Backwoodsman 4 |
For 2 hours, gain a 50% chance for double yield when harvesting plants. |
|
Backwoodsman 5 |
For 2 hours, do 15% more damage to animals. |
|
Backwoodsman 6 |
For 2 hours, receive 50% more healing from cooked food. |
|
Backwoodsman 7 |
For 2 hours, you are 50% less likely to become diseased from food and drink. |
|
Backwoodsman 8 |
For 2 hours, you are 30% more satisfied by eating and drinking. |
|
Backwoodsman 9 |
For 2 hours, repairs to your camp or workshop cost 50% fewer materials. |
|
Backwoodsman 10 |
For 2 hours, turrets in your camp or workshop do 50% more damage. |
|
Grognak the Barbarian 1 |
For 2 hours, do 15% more melee damage. |
|
Grognak the Barbarian 2 |
For 2 hours, you are 20% harder to detect while sneaking. |
|
Grognak the Barbarian 3 |
For 2 hours, gain 15 Poison Resistance. |
|
Grognak the Barbarian 4 |
For 2 hours, do +30% V.A.T.S. crit damage with melee weapons. |
|
Grognak the Barbarian 5 |
For 2 hours, do 15% more damage to Scorched enemies. |
|
Grognak the Barbarian 6 |
For 2 hours, melee weapons weigh 75% less. |
|
Grognak the Barbarian 7 |
For 2 hours, melee weapons lose condition 50% more slowly. |
|
Grognak the Barbarian 8 |
For 2 hours, gain 2 Damage Resistance for each point of Charisma. |
|
Grognak the Barbarian 9 |
For 2 hours, gain 10 Carry Capacity. |
|
Grognak the Barbarian 10 |
For 2 hours, gain 15 Energy Resistance. |
|
Guns and Bullets 1 |
For 2 hours, do 15% more damage to robots. |
|
Guns and Bullets 2 |
For 2 hours, do +30% V.A.T.S. crit damage with laser weapons. |
|
Guns and Bullets 3 |
For 2 hours, do +30% V.A.T.S. crit damage with ballistic guns. |
|
Guns and Bullets 4 |
For 2 hours, gain 6 AP regeneration. |
|
Guns and Bullets 5 |
For 2 hours, gain 50% more components when scrapping weapons. |
|
Guns and Bullets 6 |
For 2 hours, gain 10 Damage Resistance at night. |
|
Guns and Bullets 7 |
For 2 hours, do 10% more damage with guns without scopes. |
|
Guns and Bullets 8 |
For 2 hours, do 15% more damage to Yao Guai. |
|
Guns and Bullets 9 |
For 2 hours, do +30% V.A.T.S. crit damage with plasma weapons. |
|
Guns and Bullets 10 |
For 2 hours, do 15% more damage to Liberator Bots. |
|
Live and Love 1 |
For 2 hours, gain 10 maximum health when on a team. |
|
Live and Love 2 |
For 2 hours, inflict +5 more damage when you are on a team. |
|
Live and Love 3 |
For 2 hours, heal 50% more from eating vegetables and fruits. |
|
Live and Love 4 |
For 2 hours, gain 10 AP regeneration when on a team. |
|
Live and Love 5 |
For 2 hours, gain +2 Luck from drinking alcohol. |
|
Live and Love 6 |
For 2 hours, gain +10 Damage Resist when on a team. |
|
Live and Love 7 |
For 2 hours, gain 10 max AP when on a team. |
|
Live and Love 8 |
For 2 hours, ain 5% more XP while in a team. |
|
Live and Love 9 |
For 2 hours, take 25% less damage from robots. |
|
Scout's Life 1 |
For 2 hours, suffer 30% less radiation from eating or drinking. |
|
Scout's Life 2 |
For 2 hours, take 25% less damage from insects. |
|
Scout's Life 3 |
For 2 hours, gain 10 Carry Capacity. |
|
Scout's Life 4 |
For 2 hours, you have twice the normal bleedout time before dying. |
|
Scout's Life 5 |
For 2 hours, you are 80% less likely to catch diseases from creatures. |
|
Scout's Life 6 |
For 2 hours, you become hungry and thirsty 30% more slowly. |
|
Scout's Life 7 |
For 2 hours, take 25% less damage from animals. |
|
Scout's Life 8 |
For 2 hours, sprinting uses 20% fewer AP. |
|
Scout's Life 9 |
For 2 hours, placing a camp costs 80% fewer Caps. |
|
Scout's Life 10 |
For 2 hours, equpped items lose condition 30% more slowly. |
|
Tesla Science 1 |
For 2 hours, take 25% less damage from robots. |
|
Tesla Science 2 |
For 2 hours, take 25% less damage from plasma weapons, grenades, and mines. |
|
Tesla Science 3 |
For 2 hours, your explosive attacks have a 30% larger radius. |
|
Tesla Science 4 |
For 2 hours, your Power Armor consumes Fusion Cores 15% more slowly. |
|
Tesla Science 5 |
For 2 hours, your heavy guns consume ammo 20% more slowly. |
|
Tesla Science 6 |
For 2 hours, gain 15 Radiation Resistance vs. the environment. |
|
Tesla Science 7 |
For 2 hours, do +30% V.A.T.S. crit damage with energy weapons. |
|
Tesla Science 8 |
For 2 hours, do +15% V.A.T.S. crit damage with all weapons. |
|
Tesla Science 9 |
For 2 hours, do +30% V.A.T.S. crit damage with heavy guns. |
|
Tumblers Today 1 |
For 2 hours, gain a 20% wider "sweet spot" while lockpicking. |
|
Tumblers Today 2 |
For 2 hours, find extra bobby pins when you search bobby pin boxes. |
|
Tumblers Today 3 |
For 2 hours, gain +1 lockpicking skill. |
|
Tumblers Today 4 |
For 2 hours, your bobby pins will never break while picking locks. |
|
Tumblers Today 5 |
For 2 hours, gain a 20% wider "sweet spot" while lockpicking. |
|
The Unstoppables 1 |
For 2 hours, gain a 5% chance to take no damage from an enemy attack. |
|
The Unstoppables 2 |
For 2 hours, gain a 20% chance of taking no damage from Scorched enemies. |
|
The Unstoppables 3 |
For 2 hours, gain a 30% chance of taking no damage from explosions. |
|
The Unstoppables 4 |
For 2 hours, gain a 30% chance of taking no damage from melee attacks. |
|
The Unstoppables 5 |
For 2 hours, gain a 30% chance of taking no damage from energy weapon attacks. |
|
U.S. Covert Operations Manual 1 |
For 2 hours, gain 10 Damage Resistance while sneaking. |
|
U.S. Covert Operations Manual 2 |
For 2 hours, hide 50% better, even in full light. |
|
U.S. Covert Operations Manual 3 |
For 2 hours, take 10% less damage from other players. |
|
U.S. Covert Operations Manual 4 |
For 2 hours, gain 1 Perception. |
|
U.S. Covert Operations Manual 5 |
For 2 hours, gain 1 Perception. |
|
U.S. Covert Operations Manual 6 |
For 2 hours, make 50% less noise while sneaking. |
|
U.S. Covert Operations Manual 7 |
For 2 hours, hostile players' V.A.T.S. accuracy will be reduced by 50% when they target you. |
|
U.S. Covert Operations Manual 8 |
For 2 hours, do 25% more damage with knives or unarmed attacks. |
|
U.S. Covert Operations Manual 9 |
For 2 hours, Stealth Boys last 50% longer. |
|
U.S. Covert Operations Manual 10 |
For 2 hours, gain 1 Agility. |
|
Atomic Command |
Magazine and Holotape. |
|
Automatron |
Magazine and Holotape. |
|
Grognak & the Ruby Ruins |
Magazine and Holotape. |
|
Nuka Tapper |
Magazine and Holotape. |
|
Pipfall |
Magazine and Holotape. |
|
Red Menace |
Magazine and Holotape. |
|
Wastelad |
Magazine and Holotape. |
|
Zeta Invaders |
Magazine and Holotape. |