
Enemy Encounters
Appalachia has one of the most diverse ecosystems seen in a Fallout title to date. Step from one region to another and you’ll deal with new creatures, new enemies, new climates, and new dangers. Even if you were to visit the same location twice, odds are you’d find new creatures, and some enemies are so rare that you may only see them once or twice during your entire journey.
How, then, are you supposed to know the best way to tackle enemies if you’re not sure if you’ll meet them more than once? We’re so glad you asked.
Anglers

Anglers aren’t fast, per se, but their stride allows them to glide over terrain with little resistance. They fight exclusively with melee, but their resistances and aggressive natures make them hard to kill.
Angler (Lvl 15)
- Base Health: 350
- Damage Resistance: 150
- Energy Resistance: 125
- Radiation Resistance: 350
Glowing Angler (Lvl 25)
- Base Health: 525
- Damage Resistance: 150
- Energy Resistance: 125
- Radiation Resistance: 350
Albino Angler (Lvl 37)
- Base Health: 650
- Damage Resistance: 150
- Energy Resistance: 125
- Radiation Resistance: 350
Venomous Angler (Lvl 51)
- Base Health: 900
- Damage Resistance: 150
- Energy Resistance: 125
- Radiation Resistance: 350
Assaultrons

Assaultrons are highly aggressive attackers that will pursue their targets until they’ve blended them into people juice. Aside from trying to grind their victims up with their claw hands, some Assaultrons also fire lasers from their hands, and some even have the ability to cloak themselves, making them almost invisible. They are also capable of firing a massive, powerful laser, which they charge as they attack you. If their heads look like they’re completely engulfed in flames, duck and take cover. They are about to fire their super-laser and you don’t want to be anywhere near it when it goes off.
Assaultron (Lvl 10)
- Base Health: 230
- Damage Resistance: 60
- Energy Resistance: 30
- Radiation Resistance: 60
Assaultron (LVL 24)
- Base Health: 660
- Damage Resistance: 130
- Energy Resistance: 75
- Radiation Resistance: 130
Assaultron Invader (Lvl 36)
- Base Health: 1,100
- Damage Resistance: 130
- Energy Resistance: 75
- Radiation Resistance: 130
Assaultron Dominator (Lvl 46)
- Base Health: 1,550
- Damage Resistance: 130
- Energy Resistance: 75
- Radiation Resistance: 130
Bee Swarms

More of a nuisance than a terrifying foe, Bee Swarms come from Honey Beasts and beehives. They can be incredibly difficult to kill with ballistic guns, but explosive, energy, and melee weapons all make short work of them.
Bee Swarm (Lvl 6)
- Base Health: 20
- Damage Resistance: 5
- Energy Resistance: 5
- Radiation Resistance: 5
Bee Swarm (Lvl 16)
- Base Health: 50
- Damage Resistance: 5
- Energy Resistance: 5
- Radiation Resistance: 5
Bee Swarm (Lvl 26)
- Base Health: 80
- Damage Resistance: 5
- Energy Resistance: 5
- Radiation Resistance: 5
Bee Swarm (Lvl 36)
- Base Health: 100
- Damage Resistance: 5
- Energy Resistance: 5
- Radiation Resistance: 5
Bee Swarm (Lvl 46)
- Base Health: 130
- Damage Resistance: 5
- Energy Resistance: 5
- Radiation Resistance: 5
Behemoths

Overwhelmingly big and powerful, Behemoths are never to be taken lightly. As melee-based enemies, their long legs and arms help them close gaps quicker than most enemies. If it’s anywhere near you, run fast and hard. It primarily attacks by slamming its mace down in front of it, but if you approach its side, it will stomp on the ground, damaging anything near it. Get far enough away and it will throw projectiles at you. Nowhere is safe when a Behemoth is around, so get as far away as possible.
Behemoth (Lvl 50)
- Base Health: 3,700
- Damage Resistance: 150
- Energy Resistance: 100
- Radiation Resistance: 150
Glowing Behemoth (Lvl 65)
- Base Health: 3,850
- Damage Resistance: 250
- Energy Resistance: 200
- Radiation Resistance: 250
Epic Behemoth (Lvl 80)
- Base Health: 4,025
- Damage Resistance: 250
- Energy Resistance: 200
- Radiation Resistance: 250
Ancient Behemoth (Lvl 95)
- Base Health: 4,175
- Damage Resistance: 250
- Energy Resistance: 200
- Radiation Resistance: 250
Bloatflies

All the irritation of an actual fly, but with the added bonuses of being giant and shooting stingers. Bloatflies aren’t hard to kill, but they sure can be hard to see and hit. They don’t deal a lot of damage, nor can they take a lot. If you want to end the fight quickly, just activate V.A.T.S. and zap ’em.
Bloatfly (Lvl 1)
- Base Health: 20
- Damage Resistance: 15
- Energy Resistance: 15
- Radiation Resistance: 15
Black Bloatfly (Lvl 9)
- Base Health: 20
- Damage Resistance: 15
- Energy Resistance: 15
- Radiation Resistance: 15
Festering Bloatfly (Lvl 17)
- Base Health: 75
- Damage Resistance: 15
- Energy Resistance: 15
- Radiation Resistance: 15
Glowing Bloatfly (Lvl 27)
- Base Health: 75
- Damage Resistance: 15
- Energy Resistance: 15
- Radiation Resistance: 15
Bloodbugs

Bloodbugs scratch, sting, and bite, but what does it all really mean? They don’t deal a lot of damage and they are killed by very little damage in return. Sometimes you meet a creature that’s trying its little heart out for little gain and you have to ask yourself, “Why?” Hit it with a bat and end this existential crisis.
Bloodbug Hatchling (Lvl 2)
- Base Health: 30
- Damage Resistance: 1
- Energy Resistance: 1
- Radiation Resistance: 1
Bloodbug (Lvl 10)
- Base Health: 40
- Damage Resistance: 15
- Energy Resistance: 15
- Radiation Resistance: 15
Red Widow Bloodbug (Lvl 18)
- Base Health: 140
- Damage Resistance: 15
- Energy Resistance: 15
- Radiation Resistance: 15
Infected Bloodbug (Lvl 26)
- Base Health: 170
- Damage Resistance: 25
- Energy Resistance: 25
- Radiation Resistance: 25
Glowing Bloodbug (Lvl 34)
- Base Health: 180
- Damage Resistance: 25
- Energy Resistance: 25
- Radiation Resistance: 25
Vampiric Bloodbug (Lvl 42)
- Base Health: 250
- Damage Resistance: 25
- Energy Resistance: 25
- Radiation Resistance: 25
Cargobots

Cargobots don’t attack, but they are usually worth shooting down if you spot one. They frequently carry precious cargo like supply drops and keycards for the nuclear silo locations.
Cargobot (Lvl 15)
- Base Health: 1,450
- Damage Resistance: 135
- Energy Resistance: 135
- Radiation Resistance: 135
Cargobot (Lvl 25)
- Base Health: 2,225
- Damage Resistance: 135
- Energy Resistance: 135
- Radiation Resistance: 135
Cargobot (Lvl 35)
- Base Health: 2,750
- Damage Resistance: 135
- Energy Resistance: 135
- Radiation Resistance: 135
Cave Crickets
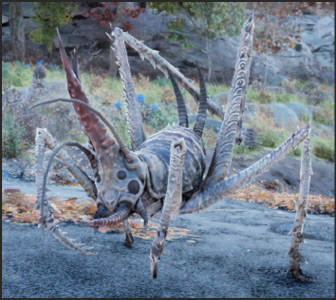
Typically found in the Mire, Cave Crickets are more creepy than they are dangerous. Can their melee attacks hurt you? Of course! But it’s damage you can take without breaking a sweat. Just be warned: They have high Damage Resistance, which makes it nearly impossible to kill them quickly without an energy weapon in hand.
Cave Cricket (Lvl 30)
- Base Health: 350
- Damage Resistance: 115
- Energy Resistance: 250
- Radiation Resistance: 250
Cave Cricket Hunter (Lvl 38)
- Base Health: 425
- Damage Resistance: 115
- Energy Resistance: 250
- Radiation Resistance: 250
Cave Cricket Piercer (Lvl 46)
- Base Health: 600
- Damage Resistance: 115
- Energy Resistance: 250
- Radiation Resistance: 250
Glowing Cave Cricket (Lvl 60)
- Base Health: 800
- Damage Resistance: 115
- Energy Resistance: 250
- Radiation Resistance: 250
Deathclaws

As scary as they are powerful, Deathclaws are the kings of beasts across the whole of Appalachia. If you see one, avoid it unless you have specific reason to kill one. They are fast and their claws will make you regret even facing them in the first place. Try to keep an obstacle between you and it, or climb on top of something it can’t climb.
Deathclaw (Lvl 21)
- Base Health: 625
- Damage Resistance: 150
- Energy Resistance: 150
- Radiation Resistance: 150
Alpha Deathclaw (Lvl 31)
- Base Health: 850
- Damage Resistance: 150
- Energy Resistance: 150
- Radiation Resistance: 150
Glowing Deathclaw (Lvl 41)
- Base Health:1,050
- Damage Resistance: 150
- Energy Resistance: 150
- Radiation Resistance: 150
Deathclaw Matriarch (Lvl 51)
- Base Health: 1,150
- Damage Resistance: 300
- Energy Resistance: 300
- Radiation Resistance: 300
Savage Deathclaw (Lvl 61)
- Base Health: 1,300
- Damage Resistance: 300
- Energy Resistance: 300
- Radiation Resistance: 300
Albino Deathclaw (Lvl 71)
- Base Health: 1,450
- Damage Resistance: 300
- Energy Resistance: 300
- Radiation Resistance: 300
Chameleon Deathclaw (Lvl 81)
- Base Health: 1575
- Damage Resistance: 300
- Energy Resistance: 300
- Radiation Resistance: 300
Mythic Deathclaw (Lvl 91)
- Base Health: 1,725
- Damage Resistance: 300
- Energy Resistance: 300
- Radiation Resistance: 300
Eyebots
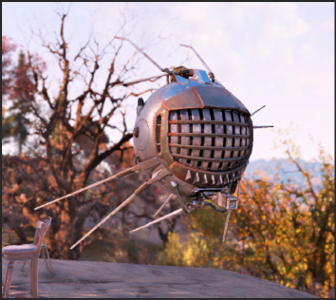
Eyebots aren’t typically hostile toward Vault Dwellers. In fact, aside from attacking the local, violent wildlife, some Eyebots will actually reveal locations to you as they fly by. If you do end up fighting one, it will drop with a few attacks from any weapon.
Eyebot (Lvl 1)
- Base Health: 20
- Damage Resistance: 10
- Energy Resistance: 10
- Radiation Resistance: 10
Feral Ghouls

Feral Ghouls are highly aggressive, persistent, and some of the fastest creatures in Appalachia. Once they decide to attack you, they’ll chase you down no matter where you go. Their attacks only involve them swatting you with their hands, but don’t take them lightly. They typically attack in groups; if you’re not careful, they’ll surround you and turn you into a bloody mess.
To deal with them, your best bet is to give them the same aggression they showed you. Pull out your most powerful weapon and take them out as they approach. The only other option is to get on top of something they can’t climb and pick them off from there.
Feral Ghoul (Lvl 3)
- Base Health: 35
- Damage Resistance: 10
- Energy Resistance: 20
- Radiation Resistance: 1,000
Feral Ghoul Roamer (9)
- Base Health: 40
- Damage Resistance: 10
- Energy Resistance: 20
- Radiation Resistance: 1,000
Feral Ghoul Stalker (Lvl 15)
- Base Health: 80
- Damage Resistance: 85
- Energy Resistance: 140
- Radiation Resistance: 1,000
Feral Ghoul Reaver (22)
- Base Health: 90
- Damage Resistance: 85
- Energy Resistance: 140
- Radiation Resistance: 1,000
Withered Feral Ghoul (Lvl 32)
- Base Health: 125
- Damage Resistance: 85
- Energy Resistance: 140
- Radiation Resistance: 1,000
Gangrenous Feral Ghoul (Lvl 42)
- Base Health: 150
- Damage Resistance: 85
- Energy Resistance: 140
- Radiation Resistance: 1,000
Rotting Feral Ghoul (Lvl 52)
- Base Health: 200
- Damage Resistance: 85
- Energy Resistance: 140
- Radiation Resistance: 1,000
Charred Feral Ghoul (Lvl 62)
- Base Health: 300
- Damage Resistance: 85
- Energy Resistance: 140
- Radiation Resistance: 1,000
Fog Crawlers
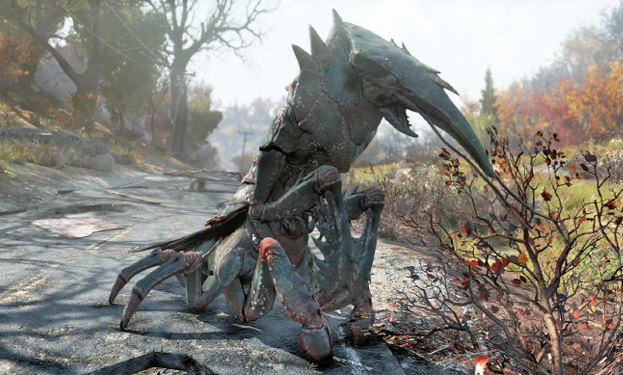
Fog Crawlers are very slow melee-focused enemies with high resistances. You’ll have a hard time killing them with weaker weapons, but you can easily avoid them by sprinting. If they appear in groups with other monsters, you might be in for some trouble. But on their own they pose little threat to anything but your patience.
Fog Crawler (Lvl 27)
- Base Health: 975
- Damage Resistance: 100
- Energy Resistance: 100
- Radiation Resistance: 100
Glowing Fog Crawler (Lvl 39)
- Base Health: 1,200
- Damage Resistance: 100
- Energy Resistance: 100
- Radiation Resistance: 100
Skulking Fog Crawler (Lvl 51)
- Base Health: 1,575
- Damage Resistance: 125
- Energy Resistance: 100
- Radiation Resistance: 125
Diseased Fog Crawler (Lvl 63)
- Base Health: 1,775
- Damage Resistance: 125
- Energy Resistance: 100
- Radiation Resistance: 125
Enraged Fog Crawler (Lvl 75)
- Base Health: 1,975
- Damage Resistance: 125
- Energy Resistance: 100
- Radiation Resistance: 125
Glowing Ones
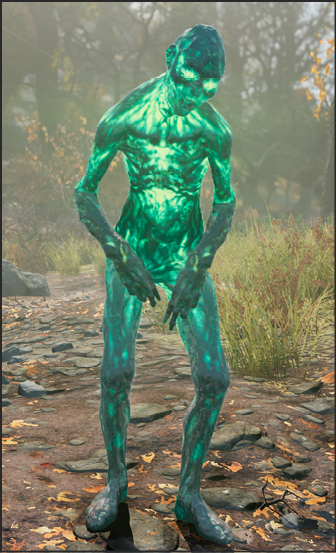
Glowing Ones are an irradiated version of Feral Ghouls. They attack in the same fashion but with the added threat of increasing the Rads of anyone they stand near. Take them out quickly and keep your distance if you want to avoid losing you max HP to their radiation.
Glowing One (Lvl 22)
- Base Health: 690
- Damage Resistance: 115
- Energy Resistance: 230
- Radiation Resistance: 1,000
Putrid Glowing One (Lvl 40)
- Base Health: 1,150
- Damage Resistance: 115
- Energy Resistance: 230
- Radiation Resistance: 1,000
Bloated Glowing One (Lvl 58)
- Base Health: 1,625
- Damage Resistance: 115
- Energy Resistance: 230
- Radiation Resistance: 1,000
Gulpers

Gulpers aren’t the brightest bulbs of the bunch, but they are slippery little devils. They’ll chase you down and give you a quick nibble from their tiny, sharp teeth. Even if you’re sprinting, they’ll catch up with you. You best bet is to either get on top of something they can’t climb, or take them down directly. Run and they’ll get you—always remember that.
Gulper Newt (Lvl 10)
- Base Health: 250
- Damage Resistance: 30
- Energy Resistance: 30
- Radiation Resistance: 250
Gulper (Lvl 22)
- Base Health: 750
- Damage Resistance: 90
- Energy Resistance: 90
- Radiation Resistance: 250
Glowing Gulper (Lvl 34)
- Base Health: 1,025
- Damage Resistance: 90
- Energy Resistance: 90
- Radiation Resistance: 250
Gulper Devourer (Lvl 46)
- Base Health: 1,800
- Damage Resistance: 90
- Energy Resistance: 90
- Radiation Resistance: 250
Hermit Crabs

Hermit Crabs are gigantic, van-wearing crustaceans with Rad-infected claws and resistance to just about anything under the sun. They are hard to outrun, but they have a hard time getting through tight spaces—use those to your advantage. If you want to have any hope of killing them, you must target their bodies and not the car attached to their backs; shooting that will yield no results.
They don’t have many attacks, but they hit hard and are insanely persistent. Find a space they can’t climb through, like a house or a van, and attack from there. Taking them on directly will cost you a lot more than it’s worth.
Giant Hermit Crab (Lvl 21)
- Base Health: 625
- Damage Resistance: 150
- Energy Resistance: 100
- Radiation Resistance: 150
Alpha Hermit Crab (Lvl 31)
- Base Health: 850
- Damage Resistance: 150
- Energy Resistance: 100
- Radiation Resistance: 150
Glowing Hermit Crab (Lvl 41)
- Base Health: 1,050
- Damage Resistance: 150
- Energy Resistance: 100
- Radiation Resistance: 150
Savage Hermit Crab (Lvl 51)
- Base Health: 1,475
- Damage Resistance: 150
- Energy Resistance: 100
- Radiation Resistance: 150
Albino Hermit Crab (Lvl 61)
- Base Health: 1,650
- Damage Resistance: 150
- Energy Resistance: 100
- Radiation Resistance: 150
Honey Beasts

Honey Beasts are slow, but they are resilient. They aren’t particularly deadly, but you definitely don’t want them anywhere near you. When they are close to enemies, they release Bee Swarms from the hive on their backs. It can be really easy to get locked in a cycle of trying to kill Bee Swarms, rather than taking the Honey Beast on directly. Attack and kill them at a distance and they’ll never get the chance to let a Bee Swarm free.
Honey Beast (Lvl 16)
- Base Health: 450
- Damage Resistance: 75
- Energy Resistance: 75
- Radiation Resistance: 250
Putrified Honey Beast (Lvl 26)
- Base Health: 620
- Damage Resistance: 100
- Energy Resistance: 100
- Radiation Resistance: 250
Raging Honey Beast (Lvl 36)
- Base Health: 700
- Damage Resistance: 125
- Energy Resistance: 125
- Radiation Resistance: 250
Glowing Honey Beast (Lvl 46)
- Base Health: 900
- Damage Resistance: 150
- Energy Resistance: 150
- Radiation Resistance: 250
Ultracite Honey Beast (Lvl 56)
- Base Health: 1,050
- Damage Resistance: 175
- Energy Resistance: 175
- Radiation Resistance: 250
Liberators

Liberators aren’t particularly strong on their own, but their agility, small size, and numbers often make them a fearsome enemy. You’ll have to avoid laser and melee attacks, so don’t be afraid to hop behind cover if things start getting hot. Use V.A.T.S. to cut their numbers down quickly. The fewer of them there are, the less damage potential they possess.
Liberator Mk 0 (Lvl 5)
- Base Health: 25
- Damage Resistance: 10
- Energy Resistance: 10
- Radiation Resistance: 10
Liberator Mk I (Lvl 10)
- Base Health: 30
- Damage Resistance: 10
- Energy Resistance: 10
- Radiation Resistance: 10
Liberator Mk II (Lvl 18)
- Base Health: 100
- Damage Resistance: 10
- Energy Resistance: 10
- Radiation Resistance: 10
Liberator Mk III (Lvl 30)
- Base Health: 150
- Damage Resistance: 10
- Energy Resistance: 10
- Radiation Resistance: 10
Liberator Mk IV (Lvl 42)
- Base Health: 200
- Damage Resistance: 10
- Energy Resistance: 10
- Radiation Resistance: 10
Liberator Mk V (Lvl 54)
- Base Health: 300
- Damage Resistance: 10
- Energy Resistance: 10
- Radiation Resistance: 10
Mega Sloths

Mega Sloths might look intimidating at first glance, but they are very surmountable. They aren’t fast, but you allow them to get in close, they’ll swipe at you with their giant claws or shake poison spores from their backs, dealing poison damage over time. If you keep your distance, they’ll pelt you with rocks. Keep your distance and strafe to avoid getting pelted by the rocks. If it can’t hit you, it can’t hurt you. Pull out a powerful gun and give it hell.
Mega Sloth (Lvl 30)
- Base Health: 775
- Damage Resistance: 200
- Energy Resistance: 150
- Radiation Resistance: 250
Ponderous Mega Sloth (Lvl 40)
- Base Health: 975
- Damage Resistance: 200
- Energy Resistance: 150
- Radiation Resistance: 250
Scorched Mega Sloth (Lvl 50)
- Base Health: 1,500
- Damage Resistance: 200
- Energy Resistance: 150
- Radiation Resistance: 250
Mirelurks

Mirelurks primarily follow the same rules of engagement: shoot their bodies, not the shell on their backs. Don’t try to circle them (they are actually quite fast and can easily keep up with their foe) and keep your distance. If you can follow these rules, you’ll have little trouble with these pesky sea spiders.
Softshell Mirelurk (Lvl 5)
- Base Health: 35
- Damage Resistance: 45
- Energy Resistance: 40
- Radiation Resistance: 200
Mirelurk (Lvl 12)
- Base Health: 50
- Damage Resistance: 90
- Energy Resistance: 90
- Radiation Resistance: 250
Mirelurk Razorclaw (Lvl 18)
- Base Health: 160
- Damage Resistance: 90
- Energy Resistance: 90
- Radiation Resistance: 250
Mirelurk Killclaw (Lvl 26)
- Base Health: 250
- Damage Resistance: 90
- Energy Resistance: 90
- Radiation Resistance: 250
Glowing Mirelurk (Lvl 34)
- Base Health: 275
- Damage Resistance: 90
- Energy Resistance: 90
- Radiation Resistance: 250
Bloodrage Mirelurk (Lvl 42)
- Base Health: 350
- Damage Resistance: 303
- Energy Resistance: 290
- Radiation Resistance: 250
Mirelurk Hunters
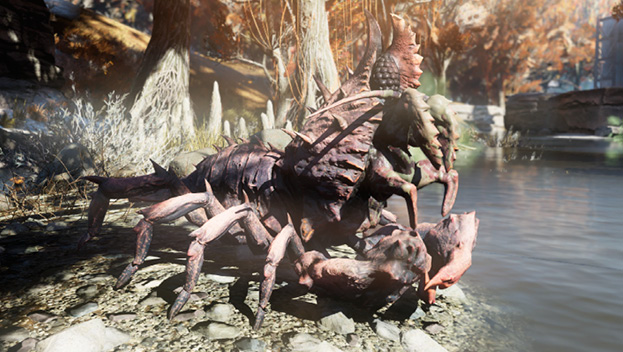
Hunters don’t have the same back protection that normal Mirelurks have. Instead they rely on spitting projectiles and speed to take down their foes. Keep your distance and circle them while shooting to make quick work of any Hunters you meet.
Mirelurk Hunter (Lvl 24)
- Base Health: 275
- Damage Resistance: 90
- Energy Resistance: 90
- Radiation Resistance: 250
Glowing Mirelurk Hunter (Lvl 34)
- Base Health: 375
- Damage Resistance: 90
- Energy Resistance: 90
- Radiation Resistance: 250
Albino Mirelurk Hunter (Lvl 46)
- Base Health: 650
- Damage Resistance: 90
- Energy Resistance: 90
- Radiation Resistance: 250
Mirelurk Kings

Extremely resistant to energy weapons, Mirelurk Kings can be a real bear to take down. They aren’t particularly fast, and unlike their smaller offspring, they can’t keep up with an enemy that is circle-strafing them. They shoot projectiles and can turn invisible, reappearing only when they are ready to strike your blind side. They can take a whole lot of effort and focus to defeat, but they can definitely be defeated.
Mirelurk King (Lvl 30)
- Base Health: 1,275
- Damage Resistance: 50
- Energy Resistance: 75
- Radiation Resistance: 250
Mirelurk Deep King (Lvl 40)
- Base Health: 1,575
- Damage Resistance: 50
- Energy Resistance: 75
- Radiation Resistance: 250
Glowing Mirelurk King (Lvl 50)
- Base Health: 2,200
- Damage Resistance: 140
- Energy Resistance: 350
- Radiation Resistance: Immune
Mirelurk Queens

Mirelurk Queens are giant and fast, and their poisonous spit is truly deadly. They are hard to avoid and hard to kill. Your best bet is to get as far away as possible and attack from a distance. Their spit can travel long distances and is fired in a volley, rather than one shot at a time. They also birth Mirelurk Spawn to help aid them in taking down their prey. Mirelurk Queens are truly dangerous; tread carefully.
Mirelurk Queen (Lvl 20)
- Base Health: 2,125
- Damage Resistance: 150
- Energy Resistance: 100
- Radiation Resistance: 150
Mirelurk Queen (Lvl 35)
- Base Health: 2,650
- Damage Resistance: 150
- Energy Resistance: 100
- Radiation Resistance: 150
Mirelurk Queen (Lvl 50)
- Base Health: 3,725
- Damage Resistance: 150
- Energy Resistance: 100
- Radiation Resistance: 150
Mirelurk Spawn

Not intimidating on their own, Mirelurk Spawn are slow and easy to kill. They are only truly dangerous when spawned by a Mirelurk Queen; the combination of fighting both the Spawn and the Queen makes for one challenging fight.
Mirelurk Spawn (Lvl 1)
- Base Health: 25
- Damage Resistance: 5
- Energy Resistance: 5
- Radiation Resistance: 5
Mole Miners

Mole Miners are a soldier-type enemy like Scorched and Super Mutants. They brandish melee weapons and guns and are rarely ever found alone. They have high resistances but aren’t particularly fast. You’ll find them at any mine in Appalachia and the Ash Heap.
Famished Mole Miner (Lvl 2)
- Base Health: 40
- Damage Resistance: 50
- Energy Resistance: 25
- Radiation Resistance: 250
Tired Mole Miner (Lvl 4)
- Base Health: 45
- Damage Resistance: 50
- Energy Resistance: 25
- Radiation Resistance: 250
Mole Miner Laborer (Lvl 8)
- Base Health: 50
- Damage Resistance: 50
- Energy Resistance: 25
- Radiation Resistance: 250
Mole Miner (Lvl 14)
- Base Health: 225
- Damage Resistance: 50
- Energy Resistance: 25
- Radiation Resistance: 250
Angry Mole Miner (Lvl 22)
- Base Health: 250
- Damage Resistance: 100
- Energy Resistance: 75
- Radiation Resistance: 250
Mole Miner Supervisor (Lvl 30)
- Base Health: 325
- Damage Resistance: 100
- Energy Resistance: 75
- Radiation Resistance: 250
Furious Mole Miner Battler (Lvl 40)
- Base Health: 400
- Damage Resistance: 100
- Energy Resistance: 75
- Radiation Resistance: 250
Mole Rats

These pests are so irritating you’ll be praying for another bomb to drop in the off chance it removes them from the face of the planet. They may not be powerful, they may not have many attacks, but dang it they are persistent and like to attack in groups. They’ll bury themselves underground, then pop up right next to you. They are also quite small, making them harder to hit than most enemies. If you see one, turn on V.A.T.S. and send it to the great molehill in the sky. You’ll be doing us all a favor.
Mole Rat (Lvl 1)
- Base Health: 15
- Damage Resistance: 5
- Energy Resistance: 5
- Radiation Resistance: 5
Rabid Mole Rat (Lvl 7)
- Base Health: 45
- Damage Resistance: 5
- Energy Resistance: 5
- Radiation Resistance: 5
Glowing Mole Rat (Lvl 14)
- Base Health: 65
- Damage Resistance: 5
- Energy Resistance: 5
- Radiation Resistance: 5
Mole Rat Brood Mother (Lvl 21)
- Base Health: 175
- Damage Resistance: 10
- Energy Resistance: 10
- Radiation Resistance: 10
Mongrels

Mongrels are fodder enemies. They aren’t fast, they don’t hit hard, and they don’t have much health. They attack very similarly to Mole Rats, but slower and without the ability to bury themselves. A few hits from anything is all it takes to take one down.
Wild Mongrel (Lvl 3)
- Base Health: 35
- Damage Resistance: 10
- Energy Resistance: 10
- Radiation Resistance: 10
Vicious Mongrel (Lvl 12)
- Base Health: 50
- Damage Resistance: 10
- Energy Resistance: 10
- Radiation Resistance: 10
Feral Mongrel (Lvl 20)
- Base Health: 150
- Damage Resistance: 15
- Energy Resistance: 15
- Radiation Resistance: 15
Albino Mongrel (Lvl 30)
- Base Health: 200
- Damage Resistance: 15
- Energy Resistance: 15
- Radiation Resistance: 15
Rabid Mongrel (Lvl 40)
- Base Health: 250
- Damage Resistance: 15
- Energy Resistance: 15
- Radiation Resistance: 15
Glowing Mongrel (Lvl 50)
- Base Health: 350
- Damage Resistance: 20
- Energy Resistance: 20
- Radiation Resistance: 20
Alpha Glowing Mongrel (Lvl 60)
- Base Health: 750
- Damage Resistance: 20
- Energy Resistance: 20
- Radiation Resistance: 20
Mr. Handies

Mr. Handy can be hard to get away from, but it doesn’t have enough health to truly be a threat. It mostly attacks with melee strikes, but it can also pull out a pretty mean flamethrower if you’re out of its reach. If you see a Mr. Handy coming for you, don’t run. Pull out any weapon and hit it a few times to send it to the scrapyard.
Mr. Farmhand (Lvl 1)
- Base Health: 35
- Damage Resistance: 10
- Energy Resistance: 5
- Radiation Resistance: 10
Mr. Handy (Lvl 8)
- Base Health: 35
- Damage Resistance: 10
- Energy Resistance: 5
- Radiation Resistance: 10
Prison Marshal (Lvl 14)
- Base Health: 55
- Damage Resistance: 10
- Energy Resistance: 5
- Radiation Resistance: 10
Mr. Gutsies

This is Mr. Handy’s meaner, tankier cousin. There aren’t many differences between Mr. Handy and Mr. Gutsy, aside from resistances, but be prepared to deal with Mr. Gutsy’s much more robust arsenal. Each Gutsy can come with a variety of weapons, but they’ll mostly rely on lasers and ballistic weapons to take you down.
Mr. Gutsy (Lvl 22)
- Base Health: 280
- Damage Resistance: 80
- Energy Resistance: 70
- Radiation Resistance: 80
Lieutenant Gutsy (Lvl 32)
- Base Health: 350
- Damage Resistance: 110
- Energy Resistance: 100
- Radiation Resistance: 110
Major Gutsy (Lvl 40)
- Base Health: 425
- Damage Resistance: 110
- Energy Resistance: 100
- Radiation Resistance: 110
Colonel Gutsy (Lvl 47)
- Base Health: 600
- Damage Resistance: 110
- Energy Resistance: 100
- Radiation Resistance: 110
Mutant Hounds
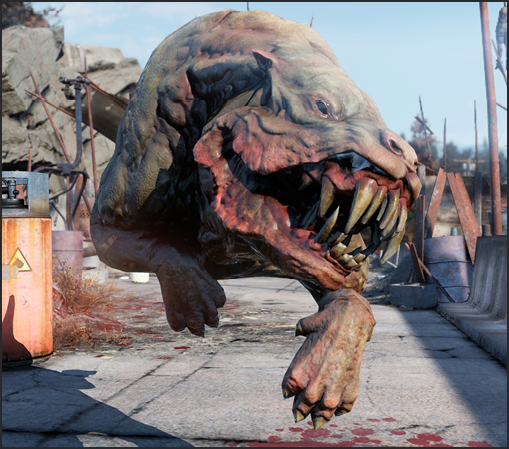
Mutant Hounds are rarely seen away from the sides of their Super Mutant masters. They aren’t terribly difficult to fight by themselves, but they do add a good bit of pressure to any Super Mutant encounter. They do little more than chase and bite, but they have decent resilience, which makes for a good distraction in the middle of a chaotic battle.
Mutant Hound (Lvl 8)
- Base Health: 35
- Damage Resistance: 15
- Energy Resistance: 10
- Radiation Resistance: 15
Glowing Mutant Hound (Lvl 28)
- Base Health: 150
- Damage Resistance: 40
- Energy Resistance: 30
- Radiation Resistance: 40
Protectrons

Protectrons aren’t very threatening. Sure, they shoot lasers, but those lasers hardly do damage and they can’t take much of a beating. Aim for their head dome and they’ll drop like a busted toaster in a garbage can.
Protectron (Lvl 5)
- Damage Resistance: 25
- Energy Resistance: 15
- Radiation Resistance: 15
Protectron Watcher (Lvl 14)
- Damage Resistance: 25
- Energy Resistance: 15
- Radiation Resistance: 15
Protectron Guardian (Lvl 26)
- Damage Resistance: 75
- Energy Resistance: 50
- Radiation Resistance: 75
Protectron Defender (Lvl 36)
- Damage Resistance: 75
- Energy Resistance: 50
- Radiation Resistance: 75
Protectron Sentinel (Lvl 46)
- Damage Resistance: 125
- Energy Resistance: 100
- Radiation Resistance: 125
Rad Ants

Rad Ants aren’t particularly dangerous. They aren’t very fast and their only attack strategy is to chase and bite. Even in large numbers, they are still very manageable. Just watch your toes and you’ll be just fine.
Small Forager Ant (Lvl 1)
- Base Health: 35
- Damage Resistance: 10
- Energy Resistance: 20
- Radiation Resistance: 250
Small Soldier Ant (Lvl 4)
- Base Health: 40
- Damage Resistance: 10
- Energy Resistance: 20
- Radiation Resistance: 250
Small Glowing Ant (Lvl 8)
- Base Health: 50
- Damage Resistance: 10
- Energy Resistance: 20
- Radiation Resistance: 250
Forager Ant (Lvl 12)
- Base Health: 65
- Damage Resistance: 10
- Energy Resistance: 20
- Radiation Resistance: 250
Soldier Ant (Lvl 16)
- Base Health: 95
- Damage Resistance: 40
- Energy Resistance: 50
- Radiation Resistance: 250
Glowing Ant (Lvl 20)
- Base Health: 110
- Damage Resistance: 40
- Energy Resistance: 50
- Radiation Resistance: 250
Overgrown Forager Ant (Lvl 24)
- Base Health: 120
- Damage Resistance: 50
- Energy Resistance: 60
- Radiation Resistance: 250
Overgrown Soldier Ant (Lvl 28)
- Base Health: 130
- Damage Resistance: 50
- Energy Resistance: 60
- Radiation Resistance: 250
Overgrown Glowing Ant (Lvl 32)
- Base Health: 150
- Damage Resistance: 50
- Energy Resistance: 60
- Radiation Resistance: 250
Rad Roaches

Rad Roaches are hardly a threat. In fact, you’re more likely to die from a heart attack when one of these things unexpectedly falls from the ceiling than you are to die from their attacks. Just listen for the telltale nasty bug noise they make to know when they’re near; then stomp them back to the Stone Age.
Rad Roach (Lvl 1)
- Base Health: 20
- Damage Resistance: 5
- Energy Resistance: 5
- Radiation Resistance: 250
Glowing Rad Roach (Lvl 5)
- Base Health: 30
- Damage Resistance: 5
- Energy Resistance: 5
- Radiation Resistance: 250
Radroach (Lvl 10)
- Base Health: 35
- Damage Resistance: 5
- Energy Resistance: 5:
- Radiation Resistance: 250
Rad Stags

Rad Stags are mostly nonhostile, but some of them will attack you with little warning (i.e., Erratic, Rabid, Devolved, and Glowing Rad Stags). They aren’t very strong, nor are they fast, but they do have delicious meat that’s worth pursuing them for.
Radstag Yearling (Lvl 1)
- Damage Resistance: 10
- Energy Resistance: 20
- Radiation Resistance: 250
Radstag Doe (Lvl 4)
- Damage Resistance: 10
- Energy Resistance: 20
- Radiation Resistance: 250
Radstag (Lvl 10)
- Damage Resistance: 30
- Energy Resistance: 40
- Radiation Resistance: 250
Erratic Radstag Doe (Lvl 12)
- Damage Resistance: 30
- Energy Resistance: 40
- Radiation Resistance: 250
Albino Radstag (Lvl 16)
- Damage Resistance: 90
- Energy Resistance: 50
- Radiation Resistance: 250
Erratic Radstag (Lvl 21)
- Damage Resistance: 90
- Energy Resistance: 50
- Radiation Resistance: 250
Rabid Radstag (Lvl 24)
- Damage Resistance: 90
- Energy Resistance: 50
- Radiation Resistance: 250
Devolved Radstag Doe (Lvl 26)
- Damage Resistance: 110
- Energy Resistance: 60
- Radiation Resistance: 250
Glowing Radstag (Lvl 32)
- Damage Resistance: 110
- Energy Resistance: 60
- Radiation Resistance: 250
Devolved Radstag (Lvl 40)
- Damage Resistance: 130
- Energy Resistance: 70
- Radiation Resistance: 250
Rad Toads

Rad Toads look more like creatures from some dark, forgotten dimension than anything actually resembling a toad. Their attacks also match their terrifying appearance. Whipping you with their three tongues, biting you with their gnarled teeth, or leaving exploding egg mines all over the ground to make escape more dangerous, the Rad Toad is not a creature to ignore. Thankfully they are painfully slow, so get some distance and erase these abominations from your realm.
Rad Toad (Lvl 5)
- Base Health: 60
- Damage Resistance: 25
- Energy Resistance: 25
- Radiation Resistance: 250
Parasitic Rad Toad (Lvl 18)
- Base Health: 150
- Damage Resistance: 100
- Energy Resistance: 100
- Radiation Resistance: 250
Glowing Rad Toad (Lvl 28)
- Base Health: 225
- Damage Resistance: 100
- Energy Resistance: 100
- Radiation Resistance: 250
Albino Rad Toad (Lvl 40)
- Base Health: 250
- Damage Resistance: 150
- Energy Resistance: 150
- Radiation Resistance: 250
Scorched Rad Toad (Lvl 50)
- Base Health: 350
- Damage Resistance: 150
- Energy Resistance: 150
- Radiation Resistance: 250
Radrats

Radrats are pests more than actual threats. They aren’t very fast and their only means of offense is biting with its two giant teeth. It’s not a very dangerous enemy, but it can be a massive pain to land hits on. We suggest using V.A.T.S. the second you see this enemy to take it out swiftly.
Radrat Pup (Lvl 1)
- Base Health: 30
- Damage Resistance: 10
- Energy Resistance: 20
- Radiation Resistance: 250
Mangy Radrat Pup (Lvl 4)
- Base Health: 35
- Damage Resistance: 10
- Energy Resistance: 20
- Radiation Resistance: 250
Mangy Radrat (Lvl 16)
- Base Health: 100
- Damage Resistance: 40
- Energy Resistance: 50
- Radiation Resistance: 250
Infected Radrat (Lvl 20)
- Base Health: 120
- Damage Resistance: 40
- Energy Resistance: 50
- Radiation Resistance: 250
Glowing Plagued Radrat (Lvl 25)
- Base Health: 150
- Damage Resistance: 40
- Energy Resistance: 50
- Radiation Resistance: 250
Radrat (Lvl 8)
- Base Health: 45
- Damage Resistance: 10
- Energy Resistance: 20
- Radiation Resistance: 250
Infected Radrat Pup (Lvl 12)
- Base Health: 55
- Damage Resistance: 10
- Energy Resistance: 20
- Radiation Resistance: 250
Radscorpions

Radscorpions are resilient and aggressive. They attack exclusively with melee attacks, but they are fast enough and hard enough to kill that they can reach you before you can kill them, unless you’re packing some serious firepower. Their stinger hits you with a burst of Rads, while their pincers are quick and painful. Get somewhere high to avoid taking damage from this thing.
Radscorpion (Lvl 14)
- Base Health: 150
- Damage Resistance: 50
- Energy Resistance: 35
- Radiation Resistance: 350
Radscorpion Hunter (Lvl 22)
- Base Health: 390
- Damage Resistance: 150
- Energy Resistance: 125
- Radiation Resistance: 350
Glowing Radscorpion (Lvl 30)
- Base Health: 525
- Damage Resistance: 150
- Energy Resistance: 125
- Radiation Resistance: 350
Albino Radscorpion (Lvl 38)
- Base Health: 650
- Damage Resistance: 150
- Energy Resistance: 125
- Radiation Resistance: 350
Radscorpion Stalker (Lvl 46)
- Base Health: 900
- Damage Resistance: 150
- Energy Resistance: 125
- Radiation Resistance: 350
Radscorpion Predator (Lvl 54)
- Base Health: 900
- Damage Resistance: 150
- Energy Resistance: 125
- Radiation Resistance: 350
Deathskull Radscorpion (Lvl 64)
- Base Health: 1,100
- Damage Resistance: 150
- Energy Resistance: 125
- Radiation Resistance: 350
Robobrains

Robobrains are the army knife of killer robots. They attack with ballistic projectiles and electrical bursts, and they like to pepper the field with smoke bombs, making it significantly harder to track them. They keep their distance and don’t move very fast, making cover easier to use and more beneficial to hide behind. They are very durable, but if you aim for the brain they are named for, you’ll have them decommissioned in moments flat.
Robobrain (Lvl 30)
- Base Health: 325
- Damage Resistance: 135
- Energy Resistance: 70
- Radiation Resistance: 135
Robobrain Sentry (Lvl 35)
- Base Health: 400
- Damage Resistance: 135
- Energy Resistance: 70
- Radiation Resistance: 135
Robobrain Tactician (Lvl 40)
- Base Health: 425
- Damage Resistance: 135
- Energy Resistance: 70
- Radiation Resistance: 135
Robobrain War Mind (Lvl 45)
- Base Health: 450
- Damage Resistance: 135
- Energy Resistance: 70
- Radiation Resistance: 135
Robobrain Devastator (Lvl 50)
- Base Health: 600
- Damage Resistance: 175
- Energy Resistance: 100
- Radiation Resistance: 175
Scorchbeasts

Scorchbeasts are devastating, flying death machines who never leave home without an entourage of Scorched to back them up. Their primary method of attack involves them shooting sonic beams of energy from their mouths while they hover in the air. They’ll also fly overhead and dust the surrounding area with irradiated dust, which will fill up your Rads faster than you can sprout a new digit.
Once on the ground, Scorchbeasts become significantly easier to deal with. They’ll still shoot sonic beams, but you’ll have a much better idea of where they’re headed. If you get in too close, it will swat you with a deadly melee attack. If it covers its face with its wings, run as far away as you can. Moments later the Scorchbeast will unleash a powerful explosion of energy around its body.
Scorchbeasts are no joke; never take them lightly (or one-on-one). If you don’t have a team with you, stay away from fissure sites and duck and cover if you see one fly overhead. Finally, if you’re in a flat area with little cover, avoid challenging them altogether. If you have no place to hide, you have no hope to win.
Scorchbeast (Lvl 50)
- Base Health: 3,700
- Damage Resistance: 125
- Energy Resistance: 125
- Radiation Resistance: 125
Scorchbeast (Lvl 65)
- Base Health: 3,800
- Damage Resistance: 150
- Energy Resistance: 150
- Radiation Resistance: 150
Scorchbeast (Lvl 80)
- Base Health: 3,900
- Damage Resistance: 200
- Energy Resistance: 200
- Radiation Resistance: 200
Scorchbeast Queens

The queen of the Scorched and undisputed ruler of the skies, the Scorchbeast Queen is everything a Scorchbeast is and then some. On top of the standard Scorchbeast moves, the Queen attacks with its freezing gale winds. It will blanket the field with pockets of deep cold and can shoot out freezing bursts of cold toward anyone on the ground. Once on the ground, it will behave like the Scorchbeasts you know and love. Queens are powerful and nearly indestructible. Expect to do a lot of prepping and planning if you and your team hope to survive the encounter.
Scorchbeast Queen (Lvl 95)
- Base Health: 32, 767
- Damage Resistance: 300
- Energy Resistance: 300
- Radiation Resistance: 300
The Scorched

Scorched come in many flavors and are never seen outside of a group. They aren’t hard to kill and are easily beaten with basic tactics: kill the melee enemies first, then take on the gun-toting Scorched from behind cover. The difficulty that comes with fighting Scorched is entirely based on what weapons they carry, how many of them there are, and what level each of them is.
Scorched (Lvl 1)
- Base Health: 35
- Damage Resistance: 5
- Energy Resistance: 20
- Radiation Resistance: 150
Scorched Wanderer (Lvl 6)
- Base Health: 50
- Damage Resistance: 5
- Energy Resistance: 20
- Radiation Resistance: 150
Scorched Believer (Lvl 14)
- Base Health: 60
- Damage Resistance: 5
- Energy Resistance: 20
- Radiation Resistance: 150
Scorched Zealot (Lvl 23)
- Base Health: 125
- Damage Resistance: 40
- Energy Resistance: 65
- Radiation Resistance: 150
Scorched Warrior (Lvl 32)
- Base Health: 145
- Damage Resistance: 40
- Energy Resistance: 65
- Radiation Resistance: 150
Scorched Berserker (Lvl 40)
- Base Health: 185
- Damage Resistance: 40
- Energy Resistance: 65
- Radiation Resistance: 150
Scorched Leader (Lvl 47)
- Base Health: 200
- Damage Resistance: 85
- Energy Resistance: 100
- Radiation Resistance: 150
Scorched Controller (Lvl 54)
- Base Health: 225
- Damage Resistance: 85
- Energy Resistance: 100
- Radiation Resistance: 150
Scorched Champion (Lvl 62)
- Base Health: 250
- Damage Resistance: 85
- Energy Resistance: 100
- Radiation Resistance: 150
Scorched Conqueror (Lvl 68)
- Base Health: 300
- Damage Resistance: 85
- Energy Resistance: 100
- Radiation Resistance: 150
Sentry Bots

These robots are walking arsenals of deadly weaponry. To make matters worse, they have high resistances and are relentless in their pursuit of their prey. Don’t try to face one down if you like living. Use mines, get behind cover, and do NOT let one box you into a corner. Its miniguns will shred you in moments, as will its melee attacks.
If you manage to defeat one, loot it quickly and run like hell! After about 60 seconds the Sentry Bot’s remains will detonate, creating a massive explosion where it used to stand.
Sentry Bot (Lvl 30)
- Base Health: 875
- Damage Resistance: 135
- Energy Resistance: 70
- Radiation Resistance: 135
Siege Breaker Sentry Bot (Lvl 40)
- Base Health: 1,075
- Damage Resistance: 135
- Energy Resistance: 70
- Radiation Resistance: 135
Annihilator Sentry Bot (Lvl 50)
- Base Health:1,550
- Damage Resistance: 135
- Energy Resistance: 70
- Radiation Resistance: 135
Annihilator Sentry Bot Mk. II (Lvl 60)
- Base Health: 1,725
- Damage Resistance: 135
- Energy Resistance: 70
- Radiation Resistance: 135
Stingwings

Sting Wings don’t have a lot of health, but they can be a real pain to kill. They tend to use stick-and-move tactics over a direct assault. Expect them to fly in, stab you with their stinger, then fly away before you can retaliate. You can try to practice your marksmanship skills to take them out, but we suggest immediately using V.A.T.S. to swiftly take them out.
Stingwing (Lvl 10)
- Base Health: 40
- Damage Resistance: 20
- Energy Resistance: 30
- Radiation Resistance: 1,000
Stingwing Darter (Lvl 18)
- Base Health: 125
- Damage Resistance: 30
- Energy Resistance: 45
- Radiation Resistance: 1,000
Stingwing Skimmer (Lvl 30)
- Base Health: 150
- Damage Resistance: 40
- Energy Resistance: 60
- Radiation Resistance: 1,000
Glowing Stingwing (Lvl 42)
- Base Health: 175
- Damage Resistance: 50
- Energy Resistance: 75
- Radiation Resistance: 1,000
Stingwing Chaser (Lvl 54)
- Base Health: 225
- Damage Resistance: 60
- Energy Resistance: 90
- Radiation Resistance: 1,000
Super Mutants

Super Mutants are formidable foes—anyone who’s played a past Fallout game knows that. They are battle-hardened soldiers that attack with every kind of implement of destruction. Deal with them as you would any soldier: take cover, avoid their attacks, and return attacks of your own. They are formidable in large groups and should never be underestimated.
Super Mutant (Lvl 5)
- Base Health: 80
- Damage Resistance: 10
- Energy Resistance: 35
- Radiation Resistance: 10
Super Mutant (Lvl 10)
- Base Health: 160
- Damage Resistance: 10
- Energy Resistance: 5
- Radiation Resistance: 10
Super Mutant Skirmisher (Lvl 16)
- Base Health: 300
- Damage Resistance: 50
- Energy Resistance: 25
- Radiation Resistance: 50
Super Mutant Brute (Lvl 22)
- Base Health: 350
- Damage Resistance: 50
- Energy Resistance: 25
- Radiation Resistance: 50
Super Mutant Enforcer (Lvl 28)
- Base Health: 375
- Damage Resistance: 100
- Energy Resistance: 50
- Radiation Resistance: 100
Super Mutant Butcher (Lvl 35)
- Base Health: 475
- Damage Resistance: 100
- Energy Resistance: 50
- Radiation Resistance: 100
Super Mutant Master (Lvl 42)
- Base Health: 500
- Damage Resistance: 100
- Energy Resistance: 50
- Radiation Resistance: 100
Super Mutant Overlord (Lvl 48)
- Base Health: 725
- Damage Resistance: 100
- Energy Resistance: 50
- Radiation Resistance: 100
Super Mutant Primus (Lvl 59)
- Base Health: 750
- Damage Resistance: 135
- Energy Resistance: 80
- Radiation Resistance: 135
Super Mutant Warlord (Lvl 68)
- Base Health: 950
- Damage Resistance: 135
- Energy Resistance: 80
- Radiation Resistance: 135
Ticks
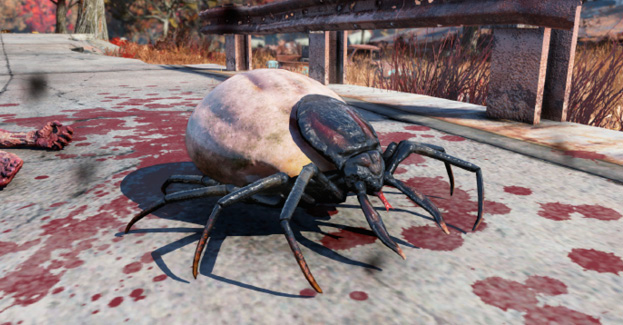
Ticks are hoppy little bloodsuckers that are hard to shake. If they are able to attack you a handful of times, they’ll swell with blood, which will cause them to slow down. Unfortunately they can use this blood as an irradiating projectile, which also has the consequence of shrinking them back to size, allowing them to attack at their normal speed.
There’s little you can do to avoid Ticks, so it’s best to just go on the offense and attack them before they can attack you.
Tick (Lvl 1)
- Base Health: 25
- Damage Resistance: 5
- Energy Resistance: 5
- Radiation Resistance: 250
Foul Tick (Lvl 8)
- Base Health: 30
- Damage Resistance: 5
- Energy Resistance: 5
- Radiation Resistance: 250
Wretched Tick (Lvl 16)
- Base Health: 100
- Damage Resistance: 5
- Energy Resistance: 5
- Radiation Resistance: 250
Vile Tick (Lvl 26)
- Base Health: 150
- Damage Resistance: 5
- Energy Resistance: 5
- Radiation Resistance: 250
Scorched Tick (Lvl 35)
- Base Health: 200
- Damage Resistance: 5
- Energy Resistance: 5
- Radiation Resistance: 250
Vertibots

Vertibots are typically found escorting Cargobots. They aren’t terribly difficult to destroy if you have cover to hide behind; being in the open is a completely different story. They are resilient to ballistic attacks, so rely on Explosive and Energy damage to take them down quickly.
Vertibot (Lvl 20)
- Base Health: 650
- Damage Resistance: 135
- Energy Resistance: 135
- Radiation Resistance: 135
Vertibot (Lvl 30)
- Base Health: 875
- Damage Resistance: 135
- Energy Resistance: 135
- Radiation Resistance: 135
Vertibot (Lvl 40)
- Base Health: 1,100
- Damage Resistance: 135
- Energy Resistance: 135
- Radiation Resistance: 135
Vertibot (Lvl 50)
- Base Health: 1,550
- Damage Resistance: 135
- Energy Resistance: 135
- Radiation Resistance: 135
Wolves
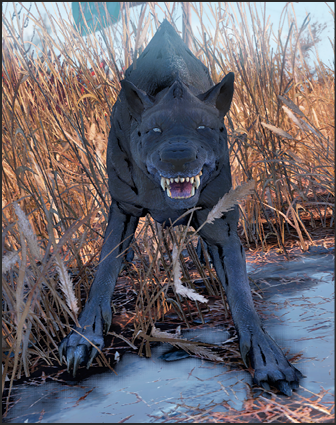
Wolves are simple creatures and aren’t particularly dangerous. They tend to attack in packs and can whittle your health down little by little as they each attack from all sides. Their main method of attack is to charge up and bite, which you can easily avoid by staying on the move. Their Resistances are incredibly low, so taking them out is a breeze.
Vicious Wolf (Lvl 10)
- Base Health: 110
- Damage Resistance: 10
- Energy Resistance: 10
- Radiation Resistance: 10
Feral Wolf (Lvl 20)
- Base Health: 350
- Damage Resistance: 15
- Energy Resistance: 15
- Radiation Resistance: 15
Grey Wolf (Lvl 30)
- Base Health: 450
- Damage Resistance: 15
- Energy Resistance: 15
- Radiation Resistance: 15
Rabid Wolf (Lvl 40)
- Base Health: 500
- Damage Resistance: 20
- Energy Resistance: 20
- Radiation Resistance: 20
Glowing Wolf (Lvl 50)
- Base Health: 750
- Damage Resistance: 20
- Energy Resistance: 20
- Radiation Resistance: 20
Yao Guais
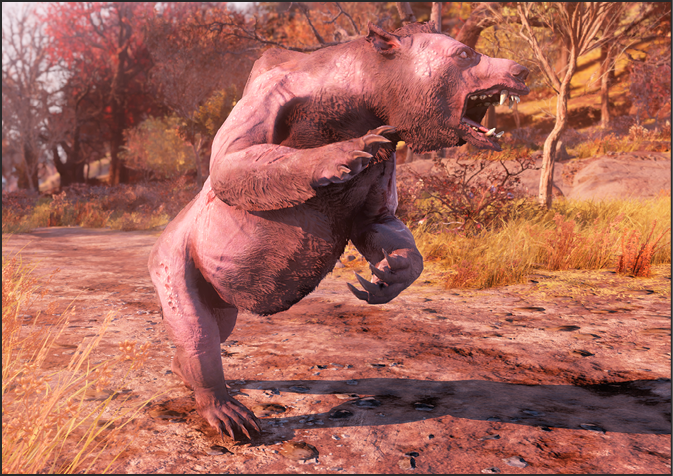
Yao Guai aren’t combat experts, but that is of little importance when you consider how near-indestructible they are. Their main method of attack is to charge and swipe you with their claws until you die. They hit hard and are relentless, but if you can get an object between you and them (or get on top of something they can’t climb, like a car) they can be pretty easy to manipulate.
Stunted Yao Guai (Lvl 16)
- Base Health: 400
- Damage Resistance: 100
- Energy Resistance: 100
- Radiation Resistance: 250
Yao Guai (Lvl 26)
- Base Health: 600
- Damage Resistance: 100
- Energy Resistance: 100
- Radiation Resistance: 250
Yao Guai Ghoul (Lvl 31)
- Base Health: 625
- Damage Resistance: 100
- Energy Resistance: 100
- Radiation Resistance: 250
Shaggy Yao Guai (Lvl 36)
- Base Health: 750
- Damage Resistance: 100
- Energy Resistance: 100
- Radiation Resistance: 250
Irradiated Yao Guai (Lvl 46)
- Base Health: 775
- Damage Resistance: 100
- Energy Resistance: 100
- Radiation Resistance: 250
Glowing Yao Guai (Lvl 46)
- Base Health: 1,100
- Damage Resistance: 100
- Energy Resistance: 100
- Radiation Resistance: 250
Albino Yao Guai (Lvl 56)
- Base Health: 1,275
- Damage Resistance: 100
- Energy Resistance: 100
- Radiation Resistance: 250
Rabid Yao Guai (Lvl 66)
- Base Health: 1,300
- Damage Resistance: 150
- Energy Resistance: 150
- Radiation Resistance: 250
Dusky Yao Guai (Lvl 76)
- Base Health: 1,475
- Damage Resistance: 150
- Energy Resistance: 150
- Radiation Resistance: 250