
Halo 4 Guide Essentials Training
Basic Training
Halo 4’s game controls are the product of years of refinement. You will appreciate the simplicity and responsiveness of the controls while threading your Spartan through dangerous situations. If they aren’t to your liking, Halo 4 comes with a wide variety of options to cater to your tastes. In addition to the alternate control layouts, you can also customize things like look sensitivity, autolook centering, crouch behavior, clench protection and flight inversion. We’ll go over the control basics based on the standard configuration.
Half of any battle is about controlling and understanding the information you’re given, and then acting on it. The heads-up display should also be familiar to fans, but for players who may be new to the franchise, we dissect the HUD (Heads Up Display) and explain its various features and functions.
Once you know how to control your Spartan and understand the data on your HUD, you can start getting into combat strategy. General advice regarding how to fight and survive, on foot or behind the wheel, can be found here.
Let’s begin your basic training. “You have been called upon to serve.”
Controls
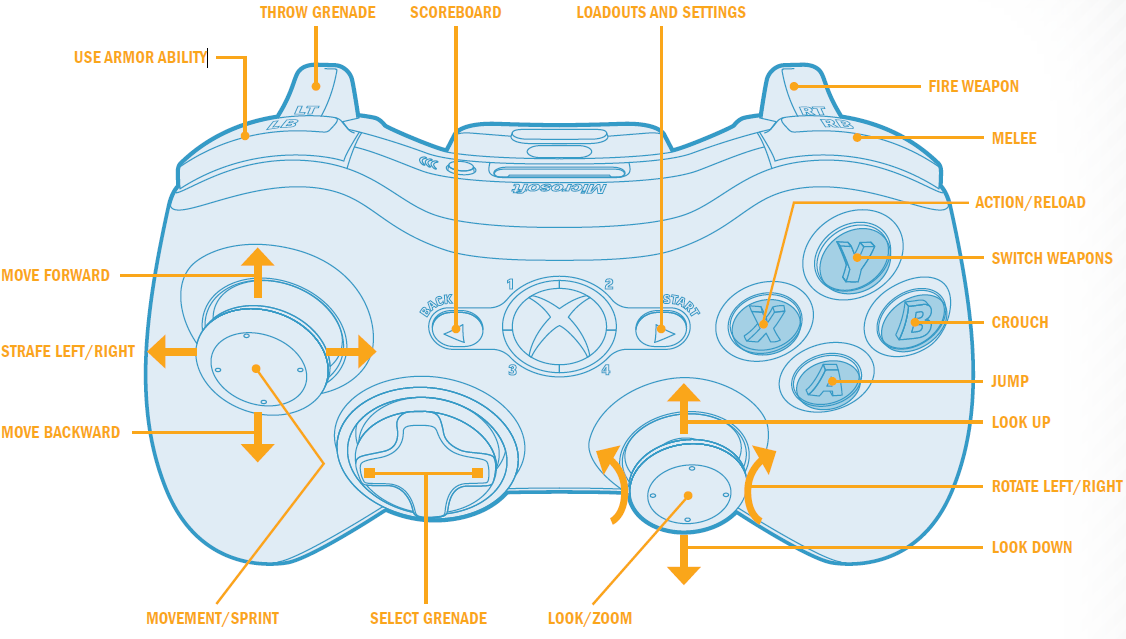
DEFAULT CONTROLS: Many players enjoy the standard control setup, so we’ll give you a quick rundown of this control method here. Vehicles are controlled differently than a Spartan, but across multiple vehicles the controls are oftentimes shared.
On Foot
Left Analog Stick
Default Function— Movement: One of the most important things you will ever do in combat, besides shoot, is move. The analog stick can control how fast you move depending on how far you tilt the stick in a given direction. This is a very important aspect of movement in multiplayer games. If you move too fast, you show up on the motion sensors of everyone next to you. Effective movement combines using the left analog stick and your activity to sprint and jump, can be augmented by very specific armor abilities.
L3 (Click Left Analog Stick)
Default Function—Sprint: This is one of the biggest additions to the Halo gameplay formula. Sprinting was originally an armor ability when it first appeared. Now you can sprint without having a special item equipped, although you will sacrifice some maneuverability as well as the ability to fire while sprinting. The problem here is that if you suddenly need to shoot at an enemy, you must stop sprinting, and that short delay while you ready your weapon can prove fatal. Sprint if you must, and always with purpose.
Right Analog Stick
Default Function—Looking/Aiming: You’re a dead Spartan walking if you’re not paying attention to your immediate surroundings. This isn’t just a saying, it’s the truth. As with basic movement, the speed at which you scan the environment varies depending on how much you tilt the right analog stick. You can further customize your look sensitivity in the options menus. Some players want the sensitivity high, even maxed out, which lets them aim to get quick shots off. Other players prefer the sensitivity be lowered to help them aim accurately. Try practicing with different settings to see what you feel most comfortable with.
R3 (Click Right Analog Stick)
Default Function—Aim/Zoom In: For weapons that have a scope, or are linked to the Spartan’s helmet, aiming allows you to zoom in on a target for more accurate fire. There are some drawbacks: aiming at enemies makes you move slower, and you can’t sprint while aiming. There’s also a loss of situational awareness, as you lose much of your peripheral vision and your motion sensor. If you are equipped with a weapon that does not have a scope, the helmet visor acts as a set of binoculars, but you can’t shoot while using this feature, it automatically disengages.
Left Trigger
Default Function—Throw Grenades: Grenades are an important part of your toolkit as a Spartan. There are 3 different types of grenades available, all of which serve a distinct purpose. You can only carry two of each type, so make each of your grenades count.
Right Trigger
Default Function—Shoot: Aim at the target, squeeze the trigger, make the shot. Shooting isn’t hard, but shooting well takes some practice. Don’t get discouraged if you’re having trouble tracking the enemy while trying to line up a shot. Don’t pull the trigger recklessly and make sure your aim is true before you fire.
Left Bumper
Default Function—Armor Ability: Armor abilities can be found in the field during the main Campaign or Spartan Ops. In War Games multiplayer, players can make custom loadouts that include preferred armor abilities. These abilities allow you some additional tactical flexibility in the field. They have limited use before they require time to recharge, so use your armor abilities wisely.
Right Bumper
Default Function—Melee Strike: If the enemy gets close, or if you get close to the enemy, and you want to make a statement, use your melee attack. A good punch in the face is enough to give most enemies a moment’s pause, and any regular melee attack to the back of most enemies (and all players in War Games) will be an instant kill. If you manage to get behind an enemy and hold down the Melee Attack button, you can perform a special assassination animation, the perfect way to humiliate the inattentive. Just don’t attempt an assassination when the victim has friends, otherwise you could be joining them in short order.
Default Function—Detach Turret: If you have taken up position on a mounted weapon, such as a Plasma Cannon or a Gun Turret, you can tear the weapon free of its mount and roam around the battlefield with it. Enjoy the benefits of such powerful heavy weapons without being confined to a single spot! However, you move considerably slower while carrying a heavy weapon.
A Button
Default Function—Jump: Jumping allows you to reach elevated positions, and can sometimes help you find ways to bypass enemy defenses. However, once you jump, you have limited control over where you’re going. You can still shoot, aim, throw grenades, and even use melee attacks while jumping, but you’re quite vulnerable and are moving slower than you would if you just chose to sprint. Still, jumping is an effective way to throw off your enemy’s aim or evade explosive ordnance. Be careful about where you choose to jump—a long fall can cost you a chunk of your shielding, or possibly kill you.
B Button
Default Function—Crouch: If you are in a situation where you need to get behind low cover, crouching can help reduce your profile on the battlefield. It cuts down your speed, but it can help you move without making your presence known by motion sensors.
X Button
Default Function—Action: At times, you will be required to activate a control panel or press a switch. You can also use this button to pick up weapons off the field, or take control of mounted heavy weapons.
Default Function—Reload: Most weapons you find in the field have limited magazines or energy cells that must be reloaded periodically. Reloading is not just something you do when you run out of bullets, it’s a tactical option that must be exercised carefully. While you are reloading your weapon, you cannot shoot. If an enemy rushes you while you are in the middle of reloading, you’re in trouble. Before any engagement, know how much ammo is in your weapons, and reload if necessary. There’s nothing worse than running dry just before you score a kill. It’s worth noting that you shouldn’t necessarily ignore picking up a weapon you are already holding. Sometimes it’s worth picking up to see if it contains more ammo than the one you have.
Default Function—Board/Exit Vehicle: Boarding a vehicle is simple. Stand next to it and press the action button. Some vehicles have multiple seating options, and you can choose one by standing close to that seat before pushing the action button. You can exit a vehicle in the same way. Vehicles that have been flipped over can be turned back by pressing this button.
Y Button
Default Function—Switch Weapon/Drop Heavy Weapon: Spartans can only carry two primary firearms. This limitation can be worked around by choosing weapons that compliment each other. Switching weapons can sometimes be faster than simply reloading, but it depends on the guns you’re switching between. The smaller the gun, the faster the animations.
Directional Pad
Default Function—Switch Grenade Types: There are three types of grenades in Halo 4 . Pressing left or right on the directional pad can allow you switch between them. When possible, be sure to use the right grenade for every situation.
Default Function—Call Down Ordnance/Switch to Special Weapon: During the campaign, pressing down on the directional pad allows you to switch to a Target designator after it has been recovered in mission 5. For certain multiplayer game types, players who score enough kills can call down special ordnance pods containing new weapons to enhance their arsenal.
In a Land Vehicle
Left Analog Stick
Acceleration/Deceleration: Warthog, Scorpion, Wraith, Ghost, Mantis, Mongoose
Right Analog Stick
Looking/Steering: Warthog (Driver), Ghost (Driver), Mongoose (Driver)
Aiming Weapon: Warthog (Gunner, Passenger), Scorpion (Driver, Gunner, Passenger), Wraith (Driver, Gunner), Mantis, Mongoose (Passenger), Shade Turret
Right Trigger
Brakes: Warthog, Mongoose
Fire Weapon 1 : Warthog (Gunner), Scorpion, Wraith, Ghost, Mantis
Right Bumper
Melee Stomp: Mantis
Left Trigger
Powerslide: Warthog, Mongoose
Boost: Ghost, Wraith
Fire Weapon 2 : Mantis
Y Button
Crouch: Mantis
Switch Weapons: Warthog passenger
In an Air Vehicle
Left Analog Stick
Acceleration/Deceleration: Banshee, Broadsword
Be aware that decelerating too much with a Banshee will cause you to lose altitude rapidly. Make sure you’re not about to fall into a hazardous situation.
Roll Left/Right: Banshee, Broadsword
Right Analog Stick
Change Pitch/Heading: Banshee/Broadsword
Right Trigger
Fire Weapon : Banshee, Broadsword
Left Bumper +Left Analog Stick
Evasive Maneuvers: Banshee
This unique ability is limited to the Banshee alone, and is highly effective at throwing off anti-aircraft defenses and other hostile fliers. Simply pressing the Left Bumper allows for a quick vertical loop. By tilting the Left Analog Stick left or right while pressing Left Bumper, you can roll the Banshee in those directions.
Left Trigger
Boost: Banshee, Broadsword
Y Button
Switch Weapons: Banshee, Broadsword
The HUD
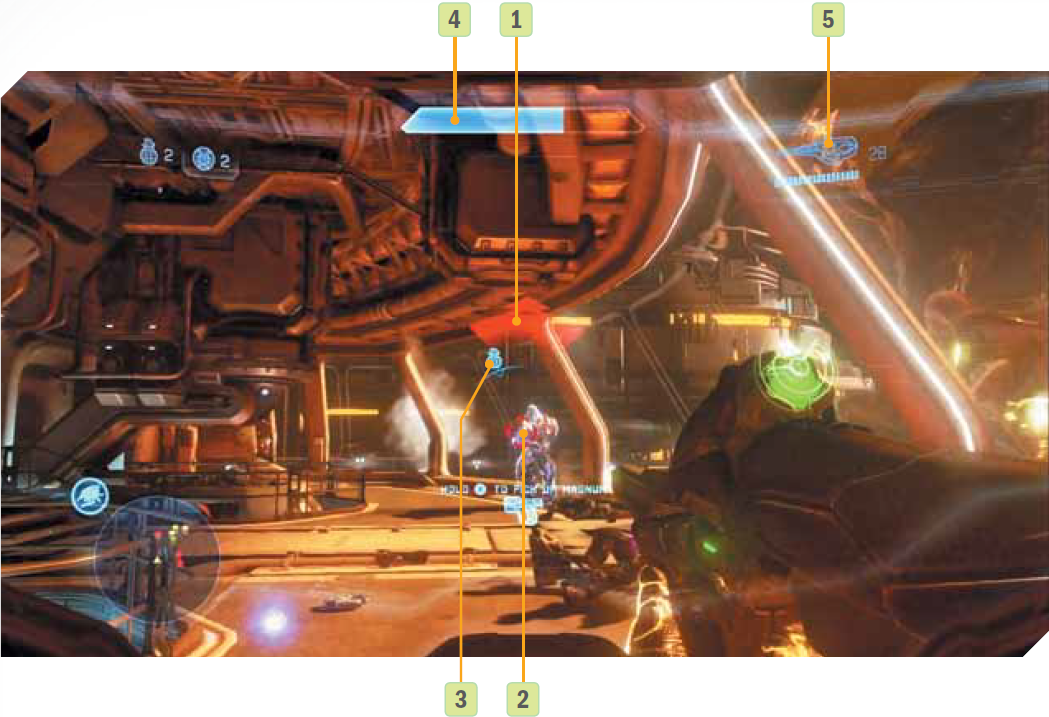
The heads-up display, or HUD, is a enhancement to your vision that tells you everything you need to know about your current situation. It is easy to read, and does not get in the way when you are trying to make sense of a firefight. So long as you pay attention to what it’s displaying, you can effectively plan for, and react to, anything the enemy throws at you.
- [1] Shot Indicator —When you get shot, a portion of the screen flares up. Use this as a secondary radar, so to speak. If the lower-right corner of the screen flares up, the enemy is behind you and to the right.
- [2] Target Reticle —The target reticle changes depending on which weapon you have equipped, but it serves the same purpose for all firearms. The reticle allows you to maintain relative accuracy while firing a weapon “from the hip.” Certain precision weapons, like the Sniper Rifle, retain their deadly accuracy even when fired without using the scope. Others lose accuracy, and this is often reflected by the reticle becoming larger. When enemies are within optimal range of your equipped weapon, the reticle turns red. For allies, it turns green. One of the most valuable features about the target reticle is that it can indicate headshots. When a headshot-capable weapon is aimed at a target’s head, a smaller dot will appear at the center of the reticle. This can act as a cue for you to shoot. Lastly, special hit markers will flash around the reticle to indicate whether or not you are hitting a target. This is especially useful if you’re fighting enemies using Active Camouflage.
- [3] Grenade Indicator —Inevitably, the enemy will be lobbing explosives at you. The grenade indicator lets you know that you are in dangerous proximity to a grenade. You can use this information to get to safety. No grenade indicator, no immediate danger. Now, if only there were a “This Object Will Explode And Kill You” indicator.
- [4] Shield Meter —The Shield Meter can also be called your life meter, and it’s one of the most crucial things displayed on the HUD. Each attack you sustain drains this meter precipitously. Once it falls below half, a pinging alarm begins to sound, warning you to take cover. When the meter is empty, the pinging becomes louder and the HUD will begin to flash red. Your shields have been broken! If you take further damage in this state, you will die. It’s possible to survive minor injuries, but don’t count on your luck to last very long unless you find cover quickly.
- [5] Weapon and Ammo Indicator —Ammo management during a firefight can mean the difference between life and death. The weapon and ammo indicator shows you what weapon is currently active, how much ammo remains in the current magazine, and how much you have left in reserve. This is a redundant system, some weapons have ammo indicators build into their frames, but it is still a valuable piece of information to have on hand.
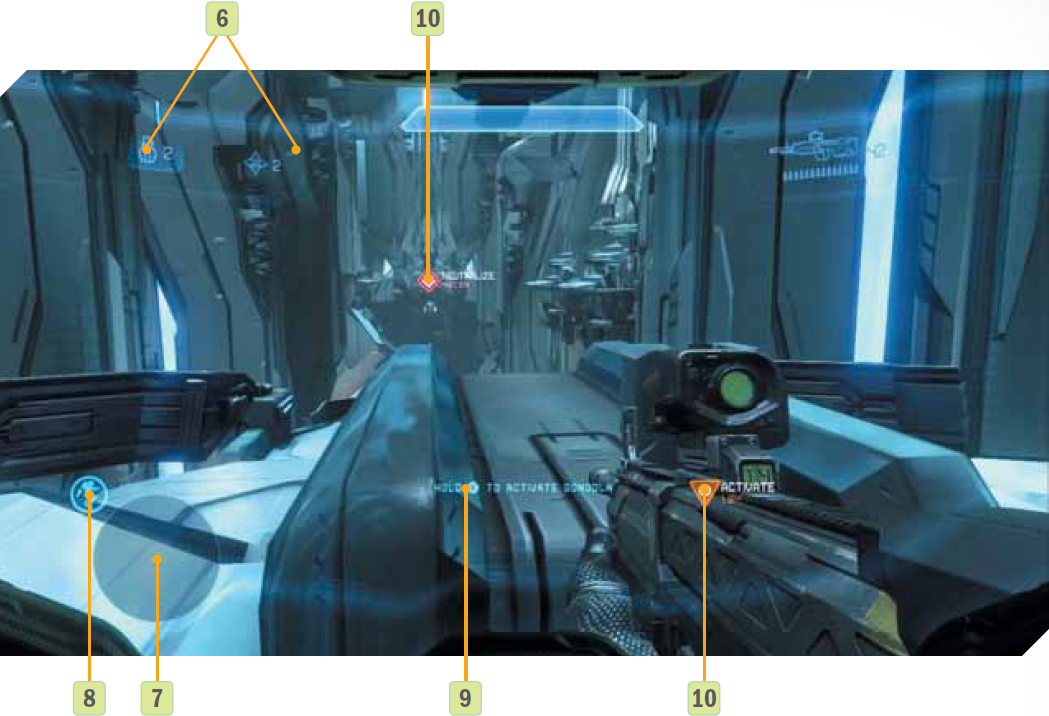
- [6] Grenade Count —You can carry two of all three types of grenades, which are displayed in the upper-left corner of the screen. As you switch between grenades, the grenade count indicator will prominently mark the active grenade in your inventory, so you know what you’re about to throw with a quick glance.
- [7] Motion Sensor —Tracking moving and shooting targets up to 30 meters away from you, the motion sensor is invaluable for determining enemy numbers, movements, and safe routes for flanking. Red dots on the tracker are hostile, yellow dots are allies. Not only does the tracker show enemies on the same level as you, it also can track and mark enemies at higher and lower elevations, adding up or down arrows to their tracker contacts accordingly.
- [8] Armor Ability —The currently equipped armor ability is displayed by this icon, as well as how much power remains in this armor ability before it requires time to recharge.
- [9] Action Prompt —Whenever you draw close to any object you can interact with, such as any gun you can pick up or any vehicle you can drive, or are suddenly out of ammo and need a new gun, you will see an action prompt appear in the lower center of the HUD.
- [10] Waypoint —Mission objectives often are marked on the HUD by a waypoint marker, although sometimes waypoints also indicate new weapons caches or specific hostiles.
Combat
The controls are setup just right and you’re properly acquainted with the HUD. That’s good! However, actually applying this knowledge during combat is a whole different ball game. Take the advice here to heart, and you’ll be on the road to becoming a proper Spartan.
Situational Awareness
This can be boiled down to “keeping your eyes peeled,” but it’s a bit more complex than that. It’s not just about what you can see directly in front of you, but also about watching for the telltale glow of a charged plasma pistol off to the side, tracking a sniper’s position by following the tracer of his Beam Rifle, noticing the subtle distortion of Active Camouflage being used, or using your knowledge of the area to be able to flank them.
Vision isn’t the only important factor. Halo 4 has an impressive sound design that can tell you everything you need to know about what is going on around you. You can tell what weapons are being used, what types of enemies are around the corner, and how close they, just by listening carefully. This is especially important for multiplayer games where the motion sensor might be disabled as part of the game type.
Moving Well
The importance of effective movement is commonly overlooked by new players, who just run to where the action is, only to die time and again. You should have a basic understanding of where you are in order to move effectively while under fire. Knowing your environment lets you avoid getting stuck on terrain as you move, and more importantly, lets you find cover when you need it. You should know when to move slowly, when to run, and when to sprint. When you start getting shot at, things get tougher. Generally, you don’t want to be out in the open if you can help it. If you’re in a safe spot, you should hold onto it, and only move to a new position when you can safely do so.
When you sustain damage, you temporarily slow down. Your first instinct may be to jump, which you should try to avoid. On lower difficulties or against less skilled players, that might be good enough to throw them off. On the higher difficulties, or against a pro, you’re still just another target, but now you’re moving in a predictable fashion from the moment you jump all the way until you land. Instead, “juke” your opponents and force them to constantly correct their aim. You might even get a skilled sniper to miss a perfect shot.
Most importantly, when you choose to move while under fire, stay moving! Many deaths happen simply because the player hesitates while out in the middle of the open, then promptly eats a sniper shot to the face. Don’t be that guy.
On the Offense
Offense can be broken down to several requirements: Being equipped with and using the right weapons, knowing where the enemy is, and attacking when it’s advantageous. You can apply this mind-set to both the Campaign and multiplayer.
Equipping and using the right weapons is quite simple. The biggest problem is that you can only carry two weapons at a time, and only two of each of the three types of grenades. You can’t have everything you want all at once, and you can’t cover every weakness for every enemy in the game. The right weapon setup depends entirely on your circumstances. For example, with an energy weapon like the Plasma Pistol, you can take out the shields of an Elite quickly, while the Magnum can instantly kill the unshielded elite with a single headshot. Against a Hunter, this loadout might not be the best, so fall back and find a weapon that can be more effective, like a Rocket Launcher. Remember that every enemy in the game has weaknesses that can be exploited by multiple weapons in the Halo 4 arsenal.
Sometimes, guns aren’t enough, and you’re forced to resort to melee attacks. This isn’t a disadvantage! Melee combat is something Spartans excel at; it’s an excellent way to finish off enemies who survive an assault just as your weapon runs dry. Running across an open field at a Shade Turret to try to punch the gunner in the face might sound cool if you play some dramatic or sad music in the background, but you’re probably just going to die.
Grenades are some of the most useful tools in your arsenal, and you have three different types to exploit. You can effectively shut down groups of enemies with one properly thrown Frag Grenade. In multiplayer, sticking an enemy with a Plasma or Pulse Grenade moments before your own death ensures that you will not die alone.
Knowing where the enemies are before you attack goes right back to situational awareness. Pay attention to the world around you during combat, pay attention to your HUD, and you can start forming a plan. When you go on the offensive, be prepared to react to what the enemy is going to do and exploit any mistakes they make. Take advantage of them being distracted by other events going on around them. Attack from the side or from behind. Crouch and hold your fire until the last moment to hide from motion sensors. Use grenades to flush enemies out of hiding, or toss them around corners to weaken anyone on the other side before charging in.
Make sure you finish off your targets. Elites and multiplayer Spartans can recharge their shields if given a few moments. Be careful, sometimes enemies may turn this second chance against you. Do what you can to deny them that opportunity.
Lastly, always go for headshots. Learn to aim for the head of all enemies throughout the Campaign, and especially in War Games. If you’re going to survive against long odds, the best course of action is headshots. Remember this mantra: strip the shields, shoot the head.
For more information about all of the weapons in the game, go to the Intel chapter.
On the Defense
You are going to get shot. This is fact. Statistically, 100% percent of Halo 4 players will get hit by enemy fire at some point, and a staggering number will eventually die. What is important about getting shot is how you react to it. If you run headlong into a wall, throwing grenades blindly, you probably deserve what’s coming to you.
There are two things about defense that are absolutely important. One goes all the way back to movement, that is, doing it well. The second is shield management. When you take damage, determine the source and general location it came from as soon as possible. Take note of how much shielding you just lost. If you’re below half, you should probably take, or make yourself a difficult target. Depending on the situation, you also might be able to fight back and even kill your attacker, but if they got the drop on you, this can be very difficult. If you realize you can’t win and you have no choice but to retreat, use grenades to cover your escape and run. Unless the enemy is so close that turning your back is essentially suicide, facing the direction you are retreating is faster than running backward through an area. You can at least sprint this way.
Advanced players who know the terrain well may be able to retreat while moving backward successfully, but even the best know when to cash in their chips and get out of town. Always remember: so long as you have a few seconds where you aren’t taking damage, you can start regenerating your shields.
This is where shield management comes into play. You will take damage during battle; you have to be willing to soak up some hits to dole out some of your own. This is a skill the best players have mastered. They know how many shots it takes for a given weapon to bring them from full shields to death, and they can plan around that. You can do the same in the campaign, either when playing alone or with friends. How much shielding you have should determine how aggressive or defensive you’re going to be.
If your shields are broken, you’re not out of the game, but these moments should act as a wake up call. You can either press your luck and go for that kill, and maybe die in the process, or fall back to safety and regenerate to fight again.
When to Drive
Knowing when to use a vehicle, when you should ditch one, and when or how to fight one is very important for both the Campaign and War Games. There are many different types of vehicles. Some are lightly armed and fast, others are well armed and armored. Vehicles change the dynamic of any battle, so it’s important to understand and respect their capabilities when operating one or defending yourself against one.
Just having a vehicle does not make you invincible. Even the mighty Scorpion tank can be taken down by a lone Spartan with a Plasma Pistol and a well-aimed rocket to the driver’s compartment. The odds may actually be worse against a coordinated group of enemies. At the same time the Scorpion can rain utter hell all over the enemy before they even have a chance to fight back.
Information about all the vehicles and their strength and weaknesses can be found in the Intel chapter.
Armor Abilities
Longtime Halo fans know how the introduction of armor abilities and special equipment changed the nature of the game, in the campaigns and in multiplayer. They return in Halo 4 , having been streamlined since their first appearance.
Armor abilities are introduced incrementally throughout the Campaign, and you get a taste of how effective they truly are throughout the various engagements you’re thrown into. In War Games, you unlock armor abilities to place in your loadouts. As with any weapon in your arsenal, knowing how and when to use these enhancements marks the difference between winning and losing.
All information about the various armor abilities and how to make the best use of them can be found in the Intel chapter.