
Pikmin 3 Guide Missions Collect Treasure!
Course 4: Twilight Hollow
Available Medals
| Medal | Required Treasure |
|---|---|
| Platinum | 3240 |
| Gold | 2500 |
| Silver | 2000 |
| Bronze | 1500 |
Time Limit: 10:00
Available Pikmin: Yellow Pikmin, Winged Pikmin, Purple Pikmin
Recommended Tactics
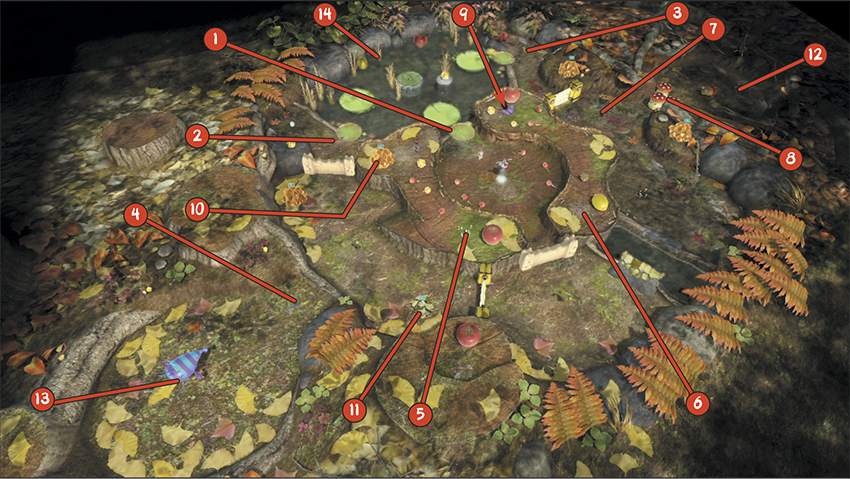
 When the mission starts, gather all three crew members and move to Point 1.
 Hop onto the first Lily Pad that approaches and look for the Winged Pikmin sprouts at Point 2. Once you’re in range, toss two crew members over to the sprouts. While both crew members pluck the sprouts, ride the Lily Pad to the other side of the water.
 When the Lily Pad carries you into range, hop off and begin to pluck the Yellow Pikmin sprouts at Point 3. Switch to one of the crew members you left at Point 2 and gather all of your Winged Pikmin. Send the squad charging into the nearby Dirt Wall, then switch back to the crew member at Point 3. Use the freshly plucked Yellow Pikmin to attack the nearby Electric Gate.
 As the Yellow Pikmin work, switch crew members and wait for the Winged Pikmin to finish destroying the Dirt Wall. When the task is done, gather your squad and lead it directly to the Puffy Blowhog enclosure at Point 4. Toss one crew member up to the Winged Pikmin sprouts just inside the enclosure, then use the rest of your squad to deal with the nearby Swooping Snitchbug.
When the Swooping Snitchbug is defeated, recall your Pikmin and switch to the crew member on the nearby ledge. Have the freshly plucked Winged Pikmin charge the Puffy Blowhog—your Winged Pikmin can handle this enemy without supervision, so drop down from the ledge and rejoin the nearby squad.
 Use the nearby ramp to lead the squad up to the Yellow Pikmin sprouts at Point 5. Have your Winged Pikmin transport the nearby Insect Condo, then move to the end of the platform and toss a crew member over to the Winged Pikmin sprouts at Point 6. Begin plucking the Yellow Pikmin sprouts.
 Switch to the crew member at Point 6 and pluck the nearby sprouts. Use this squad of Winged Pikmin to attack the remaining Dirt Wall. To keep your Pikmin safe from the nearby Swooping Snitchbug, make sure your squad attacks the Dirt Wall from inside the starting area. As the Winged Pikmin work, start plucking the Purple Pikmin sprouts on the opposite end of the platform.
Switch back to the crew member at Point 5 and use the Yellow Pikmin to attack the nearby Electric Gate. Once again, make sure your Pikmin attack the obstacle from outside the Swooping Snitchbug’s enclosure. As the Yellow Pikmin work, start plucking the Purple Pikmin sprouts at the opposite end of the platform.
 Switch to the crew member waiting near the first Electric Gate, and gather your idle Pikmin. Start plucking the Winged Pikmin sprouts just through the opening. Use these Winged Pikmin to attack the Swooping Snitchbug at Point 7. After you defeat the enemy, continue along the path to find another Swooping Snitchbug.
 When the area is safe, throw your Yellow Pikmin onto the Kingcaps at Point 8. Toss half of your Winged Pikmin onto the nearby Nuggets, and toss the rest of your squad onto the Nuggets near Point 3.
 Switch to the crew member at Point 9 and assign one Purple Pikmin to each of the nearby pieces of fruit.
 Switch to the crew member near the Nuggets at Point 10. Without leaving this platform, use the whistle to call the Winged Pikmin waiting near the SPERO. Toss the Winged Pikmin onto the Nuggets at Point 10, then assign one Purple Pikmin to each of the items located along the platform. By now, all of the map’s obstacles should be destroyed.
 Head down the ramp and gather the Yellow Pikmin waiting near the Fragments at Point 11. Continue along the path until you reach the remaining squad to defeat the Swooping Snitchbug, then use your squad to defeat this enemy. When it’s safe, return to Point 11 and send your Pikmin charging into the Fragments.
 As the bridge is being constructed, switch back to the crew member waiting near Point 8. Gather the Yellow Pikmin that were assigned to the Kingcaps, then enter the enclosure and sneak past the Bulborb. Pluck the Purple Pikmin sprouts at Point 12, then have your entire squad charge the sleeping enemy. When the battle ends, assign one Purple Pikmin to carry the defeated enemy. Have each of your remaining Purple Pikmin transport one of the nearby Sunseed Berries, then assign your Yellow Pikmin to any of the remaining items located in and around the enclosure.
 By now, the bridge should be finished. Use the “Go Here” command to plot a route to the Puffy Blowhog Enclosure at Point 4. Switch to the crew member waiting near Point 11, gather the nearby Yellow Pikmin, then round up three Purple Pikmin. Use the whistle to call down all 10 of the Winged Pikmin at Point 10. Once you’ve assembled this squad, move to Point 4 and toss all of your Pikmin into the Puffy Blowhog enclosure.
When the incoming crew member arrives, toss him or her into the enclosure. Switch to the recently thrown crew member and gather the Pikmin scattered around the Puffy Blowhog enclosure. Assign one Purple Pikmin to each Insect Condo in near Point 13. Toss two Yellow Pikmin onto the defeated Puffy Blowhog, then lead your remaining squad back out of the enclosure.
 After you drop down from the ledge, return to the Lily Pads you used at the beginning of the mission. Assign your Yellow Pikmin to the Nuggets you pass along the way, but keep all of the Winged Pikmin in your squad. Hop onto the first available Lily Pad and ride along with the current. As you approach Point 14, toss five Winged Pikmin onto the partially submerged Face Wrinkler, then toss 10 Winged Pikmin onto the partially submerged Insect Condo. As the Lily Pad approaches Point 3, hop off and assign at least three Winged Pikmin to transport the nearby Sunseed Berry.
From this point on, it’s just a matter of collecting the remaining items. To ensure each item reaches the SPERO as quickly as possible, avoid assigning Purple Pikmin to carry anything located outside of the starting area. Whenever possible, use Winged Pikmin to carry the remaining items—especially if you have to collect a large amount of Nuggets. Switch between crew members and issue “Go Here” commands to gather idle Pikmin and put them to work elsewhere on the map.