
Pikmin 3 Guide Missions Collect Treasure!
Course 3: Thirsty Desert
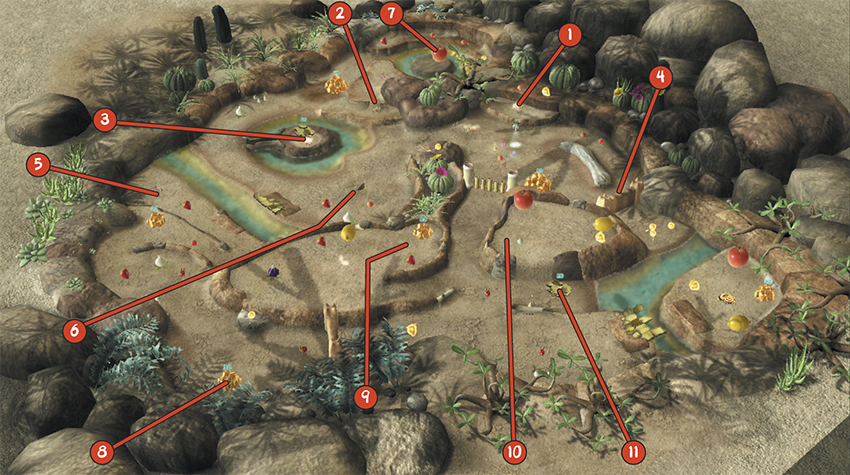
Available Medals
| Medal | Required Treasure |
|---|---|
| Platinum | 3340 |
| Gold | 2700 |
| Silver | 2000 |
| Bronze | 1500 |
Time Limit: 10:00
Available Pikmin: Red Pikmin, Winged Pikmin, White Pikmin, Purple Pikmin
Recommended Tactics
 When the mission starts, throw one crew member onto the Red Pikmin sprouts on the ledge near the SPERO.
 Lead the remaining crew member to the Winged Pikmin sprouts at Point 2. Cut through the water and double back to the ledge to shave a few seconds off of your travel time. Toss the extra crew member onto the Winged Pikmin sprouts on the nearby ledge, then begin plucking the sprouts at your feet. Switch back to the crew member you left in the starting area and use the small squad of Red Pikmin to collect the Golden Sunseed and the Cupid’s Grenade on the nearby ledge. While the fruit is being transported, drop down from the ledge and move to the patch of Red Pikmin sprouts on the ground.
 Switch to the crew member you tossed onto the upper cluster of Winged Pikmin sprouts, then have your squad charge the nearby pile of Nuggets. Switch to the crew member you left on the lower pile of Winged Pikmin sprouts and send your squad charging into the same Nugget pile. As the Winged Pikmin work, move to the Fragments at Point 3. Start plucking the nearby Red Pikmin sprouts, then switch back to the crew member waiting in the starting area.
 Gather the idle Pikmin in the starting area. Toss at least three Red Pikmin onto the Dirt Wall at Point 4, then send the rest of your squad charging into the nearby Nuggets.
 Switch back to the crew member you left at Point 3, then send the newly plucked Red Pikmin charging into the nearby Fragments. As your Pikmin work, cut through the water and pluck the Winged Pikmin sprouts at Point 5. When you finish, send this squad of Winged Pikmin charging into the Nuggets on the nearby ledge. Head back to the Fragment pile and wait for your Red Pikmin to finish building the bridge.
 When the last Fragment is en route, follow it toward the bridge and gather your Red Pikmin as they complete their deliveries. When the bridge is in place, use this squad of Red Pikmin to defeat the Joustmite buried at Point 6. After the battle, use your Pikmin to transport the enemy and the two nearby pieces of fruit. Use the “Go Here” command to follow the objects back to the starting area.
 Switch to the crew member waiting on the ledge near Point 2. By now, all of the Winged Pikmin assigned to the nearby Nuggets should have transported the entire pile. Gather the Winged Pikmin and use them to collect the Insect Condo at Point 7, as well as the smaller pieces of fruit surrounding it. As the last piece of fruit is carried off, use the “Go Here” command to follow it back to the starting area.
 Switch to one of the crew members waiting in the starting area and gather all of the nearby Pikmin into one large squad. Head across the recently completed bridge and gather the idle Pikmin waiting near Point 5. Assign a few Red Pikmin to carry the nearby fruit, then follow the path as it winds toward Point 8. Attack the Nectar Eggs and Dwarf Bulborbs in the area, and assign Red Pikmin to transport each item you encounter. Assign your Winged Pikmin to the Nuggets at Point 8, then use the rest of your squad to destroy the nearby Dirt Wall.
As the Red Pikmin work, switch to one of the crew members in the starting area and round up the Winged Pikmin waiting near the SPERO. Assign 10 Winged Pikmin to the Bamboo Gate, then have the rest of your squad charge the Insect Condo on the nearby ledge.
 Switch back to the crew member you left near Point 8 and wait for your Pikmin to finish destroying the Dirt Wall. When the job is done, round up your Pikmin and follow the path toward Point 9. Collect the Golden Sunseed you find along the way, then defeat and collect the Dwarf Bulborbs ahead of you. As these items are being transported, climb up to the fruit at Point 9. Before you collect the fruit, however, switch to one of the crew members waiting in the starting area.
Gather all of the idle Pikmin near the SPERO, then use the “Go Here” command to rendezvous with the squad waiting at Point 9.
 Switch back to the squad waiting at Point 9. Assign Pikmin to the surrounding fruit and the nearby pile of Nuggets. When the incoming squad arrives, toss the crew member and all of his or her Pikmin over to the fruit at Point 10. Use the “Go Here” command to set a route back to the starting area. Switch to the recently thrown crew member, gather your Pikmin, and use them to collect the nearby fruit. Once the fruit is en route, use the “Go Here” command to follow it back to the SPERO.
 Switch to one of the crew members waiting in the starting area and gather any idle Pikmin waiting near the SPERO. Move down to the Fragments at Point 11 and have your squad assemble the nearby bridge. When the job is done, lead your squad across the completed bridge and have your Red Pikmin attack the Pyroclasmic Slooch. Assign Pikmin to collect the nearby fruit and Nuggets. Switch crew members and gather all of the idle Pikmin near the SPERO. Use this squad to collect the remaining objects and complete the mission.