
Pikmin 3 Guide Missions Battle Enemies!
Course 5: Shaded Garden
Available Medals
| Medal | Required Treasure |
|---|---|
| Platinum | 685 |
| Gold | 550 |
| Silver | 400 |
| Bronze | 300 |
Time Limit: 9:00
Available Pikmin: Red Pikmin, Rock Pikmin, Blue Pikmin
Recommended Tactics
 The mission starts with one crew member near each of the map’s three Onions. Have the crew member near the Red Pikmin’s Onion start plucking the nearby sprouts.
 Switch to the crew member near the Rock Pikmin’s Onion and start plucking the nearby sprouts.
 Switch to the crew member near the Blue Pikmin’s Onion and start plucking the last patch of sprouts.
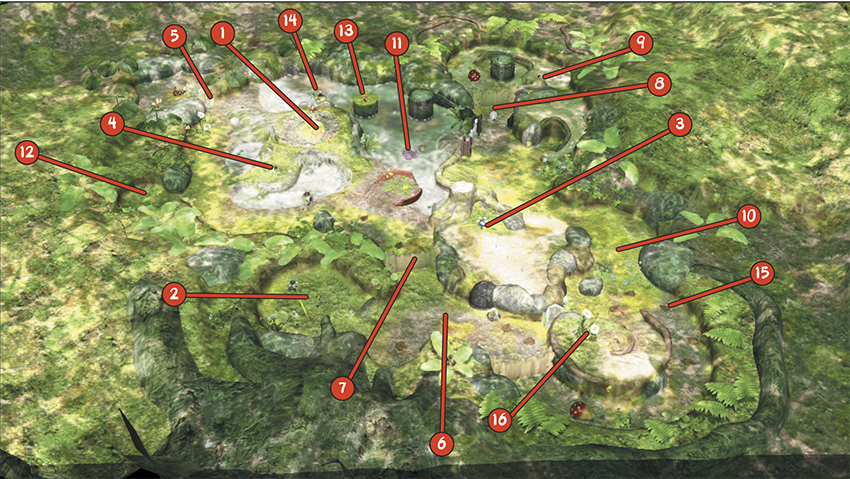
 Switch back to the crew member near the Red Pikmin’s Onion. Once you’ve plucked all of the Red Pikmin sprouts, collect the Bomb Rock at Point 4.
 Use the Bomb Rock to destroy the Large Crystal at Point 5. Aim for the area between the Large Crystal and the nearby Fiery Blowhog to ensure this creature is caught in the blast. After the explosion, use your Red Pikmin to attack the Pyroclasmic Slooches in the nearby enclosure. Have your Pikmin collect the defeated enemies, then use the “Go Here” command to send this crew member back to the Red Pikmin’s Onion.
 Switch to the crew member near the Rock Pikmin’s Onion, then toss one Pikmin onto the Desiccated Skitter Leaf just outside the enclosure. Collect the Bomb Rock nearby Bomb Rock, then move toward the Small Crystal blocking the Geyser. Clear out the nearby Desiccated Skitter Leaf enemies, then smash the Small Crystal and use the Geyser to launch your squad up to the Blue Pikmin’s Onion.
 Switch to the crew member leading the Blue Pikmin, then drop down from the ledge and have your Blue Pikmin charge the Dirt Wall at Point 7.
 Switch back to the crew member leading the Rock Pikmin and head toward the Dirt Wall at Point 8. As you move through the area, make sure you defeat all of the smaller enemies hiding along the path. There are three Skitter Leaf enemies on the ground, as well as a Yellow Spectralids flittering around the area.
As you approach Point 8, throw your Bomb Rock at the patch of ground between the Fiery Blowhog and the Dirt Wall.
 After the explosion, step into the enclosure and toss one Pikmin onto the Bomb Rock at Point 9. Turn back and run out of the enclosure to escape from the incoming Bulborb. When the Bulborb returns to its original location, use the Bomb Rock to quickly defeat the creature. Follow the curved ramp to circle the enclosure, then use your Rock Pikmin to clear out the smaller enemies flittering around the area.
 After you defeat all of the enemies around Point 9, gather your Rock Pikmin and use the “Go Here” command to send the squad to Point 10. Doing so allows your Rock Pikmin to gather near another group of Desiccated Skitter Leaf enemies without attracting unwanted attention.
 Switch to the crew member leading the Blue Pikmin, gather your squad, and attack the Desiccated Skitter Leaf enemies ahead of you. Move toward the Toady Bloyster at Point 11 and defeat all of the smaller enemies you spot along the way.
When you reach the Toady Bloyster, toss three Blue Pikmin onto the creature’s bulbous tail—this allows your Pikmin to safely attack the Toady Bloyster, but it prevents them from transporting the creature when the battle ends.
 Switch to the crew member leading the Red Pikmin, gather your squad, and move toward the enclosure at Point 12. Defeat the Red Spectralids and the Yellow Spectralids flittering just outside the enclosure, then defeat the large group of Skitter Leaf enemies within the enclosure.
After you defeat the small enemies near Point 12, gather your Red Pikmin and use the “Go Here” command to plot a route to the squad waiting at Point 10.
 Switch back to the crew member leading the Blue Pikmin. Gather your squad and attack any nearby Wogpoles. Throw two Blue Pikmin up to the Bomb Rocks at Point 13, then toss the remaining Pikmin out of your squad.
 When your Pikmin return with the Bomb Rocks, lead them to the Peckish Aristocrab at Point 14. Dismiss your squad and back away. When the Peckish Aristocrab snatches up your Pikmin, it automatically eats one of the Bomb Rocks.
After the explosion, gather your Blue Pikmin and collect the Bomb Rock near the defeated Peckish Aristocrab. Repeat the process to quickly defeat the remaining Peckish Aristocrab, then use your Blue Pikmin to clear out any small enemies in the area.
 If you’ve been vigilant, there should only be a few enemies left on the map. Switch to one of the other crew members and call all of the Rock Pikmin and Red Pikmin into a single squad. Use your Pikmin to defeat the Desiccated Skitter Leaf enemies scattered around Point 15.
 Gather your Pikmin and climb onto the nearby platform and attack the Red Spectralids near Point 16. After you defeat this creature, drop down and attack the remaining enemies. Defeat the Bulborb and the Yellow Spectralids to complete the mission.