
Pikmin 3 Guide Missions Battle Enemies!
Course 4: Twilight Hollow
Available Medals
| Medal | Required Treasure |
|---|---|
| Platinum | 465 |
| Gold | 350 |
| Silver | 250 |
| Bronze | 150 |
Time Limit: 8:00
Available Pikmin: Red Pikmin, Rock Pikmin, Winged Pikmin
Recommended Tactics
 When the mission starts, switch to the crew member near the Winged Pikmin’s Onion and start plucking the nearby sprouts.
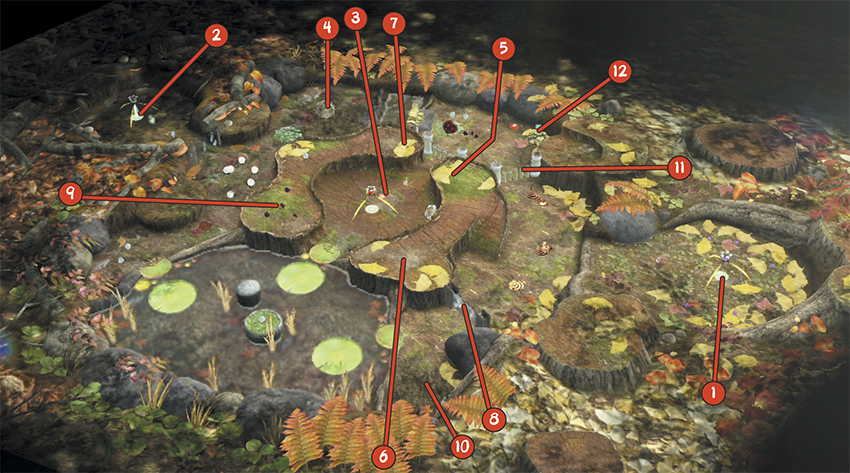
 Switch back to the crew member near the Rock Pikmin’s Onion and pluck all six of the of the Rock Pikmin sprouts. Use the Rock Pikmin to shatter the nearby Crystal Wall, then defeat the Skutterchucks waiting outside the enclosure. After you defeat all three Skutterchucks, have your Rock Pikmin collect two of them. Use the “Go Here” command to send this crew member back to the Rock Pikmin’s Onion.
Switch to the crew member near the Winged Pikmin’s Onion. Use your squad to collect the 1 Pellets scattered around the enclosure. Move under the Winged Pikmin’s Onion.
 Switch to the crew member near the Red Pikmin’s Onion and start plucking the nearby sprouts.
 Switch back to the crew member under the Rock Pikmin’s Onion. Pluck any remaining sprouts and gather all of your Rock Pikmin. Leave the enclosure and attack the Calcified Crushblat at Point 4. Don’t attempt to finish this enemy—once you shatter a piece of the Calcified Crushblat’s armor, gather your squad and use the “Go Here” command to plot a route to the Red Pikmin’s Onion.
 Switch back to the crew member near the Winged Pikmin’s Onion. Gather your squad and leave the enclosure. Dodge past the Pyroclasmic Slooches patrolling the area, then use the ramp to climb up to Point 5. When the Male Sheargrubs emerge, throw a few Winged Pikmin onto each enemy.
 After you defeat the Male Sheargrubs, gather your Winged Pikmin and use them to attack the Shearwigs hiding at Point 6.
Switch to one of the crew members near the Red Pikmin’s Onion. Merge with the nearby squad, then use your Rock Pikmin to destroy the nearby Small Crystal. Once the Geyser is exposed, use it to launch your squad onto the nearby platform and merge with the squad of Winged Pikmin.
Use your Winged Pikmin to collect the defeated enemies on each end of the platform.
 After you collect the defeated Male Sheargrubs at Point 5, toss your remaining Winged Pikmin over to the Female Sheargrubs hiding at Point 7. Throw four Rock Pikmin and one crew member over to the battle at Point 7, then turn around and use the ramp to head back down to the ground.
 Use your Red Pikmin to defeat the Pyroclasmic Slooch near the bottom of the ramp. Gather your squad and throw your remaining Rock Pikmin into the Crystal Wall at Point 8. As your Rock Pikmin attack the Crystal Wall, turn around and throw a crew member into the Winged Pikmin’s enclosure.
Use your small squad of Red Pikmin to defeat the remaining Pyroclasmic Slooches.
Switch to the crew member you left near the Female Sheargrubs.
 By now, the Female Sheargrubs should all be defeated, and many of the Pikmin involved in the battle have carried off the fallen enemies. Gather the nearby Pikmin and approach the Dwarf Bulbears at Point 9. Throw a Rock Pikmin on each of these enemies.
When the all of the Dwarf Bulbears have been defeated, attack the Nectar Egg near the center of the platform. Collect the resulting Ultra-Spicy Nectar, then throw all of your Pikmin back to Point 5.
Switch to the crew member near the Winged Pikmin’s Onion and start plucking the sprouts at the center of the enclosure.
 Switch to the crew member leading the Red Pikmin. Climb the ramp and collect the Pikmin at Point 5, then move back down the ramp and collect the Rock Pikmin at Point 8. Move through the remains of the Crystal Wall and use this squad to defeat the Sheargrubs hiding at Point 10.
After you’ve dealt with the Sheargrubs, gather your Pikmin and move to the area just outside the Winged Pikmin enclosure.
 Switch to the crew member near the Winged Pikmin Onion. Pluck any remaining sprouts, then gather any idle Winged Pikmin. Merge with the squad waiting just outside of the enclosure, then move to the Bamboo Gate at Point 11. Have 10 Winged Pikmin raise the Bamboo Gate. Move through the opening—as soon as your squad is safely past the Bamboo Gate, gather your Winged Pikmin and use your dose of Ultra-Spicy spray.
Turn around and have your squad charge the incoming Spotty Bulbear. Because your Winged Pikmin head straight for the creature’s eyes, you should be able to defeat this formidable enemy fairly quickly.
 After you defeat the Spotty Bulbear, attack the nearby Dwarf Bulbears. When the area is clear, send your Pikmin charging into the Fragments at Point 12.
After the bridge is assembled, gather your Pikmin and follow the path to the Calcified Crushblat you damaged near the start of the mission.
Keep your distance as you circle around the Calcified Crushblat. Stand directly in front of the creature’s exposed flesh, then send your squad charging in to attack. This should be the map’s last remaining enemy—defeat the Calcified Crushblat to complete the mission.