
Pikmin 3 Guide Missions Battle Enemies!
Course 3: Thirsty Desert
Available Medals
| Medal | Required Treasure |
|---|---|
| Platinum | 520 |
| Gold | 400 |
| Silver | 300 |
| Bronze | 200 |
Time Limit: 8:00
Available Pikmin: Red Pikmin, Rock Pikmin, Blue Pikmin
Recommended Tactics
 The mission starts with one crew member located near each of the map’s Onions. Have the crew member near the Red Pikmin’s Onion collect the five Red Pikmin.
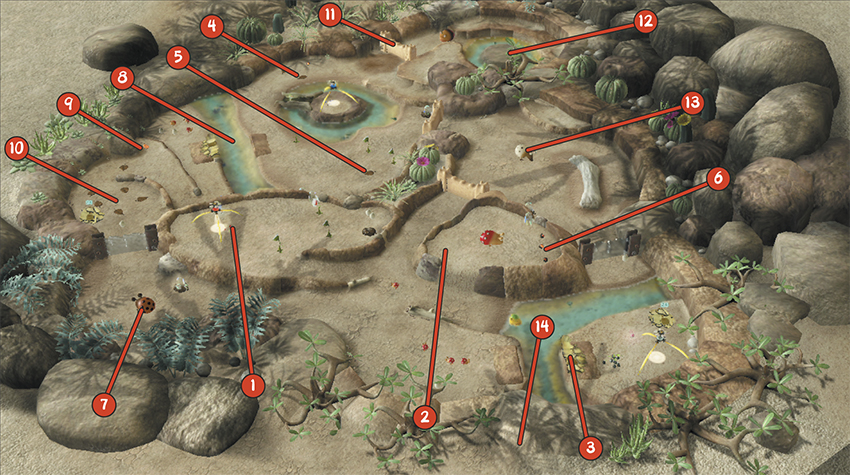
 The Geyser near the Red Pikmin’s Onion provides access to a nearby platform. Use the “Go Here” command to plot a route to Point 2—this allows your Red Pikmin to gather near the Bulborb without waking it.
 Switch to the crew member near the Rock Pikmin’s Onion. Gather all eight Rock Pikmin and lead them onto the incomplete bridge at the edge of the platform. Throw all of the Rock Pikmin over to the Dwarf Bulborbs across the gap. You can expect to lose at least one Rock Pikmin during the skirmish, but your squad shouldn’t have any trouble defeating these enemies.
 As the Rock Pikmin deal with the Dwarf Bulborbs, switch to the crew member located near the Blue Pikmin’s Onion. Gather the five Blue Pikmin and defeat the two enemies near the Bomb Rock at Point 4. Toss one Pikmin onto each Desiccated Skitter Leaf. Allow the Pikmin to transport the defeated enemies, but don’t collect the Bomb Rock at this time.
 Lead the rest of your squad to the Desiccated Skitter Leaf at Point 5. Defeat this enemy, then deal with the Wogpoles swimming around the Blue Pikmin’s Onion. Toss a Pikmin onto a Wogpole to flip it onto its back, then finish it off before it recovers. Assign one Pikmin to each of the defeated enemies then move under the Blue Pikmin’s Onion.
 Switch to the crew member leading the Red Pikmin. Sneak around the sleeping Bulborb and collect the Bomb Rocks at Point 6. Throw one Bomb Rock near the Bulborb, then drop down from the platform and throw one Bomb Rock at the Yellow Wollywog at the edge of the water. Turn around and throw one Red Pikmin on the nearby Dwarf Bulborb.
 Throw three Red Pikmin out of your squad—the only Pikmin still following you should be carrying a Bomb Rock. Use the “Go Here” command to plot a course to the Orange Bulborb at Point 7. You can save a bit of time by choosing a point in front of the Bulborb—when the creature wakes and attacks your Pikmin, it will automatically eat the Bomb Rock.
 Switch back to the crew member under the Blue Pikmin’s Onion. Gather your squad and attack the Water Dumples swimming near Point 8. After you defeat both of these enemies, recall your Pikmin and attack the Dwarf Bulborbs just across the water.
 Follow the path up to the two Bomb Rocks at Point 9. Collect the Bomb Rocks, then toss one Pikmin onto the nearest Desiccated Skitter Leaf.
 There are five enemies clustered at Point 10. Rather than attack each Desiccated Skitter Leaf individually, throw one Bomb Rock into the center of the group. Attack from a distance to prevent the enemies from scattering.
 Lead your squad of Blue Pikmin toward the Dirt Wall at Point 11. As you move into range, throw a Bomb Rock at the Dirt Wall—the five Shearwigs hiding near the obstacle should emerge just in time to be caught in the explosion.
Throw one Pikmin onto the Bomb Rock at Point 4, then dismiss your squad. Use the whistle to call the Pikmin holding the Bomb Rock, then approach the defeated Shearwigs to find a Spotty Bulbear.
When the Spotty Bulbear notices you, dismiss your Pikmin and run away. When the Spotty Bulbear eats the Bomb Rock, the explosion is enough to defeat the creature.
 Gather your remaining Blue Pikmin and move to Point 12. Use your squad to defeat both of the Wogpoles swimming in the enclosure. After the battle, call a single Blue Pikmin to your side and have it collect the Bomb Rock at the center of the enclosure.
 You squad should now contain a single Blue Pikmin carrying a Bomb Rock. Use the “Go Here” command to plot a course to the Whiptongue Bulborb at Point 13. When your squad arrives at its destination, the Whiptongue Bulborb should automatically eat the Bomb Rock.
 Aside from the Whiptongue Bulborb, the only remaining enemies should be two Wogpoles swimming near
Point 14.
Aside from the Whiptongue Bulborb, the only remaining enemies should be two Wogpoles swimming near
Point 14.
Switch to the crew member near the Rock Pikmin’s Onion and drop down from the platform. Use the whistle to call the Rock Pikmin down to your side, then lead your squad to the water’s edge. When the Wogpoles swim into range, toss a few Rock Pikmin onto each enemy. Use the whistle to recall your Pikmin as soon as they hit the water—if you’re careful, you should be able to rescue all of your Pikmin before they drown. Repeat the process until you defeat both of these enemies and complete the mission.