
Pikmin 3 Guide Missions Battle Enemies!
Course 1: Tropical Forest
Available Medals
| Medal | Required Treasure |
|---|---|
| Platinum | 650 |
| Gold | 550 |
| Silver | 400 |
| Bronze | 250 |
Time Limit: 7:00
Available Pikmin: Red Pikmin, Yellow Pikmin
Recommended Tactics
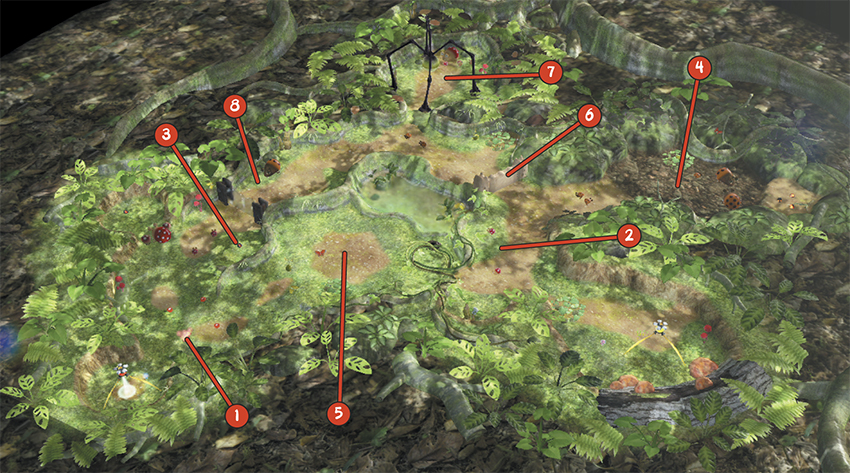
 When the mission starts, have one crew member standing near each of the Onions. Pluck three of the sprouts at Point 1 and use the resulting Red Pikmin to collect the nearby 1 Pellets. Start plucking the remaining Red Pikmin sprouts, then switch crew members and pluck the sprouts near the Yellow Pikmin’s Onion.
 Take the small squad of Yellow Pikmin and defeat the Dwarf Bulborbs at Point 2. Toss a Pikmin onto the nearby Yellow Spectralids, then have your squad transport all three enemies. Use the “Go Here” command to plot a route back to the Yellow Pikmin’s Onion, then switch crew members.
 Gather your Red Pikmin, but don’t pluck the new sprouts at this time. Instead, move toward the Bomb Rock at Point 3. Toss one Pikmin onto each of the Dwarf Bulborbs, then have a Pikmin collect the Bomb Rock. Throw the Bomb Rock at the nearby Bulborb, then toss a Pikmin onto the Yellow Spectralids flying around the area. Assign Pikmin to carry the smaller enemies, then throw one Pikmin onto the Bomb Rock in the alcove near the defeated Bulborb.
When the Pikmin returns with the Bomb Rock, use the “Go Here” command to plot a route to Point 2. Doing so sends this crew member through enemy territory, but the small squad shouldn’t have any trouble slipping past hostile creatures.
 Switch crew members and lead your Yellow Pikmin toward the enclosure at Point 4. Attack the Dwarf Orange Bulborbs just outside the enclosure and assign three Pikmin to carry each of the defeated enemies. Move back to Point 2 and rendezvous with the incoming crew member. Merge the two squads, then toss one crew member out of the group.
Switch crew members and use the “Go Here” command to plot a route to the Red Pikmin’s Onion, then switch back to the crew member leading the squad of Pikmin. Move back to the enclosure at Point 4 and throw the newly acquired Bomb Rock between the sleeping Orange Bulborbs. After the explosion, use your squad to defeat any surviving enemies within the enclosure. Throw one Pikmin onto the Red Spectralids, then collect the resulting Ultra-Spicy Nectar. Throw a Pikmin onto the Yellow Spectralids, then toss three Yellow Pikmin up to the Bomb Rocks on the nearby ledge. When these Pikmin return, use the “Go Here” command to send this squad back to the Yellow Pikmin’s Onion.
 Switch to the crew member waiting at the Red Pikmin’s Onion. Gather the nearby Pikmin and lead them to the clearing at Point 5. Defeat the Swooping Snitchbug, then attack the nearby Yellow Spectralids. Defeat the Red Spectralids flittering around the area and collect the resulting Ultra-Spicy Nectar. Use the Geyser near the curled Vine Tip to launch yourself back up to Point 2, then head over to the Yellow Pikmin’s Onion.
 Gather both crew members and all available Pikmin into a single squad, then use one of your Bomb Rocks to destroy the Dirt Wall at Point 6. After the explosion, use your Yellow Pikmin to defeat the Swooping Snitchbug ahead of you. Toss one Pikmin onto each of the nearby Dwarf Bulborbs.
 Head into the enclosure at Point 7 and use one of your remaining Bomb Rocks to defeat the sleeping Bulborb and the surrounding Dwarf Bulborbs in a single attack.
 Use your last Bomb Rock to quickly defeat the Orange Bulborb sleeping near the Crystal Wall at Point 8. Now it’s time to deal with the Baldy Long Legs. Lead your squad to the enemy’s current location, apply a dose of Ultra-Spicy spray, then send your Pikmin charging into one of the Baldy Long Legs’ feet.
As the Baldy Long Legs shakes off its attackers, gather your scattered Pikmin and send them back into the fight. When the Ultra-Spicy spray wears off, recall your squad and apply a fresh dose.
The Baldy Long Legs should be the last remaining enemy. Defeat the creature to complete the mission.