
Pikmin 3 Guide Missions Battle Enemies!
Course 2: Silver Lake
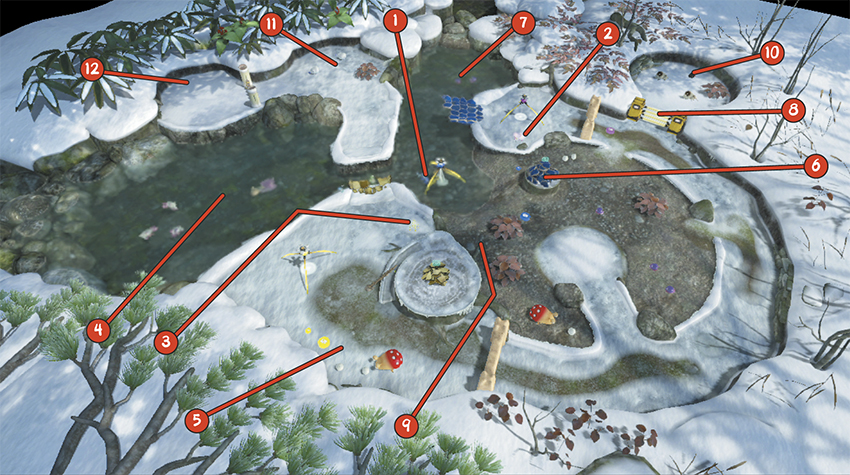
Available Medals
| Medal | Required Treasure |
|---|---|
| Platinum | 720 |
| Gold | 600 |
| Silver | 400 |
| Bronze | 200 |
Time Limit: 8:00
Available Pikmin: Yellow Pikmin, Winged Pikmin, Blue Pikmin
Recommended Tactics
 When the mission starts, gather all three crew members and move to the Blue Onion at Point 1. Use all three crew members to quickly pluck the Blue Pikmin sprouts.
 After you pluck the Blue Pikmin sprouts, toss one crew member onto the Winged Pikmin sprouts at Point 2.
 As one crew member plucks the Winged Pikmin sprouts, throw the remaining crew member onto the Yellow Pikmin sprouts at Point 3.
 Lead your Blue Pikmin into the water and clear the enemies swimming around Point 4. Start by defeating the Toady Bloyster, then use your squad to charge each of the nearby Sputtlefish. Have your Pikmin transport the Toady Bloyster and one of the Sputtlefish, then use the “Go Here” command to send this crew member to the Blue Pikmin’s Onion.
 Switch to the crew member leading the Yellow Pikmin and collect the pellets near the sleeping Bulborb at Point 5. Move under the Yellow Pikmin’s Onion, then switch to the crew member leading the Winged Pikmin.
 Have the Winged Pikmin attack the Nectar Eggs near the Fragments at Point 6. After they drink the resulting Nectar, gather the Winged Pikmin and send them charging into the Fragments.
Switch to the crew member leading the Yellow Pikmin and gather your squad. Charge the sleeping Bulborb at Point 5, then attack the nearby Nectar Eggs. Have the Yellow Pikmin drink the Nectar while you collect the puddle of Ultra-Spicy Nectar. Gather the Yellow Pikmin and send them charging into the nearby Dirt Wall.
Switch back to the crew member near the Winged Pikmin’s Onion. When the Winged Pikmin finish transporting the Fragments at Point 6, gather your squad and have them attack the nearby Dirt Wall.
 Switch to the crew member at the Blue Pikmin’s onion. Pluck any remaining sprouts and gather all of the idle Blue Pikmin. Move to Point 7 and use this large squad to charge each of the three Water Dumples at the center of the enclosure. After you defeat all three Water Dumples, gather your Blue Pikmin and use the “Go Here” command to send this squad to Point 9—this allows the squad to gather near the remaining Bulborb without provoking the Arctic Cannon Larva hiding in the nearby patch of snow.
 Switch to the crew member leading the Yellow Pikmin. This squad should have already finished destroying the nearby Dirt Wall. Gather the Yellow Pikmin and use the “Go Here” command to lead them around to the Electric Gate at Point 8.
Switch back to the crew member near the Winged Pikmin’s Onion. When the Winged Pikmin finish destroying the nearby Dirt Wall, gather the squad and use it to collect the pink 5 Pellet ahead of you. Move under the Winged Pikmin’s Onion.
 Switch to the crew you sent to Point 9, then send your Blue Pikmin charging into the remaining Bulborb. When you do, an Arctic Cannon Larva emerges from the nearby patch of snow. Defeat both of these enemies, then switch to the crew member you sent to the Electric Gate at Point 8.
Have your Yellow Pikmin charge the Electric Gate, then switch back to the crew member leading the Blue Pikmin. Use this squad to deal with the three nearby Water Dumples.
 Switch back to the crew member waiting near the Electric Gate. Once the obstacle is destroyed, gather the Yellow Pikmin and step into the enclosure. Throw four Yellow Pikmin onto the Bomb Rocks at Point 10—as you do, the Bearded Amprats within the enclosure prepare to attack. When the Pikmin return with the Bomb Rocks, throw one Bomb Rock near each of the Bearded Amprats and leave the enclosure.
 Follow the path to the Winged Pikmin’s Onion. Merge with the small squad of Winged Pikmin, then continue across the nearby bridge. Throw one Bomb Rock at each of the Watery Blowhogs at Point 11, then continue along the path to find a Bamboo Gate.
 Have 10 Winged Pikmin raise the Bamboo Gate, then slip under the obstacle. Call the Winged Pikmin back into your squad and apply a dose of Ultra-Spicy spray. Approach Point 12 to coax the Burrowing Snagret out of hiding. Send your squad charging into the enemy. Allow your Pikmin to keep attacking until the Burrowing Snagret retreats into the ground, then gather your squad and wait for the creature to emerge. Resume the attack when the Burrowing Snagret pokes its head out of the snow.
The Borrowing Snagret should be the last remaining enemy. Defeat this creature to complete the mission.