
Company of Heroes 2 Guide Multiplayer Strategies Commander Selection
Commander Selection
I recommend going into games knowing exactly which Commander you intend to pick and constructing your strategy around this choice. Conversely, you might construct a strategy and select the Commander that you think best complements it. Either path is fine, but you certainly don’t want to be spending time during a match thinking about what you ought to do—think deeply before and after games, not during them.
The first thing to consider when analyzing a Commander is what unique units or unit abilities does it give you. For example, the Jaegar Armor Doctrine gives access to the Elefant Heavy Tank Destroyer, which can be called in to the battlefield. If your desired strategy revolves around Tier 1 and Tier 3, you might decide to spend your first couple of hundred Fuel on an Ostwind and a Panzer IV, and then save for an Elefant to fill the anti-tank hole in your army composition. Alternatively, if you choose the Festung Armor Doctrine you’ll have access to the Panzer IV Command Tank, which works well for a less mobile, more defensive strategy—Tier 2 with the Panzer IV providing support against infantry and light vehicles works well. Now, the Germans can get away with being slightly inefficient in choosing Tiers and Commanders, meaning constructing the full range of production buildings instead of just two, because it isn’t that expensive to research a Tier or build a production building. I would still advise you to be as resource-efficient as possible and carefully consider whether you need units from each production building to fill roles in your army—perhaps you can do without one and you didn’t realize it. Also, be sure to build units that make use of any Commander abilities you have: If you’re planning to use the Jaegar Armor Doctrine, it would be inefficient not to have Half-tracks available to lay Riegel 43 Anti-tank Mines or vehicles that would benefit from the Spotting Scope upgrade. You might decide that Half-tracks and StuGs should be key parts of your strategy because both benefit from the respective unit abilities granted by your Commander choice.
When playing as Soviets you’ll need to be more conscious of how your Commander choice impacts your strategy during the early game. Four out of five Soviet Commanders unlock either Shock Troops or Guards Rifle Infantry with one Command Point, one also unlocks the 120mm Mortar at one Command Point, another allows your AT guns to use camouflage, one unlocks both “Hit the Dirt!” and the PPsH-41 Submachine Gun upgrade for Conscripts at one and two Command Points, and one gives Conscripts the ability to repair vehicles at two Command Points. It’s silly not to build a Conscript-heavy army when choosing Guards Rifle Anti-Tank Tactics due to the significant unit abilities it grants them.
By contrast, Guards Motor Coordination Tactics unlocks both Guards Rifle Infantry and the 120mm Mortar at one Command Point, meaning you might decide to invest a bit less into Conscripts in favor of those units. Finally, Soviet players will nearly always build either Tier 3 or Tier 4, but not both, due to the significant Fuel cost of each building. Versatility is nice, but two tanks will generally be more useful than one tank and a building. Three out of five Soviet Commanders particularly lend themselves to either Tier 3 or Tier 4, so when using these you need to be sure your strategy is suitable. The NKVD Disruption Tactics and Guards Rifle Anti-Tank Tactics are the two exceptions: These work well with both Tier 3 and Tier 4—you can even decide which Tier to build during a match, depending on the tactical situation you’re facing when you have enough Fuel for either production building.
The second consideration when choosing a Commander is the availability and type of Munitions abilities it grants. Let’s compare the NKVD Disruption Tactics with the Guards Motor Coordination Tactics with that in mind.
- NKVD Disruption Tactics has four Munitions-based Commander abilities ranging from 60 Munitions to 240 Munitions, three of which do not require the involvement of your own units to be effective (Recon Flight, Fear Propaganda Artillery, and IL-2 Sturmovik Attacks). Fear Propaganda Artillery can be used to defend points from enemy infantry attempting to capture them even when you have no units nearby, and IL-2 Sturmovik Attacks can heavily damage units of all types anywhere on the battlefield—you can even use the Recon Flight to acquire sight over a distant area and follow up with the IL-2.
- Guards Motor Coordination Tactics has two Munitions-based Commander abilities, both are low cost (50 and 60 Munitions), and both are dependent on the your own units to be effective. For example, Mark Vehicle can boost the effectiveness of your anti-tank weapons, but it’s unable to do anything on its own; and Vehicle Crew Repair Training is useful only to the extent that you have vehicles safely out of combat that need repairs.
Based on the above, we can say that taking full advantage of the abilities within NKVD Disruption Tactics is going to be more Munitions-intensive. However, we also know that the abilities within Guards Motor Coordination Tactics are only as good as the army on the field: Their utility can drastically increase the effectiveness of a vehicle force, especially when fighting enemy vehicles, but if you lack anti-vehicle weapons and you recently lost your own vehicles, there’s nothing available to supplement the weaknesses in your army.
By contrast, NKVD Disruption Tactics abilities can be used to directly counter infantry units that you don’t have an easy answer for (Fear Propaganda Artillery) or groups of enemy units that need to be softened up before an attack (IL-2 Sturmovik Attacks). When creating a strategy, you should ask yourself whether you want Commander abilities that complement (for example, Vehicle Crew Repair Training) or supplement (IL-2 Sturmovik Attacks) the army you have on the field.
German Commanders
 Festung Armor Doctrine
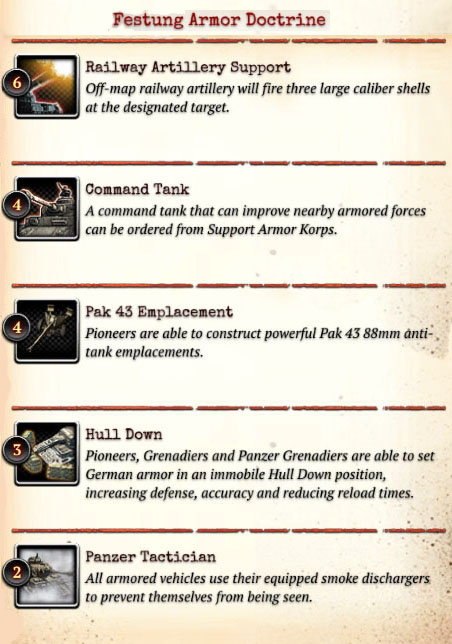
This Commander offers my favorite unit ability in the game with Panzer Tactician—vehicle smoke launchers. The most obvious use is to cover the Retreat of one of your vehicles when it’s targeted by an AT Gun or another high-damage weapon, but you can also use it more inventively. For example, rush a Scout Car directly at an enemy HMG Team in a building and use smoke—this will obscure sight long enough for your infantry force to attack without crossing open ground under fire from the MG. Is a Sniper killing your infantry but remains protected from attack? Move a vehicle near your infantry and use smoke. Trying to circle-strafe an SU-76, SU-85, or ISU-152? Smoke and reposition. Need to repair your tank that was just rammed by a T-34 and lost its main gun? Use smoke to keep your Pioneers alive.
Hull Down is a nice ability, given that it’s free and can be removed at any time with the click of a button—if you’re planning to defend an area for a little while anyway, why not increase your tank’s survivability and attack power? Note that StuG cannons are locked in position because they lack a turret, meaning they can’t rotate, so Hull Down turns them into quasi-AT Guns.
The Pak 43 emplacement is an actual AT Gun with an exceptional range. One might compare it to the Elefant, but the Pak 43 notably does not cost any Fuel. This makes it particularly well suited for use in strategies that make use of several tanks that struggle against Soviet heavy tanks—Ostwinds and Panzer IVs, for example. The Panzer IV Command tank is a strong addition to such a strategy as it increases the defense of all nearby friendly units in a sector and poses a threat to enemy infantry and light vehicles.
Railway Artillery Support excels against fortified positions, and it can force difficult decisions for your opponent when used in choke points during an attack.
For general strategy, if you use Tier 3, get a fast Ostwind as an assault unit and keep it alive with smoke, then consider where you want to set up a defensive position. Constructing a versatile force of light vehicles and medium tanks should be your focus because they can function both as mobile response units and point defense. One fun tactic is placing a Pioneer squad inside a Half-track and using it to harass enemy points—use smoke launchers to protect it against any reprisal.
 Festung Support Doctrine
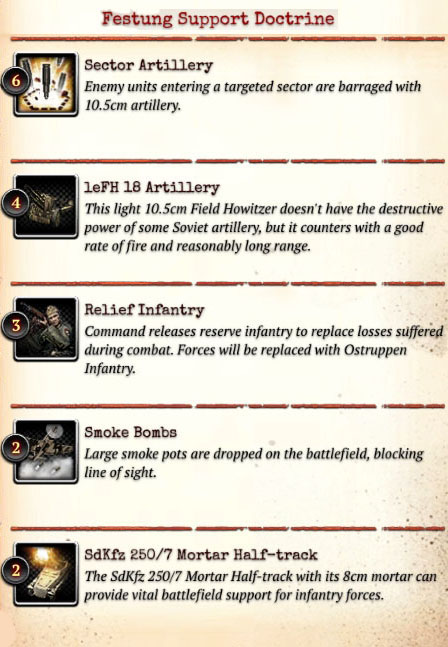
At first glance, this Commander might appear to be focused on defense due to the many artillery options. However, only the leFH 18 Howitzer is stationary, and its long range means it’ll generally be well behind your lines and perhaps even in your base, making a fortified position around it unnecessary. The rest of the indirect fire available is either mobile or off-map, meaning it’s well suited to attacking fortified positions without requiring a fortified position of your own.
The Mortar Half-track is this Commander’s defining unit. Because it’s highly mobile, you need not worry much about counter-battery fire from enemy Mortars and artillery so long as you move it frequently. It offers all of the advantages of a standard Mortar in a more survivable package that can quickly reposition to provide fire support to your attack, or lay down a barrage against an attacking enemy. Of particular note is its Incendiary Barrage ability: This can thwart an opponent’s attempt capture a sector or rush through a choke point with his infantry, and it can displace fortified positions involving HMGs, Mortars, and AT Guns.
When using this Commander, I recommend placing an emphasis on assault infantry including Pioneers with Flamethrowers and Panzergrenadiers, as well as using Grenadiers with LMG42s for more defensive purposes. Why? The Mortar Half-track, Smoke Bombs, and leFH 18 Howitzer render enemy fortified positions far more susceptible to attacks and you’ll want to make use of the Relief Infantry ability. Team weapons and Snipers synergize very poorly with Relief Infantry, while a mobile attack force of infantry that constantly reinforces from a Half-track synergizes with it quite well. Ostruppen are not so powerful, but they can fulfill useful utility roles like harassing enemy points and capturing both team weapons and vehicles.
Smoke Bombs are exceptional among smoke abilities because they provide far more extensive coverage and can be dropped on any location over which you have sight. The ideal use is directly in front of a fortified enemy position as you move in your forces to attack.
Finally, Sector Artillery is best when your opponent is continually forced to respond to point harassment. Imagine seizing a cut-off point using a Panzergrenadier squad with Panzerschrecks and a Pioneer Squad with a Flamethrower, all inside of a Half-track. Your opponent will need to send multiple units to respond, and as this occurs, you can activate Sector Artillery while your Half-track carries your infantry units to safety.
 Jaeger Armor Doctrine
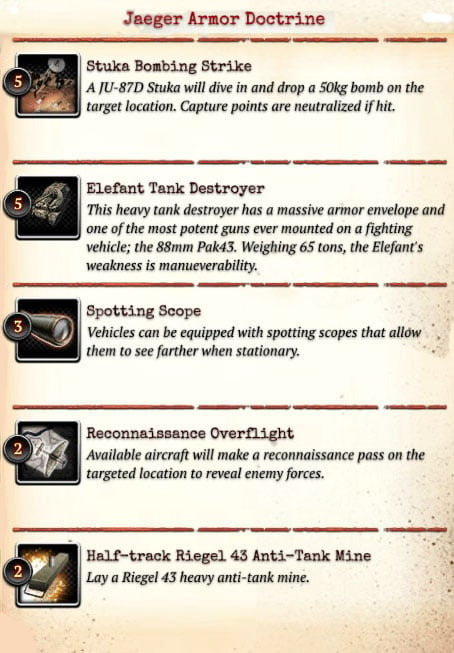
The Elefant Tank Destroyer is the centerpiece of this Commander. It functions much like a Sniper but it preys upon Soviet vehicles, even IS-2 Heavy Tanks and ISU-152 Heavy Assault Guns. To use it most effectively, you need to pay careful attention to positioning and scouting. You’ll want open fields of fire, protected flanks, and a solid supporting force of units.
The Riegel 43 Anti-Tank mine synergizes particularly well with the Elefant when placed at major crossroads, but it truly excels when you bait enemy vehicles to chase one of your units into it. When choosing a position for your Elefant, consider placing Riegel 43 AT mines on the paths most likely to be used by a flanking T-34. It can also supplement your mid-game efforts in defending against Soviet vehicles while you have only Tier 2 counters available.
The Spotting Scope is best placed on vehicles that you’ll be using on the front line—Brummbars, for example. The Reconnaissance Overflight assists with scouting, and remember that you can target it at your opponent’s base to see which production buildings have been constructed—this allows you to place mines in anticipation of T-34s, or save the Munitions if your opponent is still only constructing infantry.
Finally, the Stuka Bombing Strike is a terrifying counter to clumped infantry that might be capturing a point, or key vehicles that aren’t likely to move. Its sound is a bit of a giveaway, so be sure that multiple viable targets across the map exist when you use it to make its actual target more difficult to predict, because if there’s one obvious target your opponent will simply move it away when he hears the incomin Stuka.
For overall strategy, I’d recommend standard Tier 1 and Tier 2 play followed by teching to Tier 4 for a Brummbar when Fuel allows. The Brummbar doesn’t have high mobility, but its firepower allows you to rapidly force infantry to retreat or face annihilation. You’ll actually want to use the Brummbar a bit like an Elefant, except at closer range and targeting infantry, because it clears the way for your other forces to take ground and can easily put a dent in a Soviet attack on your position. So long as you keep your Brummbar alive and acquire veterancy, it’ll serve as a great partner for a later Elefant. If you wish for more mobility, you can go with Tier 3 for Ostwinds instead of Tier 4 and bring out an Elefant later in the game.
 Jaeger Infantry Doctrine
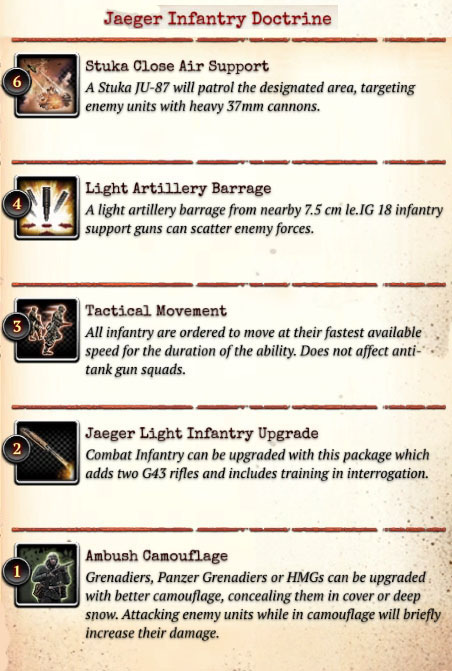
Infantry and indirect fire define this Commander. Through the available upgrades and Tactical Movement, your infantry will be more versatile and the core of your army.
Ambush Camouflage is best used by Panzergrenadiers for one of two purposes. They can hide in cover after capturing an enemy sector that you know will be retaken, or in a well-traveled area, wait for an enemy infantry squad to come near. When close, the combination of a well-placed Bundled Grenade and an MP44 charge will shred through all but elite infantry. Alternatively, with Panzerschrecks Panzergrenadiers can hide in cover to ambush vehicles along roads. Vehicle ambushes are best executed in conjunction with another infantry squad, like Grenadiers, that functions as bait for a vehicle like a T-34.
The Jaeger Light Infantry upgrade is best suited to Grenadiers as it’s a long-range weapon, and in combination with the LMG42 upgrade, your Grenadier squads will be extremely deadly.
Tactical Movement is a relatively inexpensive utility ability that allows your infantry to perform better during attacks. For example, when executing a multi-pronged attack against a fortified position you’ll be less susceptible to Mortar and artillery barrages, and you may be able to rush through HMG firing arcs before being suppressed.
Finally, the Light Artillery Barrage and Stuka Close Air Support abilities can be used against fortified positions or to weaken an enemy force immediately before an attack. Much of your army composition should be fairly obvious by now: Grenadiers and Panzergrenadiers. I’d recommend putting the focus on a mobile infantry force because you can always use your upgraded Grenadiers to defend areas when necessary, and reduce the need for HMGs. You’ll likely want a Half-track for forward reinforcement, and an AT Gun will be important for countering T-34s unless you have the Fuel income for a StuG near the time when the first one or two T-34s arrive.
As most of your upgrades take effect in the mid game, I’d recommend keeping the pressure on your opponent by using a Tier 3 strategy in lieu of waiting for Tier 4. StuGs and Panzer IVs can support your infantry well, or you can go with a fast Ostwind to seal the victory if your early game was especially strong. The safest choice is a StuG first, as it is available earliest and will provide a great deal of staying power to your infantry in countering vehicles.
 Assault Support Doctrine
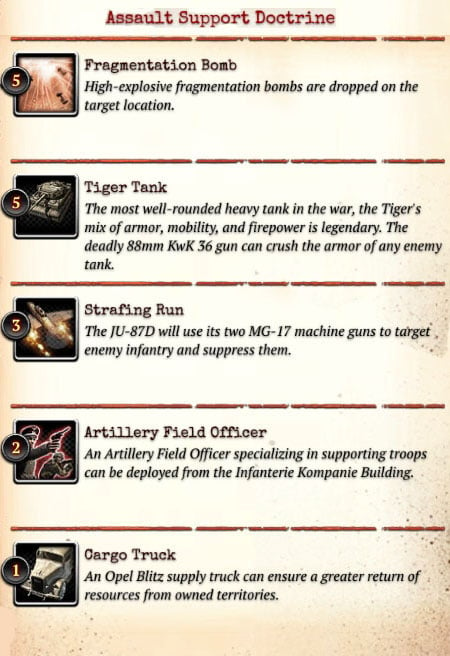
This Commander positions you well to win in the late game with Tiger heavy tanks supported by indirect fire from the Strafing Runs, Mortars, and Panzerwerfers. The Opel Blitz Truck is important as the Fuel and Munitions income it provides will speed up your teching and increase your ability to use Commander abilities. I would recommend following a Tier 1, Tier 2, and Tier 4 strategy with an emphasis on securing a steady Fuel income and protecting your Opel Blitz Trucks. Depending on how many Opel Blitz Trucks you call in, your opponent will be at an advantage in unit count, so conservative play is important until the late game.
The Artillery Field Officer is a useful utility unit, and to make the best use of it you’ll want units like Mortars and Panzerwerfers, but it will also function well in supporting your infantry squads by boosting their accuracy and dropping smoke to cover their attacks. As you won’t be building any Tier 3 units, you’ll need to rely upon Panzerfausts from Grenadiers, Panzerschrecks on Panzergrenadiers, and AT guns to counter vehicles including T-34s in the mid game.
Once you reach Tier 4 you have several options, but I would most recommend a Panther followed by a Panzerwerfer to allow you to counter nearly any Soviet threat. Once your Panther and future Tigers begin rolling out, you’ll transition from a strategy of conservative play to assaults led by your heavy tanks.
The Strafing Run is a wonderful ability at a low cost that will allow you to counter masses of Soviet infantry. Try using it in conjunction with an attack by your heavy tanks, as you’ll be able to easily crush pinned infantry squads beneath the treads of your Panthers and Tigers. The Fragmentation Bombs are more of a direct damage weapon, but they deal rather limited damage to heavy vehicles, so you’ll want to target team weapons and infantry principally.
Soviet Commanders
 Guards Motor Coordination Tactics
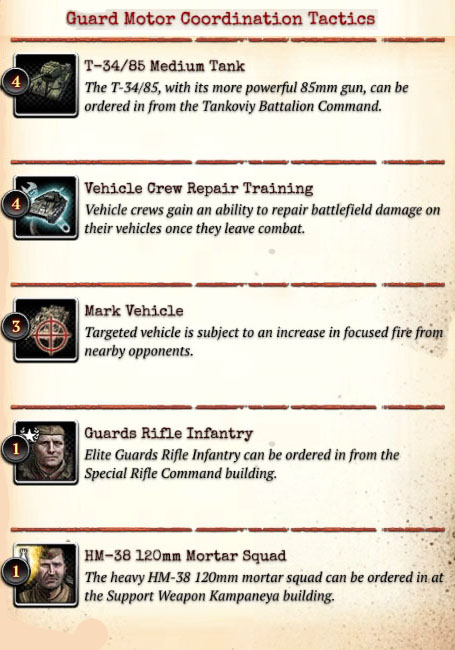
Three unit unlocks come with this Commander, meaning you’ll need to carefully consider your choices in production buildings even in the early game and how the unit unlocks synergize with them. The 120mm Mortar is an exceptionally powerful unit to have available at only one Command Point, especially on small maps where it’s often able to strike targets from a safe distance. To take full advantage of the firepower it lends to your army, you’ll want to be able to defend it effectively—HMGs are ideal for defending against Grenadiers with LMG42s and Panzergrenadiers. If you go with a four-Conscript start into two HMGs, you’ll likely have one Command Point at this point to build a 120mm Mortar.
For this Commander, it’s actually a good idea to build the Special Rifle Command in addition to the Support Weapon Kampaneya to gain access to M3A1 Scout Cars. Why? You can place Guards Rifle Infantry in them to counter enemy light vehicles with relative ease. Tier 3 and Tier 4 are actually unnecessary because the combination of Tier 1, Tier 2, and your call-in units is plenty. By doing this and only spending Fuel on Scout Cars, you’ll be able to stockpile a good supply such that you’ll hopefully have at least two hundred by the time you have four Command Points for the T-34/85 call-in.
The T-34/85s have significantly more powerful main cannons than the T-34/76, and they can actually penetrate German tank armor reliably. Use them as a mobile strike force in conjunction with the more defensive Guards Rifle Infantry and AT guns you’ll already have. In the early game, you can use Mark Vehicle to support your Guards Rifle Infantry, AT Guns, and Conscripts with AT grenades, and Mark Vehicle will be even more useful when your T-34/85s are fighting German heavy tanks in the late game.
With this Commander, you’re relying on a mix of infantry and medium tanks in the late game supported by Commander abilities to take on heavy German armor. Vehicle Crew Repair Training is exceptionally useful when you have a vehicle with a damaged engine away from your Combat Engineers, and also to supplement your repair capabilities in the field if you lose your Combat Engineers at some point in the battle. Take advantage of the ability for your vehicles to operate away from your infantry by spreading out and attacking multiple areas rather than engaging the Germans where their forces are concentrated. Don’t hesitate to use the T-34’s Ram ability against heavy tanks—you’ll have a far easier time repairing than they will.
 Guards Rifle Anti-Tank Tactics
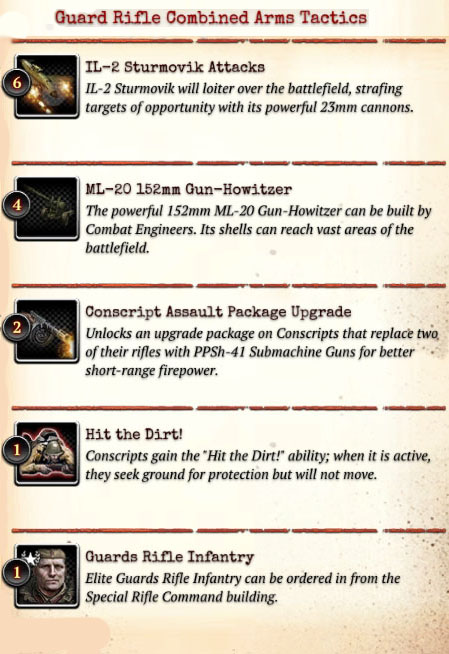
This Commander is primarily known for infantry-centric strategies. By using “Hit the Dirt!” and the PPsH-41 Submachine Guns, Conscripts become far more able to stand against Grenadiers and Panzergrenadiers in firefights. You’ll want the core of your army to be several Conscript squads, so a four-Conscript build order is a good start.
The availability of Guards Rifle Infantry means that you don’t absolutely need Tier 2 to counter light vehicles. Guards Rifle Infantry easily counter light vehicles themselves, and they turn into a highly mobile vehicle kill team when placed within the M3A1 Scout Car. Given the power of your Conscripts, they can counter infantry largely on their own, though you can mix in Scout Cars carrying Snipers or Guards.
You won’t need Tier 3 for mobile assault units, and as heavy tanks will be your main problem, I’d recommend using Tier 4. The SU-76 will assist in attacks against fortified positions using its barrage ability until you gain access to the 152mm Howitzer, and the SU-85 works very well in tandem with Guards Rifle Infantry and Conscripts with AT grenades to counter medium and heavy tanks.
None of your units are superpowers in themselves, so you’ll need to take advantage of indirect fire to tip the balance in your favor. The IL-2 Sturmovik can similarly be used to give your units an advantage in key engagements.
 Shock Rifle Frontline Tactics
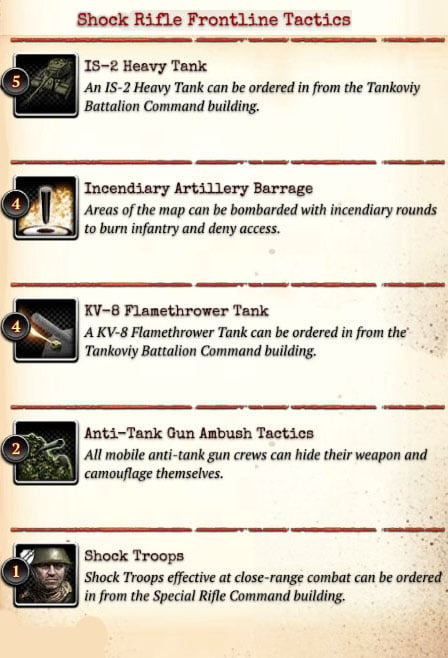
With this Commander the late game will inevitably revolve around the KV-8 Flamethrower Tank and IS-2 Heavy Tank. These are both highly Fuel-intensive, so you won’t be able to support any significant amount of vehicle production if you plan to build these. You’ll be at a disadvantage until the late game when you get these tanks and the question is, how do you want to get there?
This Commander unlocks Shock Troops and boosts the effectiveness of AT guns, but no specific early game strategy is clearly superior. You could rush Tier 3 after an aggressive, mobile Tier 1 early game, relying on a fast T-70 or T-34 and Conscript AT grenades to counter German vehicles. You could build Tier 2 to support your Shock Troops and Conscripts with AT guns against vehicles. Shock Troops can fight off both Grenadiers and Panzergrenadiers fairly well, so vehicles should be your main concern in deciding which units to build. If you do build AT guns, it’s viable to skip both Tier 3 and Tier 4 in favor of the KV-8, followed by the IS-2 to throw off your opponent who may over-invest in anti-tank weapons, expecting early tanks from you.
Be sure to carefully consider the roles of the KV-8 and IS-2 when you build them—misuse will squander your large resource investment and Commander selection. Before enemy medium or heavy tanks are on the field, the KV-8 can spearhead assaults by rapidly destroying infantry and team weapons. Later, it’s best used to counter enemy infantry attempting to harass outlying sectors, or to flank enemy positions as part of a larger attack. The IS-2 should nearly always be used alongside your main force, steadily advancing and fighting off even the heaviest German armor. You’ll want Combat Engineers on hand to repair any damage it sustains, especially engine damage.
Incendiary Artillery Barrage is strong enough to turn the tide of engagements against infantry, and inexpensive enough to be used fairly frequently. If several units of enemy infantry are advancing on a sector you’re defending, don’t hesitate to drop it on their heads. Also, if you notice several team weapons like HMGs, Mortars, or AT guns clumped up while you’re attacking a position, use Incendiary Artillery Barrage to force them to relocate or Retreat, denying their ability to counterattack.
 Shock Motor Heavy Tactics
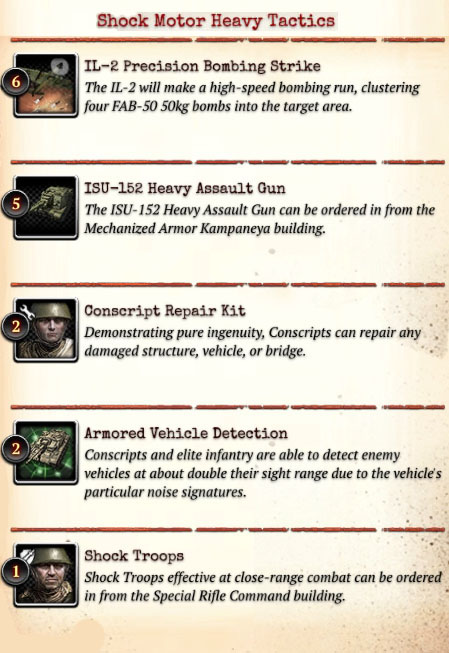
This Commander works well with the use of early vehicles due to Conscript Repair Kit, so the Special Rifle Command is the best option. Normally, you’d need to rely on Combat Engineers to repair damaged M3A1s, but Conscript Repair Kit remedies this. You can actually get away with using fewer Combat Engineers than normal, due to the greater versatility of Conscripts.
You might consider shortening your Tier 0 phase by building the Special Rifle Command with your starting Combat Engineer squad rather than construct another to do it. An early game of M3A1 Scout Cars, Shock Troops, and Conscripts will give you a great deal of mobility and strong assault options. Mixing in one or two Snipers will decrease your map control but strengthen your ability to defend positions against infantry assaults.
By holding onto a decent Fuel income and denying your opponent Fuel as much as you can through harassment, you should be able to reach Tier 4 before the Germans have anything more than Half-tracks and Scout Cars. Until Tier 4, rely on AT grenades to deal with light vehicles. SU-76s will provide artillery support and counter light vehicles effectively, while the SU-85 ought to be built if you see or expect medium or heavy tanks. Later in the game, Katyushas will add to your indirect fire capabilities, which is important given the lack of Tier 2.
When your Fuel income is high enough to support ISU-152 production, build one or two to sit well behind your lines and provide fire support. It’s essential that you keep infantry units between the ISU-152 and enemy units, as you’ll need to stop infantry with anti-tank weapons from threatening them and hinder vehicles with AT grenades. Mines are especially useful when you’re using the ISU-152 because your opponent will desperately seek to flank and destroy it, meaning you can dictate his attack paths through your positioning and place mines accordingly.
Late in the game, the IL-2 Precision Bomb Strike will allow you to finish off disabled enemy vehicles, or punish opponents who try to concentrate their forces. The broad strategy when using Shock Motor Heavy Tactics is a highly mobile, aggressive early game that scales into the late game using fire support vehicles to deal with enemy vehicles and infantry in fortified positions.
 NKVD Rifle Disruption Tactics
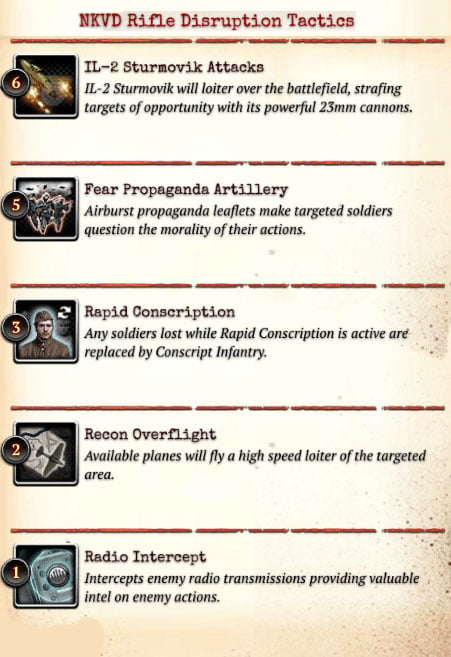
When using NKVD Disruption Tactics, I would always use a four-Conscript start because you won’t have elite infantry to rely on and so you’ll want to get veterancy on them as rapidly as you can. From there, I would build the Support Weapon Kampaneya instead of the Special Rifle Command, partially due to the lack of elite infantry, but also because it synergizes well with Radio Intercept and Recon Flight.
Radio Intercept will let you know when the Germans build vehicles, at which point you should build an AT gun and unlock AT grenades for your Conscripts at the Headquarters. Recon Flight can be used to scout enemy positions to allow for more accurate AT gun and Mortar barrages.
To counter Grenadiers with LMG42s and Panzergrenadiers, use team weapons to support your Conscripts. You’ll likely want two HMGs, two AT guns, and a Mortar in addition to your Conscripts and Combat Engineers. Note that using AT grenades from multiple Conscript squads simultaneously is a strong counter to light vehicles and can significantly damage heavier ones.
Both Tier 3 and Tier 4 are viable choices in the mid game. Tier 3 provides you with assault units that you would otherwise lack and the M5 Half-track, from which you can reinforce your team weapons and Conscripts squads. Tier 4 houses additional artillery that benefits from Recon Flight’s scouting, and SU-85s are your strongest option for countering German heavy tanks, especially if you slow enemy tanks with AT grenades and engage them from beyond their range.
Be sure to use Rapid Conscription before engaging in a large fight with your infantry. Fear Propaganda Artillery is ideally used to cause a key enemy unit to Retreat just as you engage his force in battle—an MG Team covering a critical location or Panzergrenadiers with Panzerschrecks, for example. And the IL-2 Sturmovik is also best used in conjunction with an attack as you won’t want to give the German player a chance to repair his vehicles or reinforce his infantry.