
Company of Heroes 2 Guide Advanced Tactics Unit Tactics
Mortars
Mortars were generally the only “organic” indirect fire available to rifle regiments and were usually manned by the infantry as opposed to artillerymen. Dedicated heavy weapon sections and their officers were commanded with the tasks of siting the weapons for local attack or defense. These heavy weapon sections delivered a lot of the available firepower of an attacking rifle company.
Both German and Soviet Armies made extensive use of medium and large mortars and their crews needed to immerse themselves in the artillery command systems that managed their deployment and target selection.
As the weapon team tutorial teaches you, Mortars work well when paired with HMGs to do damage to suppressed or pinned units. Mortars have more uses than this, though! If your opponent has an HMG in a troublesome position, fire a smoke barrage in front of the HMG and charge it with infantry—you’ll be able to run past and flank the HMG before it can attack your squad.
Do you have a damaged vehicle attempting to limp away while an AT gun fires at it? Fire a smoke barrage somewhere between the vehicle and the AT gun to stop the attack.
Is your opponent harassing a nearby sector? Use the standard barrage ability and hopefully force the infantry squad to Retreat.
Did you opponent place an HMG in a building? Hammer the building with steady fire until the HMG leaves or the building is completely destroyed.
High-value targets for mortars—in either attack or defense—included emplaced team weapons like machine guns and other mortars. Denying mortar coverage to the enemy could mean the difference between victory and defeat, and the forces that could silence their opponents’ supporting weapons first were almost assured a victory.
Is there a blizzard? Aim a barrage at nearby Campfires in sectors controlled by your enemy—there are likely units clumped near the fire, and destroying the Campfires is useful in itself.
Mortars are highly effective against light vehicles like Scout Cars and Half-tracks, assuming they stay still long enough to be hit. If you throw an AT grenade with a Conscript squad or fire a Panzerfaust with a Grenadier squad, you’ll invariably damage the target vehicle’s engine. You can follow this up with a Mortar barrage just behind the vehicle so that it will slowly drive through as it attempts to get away. It’s also a good idea to use the Mortar against vehicles being repaired by Engineers or Pioneers, as your opponent is less likely to dodge the shots, and even just forcing the repairing unit to Retreat is a victory.
Mortars were not intended to be high-accuracy weapons, instead they relied on rate of fire and mass to deliver large amounts of fire relatively quickly. But a well-trained mortar crew could be accurate enough—or lucky enough—to drop mortar rounds onto targets as small as an enemy vehicle.
Mortars are a force multiplier, but unlike most fire support units, Mortars can turn the tide in fights at multiple areas around the map at once. A well-placed Mortar will have several sectors within its range and it can immediately begin dropping shells onto enemy units without needing to move into position like every other unit.
Mortars were very good at attacking static or slow-moving targets, like infantry. Advancing infantry move at relatively predictable rates and bursts of speed cannot be maintained for very long. Infantry also have few places to hide; the mortars’ high angle trajectory is able to plunge down behind cover, or if the soldier in question is particularly unlucky, score a direct hit into a foxhole.
Mortar Placement
- Bad = in the open on the front line.
- Good = Behind the front line with intervening impassable terrain and/or buildings.
- Excellent = In cover to avoid freezing, with battlefield fortifications covering attack paths, and spotter units up front. Coverage of multiple key locations like Victory Points and enemy fortified positions.
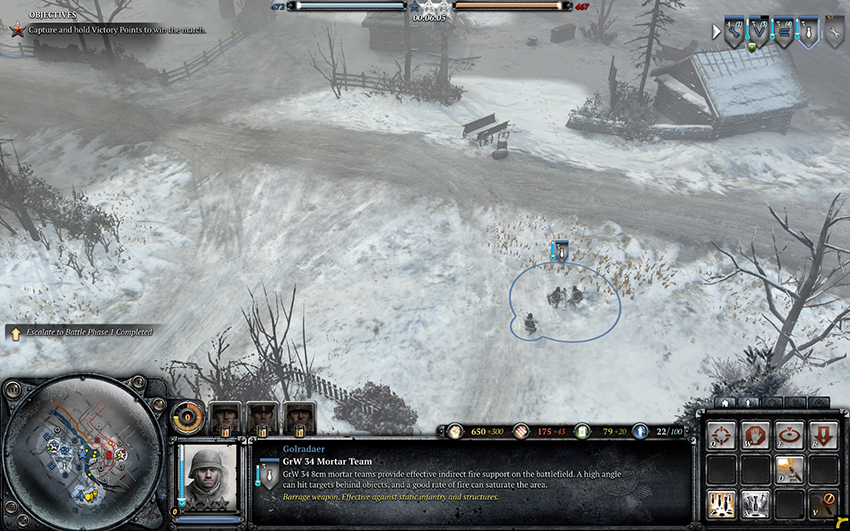
This position is terrible. There is no cover so the Mortar team will freeze in the cold over time. It’s in the open and vulnerable to attacks by all unit types. The only positive aspect of its position is that it’s behind the front line, but its firing radius has limited coverage of key points.
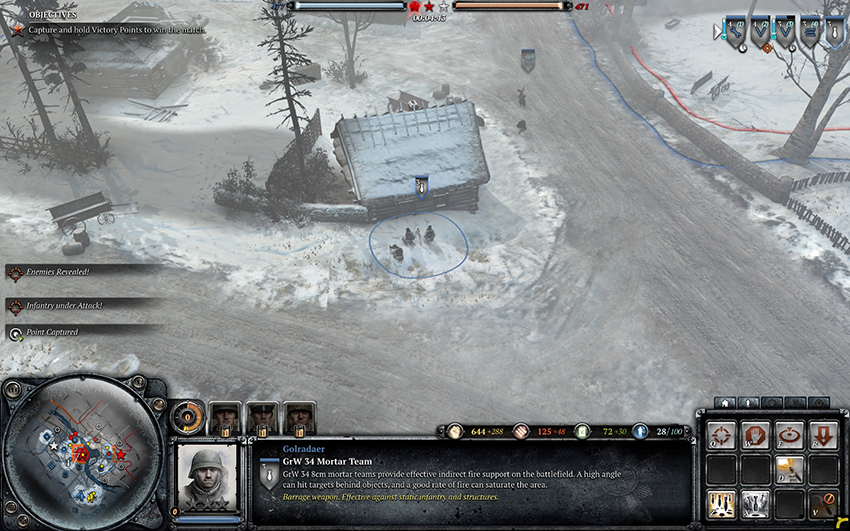
This position is decent. There is still no cover, so building a Campfire with another unit will be necessary. Its line of sight is blocked by the building just in front of it which means that enemy units must either flank it or use indirect fire—susceptibility to snipers is lessened. While it’s still near the Fuel Point, it’s also closer to the central victory point and so can provide fire support at both locations.
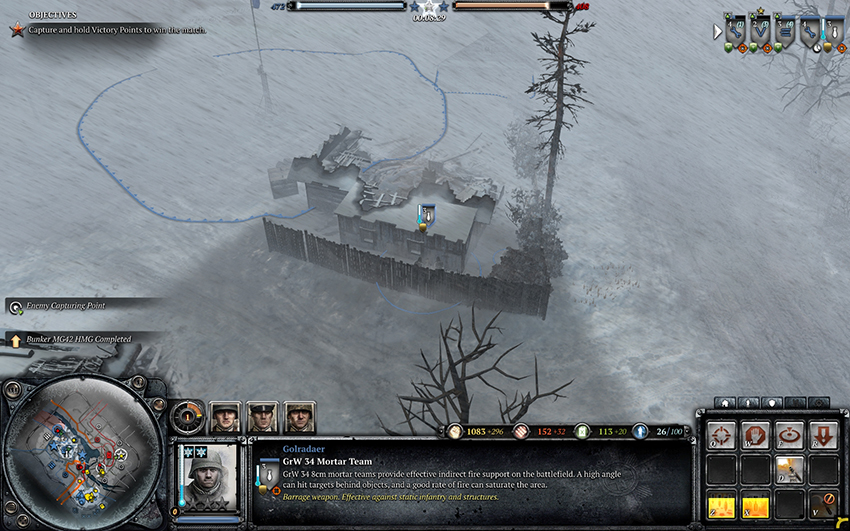
This position is excellent. Its line of sight is substantially blocked in all directions, meaning that an enemy unit would have to be standing right on top of it to attack, or indirect fire would be necessary, and light cover provides protection from the cold. Its location enables it to provide fire support to both the left and central Victory Points, as well as fire upon enemies advancing to the Fuel Point. This is a rather aggressive position unless you have a firm hold on the Fuel Point because it’s quite distant from your base, but with an HMG in a nearby building and the front line established a bit farther away, a Mortar team here will be a major pain for your opponent.
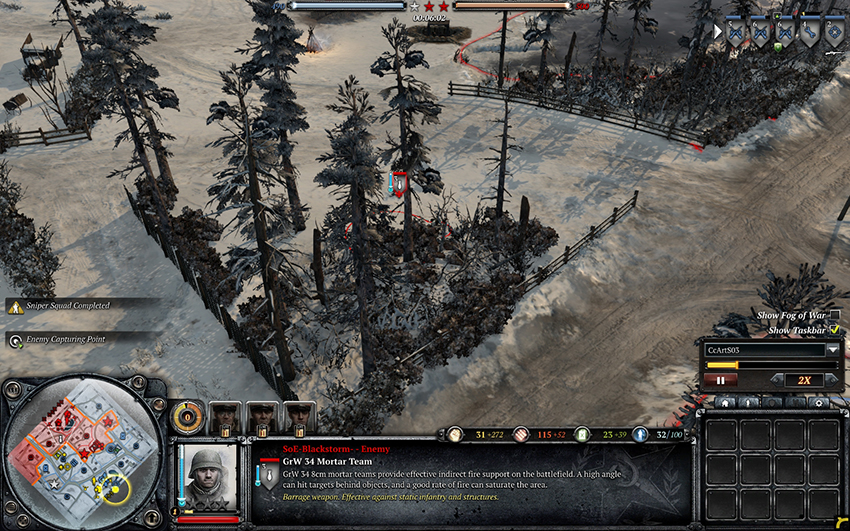
This position is good. The trees force enemy units to put themselves into vulnerable positions to reach this Mortar. While there is no cover or Campfire, the Mortar is very close to the base so it can Retreat to avoid freezing. If your side is under a lot of pressure, a conservative Mortar location like this one is great in providing fire support while you try to regain map control.
Mortar Smoke
This is a powerful ability due to TrueSight, far more so than Smoke Barrage in Company of Heroes 1. Why? I’ll explain through a few potential uses:
- Fire smoke at an enemy HMG or AT gun to obscure its vision while you directly attack it with infantry or vehicles.
- Fire smoke at one of your damaged vehicles to aid in its escape.
- Fire smoke at a suppressed or pinned infantry squad to remove those conditions.
- Fire smoke between cover locations to allow your Sniper to get into a better position safely.
- Fire smoke at a building entrance to allow your HMG to garrison it without nearby enemies noticing your approach. Fire smoke just behind one of your vehicles engaged with another vehicle to allow Pioneers or Engineers to repair without being targeted.
- Fire smoke at a point to allow decap and capture without being pinned by an HMG or damaged by other nearby enemies.
- Fire smoke to conceal your Pioneers or Engineers who are laying mines.
As you may notice, many of these uses relate to protecting a unit that your opponent is aware of, but many others attempt to engage in information warfare. Once players become more accustomed to using smoke barrage in this fashion, yet another use for it will emerge: Fire smoke at a location for no reason whatsoever apart from making your opponent believe you’re doing something there. Perhaps he’ll think you’re repositioning a weapon team or Sniper, laying a mine, or readying an assault.
The Soviet Army learned from their mistakes during the disastrous losses of 1941–42, and commanders and frontline forces were gradually honed into an effective fighting force. While the army was basically rebuilt almost three times in the first 18 months of the war, later losses were lower in comparison, and these veteran troops became the core of the army that would later take Berlin.