
Base Construction Tactics
Building the Perfect Base: UNSC

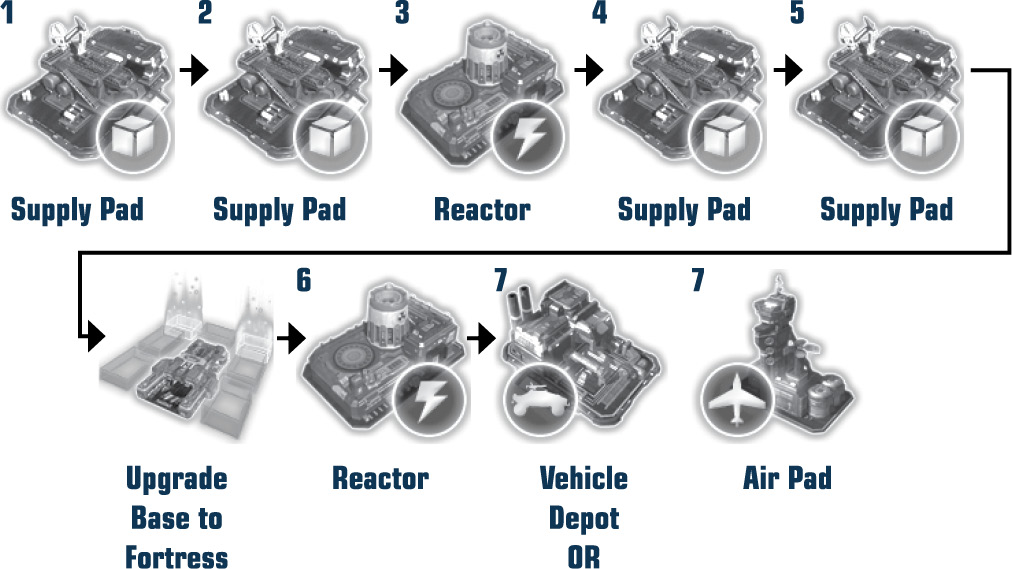
With the UNSC, begin construction with two Supply Pads, followed by a Reactor. The Supply Pads allow immediate access to Economy, and the Reactor allows you to begin building some important structures (such as Turrets). When the third building’s Reactor tower begins to glow, construct two more Supply Pads. If you’re playing as Anders or Forge, it is usually safest to begin constructing Warthogs immediately and sending them on Scouting reconnoiters across the map. This allows you to defend an early enemy Rush. The first Reactor also allows you to quickly upgrade your Warthog to Gunner status, enabling combat effectiveness. You can use them now to raid enemy structures; they are excellent at destroying enemy buildings under construction. Finish your base with a Barracks, Vehicle Depot, or Air Pad, depending on your micro-tactics and changing battle environments.

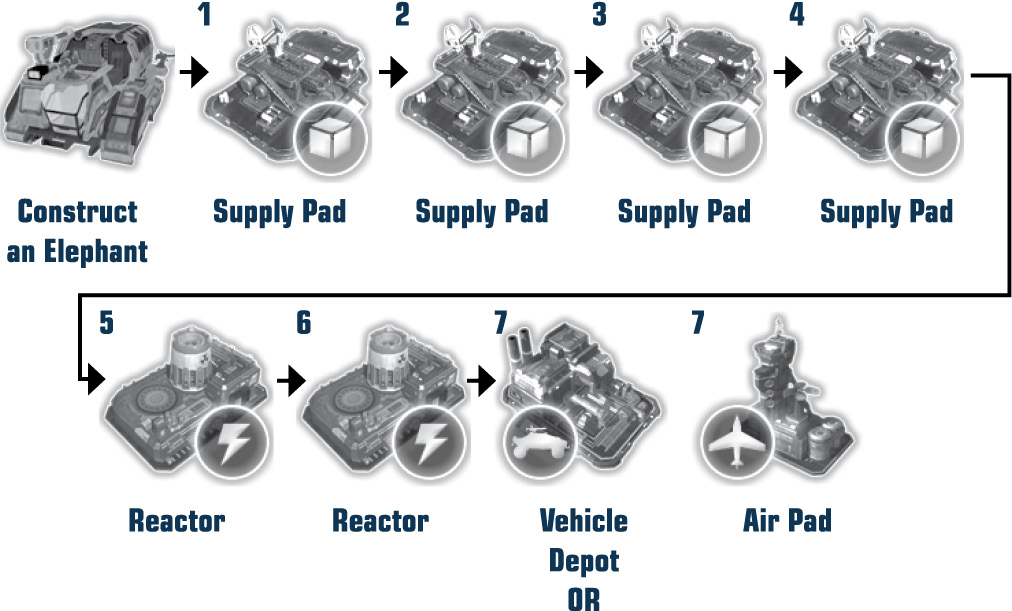
With Cutter, build an Elephant from your command center while placing four Supply Pads down in quick succession. Follow this up with two back-to-back Reactors and then a Vehicle Depot or Air Pad as your seventh structure. Cutter can train infantry from the back of his Elephant, which makes him more flexible (and powerful) in the early stages of combat. His base begins as a Station (rather than a Firebase) with seven sockets instead of the usual five.
A Typical Forge and Anders Base Progression
A Typical Cutter Base Progression
Building the Perfect Base: Covenant

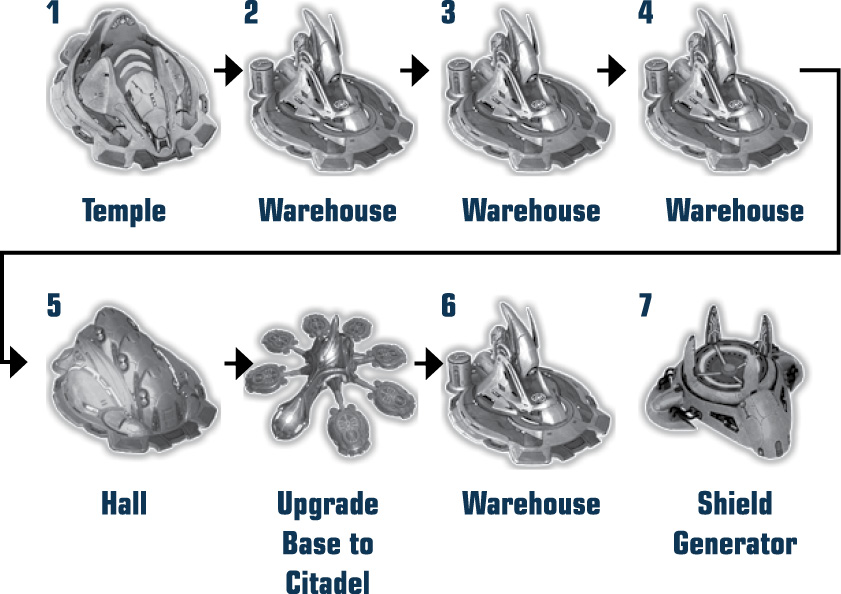
Tactically, it makes more sense to start your Covenant base-building with the Temple; this allows you to access your leader on the battlefield as soon as possible. You can then use him in several ways: He can Scout and gather supplies, bolstering your Economy while you then place a couple of Warehouses into your base to augment the supply collection. He can also defend your base against an enemy Rush with vicious effectiveness. In addition, his combat effectiveness is considerable, especially as you can Hot Drop friendly units directly to his side from the Covenant base’s teleporter—a ruthless and excellent early Rush strategy.
A Typical Covenant Base Progression
Base Control: The Rush and the Boom

When you bring in the human element of Multiplayer mode, exactly what to construct in terms of buildings and troops depends on your foe. The best plan is to build your base’s basics while Scouting your opponent. Forge and Anders should employ Warthogs to Scout and harass your foe while your base gains buildings, specifically Supply Pads and Reactors. Change this tactic only if you spot your enemy massing an early army for a quick Rush. At this point, stop the construction of “extra” Supply Pads, and focus on building an army that can swiftly counter the troops your foe is sending out. Cutter should employ an early infantry army to gain any advantage possible, whether Economically through map Hooks or militarily through a well-executed Rush. For example, your Scouting expedition has revealed a foe building Hornets. Retaliate immediately by producing Wolverines, the key antiair unit.
When facing human foes while playing as the Covenant, it is almost always best to immediately construct your Temple to gain numerous additional units to choose from and to gain access to the backbone of your army: the leader. Generally, spend your Resources into building as many units as possible once your Temple is fully built. Preferred units include Banshees (due to their mobility, especially after the Boost upgrade), a mixture of Hunters and Jackals, or an army focusing on leader upgrades with Jackals sniping foes from a great distance. The real problem is ascending to a different “Age” (Tech level); it requires 1,000 points to go from Level 1 to 2, so only attempt this if you know your foe is Turtling, and you’re comfortable enough to let your Economy build. However, the Temple upgrade is very useful in securing a win.
Additional Base Construction

The timing of constructing your next base is incredibly important and varies considerably based on the map you’re on, your current strength, and your opponent’s tactics. This can ultimately decide the outcome of a battle. Naturally, this means constructing a second base at different times:
- If you’re attempting a Boom strategy, stake a claim on a second base as early as you can so you can build Supply Pads or Warehouses as quickly as possible. Simply put, two Supply Pad queues are better than one.
- When engaged in a Rush strategy, a second base is completely unnecessary; construct one only if you have a load of additional resources, you’re at your Population maximum, or you require additional sockets for a Reactor (for army upgrading).
- If you’re trying a Turtle strategy, use a more measured approach. Ensure your primary base is defended to your satisfaction before you even think of constructing your second base. Once you’ve reached the goal for your Turtle strategy (e.g., when you’ve gained an appropriate Tech level or a strong economy), then attempt to land-grab.
The Economics of War: Supply Pads and Warehouses

Both the UNSC and Covenant rely on supplies to “feed” their armies, either by collecting supply crates dotted around maps or by building Supply Pads (UNSC) or Warehouses (Covenant; referred to from now on just as Supply Pads). Generally, the more Supply Pads you build, the more supplies are added to your economic totals, allowing purchases of buildings, troops, upgrades, and Covenant Leader Powers. Here are some vitally important points to remember when attempting to build Supply Pads:
- UNSC Heavy Supply Pads (a Supply Pad upgrade), or Covenant Blessed Warehouses (a Warehouse upgrade) are 40 percent more proficient than normal Supply Pads. For example, if a Supply Pad gives you 10 points per second, a Heavy Supply Pad gives you 14.
- Supply Pads have diminishing returns; the more you build, the less proficient they all become:
Going from one to two Supply Pads increases supplies per second by 82 percent. For example, if one Supply Pad gives you 10 points per second, two Supply Pads would give you 18.2 points per second.
Going from two to five Supply Pads doubles your supplies per second. For example, if two Supply Pads give you 18.2 points per second, five Supply Pads would give you 36.4 points per second.
Going from five to ten Supply Pads increases supplies per second by 50 percent. For example, if five Supply Pads give you 36.4 points per second, 10 Supply Pads would give you 72.8 points per second.
- The output of Heavy Supply Pads relative to regular Supply Pads is as follows and reflects diminishing returns:Two Heavy Supply Pads are the same as three regular Supply Pads.Three Heavy Supply Pads are the same as five regular Supply Pads.Five Heavy Supply Pads are the same as nine regular Supply Pads.Seven Heavy Supply Pads are the same as fourteen regular Supply Pads.