
SimCity Guide Essentials Government
City Management
Wondering what you’ve gotten yourself into? Don’t worry. While running a city is challenging, you have a wide range of tools and advisors at your disposal to help ease the burden. The Mayor Rating, Population, and Budget panels all offer a wealth of information vital to keeping your city on the right track.
If you need more information, turn to the data maps and advisors to respond to problems and discover new opportunities. Once you’ve gotten the hang of it all, complete missions offered by different Sims to earn your city some extra money. See, it’s not that bad! So go out there and exude confidence.
With so much information and data available at your fingertips, there’s no challenge too daunting.
Mayor Rating
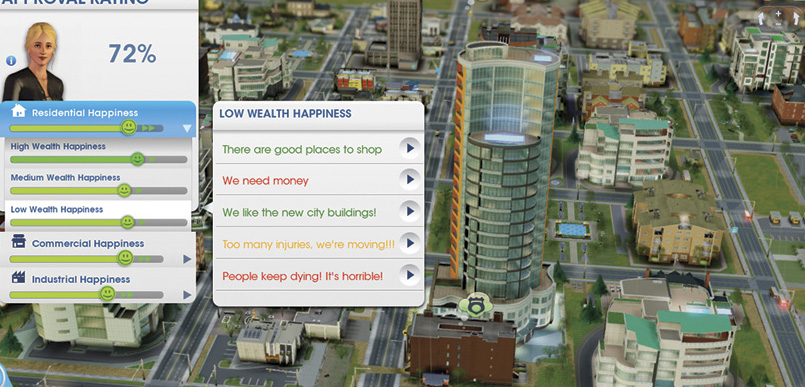
Uh, oh. Some Sims are complaining about a lack of jobs and your poor response to health concerns. Do something about it to improve your approval rating.
Want to know how well you’re doing as Mayor? Look for the face icon on the bottom of the HUD, between your city’s name and the Budget panel. This icon is a graphical representation of your current approval rating. If it’s a green happy face, you’re doing a good job—anything less, and you’ll need to make some improvements.
For a more detailed look at your approval rating, click on the face icon. This opens the Mayor Rating panel, displaying the percentage of Sims who approve of your leadership—the higher the percentage, the better your approval rating.
The panel also displays three happiness meters, separating the citizens into residential, commercial, and industrial categories. The more each meter is filled, the higher your rating is for that category.
If your Mayor Rating is low and your Sims are unhappy in a particular category, click on each individual meter to see more detailed comments from each wealth class. Address these comments and concerns to increase your approval rating.
Mayor Rating: Points to Remember
- Sims can get happiness from visiting a park designed for their wealth level. Even Sims who have no money can gain happiness from a park.
- Sims that can’t get power or water will be unhappy.
- Crimes and deaths at buildings will cause happiness loss.
- Not having money to pay rent will cause happiness loss.
- Medium and high wealth Sims are more sensitive to garbage or sewage issues.
- Medium and high wealth Sims get unhappy due to sickness.
- High wealth Sims are more sensitive to crime, pollution, and fire.
- High wealth Sims need education to be happy.
- Nobody likes high taxes. High wealth Sims don’t like medium taxes.
Getting to Know Your Sims
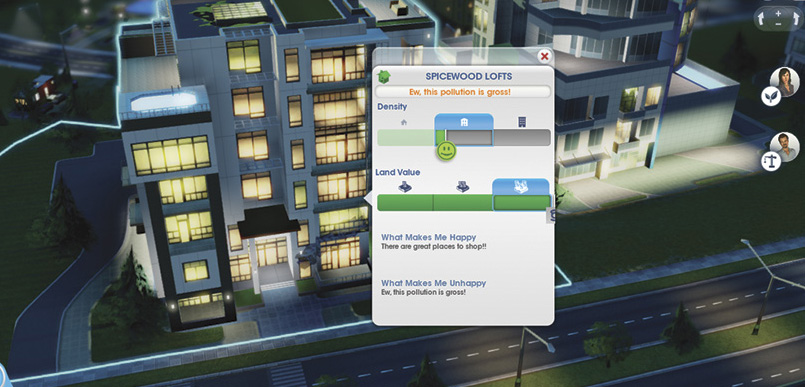
Click on any building to view its current happiness as well as any complaints issued by the tenants. High wealth Sims have no shortage of complaints.
As Mayor, it’s your job to keep the Sims and businesses in your city happy. It sounds simple enough, but it’s no small task fulfilling the needs of a large and diverse population. Fortunately, Sims aren’t exactly shy when it comes to providing honest feedback. There are several ways to tap into the word on the street.
The best way to view a general consensus of public opinion is through the Mayor Rating panel. The comments and complaints shown here are shared by several Sims, helping you address the most pressing issues.
Also, be on the watch for green, orange, and red thought bubbles appearing over buildings. Click on these thought bubbles to get direct feedback on a wide range of topics, indicated by the icon within each bubble.
When a thought bubble is green, a Sim is happy about something—yes, you’re doing something right! Orange thought bubbles indicate an issue of concern that should probably be addressed. But pay most attention to red thought bubbles, because they indicate a loss of happiness. If you’re seeing a lot of orange and red thought bubbles, you’ve got some problems.
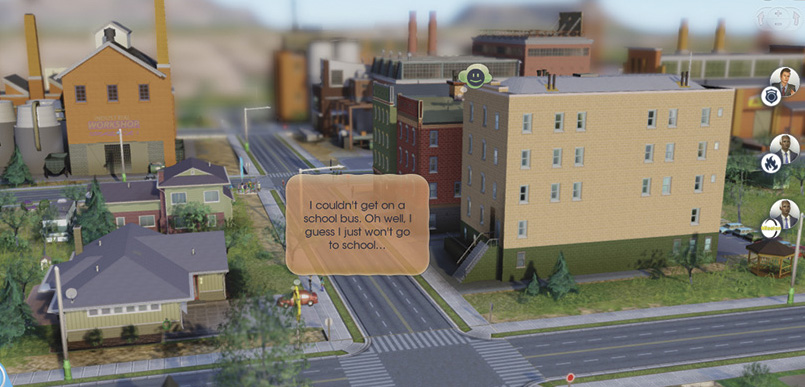
Click on colored thought bubbles to see what your Sims are thinking. This is a good way to diagnose problems with your city. Looks like your school buses are too full, so provide more to ensure all kids can make it to school.
You can also solicit feedback directly from individual Sims driving or walking around the city. Simply click on a walking Sim or vehicle to get a quick status update. A small window pops up next to the Sim or vehicle showing their name and a comment on what they’re doing.
Click on a Sim to see where they came from or click on the Follow button to track their movements through the city. When following a Sim, the camera automatically moves to keep the Sim centered in the middle of the screen. Following Sims is a good way to study the efficiency of your transportation system and layout of RCI zones.
If Sims are stuck in traffic or have to drive across the city to reach their job or desired shop, consider making adjustments to make their lives easier.
Sim Happiness

Events held at the Expo Center and Pro Stadium are likely to increase the happiness of attendees, as indicated by green thought bubbles.
So what exactly makes a Sim happy? What makes them unhappy? It depends on the Sim. But it’s not just individual Sims who are affected by happiness. The happiness of businesses in commercial and industrial zones are also affected by specific events.
The accompanying table shows the causes that affect happiness. As you can see, not every negative cause makes each Sim unhappy. Instead, they will complain about it without losing happiness. But don’t take these complaints lightly. Complaints serve as warnings, giving you a chance to address issues before they become bigger problems.
EFFECTS ON HAPPINESS
| Residential | Commercial | Industrial | |||||||
|---|---|---|---|---|---|---|---|---|---|
| Causes | Low Wealth | Medium Wealth | High Wealth | Low Wealth | Medium Wealth | High Wealth | Low Tech | Medium Tech | High Tech |
| Low Land Value | — |

|
|
— |
|
|
— | — | — |
| No Power |
|
|
|

|
|
|
|
|
|
| No Water |
|
|
|
|
|
|
|
|
|
| Can’t Pay Rent |
|
|
|
|
|
|
|
|
|
| Uncollected Garbage | — |
|
|
— |
|
|
— |
|
|
| Sewage Back-up | — |
|
|
— |
|
|
— |
|
|
| Pollution | — | — |
|
— | — |
|
— | — | — |
| Germs | — |
|
|
— |
|
|
— | — | — |
| Sickness |
|
|
|
— | — | — | — | — | — |
| Injury |
|
|
|
— | — | — |
|
|
|
| Death |
|
|
|
|
|
|
|
|
|
| Successful Shopping |

|
|
|
|
|
|
— | — | — |
| Tourist Shopping | — | — | — |
|
|
|
— | — | — |
| Student Shopping | — | — | — |
|
|
|
— | — | — |
| Visiting Parks |
|
|
|
— | — | — | — | — | — |
| Lack of Any Education | — |
|
|
— | — | — | — |
|
|
| Traffic |
|
|
— |
|
|
|
— | — | — |
| Mass Transit |
|
|
— |
|
|
|
— | — | — |
| Crime at Building |
|
|
|
|
|
|
|
|
|
| Crime in Area |
|
|
|
|
|
|
— |
|
|
| Crime Suppression | — | — |
|
— | — |
|
— | — | — |
| Low Taxes |
|
|
— |
|
|
— |
|
|
— |
| Medium Taxes | — | — |
|
— | — |
|
— | — |
|
| High Taxes |
|
|
|
|
|
|
|
|
|
| Low Wealth Plops |
|
— | — |
|
— | — | — | — | — |
| Medium Wealth Plops | — |
|
— | — |
|
— | — | — | — |
| High Wealth Plops | — |
|
|
— |
|
|
— | — | — |
| Fire Marshal Visits | — | — |
|
— | — |
|
— | — |
|
| Health Outreach Visits | — | — |
|
— | — |
|
— | — |
|
| Police Outreach Visits | — | — |
|
— | — |
|
— | — | — |
| Homeless | — | — | — | — |
|
|
— | — | — |
| Freight Deliveries | — | — | — | — | — | — |
|
|
|
Demographics: Population Panel
Want more information about the Sims populating your city? Then open the Population panel. This handy panel does a lot more than just showing a city’s current population. It also shows the population of the region as well as the number of Sims visiting your city. Not satisfied?
Then dig a little deeper into this panel to reveal much more detail concerning wealth, jobs, education, shoppers, and freight.
History
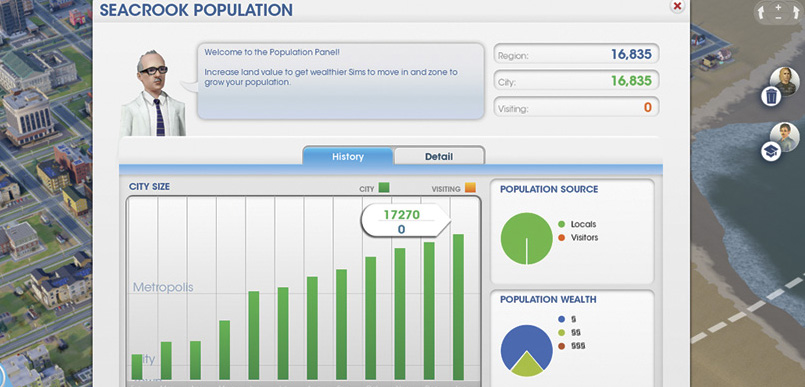
The Population panel’s history tab tracks your city’s population and wealth over a 12-month period. You can also see the number of Sims visiting your city.
At the top of the panel your city is described by two characteristics: size and wealth. Your city may be described as a Poor City, a Middle Class Metropolis, or any other moniker depending on the current size and wealth.
The factors determining this description are shown in the City Size graph. This graph illustrates the rise and fall of your city’s population. The green bars represent residents while the orange bars represent visitors.
The Population Source pie chart shows similar data. In the background of the graph are gray horizontal lines representing different population thresholds determining the type of city you have. The Population Wealth pie chart shows the proportions of low, medium, and high wealth Sims living in your city.
How your city is characterized changes frequently and has no impact on gameplay, so don’t get too obsessed with this title. But do pay attention to the activity in these graphs as well as the accompanying Population Density and Population Wealth pie charts, also in the history tab.
Detail
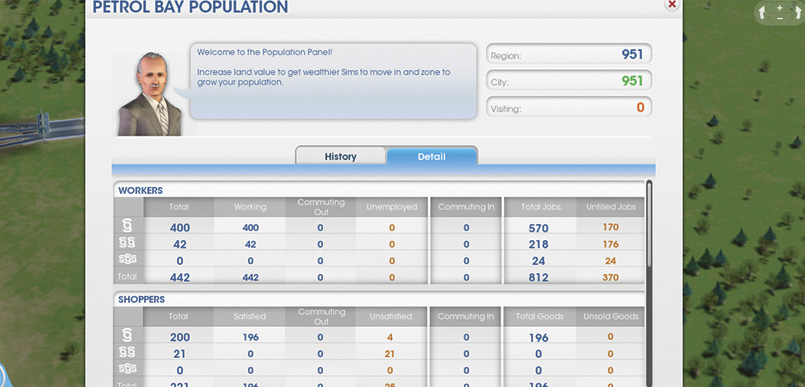
Access the detail tab for more hard data on your city’s demographics. This is a great way to determine how many workers and jobs are available within the city.
The underlying numbers behind all this data are revealed in the detail tab. Here you can see the real-time number of workers, jobs, shoppers, shops, kids, and freight in your city, all shown in individual tables.
When it comes to zoning, pay close attention to the Workers and Jobs tables, making sure you have enough jobs to accommodate the low, medium, and high wealth workers living in your city. Likewise, you’ll want to make sure you have enough shops to accommodate shoppers of each wealth strata, shown in the Shoppers and Shops tables.
But before rushing off and zoning, make sure the data you see here is backed up by current RCI demand and complaints within the Mayor Rating panel. Remember, if your Sims aren’t finding jobs or shops in your city, they’ll travel to other cities in the region.
So even if you’re showing a shortage of jobs or shops, RCI demand may be low. Study the “commute out” column in each table to see how many Sims of each wealth level are leaving your city to find jobs and shops. Likewise, look at the “commute in” column to see how many visitors are coming into your city for work and shopping.
Scroll down the detail tab to view the Students and Industrial Freight tables. The Students table shows the number of students in your city. It also shows the total number of desks in each school—you’ll need a surplus of desks to accept more students, so consider expanding your schools if there’s a shortage.
The Industrial Freight table simply shows the current supply and demand of freight. If there’s a shortage in supply, consider creating more industrial zones to generate more freight. Scroll down to the bottom of the page to get an update on the number of tourists and homeless Sims in your city.
As you can see, the Population panel is filled with tons of useful data you can leverage to make informed decisions. But since the data is shown in real-time, it’s always changing. Instead of relying solely on these figures, take into account feedback from Sims as well as current RCI demand to help influence your decision making.
City Finances: Budget Panel
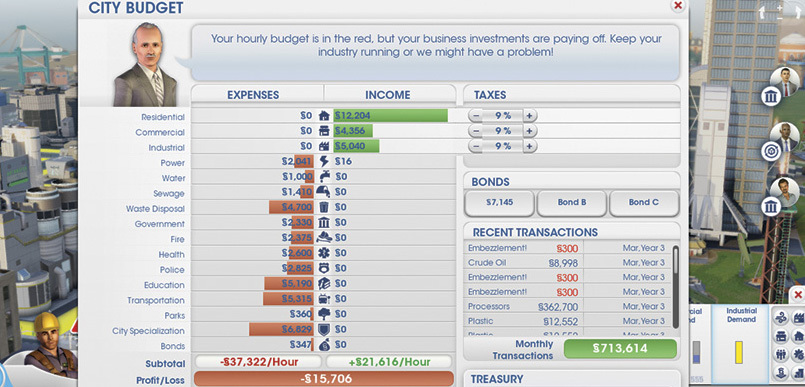
Access the Budget panel to make sure your city is bringing in more money than it’s spending. If not, consider zoning, shutting down buildings, or raising taxes.
What kind of Mayor would you be without frequent visits to the Budget panel? This essential panel includes a ledger, detailing all hourly income and expenses, itemized in 16 different categories. Income is generated through taxing residential, commercial, and industrial zones.
As a result, you should have a positive flow of income in all three categories at the top of the ledger, indicated by green bars. The remaining categories in the ledger show the hourly operational expenses associated with running buildings related to power, water, sewage, waste disposal, government, fire, health, police, education, transportation, parks, and city specialization—all expenses are shown as red bars.
The last expense line in the ledger reports hourly costs related to paying back loans. The Subtotal line at the bottom of the ledger tallies all expenses and income while the Profit/Loss line subtracts total expenses from total income to report how much money your city is earning (or losing) per hour. If this line is green, you’re doing fine. If it’s red, indicating a loss, consider creating more residential, commercial, or industrial zones to increase tax revenue.
If there’s no demand for more zones and you’re still operating in the red, consider raising taxes or cutting back on services.
But even if you’re losing money every hour, it doesn’t necessarily mean your city is facing bankruptcy. Transactions relating to city specialization and fees earned by providing services to other cities are not shown in the itemized list of the ledger. Instead, these all appear in the Recent Transactions window, on the right side of the panel. Here you can see recent sales of resources like crude oil, coal, and raw ore. Money earned from providing power, water, sewage, waste disposal, health, fire, and police services to neighboring cities is also shown here.
Since these transactions are infrequent and difficult to predict, they’re tallied monthly instead of hourly. So if you’re relying on these transactions to keep your city’s finances afloat, pay attention to the final Monthly Profit + Transactions line at the bottom of the ledger. This line calculates all profit/loss and transactions per month, providing a good overview of your city’s current financial well being. If this line is green, you’re doing okay. If it’s red, it’s time to start shutting down buildings/services, raising taxes, or taking out loans before your treasury is depleted.
Taxes
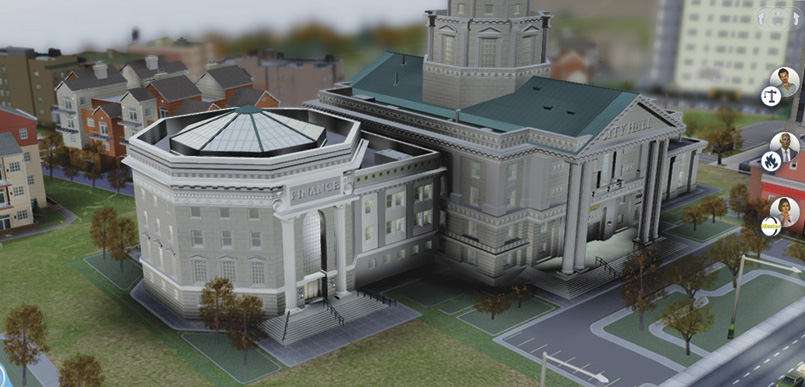
Plop a Department of Finance next to your City Hall (or anywhere in the region) to expand your city’s taxation capabilities as well as increase the size of loans you can acquire through bonds.
OPTIMUM TAX RATES
| Wealth | Rate |
|---|---|
| Low | 8-12% |
| Medium | 7-11% |
| High | 6-10% |
GROWTH PROHIBITIVE TAX RATES*
| Wealth | Density | Rate |
|---|---|---|
| Low | Low | 19% |
| Low | Medium | 18% |
| Low | High | 19% |
| Medium | Low | 17% |
| Medium | Medium | 15% |
| Medium | High | 12% |
| High | Low | 14% |
| High | Medium | 13% |
* New Sims stop moving into buildings at these rates.
HIGH WEALTH TAXES
| Tax Rate | Happiness |
|---|---|
| 0% | +3 |
| 2% | +2 |
| 5% | +1 |
| 8% | 0 |
| 11% | -1 |
| 14% | -2 |
| 17% | -3 |
| 20% | -4 |
MEDIUM WEALTH TAXES
| Tax Rate | Happiness |
|---|---|
| 0% | +3 |
| 3% | +2 |
| 6% | +1 |
| 9% | 0 |
| 12% | -1 |
| 15% | -2 |
| 18% | -3 |
| 20% | -3 |
LOW WEALTH TAXES
| Tax Rate | Happiness |
|---|---|
| 0% | 3 |
| 1% | 3 |
| 4% | 2 |
| 7% | 1 |
| 10% | 0 |
| 13% | -1 |
| 16% | -2 |
| 19% | -3 |
| 20% | -3 |
Nobody likes taxes. But unless you have an alternate source of income, such as a specialization, taxes are necessary to keep your city functioning. Tax rates can be adjusted in the Taxes window within the Budget panel.
Initially, with the Town Hall, you can only set one city-wide tax rate. But once you upgrade to a City Hall, tax rates can be set separately for residential, commercial, and industrial zones. If you build the Department of Finance, or one already exists in the region, you can adjust rates on the different zones as well as the different wealth/tech levels within each, giving you a total of nine rates to control.
By default, tax rates are set at 9%. This is a solid and fair rate for everyone, helping your city establish infrastructure and provide basic services. So when is it appropriate to raise taxes? If your city is facing a budget crisis, and there’s no better solution, you may need to raise taxes to avoid financial collapse. But when raising taxes, do so gradually, at one percentage point per category.
As you adjust tax rates, the income is adjusted in the ledger in real-time, giving you instant feedback. Simply bumping the tax rates up 1% across all categories can have an enormous impact on your city’s income, potentially restoring profitability. However, higher taxes can also lead to a loss of happiness among Sims and businesses. Sims perceive taxes in three brackets, low, medium, and high.
Increasing taxes from a lower bracket to a higher bracket may result in a loss of happiness. As tax rates increase, Sims will stop moving into your city’s residential buildings based on wealth and density. So if you want to attract new Sims, consider lowering taxes. To optimize tax rates for each category, study the accompanying tables. This will help you to set the highest rate possible without experiencing a loss of happiness or halting population growth.
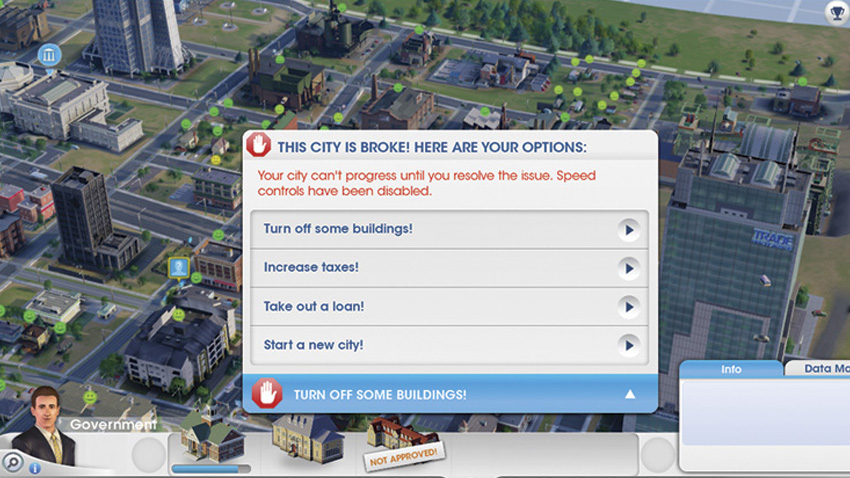
If your city runs completely out of money, you have four options: turn off some buildings, increase taxes, take out a loan, or sneak out of town and start a new city.
In addition to raising taxes, look for other ways to increase revenue. Broadening your tax base through zoning is one of the easiest ways to bring in more money. Simply draw more residential, commercial, or industrial zones to encourage new construction. If you’re out of room, encourage an increase in density by upgrading roads so they can accommodate medium and high density buildings.
Of course, as more Sims flock to your city, you’ll face an increased demand on utilities and city services, not to mention an increase in traffic, so keep this in mind before triggering a massive population explosion. Your efforts to broaden the tax base may backfire as you’re forced to expand coverage of utilities and city services, leading to higher expenses.
Loans
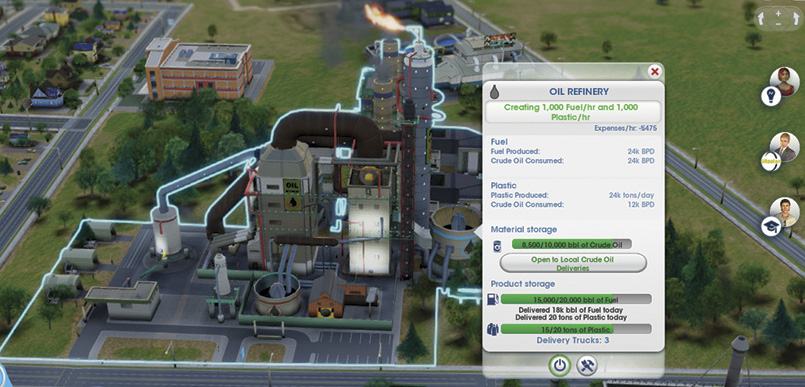
The Oil Refinery is very expensive but generates a lot of income when selling its products through a Trade Depot or Trade Port, so consider taking out a loan to build such big ticket buildings. With the extra income generated, you’ll have that loan paid back in no time.
Loan Costs
| Loan Amount | Hourly Cost | Total Cost |
|---|---|---|
 25,000
|
173
|
27,880
|
|
50,000
|
347
|
55,760
|
|
100,000
|
694
|
111,520
|
Running low on money? No problem. Take out a loan! By issuing Bond A, Bond B, or Bond C you can fill your treasury with Simoleons in a flash. Within the Loans window of the Budget panel, click on any of the three lenders to select the loan amount—you can choose from loan denominations of
25,000,
50,000, or
100,000.
But loans aren’t free—a fixed interest rate is tacked onto each loan. Loans are automatically paid back in hourly installments, as shown in the ledger—it takes approximately seven days to pay back each loan.
But if you have the money, you can pay back a loan in full at any time by clicking on the outstanding balance, shown in the Loans window. You can have a total of three loans out at any given time, one from each of the three lenders.
When should you take out a loan? Consider borrowing money when you need to make improvements to infrastructure or when constructing expensive city specialization buildings such as the Oil Refinery, Smelting Factory, Trade Port, or Processor Factory—taking out a loan so you can make more money is usually a safe and wise decision.
Also, don’t be afraid to take out small loans when starting a new city. Road construction alone can be costly, not to mention the cost of providing essential utilities. Plus, as your city grows and your tax base increases, you’ll have no problems paying loans off.
Avoid taking out loans during a budget crisis. The money you borrow may temporarily replenish the treasury, but it won’t solve the root cause of your budget deficit. Instead, consider expanding your tax base through zoning, shutting down buildings, or raising taxes to balance the budget.
Data Maps
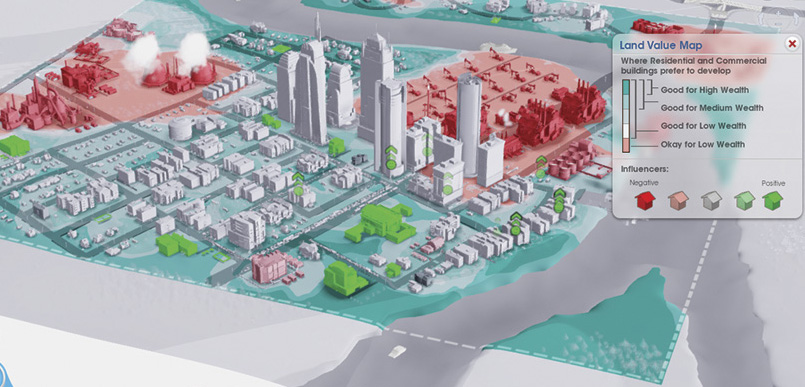
Reference the Land Value map periodically to view the negative impact of industrial and utility buildings on your city.
Numbers are nice, but if you prefer a visual representation of what’s going on in your city, rely on the various data maps to reveal problems and potential opportunities. There are more than 30 data maps in all, covering a wide range topics including land value, wealth, population, happiness, mass transit, utilities, crime, resources, and pollution.
To access all data maps, click on the Data Maps button in the bottom right corner of the HUD. Each menu also has a data maps tab, where you can access maps associated with the selected menu. For instance, the Crime map is available within the Police menu. Each data map includes a legend, explaining what the different colors and icons on the map represent.
While all of the maps reveal important information, you’ll probably access some maps more than others. The Land Value map is extremely helpful when determining RCI zoning, as medium and high wealth buildings do not like the red areas representing low land value. If your city has a lot of factories or a Coal or Oil Power Plant, reference the Air Pollution or Wind maps to see where all that pollution is blowing.
If your Clinics and Hospitals are seeing an uptick in patients, access the Germs map to see which areas of the city are a problem as well as what the source of the germs are—germs can spread through air pollution, ground pollution, sewage, water pollution, or garbage. When it comes to city specialization, don’t forget to the check the Oil, Coal, and Ore maps, preferably before you start building a city.
The Trade data map is also very helpful, showing the flow of resources throughout the city making it ideal for identifying kinks in your supply chains. If you recently built a Recycling Center, open the Garbage map to see the effectiveness of your recycling program—buildings with educated Sims recycle more than those with uneducated Sims.
Before making a decision, reference the data maps on a particular topic to help guide your actions.
Advisors
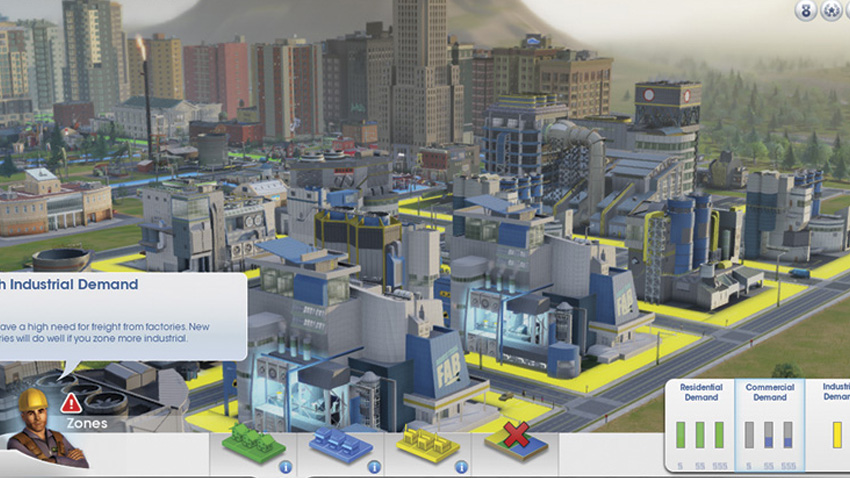
If there’s a problem in your city, advisors will let you know about it and offer solutions.
Feeling a bit overwhelmed, Mayor? Don’t worry, you’re not in this alone. In fact, you have a small army of advisors on your side, helping guide you through the challenges of managing a city. When a menu is opened, the advisor associated with the menu appears in the bottom left side of the HUD, sometimes dispensing helpful tips in a speech bubble. If you missed what they said, click on the red exclamation point icon above their head to restore the speech bubble.
Advisors usually only offer advice when there’s a problem. If an advisor has something to say, the menu buttons at the bottom of the HUD will turn yellow or red—yellow indicates a potential problem while red indicates a more serious matter requiring immediate attention. Keep an eye on all the menu buttons and address concerns as they arise before problem get out of hand.
If you need more information about a particular topic, hover the mouse over the blue “i” icon just below an advisor’s portrait. This reveals a list of helpful tips relevant to the current menu.
Missions
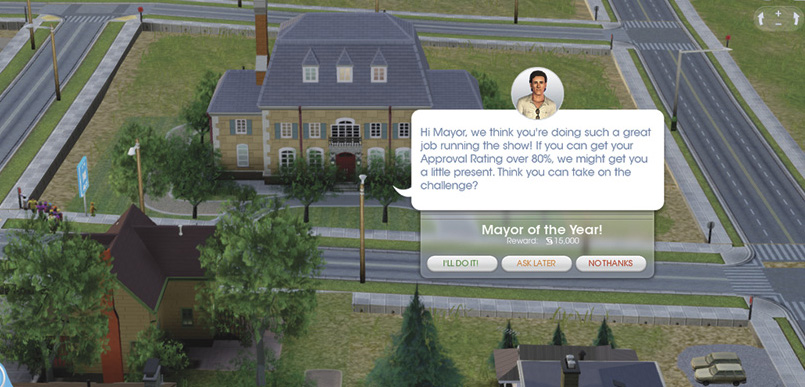
Accept and complete missions to earn some extra money for your city’s treasury. Completing this particular mission unlocks the Mayor’s Mansion.
Periodically Sims throughout the city will ask you to build a particular building or complete some other task. These are called missions. Missions first appear as blue request bubbles hovering above buildings. Click on a blue bubbles to review the Sim’s request and criteria for completing the mission.
Missions usually offer a reward issued in Simoleons (to the city’s treasury) when all required tasks have been completed. You can choose to accept, decline, or postpone any mission after reviewing it. If you’re sure you can’t complete the mission, decline it by clicking on the “No Thanks” button. If you’d like to do the mission, but the timing isn’t right, choose the “Ask Later” button and the mission will reappear later.
If you choose the “I’ll Do It!” button, a new icon appears on the right side of the HUD serving as a reminder—this area is called the Mission Tracker. Here you can have up to three missions active at any given time. Hover over the icons in the Mission Tracker to review the criteria for completing each one.
Early on, missions often serve as tutorials, helping you get your city functioning. But as your city becomes more established, a variety of missions will appear, including some your city may not be ready for. For example, Sims seeking entertainment options often want you to build an Expo Center, so they can attend local shows and sporting events.
So before taking on a mission, make sure the request is feasible within a reasonable amount of time. Otherwise, consider postponing the mission until you can easily complete it.
Government: Points to Remember
- City Hall allows you to set tax rates.
- Each City Hall upgrade grants your choice of one department module.
- Most City Hall departments grant access to more buildings for all cities in the region.
- Government buildings increase nearby land value.
- Buildings start as low density but can grow if they are kept happy/profitable.
- A building will only grow if the road it is on is big enough to permit the traffic.
- Click on an individual building to see its progress toward the next density level.
- Density is the building’s size. Land Value relates to its wealth level.
- If a building loses happiness/profit, it will eventually go abandoned.
- An abandoned building may revive if its problems are resolved.
GOVERNMENT ACHIEVEMENTS
| Icon | Name | Criteria | ||
|---|---|---|---|---|

|
Best Mayor Ever! | Have an approval rating of 95% or more. | ||

|
Big Government | Place one of each of the City Hall departments on a single City Hall. | ||

|
Bronze Anniversary (Secret) | Play a city for 10 years! | ||

|
Busy Downtown | Have at least 100 commercial buildings in your city. | ||

|
Dug Too Greedily and Too Deep (Secret) | Mine 100 tons of coal or raw ore in your city to gain access to the Earthquake disaster. | ||

|
Golden Anniversary (Secret) | Play a city for 50 years! Take a break! | ||

|
Good Credit |
Pay off
1,000,000 in bond debt.
|
||

|
Industrial Revolution | Have 100 industrial buildings in your city. | ||

|
Jumbo Region! | Have 1,000,000 residents living in a region. | ||
|
|
Mega-Region! | Have 2,000,000 residents living in a region. | ||
|
|
Metropolis! | Have 100,000 residents living in your city. | ||

|
Money Cube | Have a total income of §15,000+ per hour. | ||

|
Multi-Millionaire City |
Have
10,000,000 in your treasury.
|
||

|
My Favorite Mayor | Have 24 hours of a 75% or better approval rating. | ||

|
The Philanthropist |
Gift
200,000 or more to a neighbor.
|
||
|
|
Population Boom | Have 50,000 residents living in your city. | ||

|
Quid Pro Quo | Place one each of all the modules on a single Mayor’s Mansion. | ||

|
Sand Through My Fingers |
Have total expenses of
15,000+ per hour.
|
||

|
Silver Anniversary (Secret) | Play a city for 25 years! | ||
|
|
Suburb City | Have 10,000 residents living in your city. | ||

|
Suburbtopia | Have 500 residential buildings in your city. | ||

|
Team Mayor | Grant approvals for 10 buildings for the region. | ||

|
Worst. Mayor. Ever. | Hold an approval rating of below 50% for 24 hours. |