
SimCity Guide Essentials Getting Started
Building Your First City
Saving Summer Shoals is just the first step in your SimCity adventure.
Once you’ve completed the tutorial you’re free to start your very own city. But don’t move too quickly. Rescuing an existing city like Summer Shoals is one thing—starting a city from scratch is an entirely different challenge with numerous (and potentially costly) pitfalls.
If you don’t approach your new city with proper planning and financial discipline, you might find yourself looking for a new line of work, along with Summer Shoals’ previous mayor.
Create Game
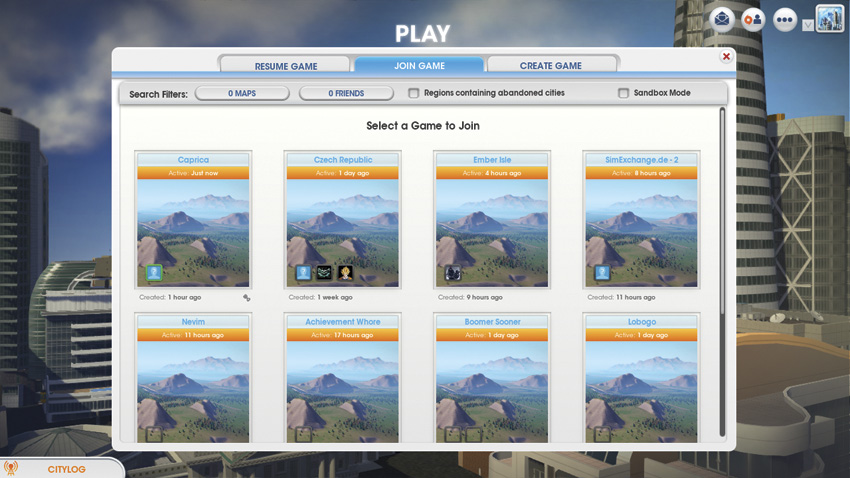
If you prefer to join an existing game you’ll enter a region already occupied by other players and cities.
Immediately following the tutorial you’re returned to the game’s main menu—choose the Play option. Now you can choose between joining an existing game or creating a new game of your own. If you choose to join a game, you’re prompted to select a region. When joining a game, the regions available are already populated by other players.
In fact, there could be up to a dozen other players playing in a single region. The prospect of playing with friends or strangers may be extremely compelling. But if you’re new to SimCity it’s recommended to create a new game of your own, where you can control access to the region.
This is also the best way to learn the principles of creating a self-sufficient city without worrying about potential pollution and crime problems encroaching from other cities in the region.
Select Region
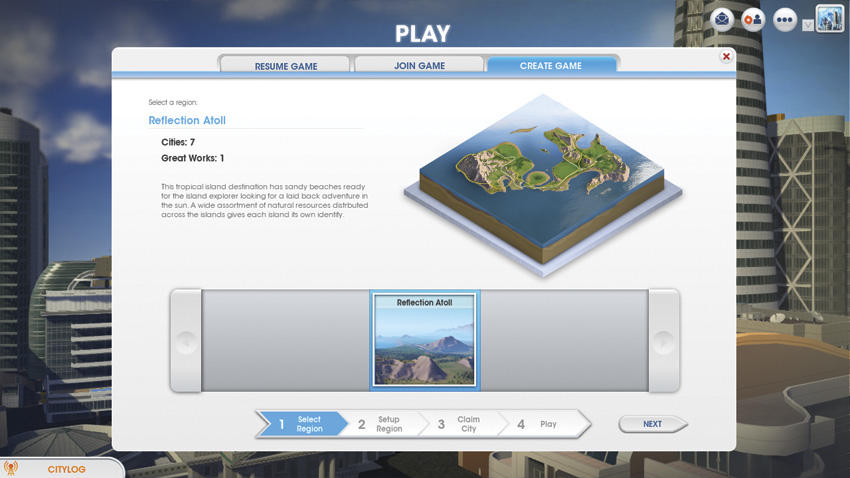
Some regions are huge, others are small. Try to find a region with plenty of open, flat space. Building in hilly or mountainous areas can be tricky.
Once you’ve chosen to create a game, the next step is to select a region. There are several different regions to choose from, each with its own distinct geographical features ranging from mountains, to rivers, to plains, to coastlines. The regions also differ in size, determining how many cities and Great Works it can support.
Small regions can only support three cities and one of the Great Works, while large regions can support up to sixteen cities and four Great Works. Great Works are large structures, like the International Airport, which benefit all cities in a region. But as the name suggests, constructing Great Works is a large undertaking often requiring multiple cities to pool their money and resources.
When starting out, don’t worry too much about Great Works. Instead, pay more attention to the topography of the region. For beginners, regions with relatively flat and level terrain are ideal—constructing cities in hilly or mountainous regions is much more challenging.
In addition to topography, pay attention to the layout of the highway and railway systems—the highway appears as a yellow line while rails appear as white. All cities have access to a highway connection, but not all have railway access.
Rail access is extremely important if you’re hoping to ship large amounts of freight or raw materials—these resources can be sent to neighboring cities or sold on the global market. Or, if you’re hoping to draw tourists into your city, trains are the perfect way to transport large numbers of visitors into your glitzy casino and commercial districts. Waterways, like rivers, are another way to transport a high volume of visitors and resources in and out of your city. So even at this early stage, it’s important to sketch out the flow of goods and Sims throughout the region.
Set Up Region
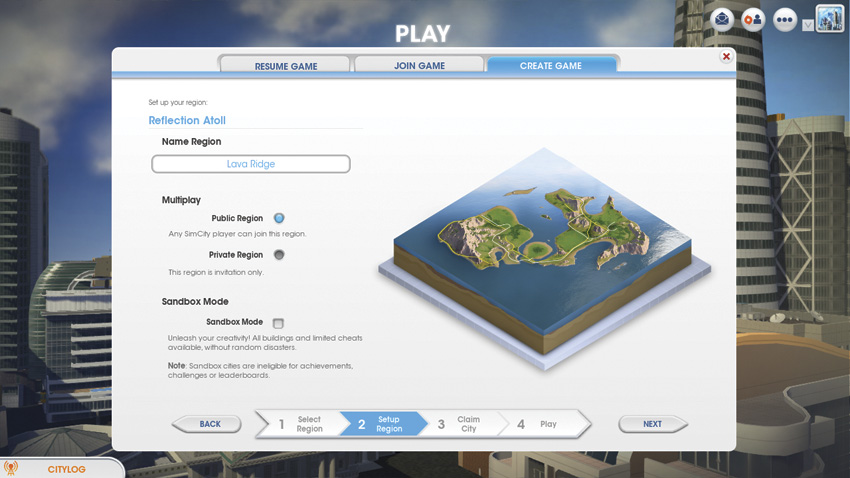
Check the Private Region box if you want to control who can play in your region. Then send invites to friends, asking them to join your game—or send no invites to have the region all to yourself.
Now that you’ve selected a region that fits your grand vision, take a moment to give it a name and adjust a couple of settings. While the region already has a default name, you can give it a more personalized touch by naming it anything you like. However, when naming a region, remember that its name can be seen by other players. Avoid any names that may be embarrassing or reveal personal information.
Next, it’s time to determine the region’s privacy setting. By default, all regions are public, allowing other players to join your game by taking ownership of any unclaimed cities. Cooperating with friends and strangers alike to create a mutually beneficial region is extremely rewarding.
However, if you prefer to have complete control of your region, check the Private Region box. When setting a region to private, you must send invites to players before they can claim a city in the region. This gives you much more control over who you are playing the game with. It also gives you the option to lock out all other players, simply by never sending any invites. Once an invited player has claimed a city in a private region, they can then send out invites to anyone.
Finally, choose whether you want to play in Sandbox Mode. In Sandbox Mode, you have access to all buildings as well as several cheats, giving you a distinct advantage. Random disasters are also turned off, ensuring your region never faces an existential calamity.
However, when choosing Sandbox Mode, any gameplay conducted in the region is not eligible for achievements, challenges, or leaderboards. So if you only want to learn and experiment with the game, Sandbox Mode is good idea. But if you’re more interested in the bragging rights associated with earning achievements, completing challenges, and climbing the leaderboards, steer clear of Sandbox Mode.
Claim City
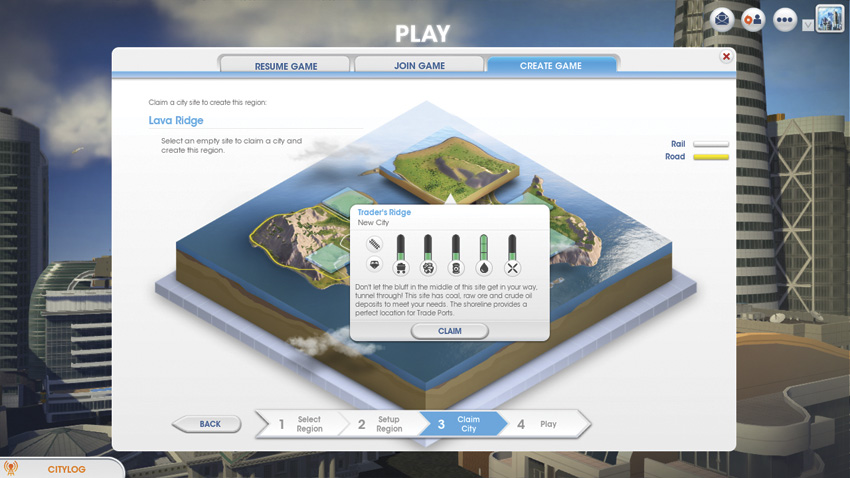
Browse the available city sites in the region to find one that has the resources you’re looking for. At the very least, make sure a city site has plenty of water.
You’re almost ready to start building your first city! Once you’ve selected and set up the region, it’s time to claim the plot of land where you’ll build your city—this is called a city site. Each region has multiple city sites to choose from, so take your time browsing the options.
Remember, pay close attention to topography—selecting a flat and even city site is recommended for beginners. In addition to the city site’s topography, take note of its natural resources. Hover the mouse over each city site to bring up a small box revealing more information about each location. At the center of the box are five colorful meter-like icons representing the site’s five natural resources: coal, raw ore, crude oil, water, and wind.
Coal, ore, and oil are all associated with the city specialization city specializations. By constructing mines and wells you can draw these resources from the ground and sell them for a big profit—coal and oil can also be used to fuel power plants. Or, you can take it a step further and refine coal, ore, and oil into metal, alloy, and fuel for even greater financial gain.
But the buildings associated with these heavy industries are big polluters, decreasing land value and spreading sickness. So if you’re looking at a city site rich with any of these resources, consider the benefits and drawbacks of building mines, wells, and their supporting infrastructure.
Of all the five resources, water is the most vital—Sims need water to survive and most buildings require water to function. Water is also essential for constructing a sewage system, a crucial element of any city’s sanitation system. While glancing at the various city sites, make sure you find one that has plenty of water, as indicated by a full, green meter. By tapping into underground aquifers, you can supply your entire city with plenty of water. Surplus water can also be sold to neighboring cities in the region, netting your city a modest profit.
Wind is less vital than water, but it still plays a significant role, particularly if you’re interested in creating a green, environmentally friendly city. By constructing a Wind Power Plant, you can harness a city site’s wind to generate power. Generally city sites in hilly and mountainous regions have the heaviest winds—the faster the wind blows, the faster the wind turbines turn, generating more electricity. However, even when placed in areas with moderate winds, a Wind Power Plant can still generate enough electricity to power a small city.
Once you’ve surveyed a city site’s natural resources, look on the left side of the information box to determine whether the site has rail and waterway access. Here you’ll find two icons: the railroad track icon represents rail access and the ship icon represents waterway access.
If either of these icons are grayed out, access is not available. Rail and waterway access is important if you want to ship large amounts of cargo or if you want to bring in tons of tourists. Most city sites have rail access, but naturally only cities adjacent to rivers and coastlines have waterway access.
Now you have enough information to claim your first city. As you can see, there are many factors to consider before choosing a city site. But most importantly, stay focused on the city you want to create and don’t let the terrain or natural resources compromise your vision.
Harvesting a city site’s natural resources can certainly be tempting, especially if your goal is making piles of money. However, there is no right or wrong way to play SimCity . So if you want to build a quaint low density burg atop a vast oil reservoir, go for it! Likewise, if you want to create city filled with factories, you can do that too. The future of your city is entirely up to you, so tap into your creative side and see where imagination takes you.
Starting a New City: 10 Steps to Success
It’s finally time to start building your city!
What kind of city will you make? Will you rely on green technologies to create a city free of pollution and waste? Will you create a small, self-contained community where most residents can walk to work? Or will you build a sprawling metropolis filled with skyscrapers and overlapping mass transit networks?
These are just some of the questions you should ask yourself before you lay the groundwork of your city. Regardless of what kind of city you want to make, all cities share the same basic infrastructure. In this section we take a look at ten steps you need to follow to get your city functioning. Once you get your city humming along, you can then focus on carrying out your grand vision. So what are you waiting for? Get to work, Mayor!
1 - Survey and Planning
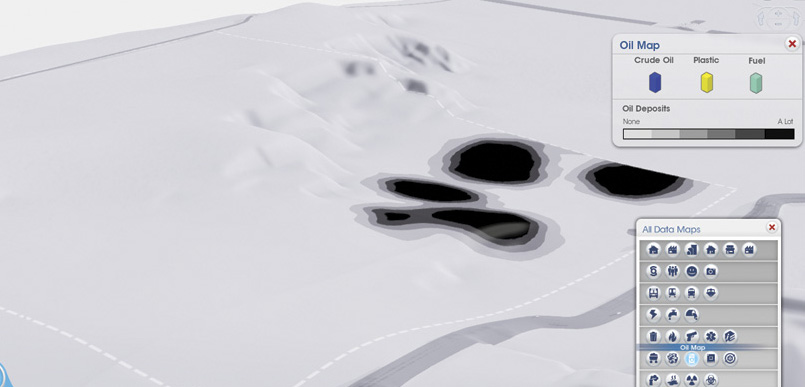
Use the data maps to locate a city site’s resources. It looks like this city has a few oil reservoirs. How do you feel about drilling for oil?
In SimCity , the importance of planning cannot be overstated. Unlike previous installments, there is no going back once you’ve made a decision. The game is continually saved to the cloud—there are no saved games you can revert back to if you make a mistake. Therefore, every decision you make may have far-reaching consequences.
To avoid blundering along, pause the game and take the first few minutes to familiarize yourself with the city site. Take note of the highway connection, as this is the area where your city will most likely start out. If available, also pay attention to rail and waterway access, as these transportation hubs are essential for trade and tourism.
Utilizing the data maps, quickly survey the city site’s natural resources—click on the Data Maps button in the bottom right corner of the screen. The data maps give you access to a wide range of information pertaining to your city. Hover the mouse over the various icons in the Data Map window to view the names of the available maps.
Start by clicking on the water data map. This shows the city’s water table, revealing subterranean aquifers appearing as blue pools—the darker the blue, the more water available. If water is scarce, you may need to construct a special Low Density Dirt Road to the nearest aquifer in order to build a Water Tower.
Next, click on the coal, ore, and oil data maps to reveal the deposits of these natural resources. Knowing exactly where these resources are located can greatly impact the structure of your city. For instance, if you want to eventually mine ore, you’ll want to avoid building directly over ore deposits. And since mines and wells lower land value and increase pollution, you’ll want to place these heavy industries far from your residential areas.
After spending a few minutes surveying the city site and studying the data maps, you should have a general idea of how you want to proceed. But remember, you only have limited financial resources to begin with. It’s important to start small and gradually work your way to greatness. The city you start with is rarely the city you end up with—keep that in mind as you begin building.
2 - Connect to Highway
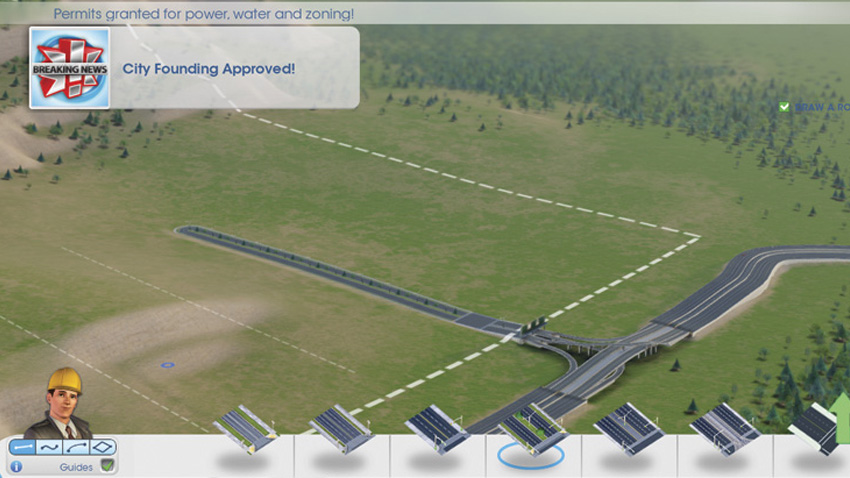
Use a Medium Density Avenue to connect to the regional highway. Once connected to the highway you can begin zoning as well as build vital utilities for your city.
Although you’ve claimed a city, the region does not recognize it until it’s been connected to the regional highway. In fact, you can’t build or zone anything until a highway connection has been established. Most cities have one, and only one, highway connection. The highway is the main thoroughfare in the region, connecting neighboring cities to each other.
This is how construction trucks, moving vans, and even tourists will enter your city. Click on the Roads menu to choose from a variety of different roads. As the main entrance into your city, the highway connection will incur heavy traffic—the narrow streets offered here won’t cut it. Choose the Medium Density Avenue to accommodate the numerous cars and trucks traveling in and out of your city.
Later on, if congestion becomes a problem, the Medium Density Avenue can be upgraded to handle more traffic. Both streets and avenues can be upgraded and downgraded, giving you better control over traffic and density. However, due to size differences, a street cannot be upgraded to an avenue and an avenue can’t be downgraded to a street.
Constructing a road is as simple as drawing a line with your mouse. But pay close attention to the length of your avenue when connecting it to the highway—avenues are very expensive to construct and you don’t want to blow all your money on this first step. When you’re ready to draw your avenue, place your mouse over a starting location, then hold down the left mouse button.
Drag the mouse in the direction of the highway connection, but don’t release the mouse button just yet. Notice how the price of the avenue increases as you drag the mouse toward the highway connection—the longer the road, the higher the cost. Are you satisfied with the length/cost of the avenue?
If not, while still holding down the left mouse button, click the right mouse button to cancel the avenue and try again—canceling is much cheaper than placing an unwanted road and bulldozing it. If you want to construct straight roads, hold down the SHIFT key while drawing your avenue.
There are also a few line tools you can use to help construct curvy roads. Once you’re satisfied by the length, shape, and cost of your avenue, release the left mouse button while hovering over the highway connection. At this point your city is connected to the region. But don’t expect to see any traffic until you start zoning.
3 - Road Construction
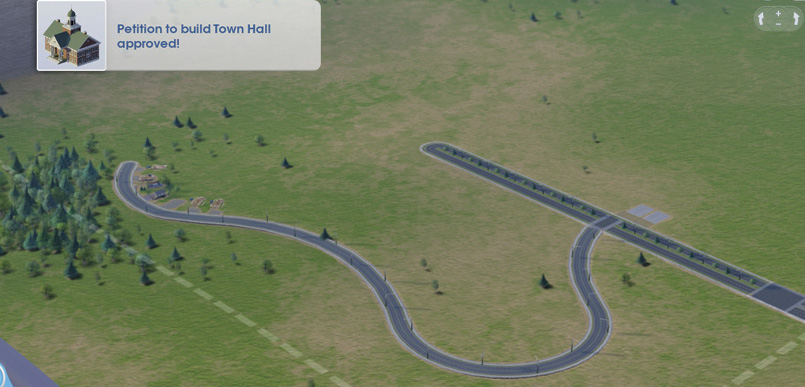
Constructing roads can be expensive, so don’t let costs get out of hand. Only build the roads you need to construct vital utilities and a few zones.
As you can see, the mechanics of road construction is fairly simple. But laying out a congestion-free network of roads throughout your city is an ongoing challenge. In addition to serving as a means of transportation, beneath the surface, your road network is also responsible for carrying water, power, and sewage. Don’t get ahead of yourself.
For the time being, figure out what kind of roads you’ll need and where they need to go. For example, where are you going to get water? Where is your power plant going to be located? Do you need any roads to reach distant coal, ore, and oil deposits? There’s a lot to figure out, and you don’t have a ton of money.
Treat the Medium Density Avenue as your city’s main thoroughfare, and then use smaller streets to branch off the avenue in different directions. Start with Low Density Streets to save money. You can even construct cheaper Low Density Dirt Roads if forced to reach distant aquifers for your Water Tower or high wind areas for your Wind Power Plant.
Only construct roads on an as-needed basis. While it’s important to keep a general plan in the back of your mind, there’s no need to lay out your entire road network now. A road is only necessary if you’re going to build something next to it.
4 - Wind Direction/Power Plant
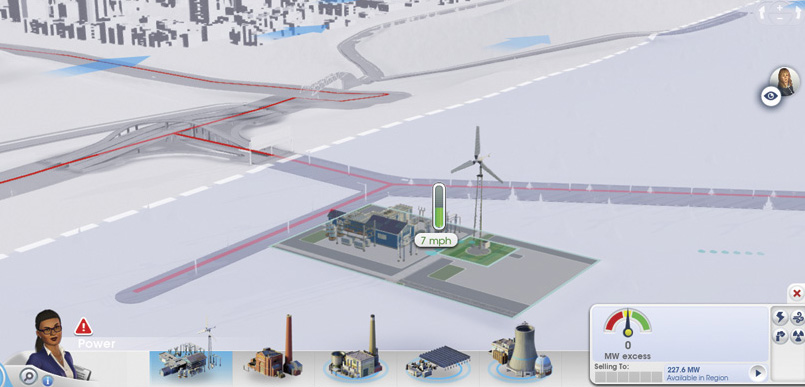
Wind Power Plants are most effective in areas with high wind speeds. Before plopping it, move it around the city site to find the optimal location.
Although you have no buildings yet, there’s a huge benefit to determining the direction of prevailing winds. Why is wind so important? All air pollution carries with the wind, across the city, and even across the region. Therefore it’s important to know which direction the wind is blowing before you start zoning.
After all, you don’t want to build a residential neighborhood downwind from a heavy polluting industrial district, right? Pollution leads to sickness and angry Sims, a negative for any mayor. Open the Wind data map to see the direction the wind is blowing—the blue arrows represent wind blowing across your city site. Consider building a Wind Power Plant to generate cheap and clean power for your city.
Before placing a Wind Power Plant, available from the Power menu, drag it across multiple areas to see what kind of wind speed is generated at each location. Usually wind speed is relatively constant across flat, low lying terrain. But wind speeds pick up considerably on hills, mountains, and other high elevation areas.
The stronger the wind is blowing, the more efficient your Wind Power Plant will be, generating more electricity per turbine. Figure out where you want to build your Wind Power Plant and plop it next to an existing road—if necessary, build a Low Density Dirt Road to reach a distant, but optimal location.
Once the Power Plant is placed, the turbine will rotate, automatically facing incoming wind. Now that you know the wind direction and are producing power, you can better plan out the zoning of your city, ensuring your polluting industries are placed in areas where they won’t negatively impact your residential and commercial zones. While the Power menu is open you can now see power flowing along your city’s streets, appearing as yellow lines.
5 - RCI Zoning
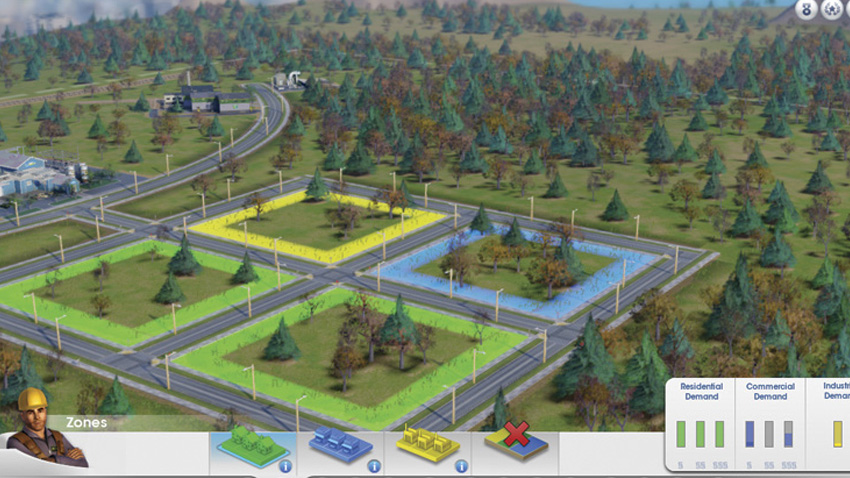
Keep your polluting industrial zones downwind from your residential and commercial zones. Air pollution spreads germs that can make Sims sick.
If you want Sims and businesses to move into your city, you need to set aside areas for them to begin the construction of houses, shops, and factories. This is accomplished through zoning. In the Zone menu there are three different zone types: residential, commercial, and industrial.
You can only zone areas adjacent to existing roads. Simply select one of the zoning options and draw a zone along the side of a road. Before long Sims will appear in these zones and start constructing buildings. Once built and occupied, these buildings then begin generating revenue in the form of taxes, the lifeblood of your city’s budget.
The density of a zone is directly governed by the density of the adjacent road. For example, if creating a residential zone next to a Low Density Street, only low density, single family homes will appear in that zone.
If you want to create higher density housing, such as tenements or apartments, you’ll need to upgrade the adjacent road to accommodate the heavier traffic associated with higher density housing. You can also dezone an area, preventing the construction of new buildings or the upgrade of existing buildings. Dezoning is a good way to freeze the density of an area regardless of what kind of road is adjacent to the zone.
So what is the relationship between these three zones? Your Sims have two basic needs: money and happiness. Sims live in residential zones and get money by working at jobs provided largely by factories in industrial zones. But Sims can also find work in the shops of commercial zones as well as at buildings, such as Coal Mines, Trade Depots, Grade Schools, and Hospitals.
Once Sims have a way to earn money, they seek out happiness by shopping in commercial zones. There are many other factors that also affect happiness, but as long as Sims have a way to earn money and a place to spend it, you’ll be on the right track when it comes to zoning.
Before zoning in your new city, plan out where you want certain structures to appear. Now that you know which way the wind is blowing, create industrial zones on the edge of your city, downwind from your other zones. This causes most of the air pollution to blow away from your city, and into the region—at least it’s not your problem, right?
Traditionally, commercial zones serve as a good buffer between residential and industrial areas. However, if pollution gets out of hand, even commercial buildings will experience difficulties when placed directly across the street from dirty factories. Consider building an isolated industrial district, using open space or parks to serve as a buffer.
Consider placing commercial zones along your Medium Density Avenue while zoning residential along Low Density Streets branching off of the central avenue. As a basic rule of thumb, create two residential zones for each commercial and industrial zone. This 2:1:1 ratio is the best way to create a self-sufficient city with a stable tax base.
6 - Water
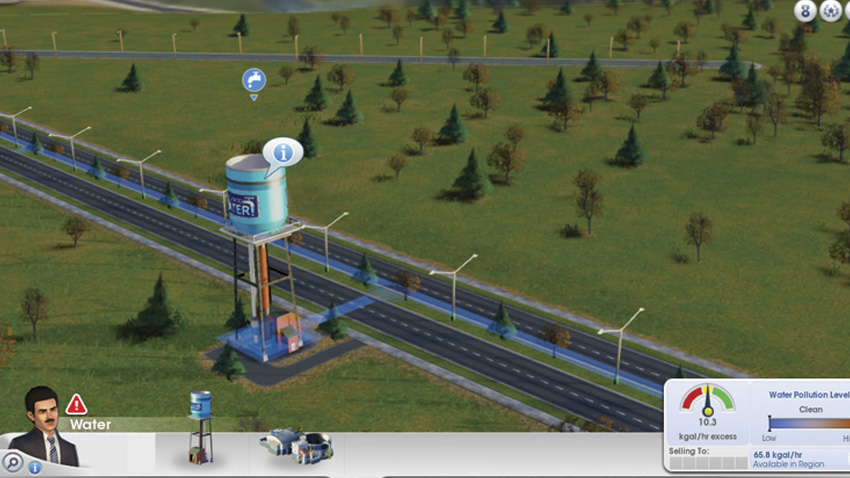
A single Water Tower is enough to quench the thirst of a small city. But as the city grows, you’ll need to place more Water Towers or a Water Pumping Station to keep pace with increased demand.
As construction is underway within the newly created residential, commercial, and industrial zones, turn your attention to supplying the city with water, otherwise you’ll have some thirsty Sims to contend with. If you haven’t already, open the water data map to find a nearby aquifer with plenty of water—look for an area that is dark blue.
Construct a small road out to the aquifer and construct a Water Tower, available from the Water menu. When you select the Water Tower, the water data map is automatically activated, helping you place the structure in an optimal location. Before placing the Water Tower, move it over different areas of land and notice how the water output changes.
When placed over a white or light blue area, the Water Tower only produces a small amount of water. But when placed over a bright or dark blue area, water production increases significantly. If you place a Water Tower next to a river, it will have an endless supply of water. So find the perfect spot for your Water Tower, ensuring it’s drawing an optimal amount from the aquifer.
Once placed, the Water Tower immediately begins pumping water. While the Water menu is open, you can see the water flowing from the Water Tower and through your road network. As water coverage spreads, every building is automatically connected and begins receiving water. No more thirsty Sims!
7 - Sewage
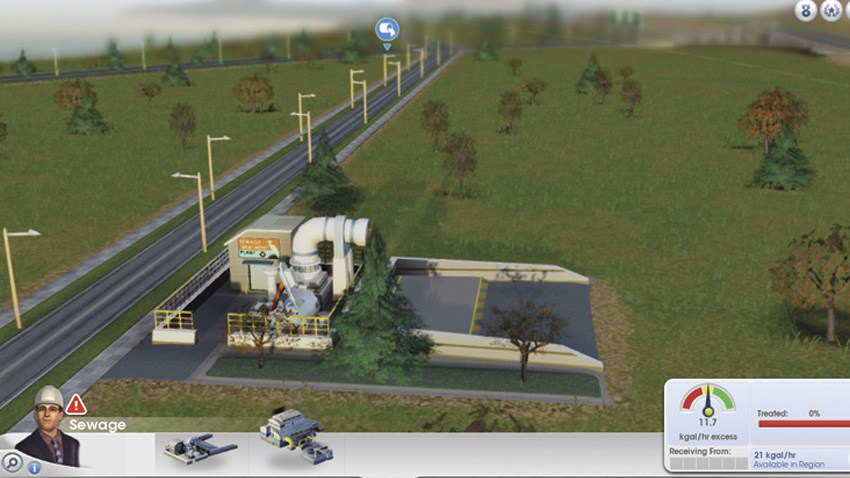
Build a Sewage Outflow Pipe on the outskirts of your city, far away from your population and Water Tower.
Immediately after supplying the city with water, your Sims begin creating sewage. Left unattended, sewage builds up in the pipes and can eventually leach to the surface, creating nasty ground pollution—you don’t want this to happen. Ground pollution isn’t just disgusting, but it can also spread germs, making your Sims sick. As expected, ground pollution also lowers land value.
To avoid a public health crisis you need to act quickly to deal with the looming sewage problem. The cheapest and easiest solution is building a Sewage Outflow Pipe, available from the Sewage menu. But you need to be very careful of where you place this building.
The Sewage Outflow Pipe pumps raw, untreated sewage out of the sewer system and dumps it onto an open piece of land, creating heavy ground pollution. Obviously, you don’t want this anywhere near your residential or commercial zones. You also want to keep the Sewage Outflow Pipe far away from your Water Tower.
Ground pollution is absorbed through the soil and can end up contaminating your water supply. If you’re not careful, you may inadvertently pump contaminated water throughout your city leading to a massive germ outbreak, generating sickness on a grand scale. So find a remote area you’re not planning to use for anything else and place your Sewage Outflow Pipe there.
Like any structure, the Sewage Outflow Pipe must be placed adjacent to a road, but don’t break the bank. Build a cheap Low Density Street to the desired location and build the Sewage Outflow Pipe. While the Sewage menu is open, you can now see sewage (brown blobs) flowing through the road network in the direction of the Sewage Outflow Pipe where it is unceremoniously dumped onto the land. Out of sight, out of mind.
8 - Town Hall
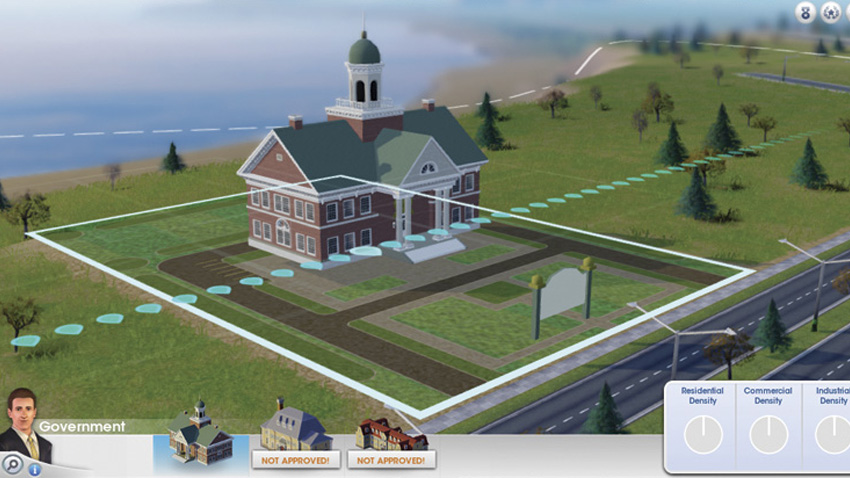
Leave plenty of open space around your Town Hall. The blue dots indicate areas where department modules can be constructed in the future.
Soon after connecting your city to the regional highway and establishing power and water service, the Town Hall is available for construction from the Government menu. The Town Hall is the seat of local government, allowing you to adjust the city-wide tax rate while unlocking the Health, Fire, and Police menus.
Constructing the Town Hall also gives Sims a place to gather and voice their concerns. If things aren’t running smoothly, large groups of Sims will gather outside the Town Hall and protest, demanding action from their mayor.
As your city grows, the Town Hall can be upgraded at specific population thresholds. With each upgrade, a new department can be constructed, allowing access to advanced buildings. For example, you’ll need a Department of Transportation before you can construct a Bus Terminal, or a Department of Education before you can build a High School.
However, if these departments already exist in another city in the region, you don’t need to build them at all. That’s because each department is shared throughout the region, encouraging communication and cooperation with your neighbors. Before constructing a department, make sure one of that kind doesn’t already exist in the region, otherwise you’ll just be wasting money and valuable space.
Before placing your Town Hall, make sure you give it plenty of room for expansion. The additional department modules can eat up quite a bit of space. Consider creating a large town square-like block and place your Town Hall at the center, giving it plenty of growing room on all sides. The Town Hall, along with all government buildings, increases land value. This is beneficial to nearby residential and commercial zones, potentially leading to the construction of buildings that cater to medium and high wealth Sims.
9 - Waste Disposal
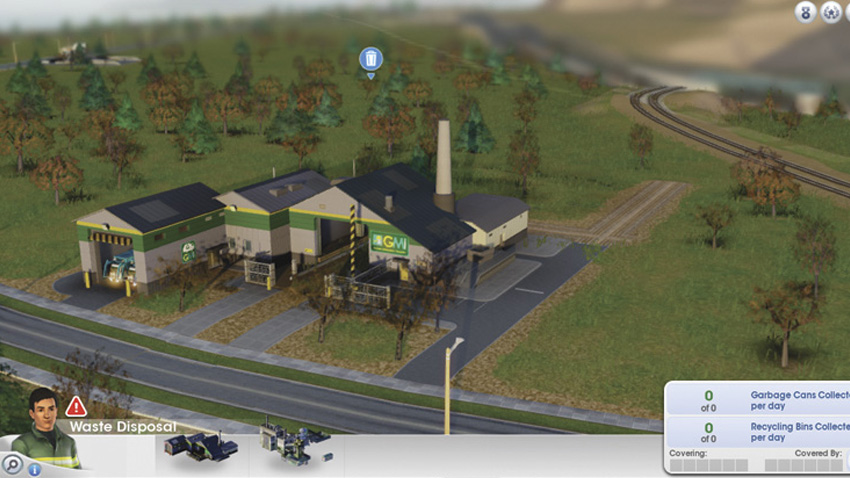
If no garbage trucks are volunteered by a neighboring city, building a Garbage Dump is the only way to empty the garbage cans lining your city streets. The facility can be expanded with modules to accommodate your growing city.
As your city slowly hums to life, each building outputs a steady flow of garbage. Like sewage, garbage accumulates over time and will eventually become ground pollution. Ground pollution caused by garbage spreads germs and can lead to widespread sickness. Furthermore, the accumulation of garbage in your city streets reduces land value and significantly increases the risk of fires.
It’s important to deal with the garbage problem sooner rather than later. Open the Waste Disposal menu and select the Garbage Dump. Since you’re already polluting an area with sewage, place the Garbage Dump along the same road as your Sewage Outflow Pipe—it’s best to keep your ground pollution consolidated in one smelly area.
The Garbage Dump automatically dispatches garbage trucks on a daily basis to collect garbage. When a garbage truck is full, it returns to the Garbage Dump and deposits the collected garbage, creating ground pollution. But as long as the Garbage Dump is far away from your water supply and populated areas, there are no immediate negative impacts.
While the Waste Disposal menu is open, study the info tab on the right side of the screen to monitor the number of garbage cans collected each day out of the total number of garbage cans in the city—as long as this number is green, you’re doing okay. At the beginning of the day, this number is red, indicating uncollected cans.
Throughout the day, the color of the number changes, from red to yellow then from yellow to green, as more and more cans are collected. If the number is still yellow or red by the end of the day, you need more garbage trucks. Add a Garbage Truck Garage module to the Garbage Dump. This increases the number of garbage trucks dispatched every day, helping ensure each garbage can in the city is collected. As your city grows, so will the number of garbage cans. Periodically revisit the Waste Disposal menu to check up on garbage collection.
10 - City Services
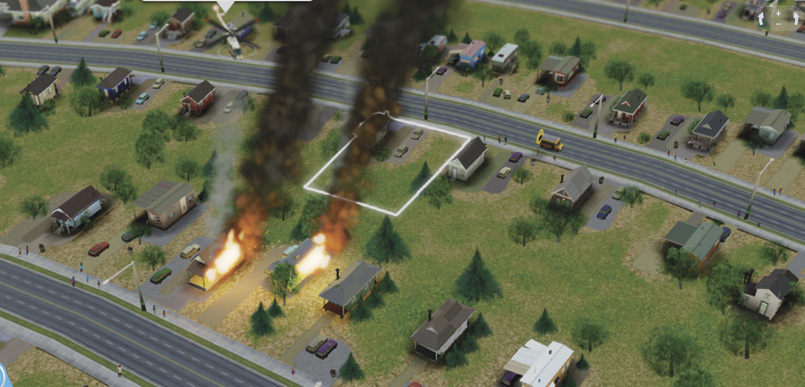
Providing health, fire, and police service is expensive, but don’t wait too long. The rise of health and crime concerns are somewhat predictable, but there’s no telling when your city will experience its first fire.
With a functioning Town Hall in place, you can now provide city services, including health, fire, and police. However, don’t rush into providing these services immediately, as they are extremely costly and could potentially cripple your fledgling city’s fragile budget. Furthermore, these services aren’t crucial to your city’s growth and development.
It’s best to spend the first few days expanding your tax base by zoning. The costs associated with providing power, water, sewage, and waste disposal are already a massive burden on your small city—open the Budget panel to see the precise cost. It’s important to grow your residential, commercial, and industrial zones to offset for these costs. The more homes, businesses, and factories in your city, the more the city collects in taxes.
Before you construct any health, fire, or police buildings, make sure you can afford them. These city services have a high hourly operational cost. For example, opening a basic Clinic, Fire Station, or Police Station will each cost your city
 400 per hour, or
1,200 per hour for all three. Can you afford that? There’s an easy way to find out. Simply study your city’s revenue in the Budget panel.
400 per hour, or
1,200 per hour for all three. Can you afford that? There’s an easy way to find out. Simply study your city’s revenue in the Budget panel.
This number shows how much money the city is generating per hour. If the number is green, and you’re generating more than
400 per hour, you can afford one of these buildings. If your city is generating more than
1,200 per hour, you can afford one of each, instantly giving your city comprehensive health, fire, and police coverage.
Just because you can afford them, it doesn’t mean you need to provide city services right away. Instead, these services are best constructed on an as-needed basis, otherwise you’ll have a bunch of doctors, firemen, and policemen on the city payroll with nothing to do. Chances are Sims will begin complaining about lack of health coverage before anything else.
When these issues arise, plop a Clinic to treat the sick and injured. It’s difficult to predict when your city will experience its first fire, but it’s better to be safe than sorry. When you can afford it, construct a Fire Station. Unless you’ve constructed a Gambling Hall, the rise of crime in your city is very gradual.
But once a criminal has moved into your city and has committed the first petty crime, it’s time to build a Police Station. Criminals are emboldened when they get away with committing a crime, so it’s best to address this problem before it gets out of hand—you can see the number of crimes committed and criminals at large in the Police menu’s info tab.