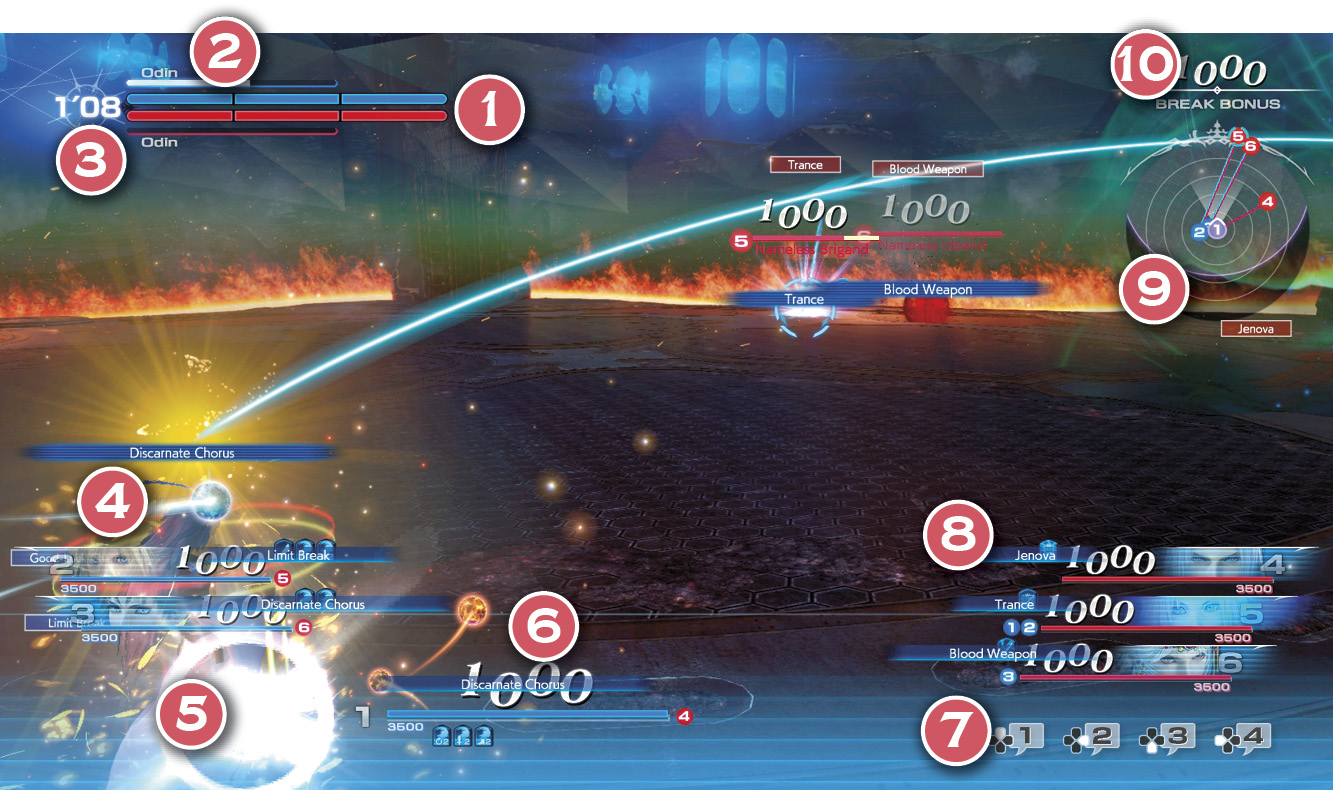
Becoming familiar with the HUD is essential to optimizing your decision-making. The HUD provides comprehensive details on almost all relevant aspects of the match and should determine how you approach certain situations. Data such as enemy Bravery/HP values should be considered in your actions and strategy.
However, the area your eyes should be focused on the most (and perhaps even more important than the actual battlefield) is the minimap. An exceedingly important skill to master in this type of game is called map awareness—the complete understanding of who and what is where—so make it a point to look at the minimap often.
General HUD Elements
Party Health
Summon Gauge
Match Time Remaining
Player Team Bravery, HP, Targeting Info, Status Effects
Party Health: The party health “gauge” is represented in three segments. Essentially, it shows the lives remaining of both teams. Your team’s health bar is blue, while the opposing team’s is red.
Summon Gauge: Above the party health bars is your team’s summon gauge. The gauge underneath the red party health bar is the enemy team’s summon gauge. Once filled, the gauge radiates brightly, indicating your summon is ready for the incantation process.
Match Time Remaining: The winner and loser of a match ending in a “Time Is Up” depends on match settings. With the “Most Points Wins” setting, the time remaining can be used to leverage mistakes from the opponent by a team who’s leading in party health. However, with the default “Double Loss” setting, both teams accrue a loss.
Player and Enemy Team Info: Your teammates are listed on the left-hand side of the screen, while the enemy team is listed on the opposite side. In addition to Bravery and HP values, the party HUD elements indicate all status effects on all players, as well as pertinent targeting information. For example, a red “5” next to your teammate’s HP bar means the second player of the enemy team is targeting this teammate. Pay close attention to this info (especially the enemy’s data), as much of the data can help guide your decisions.
EX Gauges: EX gauges are represented by an incrementally growing circle around the corresponding EX Skill icon. Skills awaiting their cooldown timers are grayed out. Note that some characters have multi-tier EX Skills (such as Kain’s Jump I/II/III, and Noctis’s multiple stocks of Warp) that can be used before being maximally charged.
Minimap: The minimap is the most important part of the HUD. In addition to showing the locations of players around you, the minimap displays targeting information, revealing how players are targeting each other.