
Assassin's Creed Unity Guide Walkthrough
Sequence 12
 Memory 01/“The Supreme Being”
Mission OverviewChallenges■Sabotage one alarm bell: see ■ Don’t let Élise get detected: see Notes & Further Reading■All zones marked in blue in this Memory are Restricted Areas, where guardsmen will attack Arno if he is seen to trespass. Complicating matters, occasional Extremists can be encountered among the crowds, which necessitates regular use of Eagle Vision to avoid unwanted conflict. Though not strictly enforced, careful stealth is definitely the best approach. ■The opening Challenge can be rather tricky to complete. If you would prefer to ignore it on a first playthrough and use a much easier way to infiltrate Robespierre’s tent and retrieve the incriminating evidence, start the walkthrough at step |
 .
. .
. and follow the path shown for that step in reverse order. This effectively leaves you with a single guard to avoid.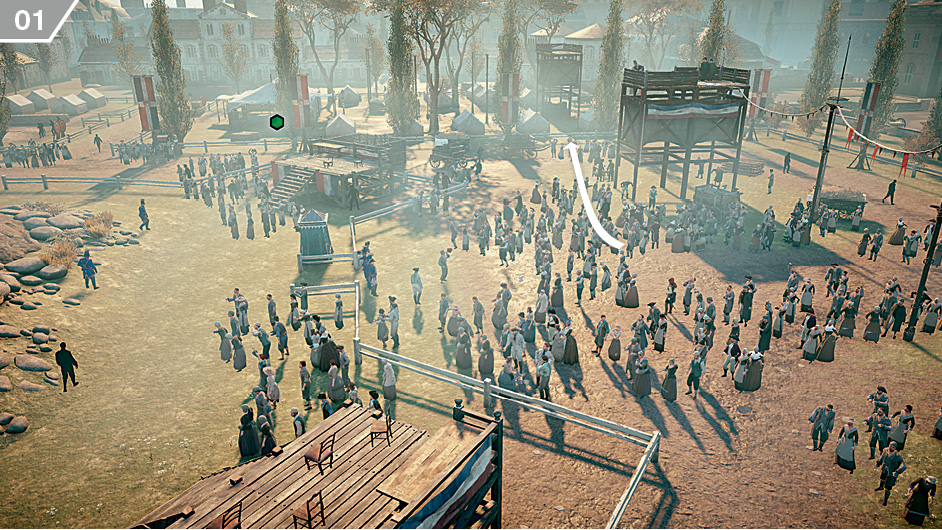
Follow Élise until you near the waypoint and trigger a cutscene. When this ends, take a moment to survey the surrounding area, then follow the path shown on the above screenshot. This takes you to a position close to Robespierre’s tent.
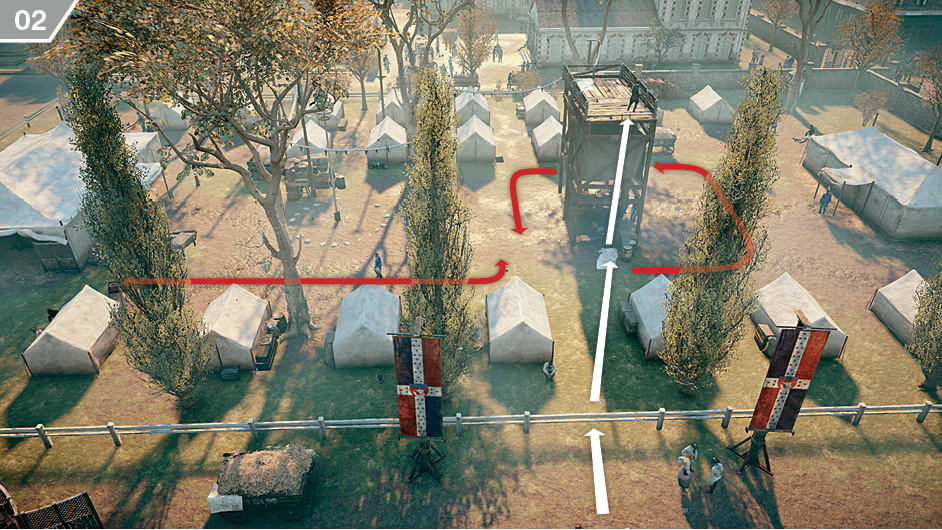
Approach the fence and watch the guards close to the tents just inside the Restricted Area. There are two guardsmen of concern here: one who walks a patrol on the left, and another who follows a long circle around the watchtower. When both are facing away, vault the fence and quietly sneak over to the ladder. You are safe from detection as soon as you reach the top, so don’t worry unduly if a guard spots Arno during the climb.
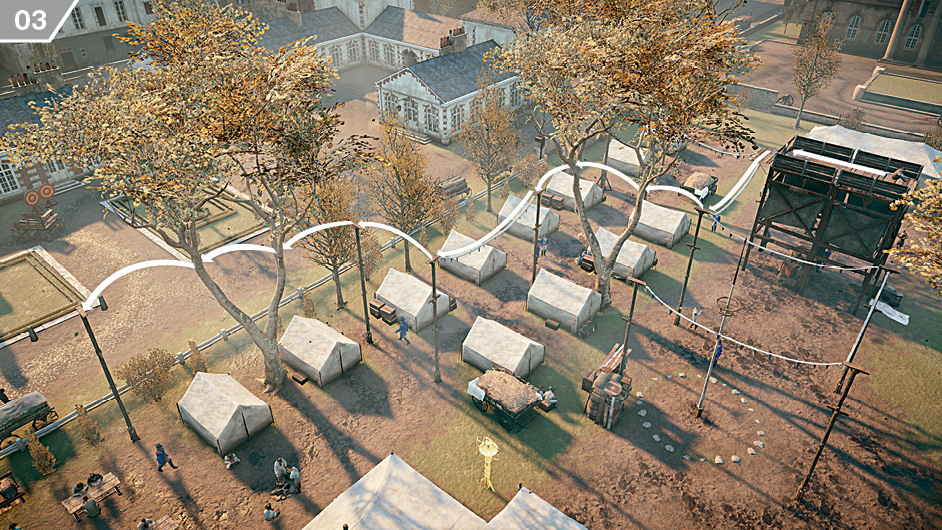
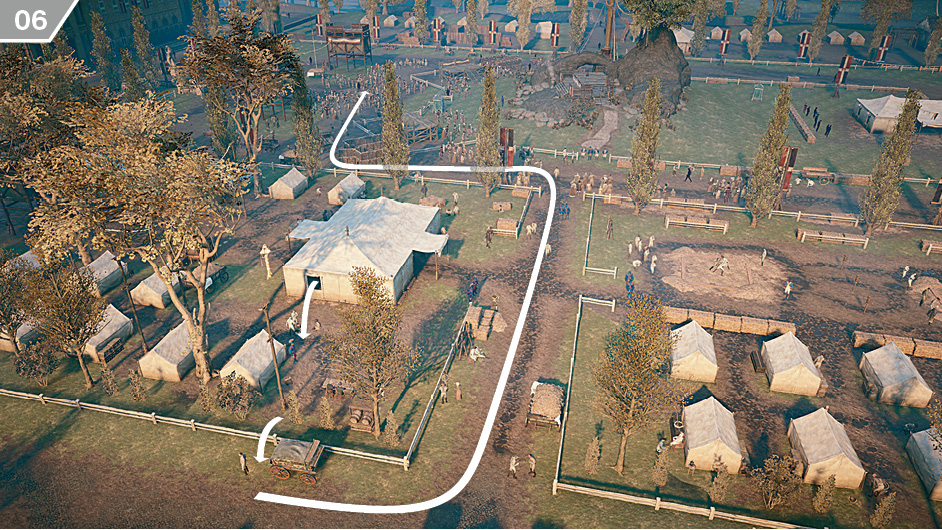
Follow the route shown here, jumping through the upper branches of the trees, to reach a position above an Officer.
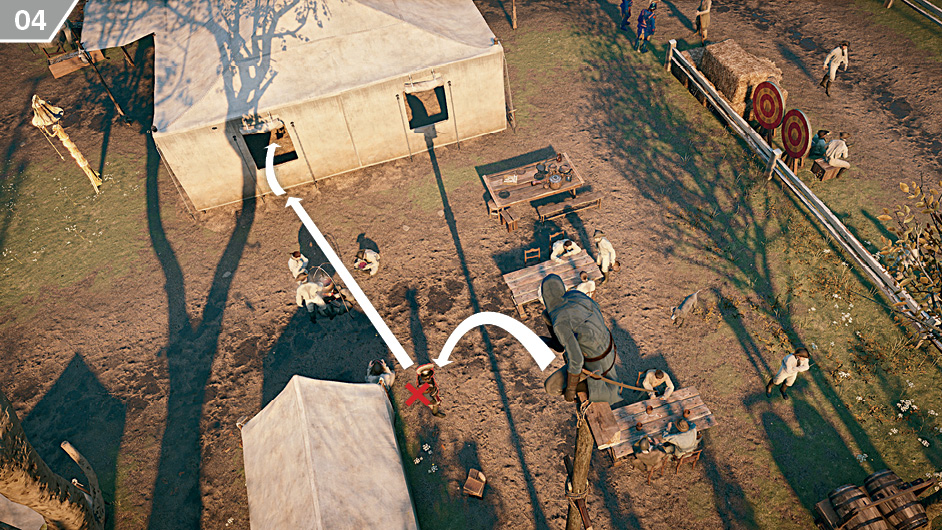
Air assassinate the Officer below your position, then enter Robespierre’s tent via either window.
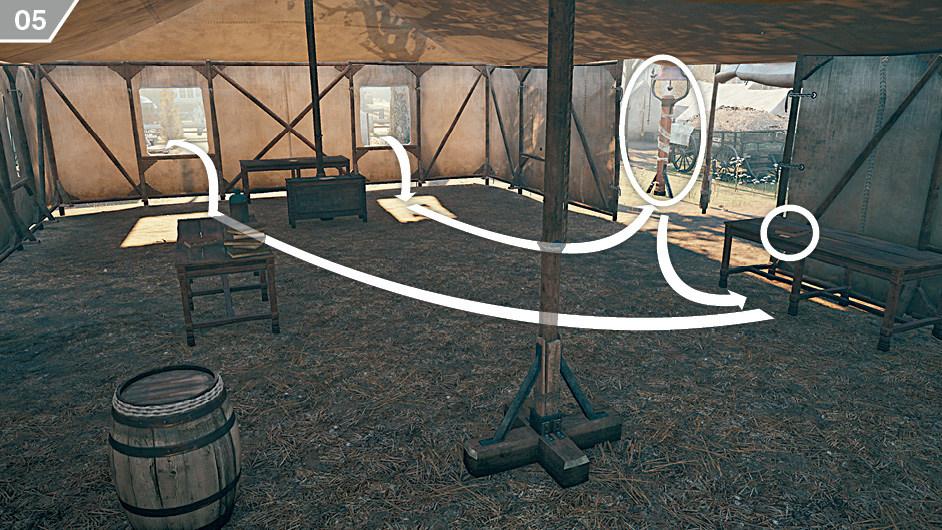
After ensuring that no one is looking Arno’s way, activate Stealth Mode and briefly exit the tent to disable the alarm bell (for the first Challenge), then reenter it immediately. Press  /
/ to collect the required evidence on the marked table, then leave the tent via either window.
Vault over the fence to leave the Restricted Area. Return to Élise at the waypoint to advance the story.
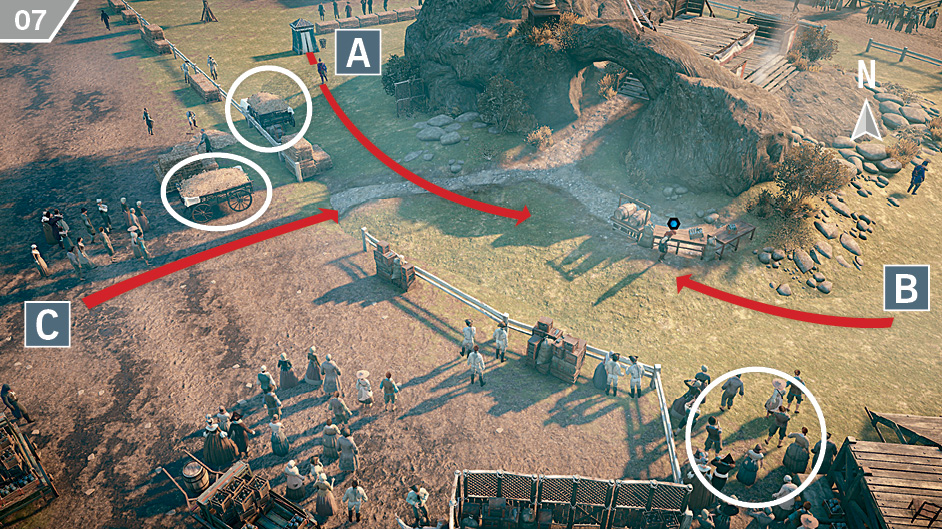
After the cinematic, the next set-piece in this Memory requires Arno to eliminate marked targets before they reach Élise. There is also a Challenge linked specifically to this event. The trick to completing this section with ease is advance knowledge of where the individuals that you must neutralize arrive from. The first guardsman walks in from position  . Hide in the hay cart and stab him from behind, then repeat this with the target at
  by Blending in the nearby crowd. With that accomplished, make a dash for the hay cart close to where two guardsmen arrive from location
  . Stay out of sight, let them walk past you, then perform a double assassination once you get behind them. Walk out of the Restricted Area and reconvene with Élise at the waypoint to advance the story.
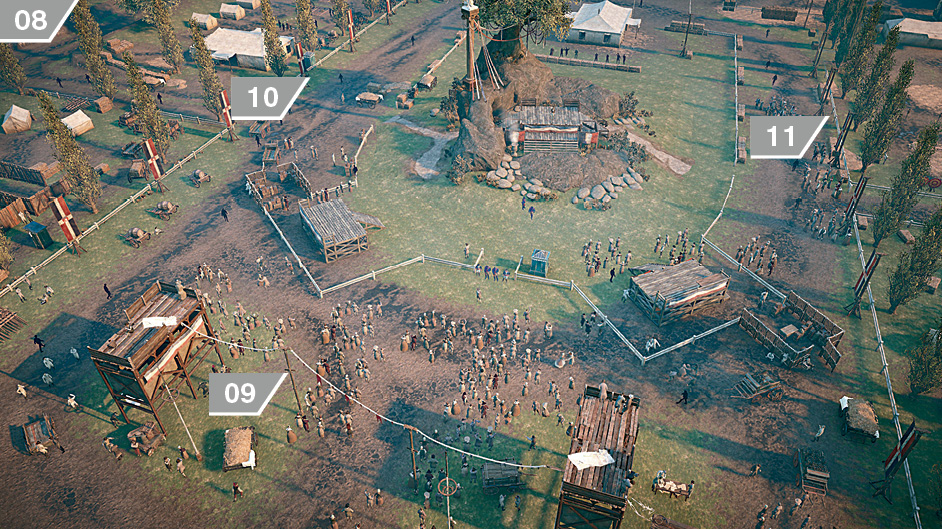
The final task of this Memory is to plant Robespierre’s incriminating list of prospective guillotine appointments in the pockets of three marked individuals. This can be accomplished by holding  /
/ in close proximity. Naturally, each intended recipient is close to those who might wish Arno harm if they identify him. The above screenshot offers an overview of the three places that you must visit, with the particulars for each following in walkthrough entries
  ,
,  and
and  .
.
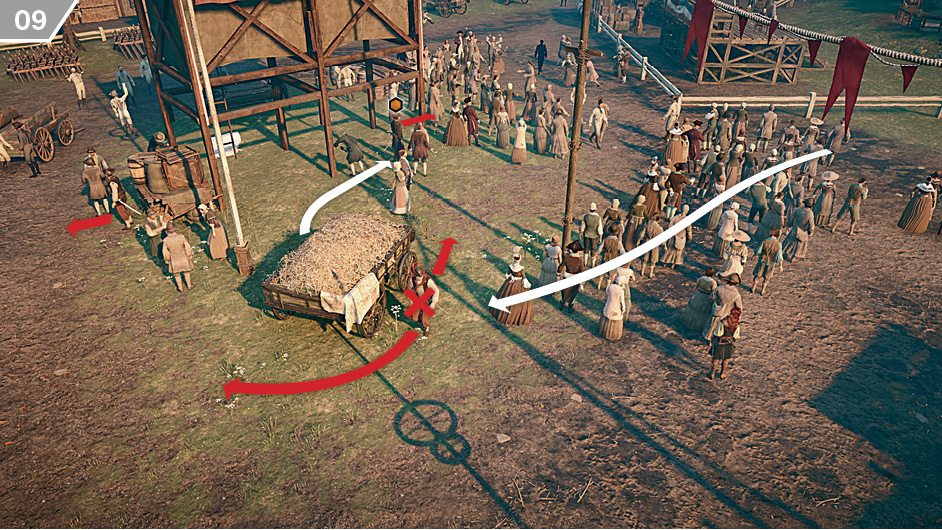
After the preceding cutscene, Arno is positioned a short walk from the first target. Blend with the crowds and approach the hay cart. When the patrolling Extremist faces away, jump inside and then perform a hiding-spot assassination when he returns. You can then hop out and plant the list on the marked citizen; the two stationary Extremists will not trouble you unless you move into their direct line of sight.
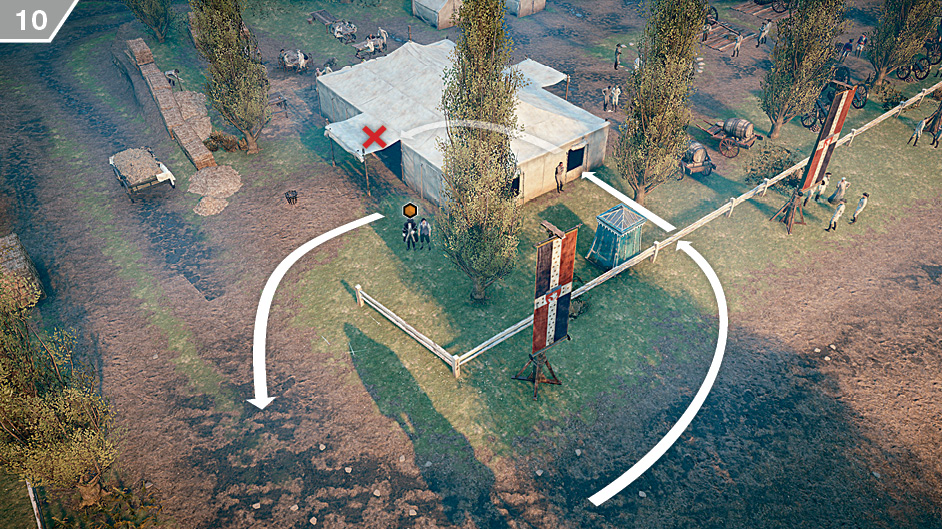
The second target is just inside a Restricted Area. Jump through the window at the back of the tent just behind him and then incapacitate the guard directly behind the list recipient. You can then plant the document and walk out of the Restricted Area.
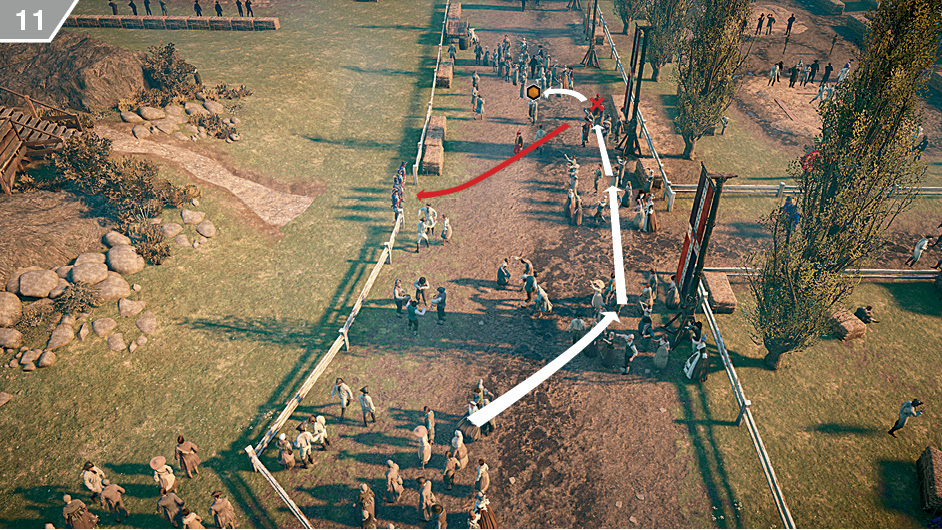
There are two Extremists and numerous blue-coated guards close to the final target. One solution is to initiate a faction fight when an Extremist approaches the four guardsmen: a Phantom Blade fired at a blue-clad soldier will trigger a conflict that usually draws all complicated NPCs out of the area. An equally valid approach is to use Blend assassinations. Hit the first Extremist at the position marked with an X, then wait for his companion to approach to investigate the corpse before you strike for a second time. You can then quickly plant the document and move through the crowds before the bodies are noticed.
 Memory 02/“The Fall Of Robespierre”
Mission OverviewChallenges■Don’t get into conflict: see ■Lockpick one door: see Notes & Further Reading■You must have the Master Locksmith skill (and, unless gifted with almost preternaturally precise reflexes, a plentiful supply of lockpicks) to complete the second Challenge in this Memory. If picking the most advanced locks is not your forte, you may wish to equip a belt (Character Customization |
 .
. .
. Gear Loadout
 Waist) that increases Arno’s maximum Lockpick capacity.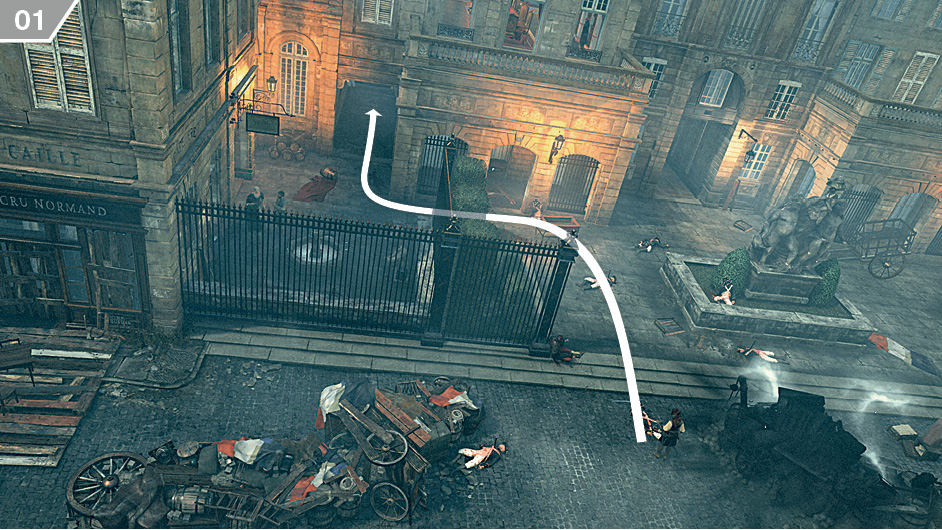
Follow Élise until you reach a green investigation zone, then enter the alleyway as illustrated above to find a survivor. Interact with him to advance the story.
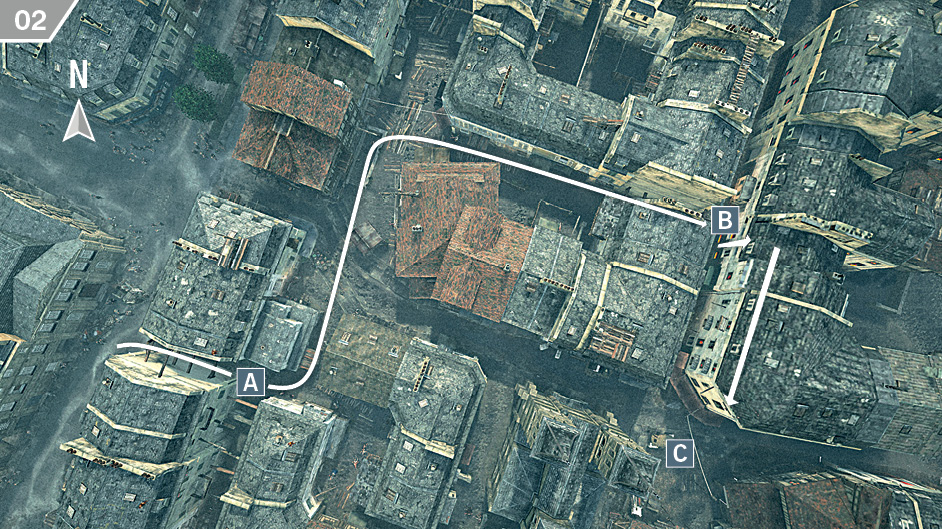
In this next stage of the Memory you need to explore the giant investigation zone to locate additional survivors, with their directions enabling you to narrow down Robespierre’s position. The above map illustrates the easiest path to follow. The survivor at  is a short walk over the street and through an alleyway from Arno’s start position, though you should quickly check for a nearby Extremist patrol to your right before you set off. The route to the second survivor at
  is clear of hostiles if you stay at ground level; after you approach him, the investigation zone narrows to a small circle. Robespierre is located at position
  , but don’t approach him just yet: beforehand, climb to the roof of the building across the street from the second survivor.
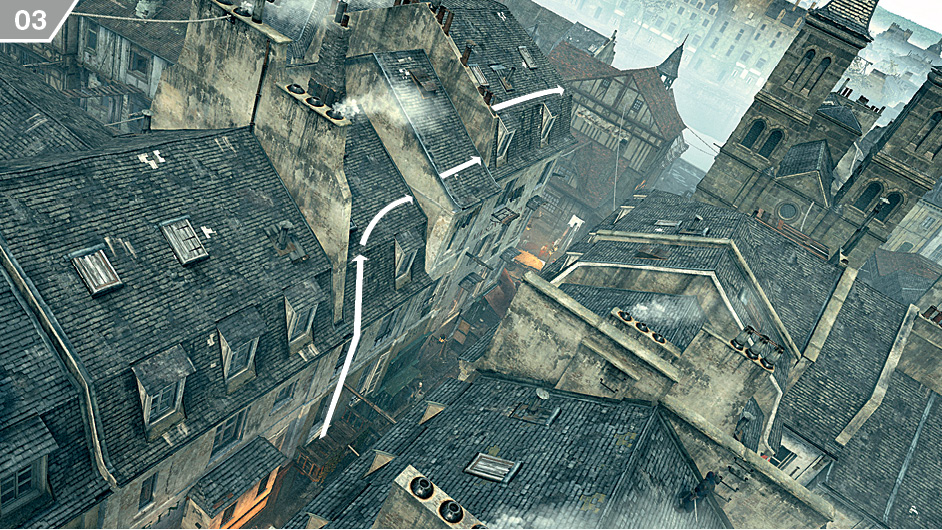
From the rooftop, sprint to the south and look down at the intersection to identify Robespierre, as illustrated here. He will break into a run and head in the direction of Hôtel de Ville. This event triggers a new Challenge, to avoid conflict, which lasts for the rest of the Memory. You can reduce the difficulty of the chase by broadly ignoring Robespierre’s movements below as you follow a set route to the destination.
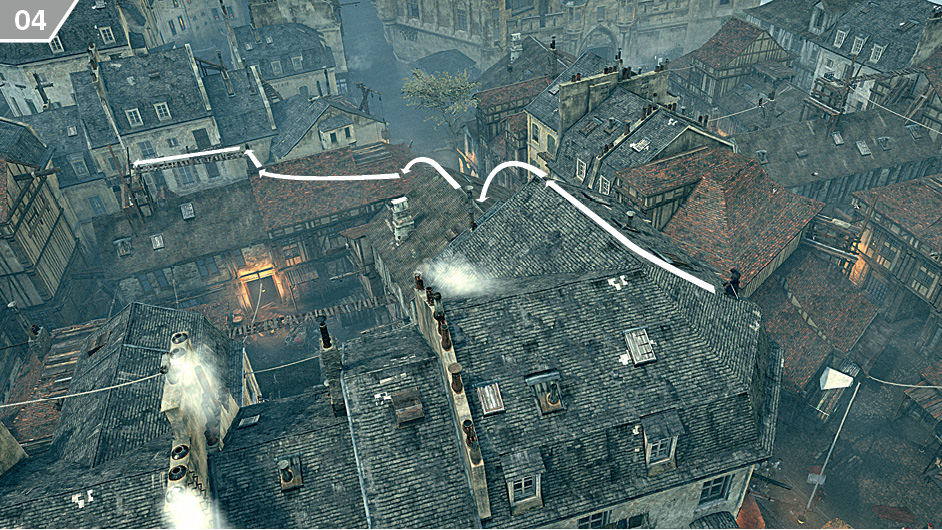
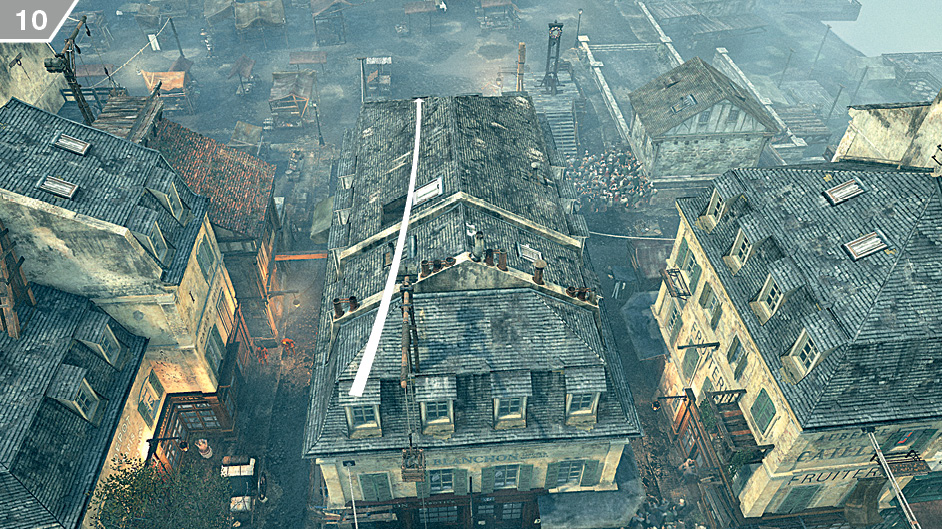
During the initial part of the route, simply free run towards the east, then north, remaining on the rooftops at all times until you reach the wooden boardwalk between the chimneys, as illustrated above.
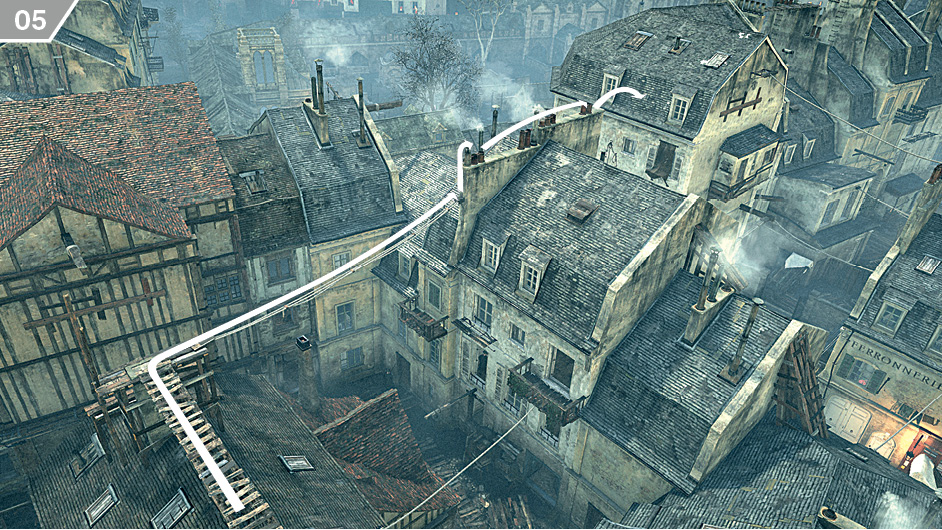
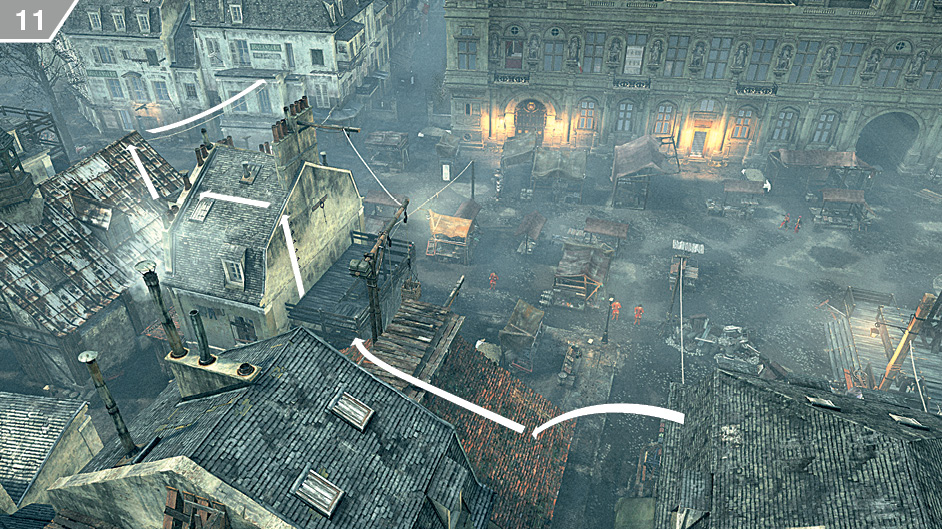
Turn right as you reach the end of the wooden boardwalk, then free run over the rope and chimneys. Robespierre’s winding path through the streets and alleyways will bring him closer to your position as you reach this stage of the chase.
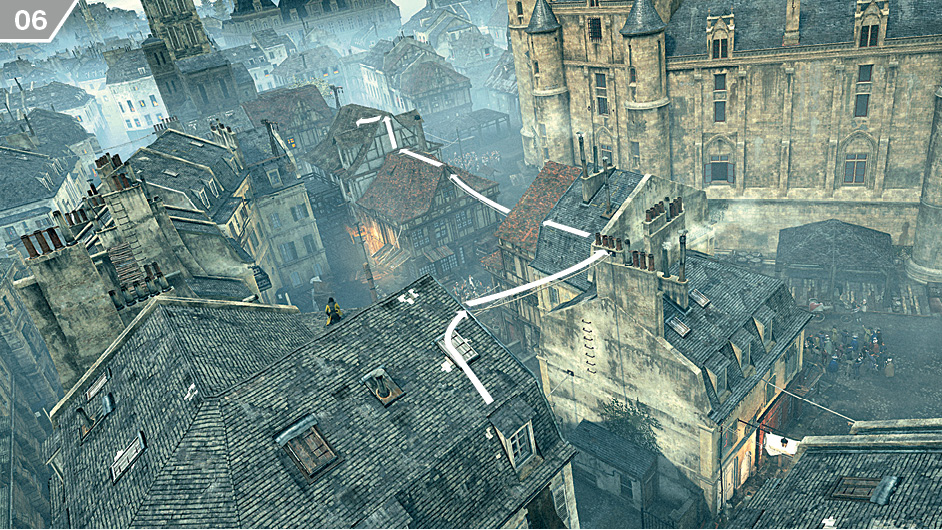
Use the ropes between buildings to make easy progress here. If you are doing well, Robespierre should be almost directly below you at this stage.
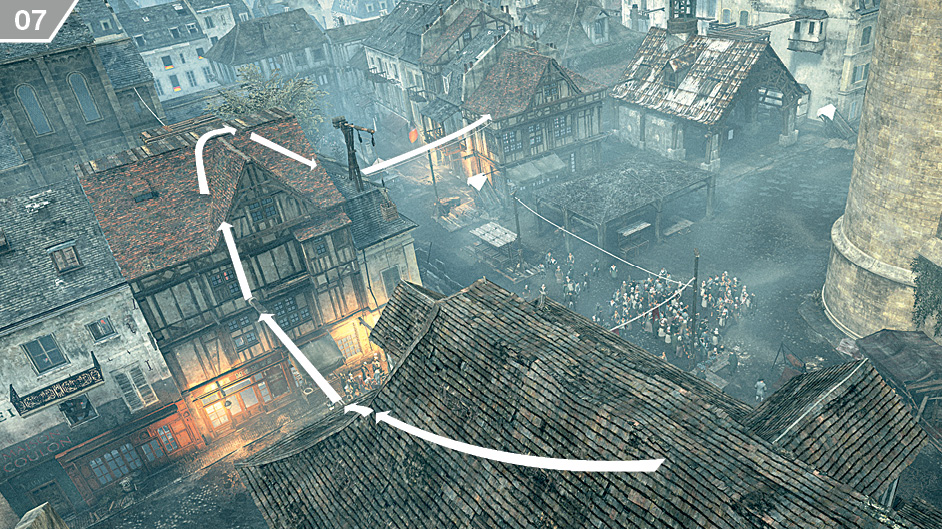
Be careful in the way that you approach the ropes spanning the street: they are quite a way down from the top of the roof when you arrive, so drop down carefully before you jump.
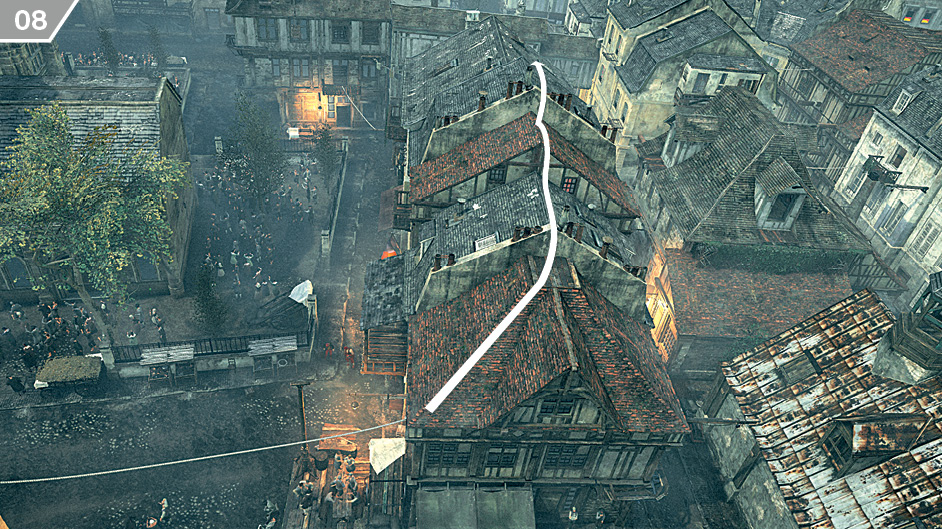
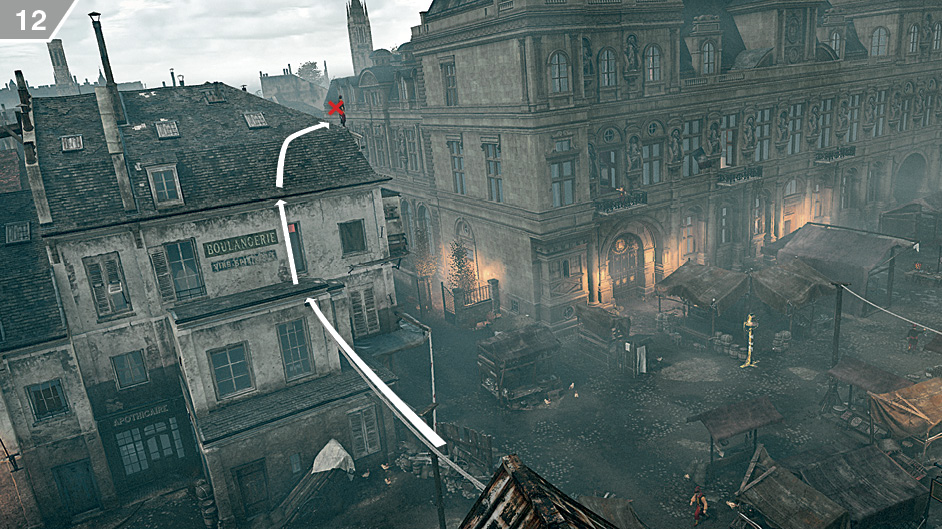
This section is entirely straightforward, with the end quite literally in sight: the Hôtel de Ville will loom large in your view as you sprint and vault over this stretch of rooftops.
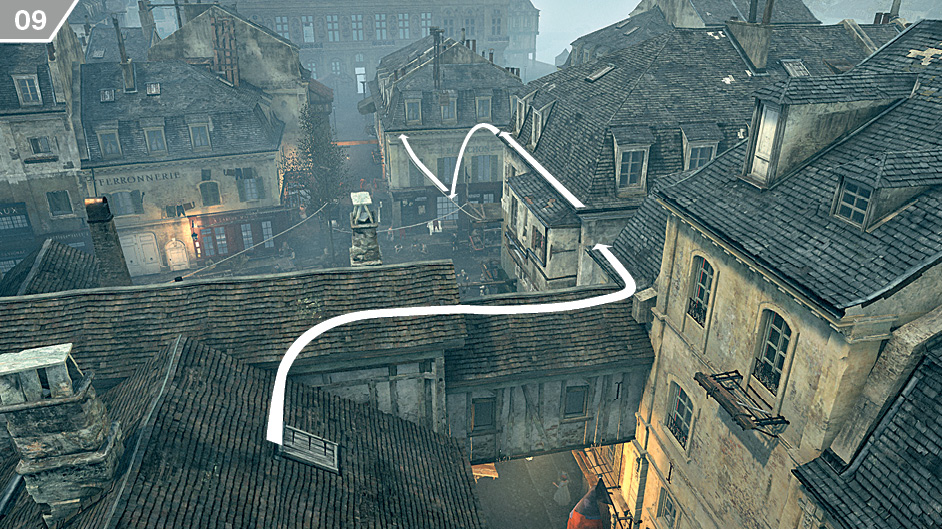
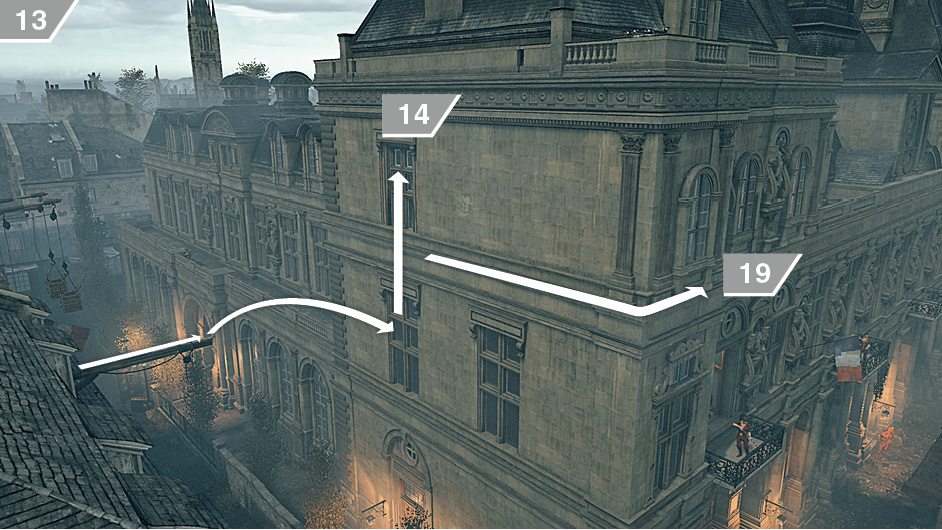
Run along the outer ledge of the building on the right; when you reach the end, by the far window, there’s an easy jump down to the rope below.
When you reach the end of this rooftop, a short cinematic is triggered before the final stage of the Memory begins.
The area in front of Hôtel de Ville is populated by numerous Extremists, including a trio of snipers on the upper balconies overlooking the most obvious approach. Follow this conflict-free route from your start position to begin your infiltration.
Cross the rope and sneak up behind the sniper on the rooftop to perform a quiet Hidden Blade kill.
From the wooden beam, leap to the window. At this stage, you have a choice. If you are determined to complete both Challenges and are prepared for the difficult exercise in lockpicking that is required to do so, climb up and continue to entry  . If you are ambivalent about the Challenges or have yet to master the art of unlocking three-chamber locks, traverse to the right and skip to the alternative infiltration strategy that begins at entry
  .
.
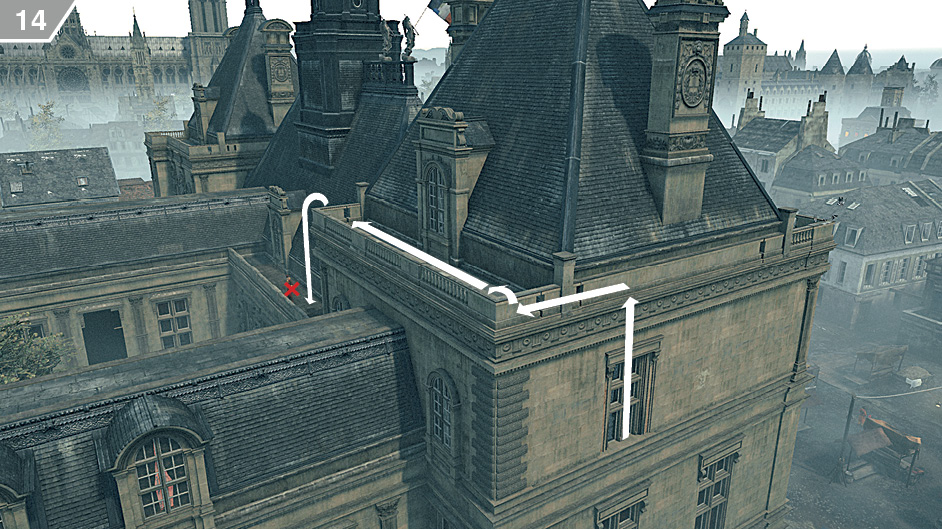
Climb to the balcony and move to the opposite side of it. There is a sniper below; jump down to that lower balcony and stab him from behind or dispatch him with a Phantom Blade headshot.
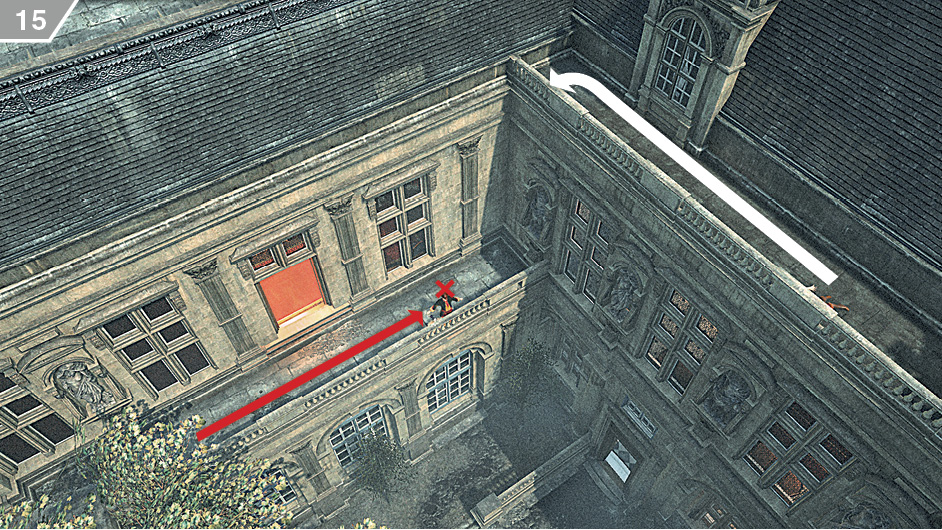
Staying out of sight behind the balustrade, watch the guard patrolling outside the open window. When he reaches the position marked on the above screenshot, perform an air assassination.
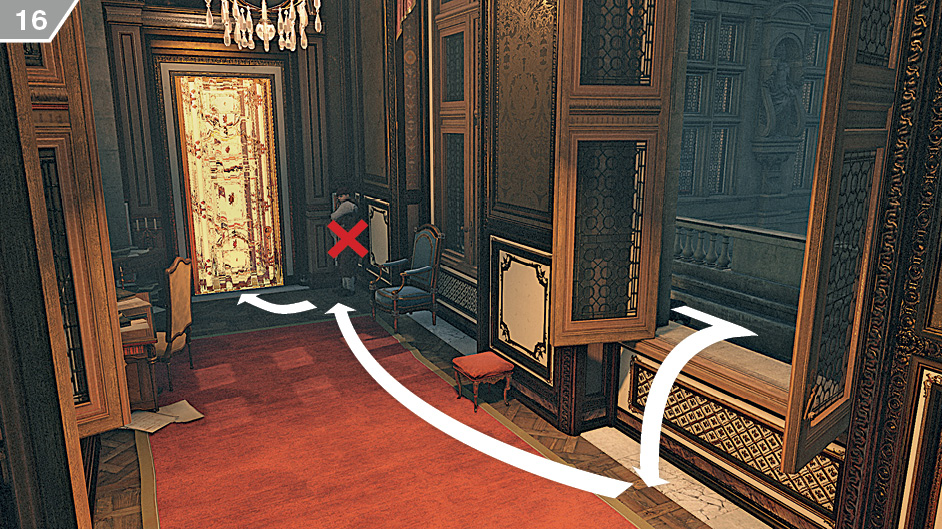
Be careful as you vault through the open window: there is a Brute to the right of the locked door. However, he will not see you unless you move into his direct field of vision. Quickly creeping towards him, staying close to the furniture, will enable you to perform a Hidden Blade kill just before he detects Arno. You can then pick the lock. In the event that your attempts at opening the door go terribly awry, leaving you without lockpicks and no means to acquire more, you can backtrack to the outer wall of the building and follow the alternative approach that begins at entry  .
.
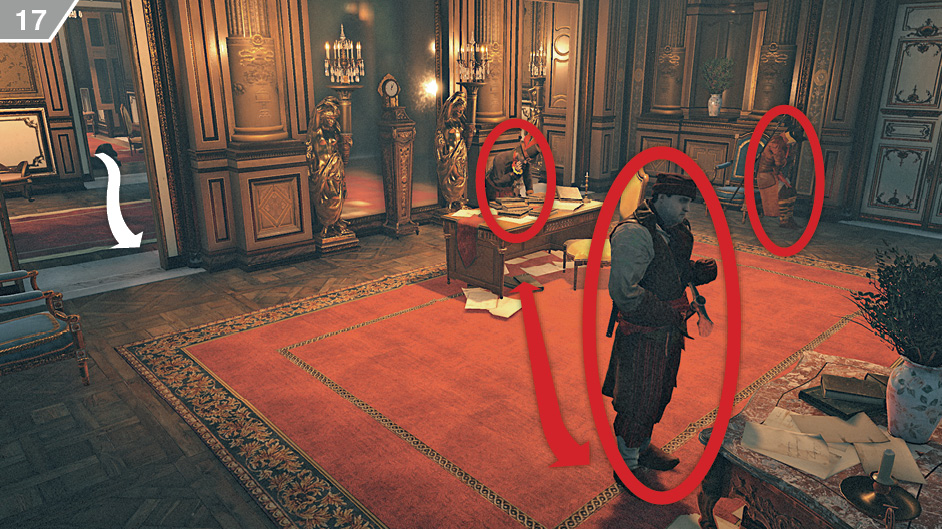
There are three Extremists in the adjoining room that block the approach to the shining double doors that lead to the Memory’s closing cutscene. Unless they are disturbed, only the Brute moves, and his short patrol (and its all-important pauses) is easy to memorize. It is possible to eliminate all three with Phantom Blade headshots from the doorway, starting with the Extremist at the desk, followed by the dozing Defender by the double doors, and concluding with the Brute before he turns around. Once you interact with the double doors, you complete the Memory.
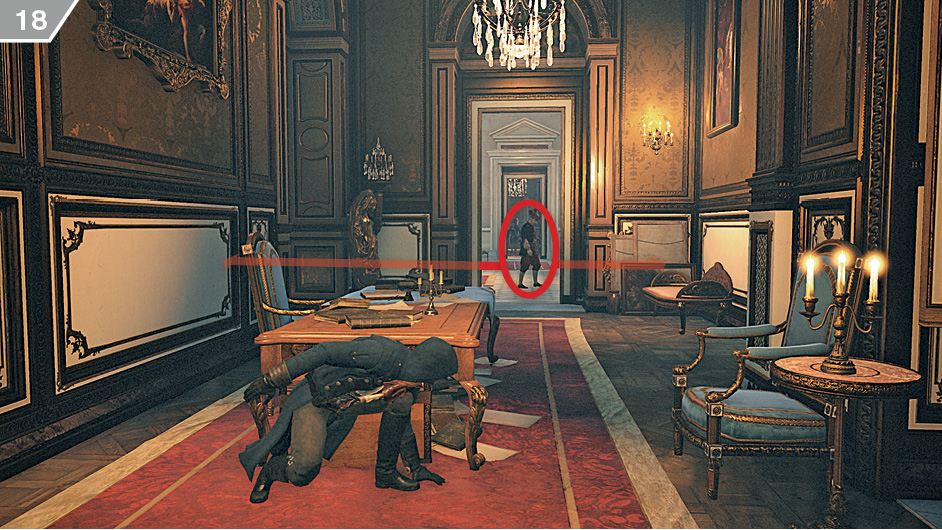
Another approach is to use a Berserk Blade to draw the three Extremists away from the double doors that lead to Robespierre. There is an Extremist who regularly walks past the door shown above – to your right as you go through the door you lockpicked. If you hit him with a Berserk Blade from cover behind the table (a snap-shot with  /
/ is the easiest way), the trio of Extremists that block your route to Robespierre will often leave their positions to join the melee. Make a dash for the double doors when you espy an opportunity with Eagle Vision.
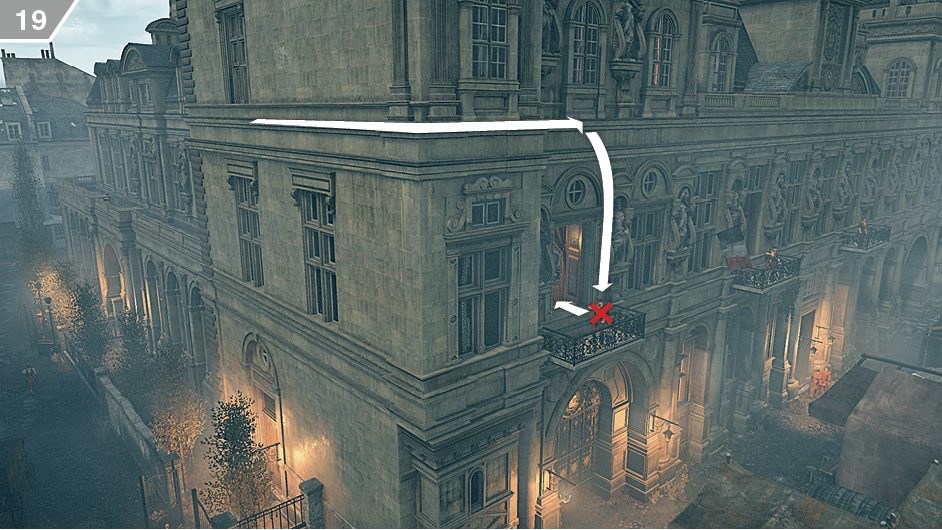
ALTERNATIVE INFILTRATION STRATEGY: If you have no patience for difficult lockpicking exercises, have yet to unlock the requisite skills, or have unfortunately arrived here fuming with pockets full of broken picks, worry not: entering via the route we’ll detail here leads to an easy conclusion of the Memory. From the outer wall of the building, traverse to the right until you reach a position above the sniper on the first balcony. Adjust the camera to highlight the Extremist, then perform an air assassination and vault through the open window.
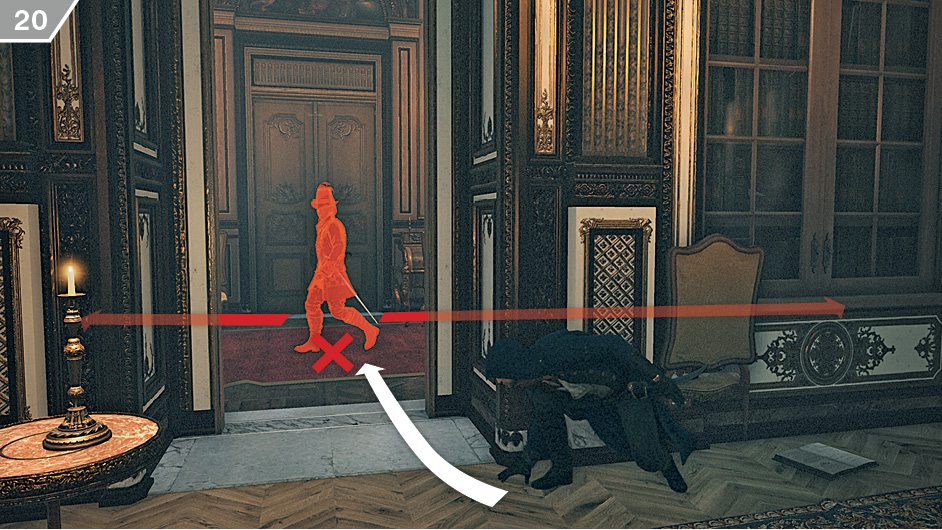
Lock to cover at the right side of the door opposite your point of entry. When a Seeker walks past to the left, sneak up behind him and strike with the Hidden Blade.
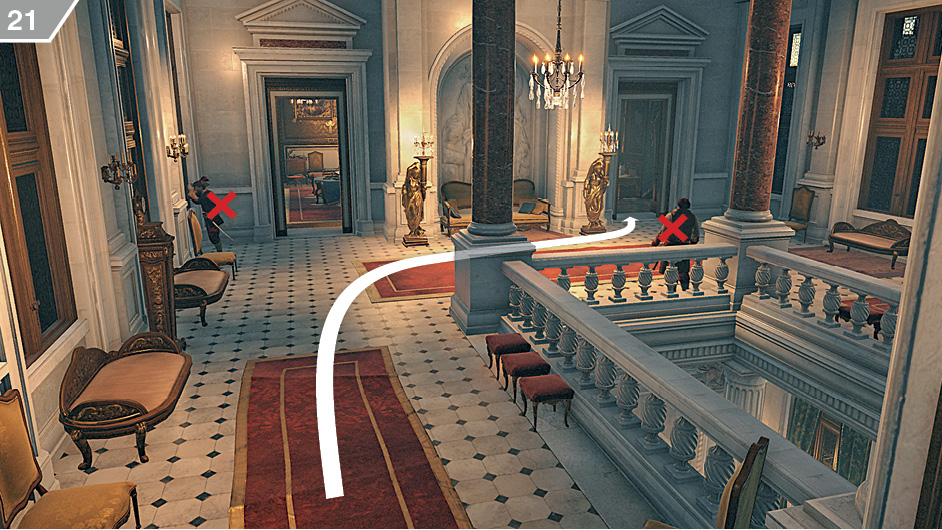
Turn around and walk to the doorway. The next step is to eliminate the two Extremists in the room beyond. The man on patrol and stationary Brute represent easy Phantom Blade kills, especially if you wait until the former moves to the far left of his default route, as shown here. You can then head towards the door on the right-hand side.
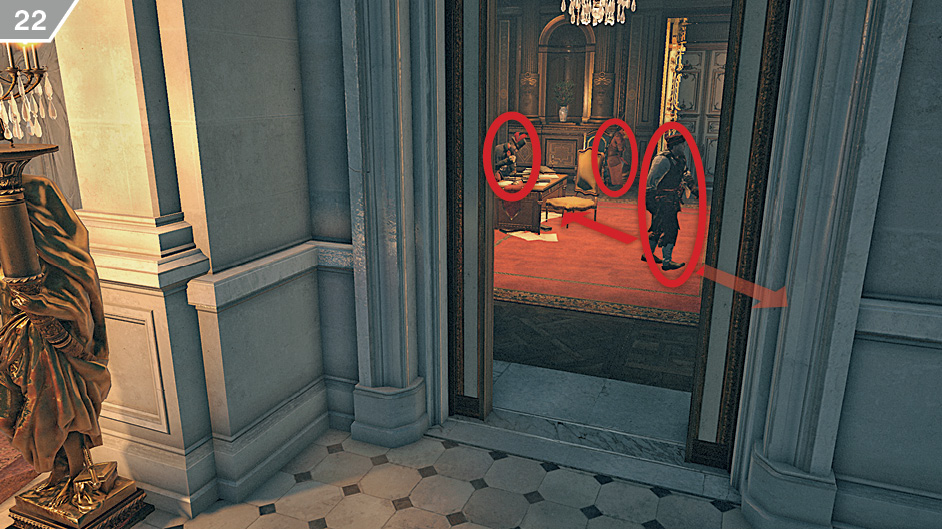
The final step is to eliminate the three Extremists guarding the double doors that lead to Robespierre. The easiest way is with Phantom Blade kills; start with the Brute when he moves to the right and faces away, then pick off his companions when they move to investigate. Once the coast is clear, interact with the glowing doors to trigger the Memory’s closing cutscene.
 Memory 03/“The Temple”
Mission OverviewChallenges■Three double air assassinations: see ■ Two alarm bells sabotaged: see Notes & Further Reading■This is one of the most difficult missions in the entire game. With an intimidating number of high-level Extremists occupying the area, a frontal approach is suicidal. Your only option is to use stealth, especially if you plan to complete the Challenges. ■ To increase your chances, be sure to bring a full stock of consumables, and equip your best weapons and gear. Having an increased Phantom Blade capacity and a large health bar thanks to the Iron Skin skill and dedicated pieces of equipment is heartily recommended. You should also select the Assassin Cache active skill to regularly top up your stocks of Phantom Blades. |
 .
. .
.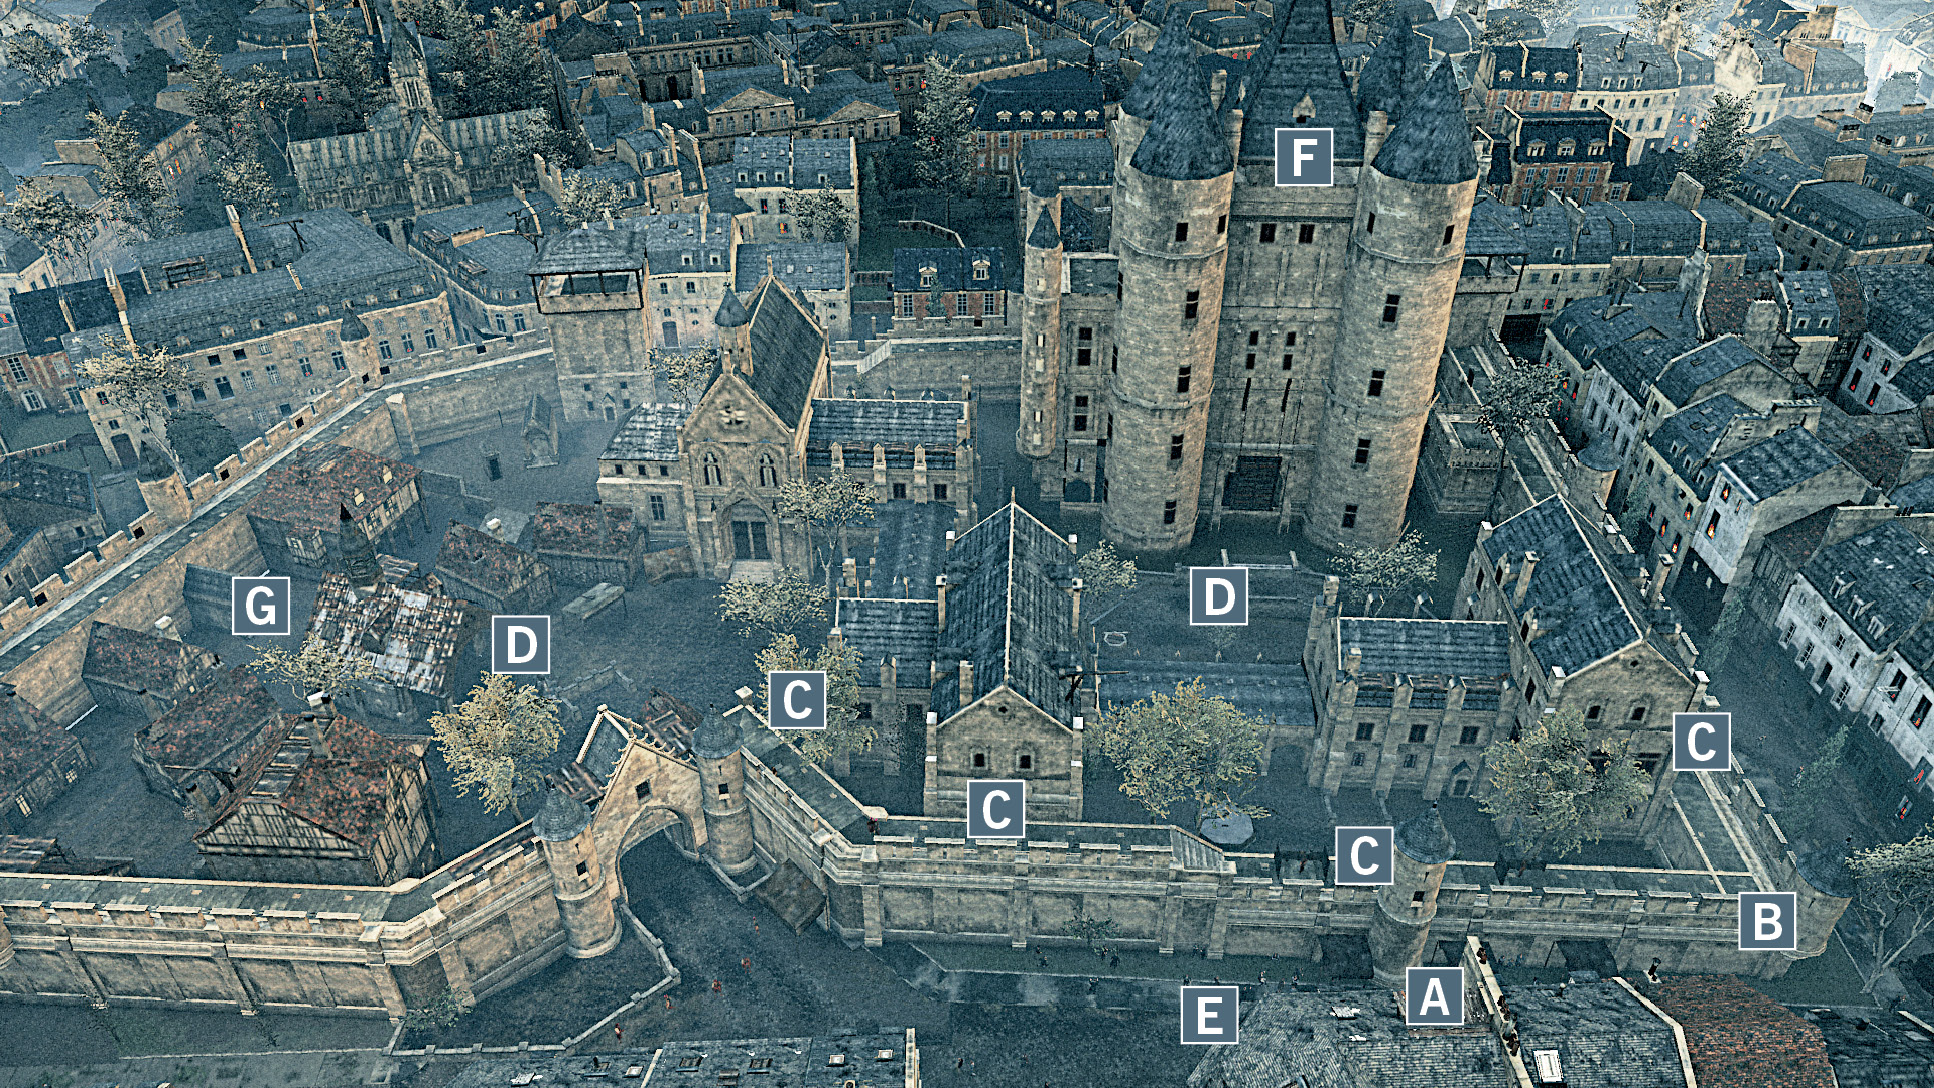
 Arno’s start position.
 The fortress’s corner, to your right when you begin this mission, is an excellent point of entry for a stealth infiltration, and it offers a convenient way to complete both Challenges.
 We have marked four double assassination opportunities here, and we describe them in the walkthrough that follows. You only need three for the related Challenge, but this way you have a “second chance” if one of the other attempts is less than successful.
 The two alarm bells are found in these positions. Given the number of Extremists in their vicinity, you will need to eliminate practically every living being within potential detection radius, starting with the rooftop snipers, to be able to sabotage them.
 If you run out of consumables at any point during the infiltration, you can make a quick detour to this shop to restock. This is especially useful for Phantom Blades, which you will need in large quantities.
 Germain awaits at the top of the central tower. You have to stab him once to trigger the next step of the mission.
 Once you defeat Germain, he flees underground. This is the catacomb entrance you need to use to track him down.
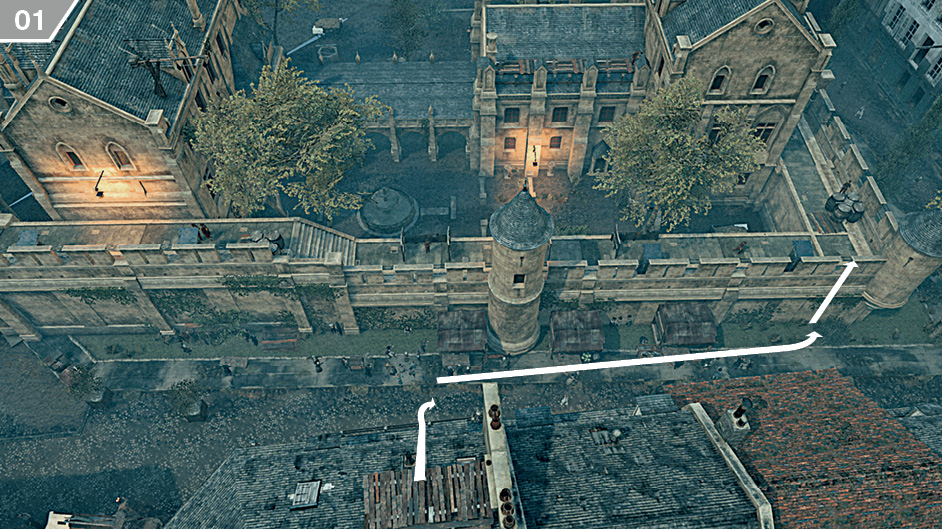
From your start position, drop down at street level and head towards the small tower to your right. After ensuring that there are no Extremists patrolling nearby, climb the wall and stop when you reach the top.
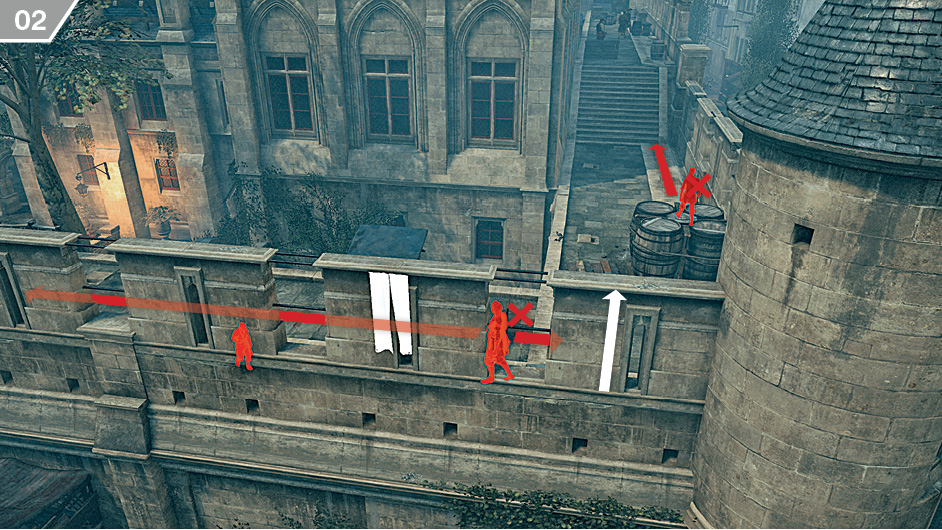
Activate Eagle Vision to identify the two snipers who patrol in this corner. When they both face away from you, climb on top of the wall and take them both down in turn with a Phantom Blade headshot.
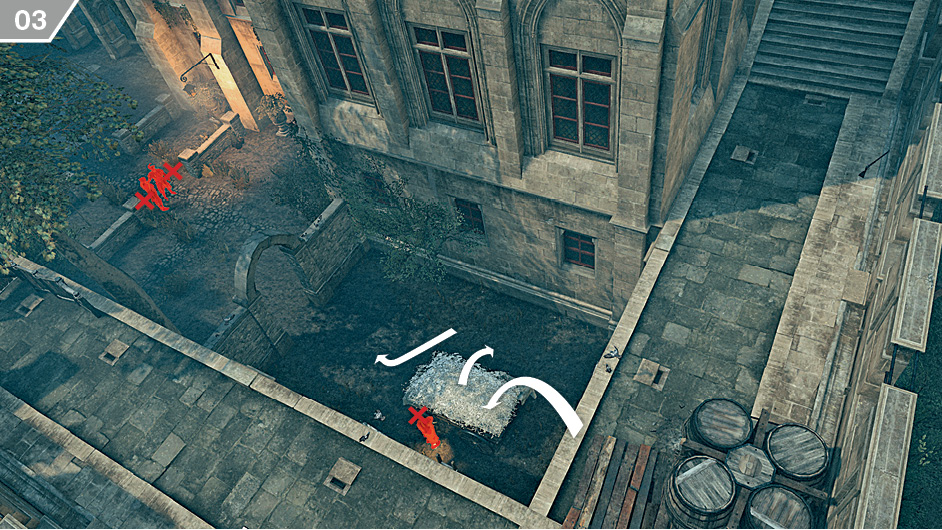
Dive into the hay cart and eliminate the Brute with a hiding-spot assassination. Exit the cart and carefully position Arno in front of it when no one is looking. If a sniper notices you, immediately step back. From this position, pick off the two Extremists in the adjacent courtyard with clean headshots. You can now climb back up to your initial position via the ladder.
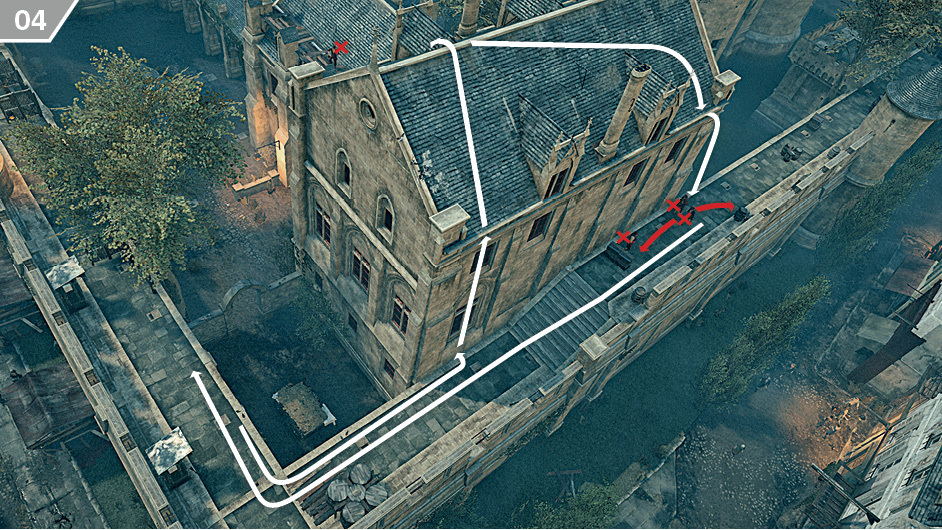
After ensuring that no one is looking your way, climb the building’s wall as shown here. Wait until the sniper on the rooftop below your position faces away, then take him down with a headshot. If he spots you, hide behind the chimney or any other obstacle. Once he’s dead, turn around and move to the western corner of the building. When the two patrolling Extremists walk away, pick off the Brute below your position. The two prowling soldiers will come to investigate: stand just above them and, when they are both highlighted with a red glow, double air assassinate them to start working towards the related Challenge. You can now return to the corner where you infiltrated the fortress.
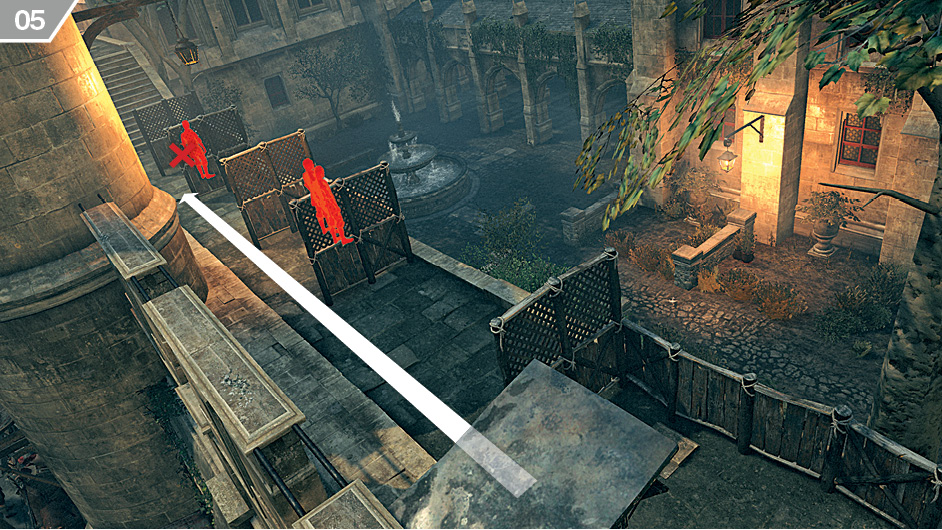
With Stealth Mode activated, walk to the lone sentry and quietly stab him from behind, ignoring the pair of snipers on the way.
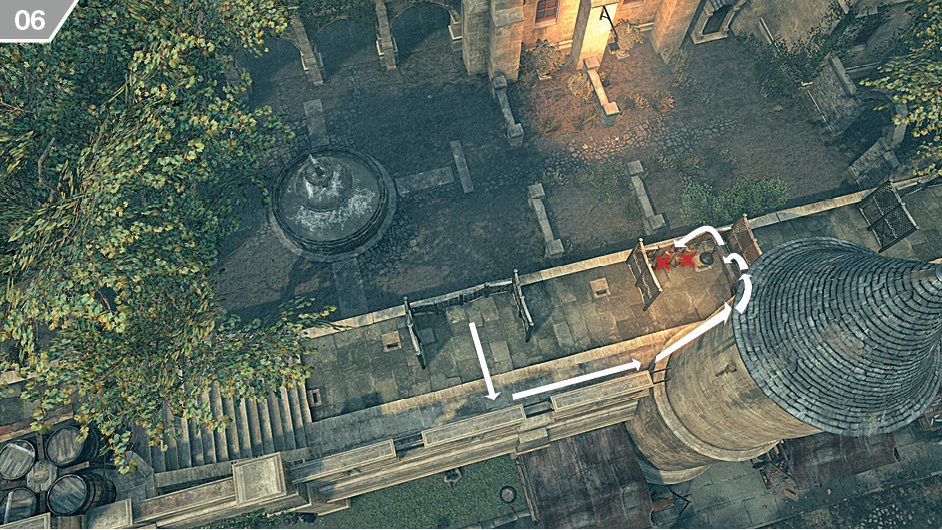
Retrace your steps towards the small tower you just passed and traverse along its roof. Now drop down on the wooden beam. From here, you have a second easy double air assassination opportunity. If you are running short of Phantom Blades, start using the Assassin Cache skill regularly, or make a quick dash to the nearby shop, just behind the tower.
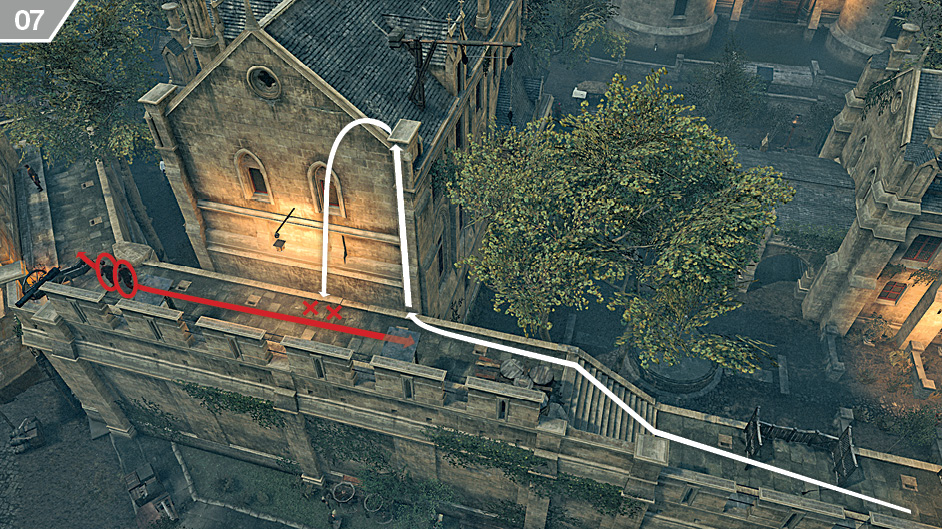
From the tower, identify the two Extremists who patrol to the northeast. Walk towards them in Stealth Mode and climb to the building’s rooftop when they walk away from you. Wait until they come back below Arno and eliminate them with a third double air assassination. If everything went according to plan so far, you should have completed the first Challenge.
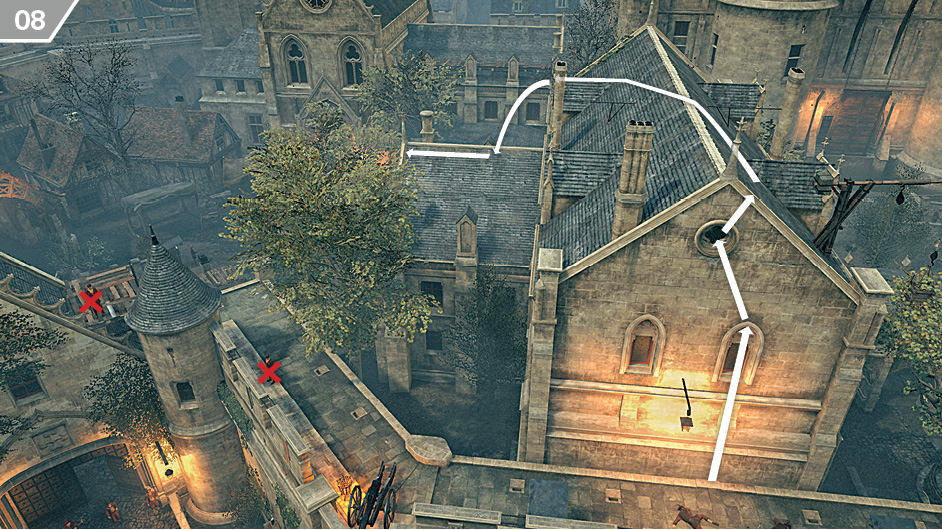
Climb back to the rooftop of the same building. Run to the end of the “L” that it forms. From here, you can quietly pick off two snipers with clean headshots.
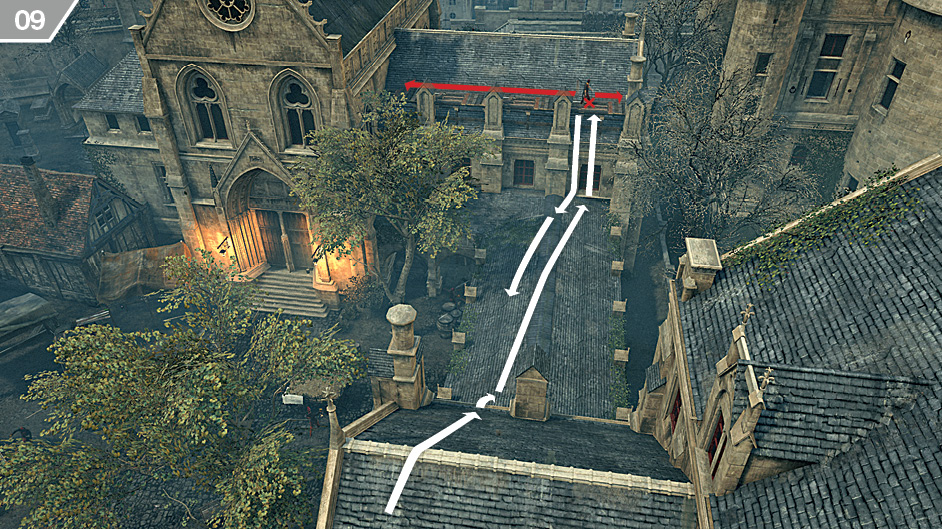
From the L-shaped building, identify the sniper to the southeast with Eagle Vision. The moment he turns sideways to walk towards the other end of his patrol route, sprint across the low rooftop that forms a “bridge” between the L-shaped building and the sniper’s platform. Climb below his position and perform a ledge assassination. You can now return to the low rooftop, where you are safe and effectively invisible to all Extremists in the vicinity.
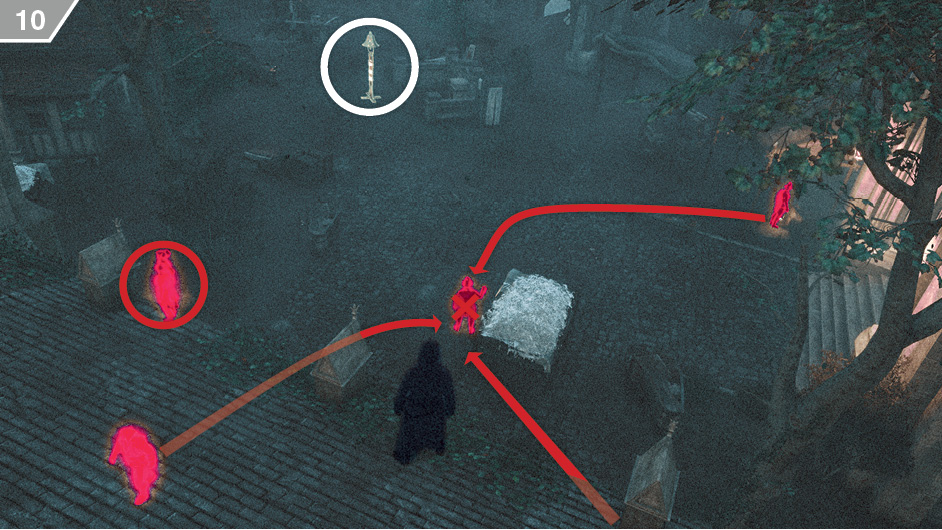
While standing on the low rooftop, turn northeast and wait until an Extremist who patrols around the nearby tree makes a stop by the hay cart, as shown above. Snipe him with a Phantom Blade headshot, which should gradually draw most Extremists in the area towards the body. Pick them off one by one with maximum accuracy: any missed headshot will raise the alarm. Consider leaving the pair highlighted on our screenshot alive if you haven’t yet completed the first Challenge: they can easily be double air assassinated from the rooftop of the L-shaped building. Once all targets are dead, you can sabotage the nearby alarm bell (circled on our screenshot) before returning to the opposite side of the low rooftop.
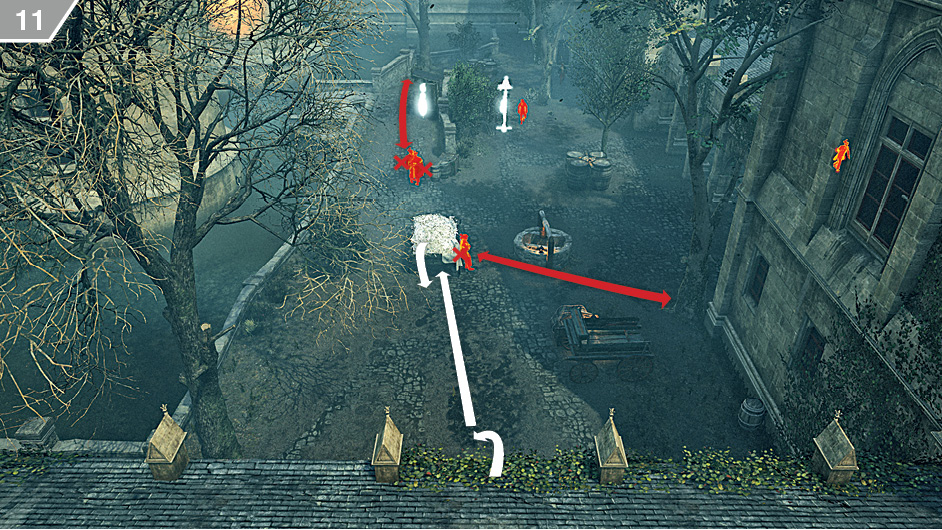
From your vantage point, identify all Extremists in the courtyard with Eagle Vision. Sneak into the hay cart when no one is looking and perform a hiding-spot assassination on the soldier who patrols between it and the nearby tree. Now exit the hay cart on the same side that you entered it, and eliminate the two Extremists who patrol along the wall. You can either snipe them with Phantom Blade headshots, or lure them to you one after the other with the Last Known Position feature for easy hiding-spot assassinations or cover kills.
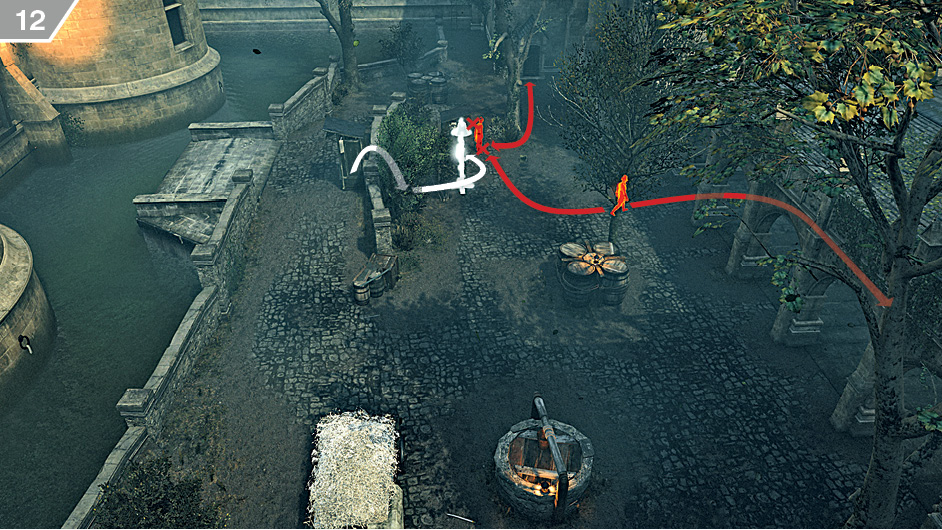
There should now be only two Extremists left in the area, and they both have a patrol route that takes them in front of the hiding place by the alarm bell. Walk along the wall as shown here, climb on the other side and hop into the hiding place while no one is looking. You can then perform two hiding-spot assassinations, making sure the second soldier has his back turned when you dispatch the first one. Sabotage the alarm bell when you’re done to fulfill the related Challenge.
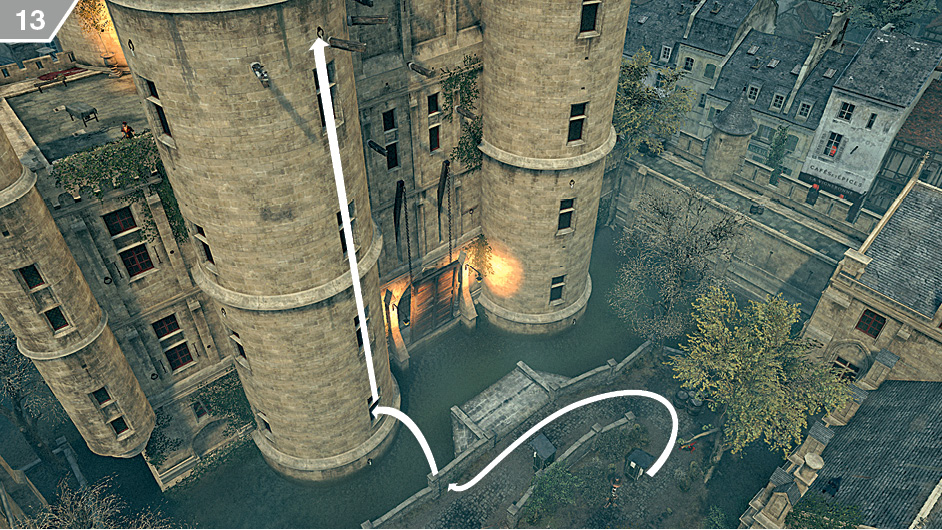
With no one to see you, you can now climb to the top of the Temple, as shown here.
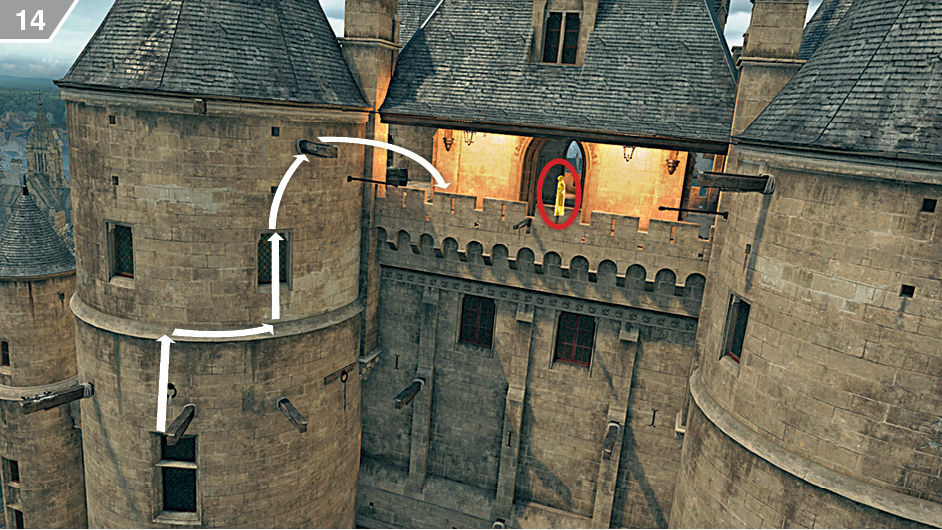
When you reach the top of the tower, traverse and jump towards the central platform, where Germain awaits.
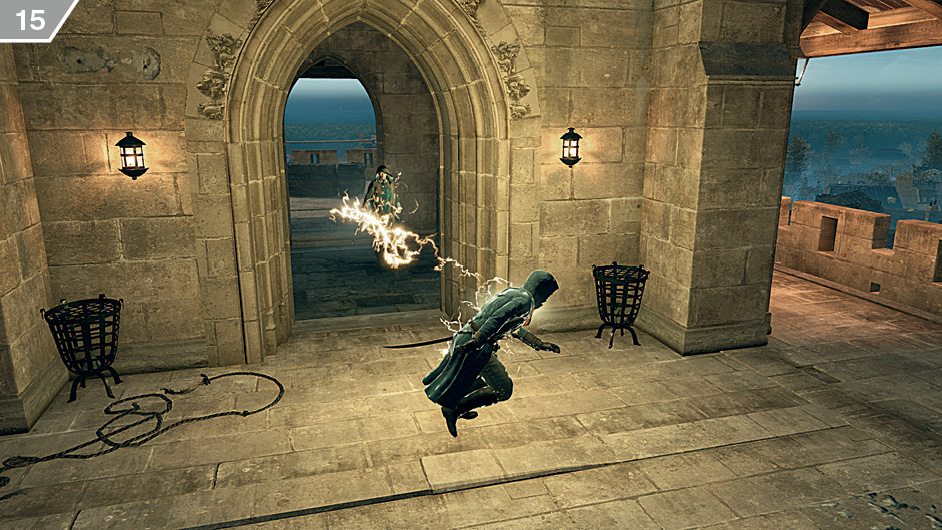
Germain always remains in the interior area of the tower. Your goal is to stab him with the Hidden Blade, as your ranged weapons are ineffective on him. Germain does his best to keep track of your movements, so a frontal approach is definitely not a good idea: the moment he spots you, he will use his Sword of Eden to hit you with a devastating lightning bolt, as illustrated here. If this happens, run to cover as quickly as possible to avoid certain death.
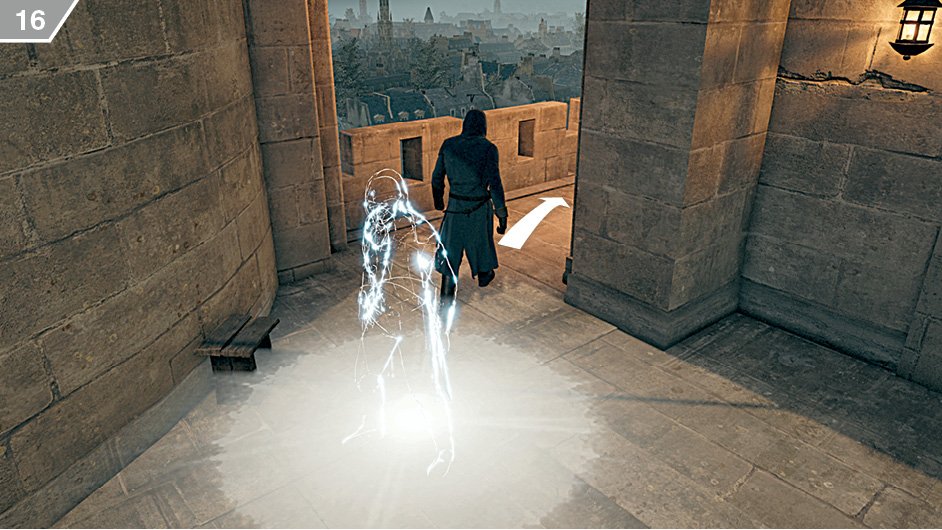
Though you have to be patient, avoid staying in the same place for too long, or else Germain will cast his second attack: a lightning bolt that strikes you from above. Whenever you notice sparkles around Arno and a glowing light at his feet, move away.
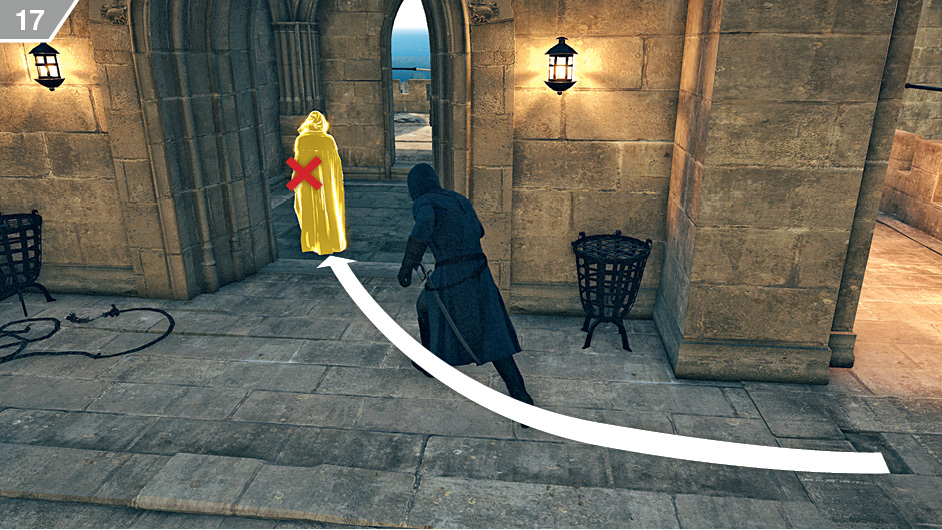
For a quick end to this confrontation, run around the tower in circles with Eagle Vision activated until you notice Germain is facing away from you. You can then move behind his back to stab him. If you struggle, feel free to throw Bombs to draw his attention away from you.
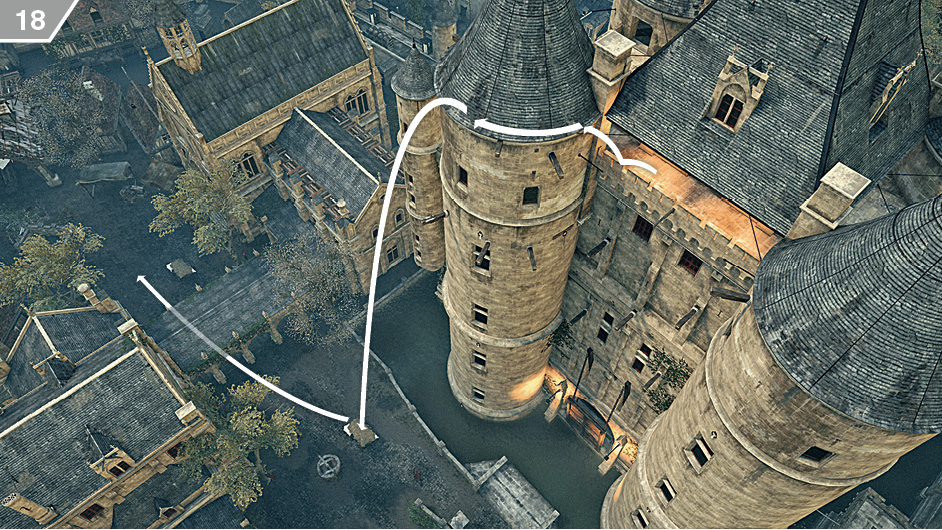
After the cutscene, climb back to the tower you used during your ascent, then dive into the hay cart down below with a Leap of Faith. You can now run through the arcades, toward the first alarm bell that you sabotaged during your infiltration.
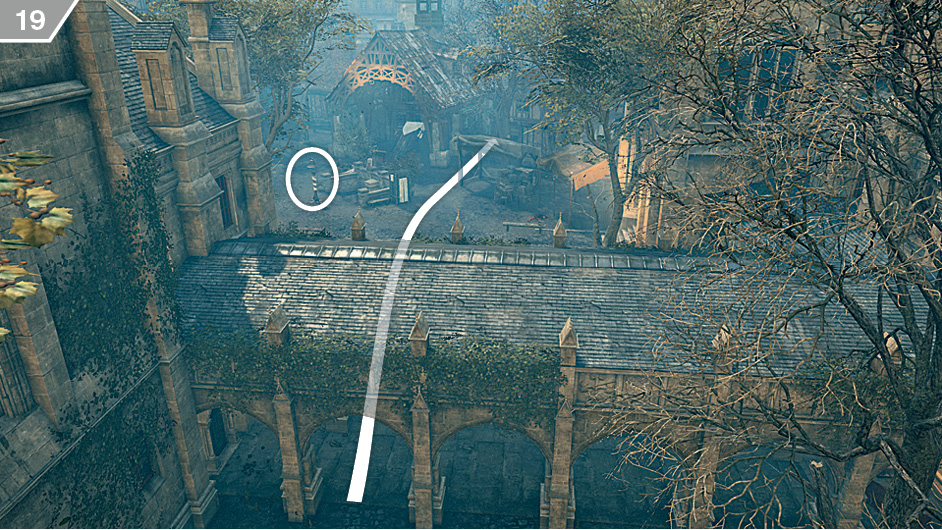
When you reach the alarm bell (circled here as a navigational aid), head towards the small alleyway to the right of the large wooden canopy structure.
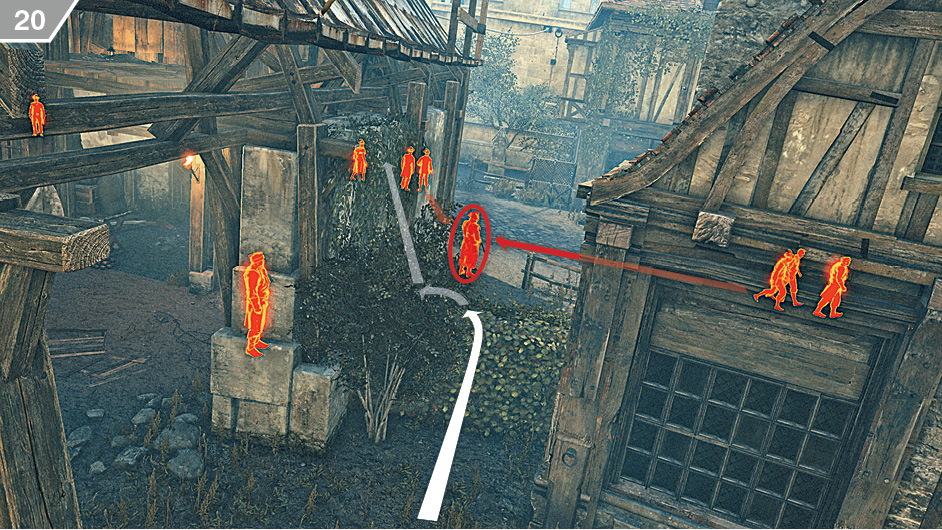
Climb on top of the small stone wall in the alleyway, and from here shoot a Berserk Blade at the Defender who is conveniently positioned on the other side. He will draw all nearby Extremists to him, leaving the entrance to the catacombs that you have to go through completely unattended. Though you could kill all enemies using Poison Gas Bombs and Phantom Blades, there really is no reason to do so. Simply sprint through the entrance, ignoring all Extremists on the way. Even if some notice you, they will not have the time to catch up with you as you go down the stairs, and will remain focused on the traitorous Extremist.
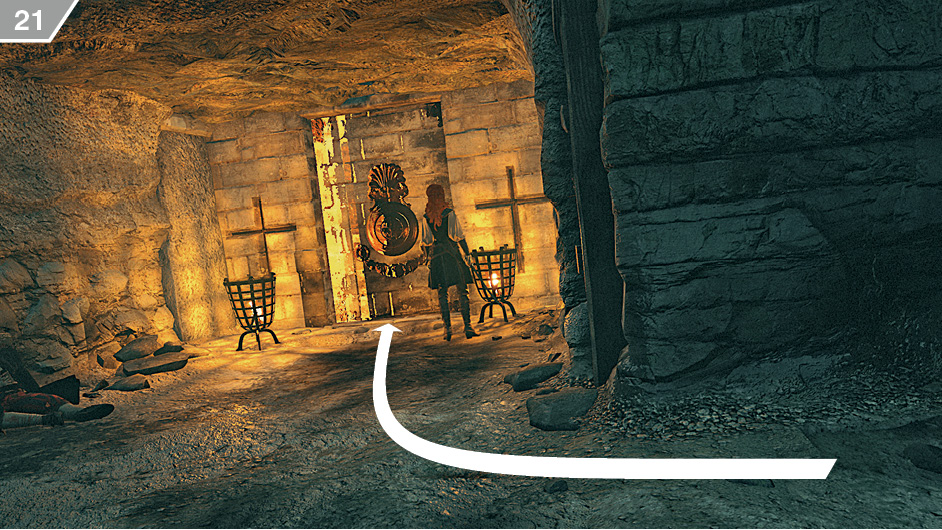
Follow the linear underground path until you meet up with Élise. Open the highlighted door to initiate the final showdown against Germain.
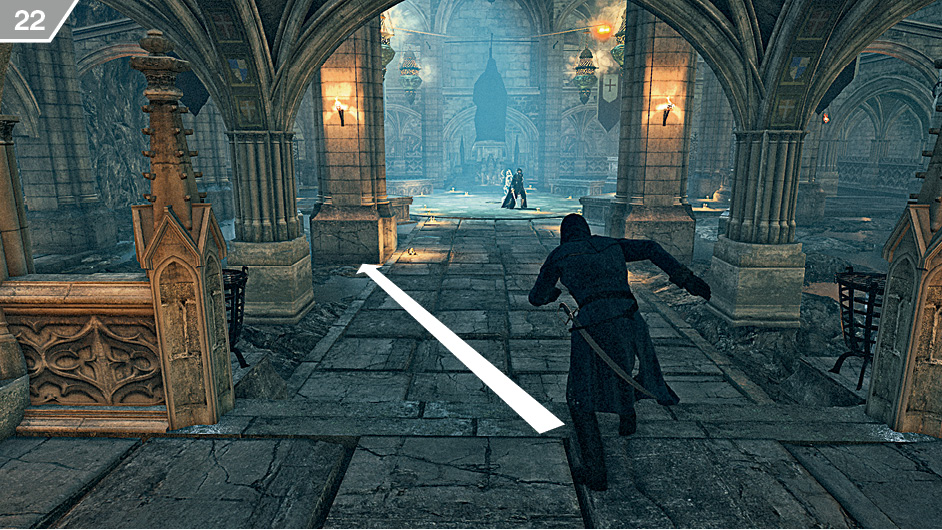
The moment you regain control of Arno, sprint to safety behind a pillar on either side of Germain.
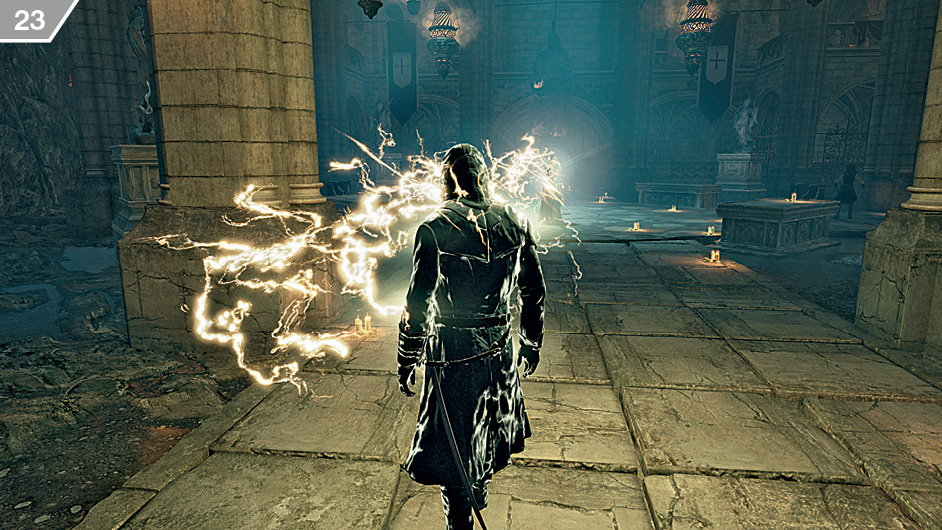
Your goal in this battle is to approach Germain from behind while his attention is focused elsewhere. As during your earlier encounter, frontal assaults are out of the question: Germain will simply destroy you with his Sword of Eden’s lightning bolt whenever he spots you.
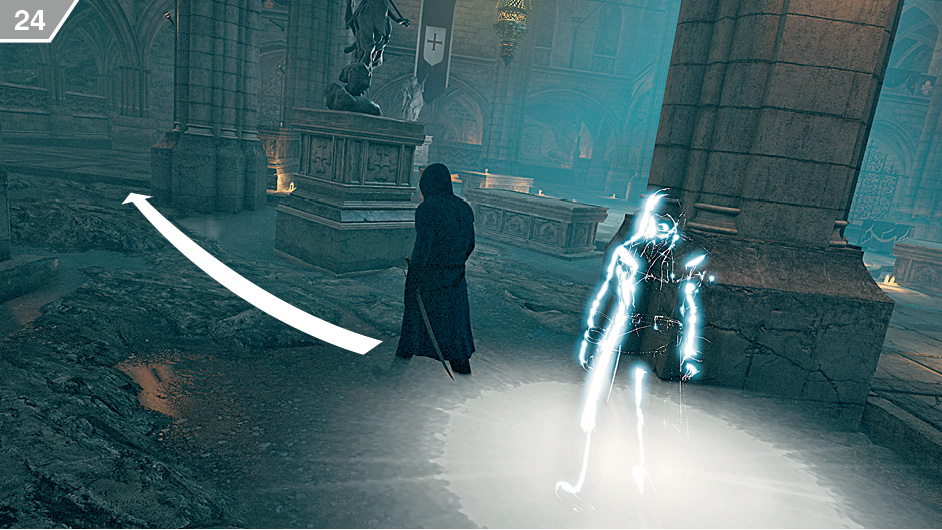
You cannot linger in one place for too long either, as Germain can still cast a lightning bolt that strikes from above. This is heralded by sparkles on Arno’s body, and a glow on the floor. Sprint to another point of concealment whenever you identify these signs.
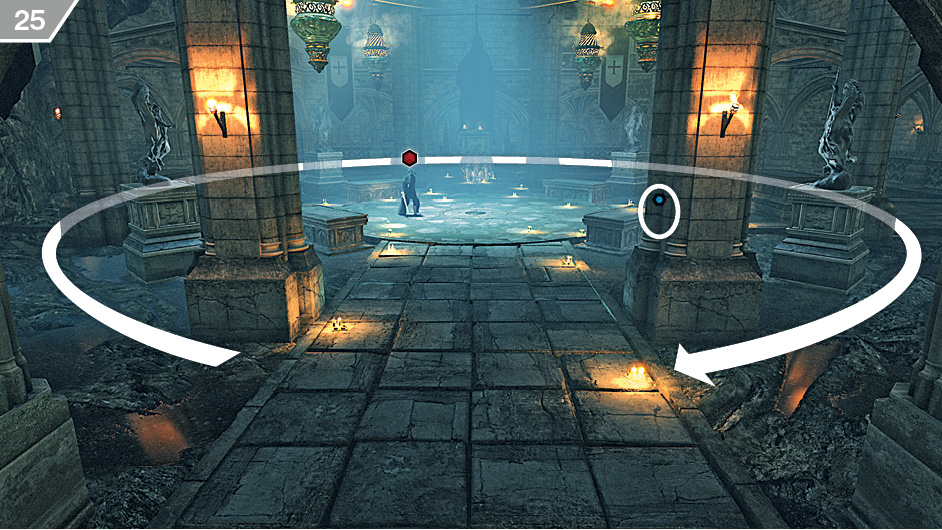
The best way to find an opening in Germain’s seemingly flawless defense is to run around the arena’s perimeter in circles, with Eagle Vision activated at all times (brief cooldowns notwithstanding). Constantly keep an eye on Germain, looking for a moment when he is no longer facing you.
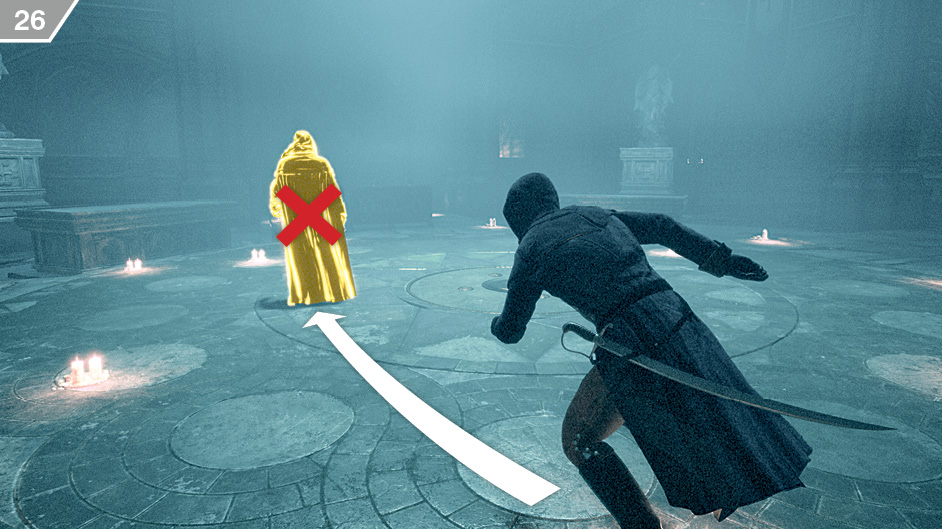
As soon as Germain presents his back to Arno, sprint straight towards him to perform a high-profile assassination. Arno will be propelled away, but this will still deal heavy damage to Germain. You have to repeat this maneuver three times to win the duel.
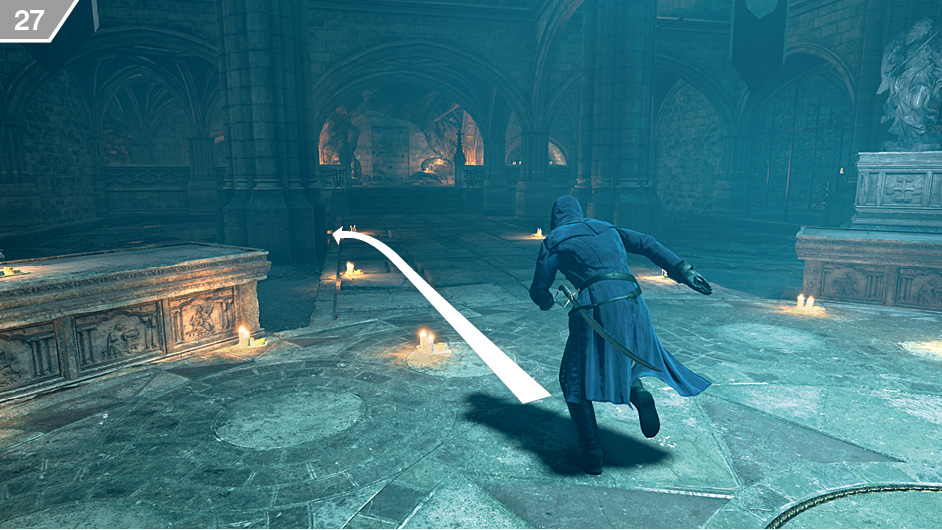
After each successful attack, rush to safety behind a solid object. If you linger for one second too long, you run the risk of being struck by Germain’s deadly lightning bolt. Consider dropping a Smoke Bomb each time to gain a few precious seconds of respite as you sprint to a cover position.
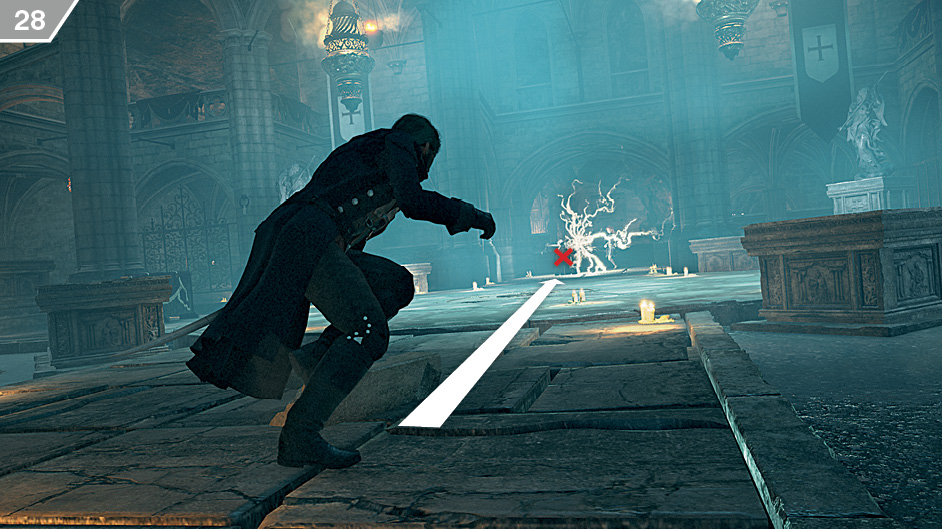
After you stab Germain for the third time, a cutscene begins. When you regain control of Arno, sprint towards Germain to deal the final blow.
Post-Story PlayAfter the closing credits (which you can skip by holding |
 /
/ ), Arno is returned to the streets of Paris, marking the end of the main storyline – but, for most players, the game will be far from over. You can now return to completing all remaining