
Assassin's Creed Unity Guide Side Quests
Co-op Missions
There is no perfect way to play Co-op Missions in Assassin’s Creed Unity. Every approach has some small measure of merit, and could lead to memorable situations: sometimes, triumphs are entirely eclipsed by epic tribulations. As you doubtlessly know, the process of coordinating the behavior of different gamers at once is akin to herding cats, but with a profoundly higher difficulty level. Our goal in this section of the guide, then, is not to “solve” the Co-op Missions, but to draw your attention to points of interest, effective routes and broad strategies that should deliver even modestly capable (or, indeed, cooperative) Assassins to the end of each mission.
For further advice, suggestions, potential tactics and other points of interest that you mind find useful for Co-op Missions, refer to the Reference & Analysis chapter.
Heads Will Roll
| Mission Availability | |
|---|---|
| Players |
2 max |
| Difficulty |
|
| Mission Rewards |
Handmade Prowler Breeches, Handmade Medieval Belt, Tailored Musketeer Coat |

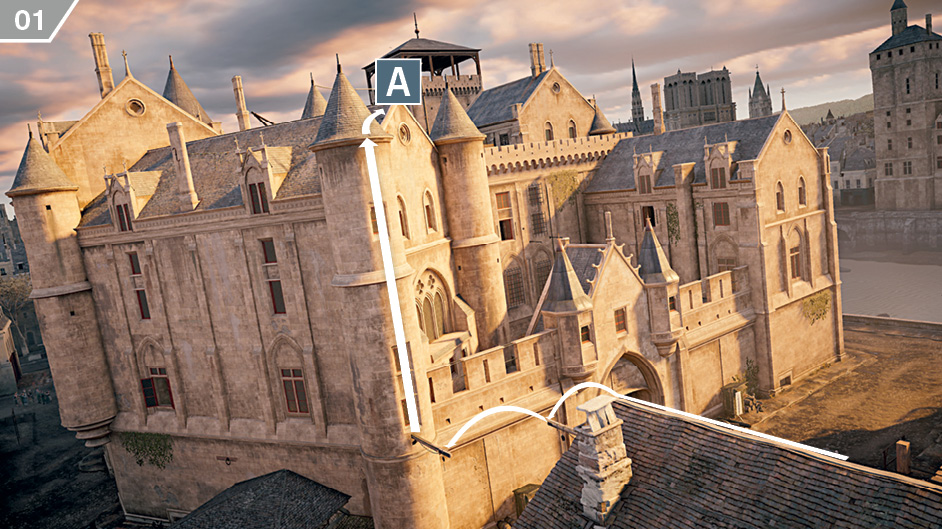
Your first task is to obtain a key from the Warden of the Grand Châtelet. From your start position, scale the tower to reach the rooftop at position  .
.
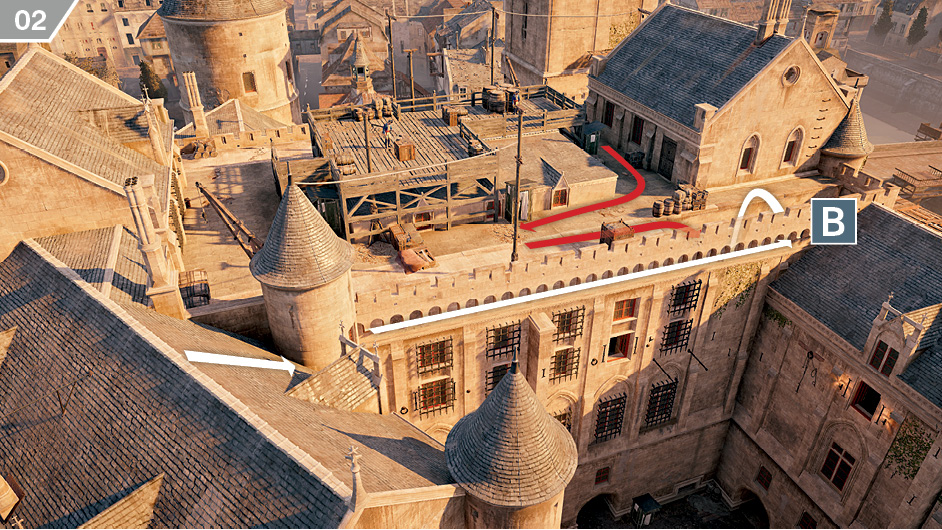
The Warden’s patrol route takes him from the rooftop area to the cells on the floor below, before returning to the roof; a full circuit takes no more than a few minutes. There are multiple guards here. Feel free to quietly snipe the ones closest to your position to make the next step easier. To slay the Warden and acquire his key without causing a commotion, traverse along the wall to reach position  . When the Warden walks down the stairwell, perform an air assassination and loot his body to obtain the key. (You can instead attempt to follow him down the steps and perform an expert piece of pickpocketing, though this naturally increases the likelihood of detection.)
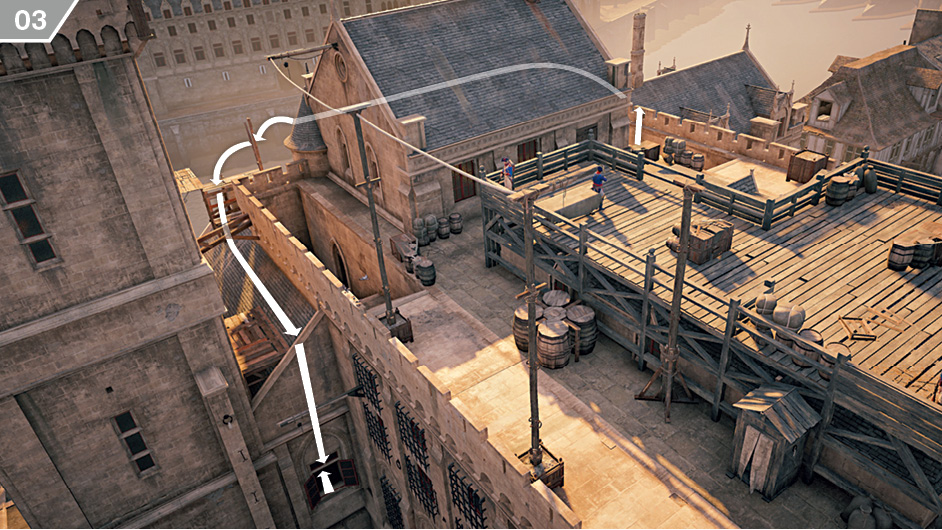
Your next task is to retrieve Paton’s notebook. The most direct way is to free run along the south wall to reach the open window by the square tower, as illustrated on the accompanying screenshot. If you are playing with a friend, one Assassin can get into position here while the other deals with the Warden.
Before you go through the window, make sure no one is looking in your direction with Eagle Vision. Once inside, eliminate all guards with Phantom Blade headshots or using the Last Known Position to clear the way to the notebook. The chest that contains it lies at the end of the corridor, to the left, as shown here. A soldier is in position right next to it, so be ready to dispatch him as you approach. Retrace your steps to exit the building.
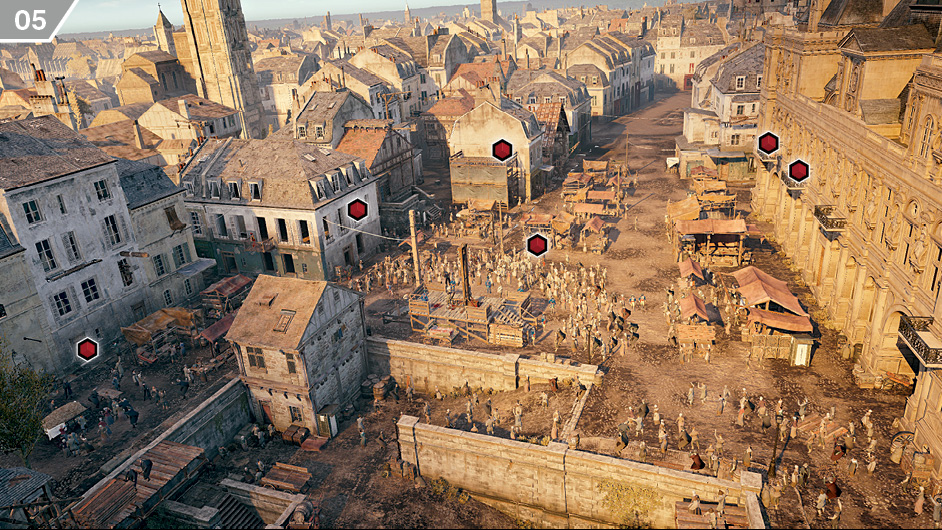
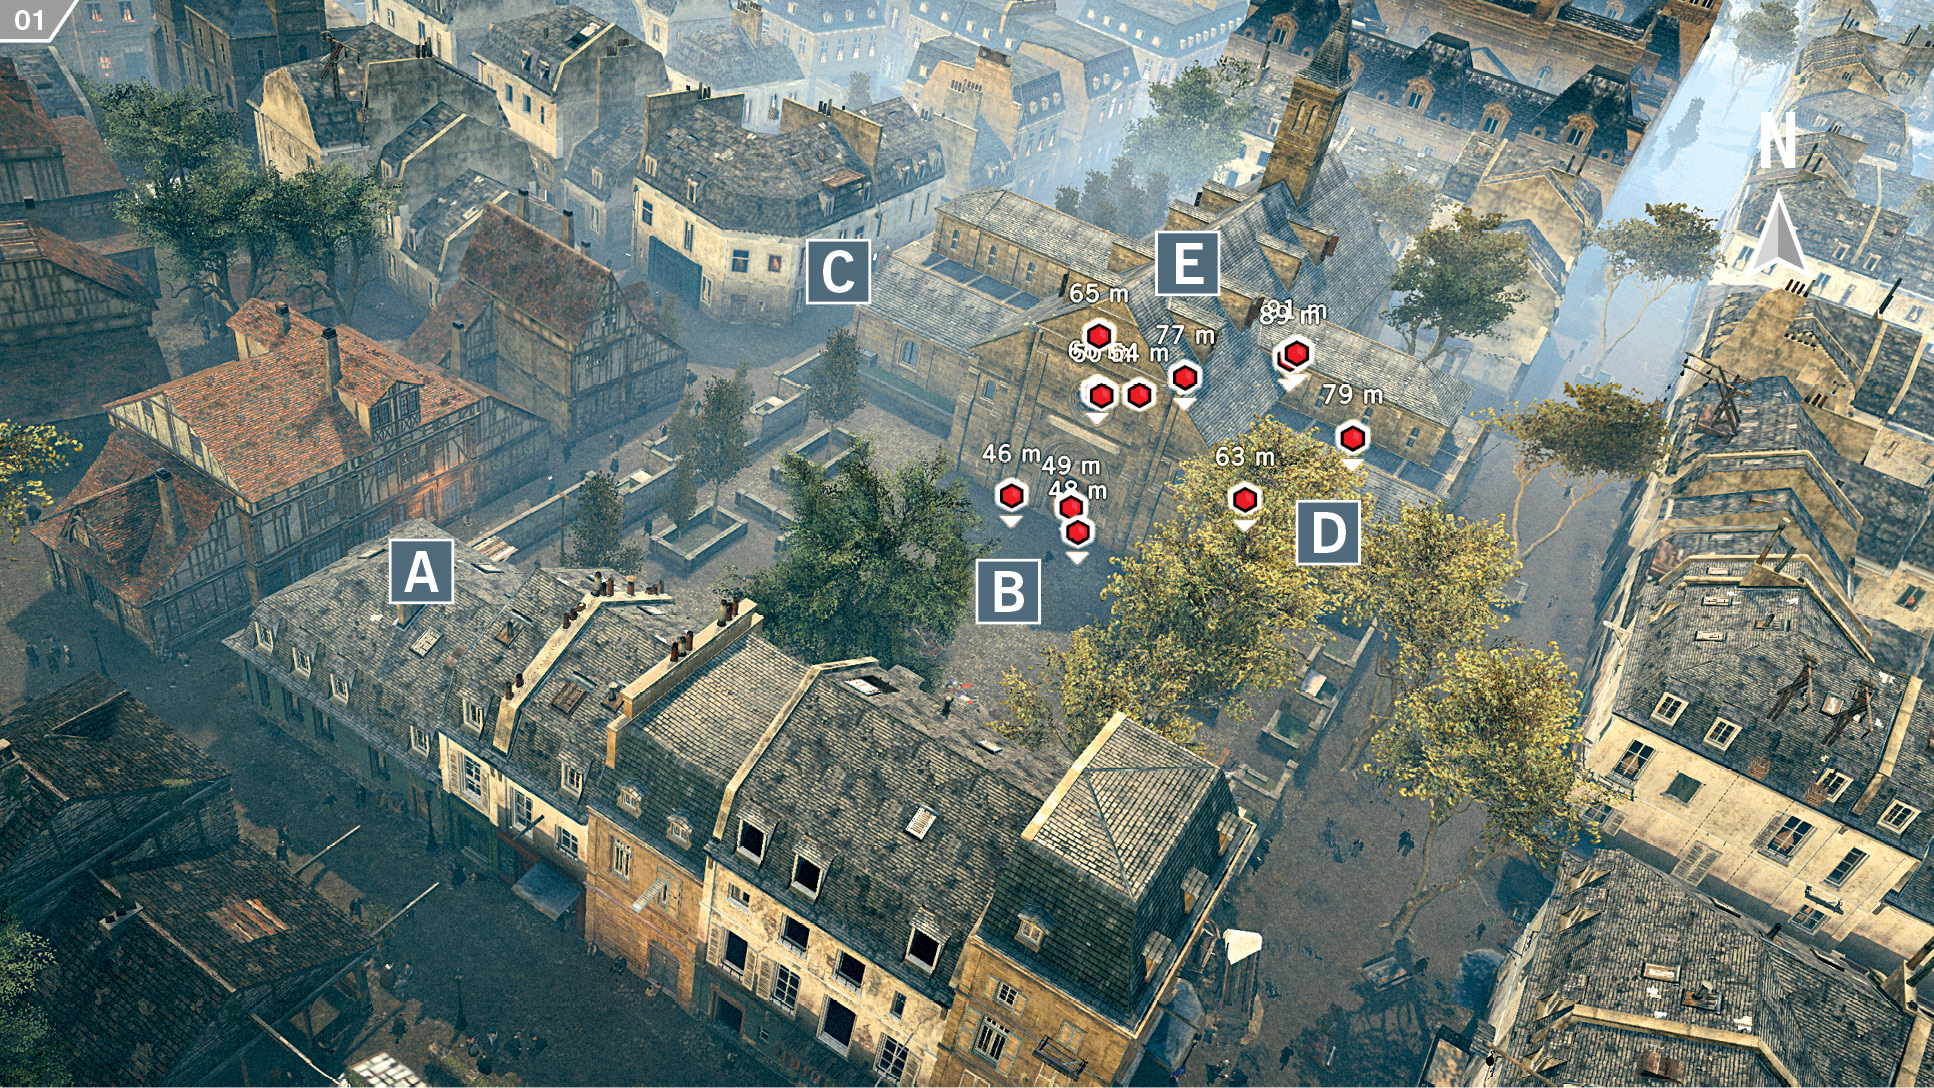
Head to the waypoint to the southeast to begin the most challenging section of this mission. In a crowded area featuring numerous Extremists and standard guards, you must locate and eliminate three specific Templar henchmen. We show some of their most common positions on the screenshot above, but keep in mind that these positions are randomized. Activate Eagle Vision to simplify the process of spotting them.
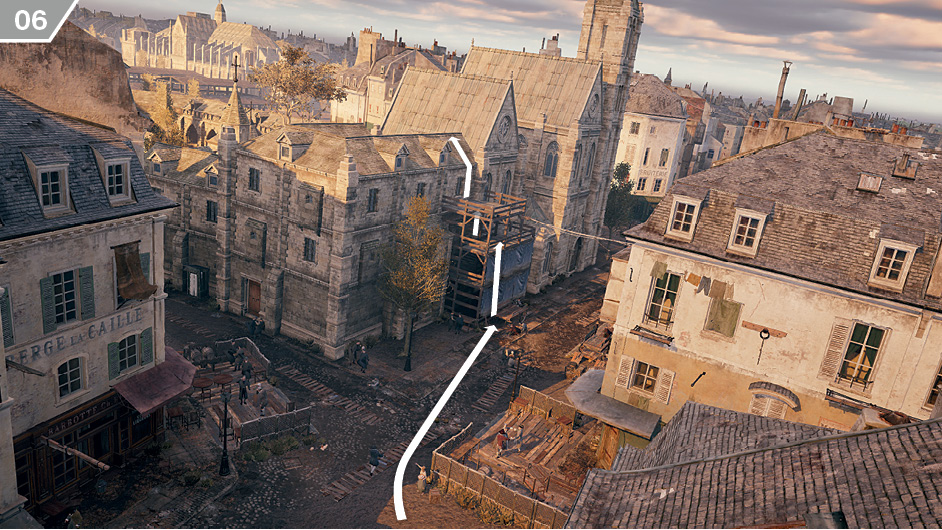
The Brotherhood will launch a surprise attack as a distraction as soon as the third Templar falls. Paton will escape to the northeast. Follow the waypoint markers until you reach the graveyard: a massive, heavily guarded rectangular search area. Fortunately, the process of reaching Paton is much easier when you have an inkling of where he is. Approach the building at the very south of the Restricted Area and, with eyes peeled for Extremist marksmen, climb to the roof as illustrated here.
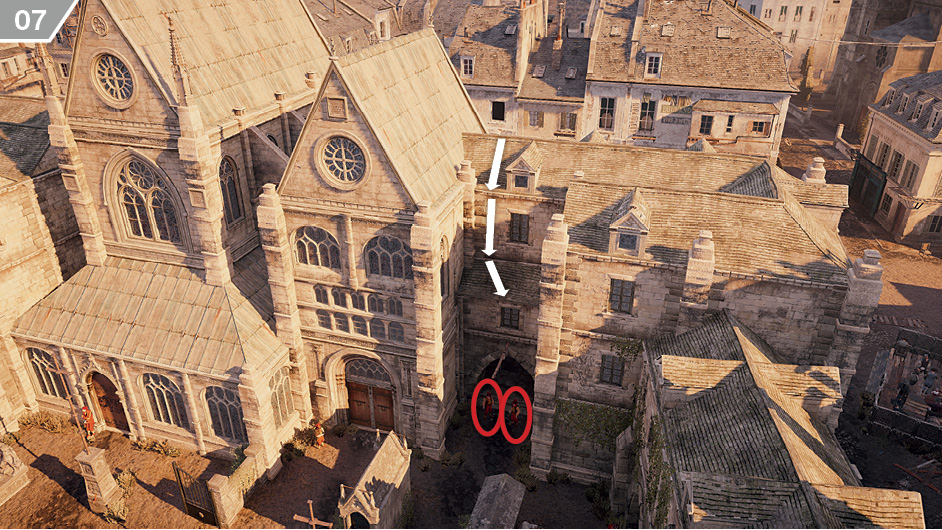
Climb down the opposite side of the building to reach a beam above two Extremists, then perform synchronized air assassinations or Phantom Blade kills. Go through the archway that they were guarding and turn right to reach steps leading to the catacombs.
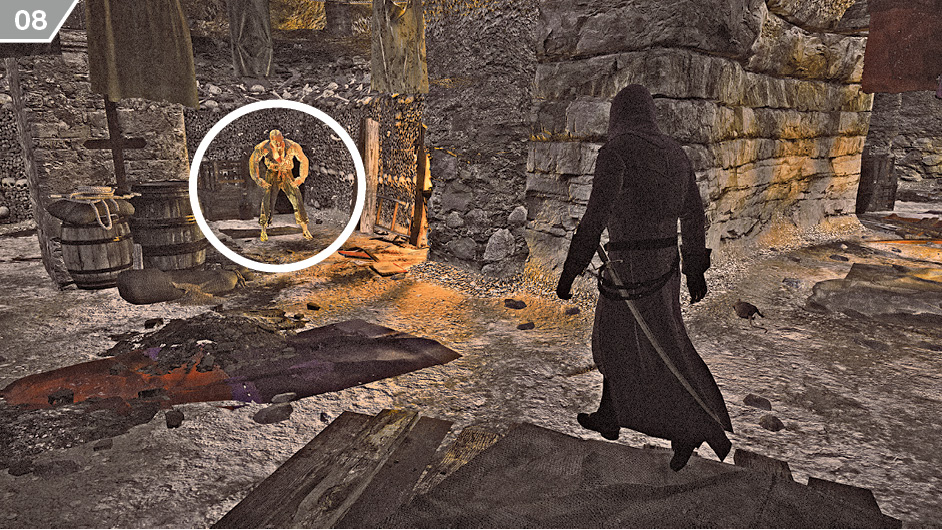
Pick the lock on the door if required, then follow the corridor beyond until you reach the first junction; take a right here, then the next right to find Paton. Speak to him to end the mission.
The Food Chain
| Mission Availability | |
|---|---|
| Players |
4 max |
| Difficulty |
|
| Mission Rewards |
Handmade Sans-Culottes Coat, Handmade Napoleonic Bracers, Arno’s Tailored Hood |

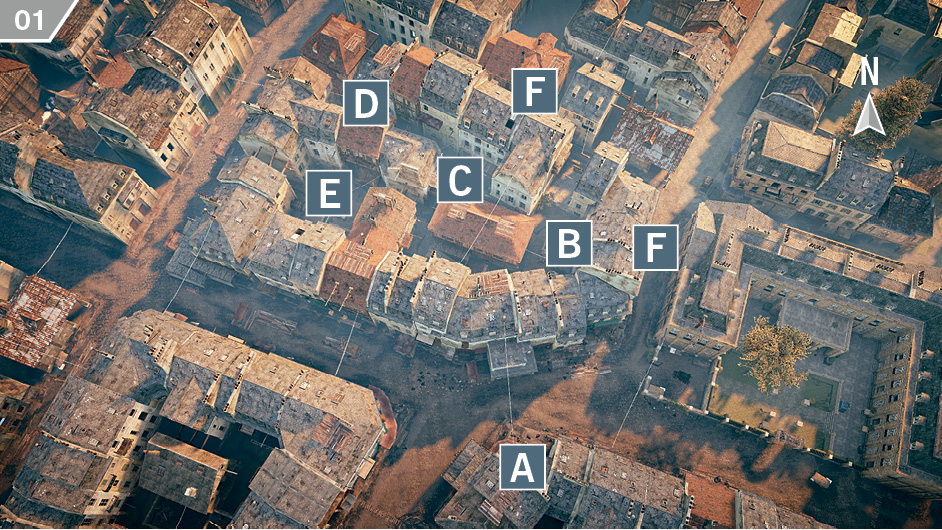
From your start position at  , you must reach and investigate two waypoints (sacks that contain secret messages) that can randomly appear at the positions marked
  ,
,  ,
,  , and
, and  . There are actually three possible sets:
  -
- ,
,  -
- , or
, or  -
- . We strongly suggest that you coordinate your efforts to reach each one consecutively, as all positions are guarded by multiple Extremists at ground level, with marksmen positioned on the rooftops. There is also a large patrol in the central area. Opening locked doors at positions
  will enable you to enter buildings close to each waypoint and eliminate troublesome sentries that may otherwise detect you.
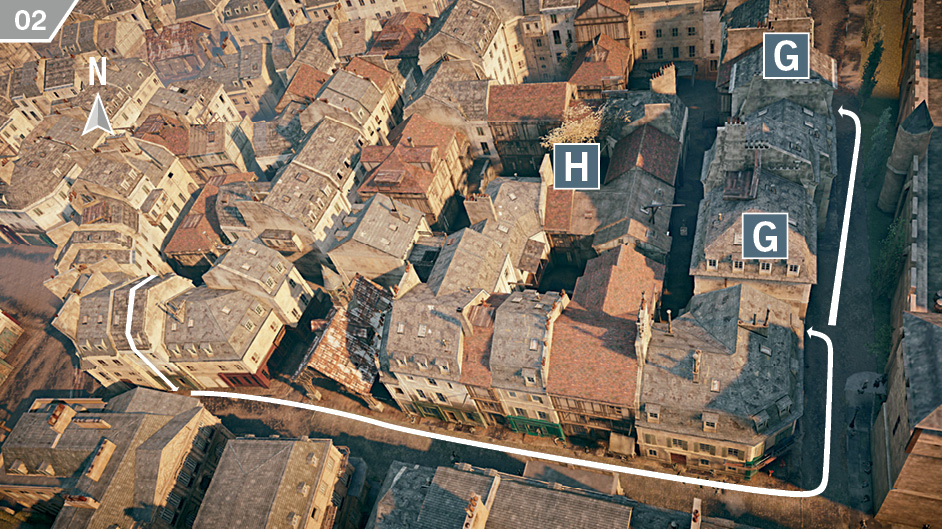
After you have the address, a new waypoint appears for Méricourt’s location. From your previous position, the quickest way is to take the main road to either position  (chosen randomly), where you can climb through an open window and disable enemies inside. Méricourt can be found on the top floor, surrounded by Extremists: if you are quick and purposeful, you can assassinate these before a fight breaks out. An optional step before you meet Méricourt, and one that will reduce the difficulty of the escort objective that follows, is to clear all enemies in front of the house and in the zone highlighted at
  (see
(see  for useful details).
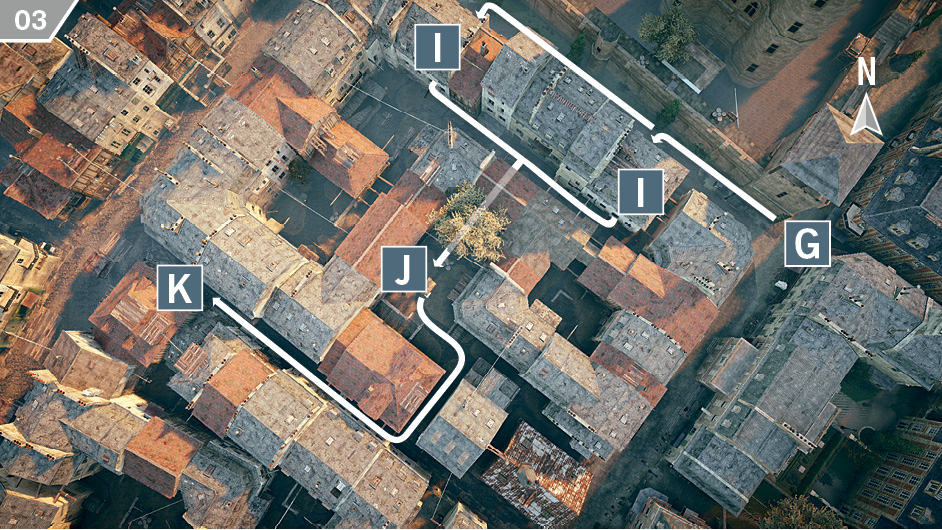
Your next task is to escort Méricourt. If you have already cleared out the neighborhood, this is a routine journey until you reach the main street. If not, you must defend her from attacks as soon as you head outside at  . Pay special attention to snipers. At position
  , Méricourt hides and requests that you kill a group of highlighted Extremists. Observe them through Eagle Vision and formulate a plan of attack. If you cannot kill them all without revealing your presence, have one player guard the alarm bell to prevent a call for reinforcements. Once you have completed this task, keep up with your ally until you reach position
  , then assassinate the Extremists as directed. Be vigilant during the remaining portion of the journey: enemy patrols can cross your path at any time.
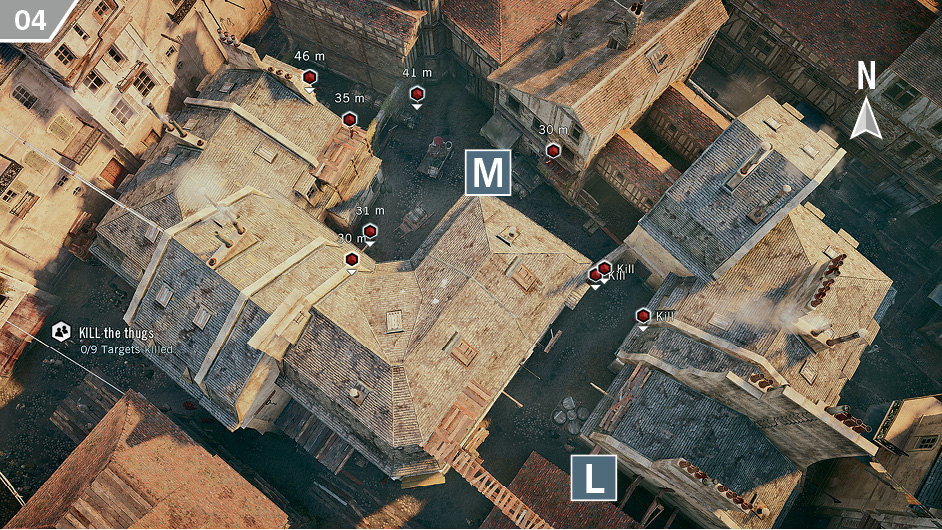
You will soon reach a second area where Méricourt takes cover ( ) and requests that you neutralize a set number of Extremist targets– but this time, the group is much larger (
 ). Once again, study the area with Eagle Vision and agree on a plan of action with your cohorts beforehand. In this instance, coordinating ranged attacks from the (pre-cleared) rooftops is a reasonable strategy. Cherry Bombs are also useful here for misdirection – and to lure individuals into positions out of sight for quiet kills.
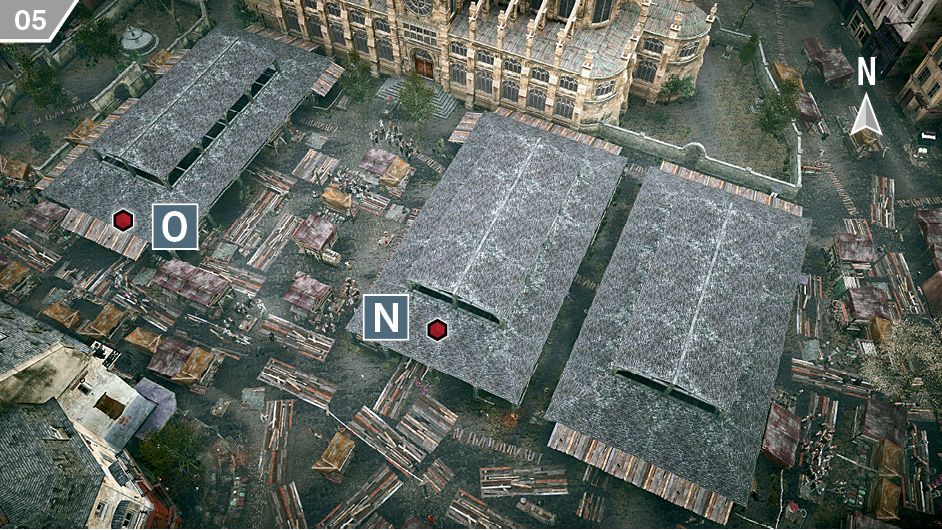
The next objective after Méricourt departs is to kill two Templars in the market area shown here. Having Assassins take to the rooftops at  and
and  will enable you to locate your targets with ease, and keep track of their movements without fear of detection. The most efficient way to eliminate these individuals is to have someone sneak to within Phantom Blade range. A Berserk Dart to each Templar will lead them to assault their much stronger bodyguards – which, as you might expect, won’t end well for them. Even if their associates don’t finish them off, the guards policing the area certainly will.
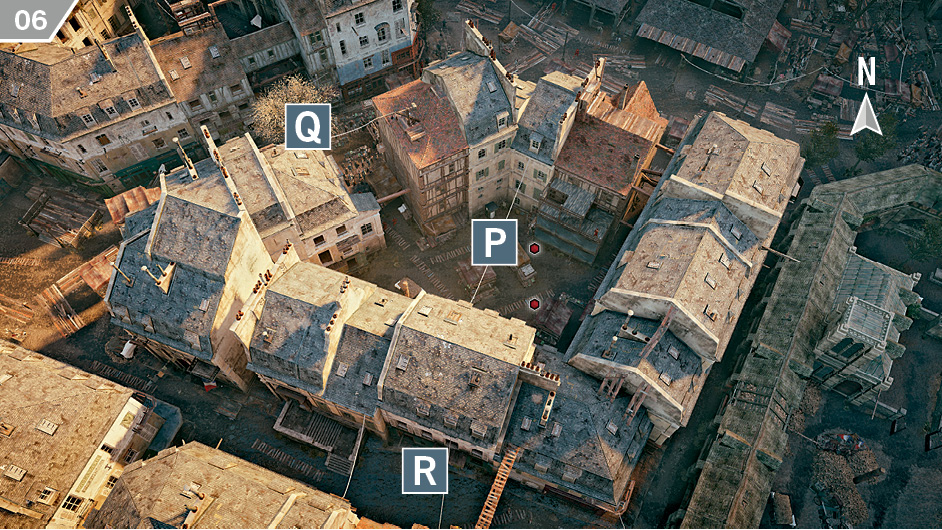
The final two targets of this mission can be found almost directly to the south, where they walk in circles around a yard surrounded by buildings at position  . For a fast finish, two synchronized air assassinations from the rooftops after taking care of enemy marksmen will certainly suffice. For a more cultured solution, locked doors at
  and
and  can be picked to gain entry to the buildings that provide access to the central area. After clearing out the Extremists inside, and with another Assassin dealing with troublesome snipers from rooftop level, you can conclude the mission with silent kills at close range. Leave the highlighted area (and escape pursuing aggressors, if required) to claim your rewards.
The Austrian Conspiracy
| Mission Availability | |
|---|---|
| Players |
2 max |
| Difficulty |
|
| Mission Rewards |
Improved Military Hood, Tailored Prowler Breeches, Tailored Medieval Belt |

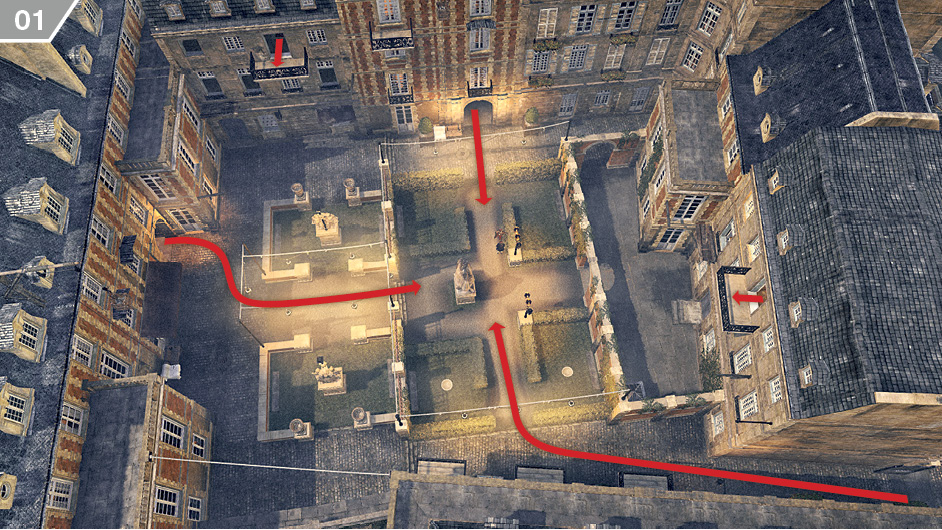
As the mission begins, Danton is under attack by a single target. Once this individual falls – by Danton’s hand or after a swift Assassin intervention – numerous hostiles will gradually enter the area from multiple directions. Working in tandem, it is possible (though certainly challenging) to eliminate all of these targets with the Phantom Blades from elevated positions of safety. You can also employ Berserk Blades to create distractions. Watch the balconies overlooking the area: two marksmen will arrive later in the confrontation. Once you have eliminated all marked targets, check your map and make your way to the closest of the two new waypoints (the one slightly further to the south).
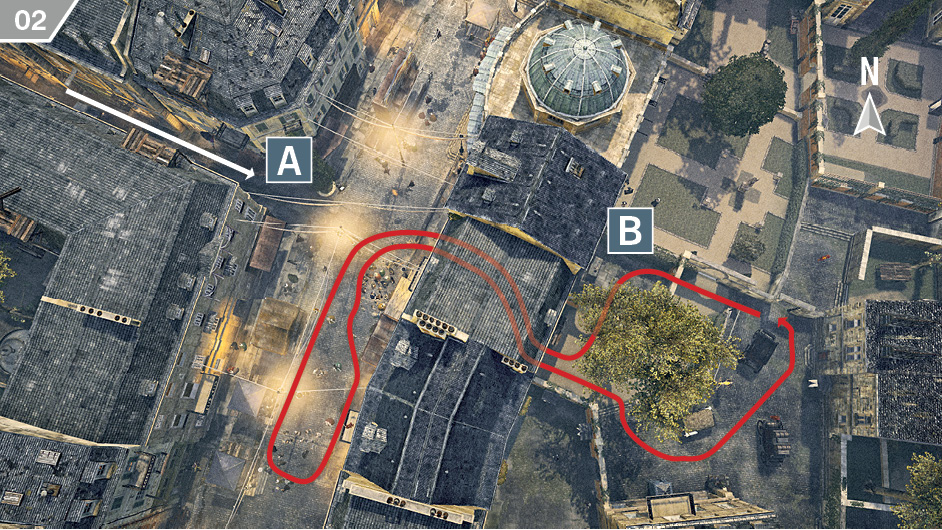
Approach the first green search zone from the west to arrive at position  , but stay out of sight of enemies. The target that you need to eliminate walks a fairly lengthy patrol along the (approximate, simplified) path marked in red, accompanied by two bodyguards. Usually, he will be in front of the house and within range of Eagle Vision identification as soon as you arrive. For a fast but brutal solution, you can choose to eliminate him immediately and then fight all enemies that join the fray. For a more fitting conclusion, both Assassins should stealthily reach the lightly guarded area at
  and seek concealment in the two hiding places. After a wait of no more than a few minutes, the target will pass your position – providing the perfect opportunity for fast and silent kills in the alleyway.
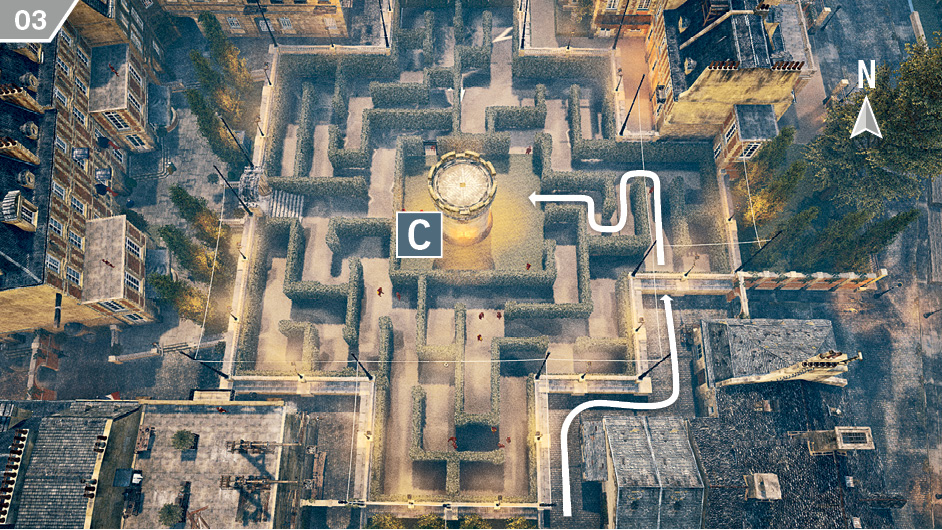
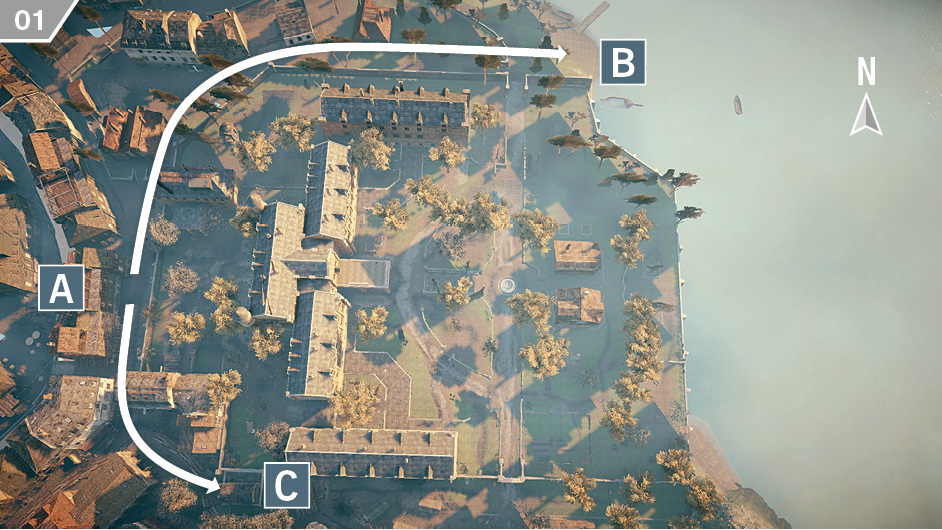
The second target is located at the heart of a hedge maze at  . Approach the search zone from the south, then follow the route detailed on the accompanying screenshot to avoid unnecessary conflict before you reach his position. A wise plan is to have one Assassin take up position on the ropes and poles at the southeast of the search zone while the other enters the hedge maze, which enables the person with the overview of the area to offer advice and directions. There are several enemies in the central tower area, so the Assassin approaching the target should employ Eagle Vision and judicious use of the Phantom Blades (and other tools) to eliminate these hostiles.
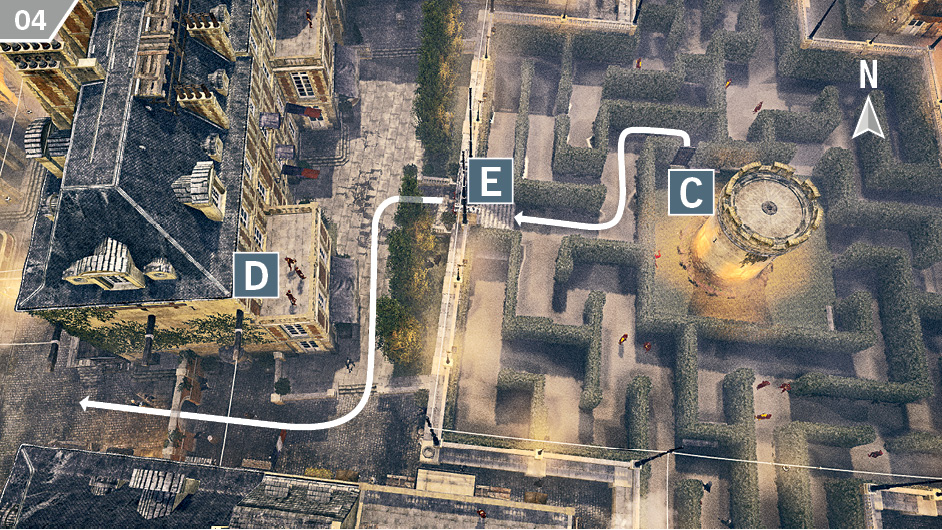
Once you have the documents, it’s time to leave: a slightly more involved process than your arrival. The Assassin inside the hedge maze should wait at the door at  (where the documents were just stolen) in preparation for departure. Meanwhile, the second Assassin should, for an optimal silent escape, kill the sentries on the rooftop at
  and the enemies under the arch at
  . The Assassin inside the maze can then unlock the door and, with assistance if required, kill the handful of hostiles guarding the short path to the exit. You can then leave the Restricted Area by heading west.
The closing objective of the mission is to eliminate two master spies in the mansion shown here. With enemies stationed on rooftops and the inner courtyard featuring a fairly densely woven network of patrols and sentries, identifying the optimal way to reach each target is the real challenge here. Expert Assassin partnerships can potentially split up to deal with each target individually, though those less confident with performing multiple stealth kills in succession – or dealing with the consequences when things go awry – should double up and deal with each master spy together. Once both targets are dead, move outside of the highlighted area to end the mission.
Master spy, southeast: Climb to the rooftop at  and eliminate the marksman on the balcony, then go inside and approach the two locked doors that lead to the master spy at
  . The door on the left is a hard lock with three pins, but presents the inviting target of your quarry’s back once opened. The other door is a simple lock, but using it will probably lead to combat with all hostiles in the room. Once the deed is done, return to the street outside the same way that you came.
Master spy, northwest: From the street that runs outside the north face of the mansion, enter the building via the (sometimes locked) door at position  . Inside, climb to the floor above using a back eject from the top of the hiding spot. Use Eagle Vision to identify hostiles in the next room along – and, just beyond them, your target (
 ). From the left-hand door it’s possible to hit the spy with a Berserk Blade from cover, watching with quiet satisfaction as his associates work on your behalf before you depart.
The Infernal Machine
| Mission Availability | |
|---|---|
| Players |
2 max |
| Difficulty |
|
| Mission Rewards |
Tailored Brigand Coat, Tailored Sans-Culottes Bracers, Improved Brigand Hood |

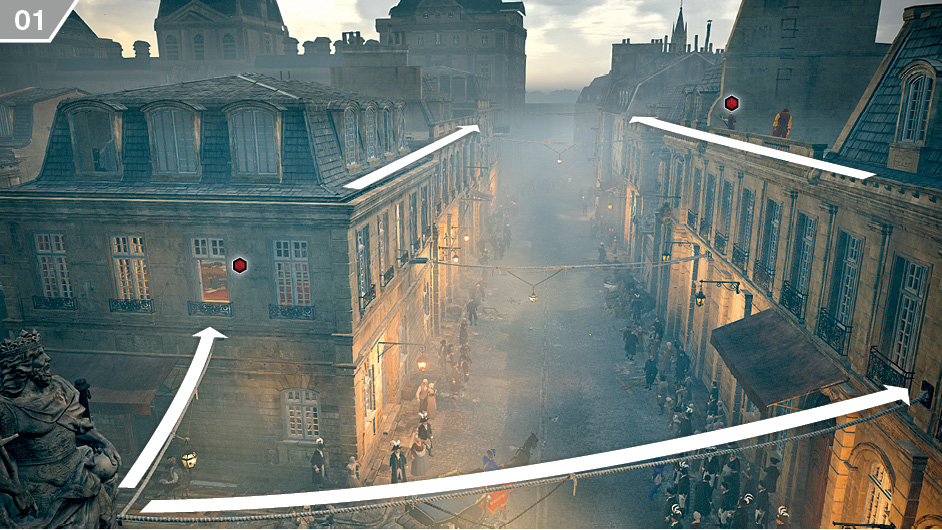
In the opening section of this mission, you must eliminate snipers stationed on the route that Napoleon’s carriage takes as it winds through the Parisian streets. You only need to eliminate the Extremists highlighted with waypoint markers, and time is of the essence, so aim for fast kills and ignore or evade the many non-critical adversaries. In this first section, both Assassins should split up and each focus on one side of the street.
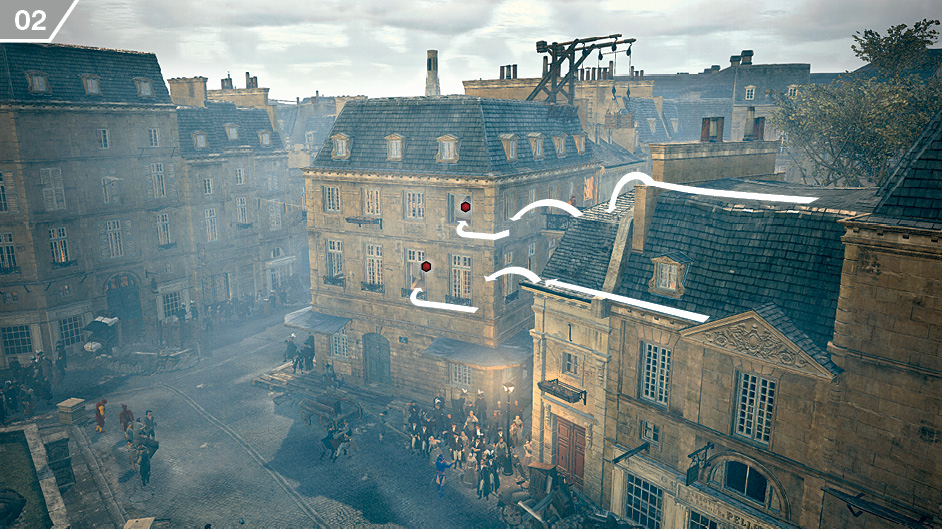
Employ the quickfire function of the Phantom Blades for speed, Smoke Bombs and Cherry Bombs to facilitate rapid escapes, and always look for opportunities for near-instant Hidden Blade assassinations. If a target is standing in a window, for example, a ledge assassination will be the easiest way to deal with them. When you reach the area shown here, each Assassin should take a floor level to neutralize the snipers in the next building.
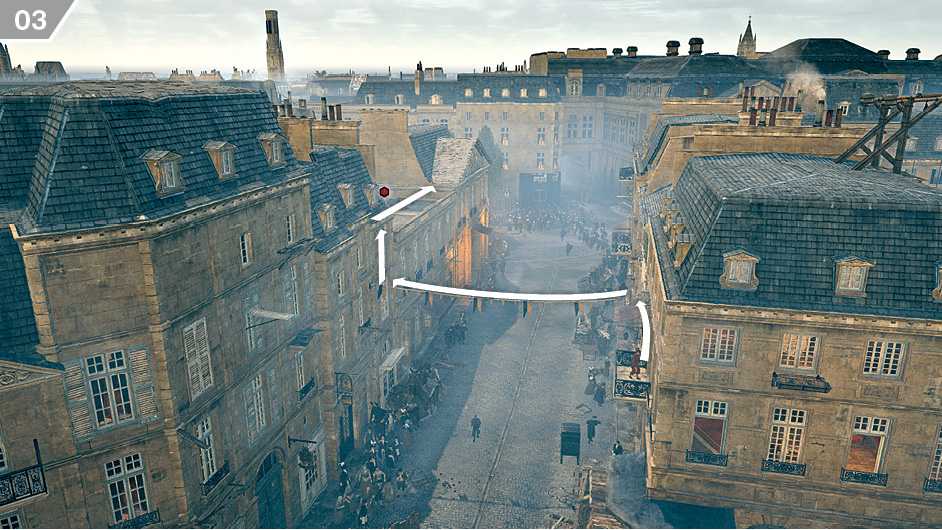
For the final stretch of the route, work together to eliminate the remaining snipers. If you are making good time, be careful to not move too far ahead of Napoleon’s carriage – this can lead to Desynchronization.
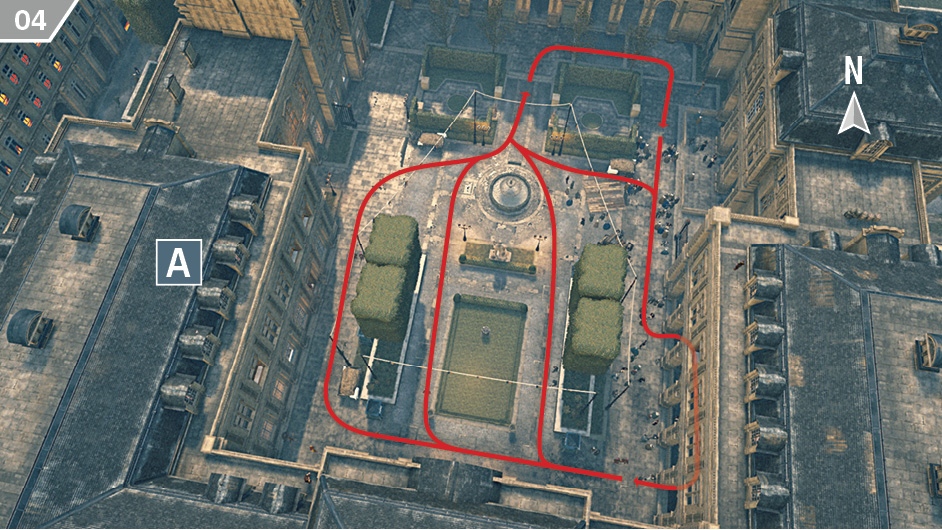
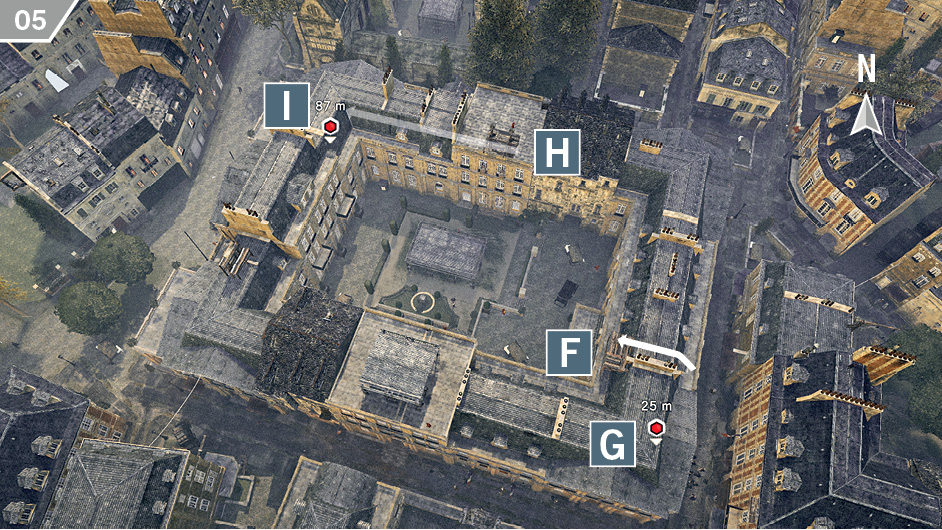
The second part of the mission involves infiltrating a heavily guarded mansion to retrieve two separate documents. The first is always in an office at position  that can be accessed directly via open windows. You will need to search the highlighted desks (hold r/s) until you find the required item. However, the office contains multiple Extremists (and others in adjoining rooms), with snipers on the rooftop above: be patient in your approach. The second document is carried by a man who patrols, with two bodyguards in tow, around the central courtyard (via the route approximated on the screenshot here, with a random factor determining the exact route of each loop). Use Eagle Vision to identify him.
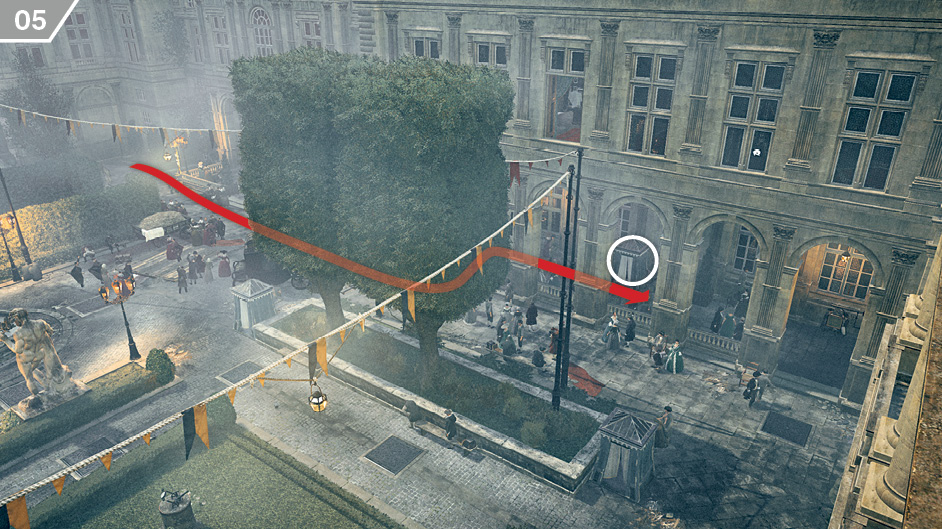
Openly attacking the target in the courtyard area is not wise: with so many guards in the vicinity, and the potential for reinforcements, this could lead to an extremely difficult fight. The most subtle solution is to have one Assassin sneak inside the hiding place on the southeast of the courtyard (pictured here). When the target walks past, you can perform an assassination to gain the document immediately (thereby exploiting a quirk whereby kills from hiding places always award mission-specific items instantly). A second Assassin could simultaneously step out from Blending with the nearby crowds to double assassinate the bodyguards, but this isn’t strictly necessary. For a rapid escape if required, sprint to the north edge of the Restricted Area and Blend with the protesting mob just outside the mansion to evade your pursuers.
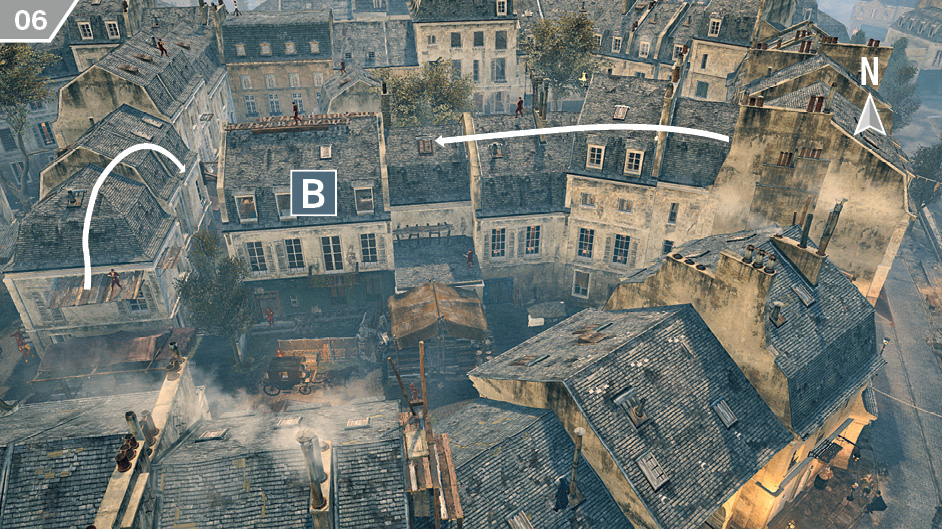
The final step is to kill the royalist leader and, as you might expect, he can be found at the center of a densely patrolled Restricted Area. He is located on the upper floor of the building at  , with available entrances randomized for each playthrough. Approach via the adjacent buildings (ideally splitting up to systematically eliminate all rifle-carrying sentries in the area), and look for a hatch in the rooftop: if available, this is the best way to enter. Once the assassination is complete, exit the highlighted area to complete the mission.
Danton’s Sacrifice
| Mission Availability | |
|---|---|
| Players |
4 max |
| Difficulty |
|
| Mission Rewards |
Tailored Military Bracers, Tailored Musketeer Belt, Improved Napoleonic Coat |

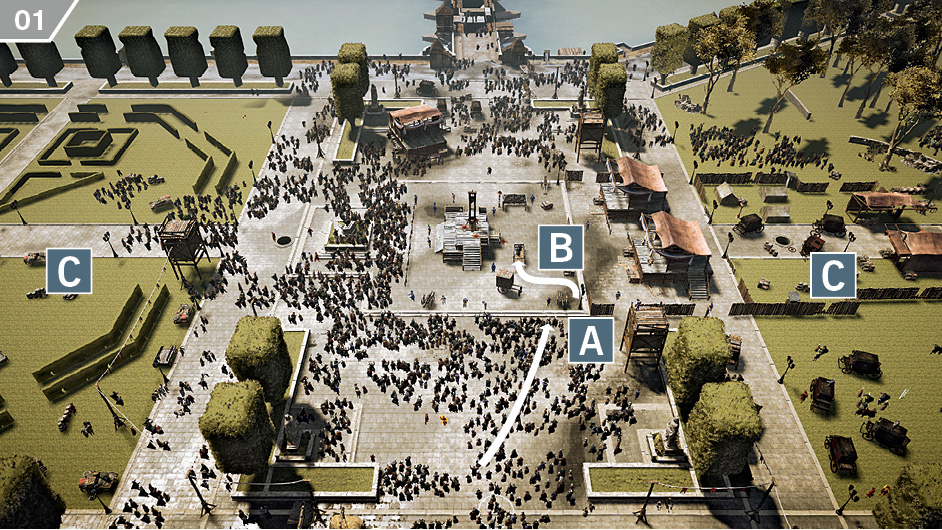
From your starting position, approach Danton while Blending in the crowd and stop when you reach the border of the Restricted Area at  . Have one Assassin take the appearance of a guard with the Disguise skill and calmly walk up to Danton at
  ; there is a convenient cover point where you can hide out of sight. While this Assassin is getting in place next to Danton, the other players should try to get into position for the next stage of the mission in the garden areas on either side of the Place de la Révolution (
 ). Four marked Extremists approach the first of Danton’s incriminated associates, who can randomly appear in either position. If you have Assassins poised to quietly intercept them, you can avoid a messy fracas that will entail other hostiles entering the fray.
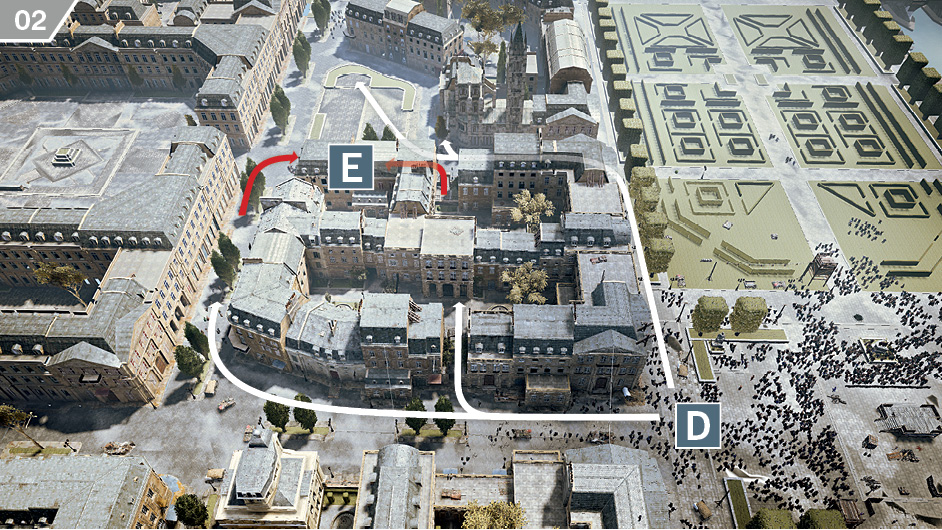
Leaving the crowded Place de la Révolution ( ), head northeast to approach the second of Danton’s associates at position
  . As previously, four marked Extremists approach their target from the directions indicated by red arrows; there are also other enemies distributed around the area. It helps if you operate as a full squad of four Assassins, as this means that you can follow the routes suggested here to each take responsibility for an Extremist. If not, improvise by dealing with the hostiles closest to position
  first.
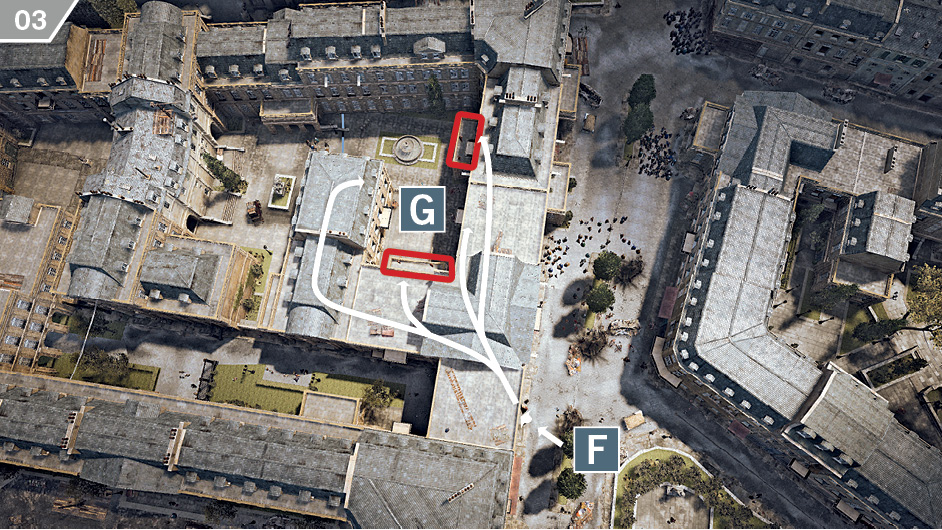
The third of Danton’s associates can be found a little further to the east, and is in the process of being confronted by Extremists as you arrive. After assembling following the previous objective at position  , a good strategy is to have all Assassins take to the rooftops before approaching the next waypoint at
  . This way, two Assassins can eliminate the snipers overlooking the area at the balconies highlighted in red before you strike with coordinated air assassinations. In the event of open conflict, it may be prudent to have one of your number employ Stun Bombs and Smoke Bombs to protect the target once combat begins.
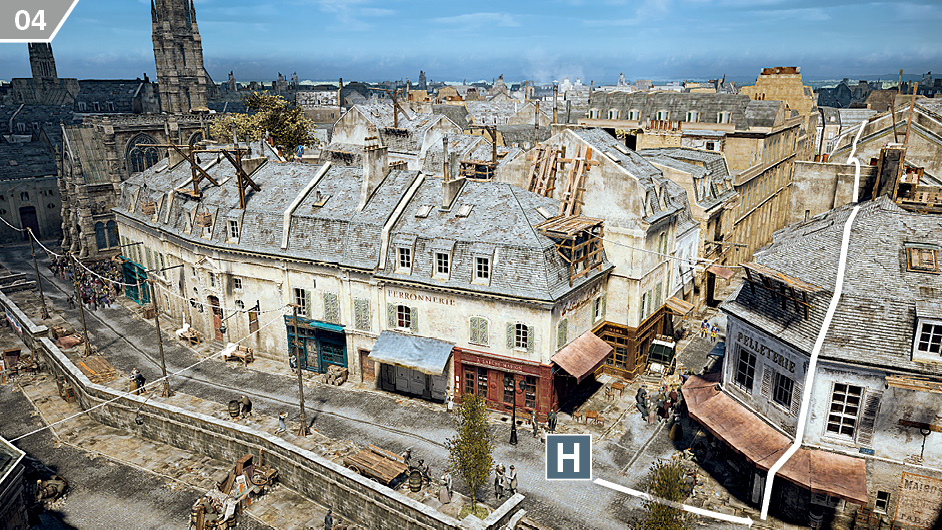
Your final task is to find and retrieve Danton’s letters from a search zone located to the northeast of your last objective. The specific building that you need to infiltrate is heavily guarded at both street and rooftop level, but there is one point of ingress that you can reach with comparative ease. Assemble at the “L’Arche Marion” grocery store at  , directly south of the waypoint marker. Climb on the rooftop of the opposite building then free run approximately halfway through the street.
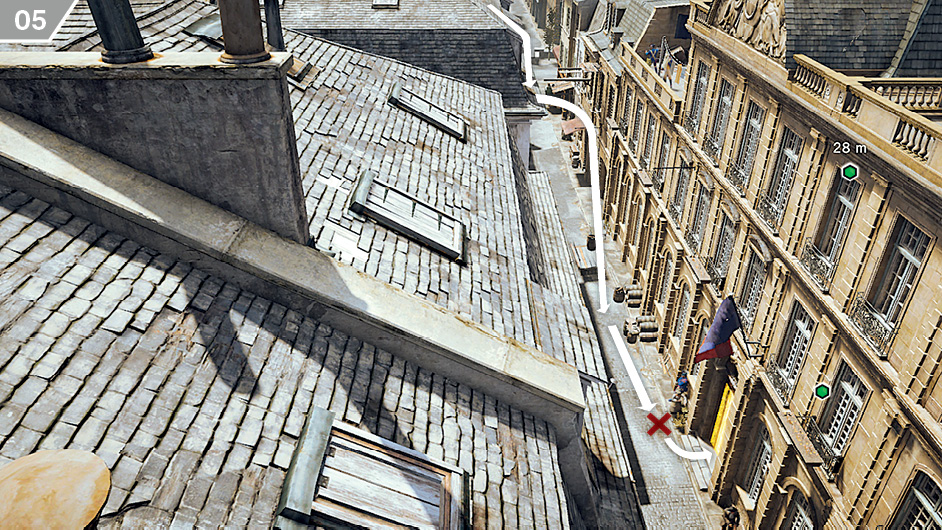
Drop down from the rooftop when you reach the locked door and kill the nearby guard. Pick the lock and enter the building. You will find yourself conveniently facing the staircase. One letter is located on the floor above, with another on the uppermost floor. Activate Eagle Vision to discern the location of any guards, then coordinate your efforts to eliminate them quietly. You can then retrieve the documents and depart via the route you arrived by. When all Assassins leave the highlighted area, the mission ends.
Jacobin Raid
| Mission Availability | |
|---|---|
| Players |
2 max |
| Difficulty |
|
| Mission Rewards |
Improved Medieval Coat, Improved Phantom Belt, Arno’s Master Hood |

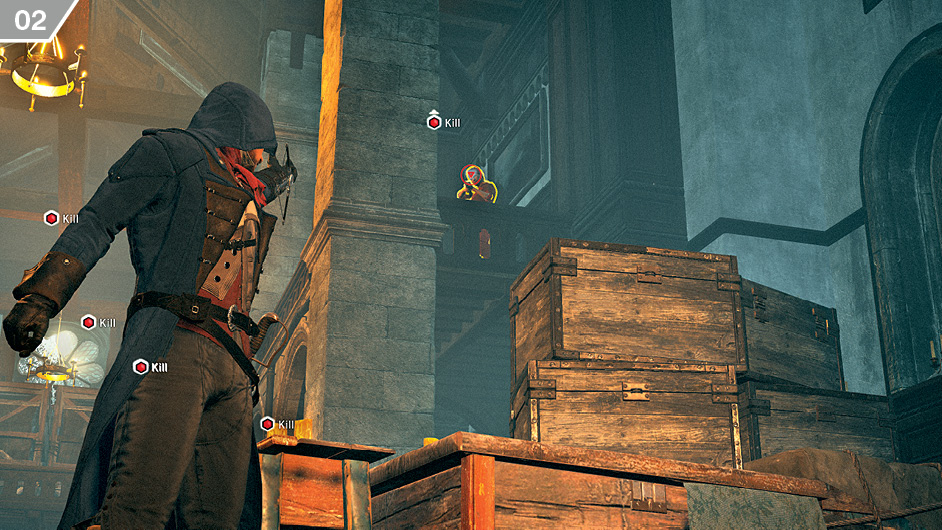
From your start position at  , the first objective of this mission is to eliminate a dozen marked Jacobin targets. This task is complicated by the presence of additional Extremists stationed on rooftops in the area, and an alarm bell inside the building where most Jacobins await in a heightened state of vigilance. Having one Assassin with an Assassin Cache skill is a must here, as you will be making regular use of ranged weapons to avoid open conflict.
There are multiple ways to enter the building and kill targets silently, but no one way is superior to another. In actual fact, you will probably find that splitting up to exploit each avenue of attack is the most effective way to tackle this opening challenge.
Your first task will be to investigate the rooftops and eliminate marksmen that watch over the primary routes of entry to the building. With that complete, you can turn your attention to the Jacobins.
 Your start position.
 The main entrance. The Jacobin targets guarding this can be eliminated by a couple of well-placed Poison Gas Bombs dropped from above, but this is something that you should leave until you have disabled their many allies.
 A locked door that can be opened to gain access to the west wing of the building. Use Eagle Vision to look for a patrol inside before you pick the lock. There is a stairway just inside. This leads to a balcony that overlooks the central interior area, which – after you eliminate the targets on that level – provides a risky but nonetheless viable position for sniping.
 The east wing (which, as with the west, has stairs leading to the balconies above) has two open windows, with one usually guarded by a marksman.
 There are four open windows on the rooftop, though making use of these will probably require that you silence the marksmen in the area beforehand. The two southernmost windows lead to rafters that put you in serious danger of detection by multiple guards on the upper level. The northernmost windows, by contrast, both lead to a wooden rafter that overlooks the main interior area. From this position, you can kill numerous targets with the Phantom Blades.
Once all Jacobins have been eliminated, Méricourt will enter the building. Interacting with Méricourt coincides with a Jacobin ambush, with most of the targets appearing on the upper balconies. Split up, and have each Assassin take cover under a balcony. Make your way back towards the entrance, taking down any target that you encounter, then use the stairs in the side rooms to reach the upper floor. From there, take cover and methodically take down all Extremists with Phantom Blade headshots.
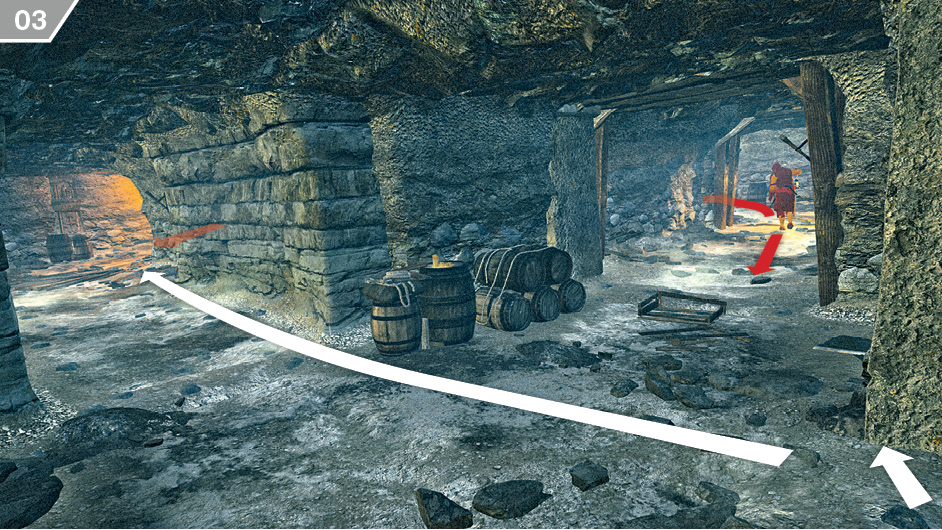
After foiling the ambush, interact with the torch to the left of the fireplace to open an entrance to a secret network of tunnels. Head down the stairs and follow the tunnel until you reach the first intersection. Pause at the corner of the right turn and check for patrols, then continue straight ahead. When the tunnel curves to the right, activate Eagle Vision to identify a potential guard. Use a Cherry Bomb to lure him out of position for an easy stealth kill.
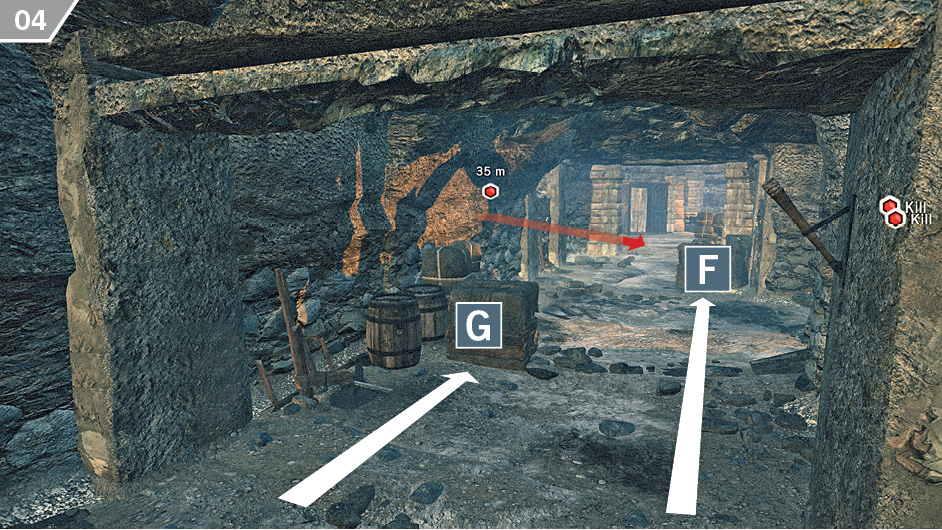
Pause when you reach the next junction and use Eagle Vision to detect a possible patrol to the right before you run straight ahead. You will reach a locked door with three pins when the tunnel curves to the left. Picking this lock enables you to bypass numerous enemies, but also provides a perfect avenue for picking off the first marked Jacobin target with the Phantom Blades. In the tunnel shown here, have one Assassin take cover at  and another (ideally the best marksman) at
  . From here, you can easily kill the Jacobin leader – and then pick off other awkward henchmen as they move to investigate.
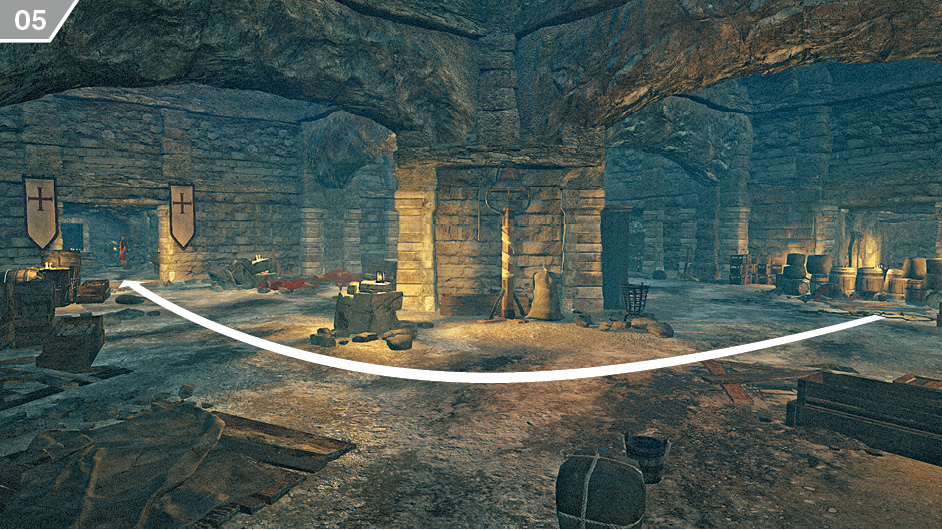
Once you have cleared a sufficient number of guards to enable movement into the main chamber, follow the left-hand wall and – being watchful for enemies – make your way to a second locked door at the end of a short tunnel to the north. Open this and go through.
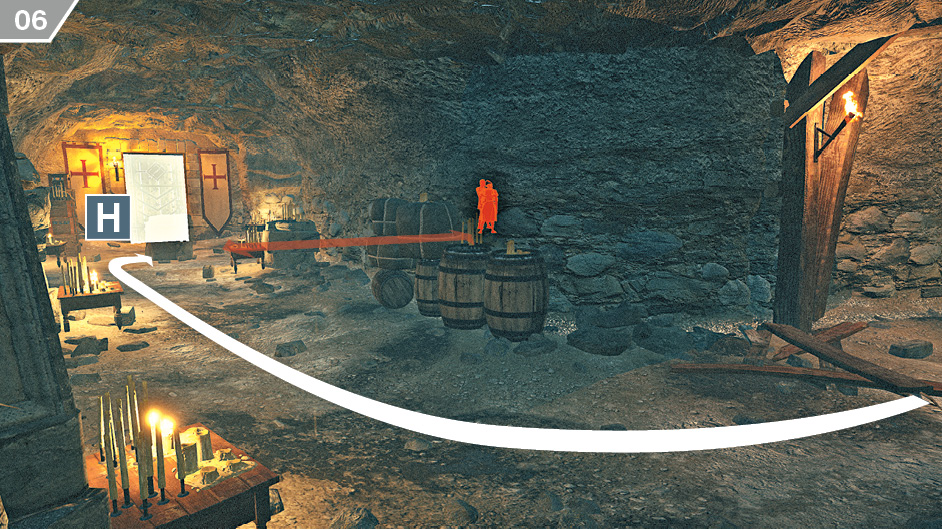
Follow the tunnel until you approach a third locked door. Use Eagle Vision to identify the enemies in the corridor to the right. There is one patrolling enemy that you must quietly neutralize before you can pick the lock. After watching his movements, take up position in cover at  . Perform a cover assassination when he moves within range.
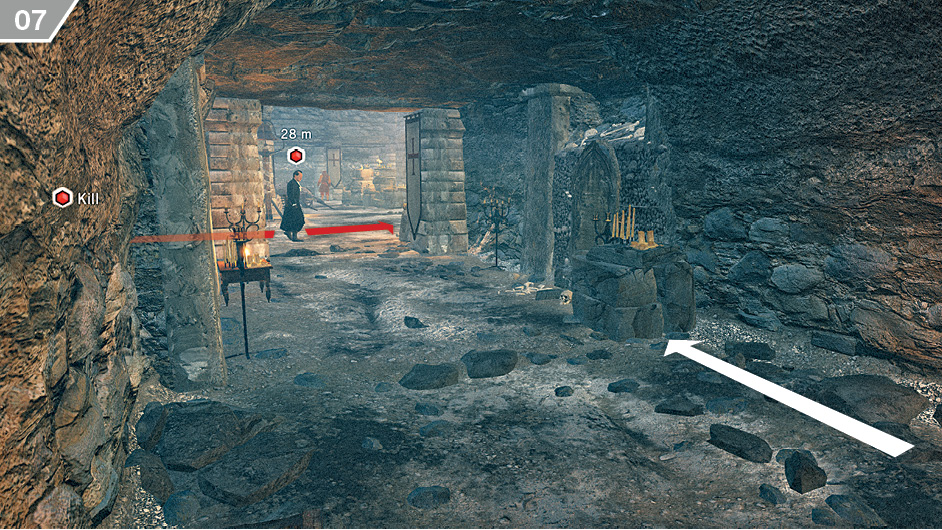
Use Eagle Vision to watch the area behind the locked door. You will notice a patrolling guard walk into view. When he moves away, this is your cue to quickly pick the lock and have your most accomplished marksman take up position behind the solitary cover point. Both remaining Jacobin leaders walk past this position. If you hit both with Berserk Blades – one leader will always rush to investigate when the first is hit – they will usually devastate their allies in a pitched melee. Watch this from cover with Eagle Vision until both targets fall. Your final task is to reach the waypoint marker at the end of a long tunnel to end the mission.
Political Persecution
| Mission Availability | |
|---|---|
| Players |
4 max |
| Difficulty |
|
| Mission Rewards |
Improved Bourgeois Bracers, Improved Prowler Breeches, Arno’s Master Coat |

 The opening five minutes of this mission offer its most frantic and challenging moments by far. As soon as it formally begins, you must reach and “warn” (for which, read: interact with) a specified number of highlighted Girondists before the timer expires. These targets can appear in many different houses, with the configuration potentially changing each time you play “Political Persecution” (though not, you should note, should you be returned to the opening checkpoint).
As the locations of your targets are revealed in-game and vary from session to session, there is little point in documenting potential scenarios here. However, you may find the following general tips to be useful during early playthroughs:
There are usually guards in and around each building containing a Girondist. Watch out for rooftop sentries, guards patrolling floors above or below a target’s position (or even in the room with them), and numerous patrols and watchmen at ground level.
The buildings where Girondists are located usually have between two and five points of entry. Not every building offers free movement between all floors: closed doors may prevent access to stairways.
Make liberal use of Eagle Vision to avoid being surprised by guards, and be sure to mark dangerous enemies to assist your allies. Eagle Vision will also enable you to identify the precise floor where each Girondist can be found: they appear in gold.
You should ideally play this mission with the full complement of four Assassins. If you have this luxury, work in pairs to reach each Girondist. This will double your firepower (stealthy ranged kills save time here), and help to limit instances where a player is besieged by more enemies than he or she can handle.
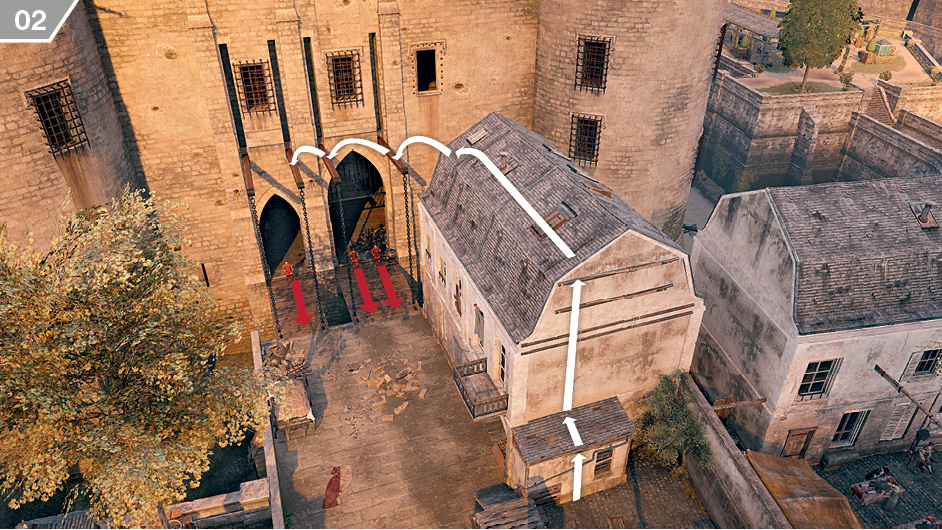
Take a moment to catch your collective breath after the previous objective, then travel to the Bastille. To avoid a lengthy and complicated infiltration, a focused frontal attack on the south gate and inner courtyard will enable you to reach the upper level quickly. Begin by scaling the building to the right of the entrance, then take up positions on the beams above the guards. When everyone is ready, coordinate your air assassinations.
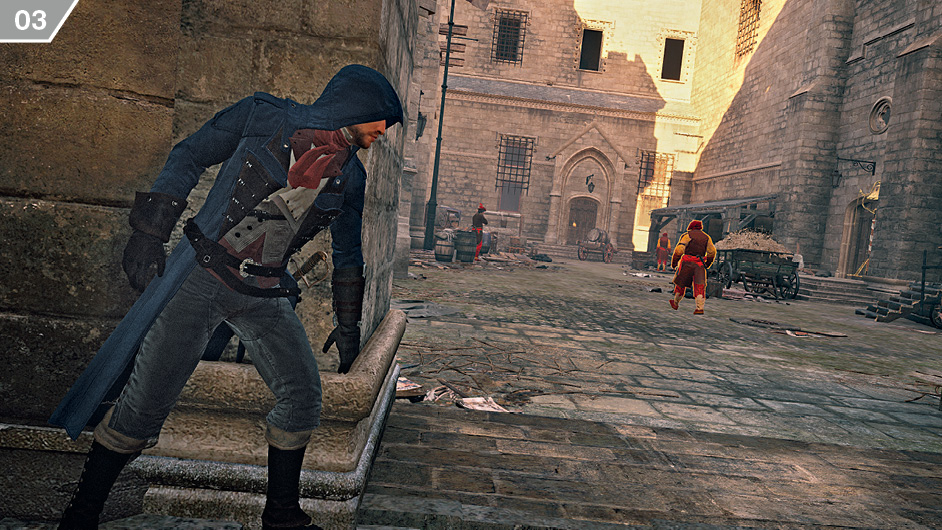
Through the gates, take a moment to identify your targets in the courtyard and agree on a plan of action. Your best two marksmen should be able to eliminate all hostiles with Phantom Blades without raising the alarm.
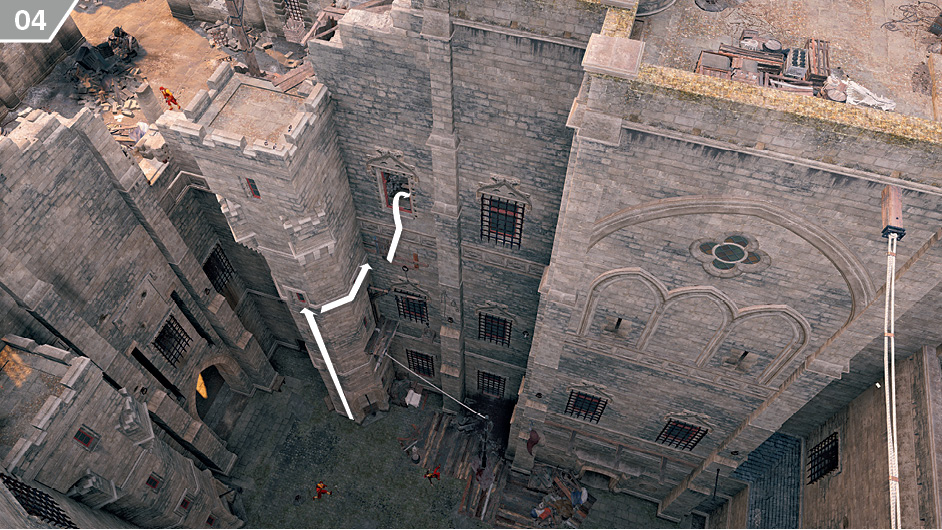
Scale the walls as directed here to reach a window on the eastern wall, then climb through. In the ruined room without a ceiling, you can scale the south wall via the barrels to reach the upper rooftop area.
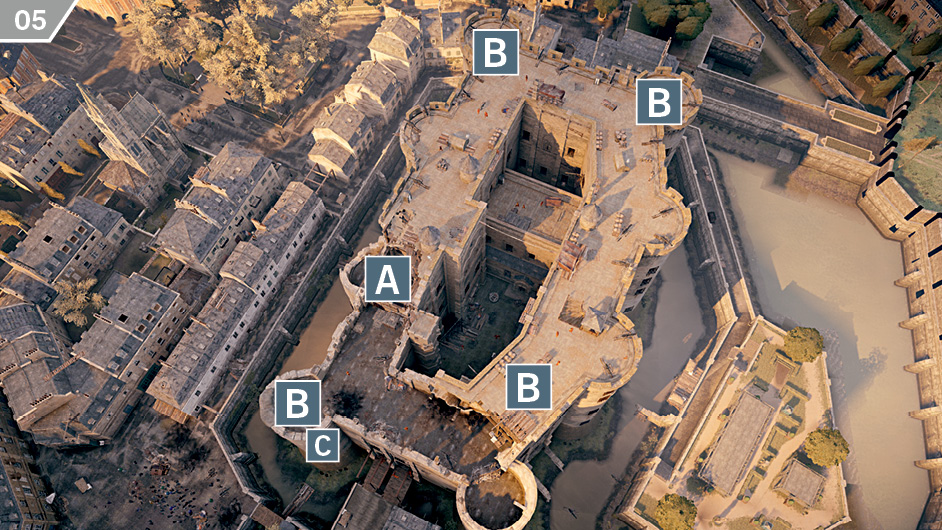
If you followed our instructions on the climb, you begin at position  . There are four possible pyre positions (
 ), the two that appear in each session being randomized. While it is possible to avoid guards, using cover and occasional traversal around the outer ledges of the rooftop, it’s definitely quicker to embark on a silent yet purposeful killing spree with ranged weapons to clear a path – especially as the pyres take almost 20 seconds to light. Be sure to hold the specified button until the flames burst into life. After lighting both pyres, leave the Bastille via the Leap of Faith point on the southwest of the rooftop (
 ), then travel to the next waypoint.
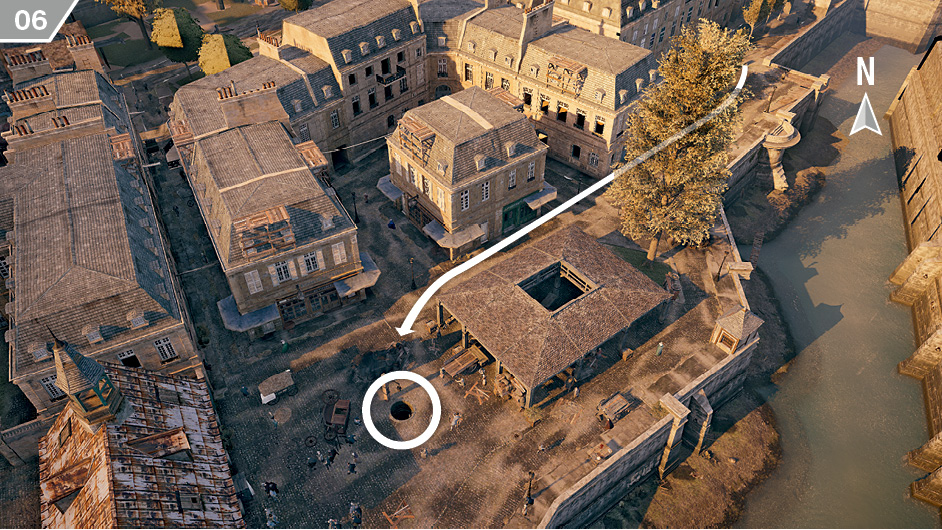
When you arrive at the location shown here, locate the sewer access hole. Have someone climb down and interact with the mechanism to open the gate, which initiates the final task of this mission.
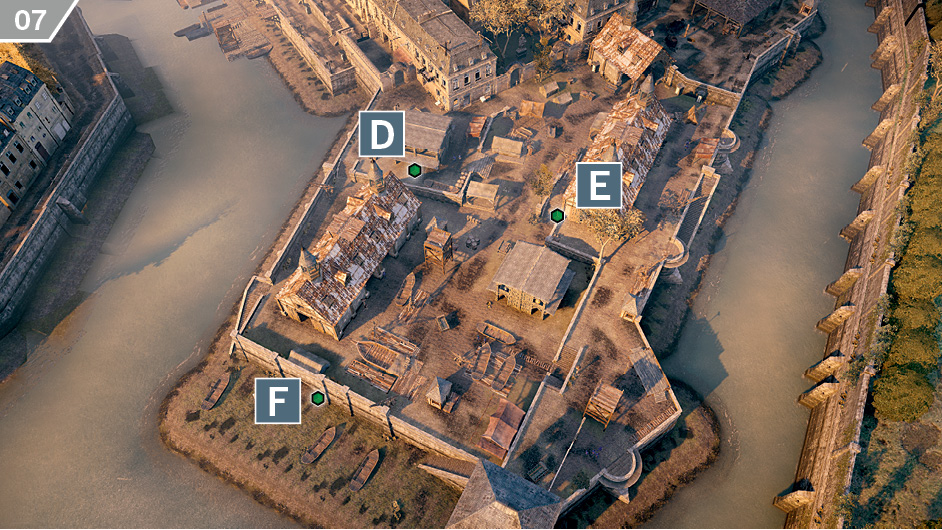
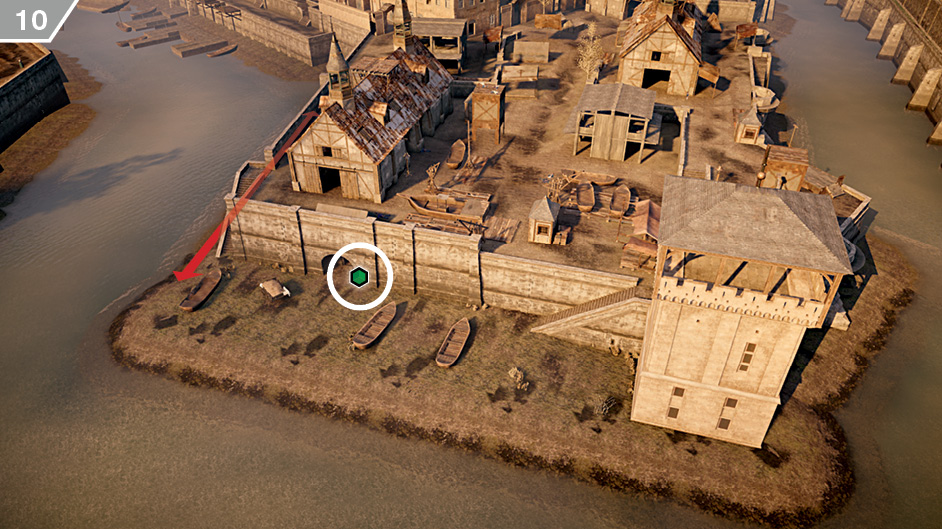
You must open three further gates to enable the Girondists to pass through the sewer to reach a boat, but two of these are accessed via sewer entrances in a heavily guarded Restricted Area. We have marked their locations on this screenshot to give you a general overview. You begin at the north of this area. We suggest that one Assassin deal with position  (see
(see  ), while everyone else should focus their attention on
  (see
(see  ). Position
  should be left until last.
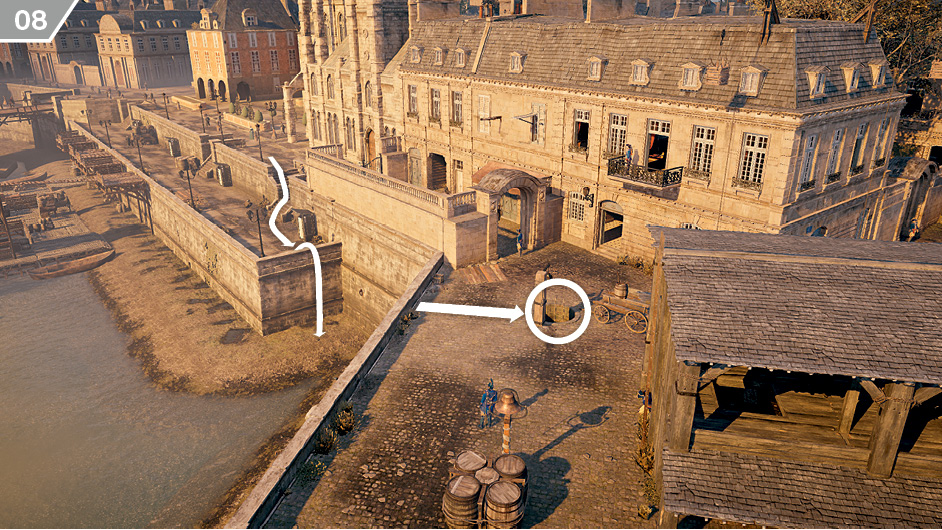
The sewer entrance on the west side of the Restricted Area has patrols and sentries in its vicinity, including marksmen on the nearby building. However, by following the approach shown here, it is possible for an Assassin to make a well-timed run and drop through the opening before they are identified.
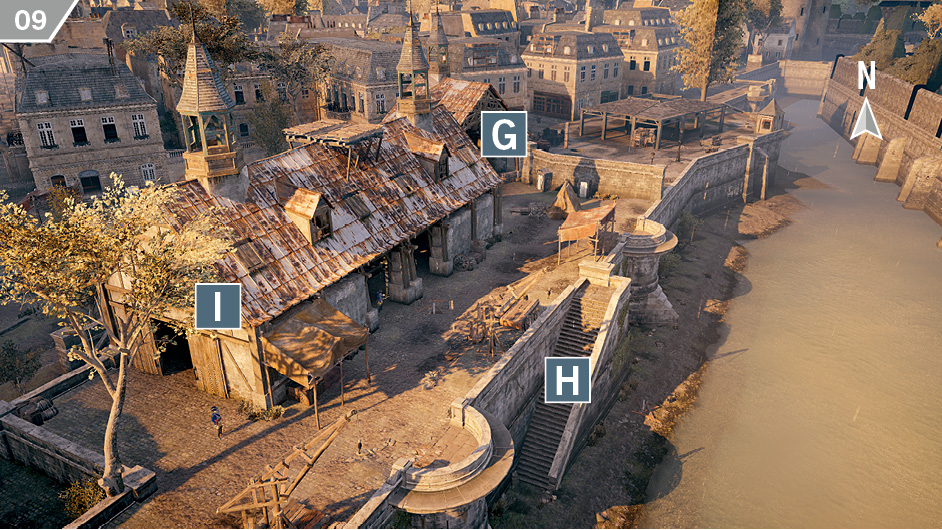
By contrast, the sewer entrance on the east side of the Restricted Area is guarded by an intimidating number of guards, many with interwoven fields of vision that make a stealth-based approach impractical, if not entirely implausible. The least demanding solution is that players engage in creative mischief-making with Berserk Darts from the front gate ( ) and steps to the east (
 ) to reduce the number of prospective assailants in the area before someone makes a dash for the sewer access hole inside the warehouse (
 ).
).
Finally, approach the waypoint to the south, ideally bypassing the Restricted Area by moving around the periphery. There is a large patrol on the west bank that may be a problem; a Poison Gas Bomb or two should suffice to address this concern. When you are ready, interact with the mechanism to unlock the last gate. The mission ends when you reach the waypoint marker and the Girondists arrive at the boat.
Les Enragés
| Mission Availability | |
|---|---|
| Players |
4 max |
| Difficulty |
|
| Mission Rewards |
Improved Napoleonic Hood, Improved Prowler Belt, Master Phantom Breeches |

This is a mission where it makes sense to split up into two parties – hereinafter referred to as the Ledger Team and Prison Team – each taking responsibility for different critical mission objectives. From the start point at  , the Ledger Team should make their way to position
  (see
(see  ). The Prison Team should proceed to the sewer entrance at
  (see
(see  ).
).
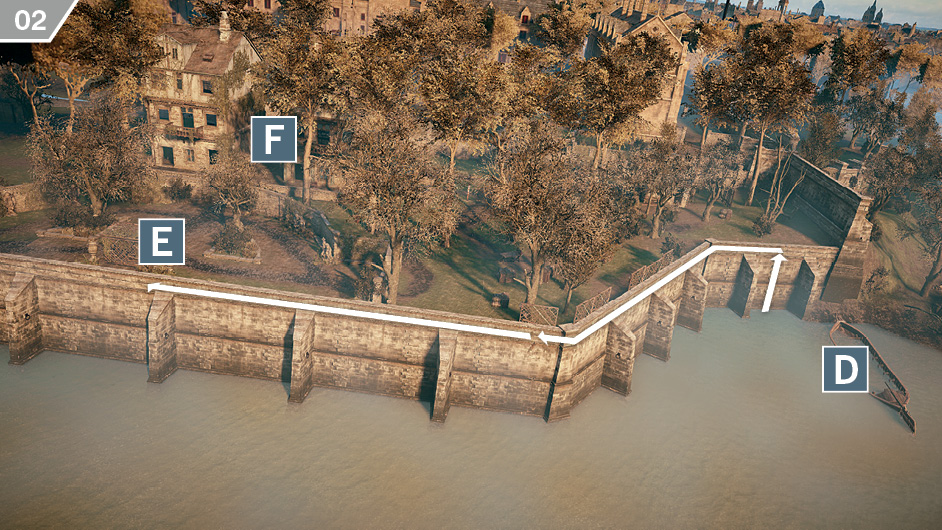
The team in the north of the map will be completing the first objective: the retrieval of the patient ledger. From your position by the water at  , climb the wall and traverse around the outer edge of the wall to reach position
  . The document that you are seeking will be in either of the two detached buildings at
  .
.
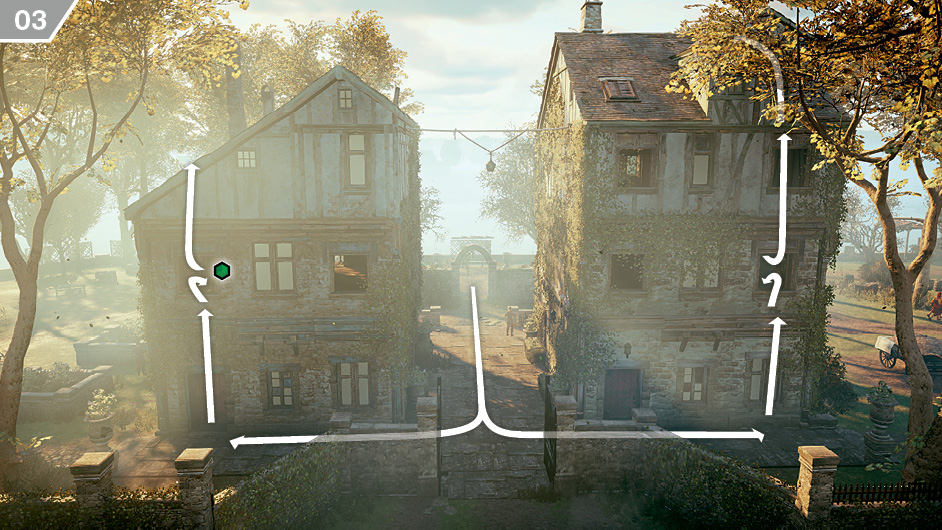
The two houses have far fewer guards on their west side, so wait for an opening to sneak through to that side. You can then climb out of sight and use Eagle Vision to locate the ledger. After collecting it, climb to the rooftops and wait for the Prison Team to complete their objectives.
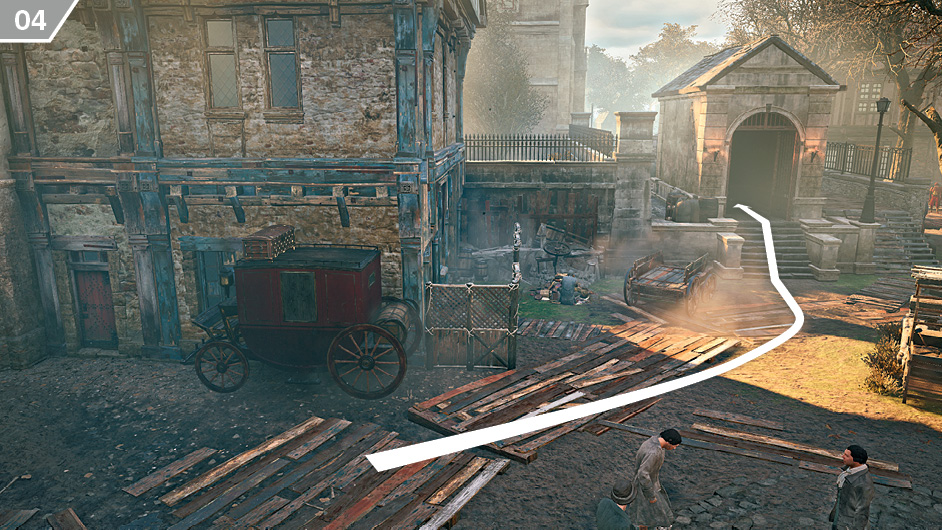
Meanwhile, the Prison Team should enter the sewer entrance shown here and head down both sets of steps. Follow the (broadly linear) pathway until you slide beneath a circular fence to find a locked gate on your left; watch out for guards at the far end of the tunnel here. Pick the lock, then go through and turn left to reach a ladder. Climb it to reach the room above.
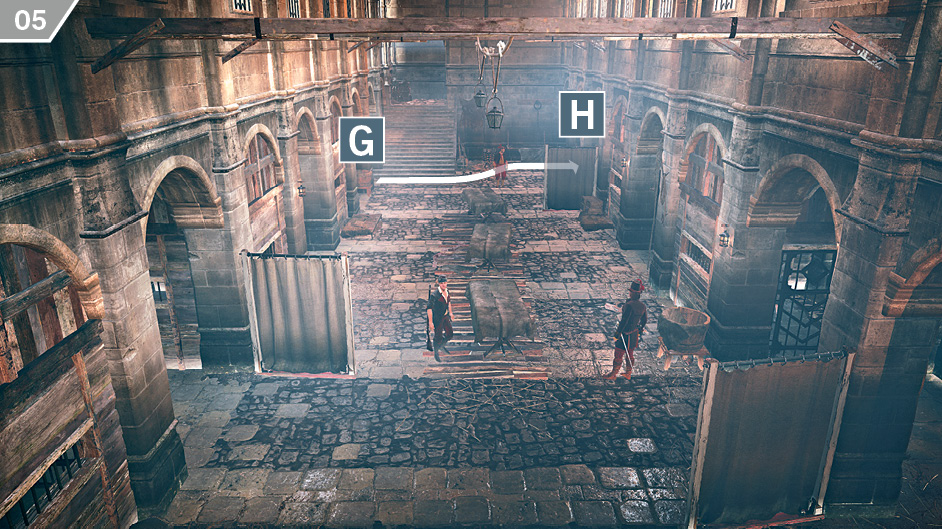
The objectives in the cell areas do not become active until the Ledger Team complete their objective, but this is not a problem – you not only have time to kill, but guards as well. You emerge from the room with the sewer access at  . Clear this room of potential hostiles, then go through the tunnel leading north at
  to carefully approach the next cell area.
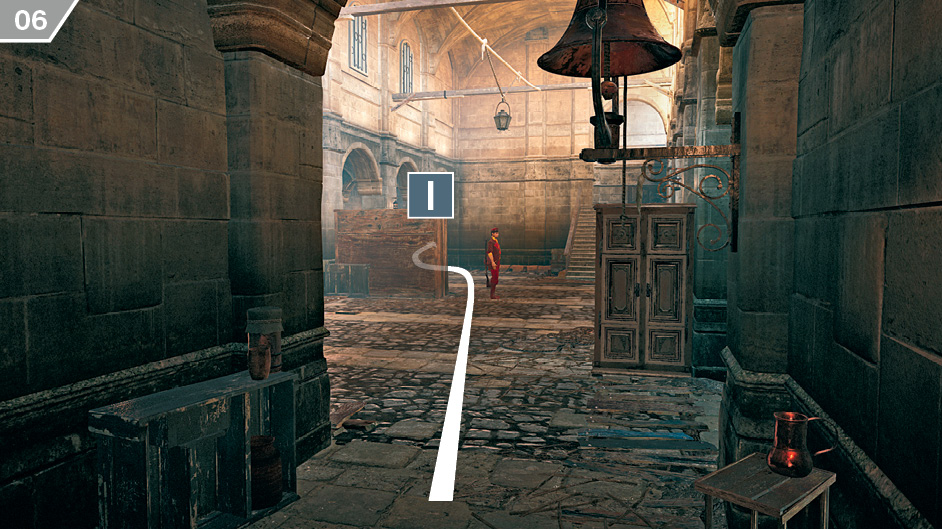
Take cover and eliminate all enemies in this second cell block with quiet ranged takedowns, then approach the locked gate to the left of the steps ( ). Pick this lock, then do the same with the next gate at the end of the corridor.
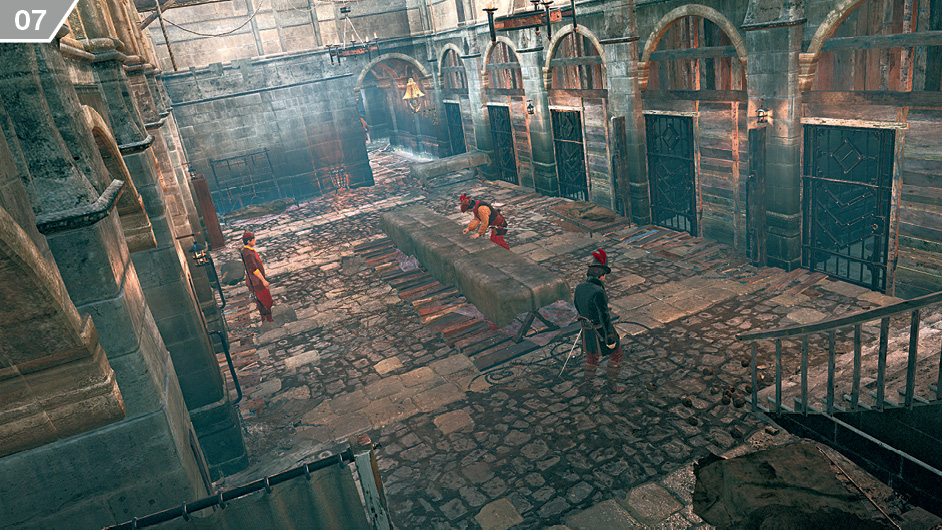
In the third cell area, neutralize all guards. By this point in the mission, the Ledger Team should have completed their objective – which will trigger three prisoners to rescue in the cell blocks that you have by now cleared of potential hostiles. Activate Eagle Vision to identify the first Assassin prisoner in this area, then interact with the door of their cell to automatically unlock it. You can then backtrack through the previous cell areas to free the next two Assassins. When all three have been released, return to the sewer to leave the Restricted Area.
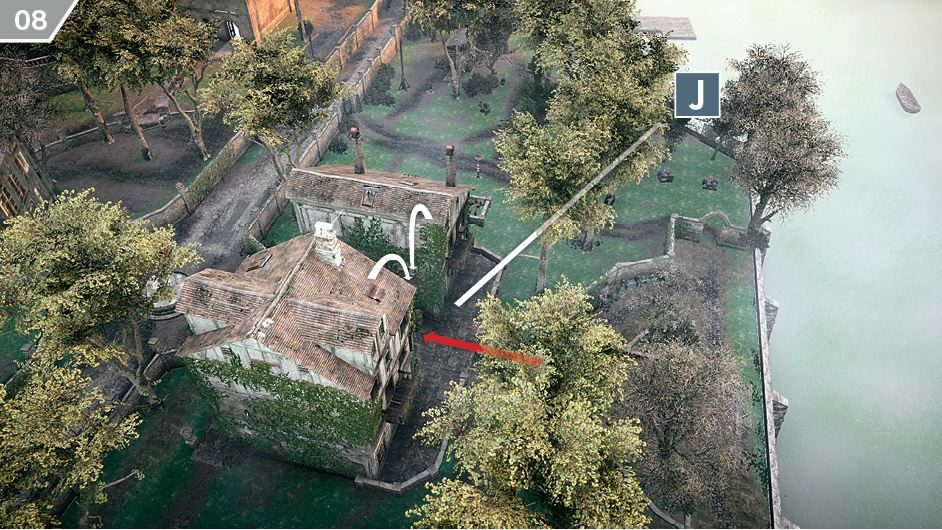
When the third Assassin is released, the Ledger Team can complete the final objective. Jacques Roux appears close to the two buildings where you are standing out of sight on the rooftops. He then walks between them – which is your cue to perform a decisive air assassination. Roux will flee at the slightest hint of danger, so this aggressive approach minimizes the risk of an escape. On that subject, the Ledger Team can easily outpace guards during a sprint to the water at  , and then swim away to the north. All Assassins can then leave the highlighted area to end the mission.
Moving Mirabeau
| Mission Availability | |
|---|---|
| Players |
2 max |
| Difficulty |
|
| Mission Rewards |
Legendary Napoleonic Breeches, Master Bourgeois Belt, Master Musketeer Bracers |

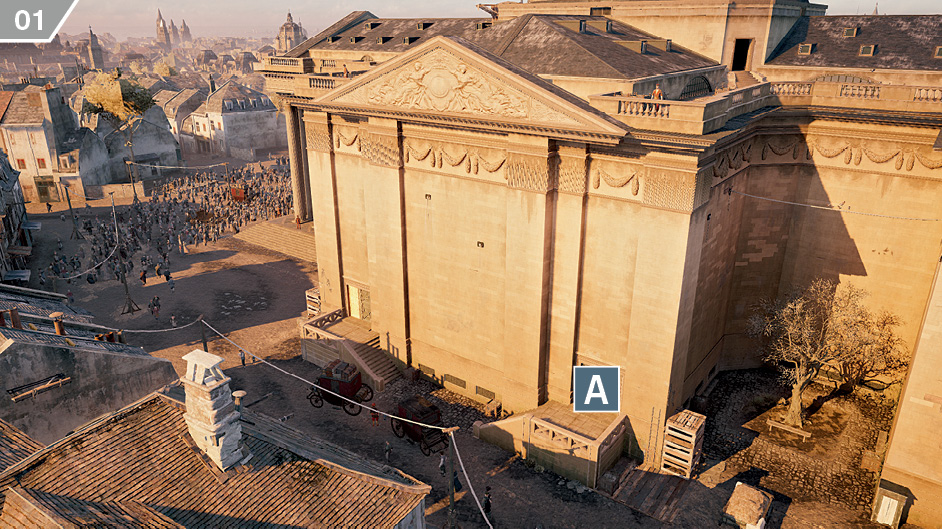
Though there are several points of entry to the Pantheon, including four on the roof (and a brazen fight at the front entrance if you are so inclined), the two locked doors on the south side of the structure are lightly guarded. The right-hand door ( ) puts you in the best position to avoid conflict once you are inside.
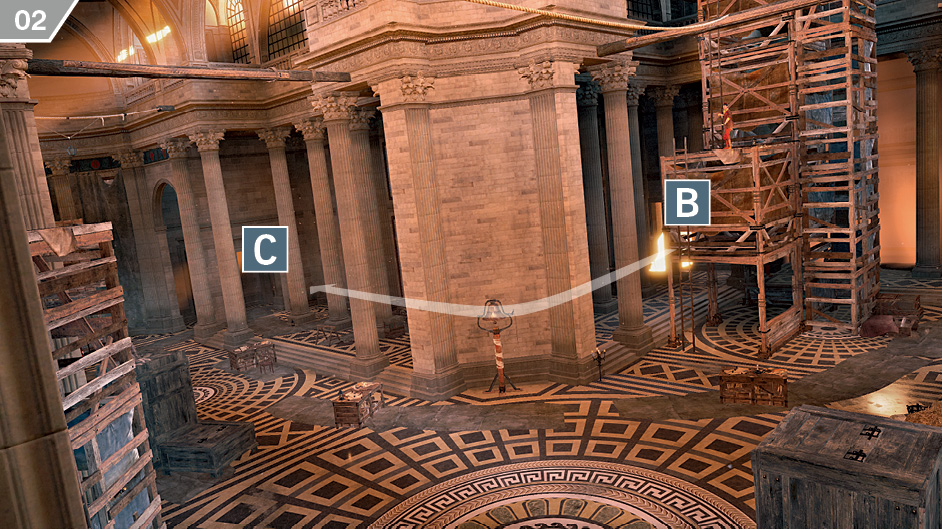
From just inside the door at  , watch patrols and sentries carefully and use the pillars to avoid detection as you make your way to the steps leading downwards at
  .
.
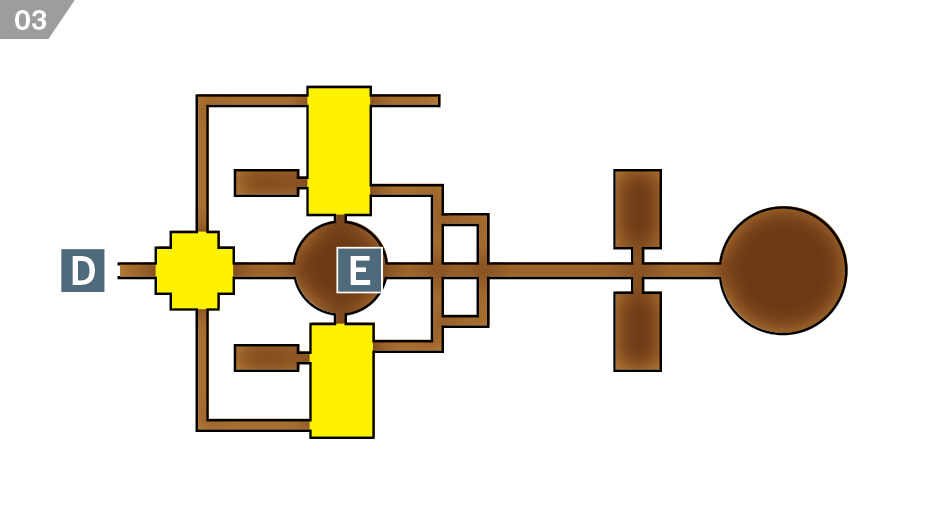
When you reach the waypoint at the bottom of the stairs ( ), a puzzle awaits. To solve it, you must first find three symbols in the highlighted search areas with Eagle Vision. As there are numerous Templar henchmen in the area, it pays to work as a team to methodically eliminate potential witnesses as you move between the rooms. Look for square panels on the walls and pillars in each area: these are the potential sites of each symbol. When you find one, keep it in sight (and at relatively close range) until the mission tally updates, then move on to the next search zone. Once you have found all three symbols, move to the central chamber with three pedestals (
 ), then interact with each one until all three illuminated symbols are aligned in the direction of the northwest corridor. After the secret door opens, go into the chamber beyond to collect Mirabeau’s relics.
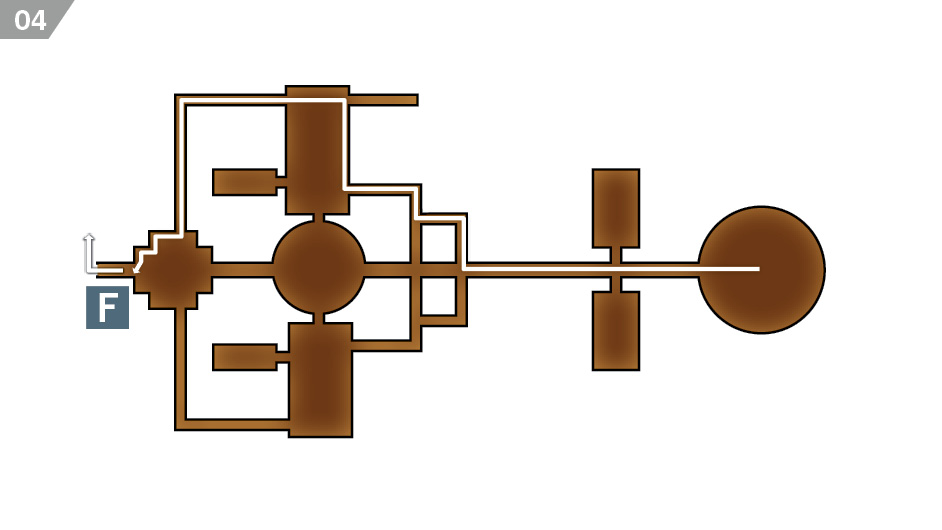
Your next task is to escape – but the arrival of the National Guard rather complicates your departure. Follow the route on the map shown here to avoid conflict, sliding through low gaps and unlocking gates as you move around the outside of the underground area. Rather than avoiding the new enemies, it’s probably more prudent to eliminate them to reduce potential assailants in the event of a fight. When you reach the exit at  , you must interact with the torch on the left-hand side of the door to unlock it. This will not work if you are in open conflict – so ensure that potential witnesses are either incapacitated beforehand, or in no position to spot you for at least several seconds.
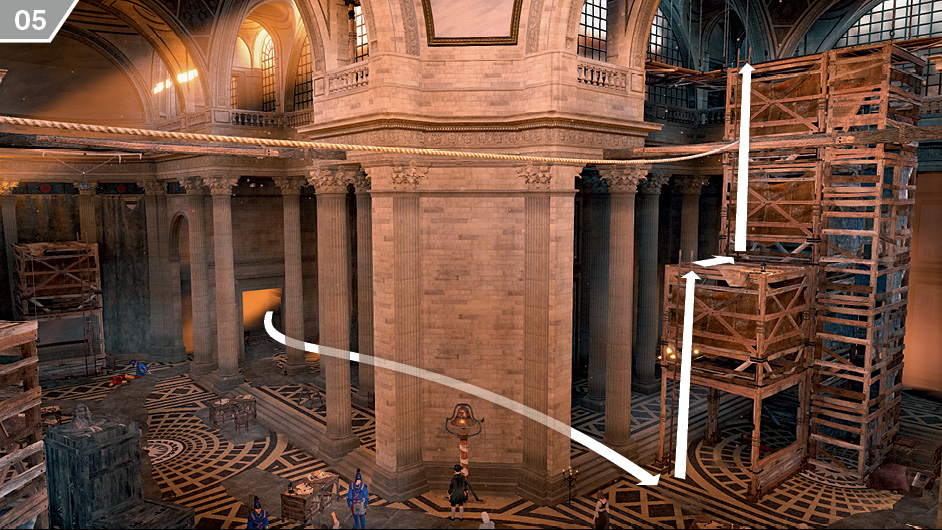
When you pass through the door, turn right and head up the steps. This will lead you to emerge from the door shown here. Creep out of sight to the scaffolding, then climb up.
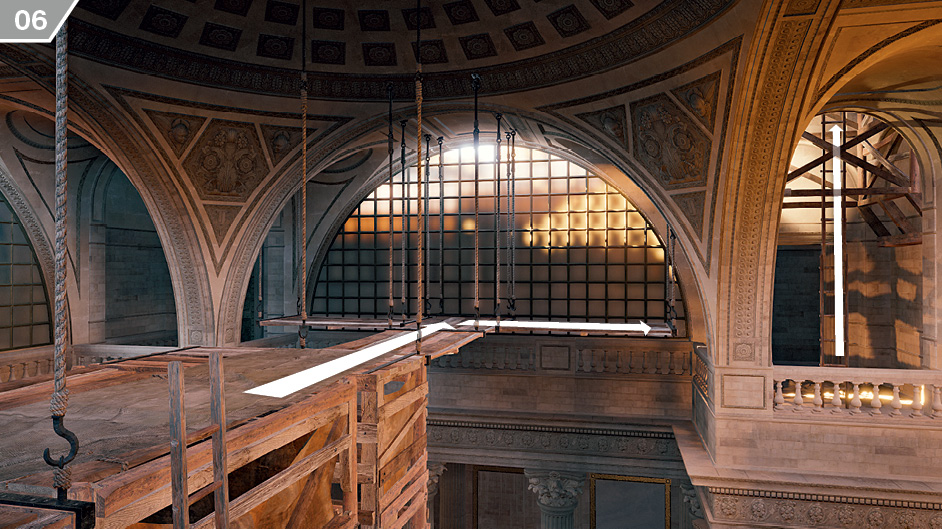
From the top of the scaffolding, make your way to the ladder shown here to ascend to the roof area. In the corridor, go through the first exit and approach the ledge to find a Leap of Faith position. When you leave the highlighted area, the mission ends.
The Tournament
| Mission Availability | |
|---|---|
| Players |
4 max |
| Difficulty |
|
| Mission Rewards |
Master Phantom Hood, Master Brigand Breeches, Legendary Musketeer Coat |

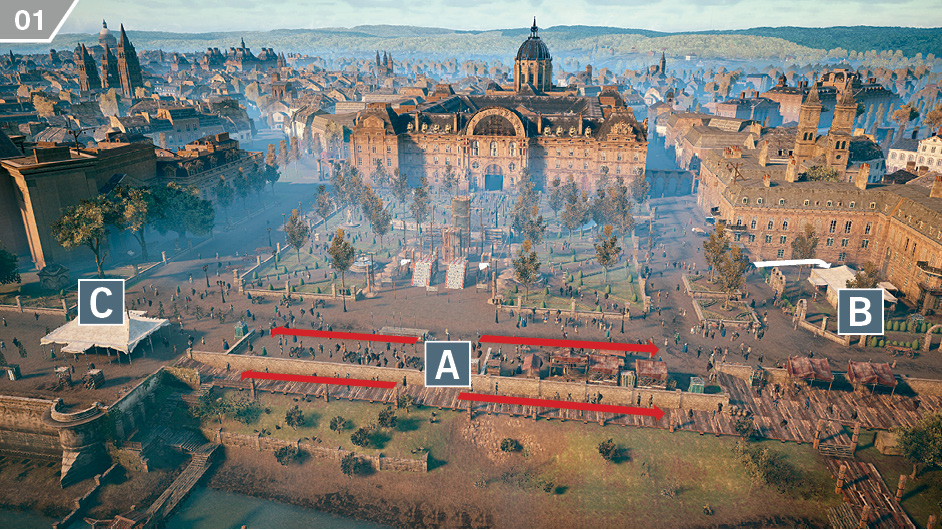
Your first task is to collect four letters of permission. Two of these are carried by senior guardsmen who can be found wandering in area  . One guardsman is alone, and therefore an easy target for an able pickpocket, but the other is flanked by three companions. Approach the group from behind and throw a Stun Bomb in their direction, then sprint to your target and pickpocket him. If you’re swift enough, you can complete the robbery before the cloud disappears. The two remaining letters can be found in the tents at
  and
and  . The fixed letter at
  is easy to pick up without bloodshed: just hop through the window at the back of the tent while the guards are facing away. The second at
  requires a little teamwork: Cherry Bombs or outright provocation will work to redirect the vigilance of the guards while an unseen Assassin expertly lifts the required item. The amount of guards that you kill during this entire step is very important: if you do not kill any (as we recommend here), you will be able to use the easiest point of entrance during the mission’s final step (
 ), and the assassination zone will not be a Restricted Area – the easiest scenario by far. If you kill fron one to four guards here, the easiest entrance point will be closed during the final step and you will trigger a small Restricted Area. If you kill five or more guards here, the easiest entrance point will be open, but you will trigger a large Restricted Area in the final step.
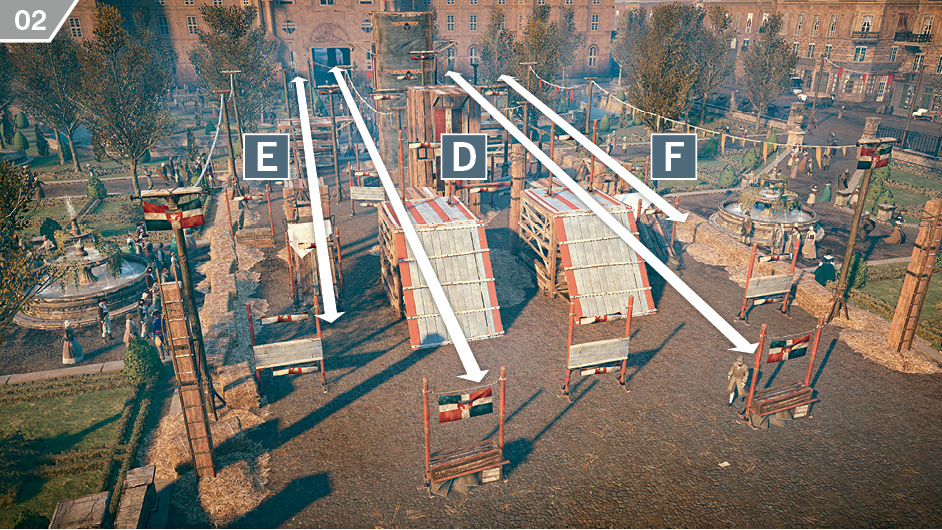
The second stage of the mission is a challenge to reach all flags marked by waypoints before the timer expires. Collecting each flag provides valuable bonus seconds and causes other flags to drop into position. With four players, it’s prudent to have two players work at opposite ends of the large central lane at  , while two others work on the outer lanes at
  and
and  . The same principle works with three players. Those playing with a single partner will need to concentrate and communicate to complete the task before the timer expires.
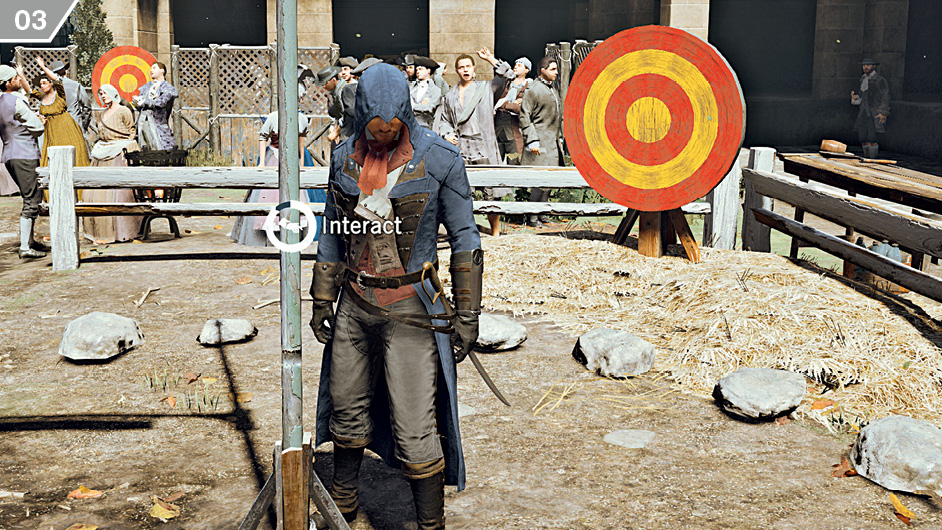
In the arena battle, all but one Assassin should use all means at their disposal to engage the enemies surrounding a single flag at a time. Meanwhile, the remaining Assassin needs to reach the flag and hold  /
/ until the onscreen meter fills. Any attack during this process resets the meter to zero, which can make this an extremely tough battle for those playing with anything less than the optimal four Assassins.
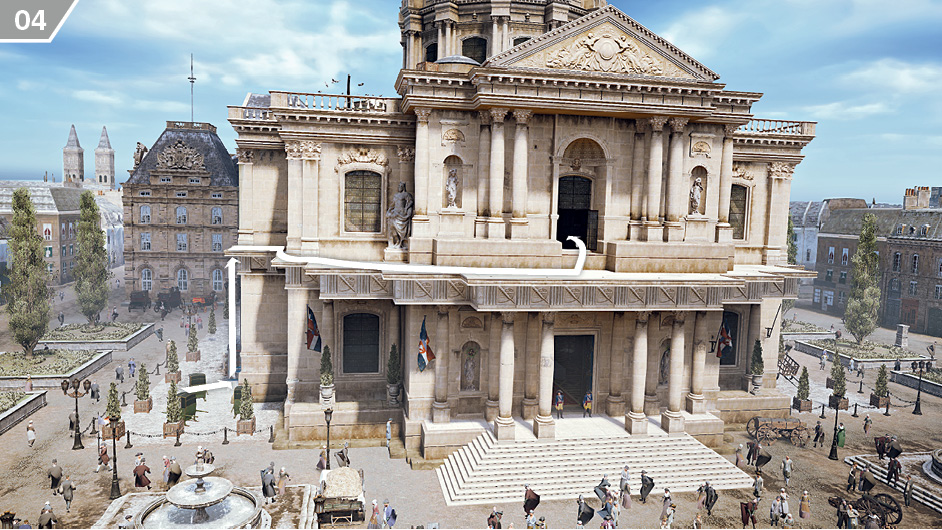
Speak to Dumas, then approach the building where the four specified targets can be found. If you followed our advice and killed no guard during step  , the best access point by far – the window above the main entrance – will be open; climb the building from a secluded spot to either side, then traverse to it. On the ledges and ropes inside, you have a clear view of all four coup conspirators. Berserk Blades offer a convenient way to eliminate all targets without repercussions, though this situation also presents a rare opportunity for a perfect four-man synchronized air assassination display. This will clearly lead to a pitched fight with the remaining enemies, but some might deem this an acceptable consequence… If you killed five or more guards during step
  , the front window will still be open, but the zone will be considered as a Restricted Area. If you killed one to four guards, the front window will be closed, so you will have to use side windows instead.
Women’s March
| Mission Availability | |
|---|---|
| Players |
4 max |
| Difficulty |
|
| Mission Rewards |
Master Military Coat, Master Sans-Culottes Hood, Legendary Prowler Bracers |

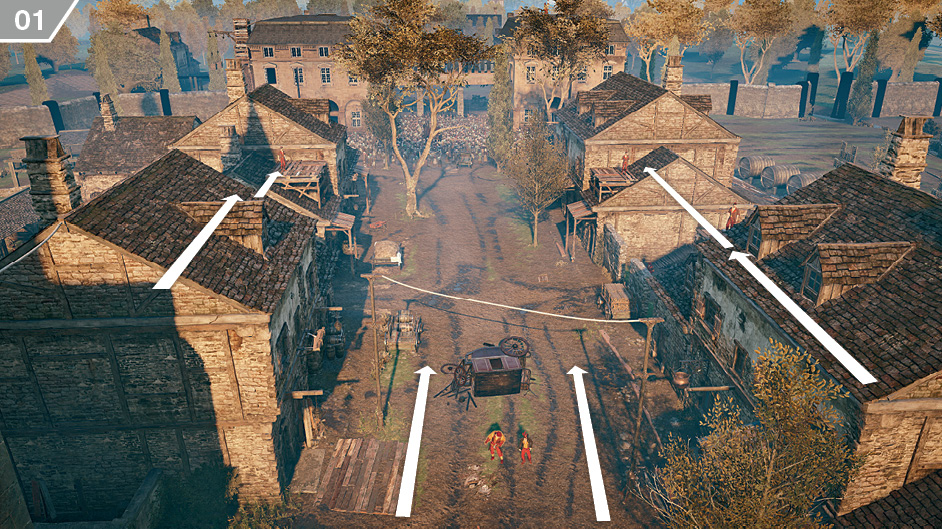
The best way to deal with the opening skirmishes is to stay at the edge of the road when the Extremists initially run in to attack Méricourt, then sprint in behind them for coordinated assassinations, or take them out with ranged attacks. When you reach the Restricted Area, though, two Assassins should take to the rooftops on either side of the road to eliminate the snipers. The Assassins on the ground can weaken onrushing assailants by throwing Poison Gas Bombs in their path.
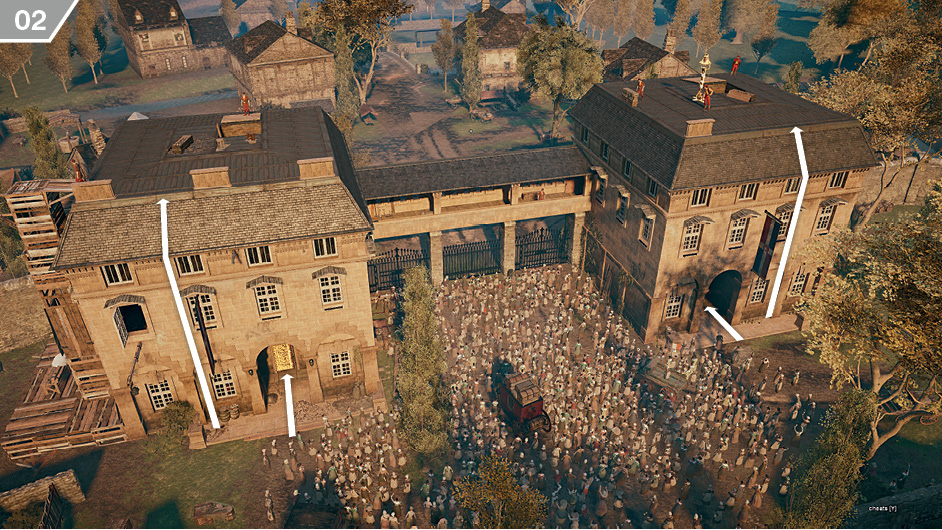
When you reach the large crowd outside the gatehouses, you discharge your escort responsibilities. You objective here is to kill the three marked captains. While the buildings contain a not inconsiderable number of guards, a full group of four Assassins should be able to patiently clear both buildings without difficulty. Use Eagle Vision to identify enemy movements before you transfer between floor levels, and you can coordinate your efforts to eliminate targets before they can react. Don’t neglect to clear all Extremists on both rooftops – this will make your life easier during the final objective.
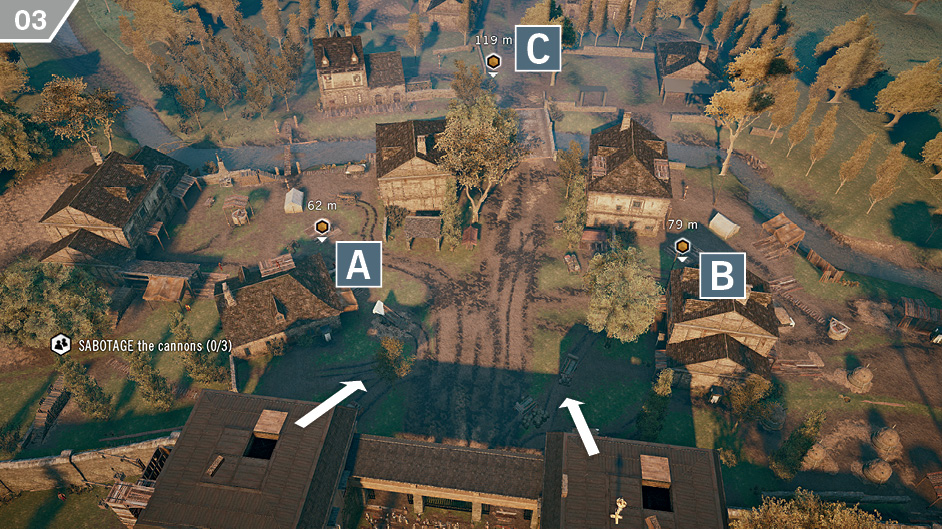
When the captains have fallen, exit via the doors at the rear of the gatehouses. Each of the three cannons ( ,
,  ,
,  ) in this sizable area is protected by a large number of Extremists, with alarm bells in each location. As combat might become unmanageable if an Assassin is detected, scout the periphery of each position and eliminate marksmen stationed on buildings and other elevated vantage points. You can then get creative in the way that you reduce the number of Extremists surrounding each cannon. For example, Berserk Blades employed against a couple of stronger enemies (Brutes or better) is clearly a smart move… but a couple of Poison Gas Bombs expertly lobbed into the middle of the melee that ensues turns a good plan into a great plan.