
Assassin's Creed Unity Guide Walkthrough
Sequence 09
 Memory 01/“Starving Times”
Mission OverviewChallenges■Don’t touch the water: see “Notes & Further Reading”. ■ Don’t trigger any alarms: see Notes & Further Reading■The water-based Challenge only applies for the first part of the Memory, until entry |
 .
. , and ends once Arno discovers the destination of the barge.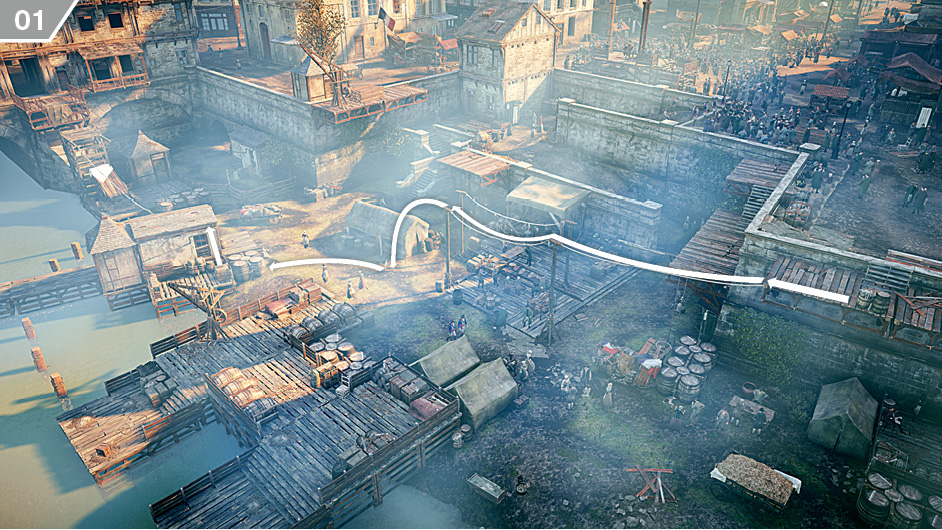
After the opening cinematic, travel to the waypoint at the docks. The first section of this Memory is a trial of your free running skills as you guide Arno in pursuit of a fast-moving barge. From your start position, run over the ropes and, when you reach the end, drop to the ground. Climb to the roof of the small building.
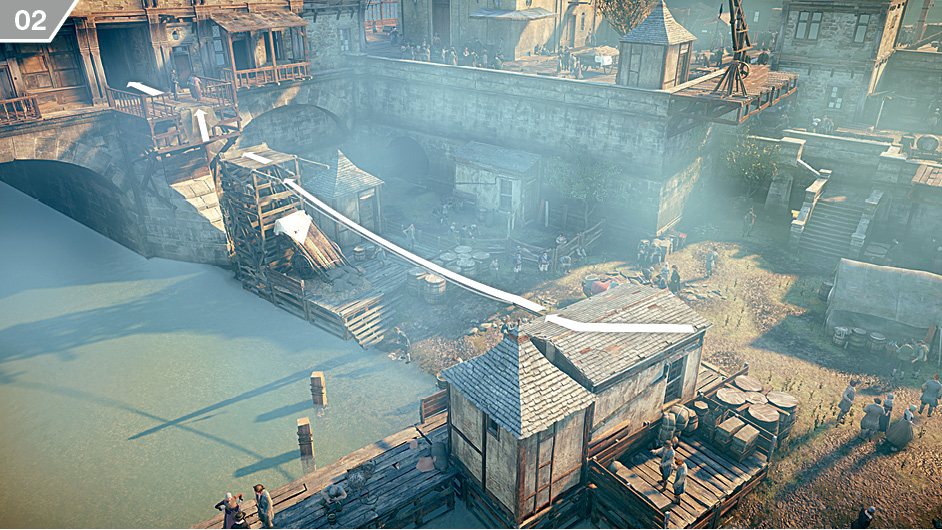
Run along the next rope to reach a scaffold and, from there, leap to the bridge.
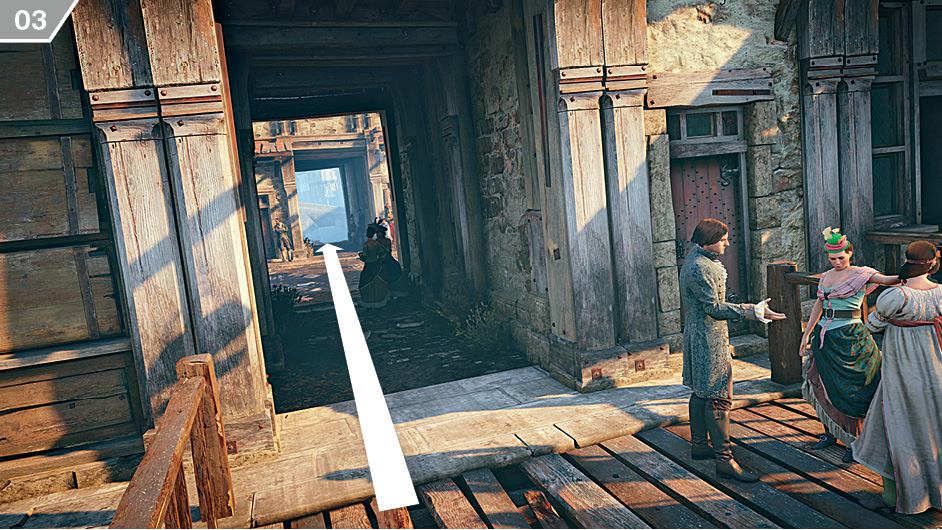
Run straight across the bridge and through the opening at the other side.
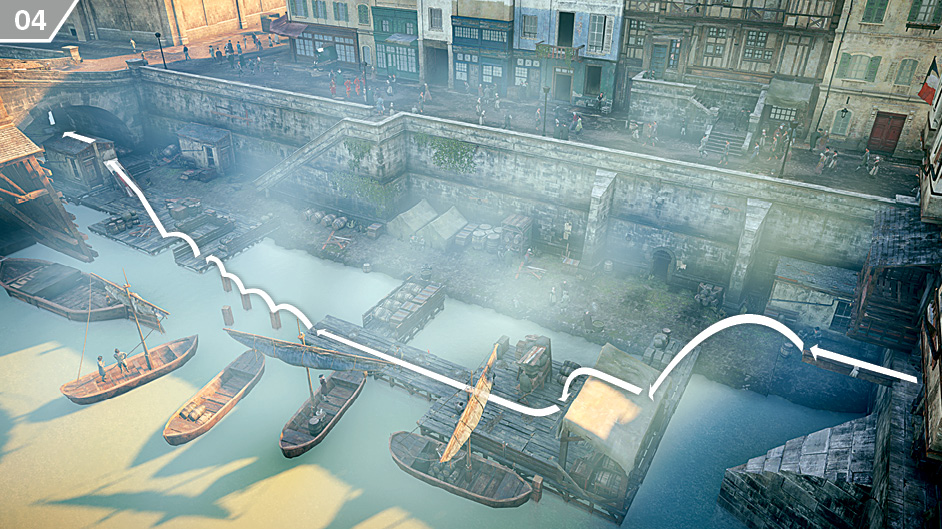
From the beam, leap to the canvas-covered roof. The boats seem to offer the most suitable route, but that free run course leads to a much higher chance of Arno getting his feet wet – which will lead you to fail the opening Challenge. Instead, drop to the wooden boards and hop over the wooden piles. Run up the ramp and over the rope just beyond the roof to pass beneath the bridge.
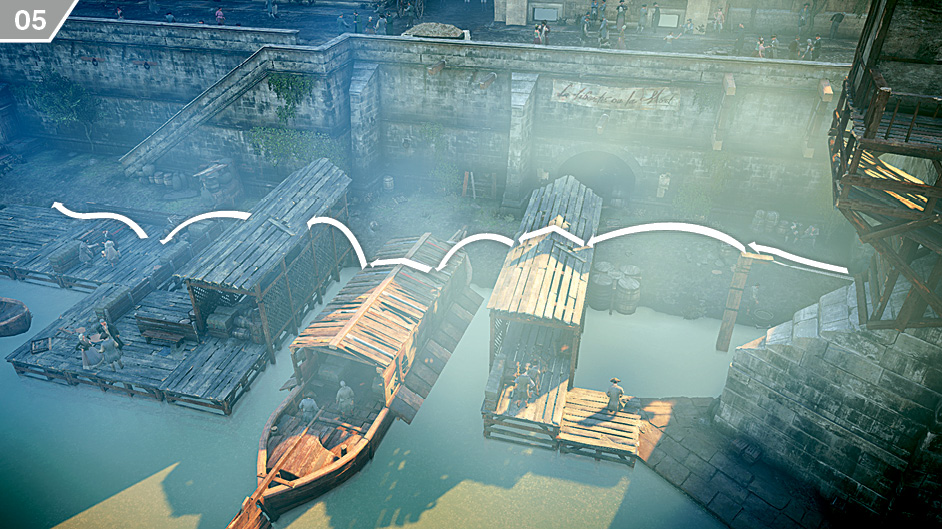
At the end of the rope, jump from roof to roof and then make a suitably large leap on the final roof to avoid the water just beyond it. You can then run along the riverbank.
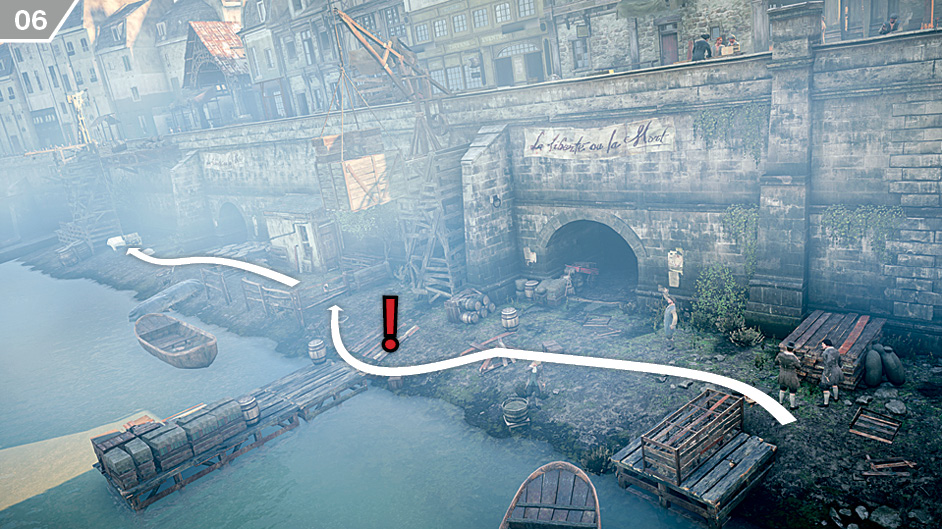
As you approach this position, ignore the Extremist and get ready to swerve around the crate as it plummets to the ground. You can then continue along the riverbank, vaulting or dodging obstructions, until you reach a lift.
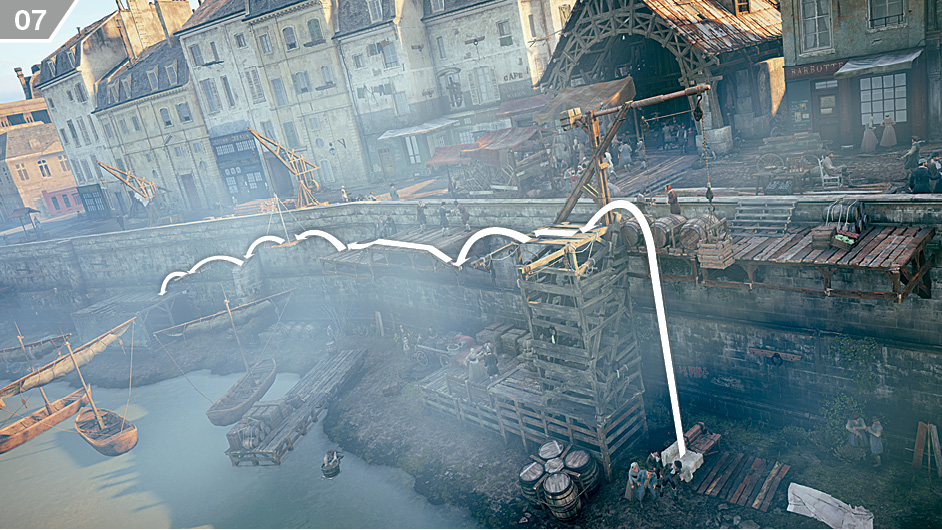
Free run via the platforms, beams and poles to follow a course alongside the wall.
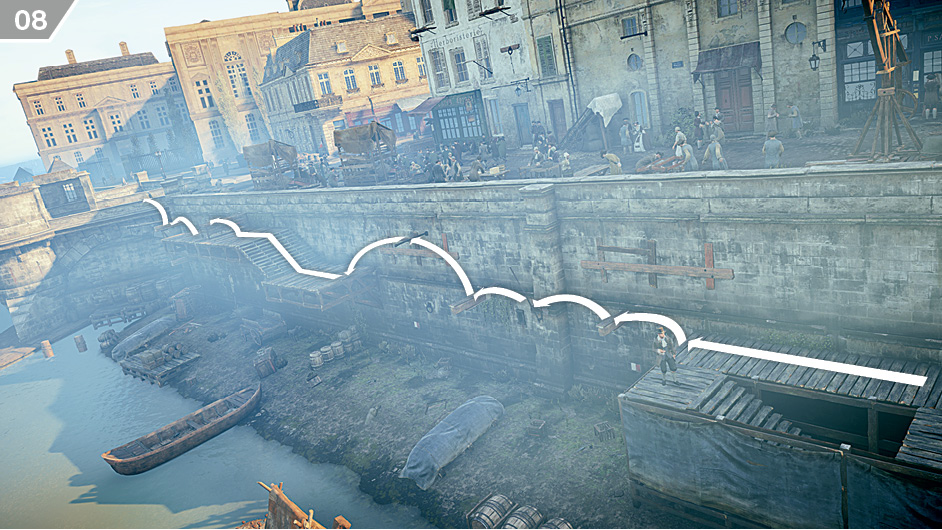
Follow the route illustrated here to reach the bridge to trigger a brief cutscene and end the opening chase. The Challenge to avoid touching water ends here.
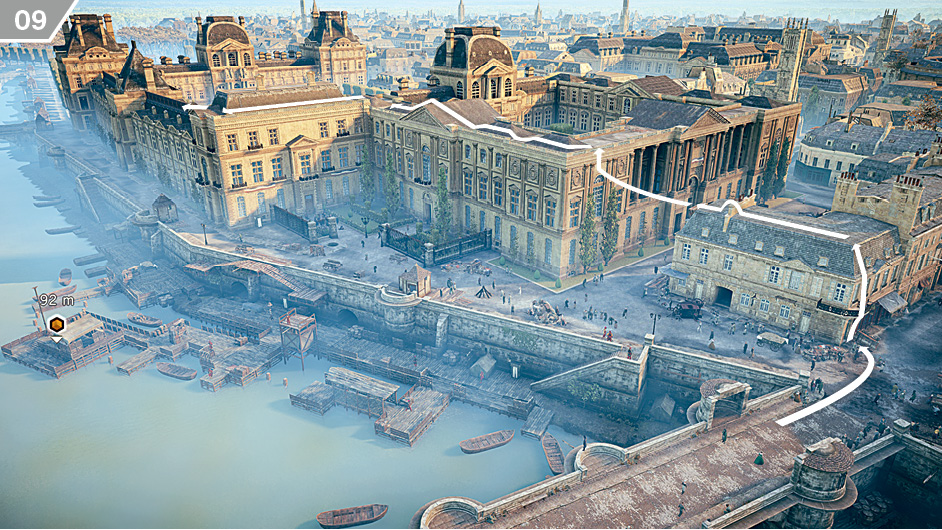
You must now steal (or loot) orders from the individual highlighted by a waypoint marker. The dock area may seem lightly guarded at first if studied from the bridge, but the number of Extremists – and complexity of navigating interlocking fields of vision – makes a direct approach very difficult. As the Challenge for this section of the Memory is to avoid triggering the alarm bell, our strategy involves bypassing the vast majority of enemies in the area. From the bridge, follow the detour illustrated above to climb to a rooftop, cross via a rope to the next building along, then continue to reach a Leap of Faith position. Though it may seem unnecessarily circuitous, this enables you to avoid Extremists on the street.
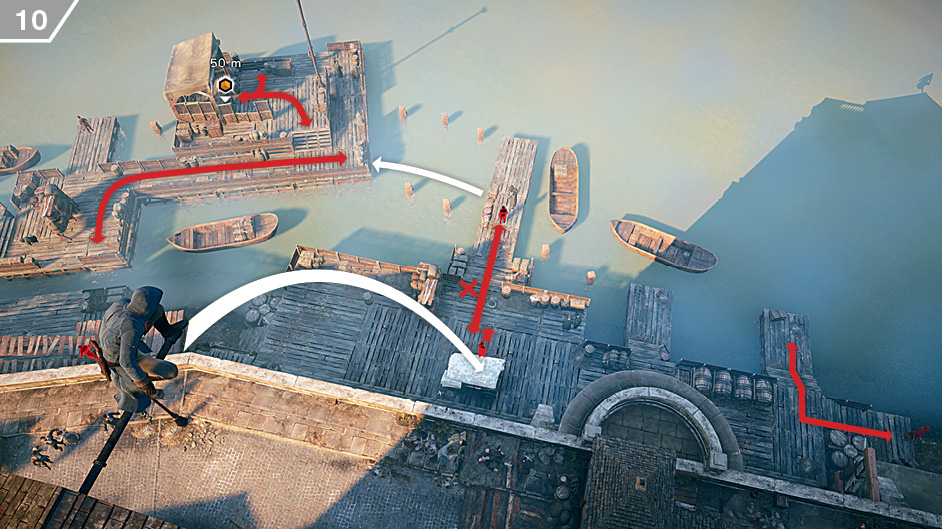
From the pole far above the hay cart, watch the guards below to get a feel for their movements. We have highlighted the individuals that you need to focus on. The one at the top of the annotated screenshot is the target – but before you reach him, you’ll need to eliminate specific Extremists. Dive into the hay cart and, after ensuring that the patrolling Brute is facing away, perform a hiding spot assassination on the guard right by you. Wait until the Brute returns. When he turns away, perform a Hidden Blade kill at the position marked with an X: this should prevent his allies from noticing his body. After checking that surrounding guards are not looking in your direction, swim over to the position marked on the screenshot.
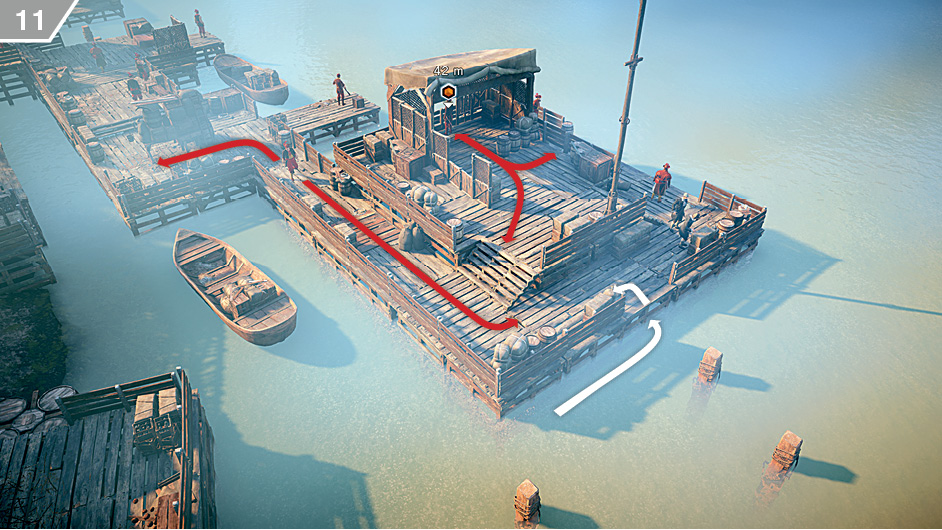
There are multiple ways to acquire the orders at this stage (a deft and daring exercise in pickpocketing, the nefarious mischief of a Berserk Blade, clever use of Cherry Bombs), but elementary violence offers the most reliable method. Get into position as marked on the screenshot, then activate Eagle Vision to watch the patrolling guard approach. When he moves within view, hit him with a Phantom Blade headshot. Now wait. The target with the orders will soon notice the body, and move to investigate – at which point, you can sneak up behind him and strike. If not, you can make your move when he stands at the top of the steps.
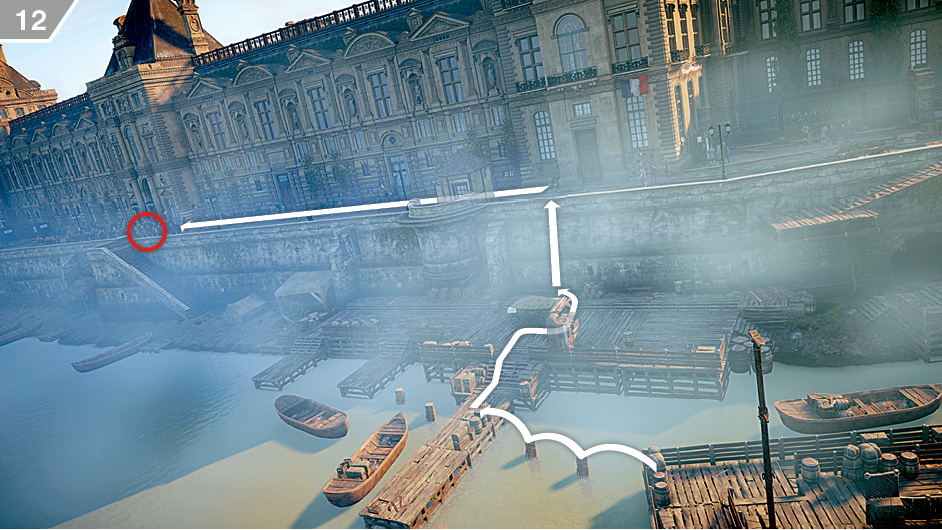
With the orders in Arno’s possession, your only remaining task is to escape. Carefully backtrack to the hay cart and climb the wall behind it, then run along the street in the direction of the protestors. Blend with the crowd to avoid detection by the two Extremists guarding the steps down to the docks. Once you move outside the highlighted area, the Memory ends.
 Memory 02/“Hoarders”
Mission OverviewChallenges■Rescue Thomas Levesque: see ■ Don’t trigger any alarms: see “Notes & Further Reading”. Notes & Further Reading■The Challenge to avoid triggering any alarms is active from the beginning of the mission to the moment that you assassinate Marie Levesque. ■If you would prefer a more direct route to Levesque, you can skip straight to entry |
 .
. . As with other set-piece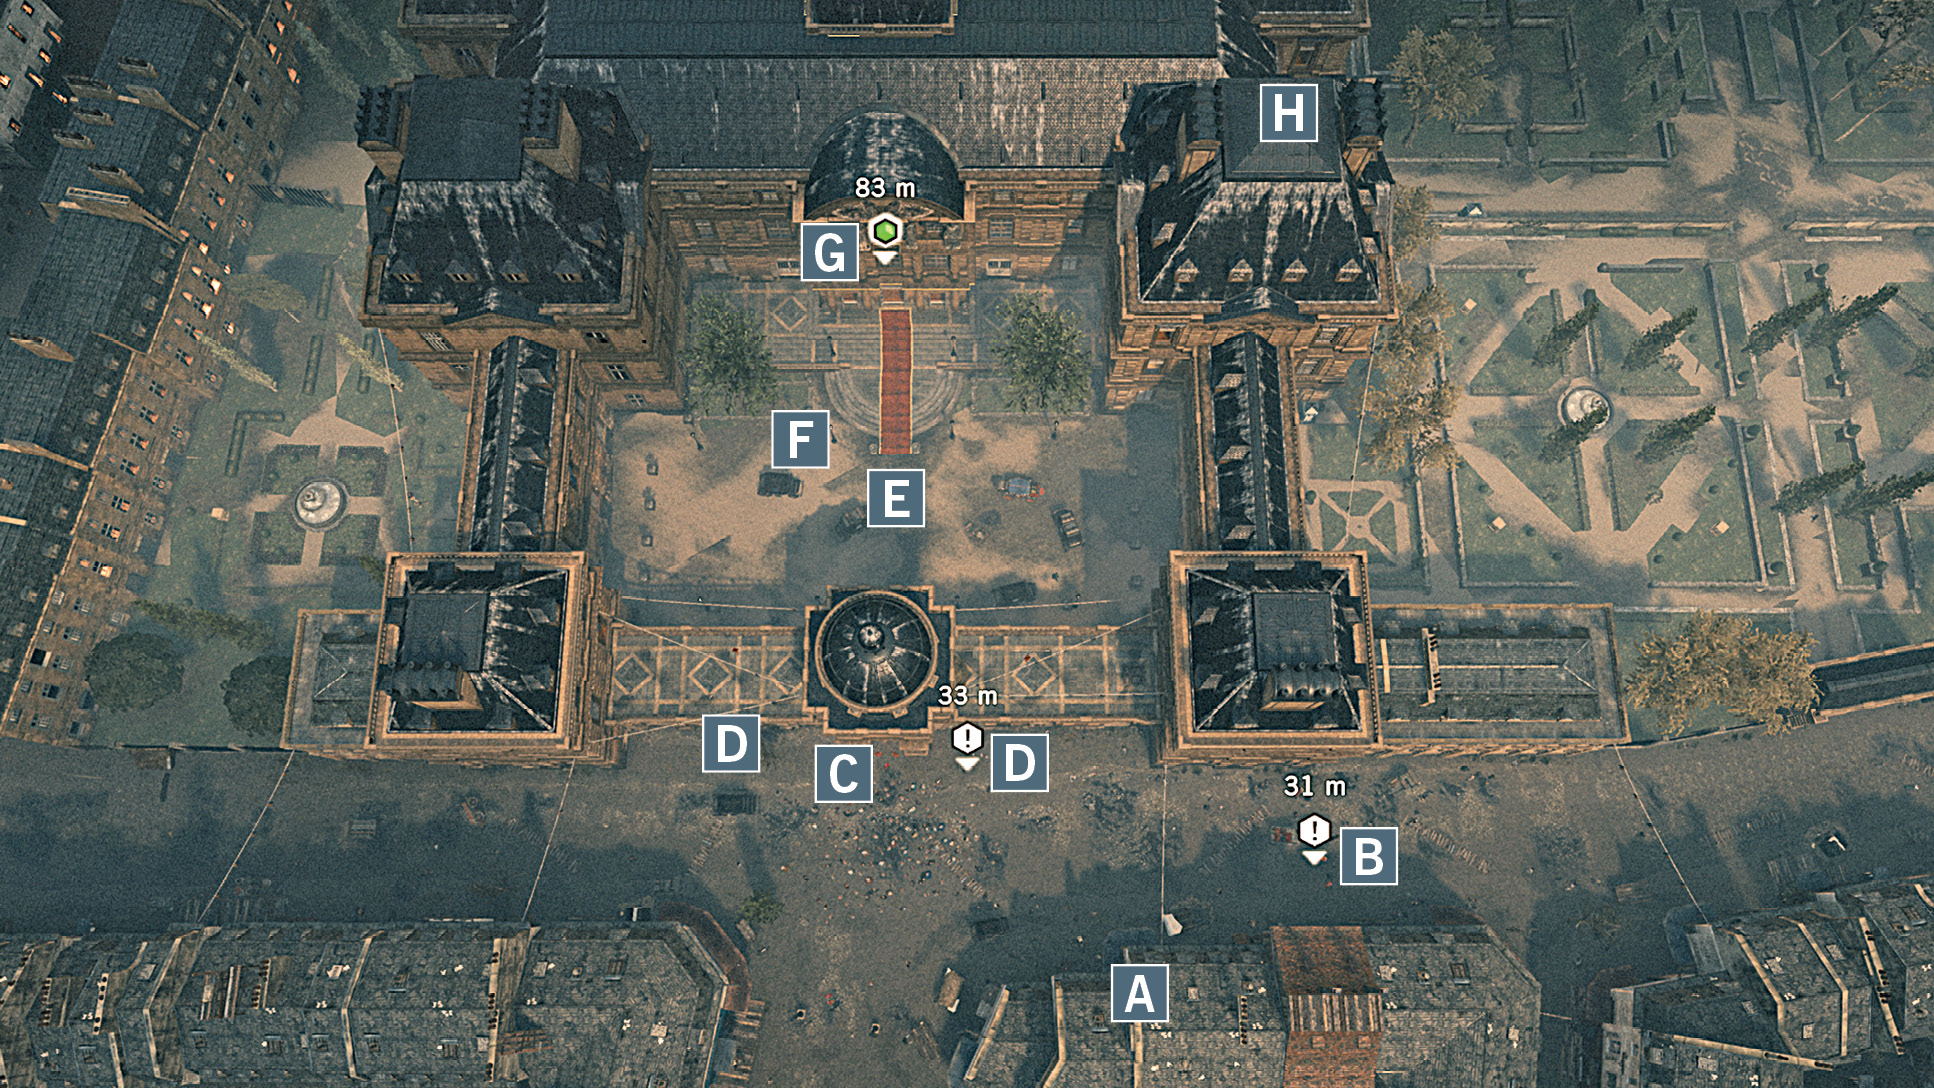
 Arno’s starting position.
 A man with a cart full of fireworks beset by Extremists. If you neutralize the pair confronting him and then strike up a conversation, Arno will agree to escort him. You must then eliminate Extremists as they arrive, in three waves of two. Completing this optional objective triggers a fireworks event after a minute and a half, which lures Marie Levesque and some of her guests towards the garden window, offering an alternative way to assassinate your target.
 The main entrance. It is, naturally, guarded.
 There are two cells containing prisoners either side of the main entrance, with their (locked) doors accessed via the courtyard. Both cell doors have advanced locks, though, which some players may find a little challenging to pick. If you open these, the prisoners will attack the guards in front of the house, causing Extremists to pour out to join the fray.
 An Extremist with a key to the two cells patrols the outer edge of the courtyard with a companion following close behind. There is a position where you can eliminate both with a double air assassination.
 While there are alarm bells inside the building, this one inside the courtyard is the most likely to be rung during the initial stages of your infiltration.
 The function room where Marie Levesque is entertaining her guests is here.
 There is a Challenge to release Thomas Levesque; he is found in a top-floor room in this area. There are two guards stationed at the locked door if you approach it inside; it’s far wiser to enter through one of the open windows.
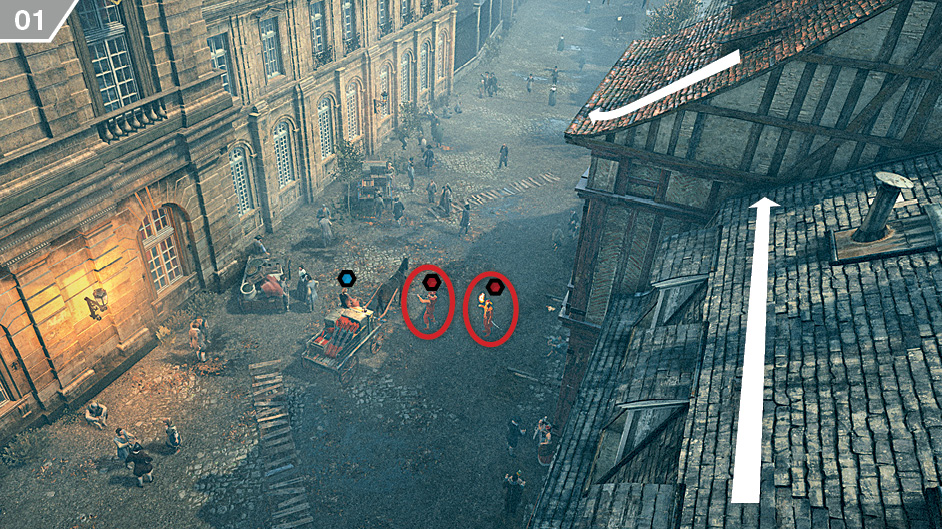
From your start location, look to the right to see the  icon that indicates an optional objective, then approach it via the rooftops. You can dispatch the two Extremists from above with the Phantom Blades, or enter the fray with a showy air assassination. Once both have been disabled, speak to the driver of the cart filled with fireworks. This will trigger a set-piece where you defend the cart against three waves of two Extremists.
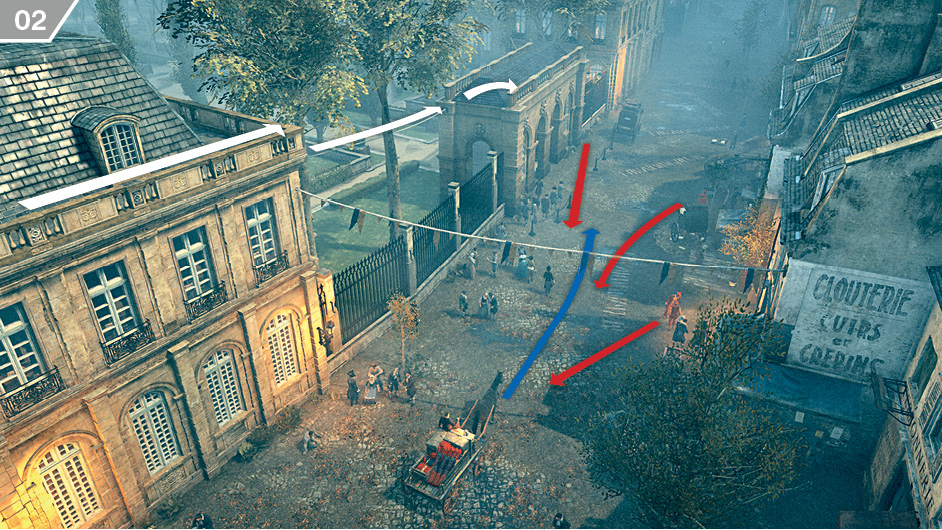
The first two Extremists are on the right-hand side of the street, with the second not far behind. The third, however, arrives from the left-hand side of the street and features a Seeker. If you are fast and purposeful, you can climb the building on the left-hand side of the street and cross the rope to reach the position marked on the accompanying screenshot. From here, you can eliminate all six targets with Phantom Blade headshots. Once the cart rolls to a halt, speak to the driver again to complete this optional objective.
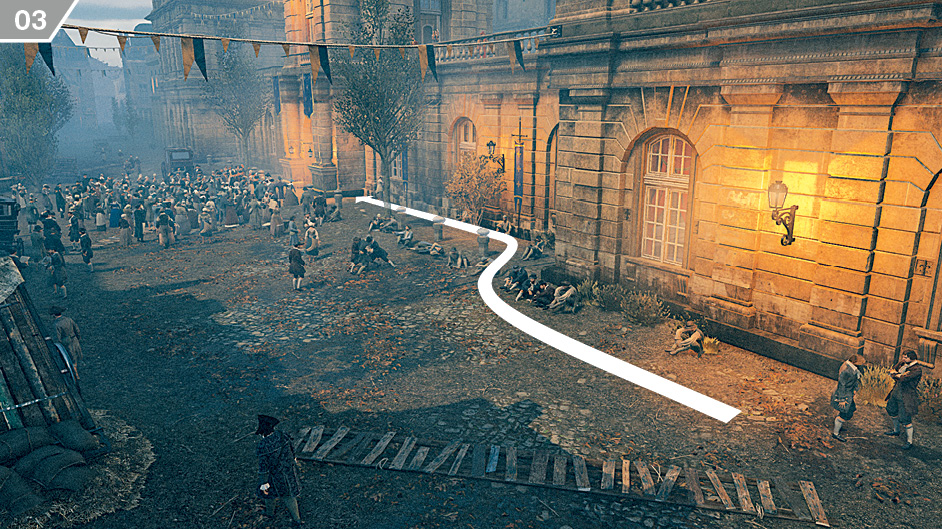
Head back towards the main entrance, using Stealth Mode and staying close to the wall when you draw near to safely reach the position marked on the above screenshot. This will trigger the second optional objective: to free the prisoners.
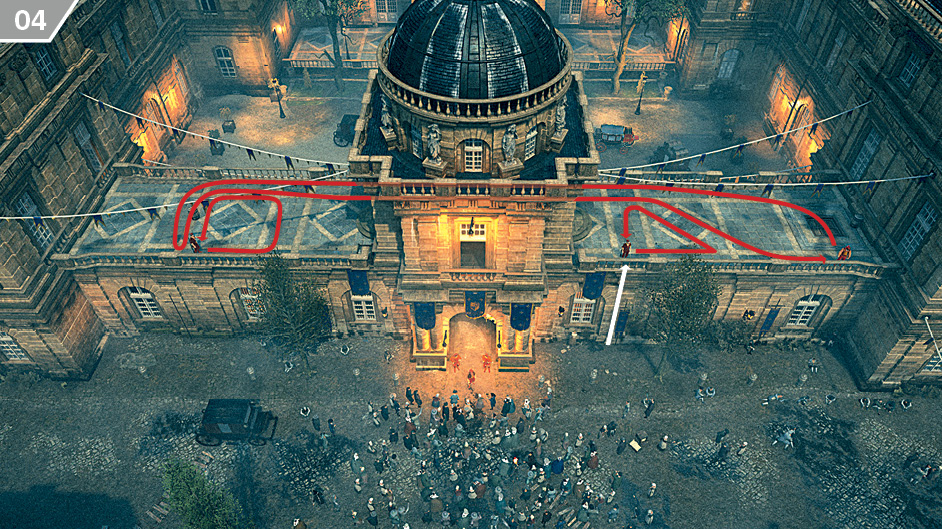
Climb the wall and hang just below the balustrade. There are three Extremists on the roof terraces: one sniper on either side, and a third guard who follows a long patrol, as illustrated above. Eliminate all three without causing a commotion before you continue. You can start with a ledge assassination on the first sniper, then kill the other two after sneaking up behind them.
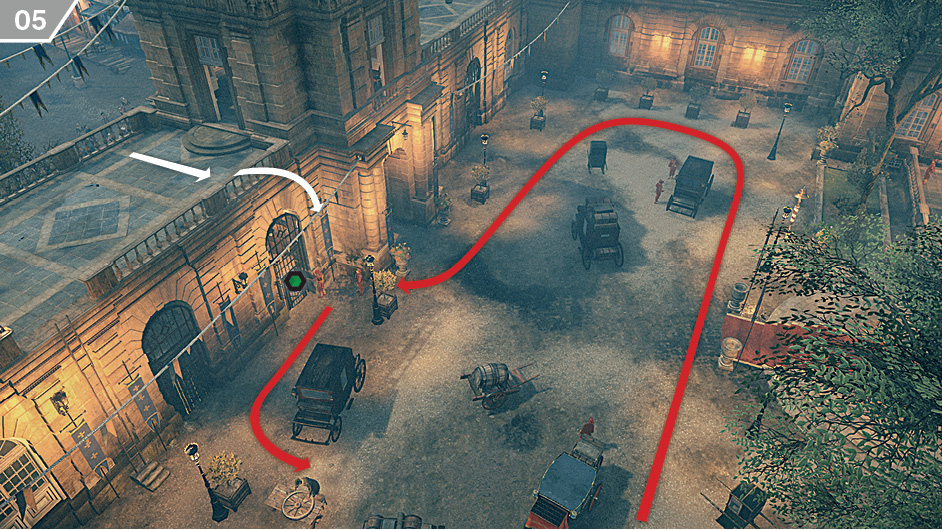
The next step is to obtain the key to the two cells. The Extremist who carries it is accompanied by a Defender, which seems an insurmountable problem – but there is actually a secluded position where you can eliminate both with a double air assassination. Wait on the rope in this position until their patrol delivers them to the cell door.
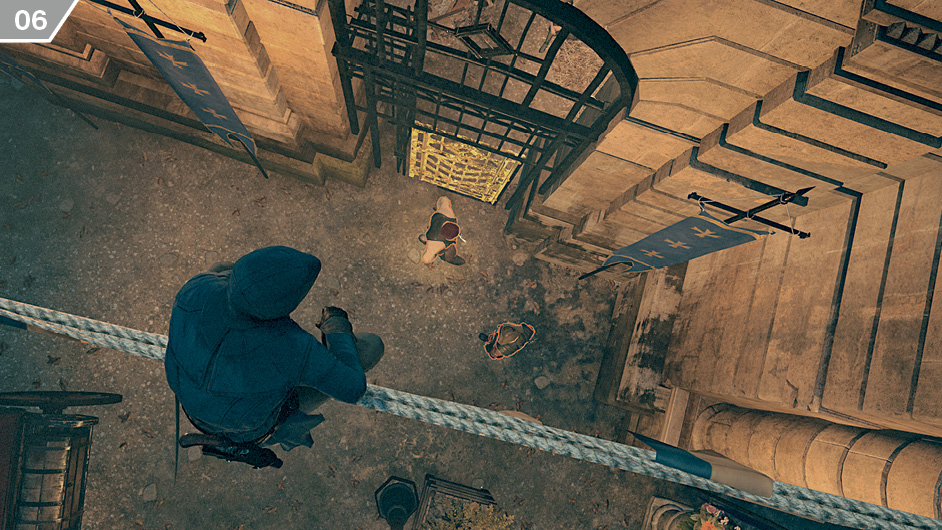
When the two Extremists arrive, keep the game camera trained on them at all times. When they move into close proximity – and, more pertinently, are both highlighted to indicate that a double air assassination is possible – press  /
/ to jump down and eliminate them instantly. You can then loot the prison key.
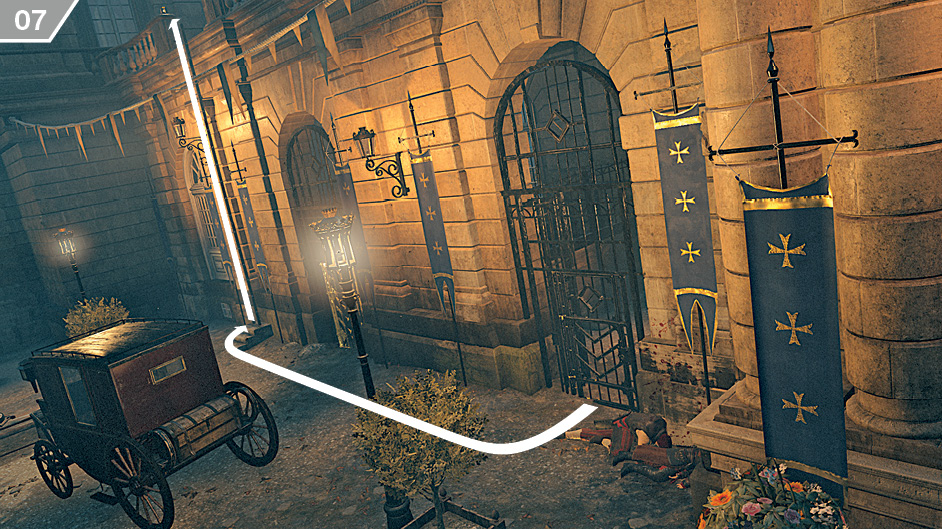
Press  /
/ to open the cell door, then quickly run to the left and climb the ladder.
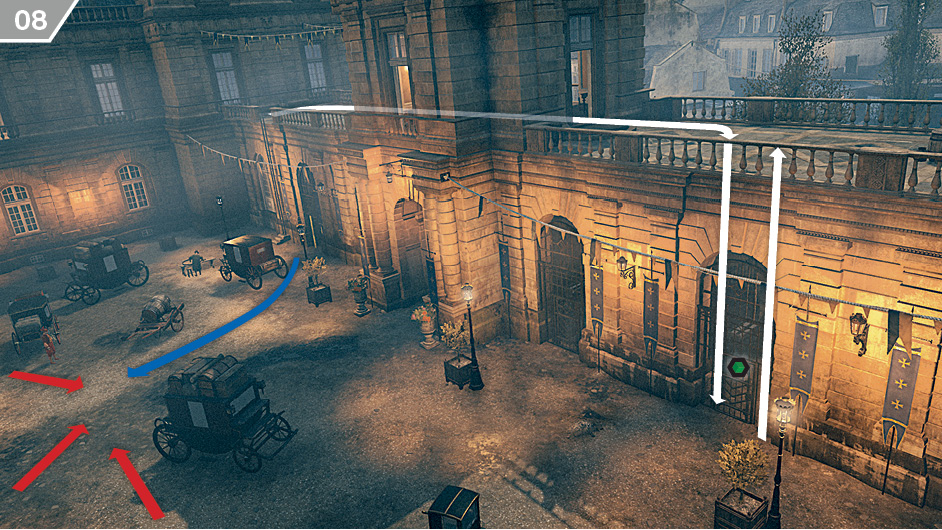
If you would like to free the second set of prisoners, you will need to work fast. Run to the next cell along and ensure that the first group have engaged the attention of all guards, then drop down and unlock the door. Immediately climb back up to avoid any chance of detection.
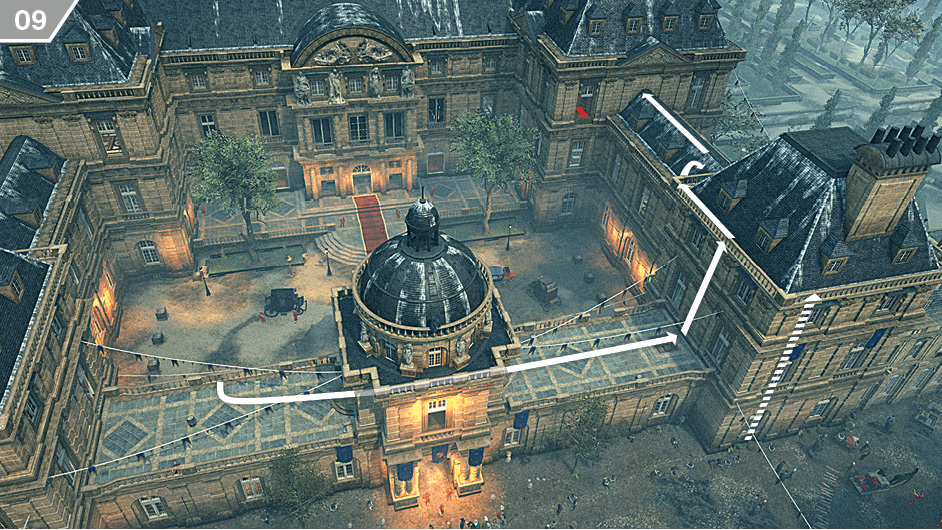
The next task is to rescue Thomas Levesque to complete the related Challenge, but it’s worthwhile to take a slight detour to eliminate a couple of potentially troublesome guards beforehand. Carefully make your way to the window as directed on the accompanying screenshot, being mindful to avoid disturbing a guard who occasionally stands at the window. (If you are joining the walkthrough at this stage, having decided to leave the optional objectives for another time, the dotted line at the bottom right of the annotated image shows where to climb: it’s just across the street from Arno’s start position.)
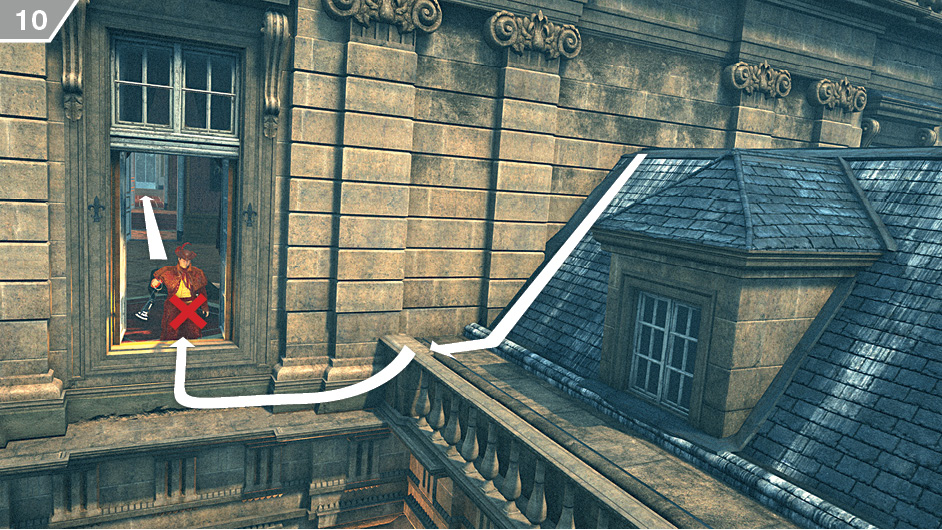
Get into position by the window and use Eagle Vision to identify the guard inside. Wait until his back is turned, then kill him. Go through the door directly opposite the window.
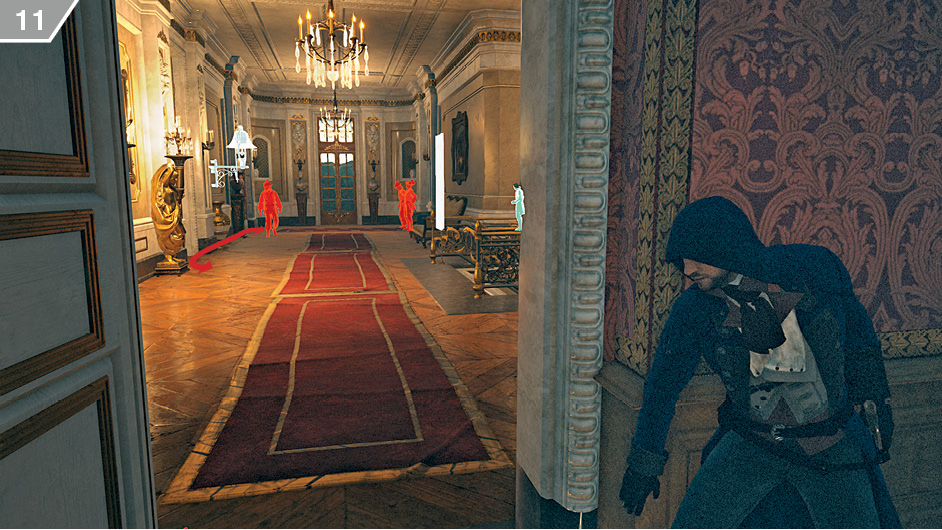
Move up to the next doorway directly ahead of the last. Without disturbing the two Extremists outside the locked door on the right, try to entice the individual on the left to walk towards Arno when his short patrol brings him closer to your position. He can identify Arno very quickly unless you are using equipment that reduces detection time, but you should still be able to use a Last Known Position lure to draw him to your location irrespective of your current garb. Once you have disabled him with a cover kill, backtrack to the window that you used to enter the building.
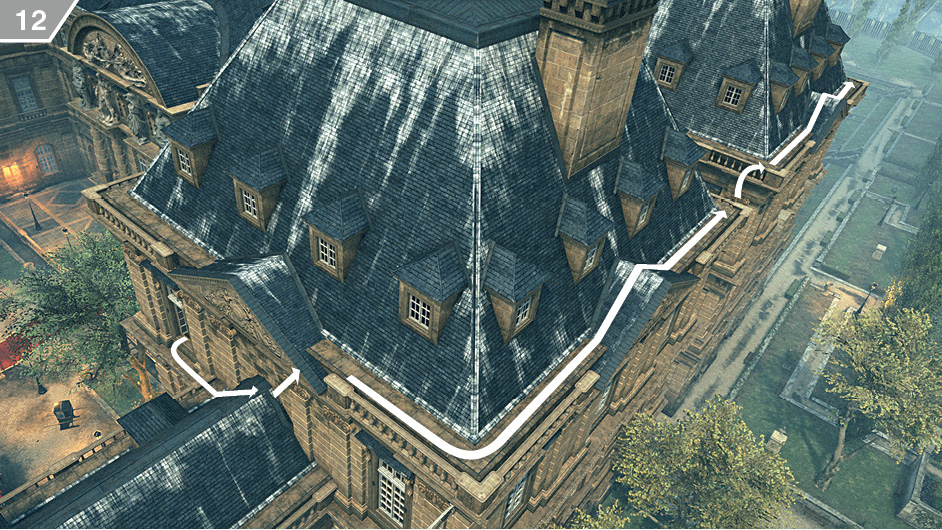
Climb back outside and follow the route shown above to approach the room where Thomas Levesque is imprisoned.
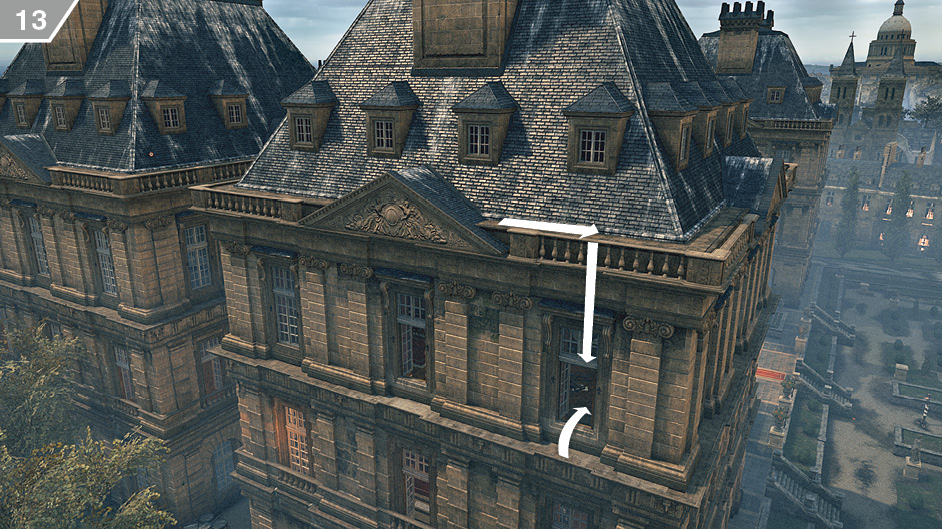
Climb in through the open window shown here. After Thomas Levesque has finished speaking, pick the lock on the door.
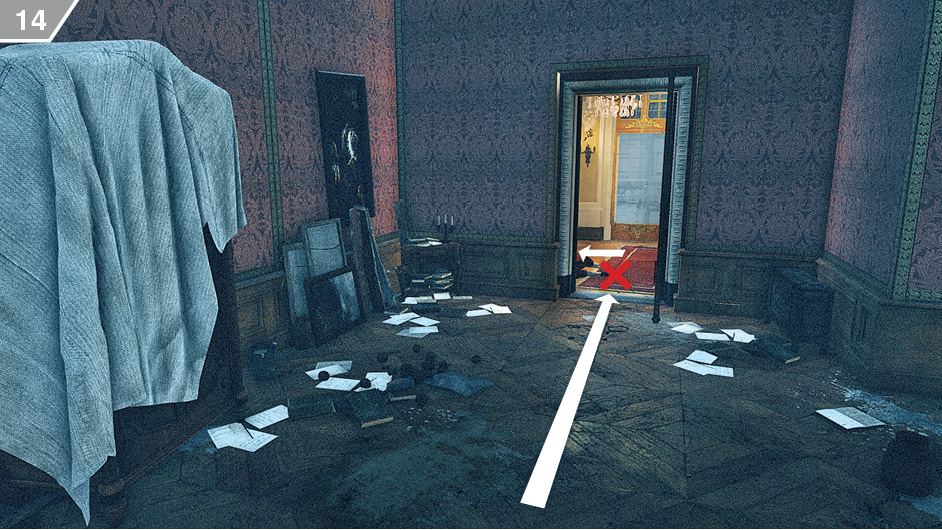
When the door swings open, double assassinate the two guards before Levesque runs through, then turn to the left. You should recognize where you are from your earlier foray into the building.
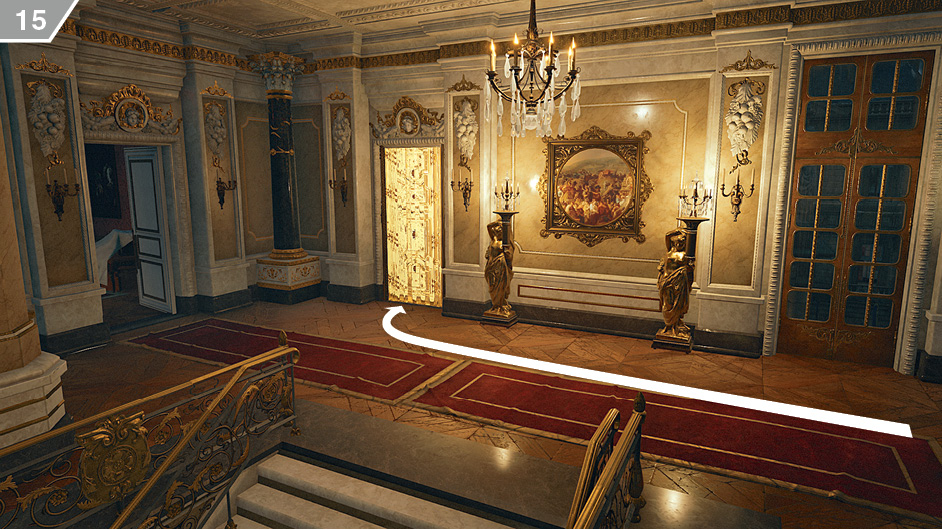
Approach the door shown here, opposite the stairway. Activate Eagle Vision and check the area beyond for a patrolling Brute. If you cannot see him, or if he is walking away, it’s safe to pick the lock and go through. If he is heading towards you, wait.
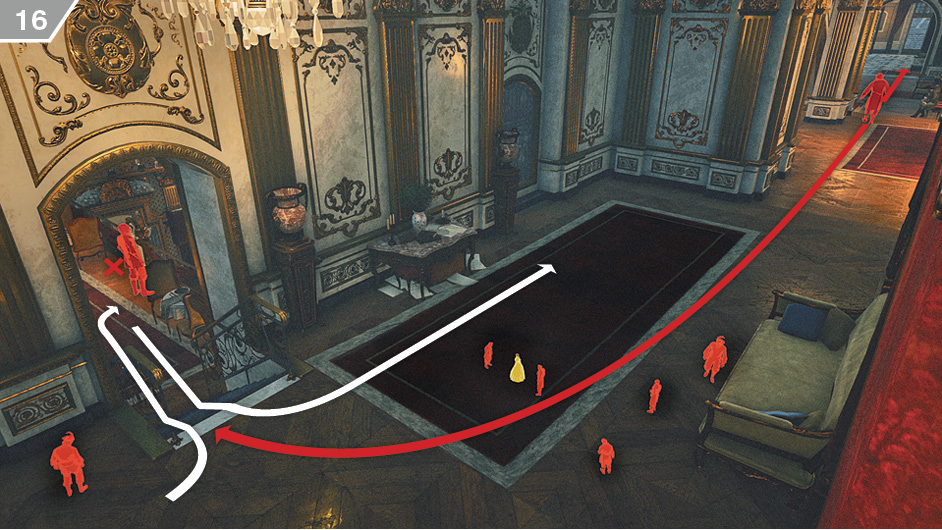
The Brute has a long (and ambling) patrol that follows the route shown here. If the coast is clear, activate Stealth Mode, sneak through the archway immediately to your left and disable the sniper overlooking the party. Though it is possible to assassinate Marie Levesque from this position, disabling the sniper on the opposite balcony will help to tip the odds in your favor in the chaotic aftermath of your imminent introduction. First, though, you should kill the patrolling Brute, preferably from behind after he returns to your current position.
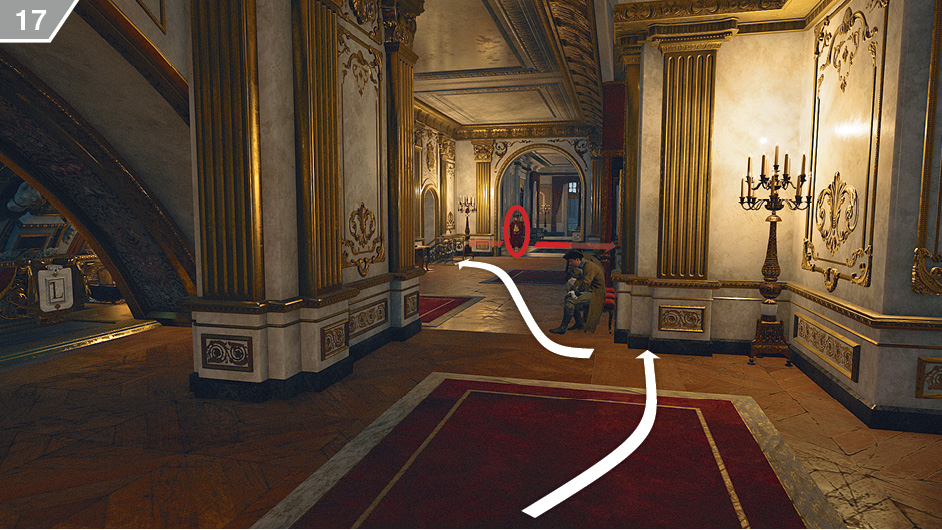
With the Brute dead, continue a little further along the corridor until you reach the position shown here. After ensuring that the patrolling Extremist is looking away, sneak down the steps to eliminate the second sniper. You can now move back along the corridor to the opening that offers a full view of the party, or the far balcony where you killed the first sniper.
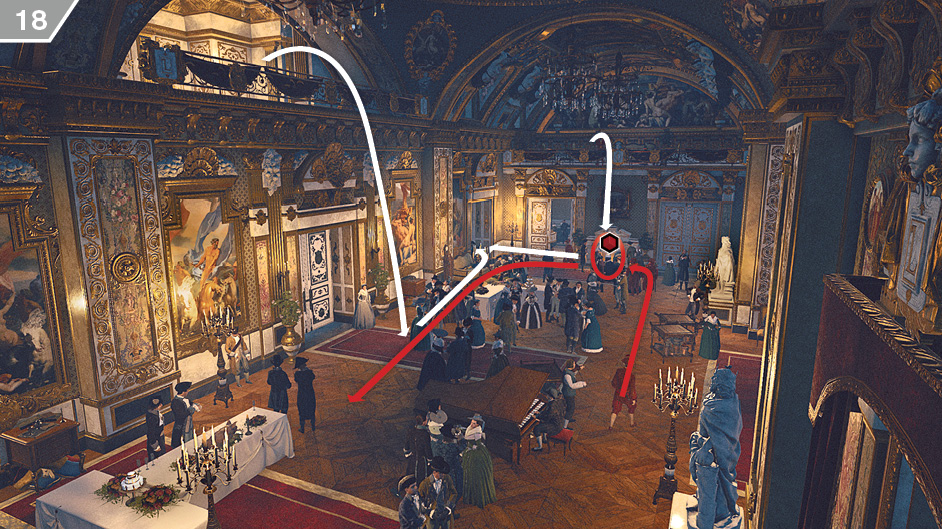
From either of the two vantage points shown here, you can watch Marie Levesque circulate in a counterclockwise direction. Make sure you never stay in her line of sight, however, as she has remarkable detection skills – remain behind a cover position at all times to be safe. Wait until she is beneath your position, direct the camera to ensure that Arno is targeting her – and not one of her two bodyguards – and then perform an air assassination. After the cinematic ends, start moving towards the door marked in the corner (as shown on the screenshot above) as soon as you regain control.
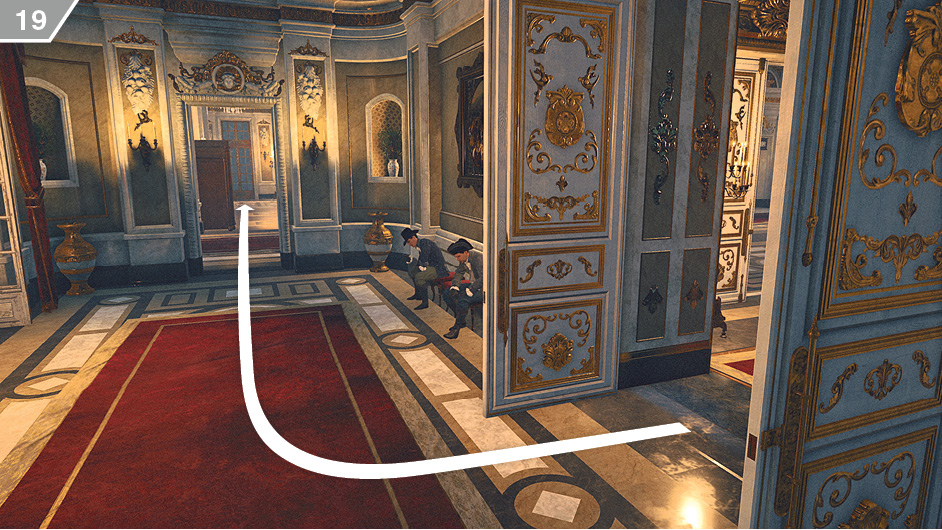
On the other side of the door, turn right and run straight in the direction of the window in the distance, as shown above.
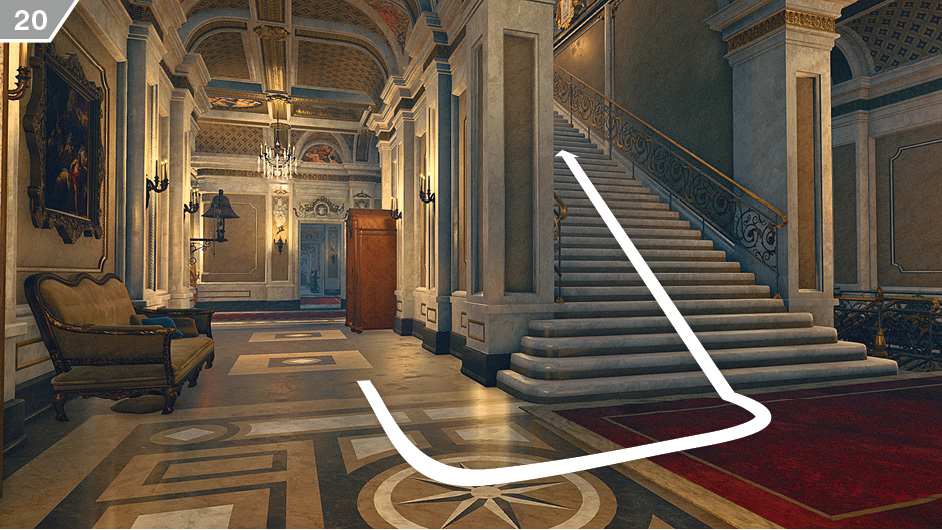
As you near the window, make a U-turn to the left and sprint up the stairs.
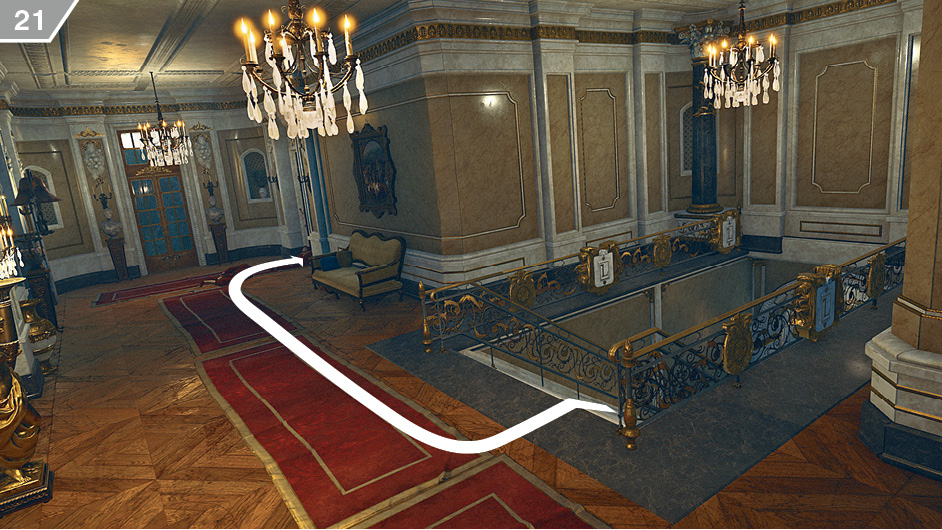
At the top of the stairs, turn right and head into the room where Thomas Levesque was imprisoned earlier. Vault through the window to reach the ledge outside.
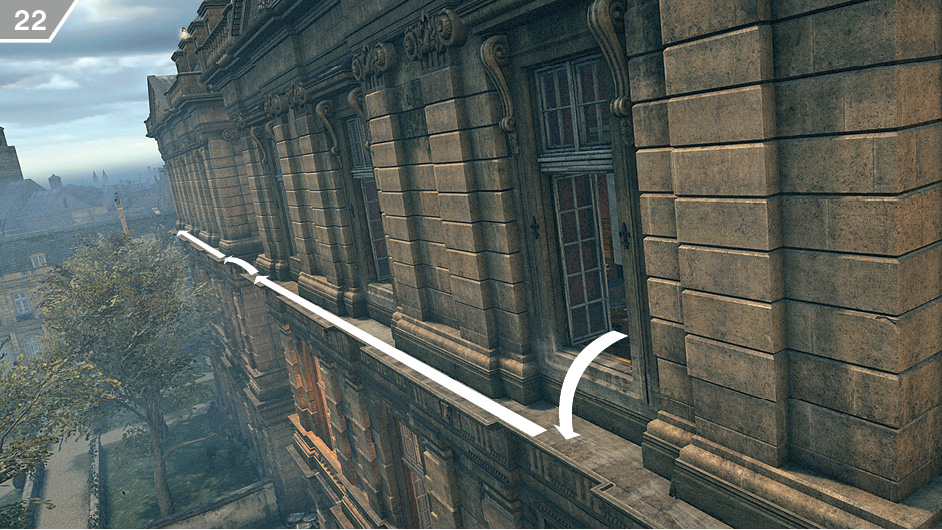
On the ledge, follow the route shown here to completely shake your pursuers. There are faster and more direct ways to leave the building after the assassination, but this one guarantees that you will leave all Extremists behind.
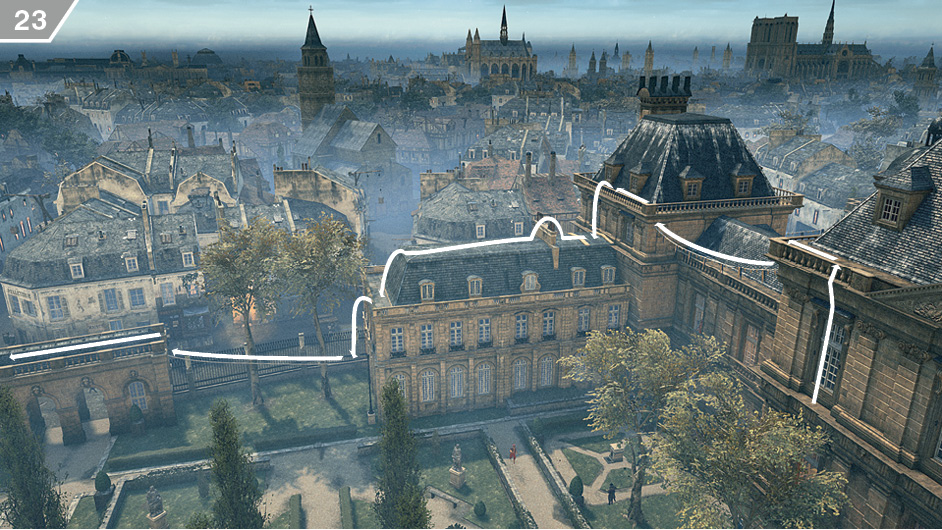
The only remaining step is to leave the highlighted area. The free run course illustrated here will deliver you to safety without risk of encountering an Extremist.
 Memory 03/“The Escape”
Mission OverviewChallenges■Keep up with Montgolfière. ■ Don’t touch the ground. Notes & Further Reading■Before you begin this Memory, ensure that Arno has a full stock of Smoke Bombs and that they are your current active tool. |
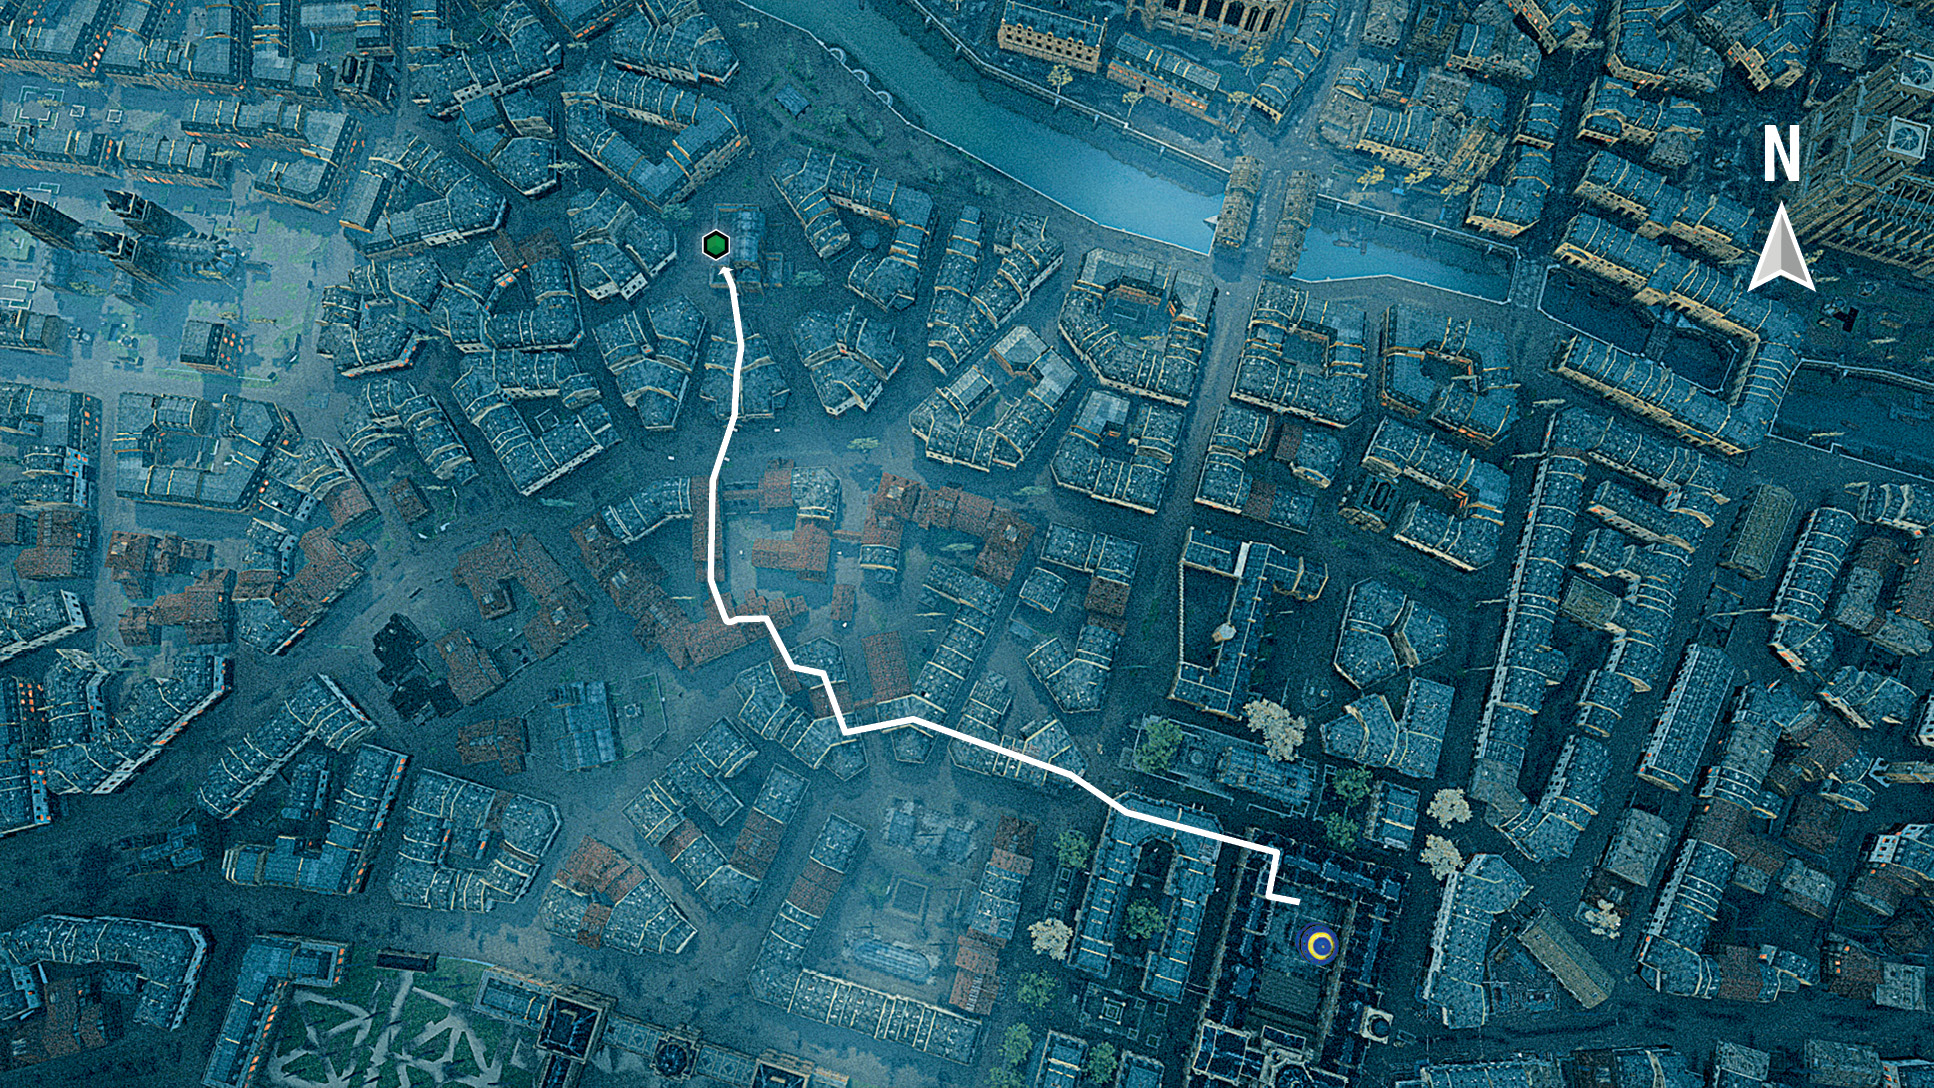
After the introductory cinematic, you must reach three marked positions and press  /
/ to cut the ropes. Complicating matters, a group of Extremists will chase Arno – but if you use Smoke Bombs just before you reach each rope, you can perform the necessary action without being attacked or surrounded. When all three ropes have been cut, run into a lift to reach the rooftops. There is no need to track the movements of the balloon with unerring accuracy: as long as you follow the route shown on the annotated map here, Arno will stay within the range limit for the first Challenge. The trick is to quickly identify ropes that provide easy movement between buildings. When you reach the church, cross via the rope and climb to the top of the tower to trigger a cutscene where Arno frees the balloon.
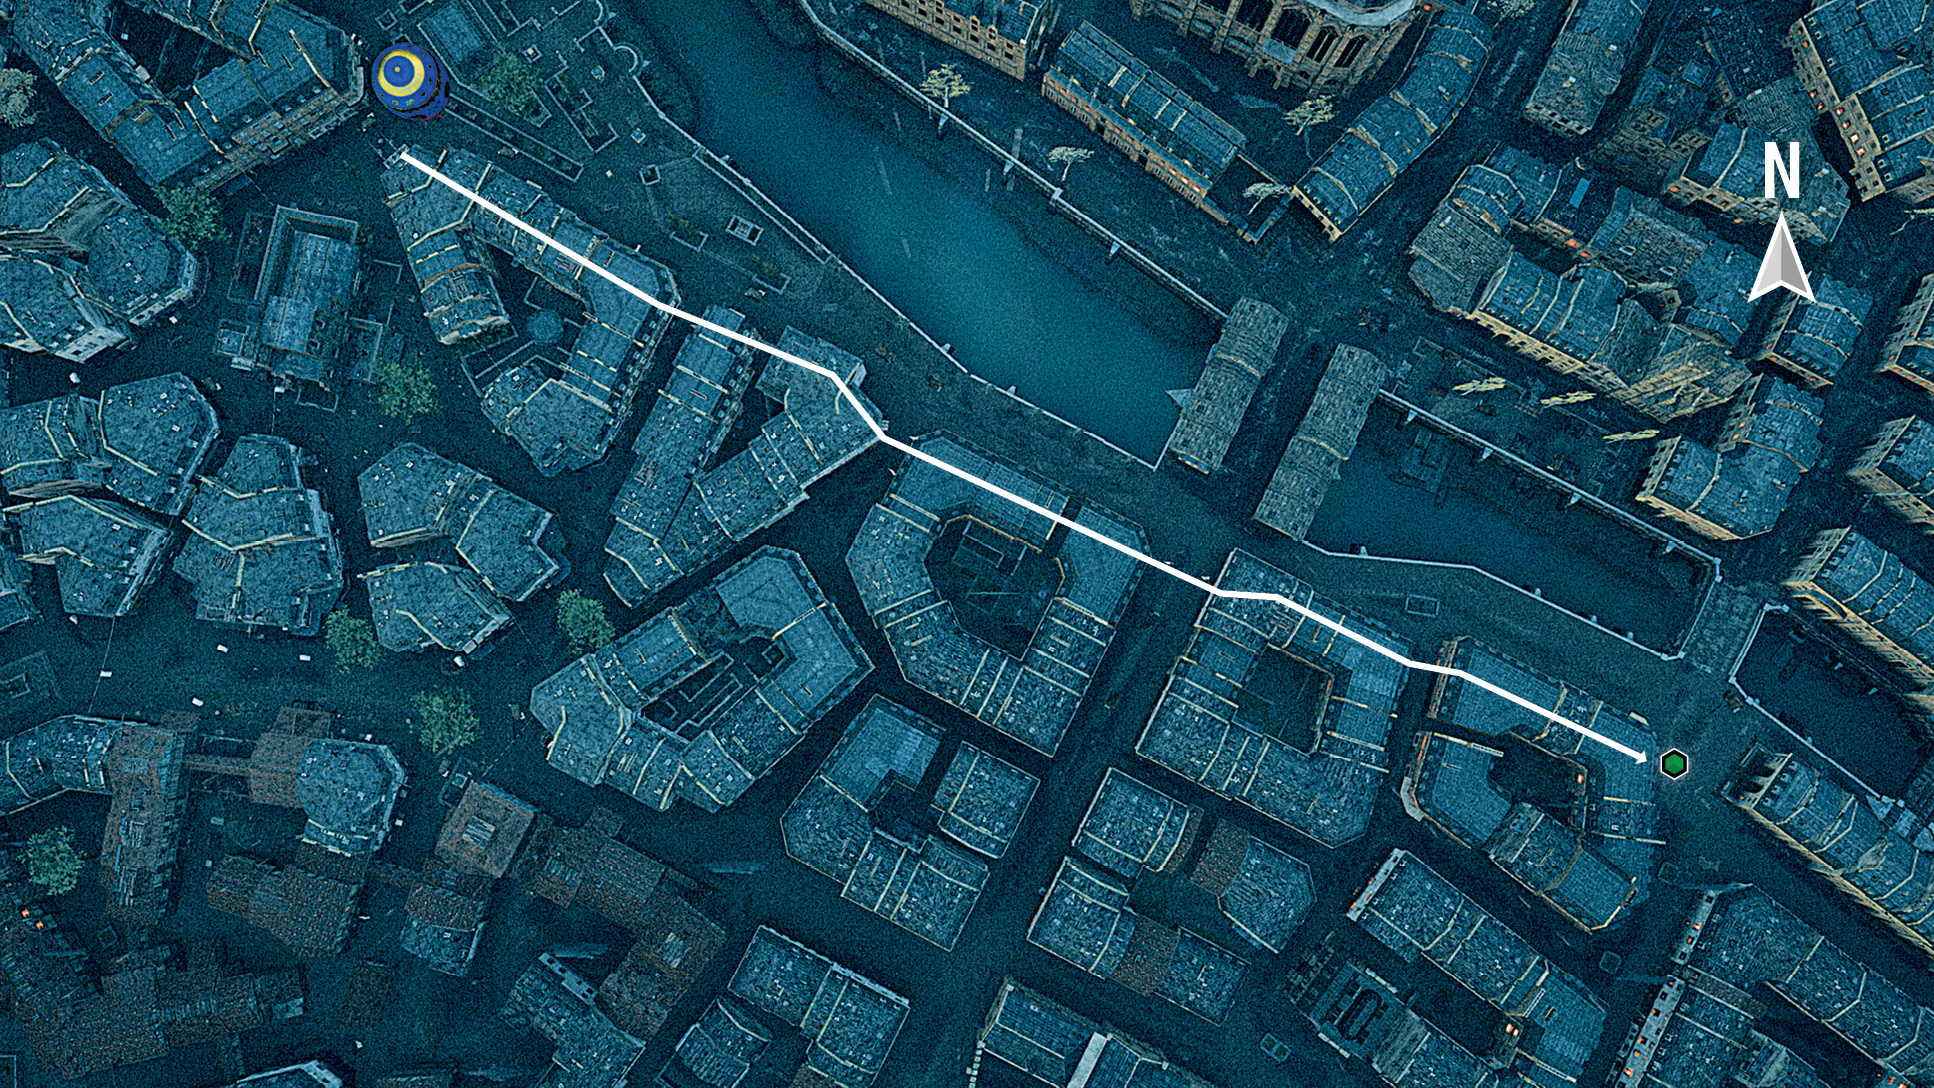
After riding the lift back to the rooftops (don’t worry – this won’t affect the second Challenge), you begin the second portion of the chase, with the optimal route illustrated on the above map. At the very end of the pursuit, a green waypoint marker appears on a wooden beam. Leap from this to trigger the closing cinematic.