
Assassin's Creed Unity Guide Side Quests
Helix Rifts
Once you have completed each of the three Server Bridge main story missions (at the end of Sequences 03, 07 and 11), you can return to these time anomalies to fulfill tasks for the modern-day Brotherhood. Your goal is to collect as much data as you can and save friendly Assassin operatives who have been trapped in these simulations – all within a limited time. Once time runs short, you have to reach the exit before its walls close in on you and the simulation collapses, with the whole process usually leaving you with precious few seconds to rush towards the exit portal.
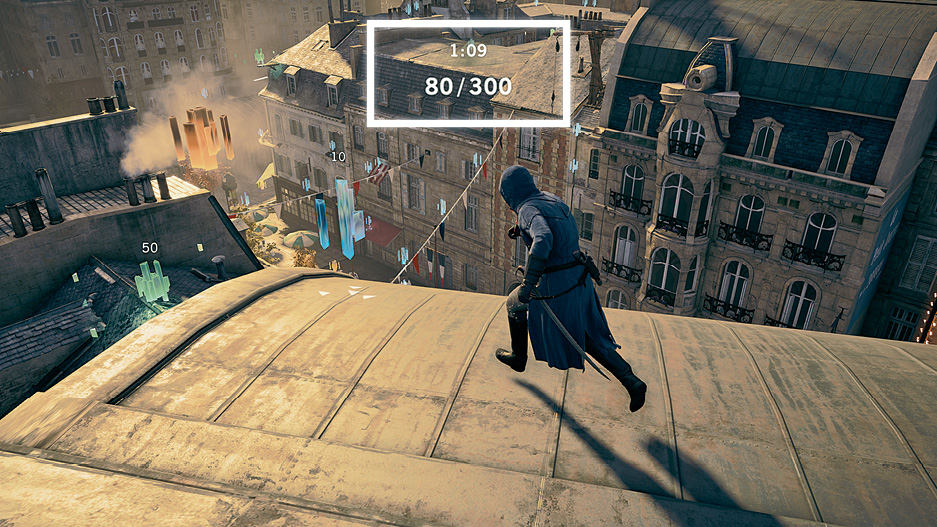
The amount of time you have left and your current score appear in the center of your screen ( ). Your primary goal is to ensure you reach the mission’s initial target score. When you do so, this immediately reveals the position of the trapped Assassin, who you can then save to unlock Assassin Intel and receive a score bonus. Reaching this first milestone also unlocks a second score target, which requires you to collect even more data.
The real challenge in Rifts is maintaining a consistently high standard of fluid movement and smart navigation. To collect as much data as possible, you need to be very efficient in terms of free running skills and route planning. You should always try to minimize the time spent in between two data collection points, and make sure you constantly aim for groups of collectibles rather than isolated ones. Collectibles have different score values, so focusing on those with the greatest point rewards is also a priority.
Data Collectibles
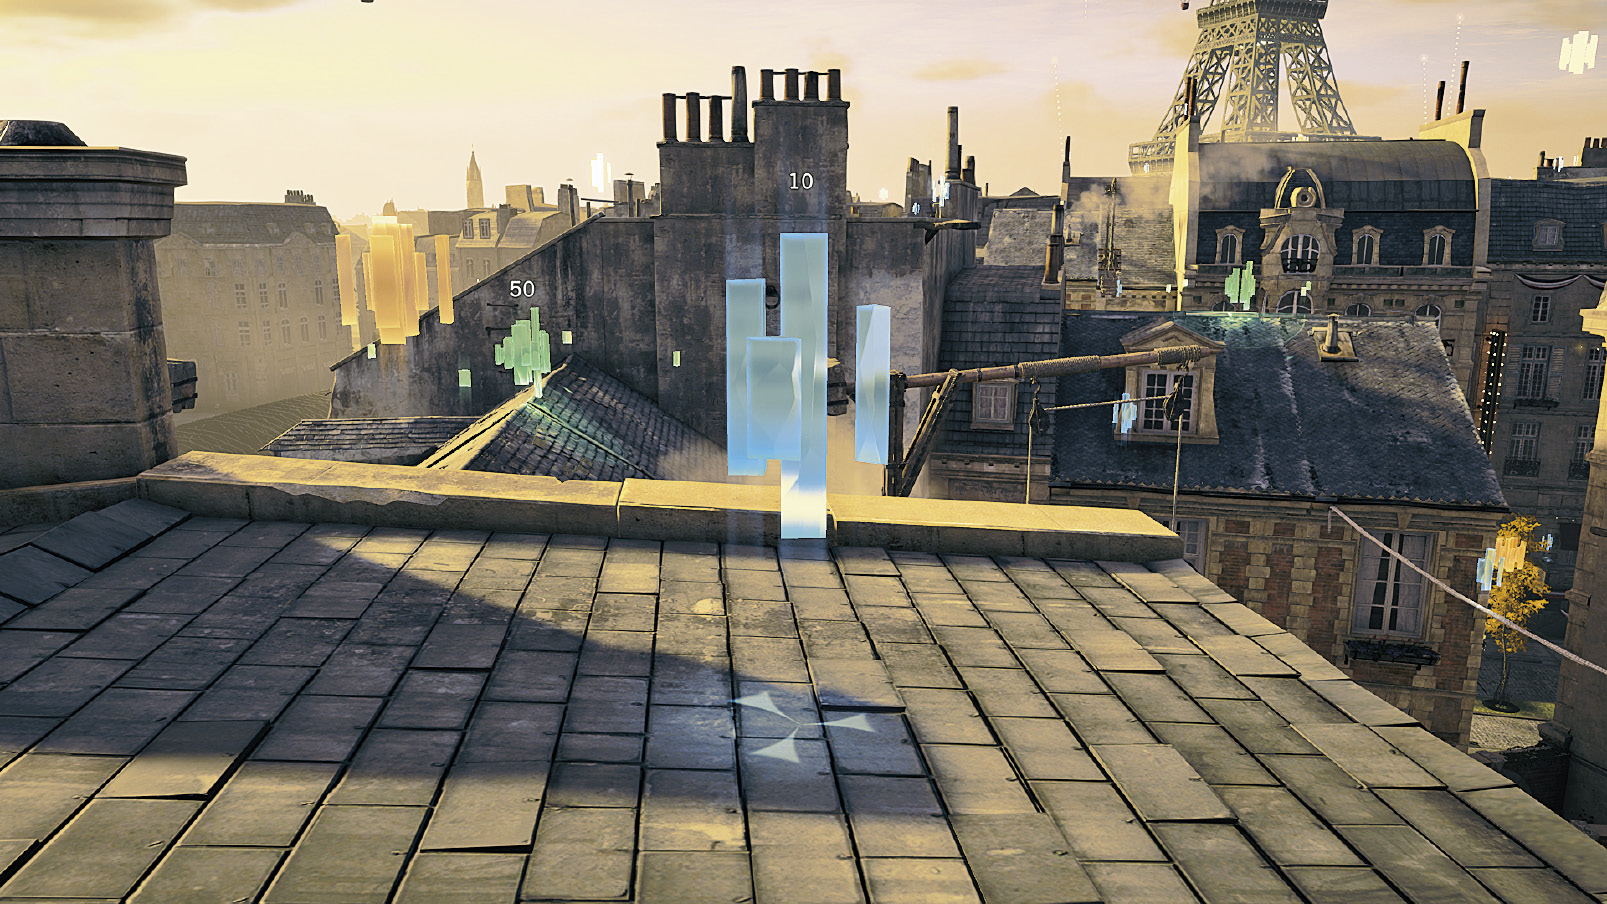
| Score Value: |
10 |
|---|---|
| Notes: |
Run over this collectible to obtain it. |
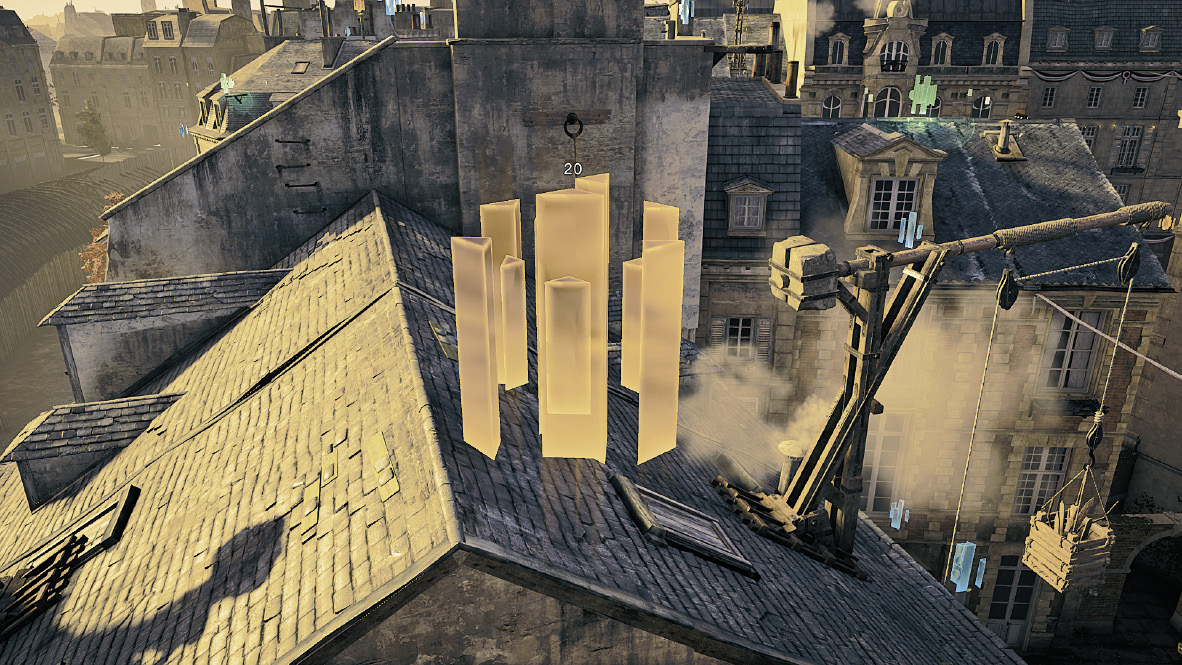
| Score Value: |
20 |
|---|---|
| Notes: |
Run over this collectible to obtain it. It can sometimes be found in a mobile variant that moves along a loop. |
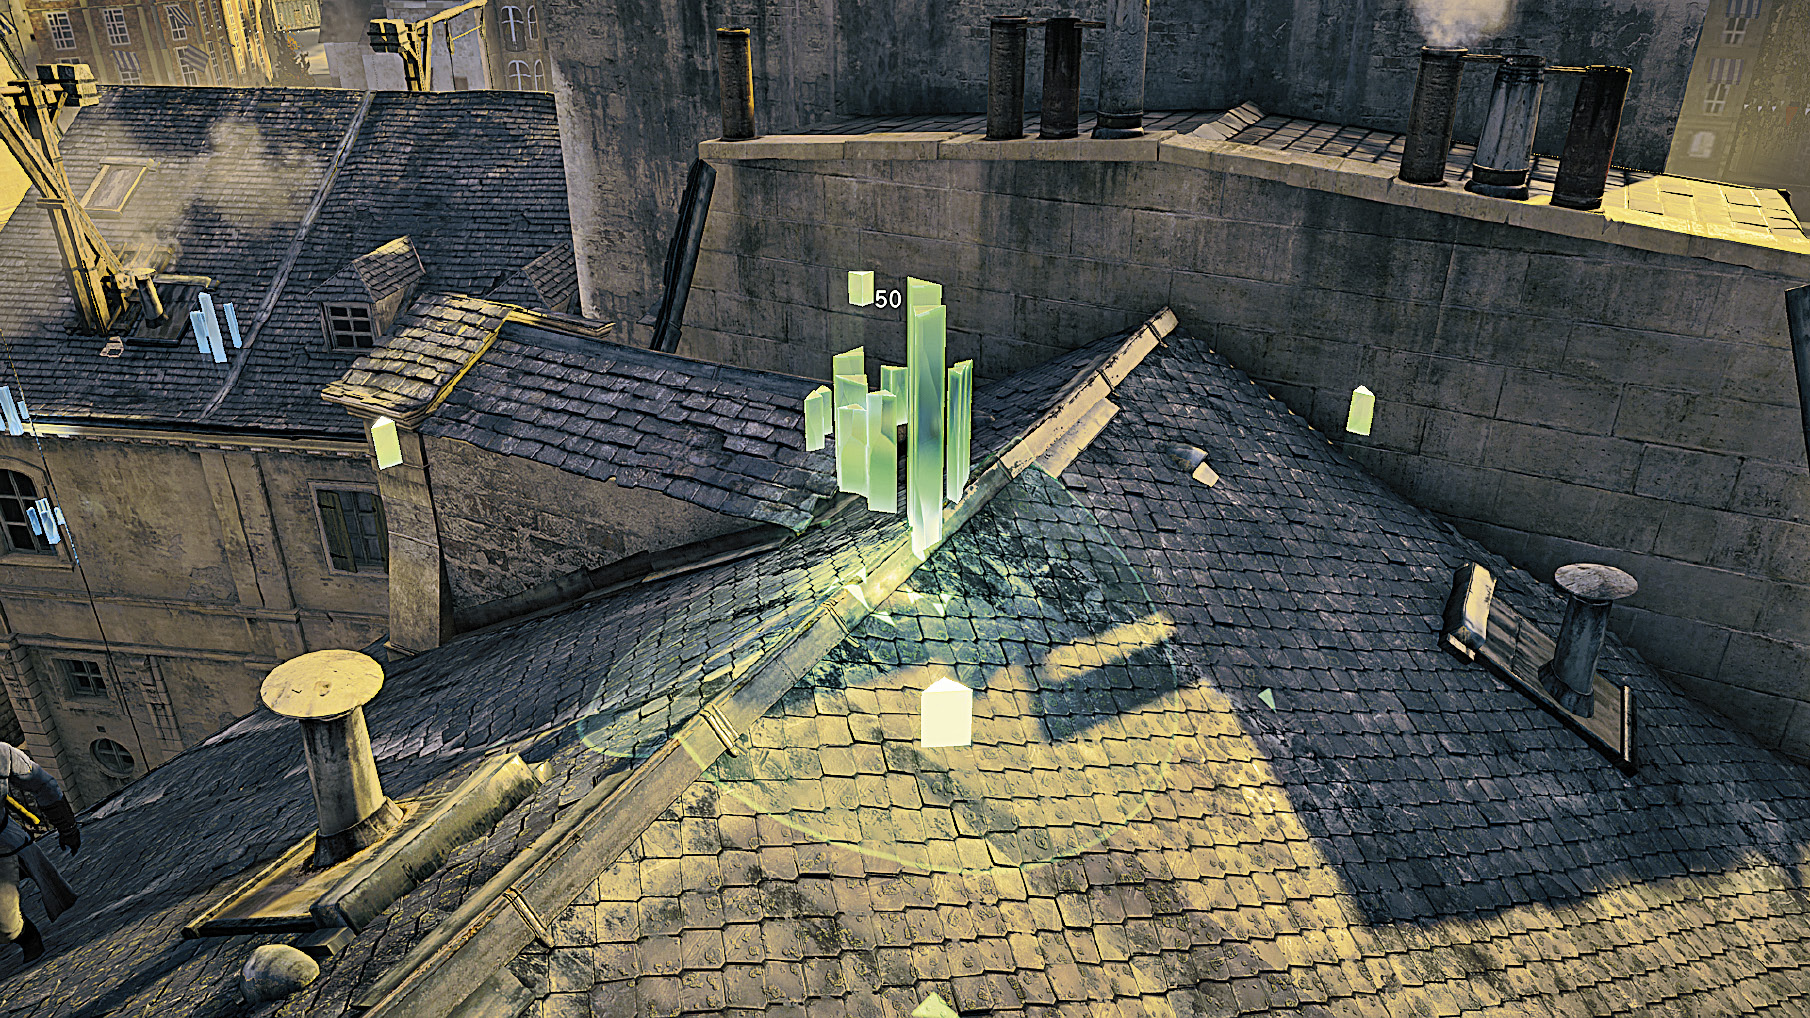
| Score Value: |
50 |
|---|---|
| Notes: |
To obtain this encrypted data collectible, you have to stand over it for a few seconds until the meter that appears onscreen is depleted. |
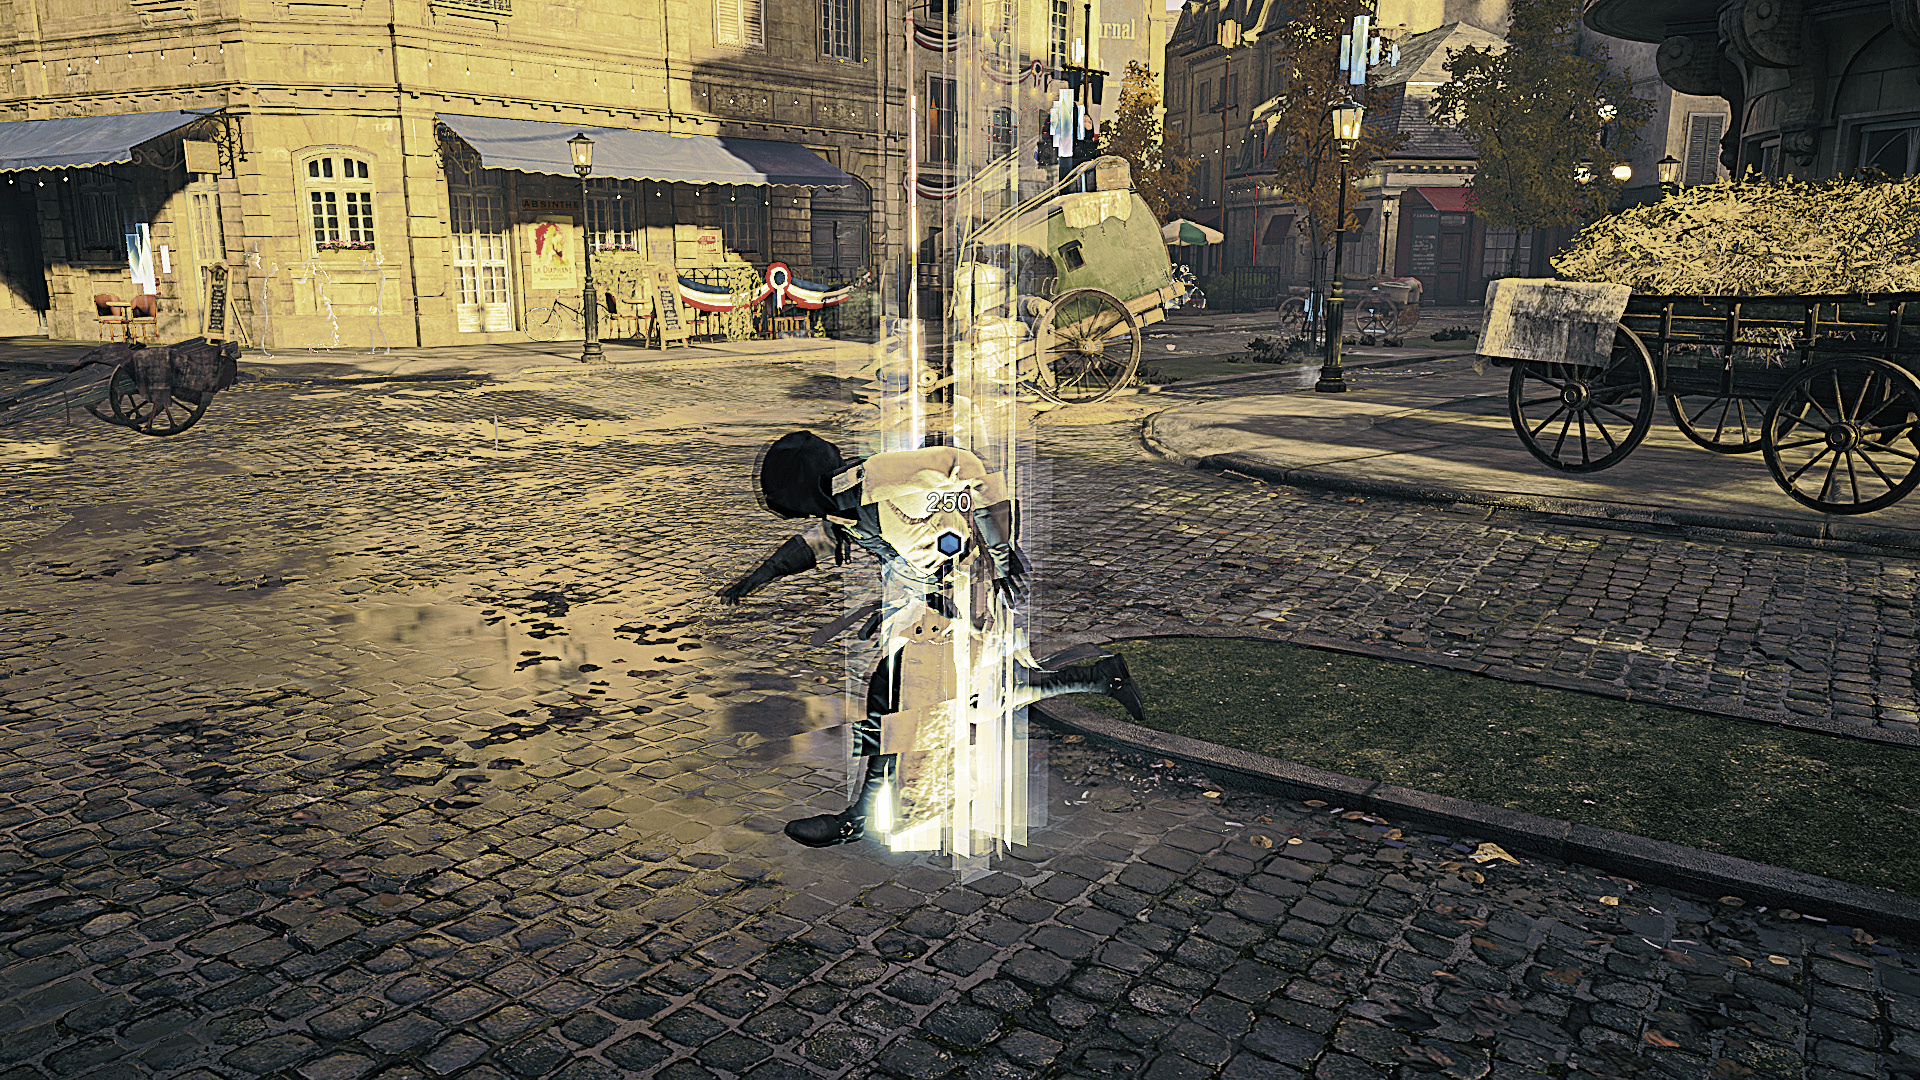
| Score Value: |
250 –1,000 |
|---|---|
| Notes: |
Head to the trapped Assassin and press r/s to free him. |
Belle Époque – Training
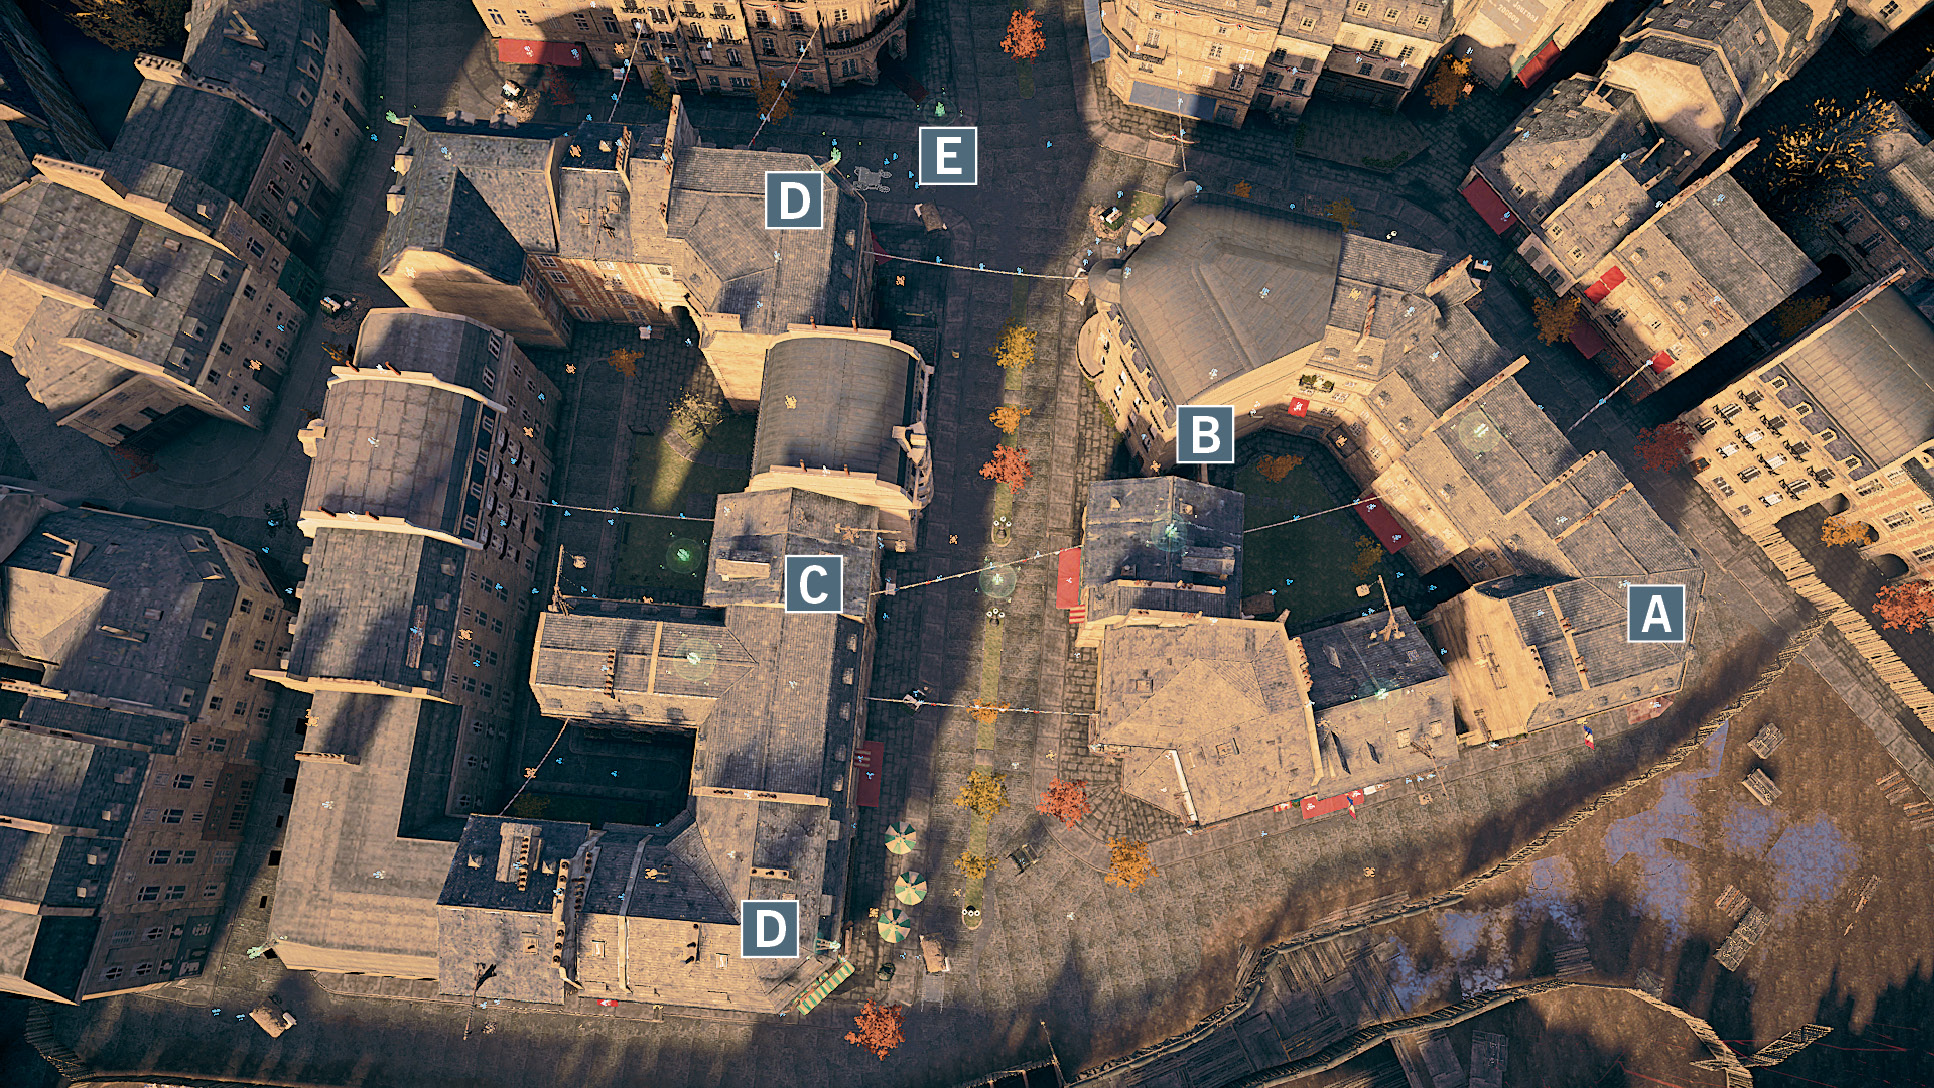
 From your starting point here, follow the linear path on the rooftops to retrieve multiple collectibles in very little time. You will encounter a first instance of encrypted data on the way: briefly pause within the green circle until the meter is fully depleted to receive 50 points.
 When you reach the large rooftop at the end of the row, turn left here to collect another encrypted data collectible (as well as a 20-point one on the way). You can then turn right to cross the street via the hanging rope.
 Pick up all the collectibles on the way until you reach the encrypted data at this position. If you have diligently retrieved all collectibles so far, you should have almost enough data to reveal the trapped Assassin.
 Make a large sweep on the rooftops to increase your score, then perform a Leap of Faith at either position here to reach street level while obtaining more collectibles. Keep prioritizing valuable collectibles and groups of low-value ones.
 When the timer starts running out, head towards this position to both free the trapped Assassin and make your exit through the portal.
Belle Époque – Data Harvest
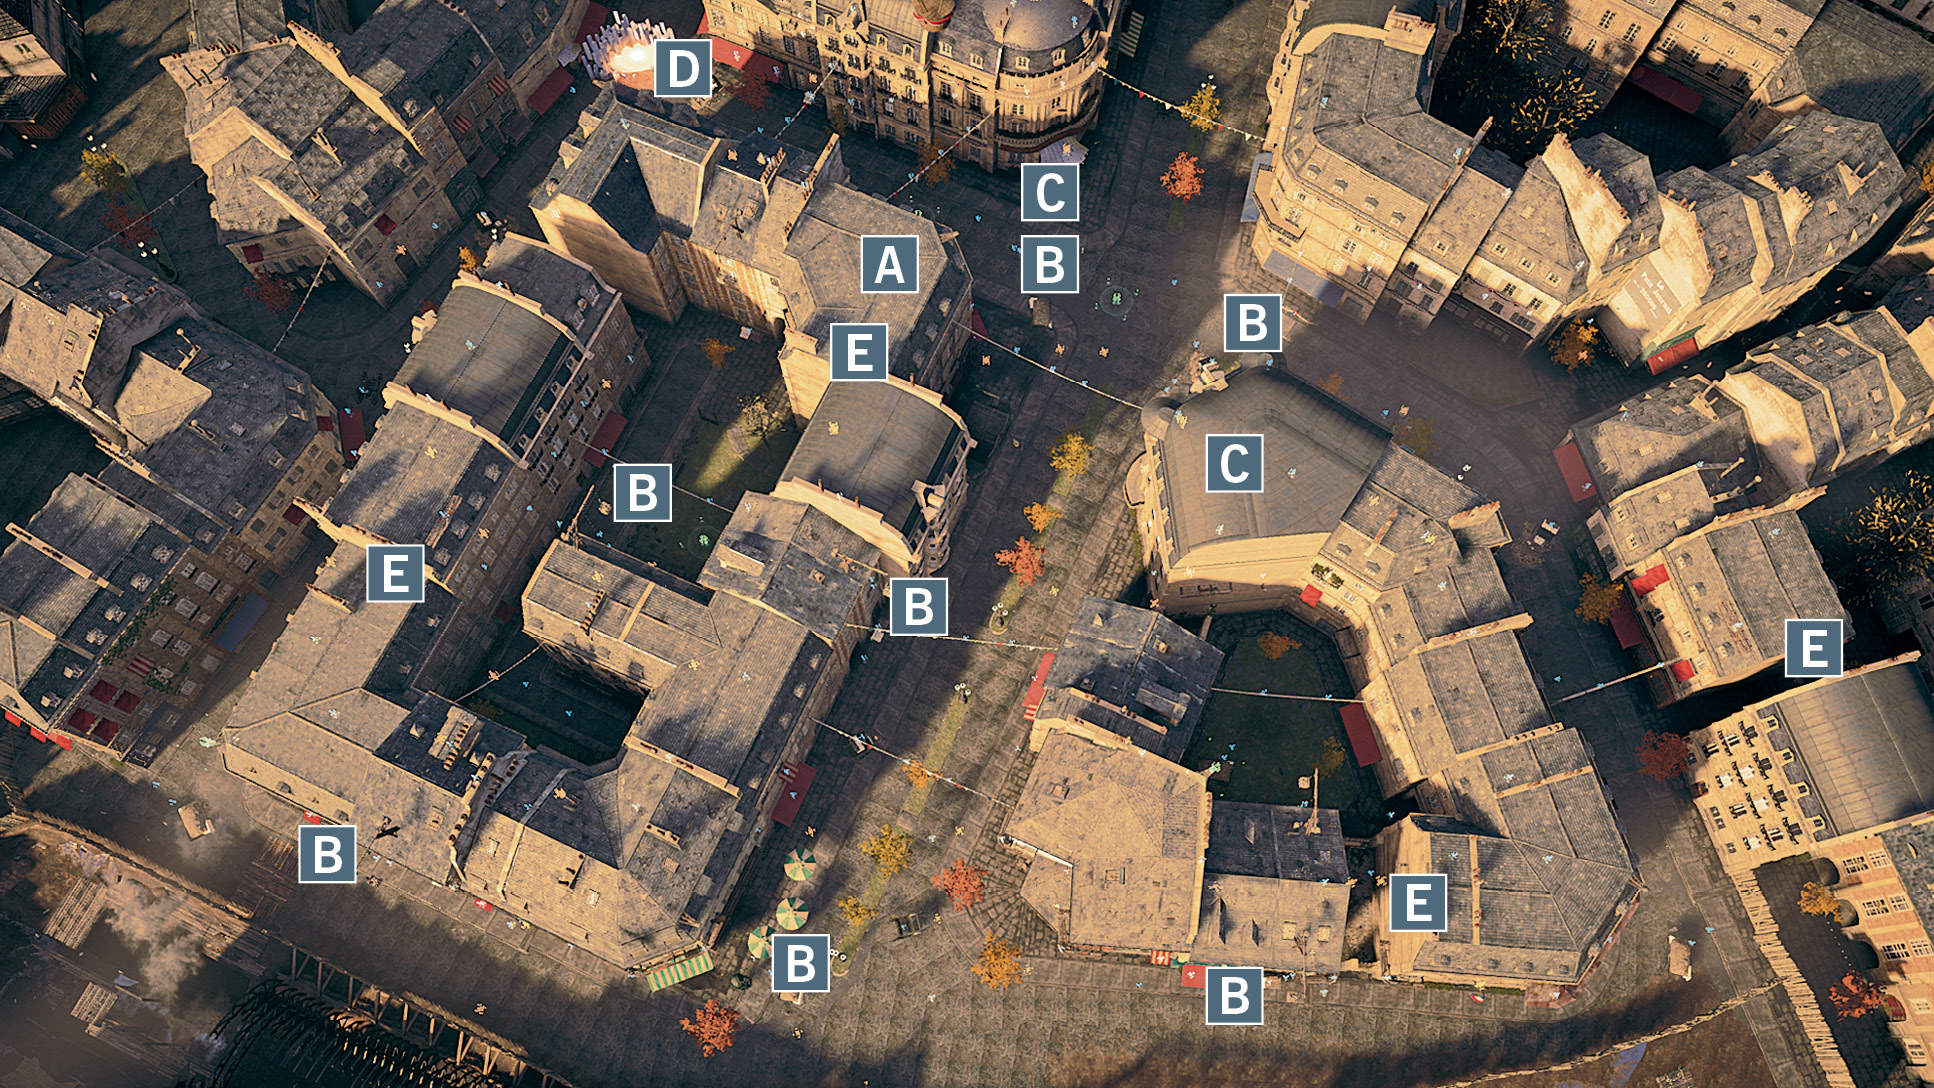
 This Belle Époque mission begins on this rooftop. It makes sense to scour all the rooftops for collectibles first, then quickly drop to street level with a Leap of Faith. Your knowledge of the map from the previous two missions should make this a relatively easy task.
 As in the previous mission, you will find guards at the positions shown on our map. Again, feel free to ignore them. If you free run at all times, you will be gone by the time they become suspicious about you. If you approach one from behind, however, a swift and silent assassination will bring a welcome +20 score bonus.
 Once you have revealed the Assassin, you need to ascertain his position: he is most commonly found either by the Metro’s entrance, or on the opposite rooftop, though there are other possible spots.
 The exit portal is located in the same position as the previous mission. As before, it makes sense to leave the exploration of the area surrounding it to the very end, when the timer is running out. This way, you can pick up many of the collectibles as you rush to safety.
 The Artifacts unlocked through the Companion App and Assassin’s Creed Initiates appear in these positions.
Belle Époque – Tornado
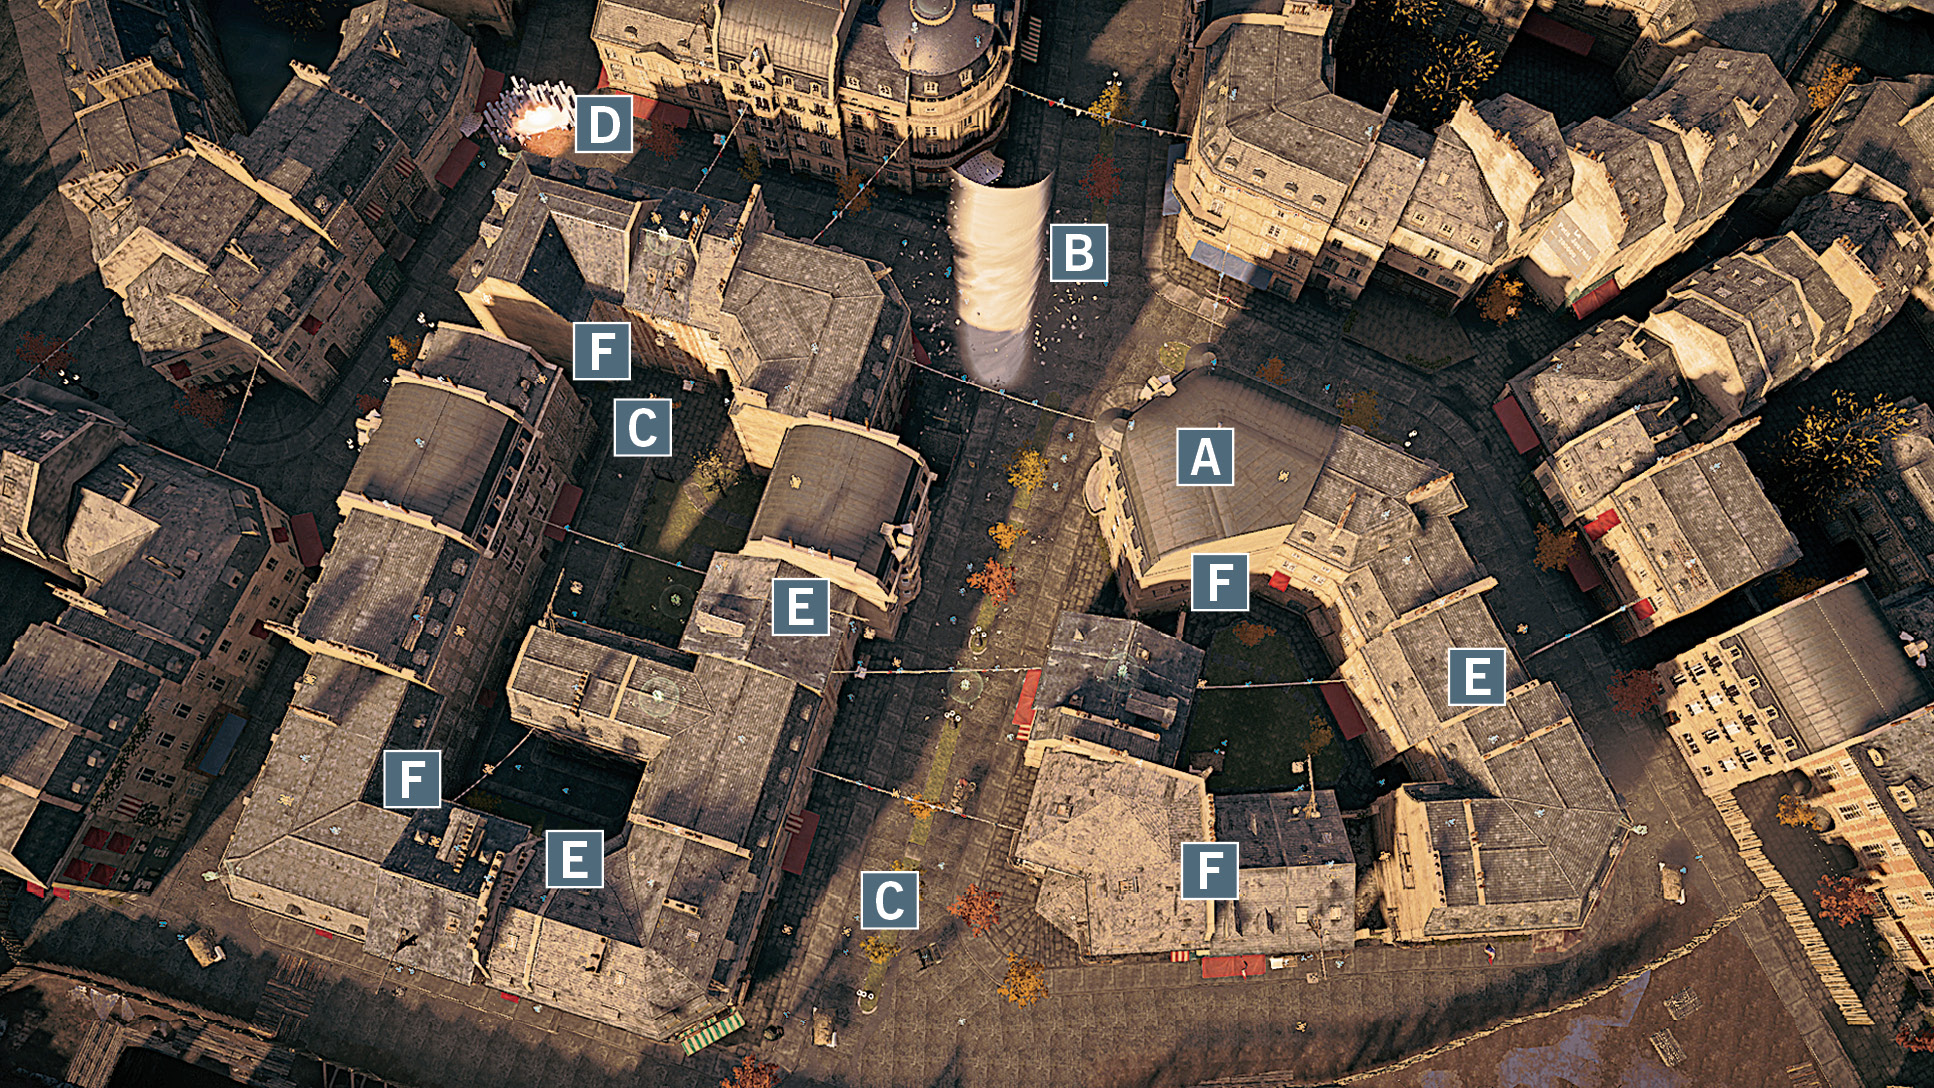
 Your starting position means that you can broadly follow the same route as in the opening mission if you’re already familiar with it for more navigational efficiency.
 The main difference from the previous missions is that a tornado randomly runs through the map. If you come into contact with it, you sustain damage and lose precious seconds as Arno is knocked down. Try to plan your movements ahead to always avoid the sections of the map where the tornado is wreaking havoc.
 The location of the trapped Assassin is randomized, but he is most commonly found at one of the two positions shown here.
 In this version of the map, the exit portal is located here. To hit two birds with one stone, consider grabbing the collectibles found in this street as you run towards the exit.
 A new complication in this mission is the presence of guards at the positions shown on our map. This sounds worse than it really is, however, as you can completely ignore them. As long as you free run at full speed at all times, you won’t even notice guards – and they will barely have the time to notice you too. If you approach one from behind, feel free to assassinate him, though, as this will net you a +20 score bonus.
 The Artifacts unlocked through the Companion App and Assassin’s Creed Initiates appear in these positions.
Occupied Paris – Covert
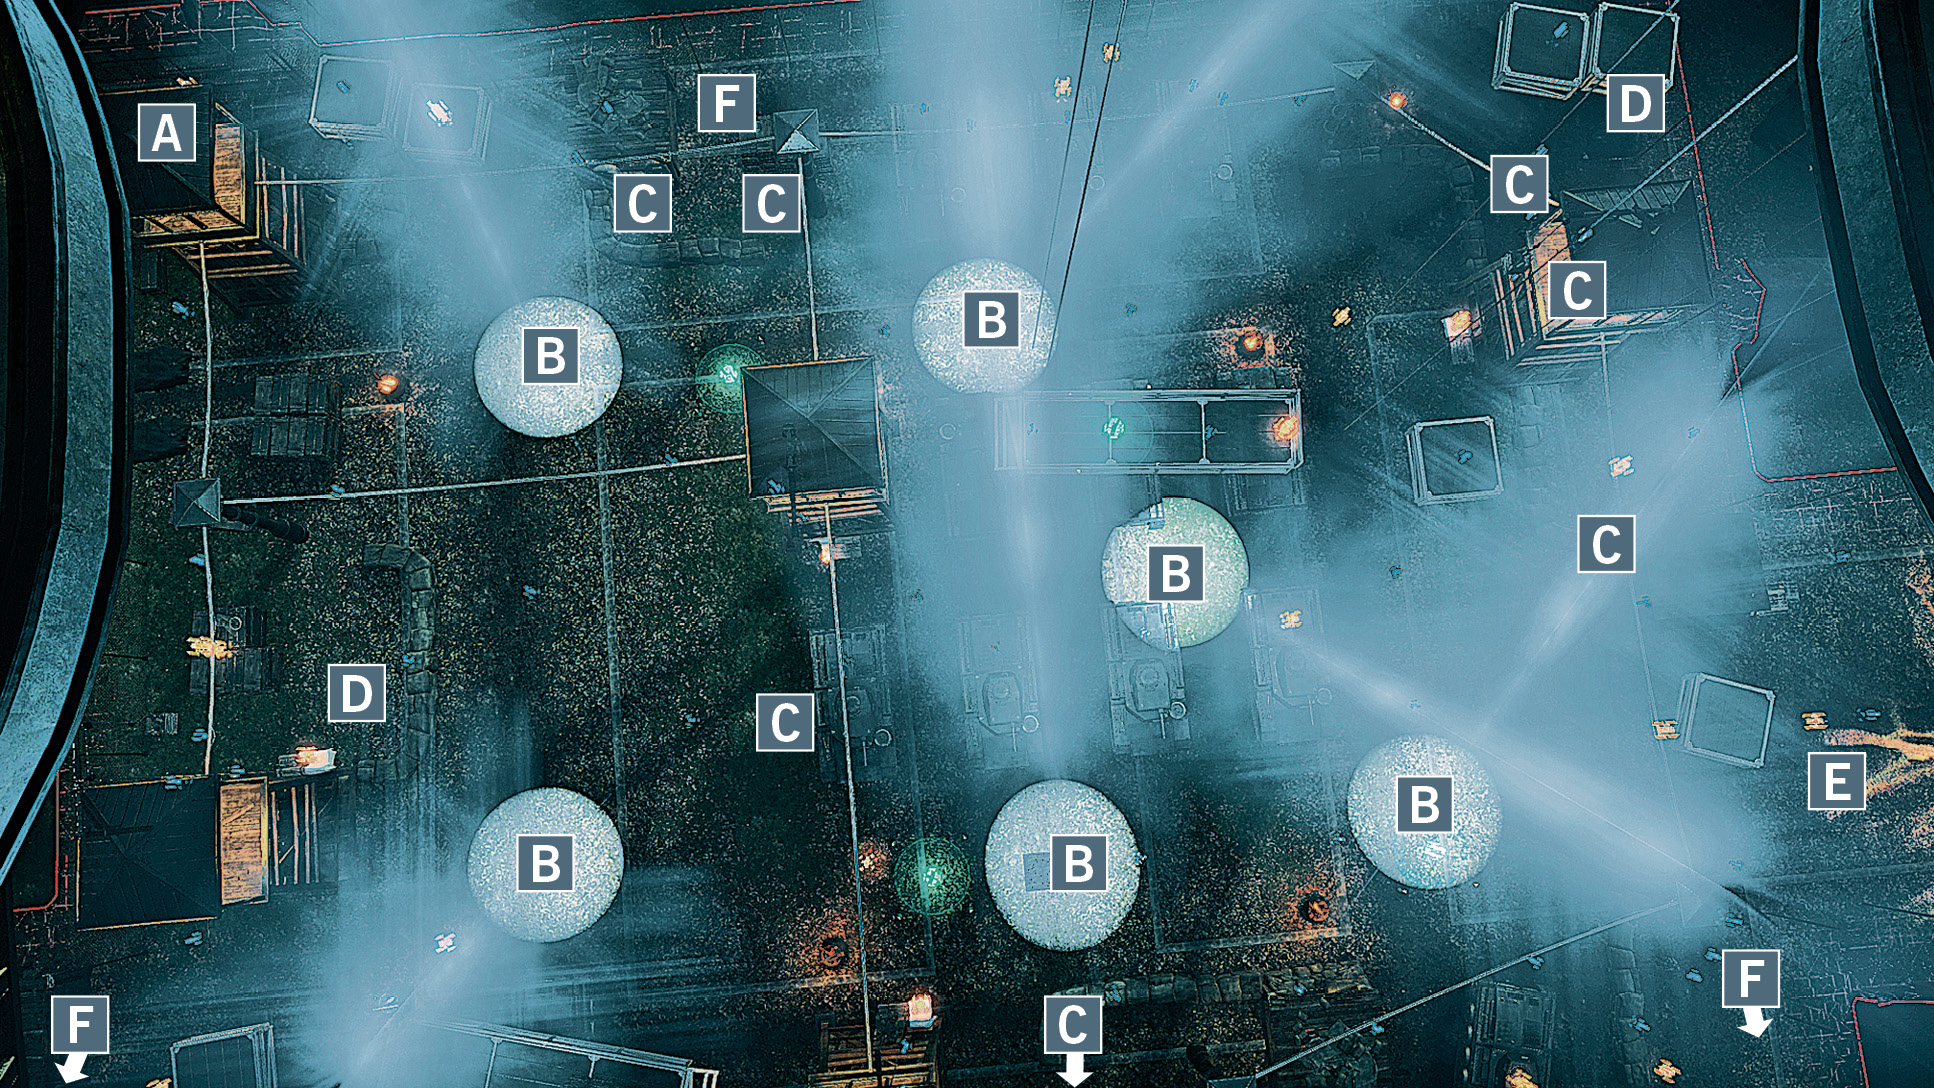
 In this mission, you begin on the roof of the watchtower in this corner. An effective approach is to use the hanging ropes to pick up all the elevated collectibles (including those found inside the various watchtowers) before you jump down to the ground level.
 Six spotlights constantly sweep across the area. Always try to avoid them, as any time spent within their beams will lead you to be fired at and sustain damage. If your health bar is depleted, you will be desynchronized.
 This map also features multiple guards, some stationary and others running short patrols. Unlike the Belle Époque mission, they have firearms and will shoot you from a distance, dangerously reducing your health bar. It therefore makes sense to assassinate them as you hunt collectibles. As a fringe benefit, each soldier you eliminate will reward you with a +20 score bonus. An efficient route involves taking out the two standing in watchtowers, then air assassinate the ones right below. You can then get rid of the remaining ones as you run along the map’s borders. This will enable you to explore the center portion of the area without having to worry about detection or damage. If you happen to be spotted, avoid direct combat at all cost, as this process is far too time-consuming – running away and focusing on collectibles makes much more sense.
 Once you have revealed the trapped Assassin, rush to his position, which is determined randomly. Don’t leave this task for later, as both potential locations are far from the exit portal.
 When the timer runs out, rush towards the exit portal found here. Grab the few collectibles around the barrier as you make your escape.
 The Artifacts unlocked through the Companion App and Assassin’s Creed Initiates appear in these positions.
Occupied Paris – Tower
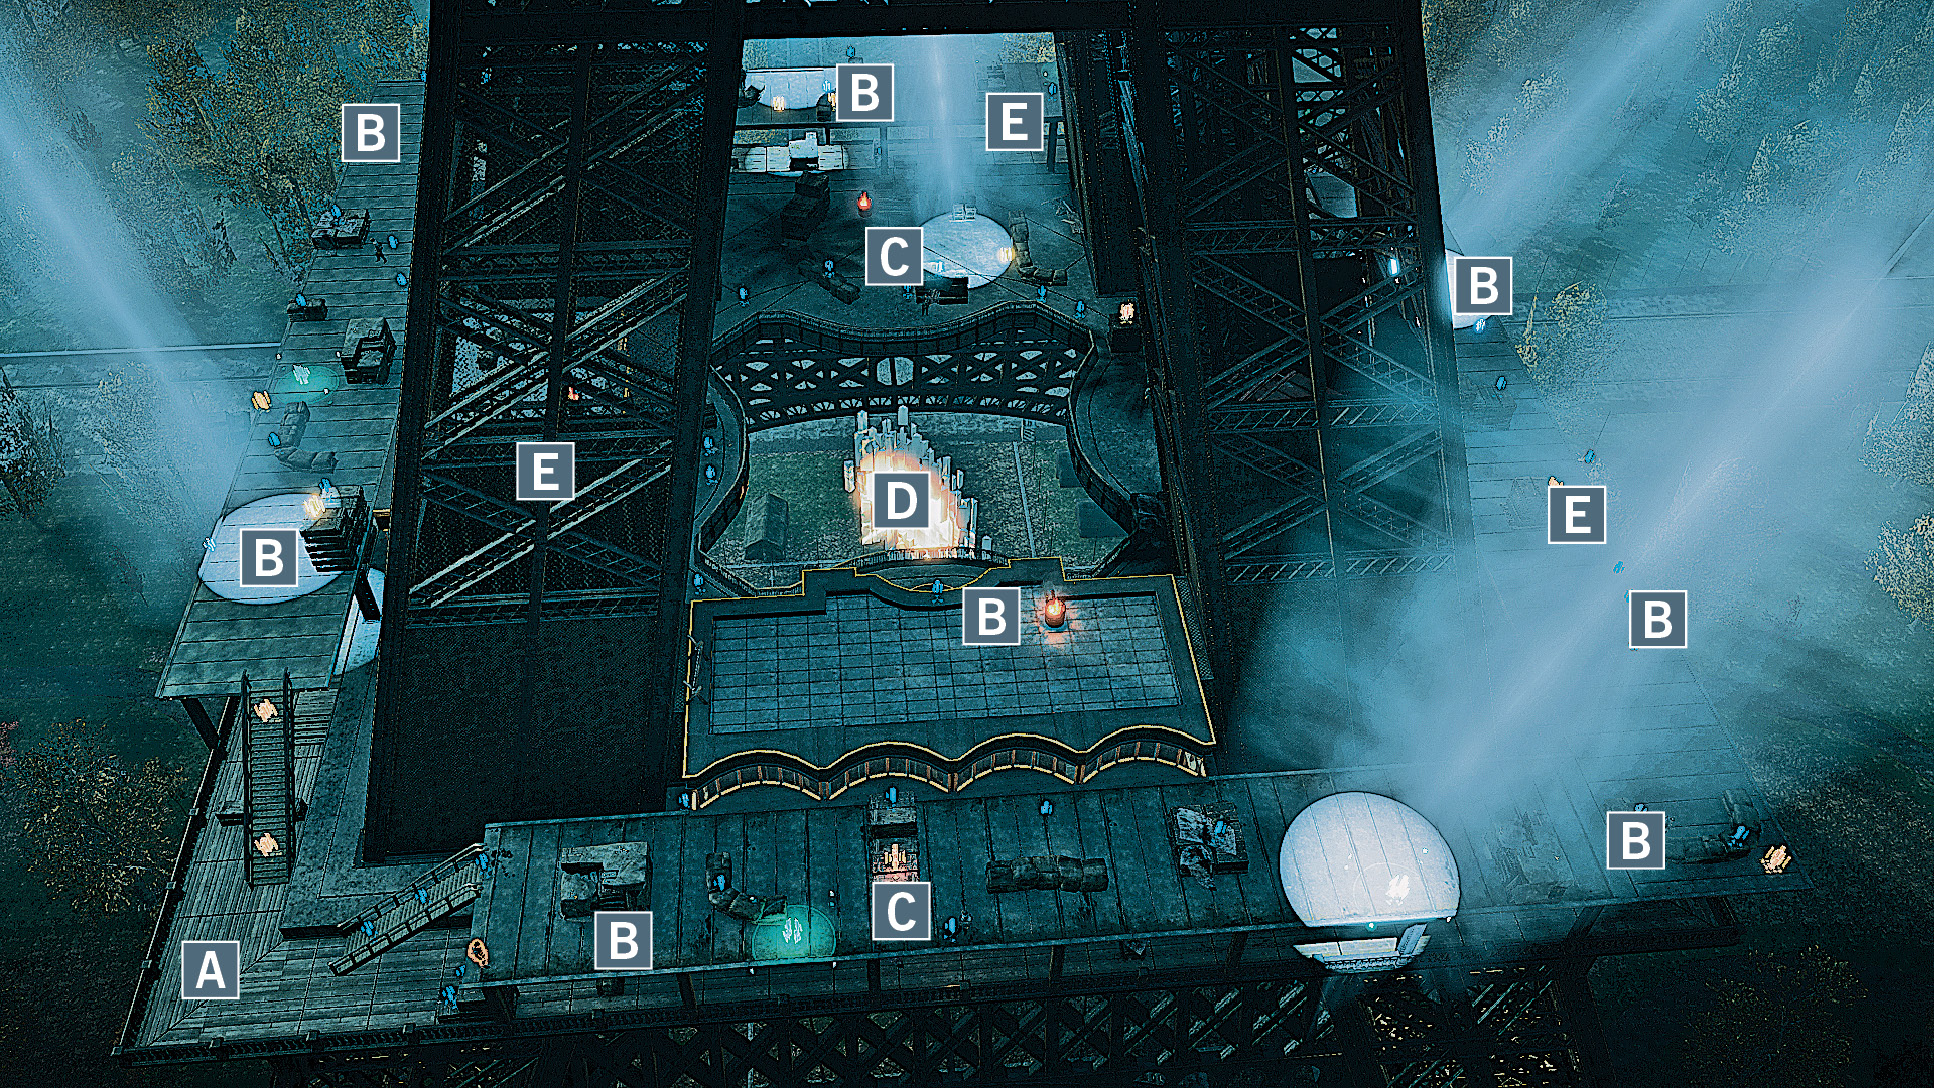
 The mission’s start point is in this corner. As most of the collectibles are found on the upper platforms, it makes sense to immediately climb the stairs and run around the tower in a counterclockwise direction. Sweeping up most of the collectibles found on these platforms is enough to reveal the position of the trapped Assassin. Just be sure to stay clear of the spotlights during the process.
 There are many guards patrolling this map, and their firearms can significantly complicate your task if you get detected. If you run around the tower’s upper platforms in a counterclockwise direction as we suggest, however, you can actually assassinate most of them on the way. You will notice that several of them face away as you approach, making them easy targets.
 The trapped Assassin’s location is determined randomly, but we have shown his most common positions on our map. Make sure you free him while the spotlight is directed elsewhere.
 When the timer runs out, simply rush to the center of the map and perform a Leap of Faith from the handrail to reach the exit portal.
 The Artifacts unlocked through the Companion App and Assassin’s Creed Initiates appear in these positions.
Occupied Paris – Data Harvest
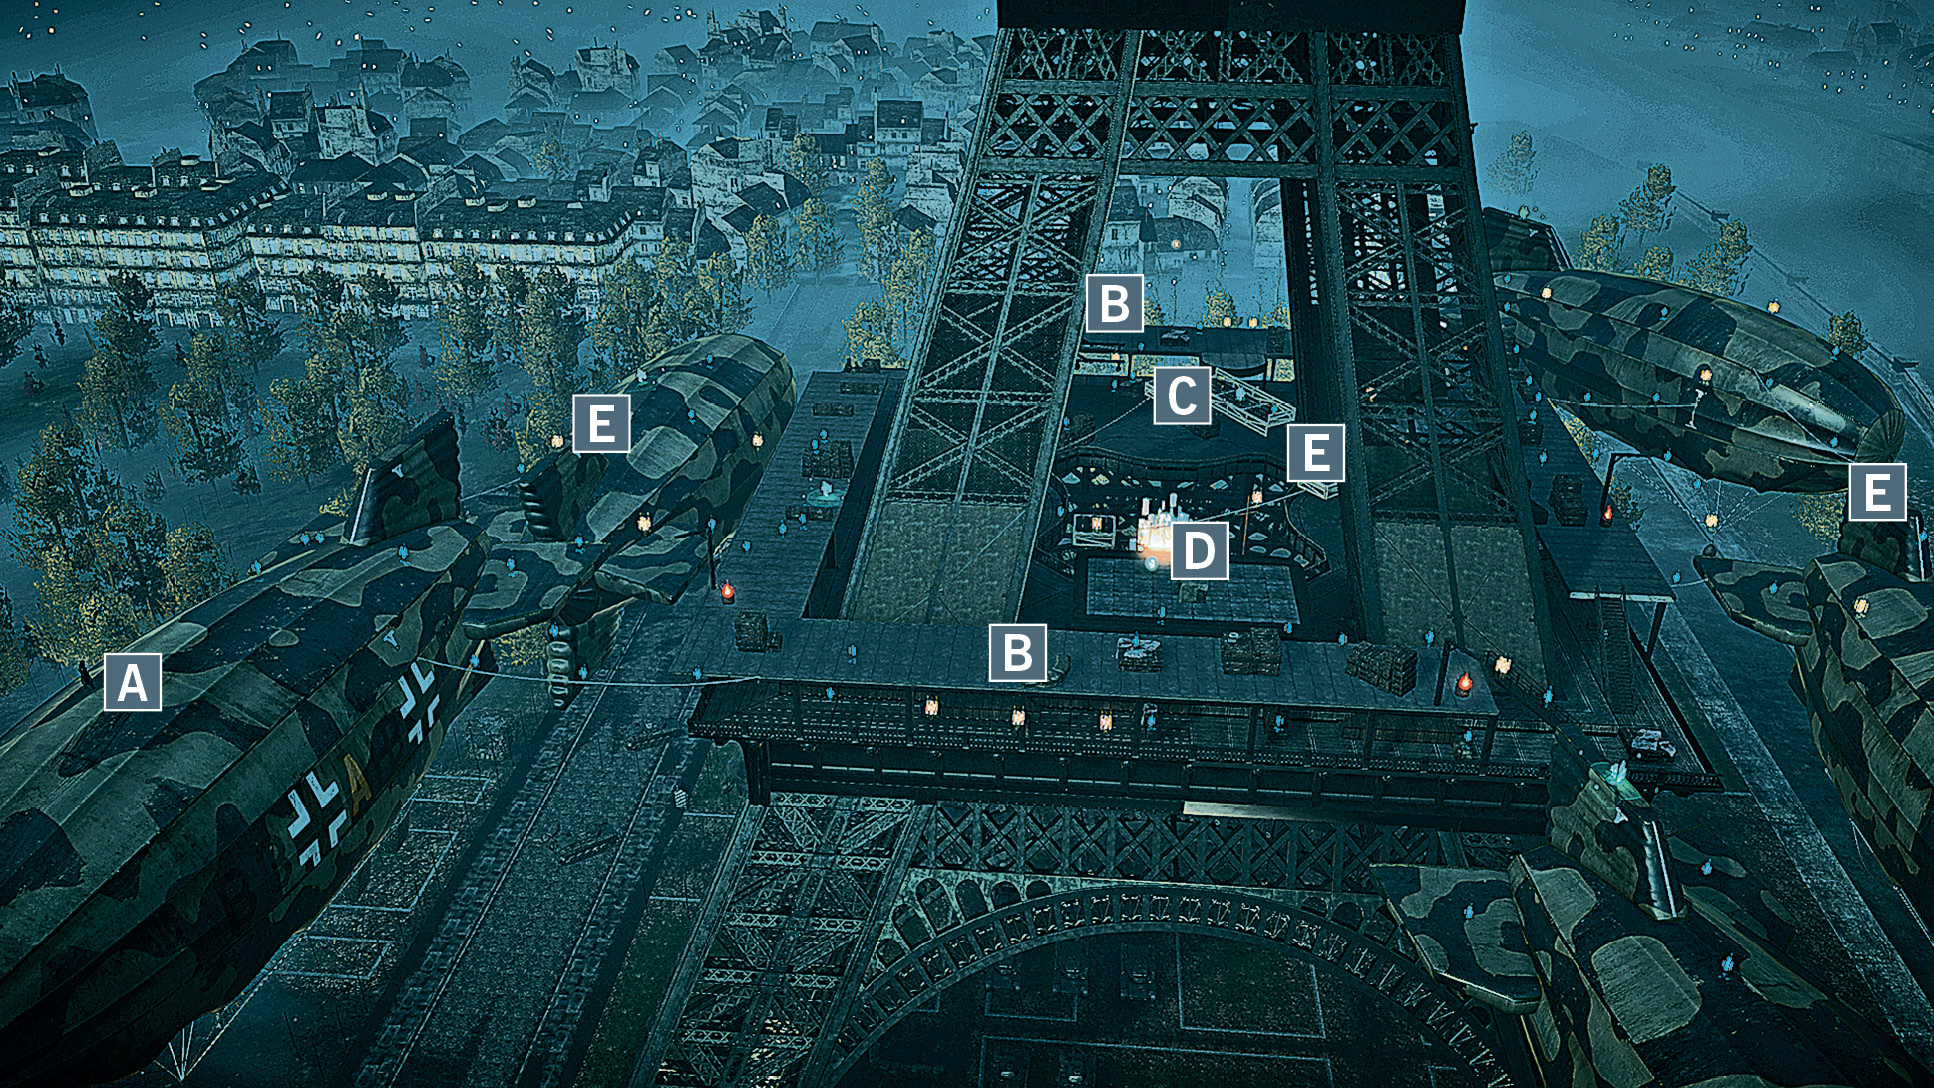
 From your start position on top of the dirigible, you can obtain an impressive amount of collectibles by going around the tower in a clockwise direction, focusing on the five dirigibles first. Once you’ve retrieved most of the data on the airships, move back to the tower and sweep the upper platforms in priority for maximum efficiency.
 As you explore the tower’s upper platforms, consider making a stop at either or both of the turrets in these positions. Each plane that you manage to shoot down will net you a whopping 100 points. This only makes sense if you can destroy the aircraft in a relatively short timeframe, though.
 The trapped Assassin usually appears here once you have located him. You can access the nearby turret to take down a plane before or after you free him.
 When you run out of time, jump to the exit portal with a Leap of Faith from any handrail or hanging platform surrounding it.
 The Artifacts unlocked through the Companion App and Assassin’s Creed Initiates appear in these positions.
Medieval – Quarry
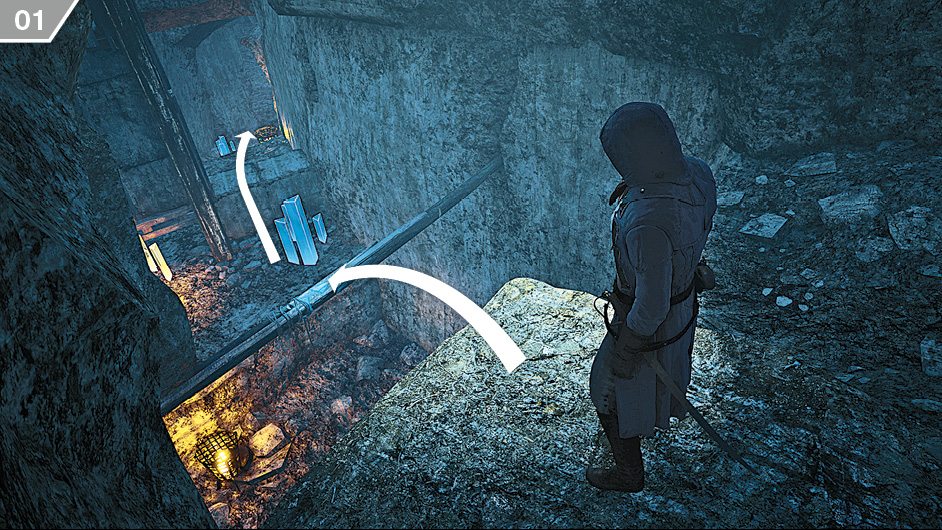
From your starting point, simply free run along the linear path, collecting all the data on your way. A Companion App Artifact can be found on the left-hand side.
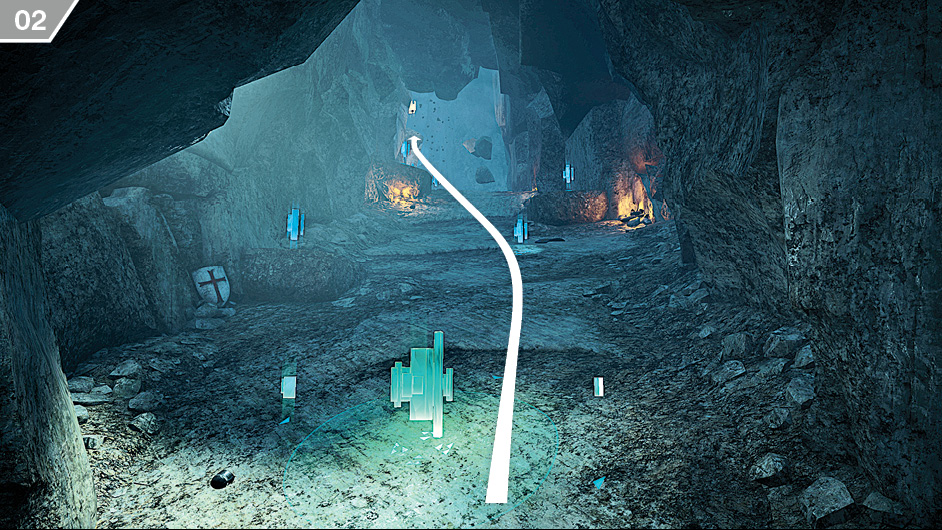
Pick up all the collectibles as you run up the slope, then climb the cliff at the end of the path.
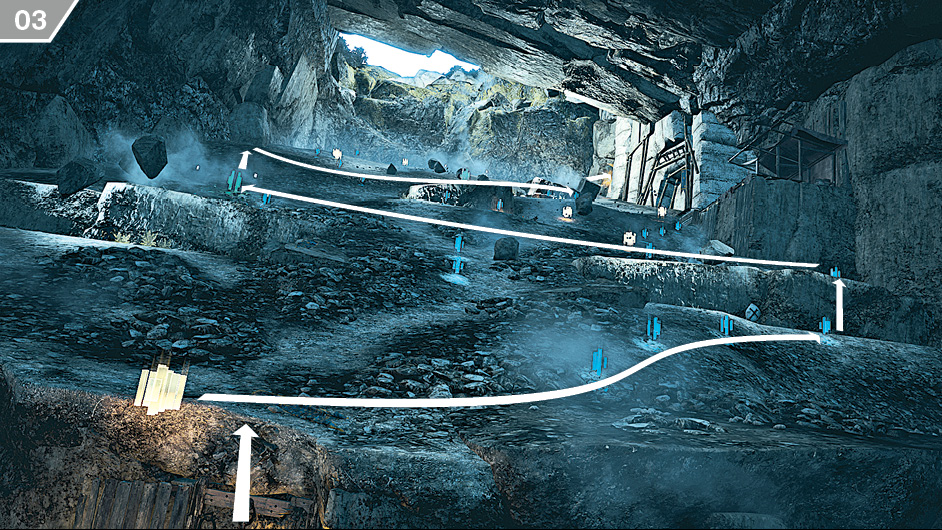
In the quarry section, try to sweep the area from one side to another, retrieving as many collectibles as possible, then move up to the next section and repeat until you reach the tunnel on the far right-hand side. Try to keep the camera oriented a little towards the top of the slope to spot incoming boulders, and dodge them carefully. You can also take cover behind the natural walls and resume your hunt once the danger has passed. Note that two Artifacts (one Companion App and one Initiates) can be found on the right-hand side of this sloped section, and a third one awaits you to your right as you exit the tunnel at the end.
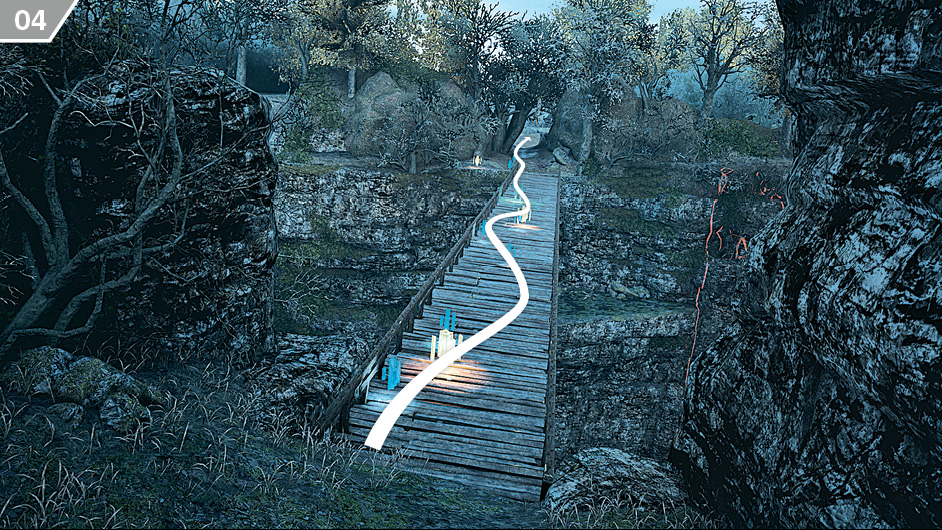
When you reach the wooden bridge, sprint to the other side, picking up all the collectibles you can grab on the way. Don’t waste any time, as the simulation’s borders will quickly close in on you, destroying the bridge in the process.
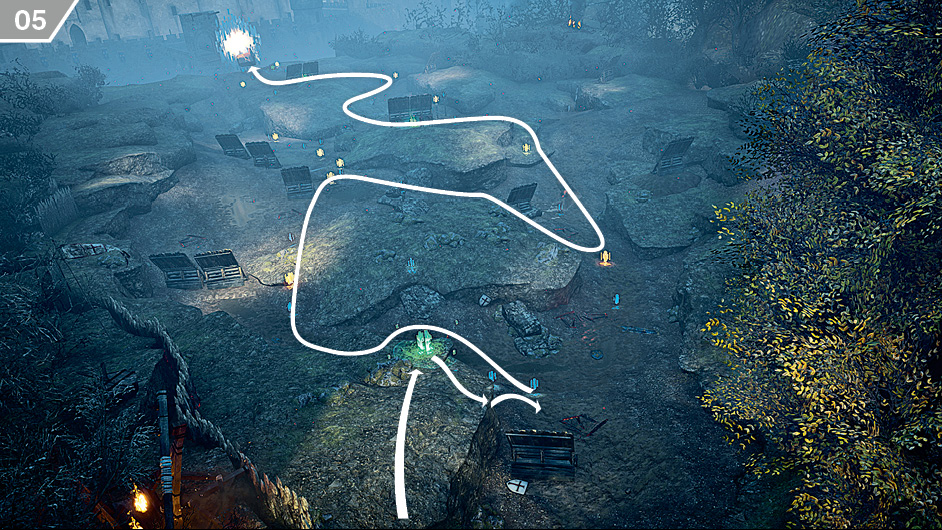
When you reach the final battlefield area, all you have to do is run towards the exit portal. The trapped Assassin will appear almost directly in front of it, so you can free him during the final stretch of your escape. Try to grab as many collectibles as you can along the way, but make sure you adapt your route to the amount of time you have left. Taking a shortcut to ensure you safely reach the portal definitely makes sense if you have little room for maneuver. Two types of danger threaten you in this section:
- There are many soldiers that will attack you as you cross the battlefield, but you should ignore them (unless you have an easy assassination opportunity, naturally). Fighting them will cost you precious seconds that are best spent focusing on collectibles.
- You will also regularly spot red circles that appear on the ground: these foreshadow the imminent fall of fiery projectiles. Be careful to stay well clear of them.
Medieval – Battlefield
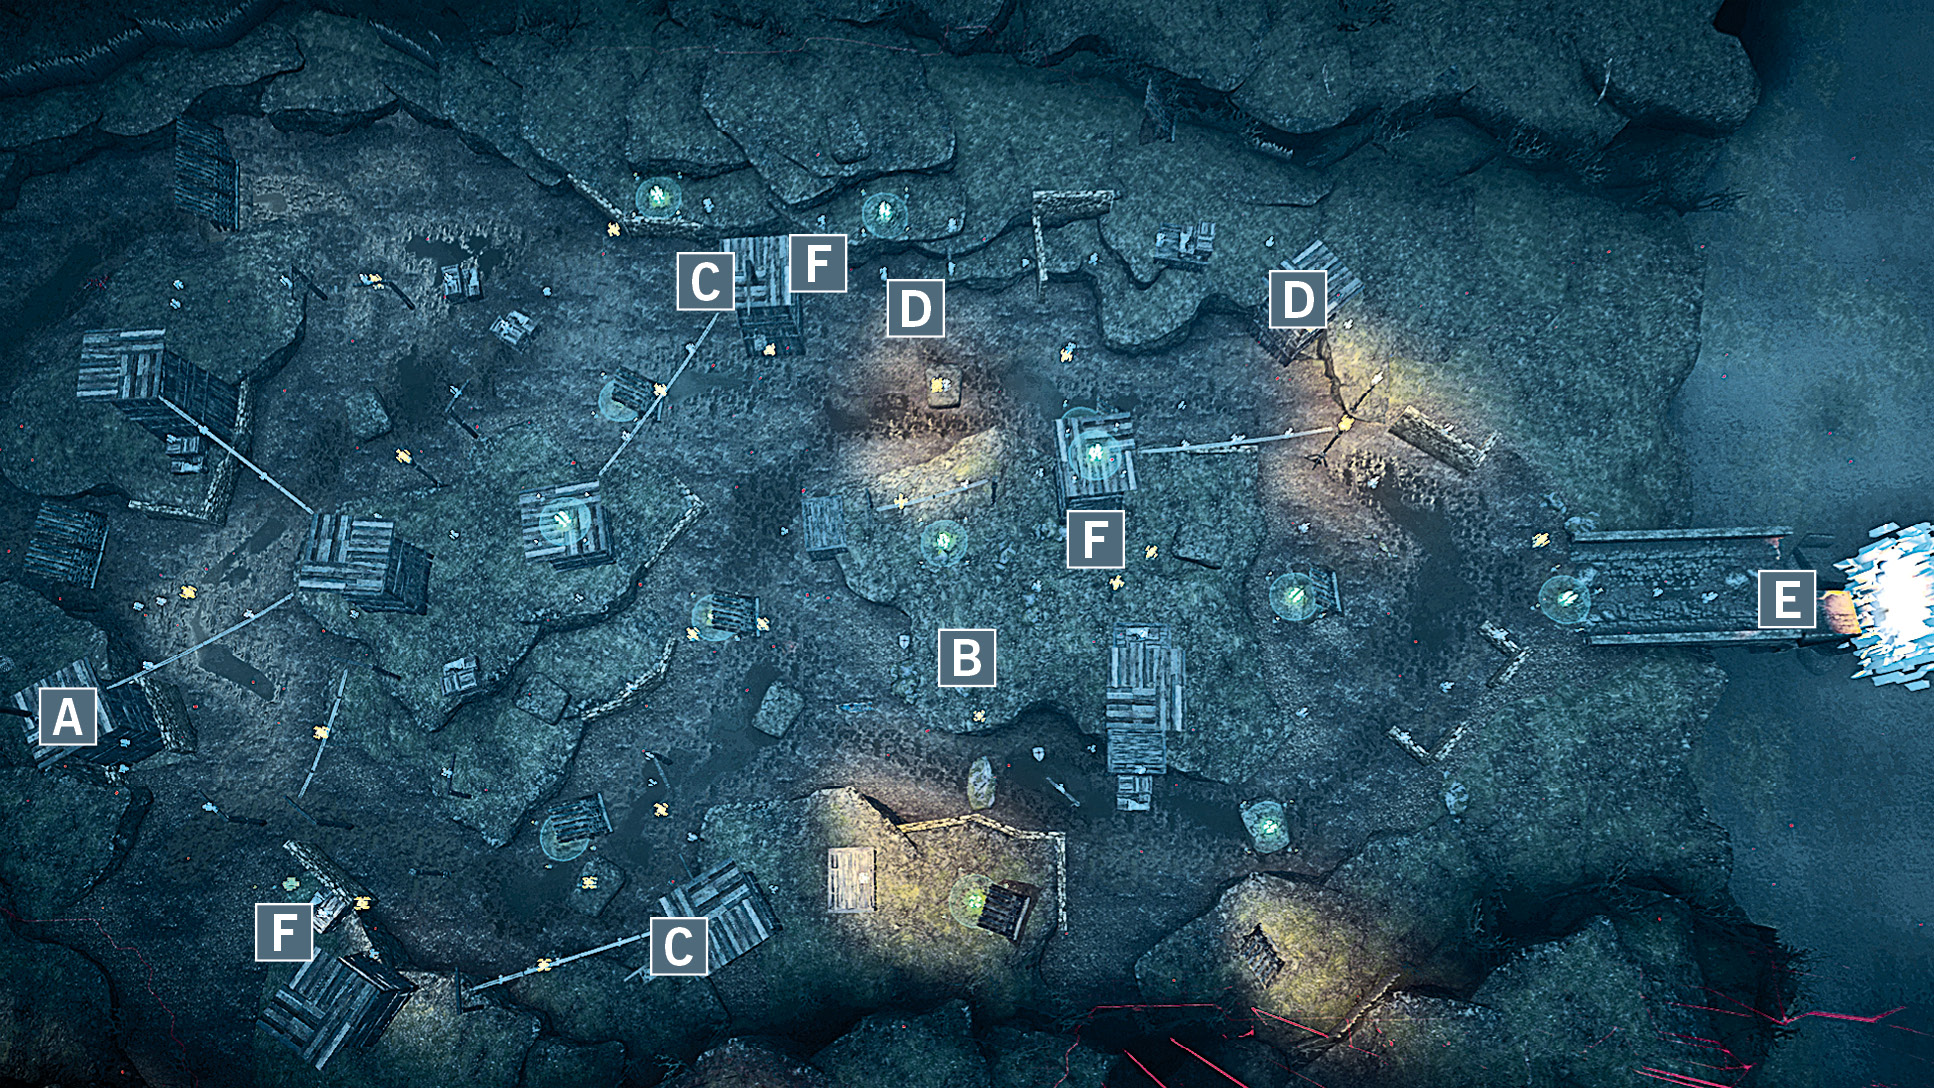
 Your starting position in this mission is at the top of a wooden tower in a corner. The ropes leading to the nearby towers are an excellent way to begin your harvest of collectibles. Once you have to jump down to ground level, try to plan and adapt your route so as to constantly follow long trails of collectibles.
 As with the previous mission, you will regularly notice red circles that foreshadow the arrival of damaging projectiles.
 You will find lift ropes at these positions. You can use these to instantly reach the upper reaches of the corresponding wooden towers.
 Once revealed, the trapped Assassin can randomly appear in multiple locations. Try to free him as you’re collecting data nearby to optimize your movements.
 The exit portal stands at the opposite end of where you begin this mission. You can completely ignore the ghost soldiers that fight in front of it: they cannot harm you in any way.
 The Artifacts unlocked through the Companion App appear in these positions.