
Assassin's Creed Unity Guide Walkthrough
Sequence 05
 Memory 01/“The Silversmith”
Mission OverviewChallenges■Lockpick four doors: see ■ Drive two Brutes berserk: see Notes & Further Reading■If you have yet to do so, you must view the introductory cutscene of the Café Théâtre side quest chain before you can begin this memory. Go to the Memory Start icon outside and press ■This Memory may mark your first encounter with the Defender enemy archetype. These are easily identified by the spears that they carry. |
 .
. .
. /
/ at the door to trigger a cutscene.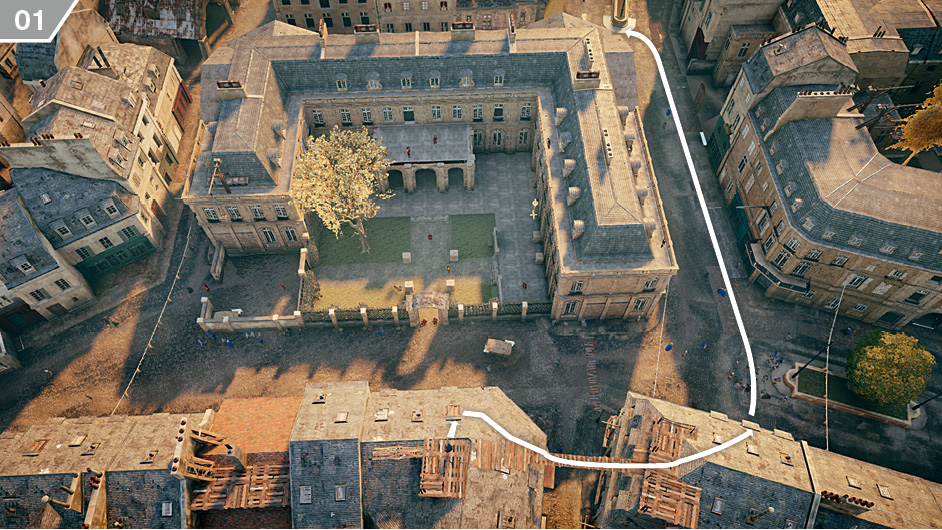
Enter the Brotherhood Sanctuary and activate the Council Report cinematic. When this ends, travel to the Memory Start marker. Germain is somewhere inside the building directly ahead of your position, but strolling in through the front door is clearly not an option. Instead, taking care to avoid patrolling Extremists, make your way to the rear of the house.
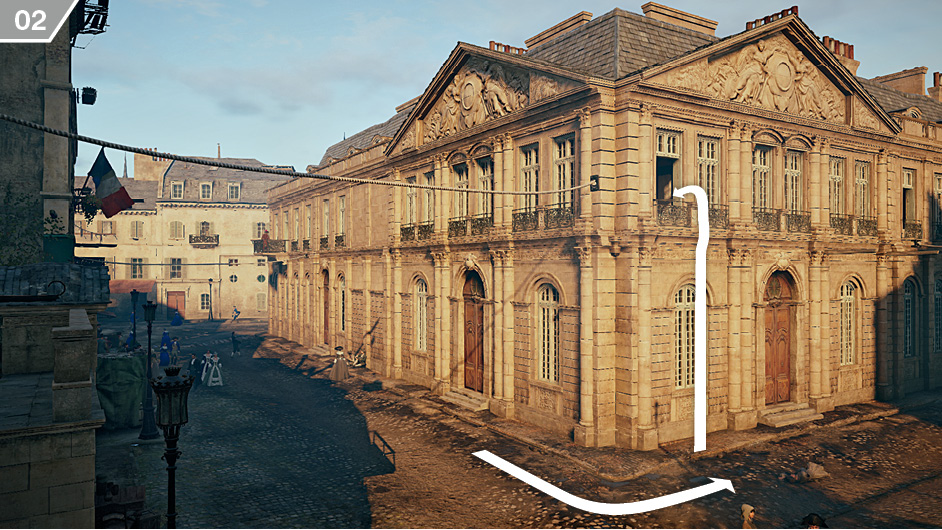
After ensuring that there are no nearby Extremist patrols, scale the northeast corner of the building to reach an open window.
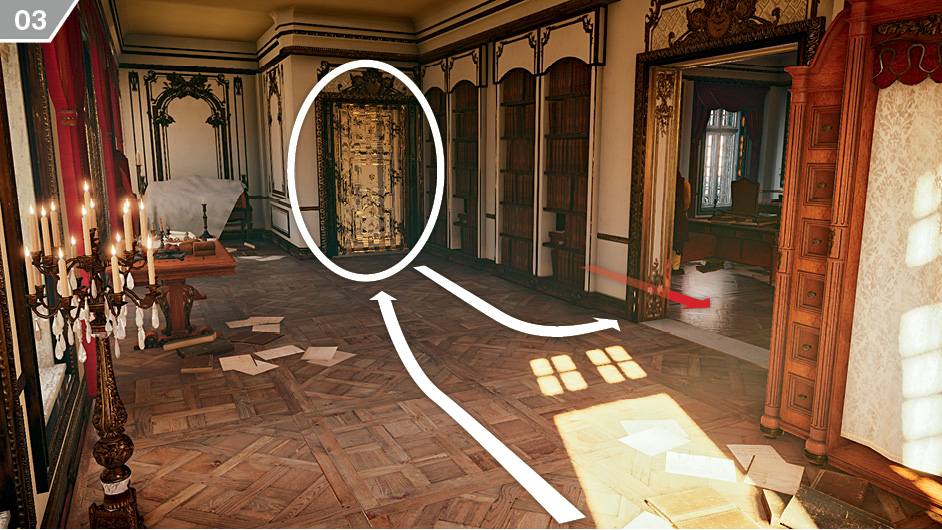
The first of four doors that you must lockpick to complete the associated Challenge is located in this room, so start by dealing with that. If you take cover at the left-hand side of the door leading to the room with three Templar hirelings, you can perform a cover assassination on one of the Extremists as he walks past. You can then sneak in to stealthily kill the Brute at the desk and a third target by a window.
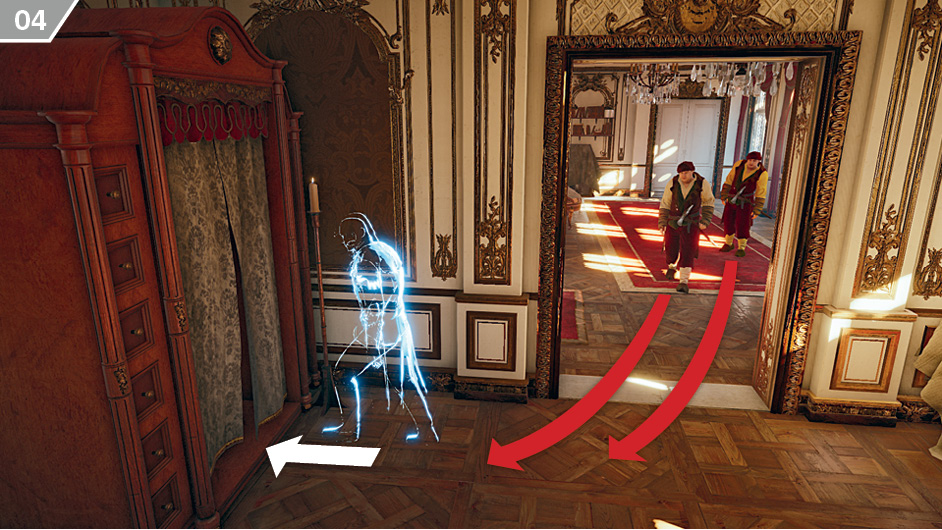
Sneak to the northwest through the next empty room along until you reach the hiding place shown on the above screenshot. Activate Eagle Vision to identify two Brutes standing guard close to a highlighted door. Stand in the open doorway to attract their attention, then slip into the hiding spot as they move to investigate (as illustrated). This will break up their routine and enable you to emerge and perform two quiet Hidden Blade kills as they walk away.
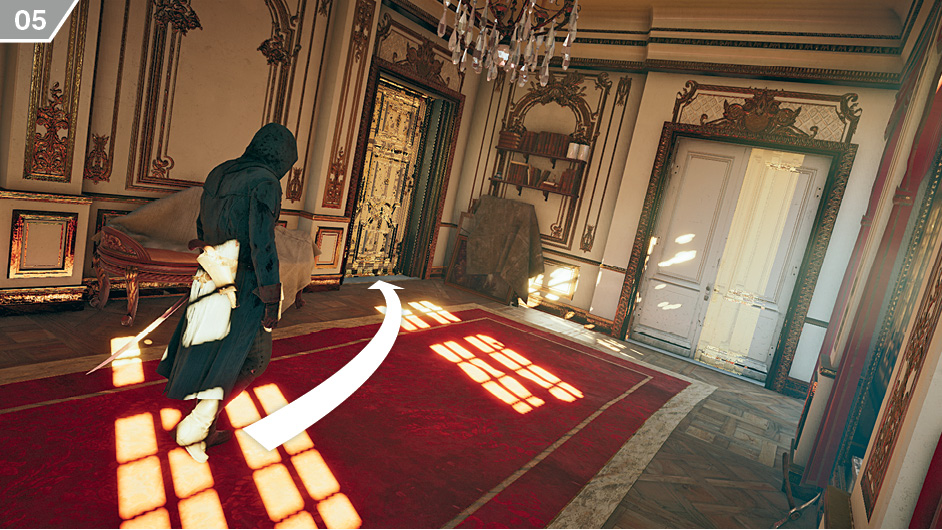
The double-door to the right leads to Germain, but do not open this just yet. Instead, pick the locked door to the left, collect the Artifact from the wall in the next room, then open the third locked door; note that there is a guard at the end of the corridor beyond, but you can easily step away before he detects Arno. You can then return to the previous room and interact with the double doors to meet Germain. The second stage of the Memory involves eliminating groups of Extremists in different areas of the building to enable Germain to escape.
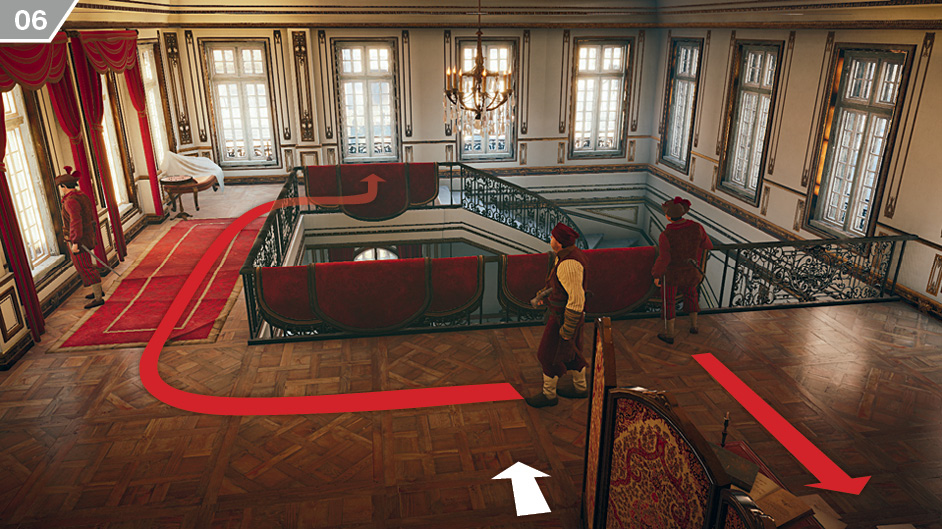
While there is no penalty for detection here (other than the usual risks associated with open conflict), there are efficient stealth-based approaches for each group of assailants. With the first three Extremists, activate Eagle Vision and wait for the Brute to walk towards the staircase. Now watch for the instant that the Extremist to the far right turns to walk away. This is the optimal moment to strike. Enter Stealth Mode and kill the aforementioned Extremist, then silence the second target standing by the window. You can then use the Phantom Blades to kill the Brute from a distance, or sprint to complete the job in person.
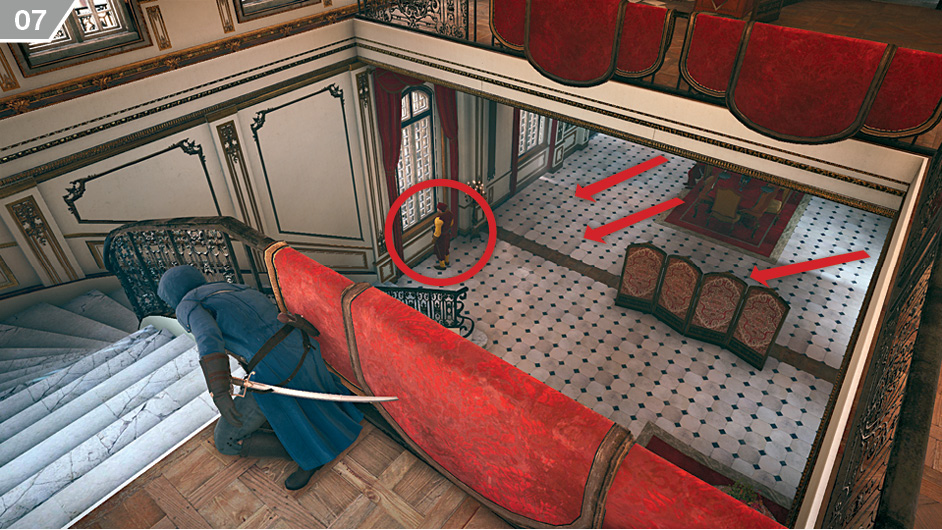
Germain will automatically move to the stairs once the first group has been eliminated. Move into the position shown here and watch the area below. Equip the Berserk Blades and fire at the Brute highlighted on the above screenshot (which also contributes to your tally on the related Challenge). When his associates run over to engage him, you can take the opportunity to quietly tip the odds in his favor with the Phantom Blades. Ensure that you save one Berserk Blade for a later group of enemies.
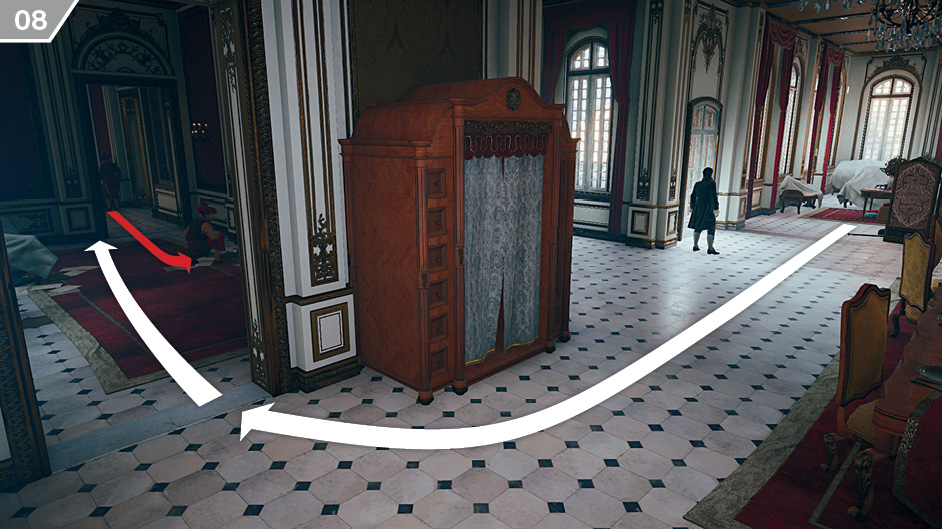
When all Extremists have been defeated, Germain will again move forward. Immediately follow him downstairs and head for the open doorway at the far end of the room. If you approach this position instantly, you will see an Extremist walk into the room just beyond your position. Sneak in behind him for a Hidden Blade kill, then take cover on the left-hand side of the next doorway (as shown on the screenshot above). When the Brute approaches, perform a cover kill; you can then neutralize the Extremist with his back to you. Before you head on to the fourth group of enemies, there is a door nearby to lockpick to complete the first Challenge.
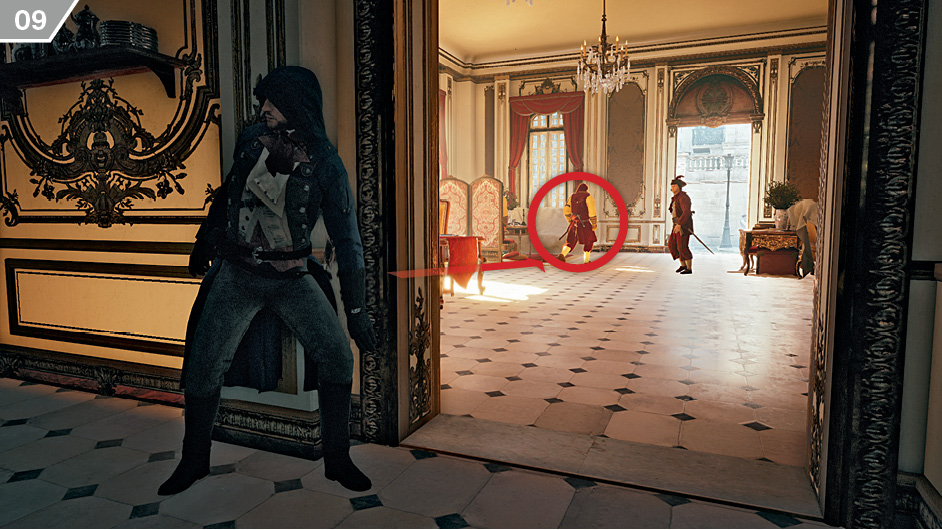
There are four Extremists in the final room. Take cover to the left of the door and use a Berserk Blade to hit one of the two Brutes (also completing the second Challenge). As before, you can use any remaining Phantom Blades to eliminate the Templar lackeys while they are distracted.
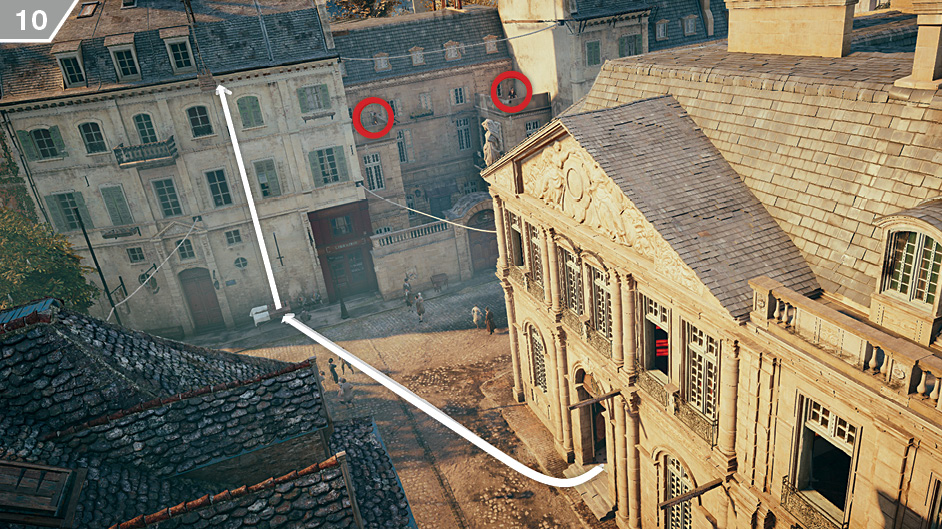
Your next task is to eliminate two sentries armed with rifles who overlook the exit. If you creep out with Stealth Mode via the side door (rather than running straight ahead into their direct field of view), it’s possible to get behind cover before they identify Arno as a target. You can then use the convenient lift to reach the rooftops, and sneak behind them for quiet kills.
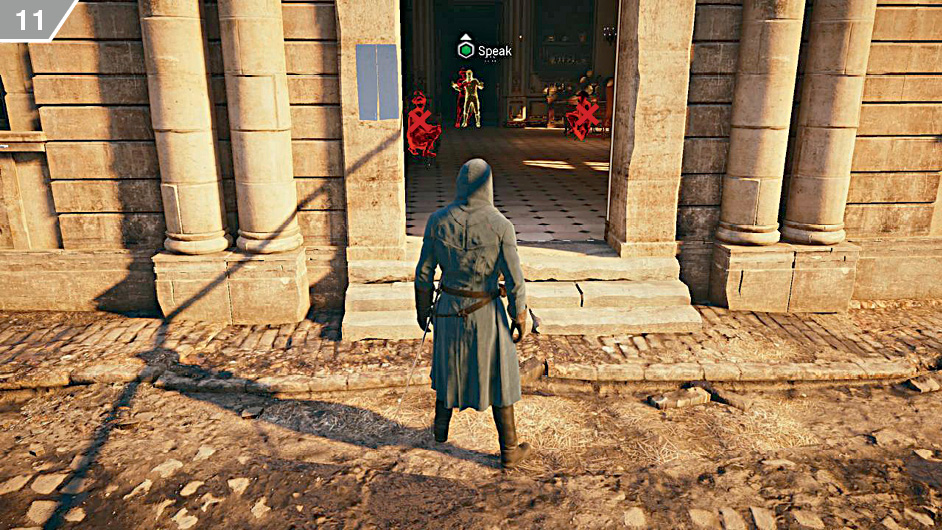
When you return to Germain, you will find him at the mercy of an Extremist. Ignore this for now: your priority is to defeat the other enemies about to ambush you in the room, including a spear-carrying Defender. Don’t feel the need to fight fair, however: you can win this battle before it even begins. From just outside the doorway, identify the Extremists in crouched position with Eagle Vision, and eliminate them with Phantom Blade headshots (note that you can make a quick stop at the shop at the corner of the street if your stocks are low). A short cutscene will ensue. You should then follow Germain until the Memory’s closing cinematic begins.
 Memory 02/“La Halle Aux Blés”
Mission OverviewChallenges■Three pistol kills: see “Notes & Further Reading”. ■ Slide under/over four objects: see Notes & Further Reading■The configuration of enemies in the mission area lends itself to a silent infiltration. If you wish to complete the pistol kills Challenge, we suggest that you snipe at patrolling Extremists from the rooftops close to your starting position before you enter the Restricted Area. Alternatively, you can leave this Challenge until a later replay and incorporate it into a gung-ho attack on the building. |
 .
.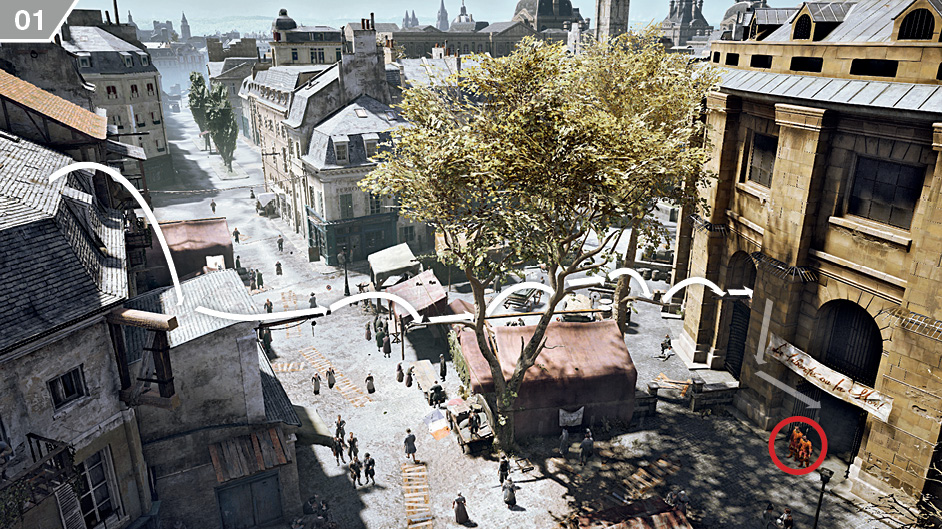
After completing the first Challenge (see “Notes & Further Reading”), you should begin your infiltration from your original starting position. Free run into the trees close to the southeast entrance as shown here to bypass the two Brutes standing guard at the entrance, then sneak behind them to the north.
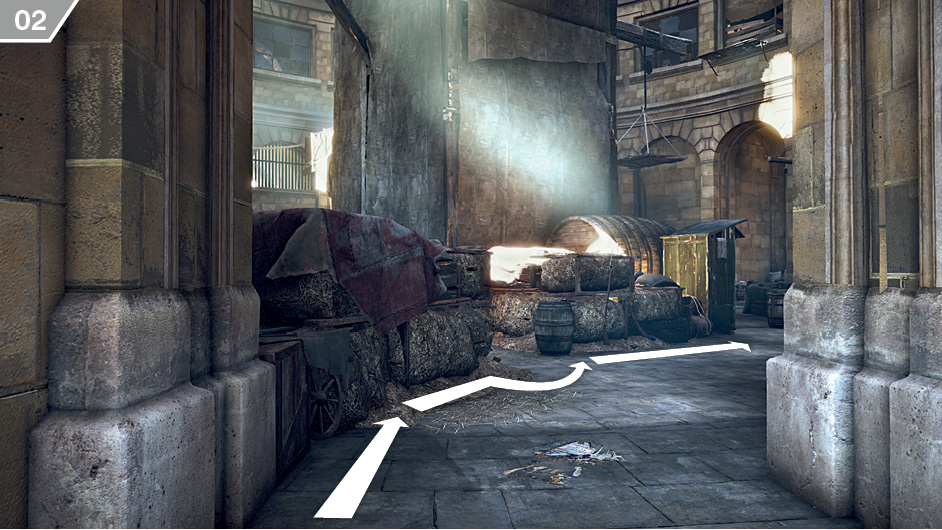
Take cover behind the weapon-filled hay bales and move along to the right. When you reach the gap, look at the next stack of hay bales and tap  /
/ to swap cover while remaining incognito.
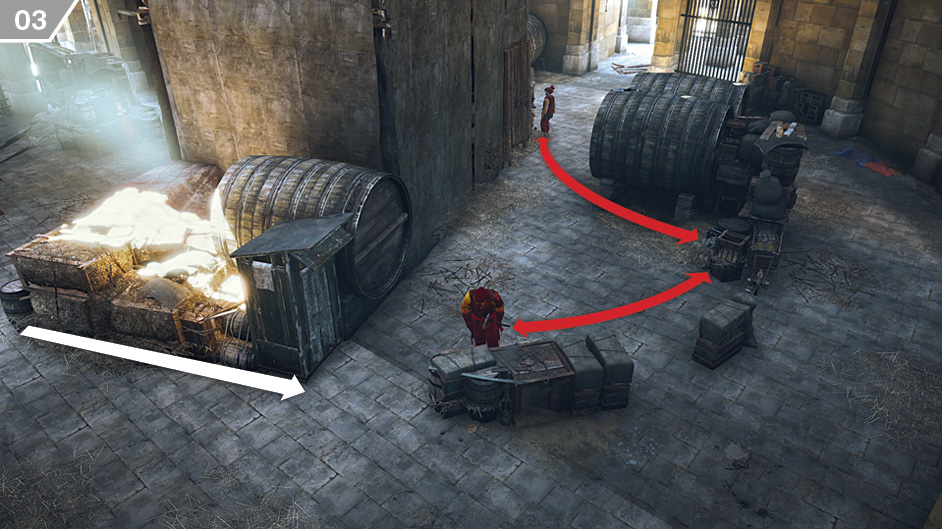
Wait and watch when you reach the hiding place at the end of the stretch of cover. The two Extremists in this area periodically move on the routes illustrated on the above screenshot. You can either wait until they both face away at the same time and run in for fast Hidden Blade kills, or – less risky – hit them with Phantom Blades from cover when they are looking elsewhere.
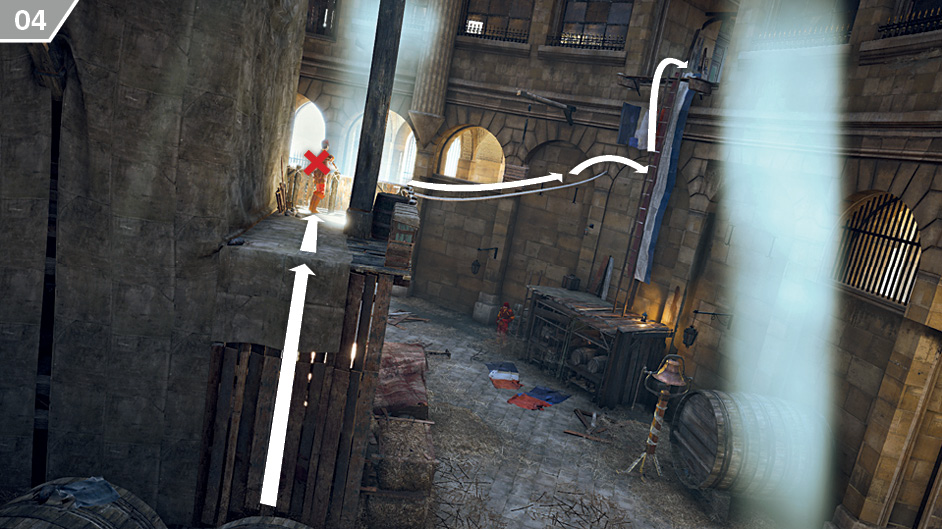
Climb the nearby wooden wall behind the two giant kegs, incapacitate the marksman, then follow the route shown in the screenshot (move quickly along the rope to avoid detection by a Brute below) to reach the room at the top of the ladder. Inside, examine the ledger on the table.
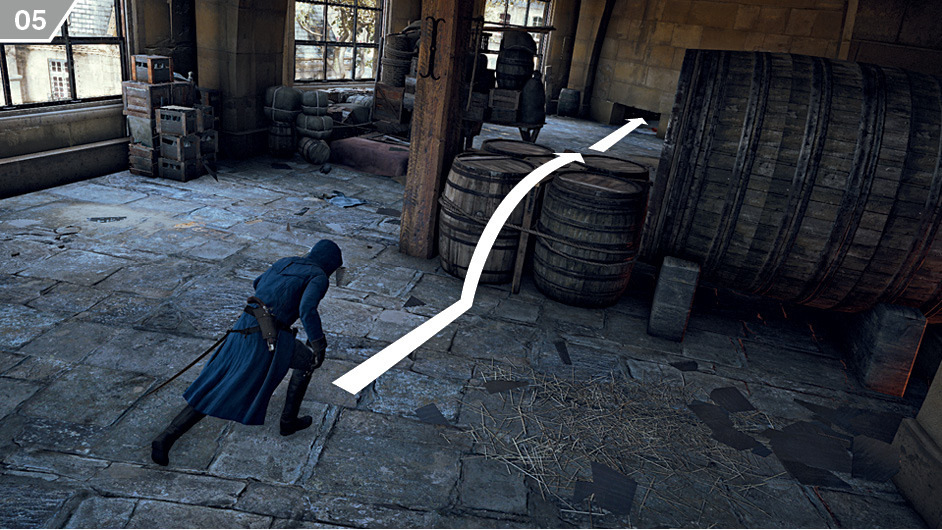
After the cinematic, run through the door next to the desk and into the next room. The second Challenge of this Memory becomes active at this point. When you reach the position shown here, hold  /
/ while running to slide over the four barrels. Use the same command when you reach the hole in the wall beyond to slide through it.
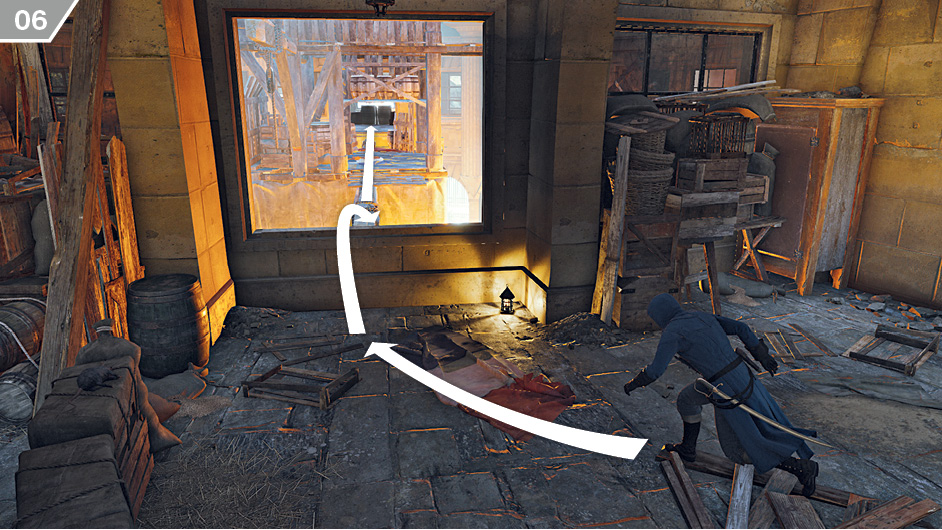
Head for the open window and leap through it. When you reach the central area of the building, hold  /
/ again to slide through the gap. On the opposite side, jump over to the opening directly ahead.
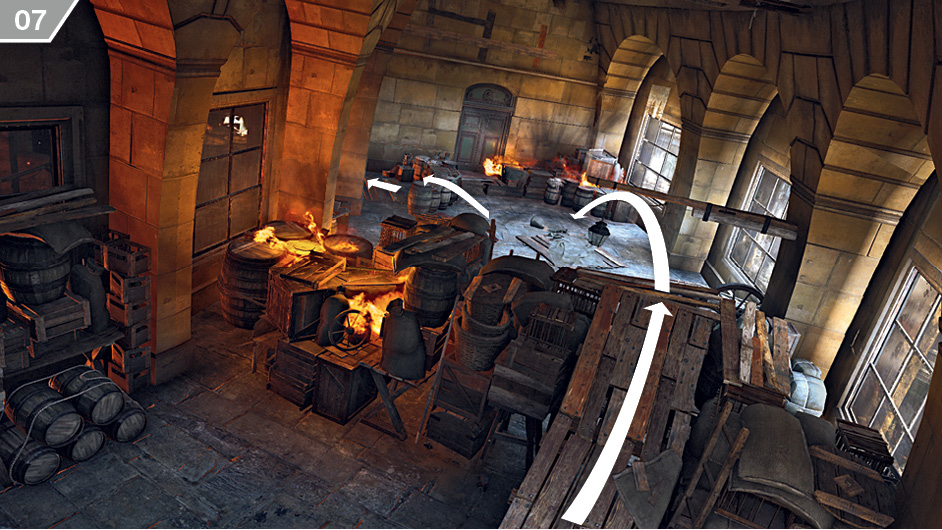
Run through the next room until you approach a wall, then sprint towards the barrels and hold  /
/ to slide over them (and, if you have successfully executed all slide opportunities, complete the Memory’s second Challenge). You can then leap through the window to reach a platform.
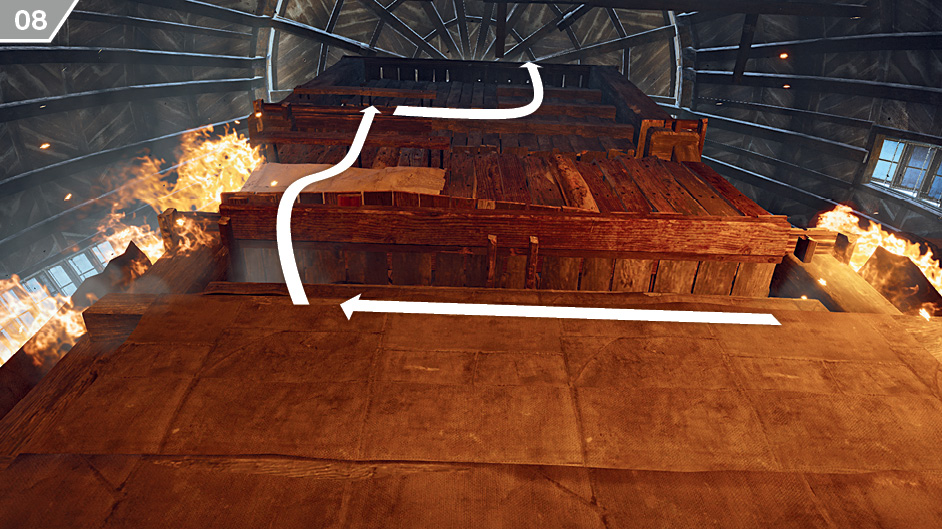
Jump to the wooden structure and use the beams to reach the top.
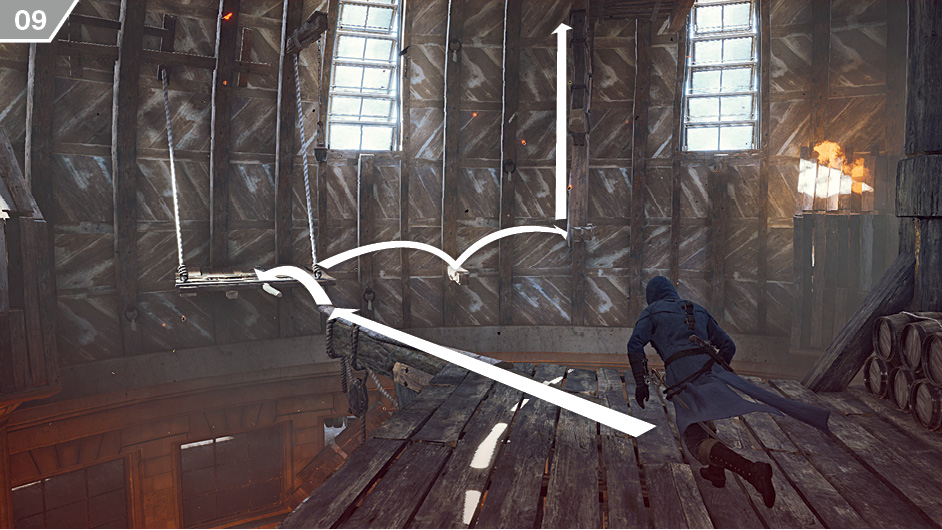
Leap over to the platform suspended against the wall, then turn right and hop onto the beam. You can then jump to the wooden wall and climb to the top.
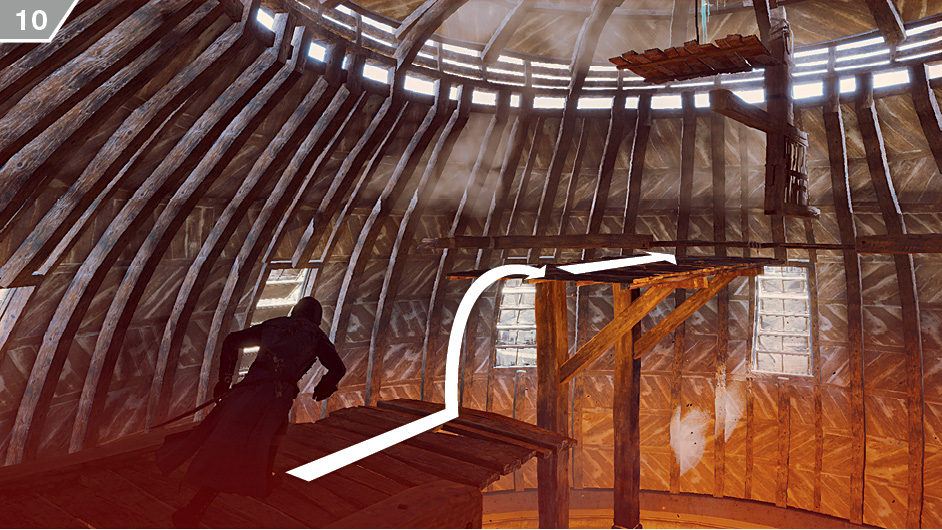
Jump from the ramp before it falls to catch the wooden pole.
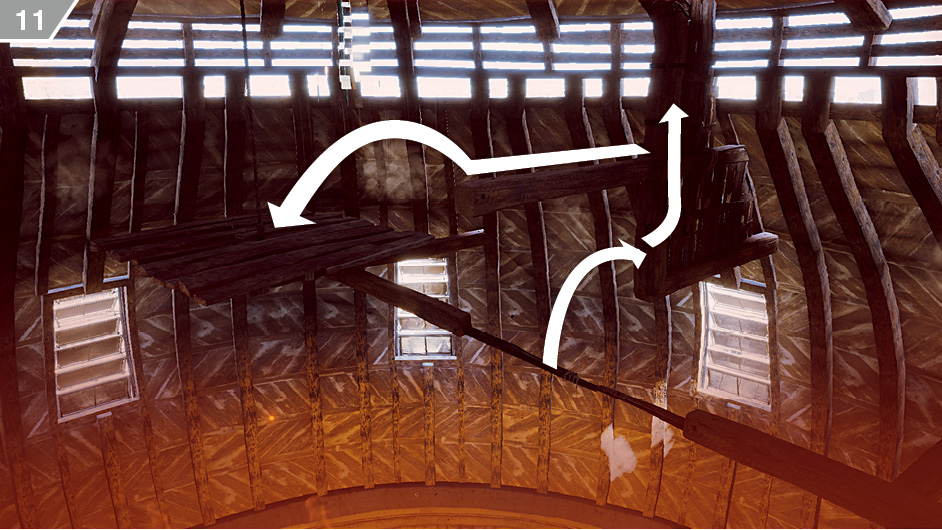
Finally, climb via the route shown here to reach the topmost platform and trigger the closing cinematic.
 Memory 03/“The Prophet”
Mission OverviewChallenges■Sabotage four alarm bells: see ■ Three cover kills: see Notes & Further Reading■As with all signature assassination missions of this kind, there are multiple approaches. The solution that we detail in our walkthrough is designed to minimize potential conflict, but we highlight other possibilities on this map. |
 .
. .
.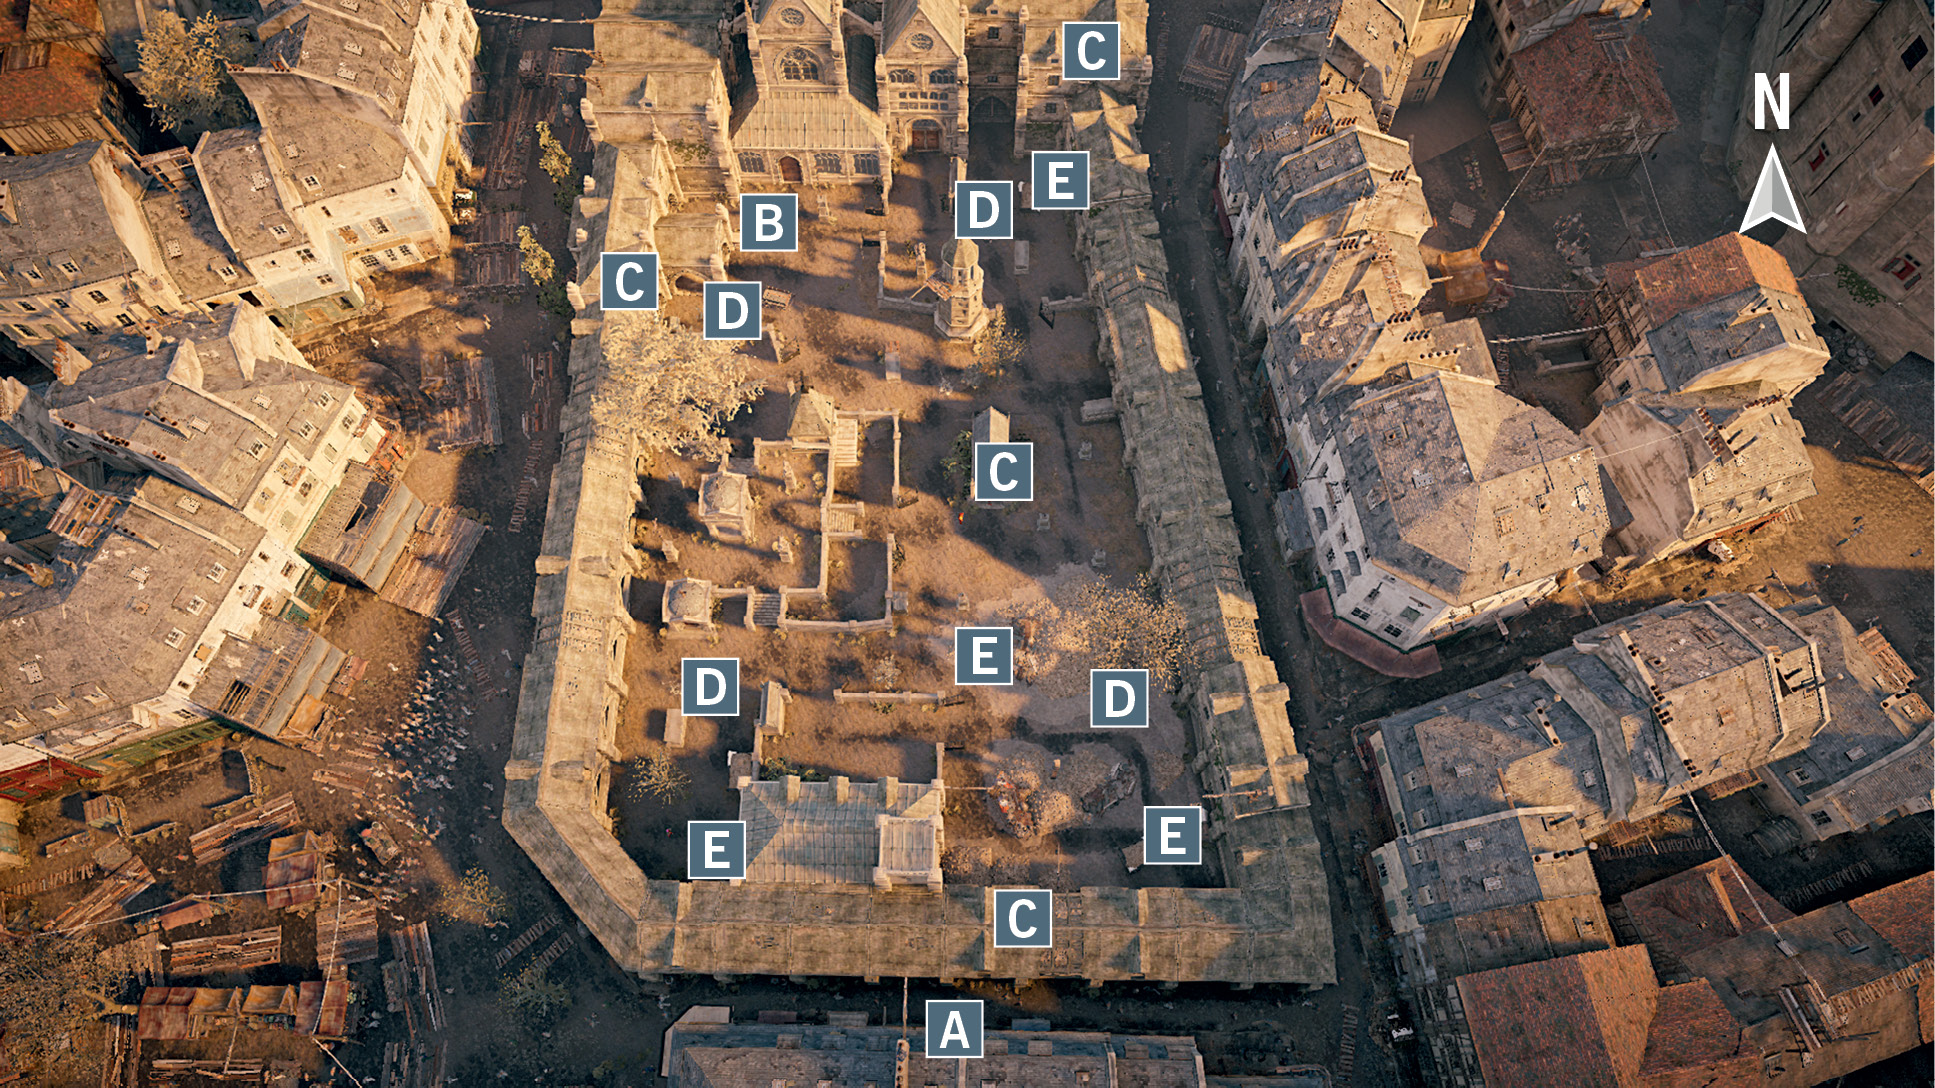
 This is Arno’s start position. The assassination begins with an opportunity to reconnoiter the lightly guarded graveyard during the day, completing tasks and investigating the area in preparation for the second stage of the Memory. Once you are ready, you can conceal Arno in any of the available hiding places to advance the story to the arrival of Lafrenière and his guards in the evening. Arno will begin this second stage in the hiding spot of your choosing.
 Plans documenting the security arrangements for the evening’s meeting can be stolen from this location. Once collected, you can activate Eagle Vision to see red footprints that indicate the prospective locations of guards, and yellow footprints that reveal the route that Lafrenière will take whilst rallying his troops.
 During the first stage of this Memory, you can use any one of the underground entrances to reach catacombs beneath the graveyard to secure the “assistance opportunity” for this assassination. At the position marked by a waypoint, Templar henchmen are poised to attack gravediggers. If you intervene and save them, they will appear next to the central underground entrance during the evening. If Arno is attacked in their vicinity, they will rush to his aid to repay his earlier favor. Saving them also removes Lafrenière’s two bodyguards, which makes his assassination easier.
 There are four alarm bells in the graveyard. To complete the first Challenge of this Memory, you must sabotage all four before you advance the story to Lafrenière’s arrival.
 These are the most appropriate hiding places. The hay carts all offer different approaches to the second section of the Memory, but the hiding spot close to the central underground entrance (
 ) offers the most elementary solution: Lafrenière walks directly past it…
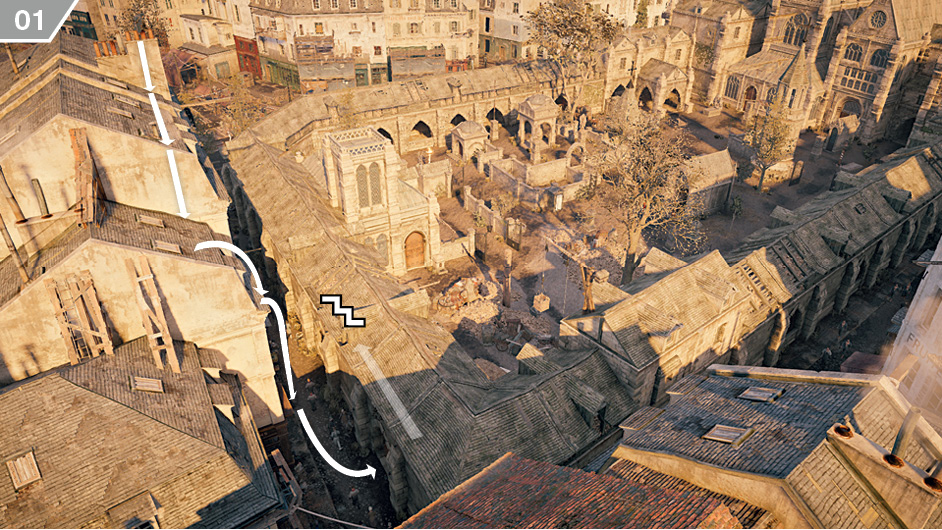
Your first step should be to head through the closest underground entrance to save the gravediggers, as this is the only point in the first stage of the Memory where you might experience difficulties. From Arno’s starting position, drop down to street level and head through the entrance at the western corner of the Restricted Area. Turn left immediately to find steps leading to the catacombs.
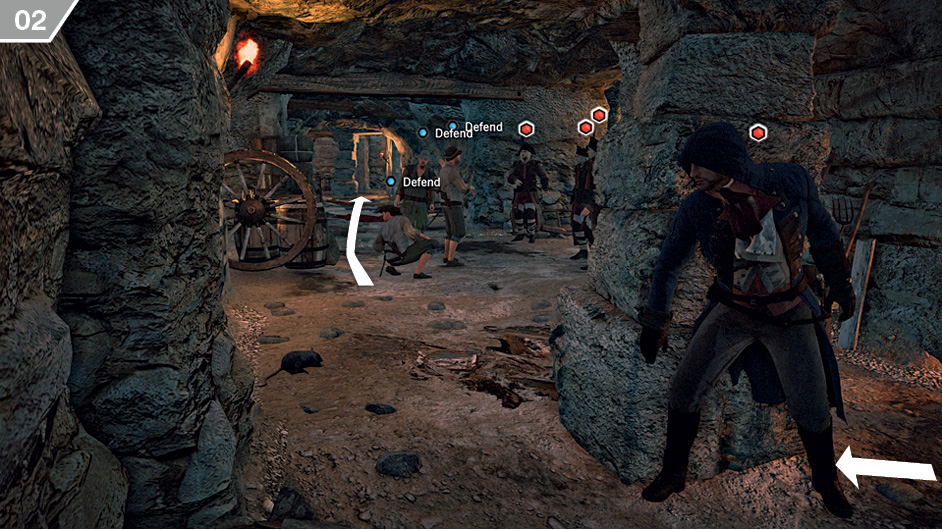
Follow the tunnel until you reach a waypoint, then activate Eagle Vision to identify the gravediggers and their Templar assailants. Conflict is hard to avoid here, so it pays to make your first steps count. If you take cover behind the pillar, you can potentially neutralize two hostiles with the Phantom Blades, and a third with a cover kill when he rushes to engage Arno. After the battle ends, keep following the tunnel until you reach steps leading back to the surface: you will emerge close to the southernmost corner of the Restricted Area.
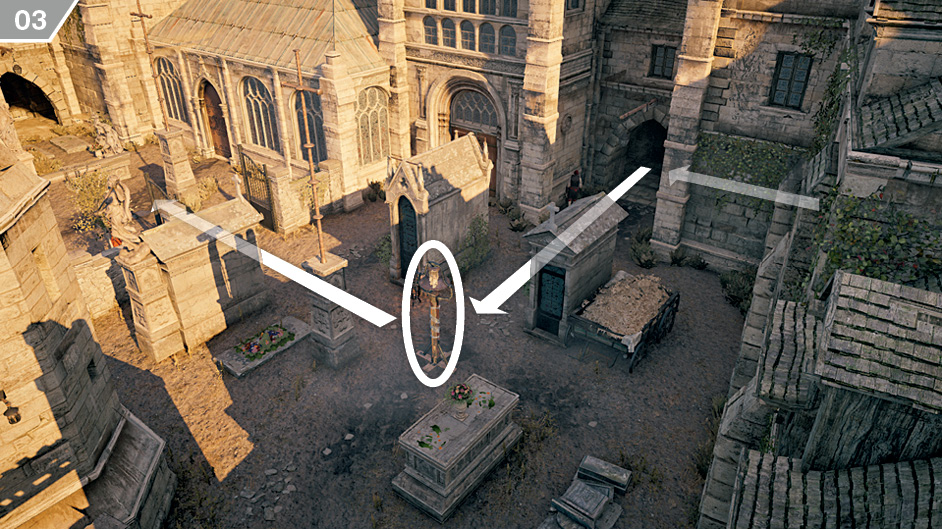
The central graveyard is guarded by a skeleton crew of Extremists, so careful movement, regular use of Eagle Vision and pragmatic use of stealth assassinations will enable you to move around the area without being detected. From the catacombs exit, enter the central graveyard to disable an alarm bell, then head to the northeast in the direction of the white mission waypoint – look out for a Brute patrolling this area.
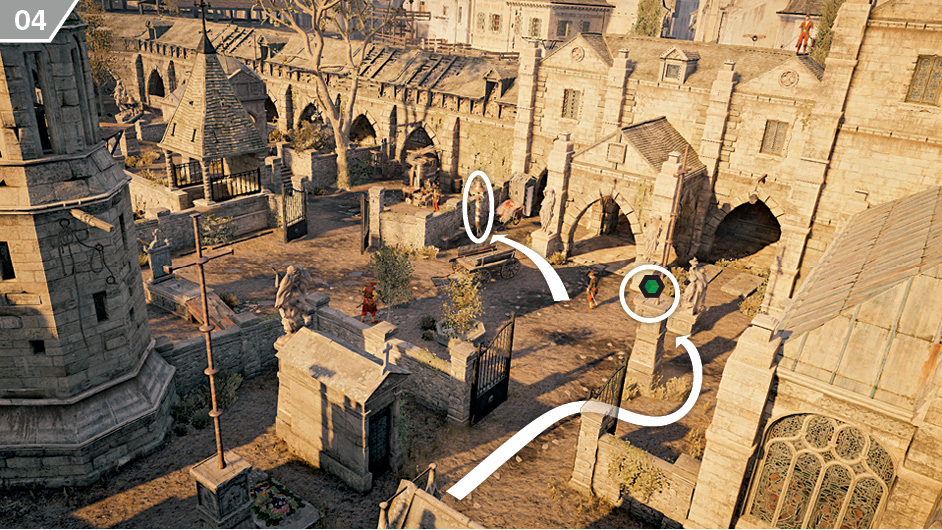
As you move close to the mission waypoint marker, the precise location of the plans for the evening’s meeting is revealed. Disable the nearby guard (and, if necessary, the sentry on the adjacent rooftop), then collect the documents. You can then sabotage the nearby alarm bell.
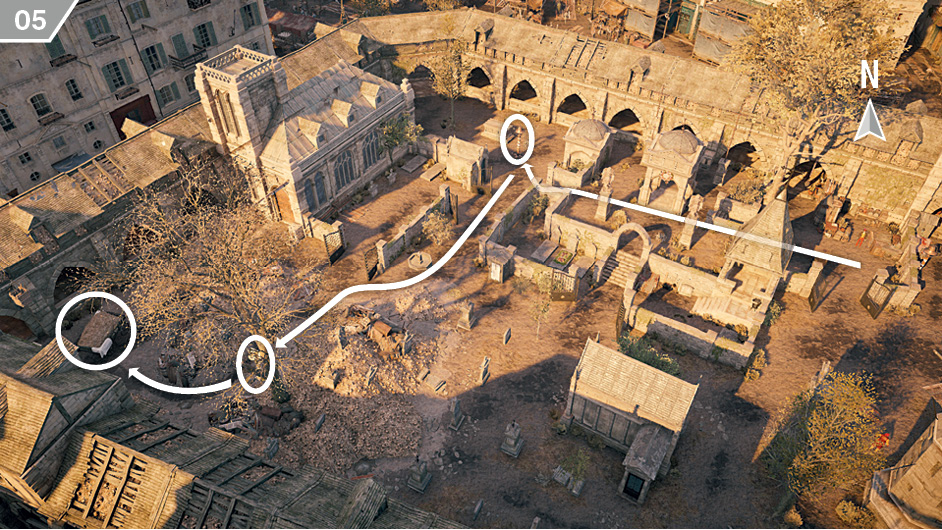
There are even fewer guards close to the two remaining alarm bells at the other end of the graveyard, so reaching them – and eliminating scattered enemy patrols, if required – is entirely routine. Once all four alarm bells have been sabotaged, it’s time to pick the hiding place where Arno will wait until the evening. A very efficient approach is to begin in the hay cart on the western corner of the Restricted Area, as highlighted on the screenshot. Once you are inside, hold  /
/ to wait until the evening.
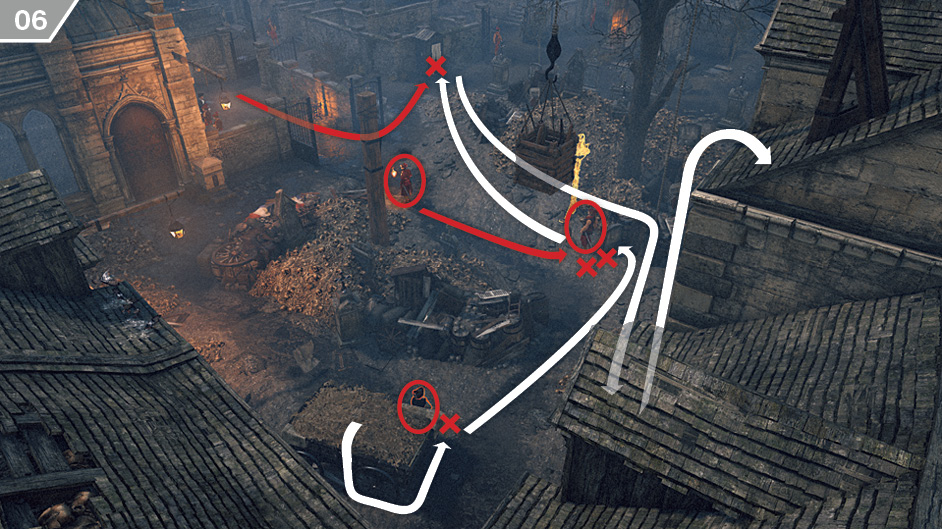
After the cinematic interlude, it’s possible to eliminate all three enemies in your vicinity with kills from cover, completing the associated Challenge immediately. There is a checkpoint here, so it’s no great hardship to restart if things don’t work out the first time. Jump out of the back of the hay cart and wait for the guard carrying a torch to set off on his patrol. Immediately lock into cover on the corner of the hay cart next to the nearby guard and perform a cover kill. Run to the gravestone behind the second guard, lock to cover, then perform the second kill. Finally, don’t move but briefly detach from cover to attract the patrolling guard to his death – and your third cover kill – with the Last Known Position feature. You can now sneak to the hiding place that lies on Lafrenière’s course around the graveyard and await his arrival. When he passes, perform the assassination to trigger a cutscene. When you are ready to depart, return to the area with the hay cart. There is a lift and a ladder here for easy access to the rooftop, but bear in mind that there are sentries facing the streets to either side of you. Once you leave the area (and, if necessary, evade any pursuers), the mission ends.