
Plants vs Zombies Garden Warfare Guide Zomboss Down NEW DLC New Map! Cactus Canyon
Cactus Canyon
The Zombies have crash-landed in the desert, near a top-secret Plant research facility under the golf course. If the Plants don’t stop them, they’ll ruin everything!
Phase 1: Crash Site
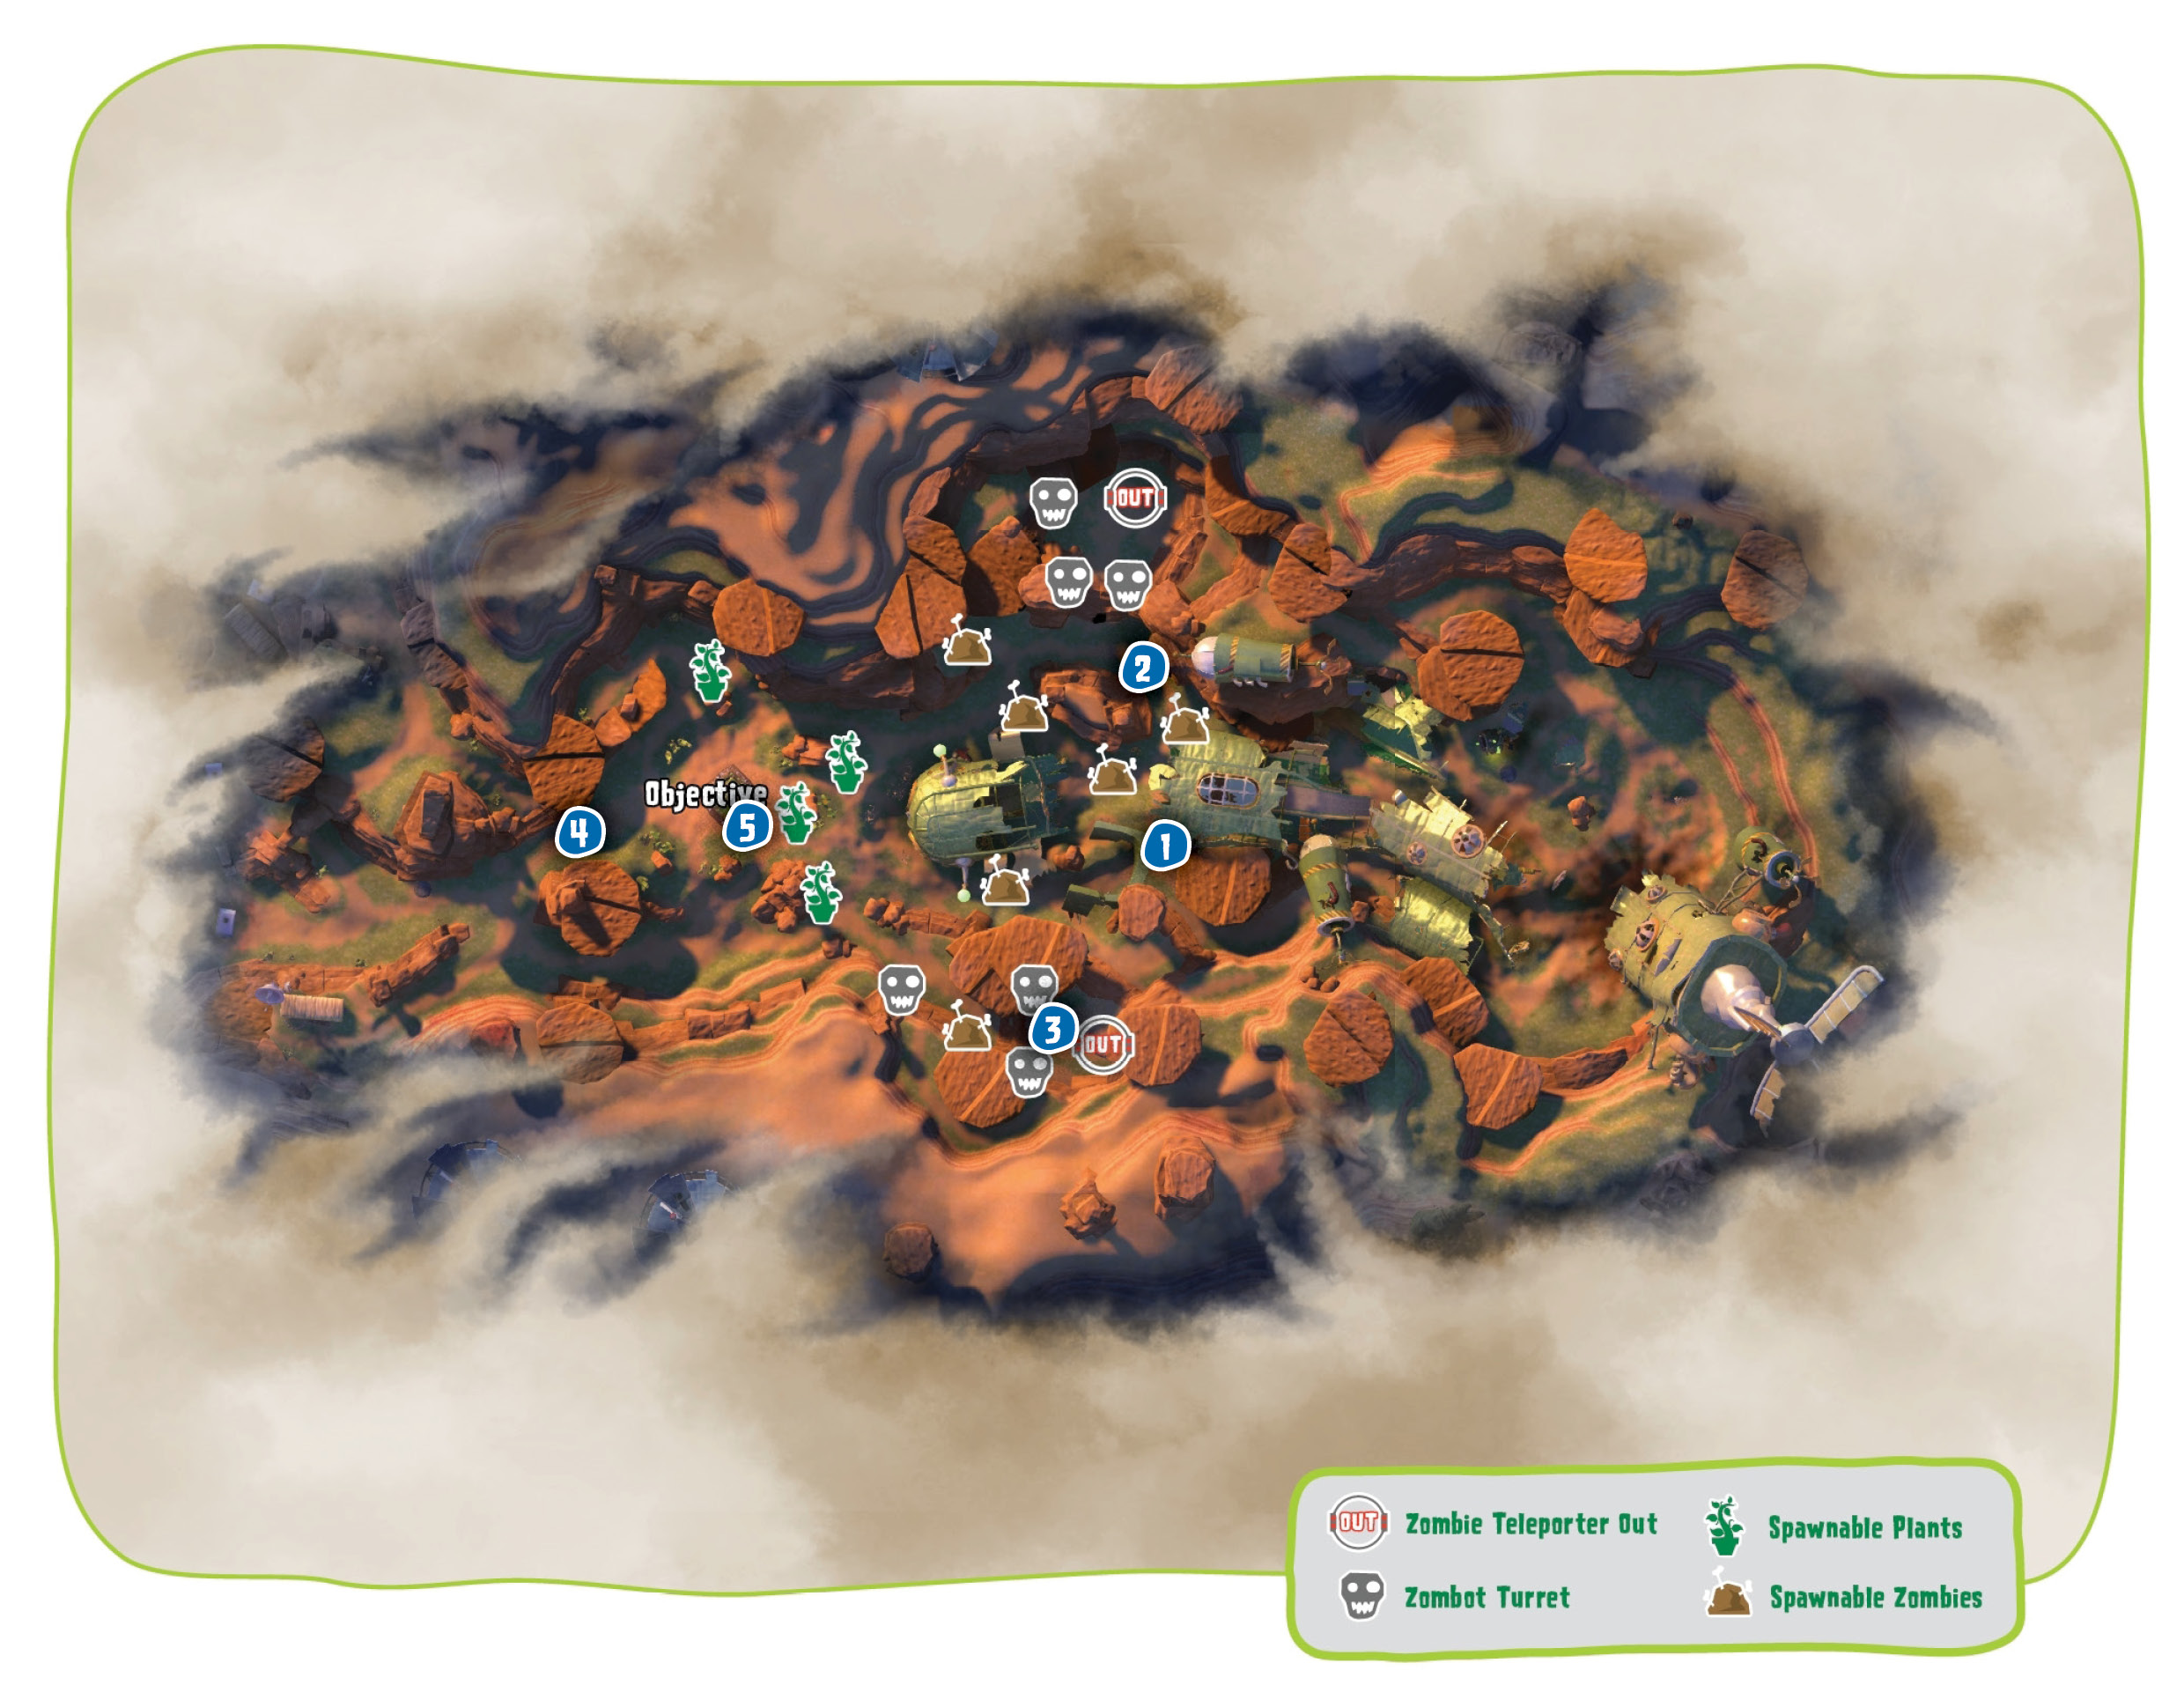
Points of Interest
[1][2] Zombies: More than the other Gardens and Graveyards maps, the ball is in the Zombies’ court in Coastal Canyon, with several tools being given to them to ensure a swift and decisive victory. The crash site provides several excellent places to hide or use as cover on the way to the Plants’ Garden. Whether you stick to the ground or take to the sky, always switch up your paths to make sure Plants don’t know when, or from where, you’ll be coming.
[3] Zombies: Keep a lookout while planting the Teleporter here, as Plants can and will assault you from the high ground.
Plants: Take your Peashooters, use Hyper, and get the drop on Zombies trying to build Teleporters here. The Zombies don’t have to cover much ground to get to your Garden—you want to make it as hard as possible.
[4] Plants: More than the other Gardens and Graveyards maps, if you’re playing as a Plant on Coastal Canyon, you will absolutely be on the defensive. The big advantage you have here, however, is that barring the golf course, these territories are small. So long as you spread out your forces to the rear and sides, you’ll be able to easily see Zombies approaching and be in a position to do something about it.
[5] Plants: There are a lot of nooks and crannies to police on the crash site. Set up a couple of Bamboo Shoots near the base, keeping an ample amount of backup spread out for them. With your remaining forces, use scouts to venture forward to flush out hiding Zombies, and shut down any completed Teleporters!
Phase 2: Trailer Park
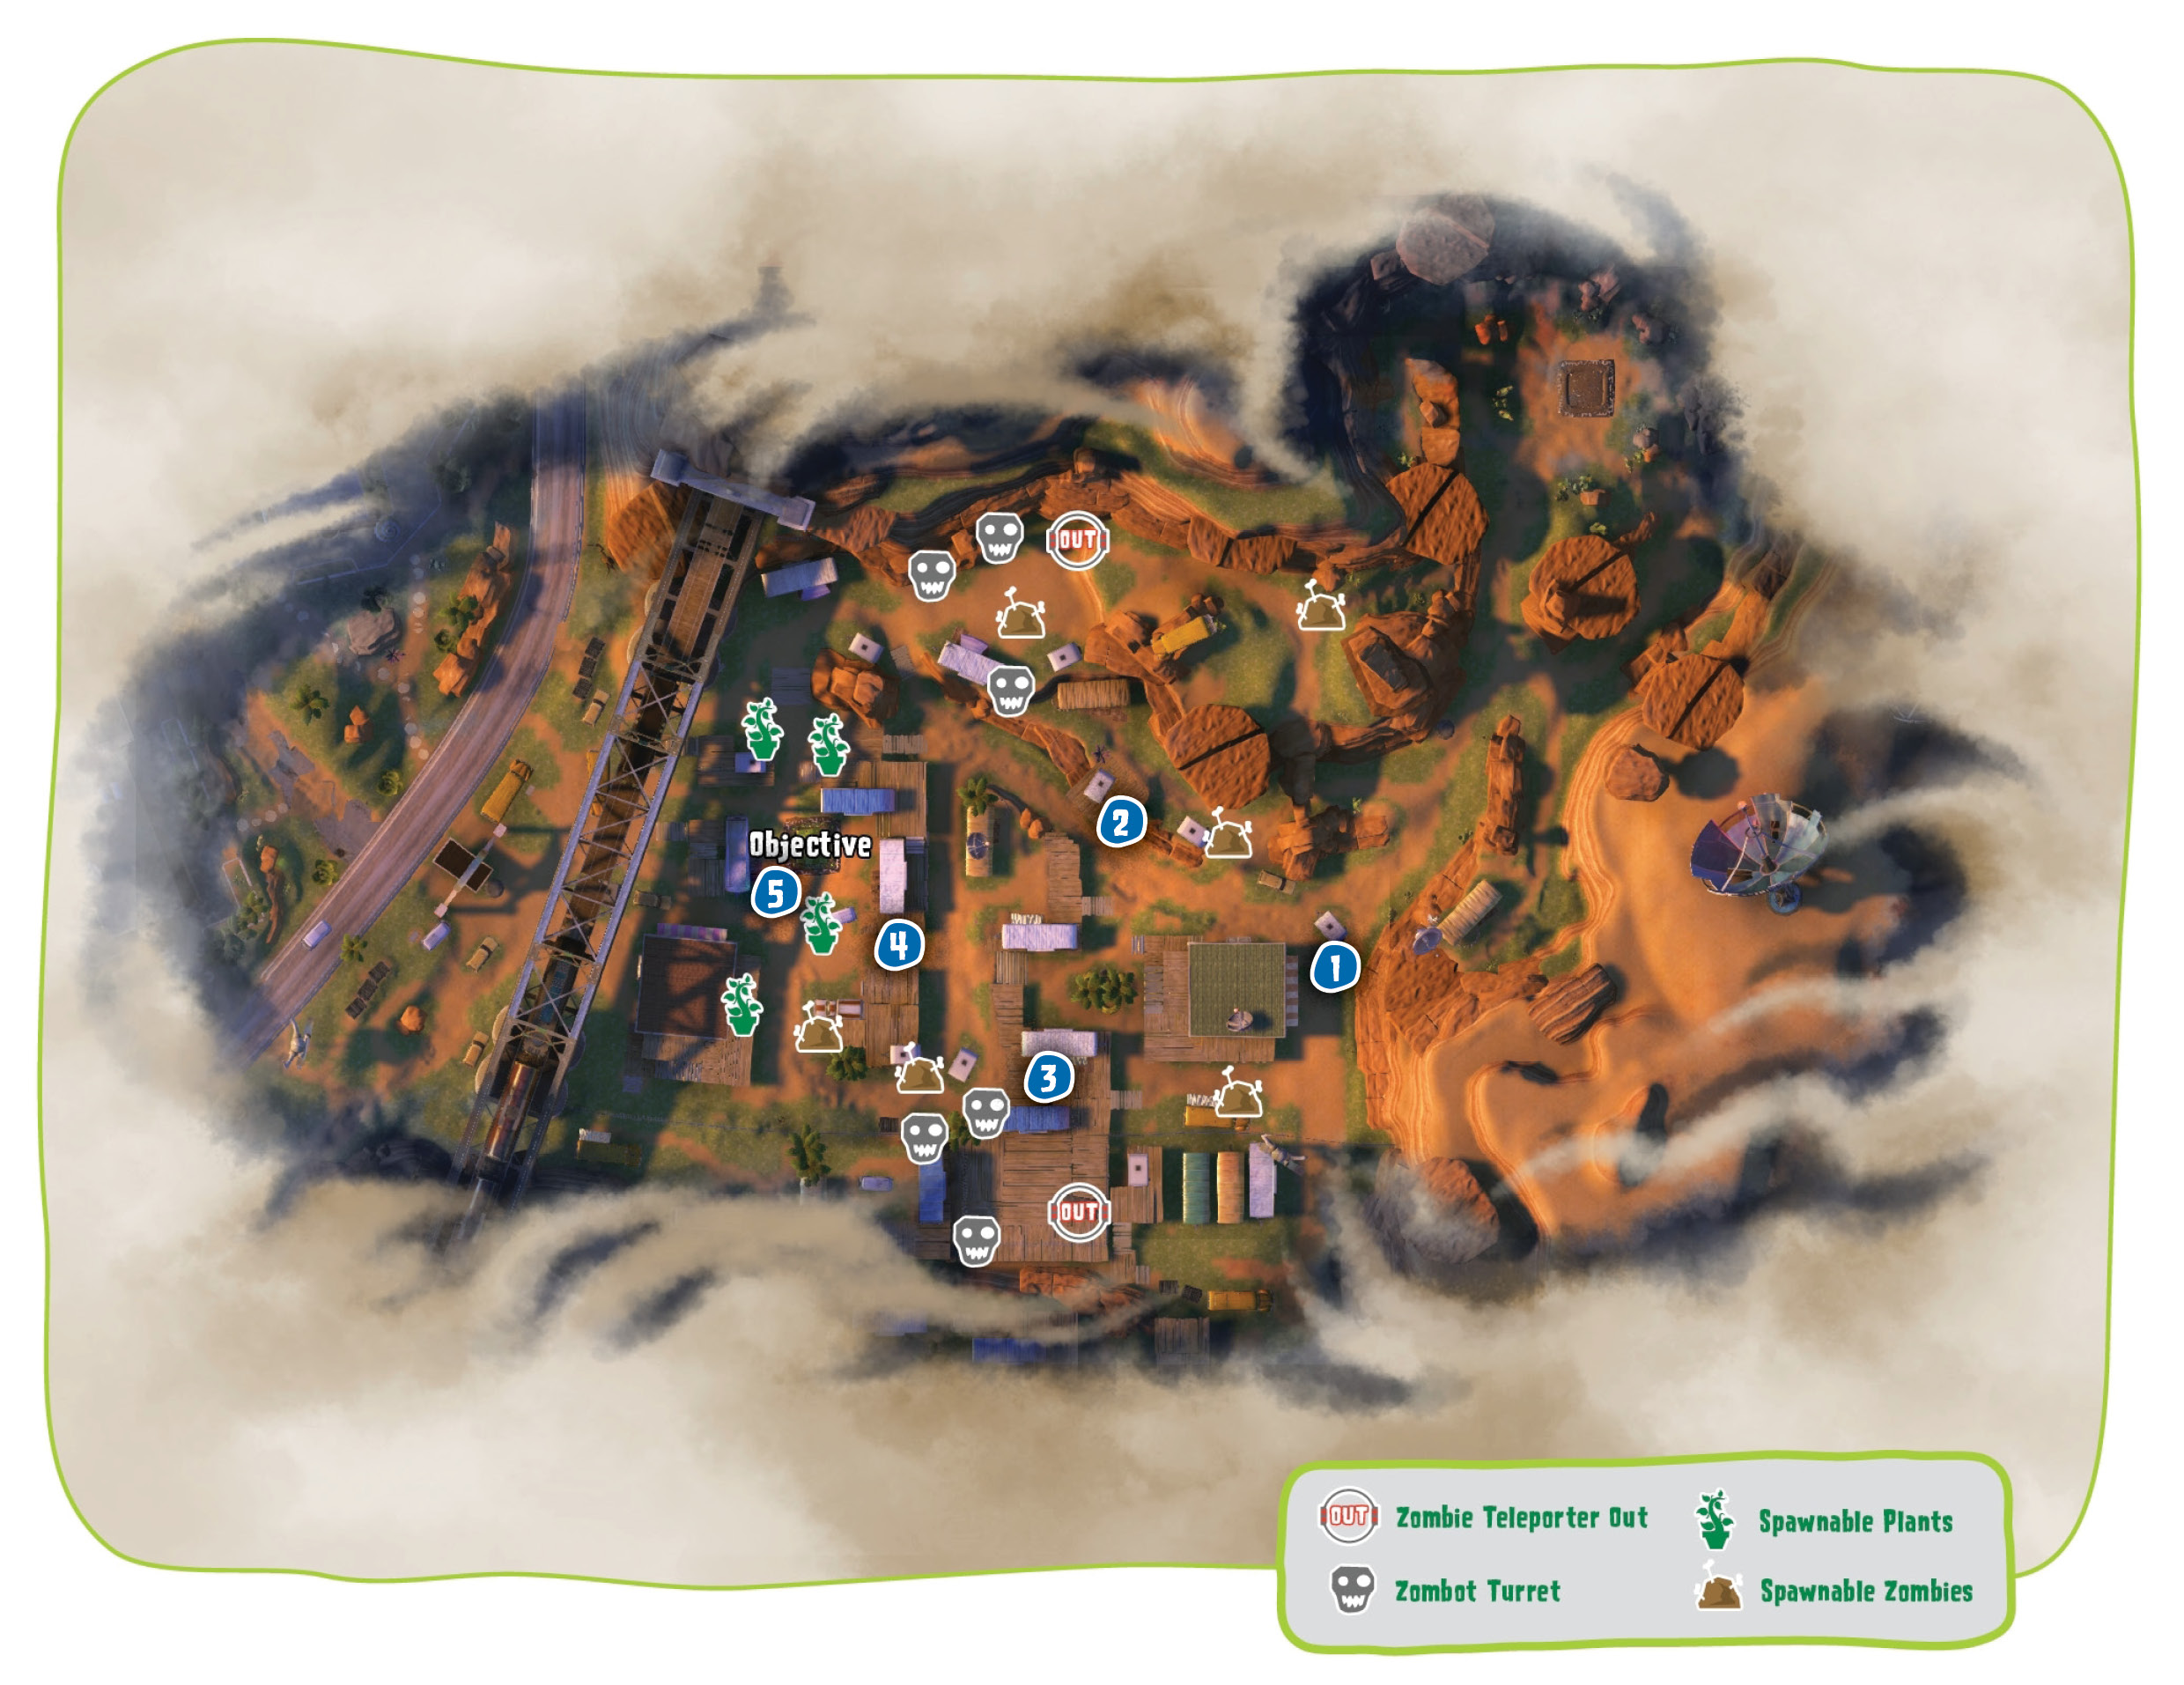
Points of Interest
[1] Zombies: This house is one of the better lookout points for this phase. Get your Foot Soldiers ready, but don’t keep them there for too long—long-ranged characters aside, you’ll want a front-row seat to the heavy action this phase will see.
[2][3] Zombies: These walkways are where most of the fighting will take place, and there will be a lot of it. What you want to do is take control of this area so that you’ll have ample territory from which to make a move on the Garden. Get your Teleporters built as fast as possible, swarm the area in any horizontal formation you can, and close in. Use the elevated platforms as much as possible as well on your approach, because the Plants will definitely be doing so on defense.
Plants: As with the Zombies, you want to control the middle of this area at all costs. If you can, it’s much easier to establish a defensive wall and keep Zombies away from your Garden. Use characters that have very good stopping power, such as Fire Peashooters, or characters with rapid-fire weapons. Set any traps you can as well, and make sure your Teleporter gets built.
[4] Plants: This will be your primary or secondary line of defense, depending on how well you’ve managed with the walkways in the middle. Even if those walkways fall to Zombies, make sure this area doesn’t.
Zombies: If you can inch forward and take this area, the phase is pretty much yours. Use Teleporters to your advantage.
[5] Plants: There are areas behind your Garden that you can use for an elevated defense. However, the area in front should still be your biggest priority in terms of establishing a presence. Don’t forget to keep eyes on the extreme left and right areas as well.
Phase 3: Suburbs
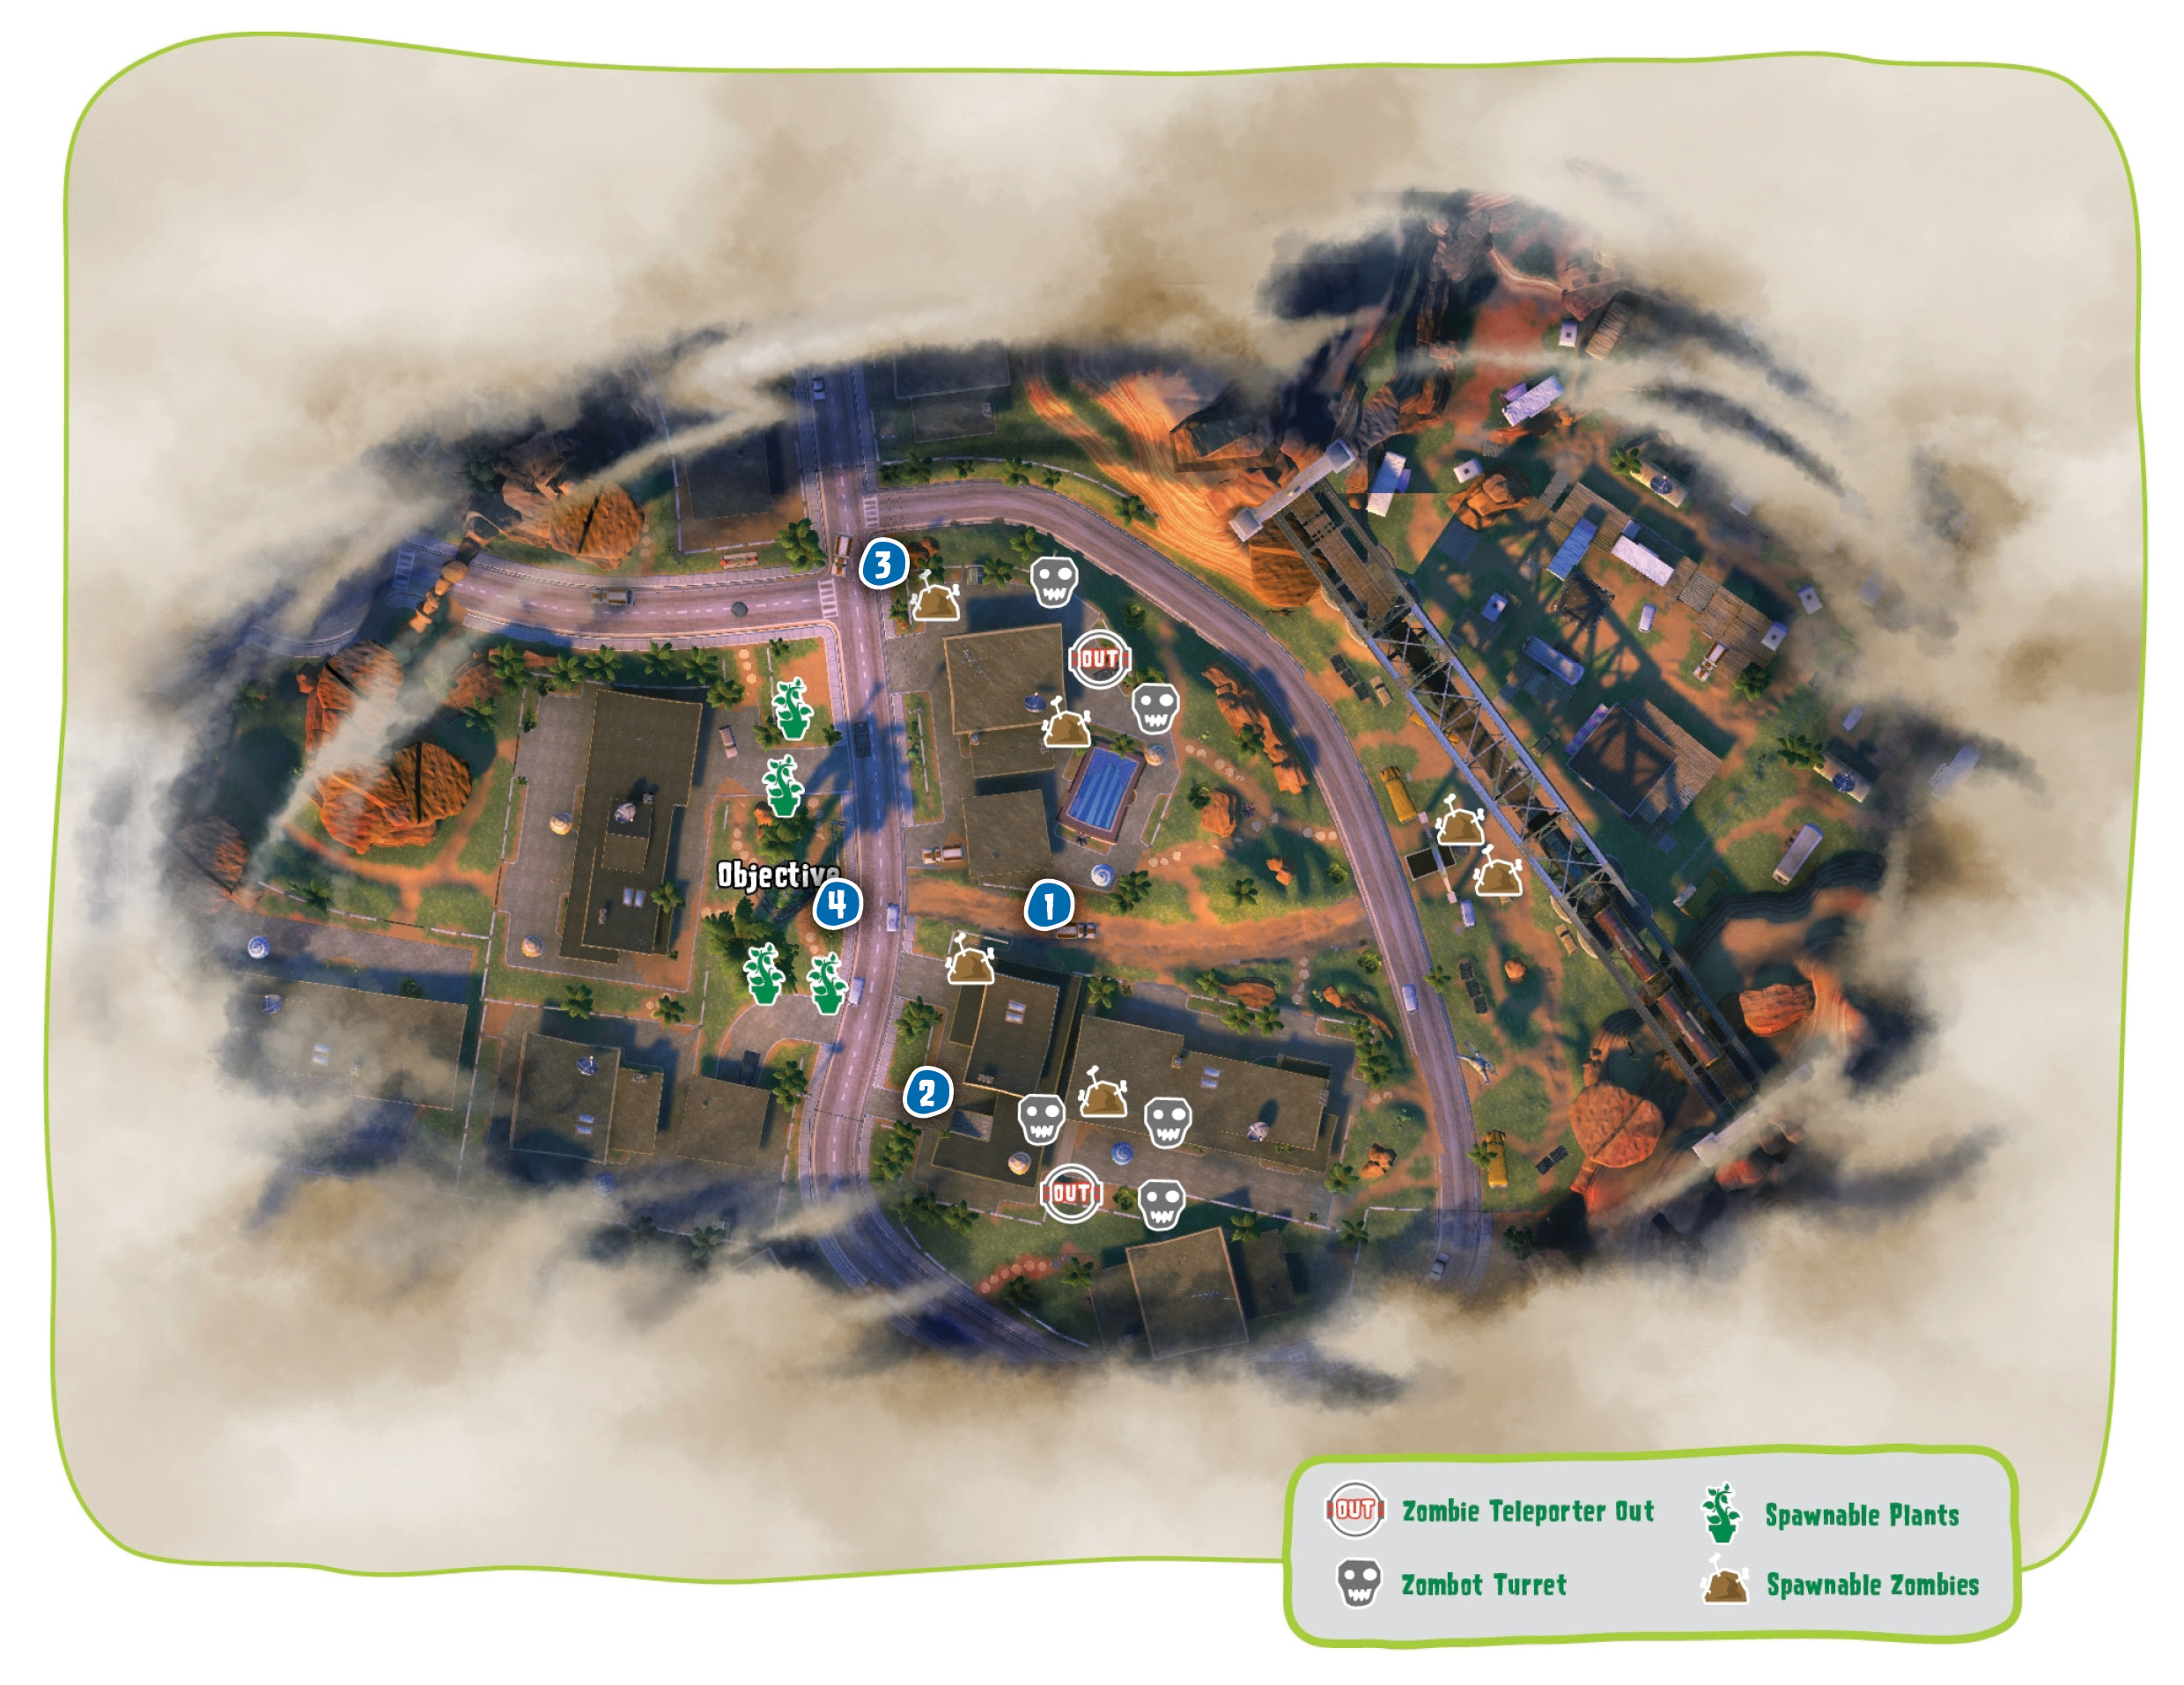
Points of Interest
[1] Zombies: This is another phase where a lot of your fighting will be elevated. Place your Foot Soldiers on the rooftops while using your other characters to weave through the buildings, using any walls you see for cover as you approach the Garden. If you can get long-range characters on the rooftops, so much the better.
[2][3] Zombies: As implied above, the Suburbs are very much a maze of walls, vehicles, and buildings. These will eventually be your best friends, but when you first play this map they will be your worst enemies, especially if the Plants know them better than you. If you’re a Foot Soldier, take the top route. Engineers can Jackhammer to cover the ground route quickly. Your top priority is getting to know this maze, because it will eventually yield all of your lookouts from which to spy on the Garden’s weak points that are vulnerable to flanking.
[4] Plants: Your Garden is actually pretty well walled in, but you also have obvious open spots from where Zombies can approach. Watch all of these places, and watch the skies for Zombot Drones as well. During this phase, you’re going to want to hold what little territory you have as fast as possible, from your Garden to the buildings in front. Past those buildings is a maze, making scouting very dangerous and something that should only be attempted if you’re confident in your knowledge of the map and are very proficient in handling unexpected combat situations. It might be best to just lay traps near the exits leading to your Garden instead.
Phase 4: Resort
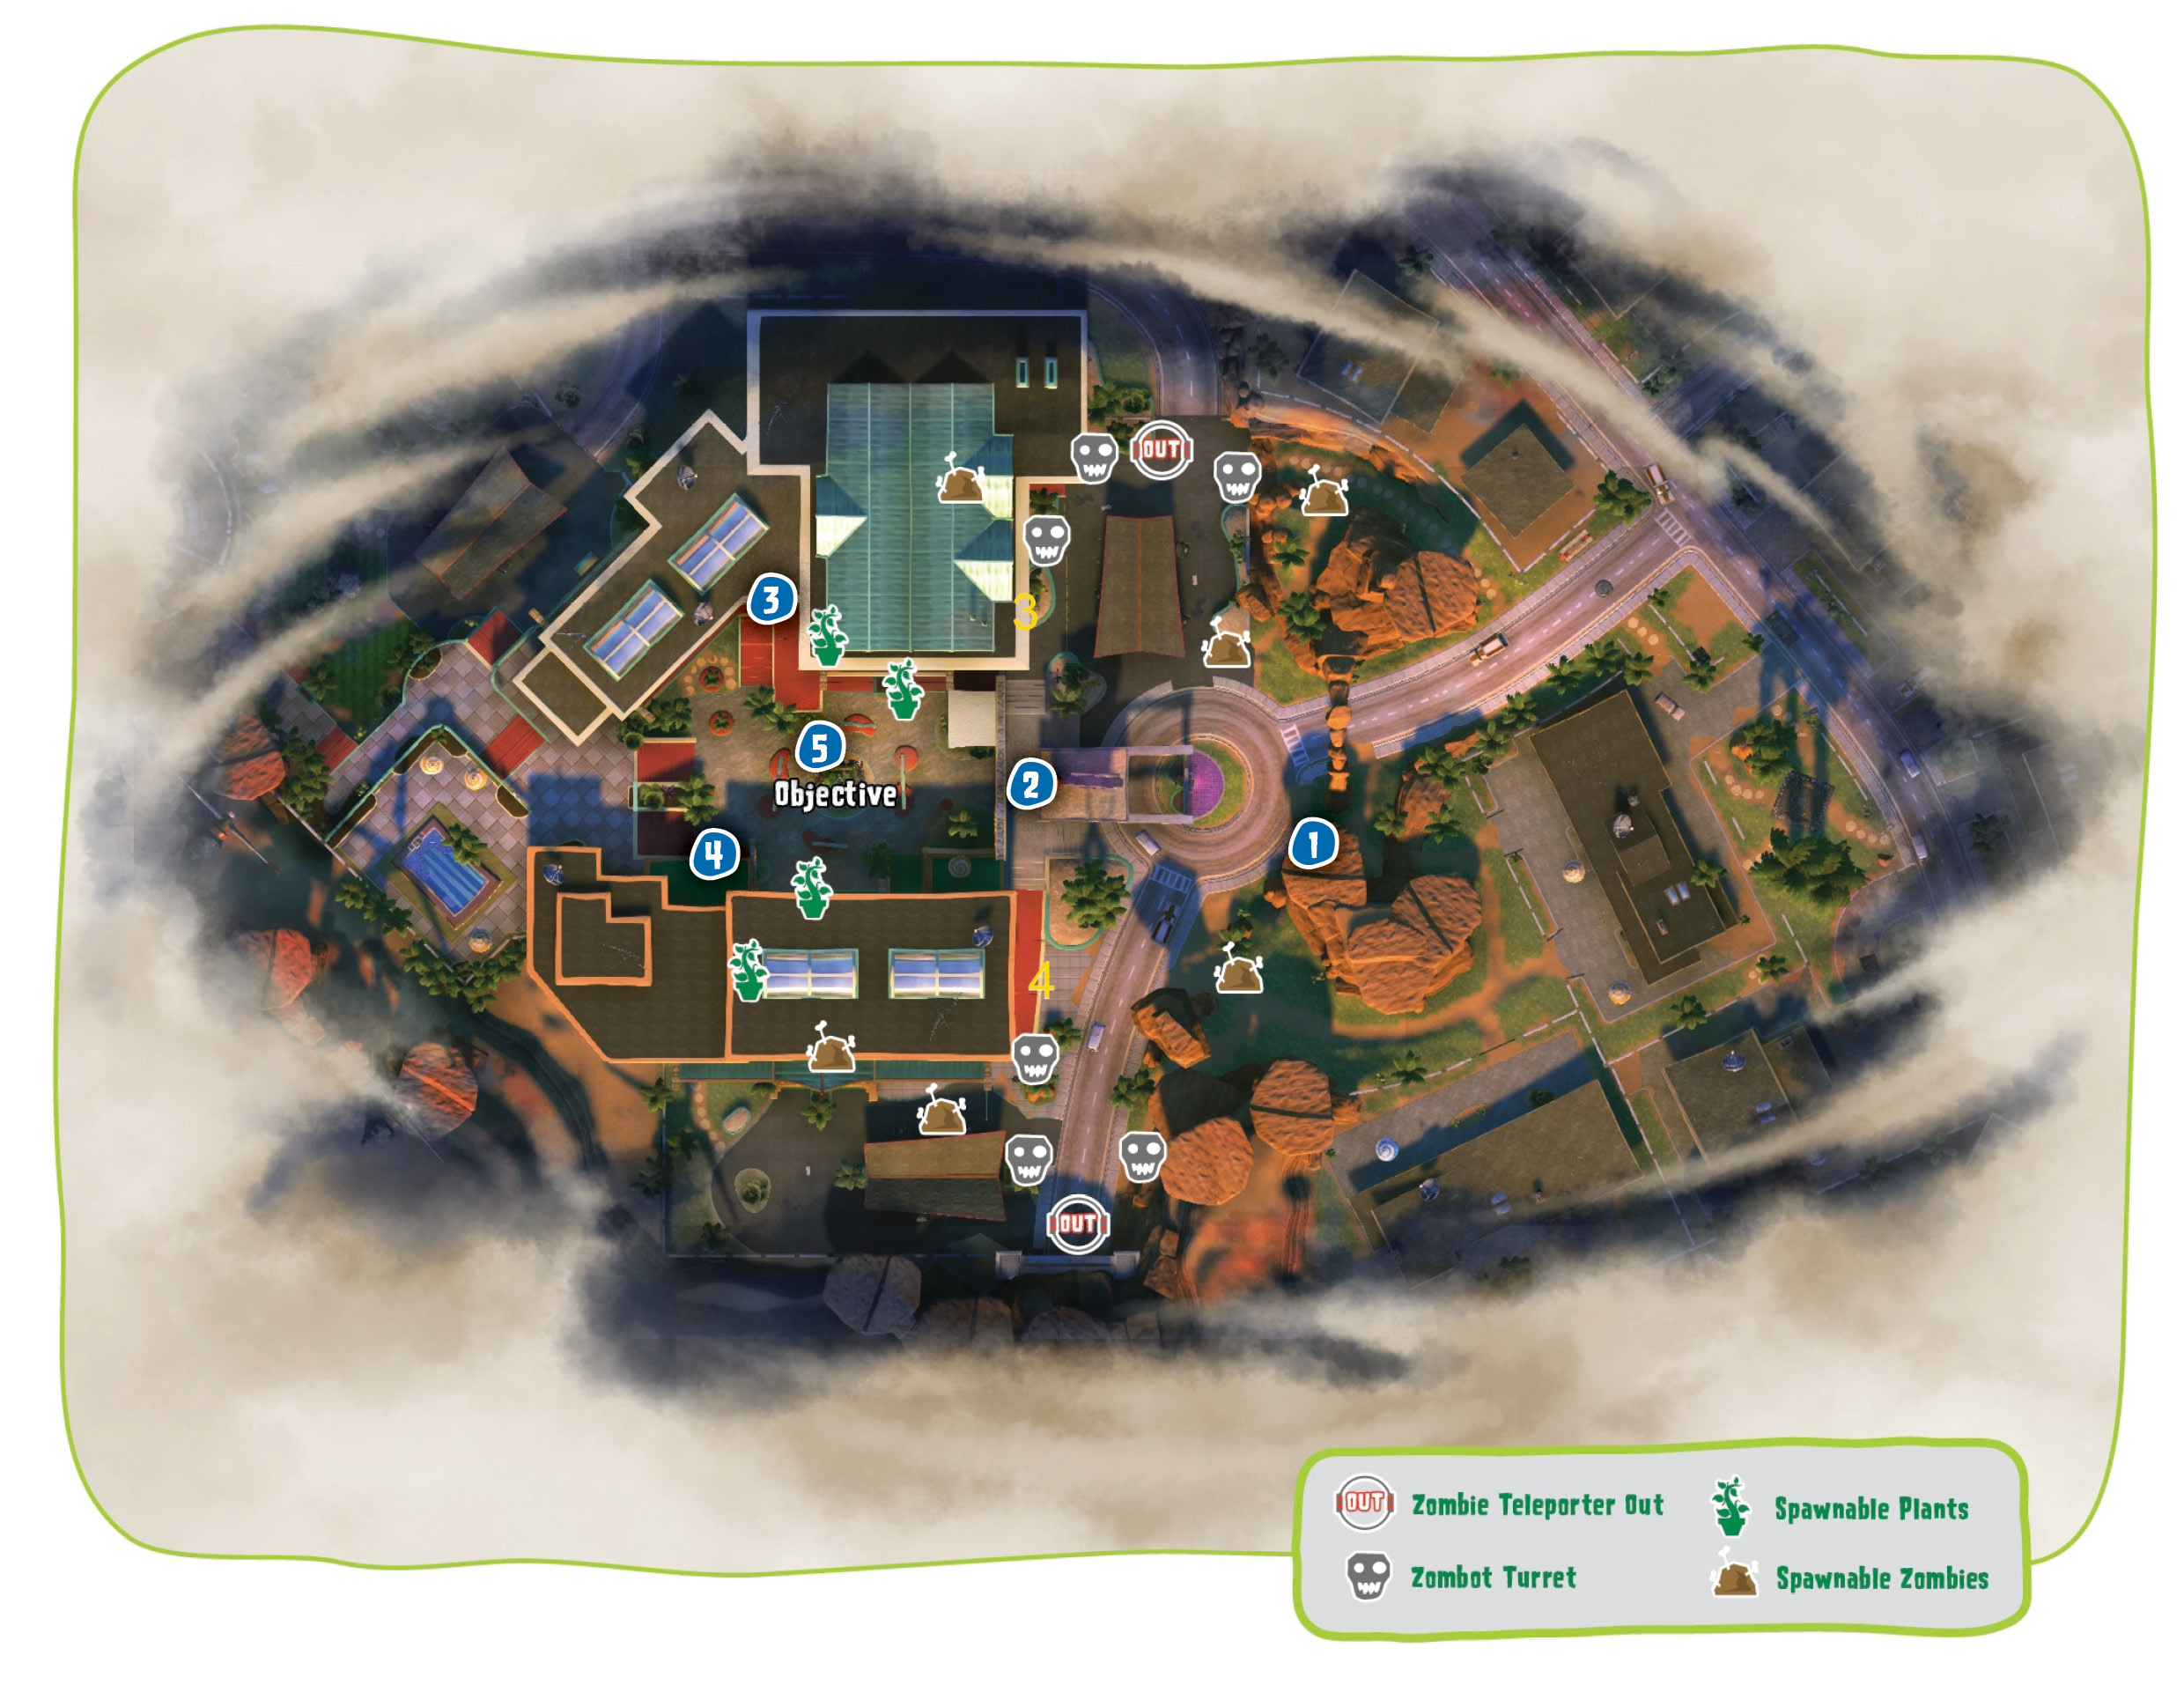
Points of Interest
[1] Zombies: Foot Soldiers can actually Rocket Jump up to these rocks to get a good view of the entry to the main battlefield.
[2] Zombies: As far as approaches to the Garden go, going straight up the middle isn’t the best of ideas, especially given the narrow chokepoint. You’re better off going through the sides unless you’re trying to distract the enemy.
Plants: Smart Zombies probably won’t be trying to come up through the middle too much, but that doesn’t mean you shouldn’t watch the area or plant traps here.
[3][4] Zombies: You’ll be seeing these two buildings a lot, from the inside and outside. Swarm them, own them. The exits that flank the Garden are your conduits to victory.
Plants: These two buildings are your worst enemies. You have two choices—set up an exceptionally tight defense around your Garden, or play cat-and-mouse with the Zombies inside of said buildings. Either tactic is equally valid, but if you want to, say, disable the Zombies’ Teleporter, you’ll have to get your pea stalks dirty.
[5] Plants: You’ll have your work cut out for you defense-wise, especially with the building exits that flank you from both sides. At a minimum, what you’ll want to do is spread out a little ways from your Garden, run around, and cover as much of the immediate area as you can, heading off Zombies at the pass. If you’re confident, go inside buildings and flush Zombies out instead of waiting for them to come to you. If you’re extra confident, go through those buildings and take out the Teleporter on the other side.
Phase 5: Golf Course
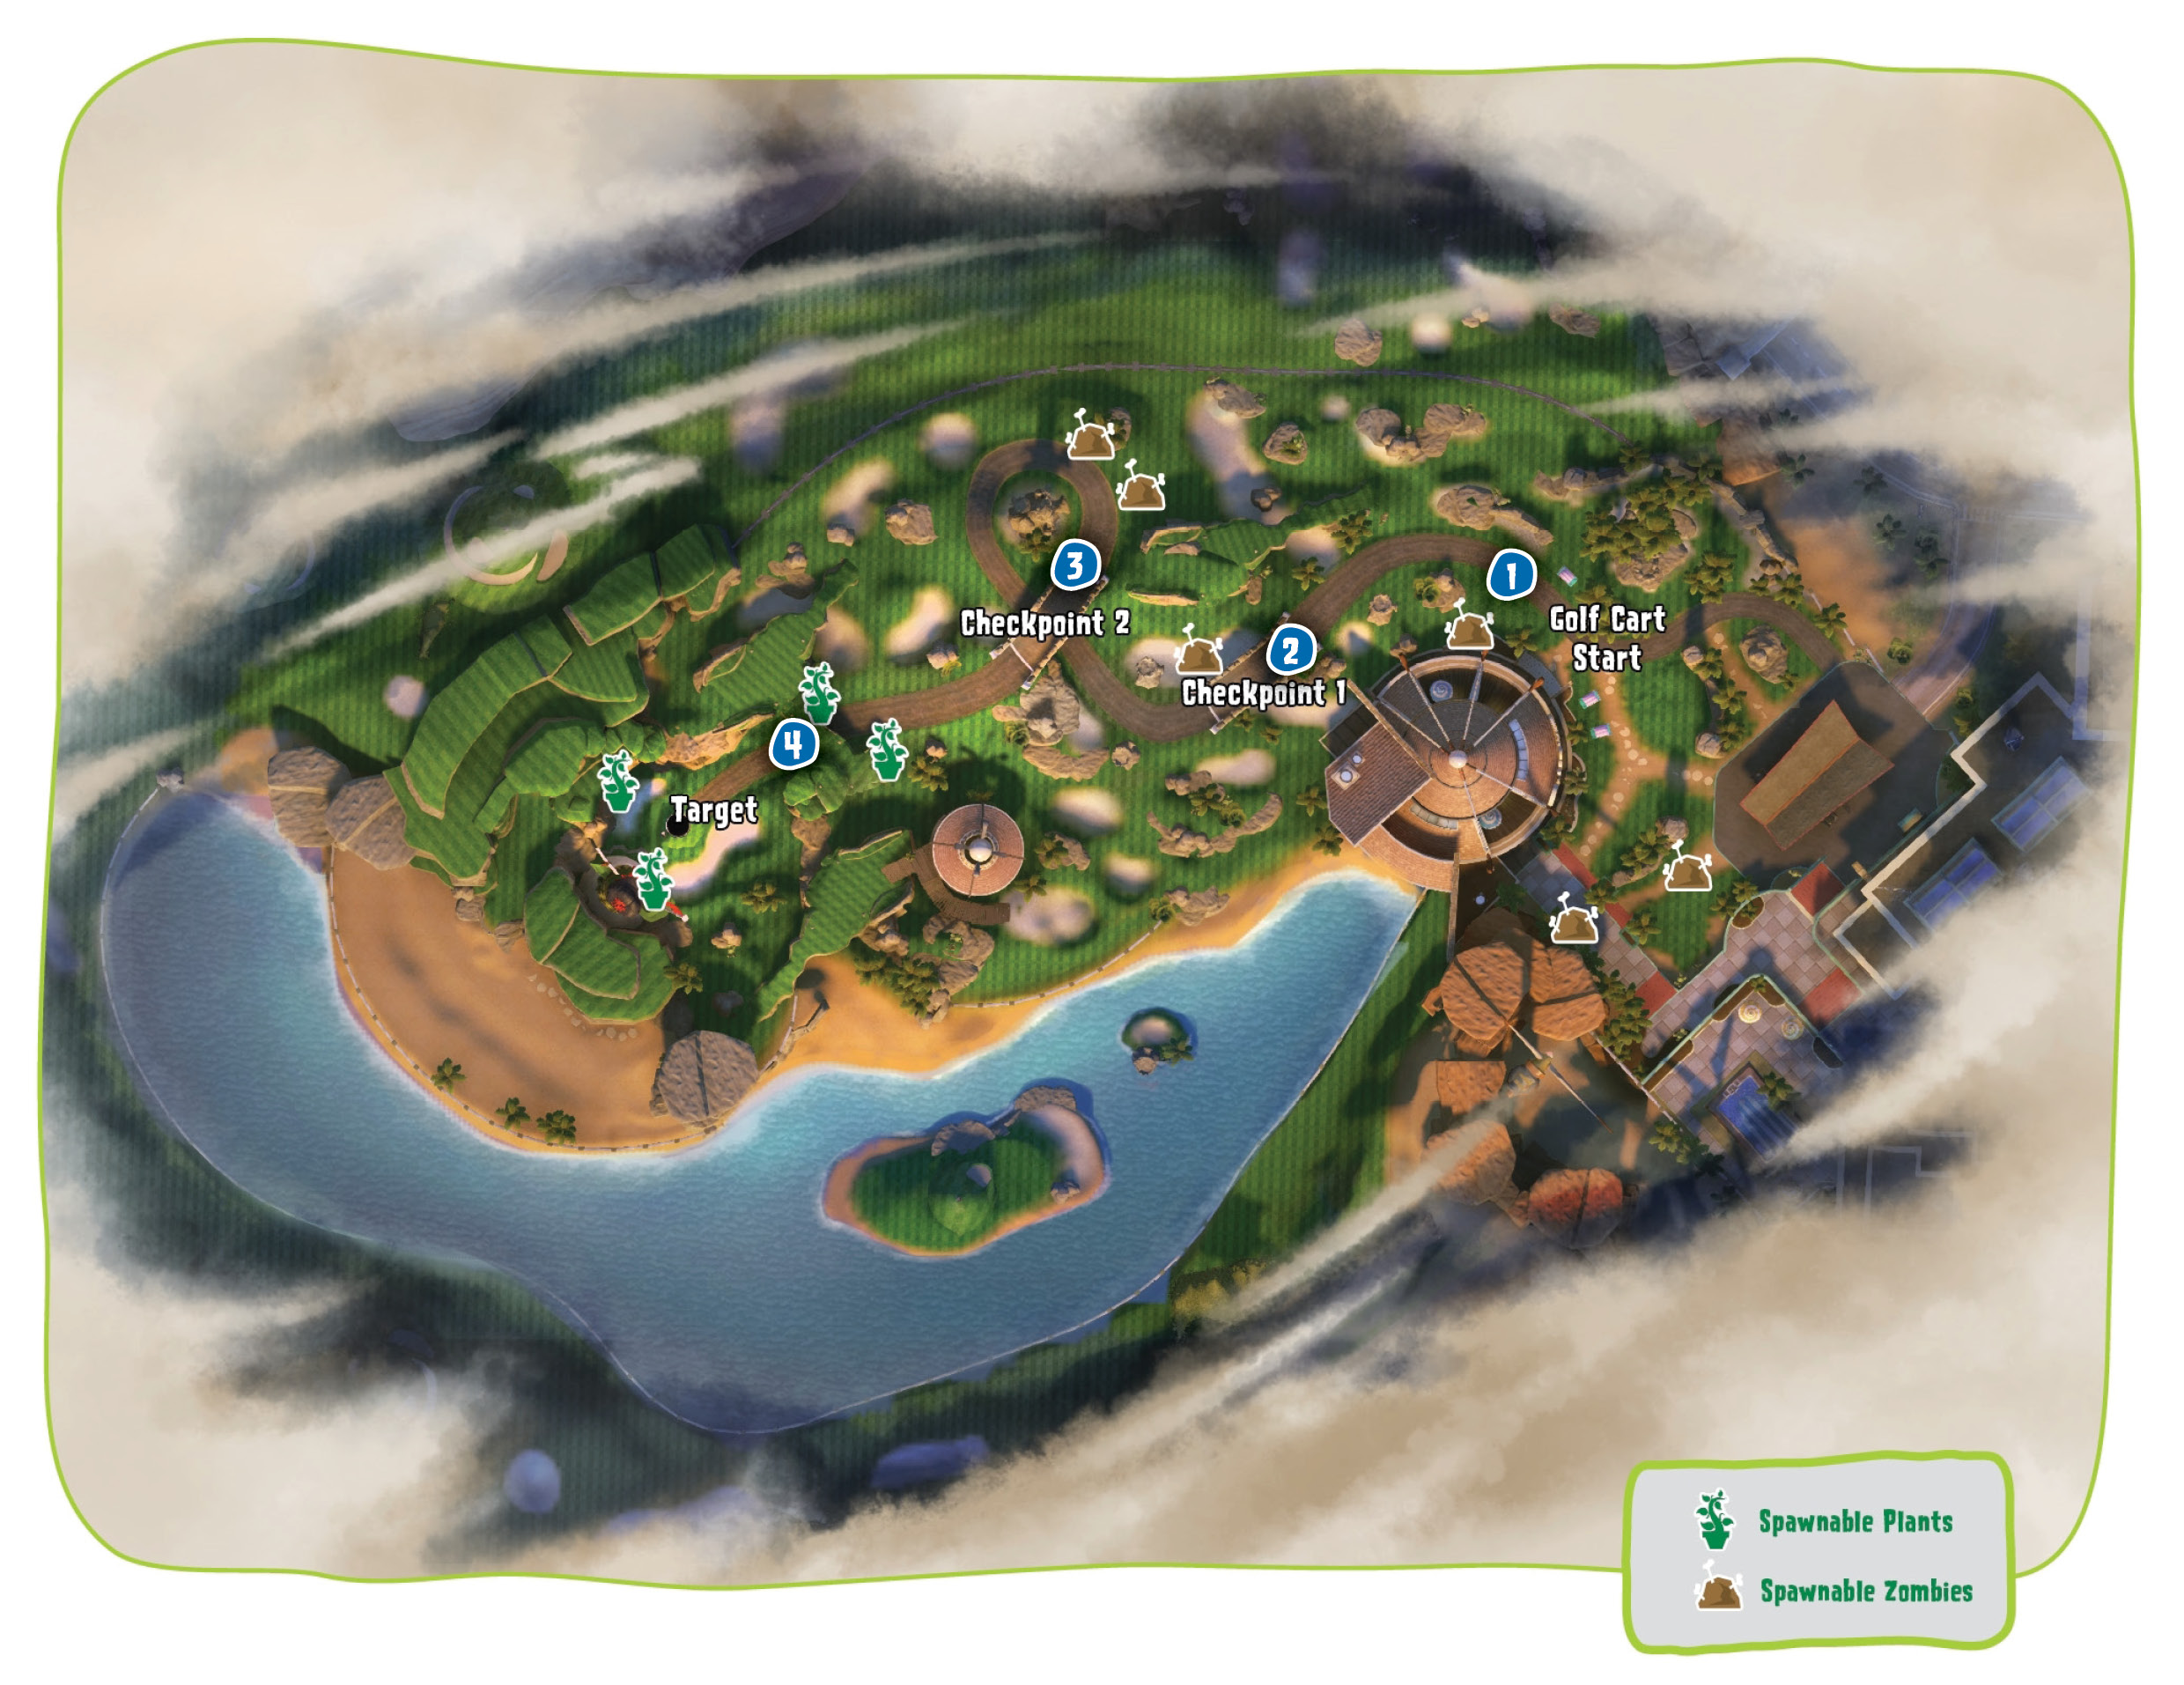
Points of Interest
[1] Zombies: Welcome to the wackiest Plants vs. Zombies: Garden Warfare setpiece yet! The rules of the golf course are as follows: As the Zombies, you must physically push a giant golf ball along a long path until it reaches a hole at the end. Make sure at least one Zombie is touching it, or the ball stops moving. It sounds easy, except for two problems. The first is that you have a time limit. The second is below.
Plants: You are the Zombies’ second problem. You are hereby authorized to vanquish any Zombie that you see with impunity so that there are none around to push the golf ball. Lay all traps, fire all the peas, bring the chaos!
[2][3] Zombies: At these locations are checkpoints which will give you more time to push the ball into the hole. Once you cross them, you can rest easy for all of three seconds.
Plants: The checkpoints are marked by bridges, and are some of the best places to stop the Zombies’ plans. More so than on the rest of the golf course, traps are key because of the walls on either side of the bridges. Set up Tallnut Battlements, Potato Mines, Spikeweeds, anything you can think of. Of course, keep vanquishing Zombies the old-fashioned way, too!
[4] Zombies: You’re almost there! Of course, the underpass here carries the same amount of danger as any of the bridges, so keep your Zombies extra vigilant, and always support your ball pushers!
Plants: If the gloves weren’t already off, take them off here. Chili Bean Bomb like crazy, especially at the underpass where Zombies have little chance to escape. Do your best to wipe out every Zombie you see with traps and primary weapon fire. Otherwise it won’t be long before they win!