
Plants vs Zombies Garden Warfare Guide Supply Drop! DLC New Game Type
Gnome Bomb
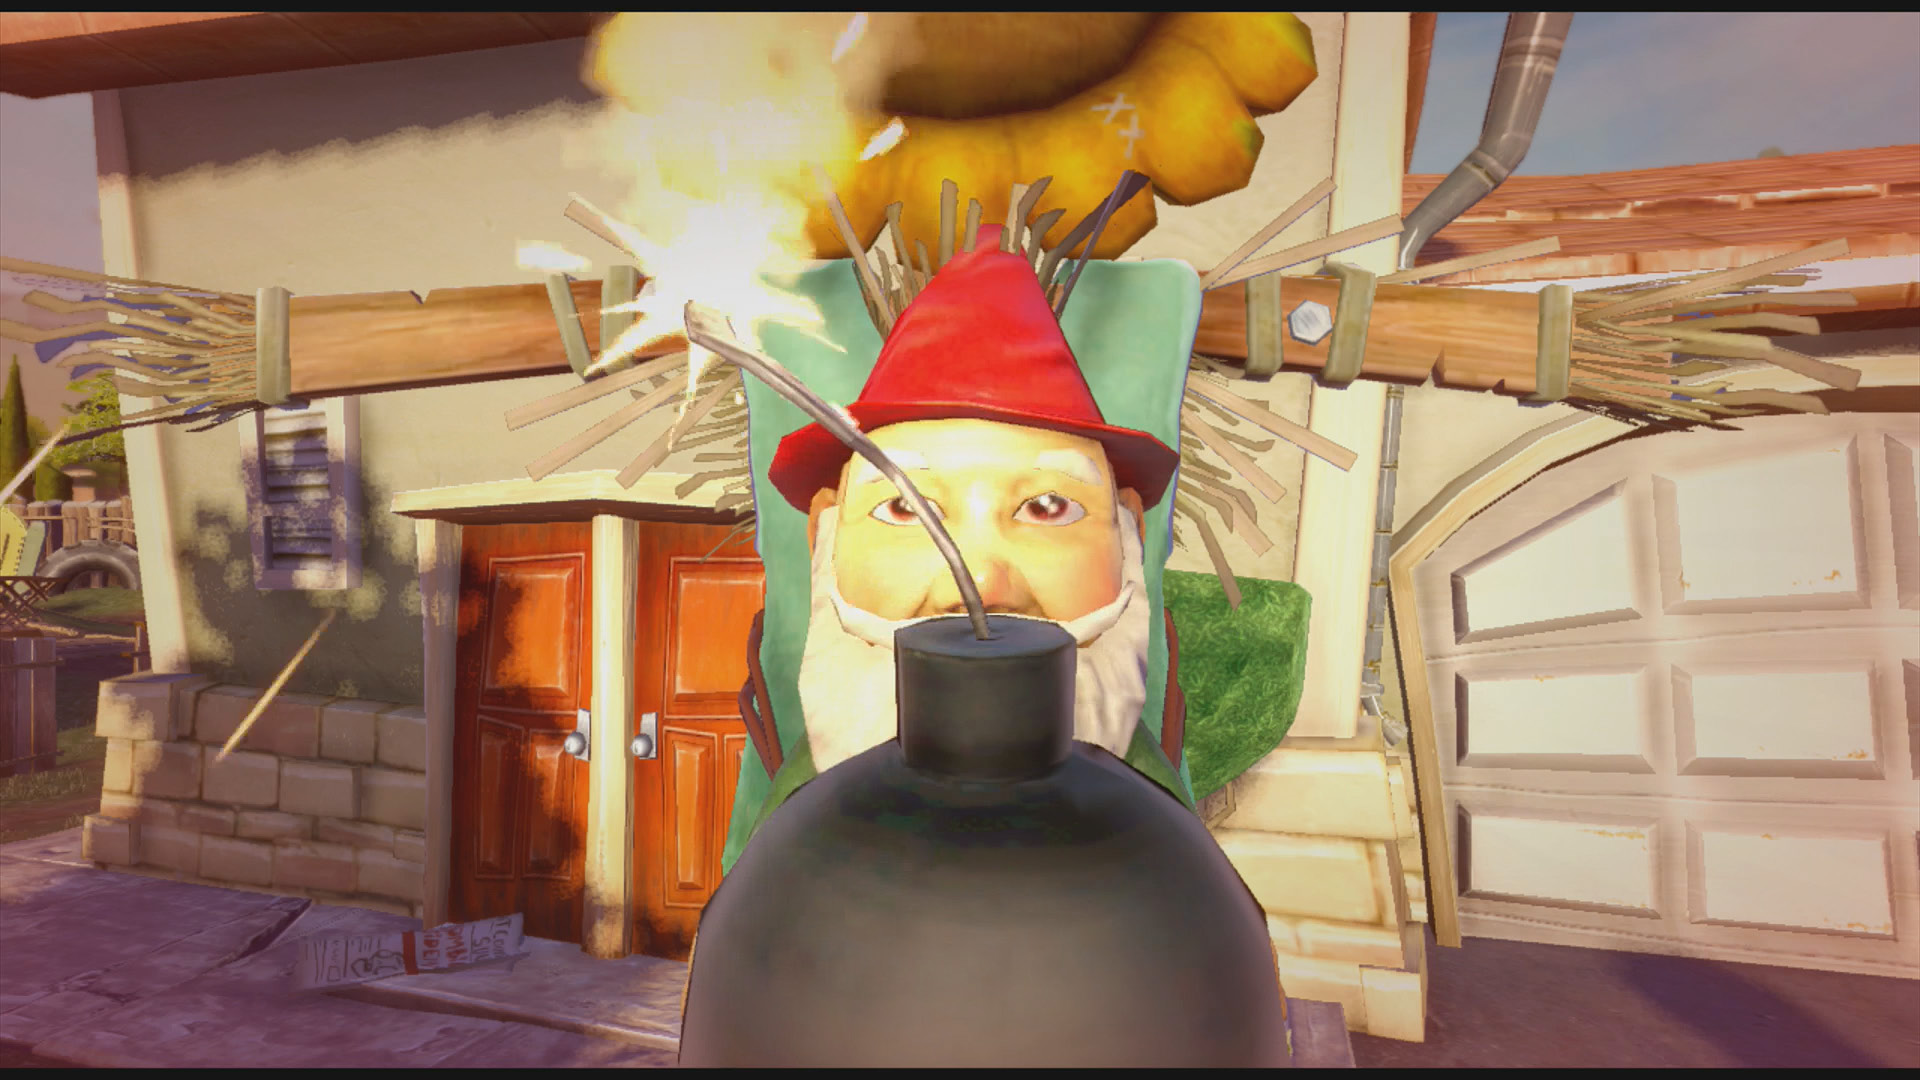
You always knew garden gnomes were up to no good—well, here’s the proof. Garden gnomes holding live bombs spawn in the midst of the play field, and it’s your job to grab and place them on the opposing team’s objectives. The fun doesn’t stop there, however—once the Gnome Bomb is placed and armed, you will then have to protect it from a horde of naturally angry enemies seeking to defuse it! It’s a recipe for mayhem all around.
How to Stop Worrying and Love the (Gnome) Bomb
- Gardens and Tombstones are always set in the same locations, and there are always three of each. As soon as the match starts, fortify them!
- Crowd control is key to doing well in Gnome Bomb. Always protect a teammate who has a Gnome Bomb, and while the Bomb is armed, protect it as well. Weapons with a wide area of effect (such as Corn and Cone Strikes) can clear out would-be defusers.
- When trying to defuse a Gnome Bomb, keep your healers at the ready, and give defusing duties to whoever has the highest maximum health (All-Stars, for example, are great defusers). Once again, area-of-effect weapons can help if too many enemies are close.
- Gnome Bomb mode has it own built-in timer. Once it hits zero, that’s the match. However, if both sides still have the same number of objectives to blow up when time runs out, the game goes into overtime! In overtime, fuses are instant—if the Gnome Bomb so much as breathes on a Garden or Tombstone, it blows. To make things even more hectic, the first time this happens, the match is over in favor of whichever side guided the Bomb successfully!
- We know how it goes: sometimes you just can’t get rid of a bomb. However, even if you lose a Garden or Tombstone, it’s important to persevere. Given enough time on the clock, it’s always possible to come back from behind, no matter how bleak the situation looks. If all else fails, go for a win via overtime.
Gnome Bomb Maps
Chomp Town
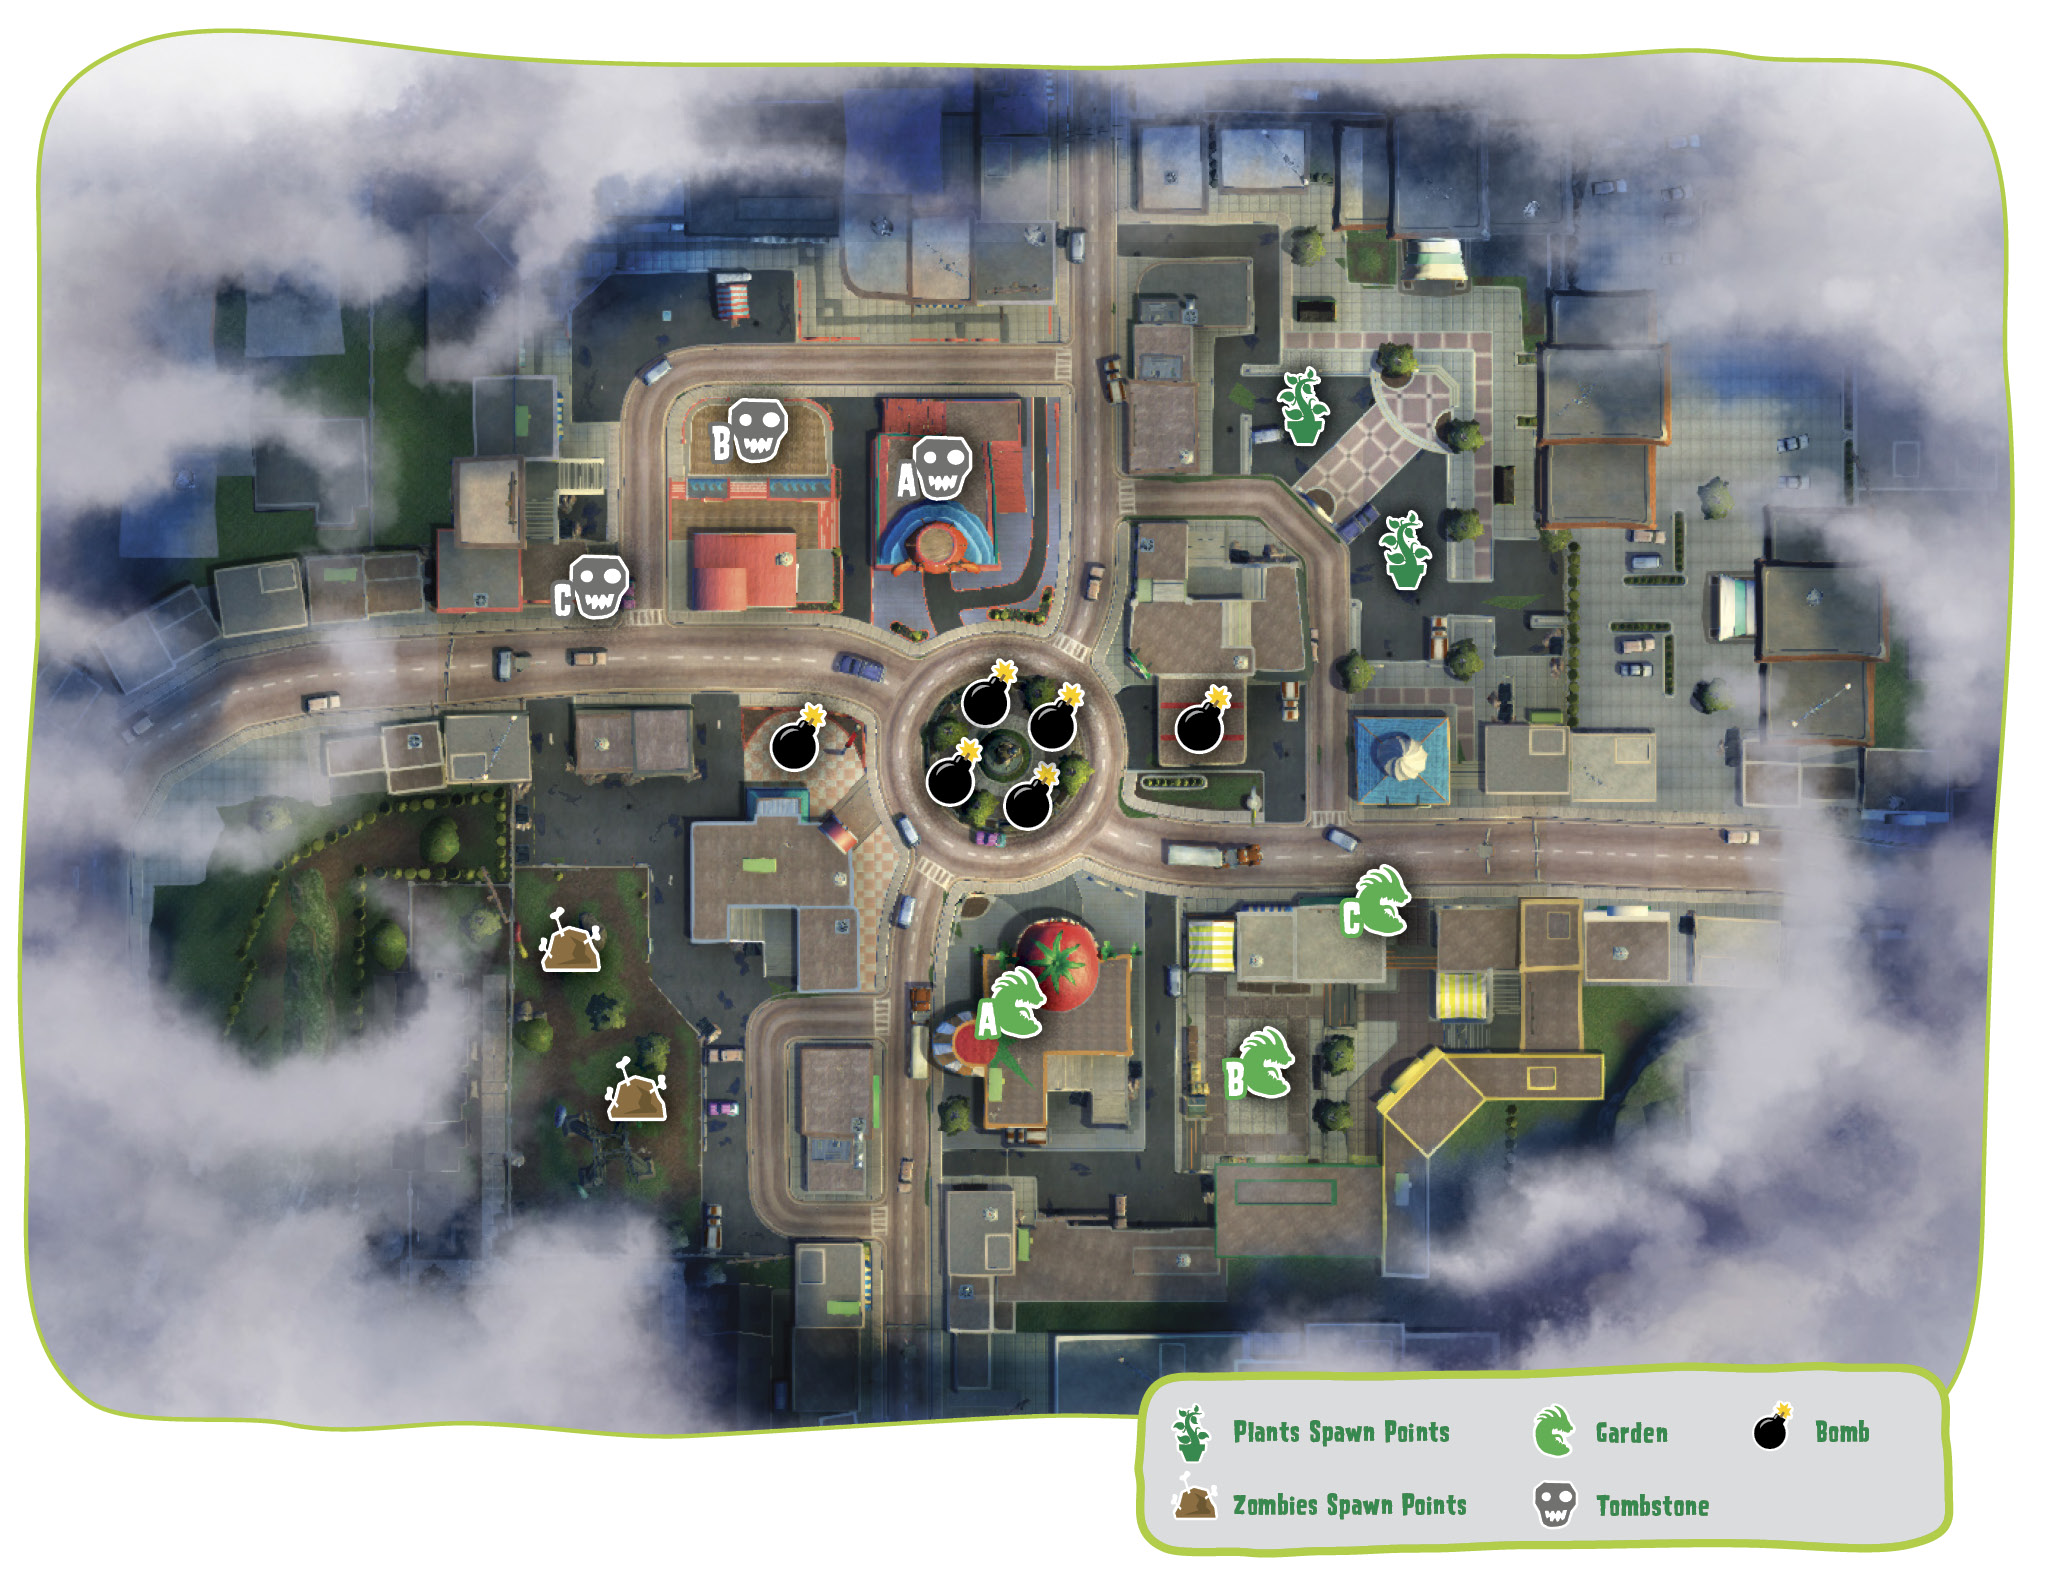
Plants’ Gardens

Plants: This is a pretty well-defended spot, with only one staircase leading to your Garden. However, Foot Soldiers will try to make your life tough whenever they can, so be ready for the rush.
Zombies: This one’s a little tough to get to since there’s only one staircase leading up to the Garden. Rush it down. Use Cone Strikes and your Foot Soldiers’ Rocket Jumps whenever you can to bypass the stairs.

Plants: Use the nearby high perches to your advantage to rain shrubbery onto those who would Plant Gnome Bombs at your Garden!
Zombies: You’re going to have a tough time here—the Plants have the clear high ground. Make sure to return fire at anything and everything, and sweep the perimeter, high and low, for interference from Plants.

Plants: This is the Plants’ corner Garden, located right at a chokepoint. There are multiple points to defend it from, none of them easy. Ground troops and mines will be the order of the day here.
Zombies: Try to take the [B] Garden before taking this one, and keep some troops where that Garden was to make taking this one easier. The Plants will be spread thin trying to defend it, but so will you. Once again, go for a ground assault.
Zombies’ Tombstones

Plants: Try not to use the stairs unless you have lots of backup, since the stairs serve as small chokepoints. Jump up here if you can, or use aerial units to clear out the area and give your fellow Plants an easier time.
Zombies: The Tombstone atop Swabbie Shaw’s is easy to defend against ground troops, who must go up stair chokepoints to even see it. However, jumping and flying units are a different matter, especially since there’s little cover up here. Be ready to shoot anything you see out of the sky!

Plants: The Zombies will be closely watching the two chokepoints leading directly here. Come through them in force, and be ready to defend just as hard.
Zombies: This is arguably even easier than the [A] Garden to defend, seeing as it has more room to maneuver and some obvious chokepoints. Still, this means that the Plants will compensate with greater numbers. Keep them in your sights and at bay with long-range weaponry and your fastest troops.

Plants: The Tombstone here is a bit out of the way, and you might have to do some extra work to get to it. Cut through the back alley, but keep in mind that Zombies will likely be patrolling the area (especially since the back alley is their spawn point!). If your unit has aerial capabilities, cut a path diagonally from your territory to the Tombstone as best you can.
Zombies: This is a corner Tombstone, meaning it’s easier to see what’s coming, but don’t let your guard down. Watch out for the path leading from the back alley as well as air troops. It’s easy to get pinned against the wall here.
Garden Center
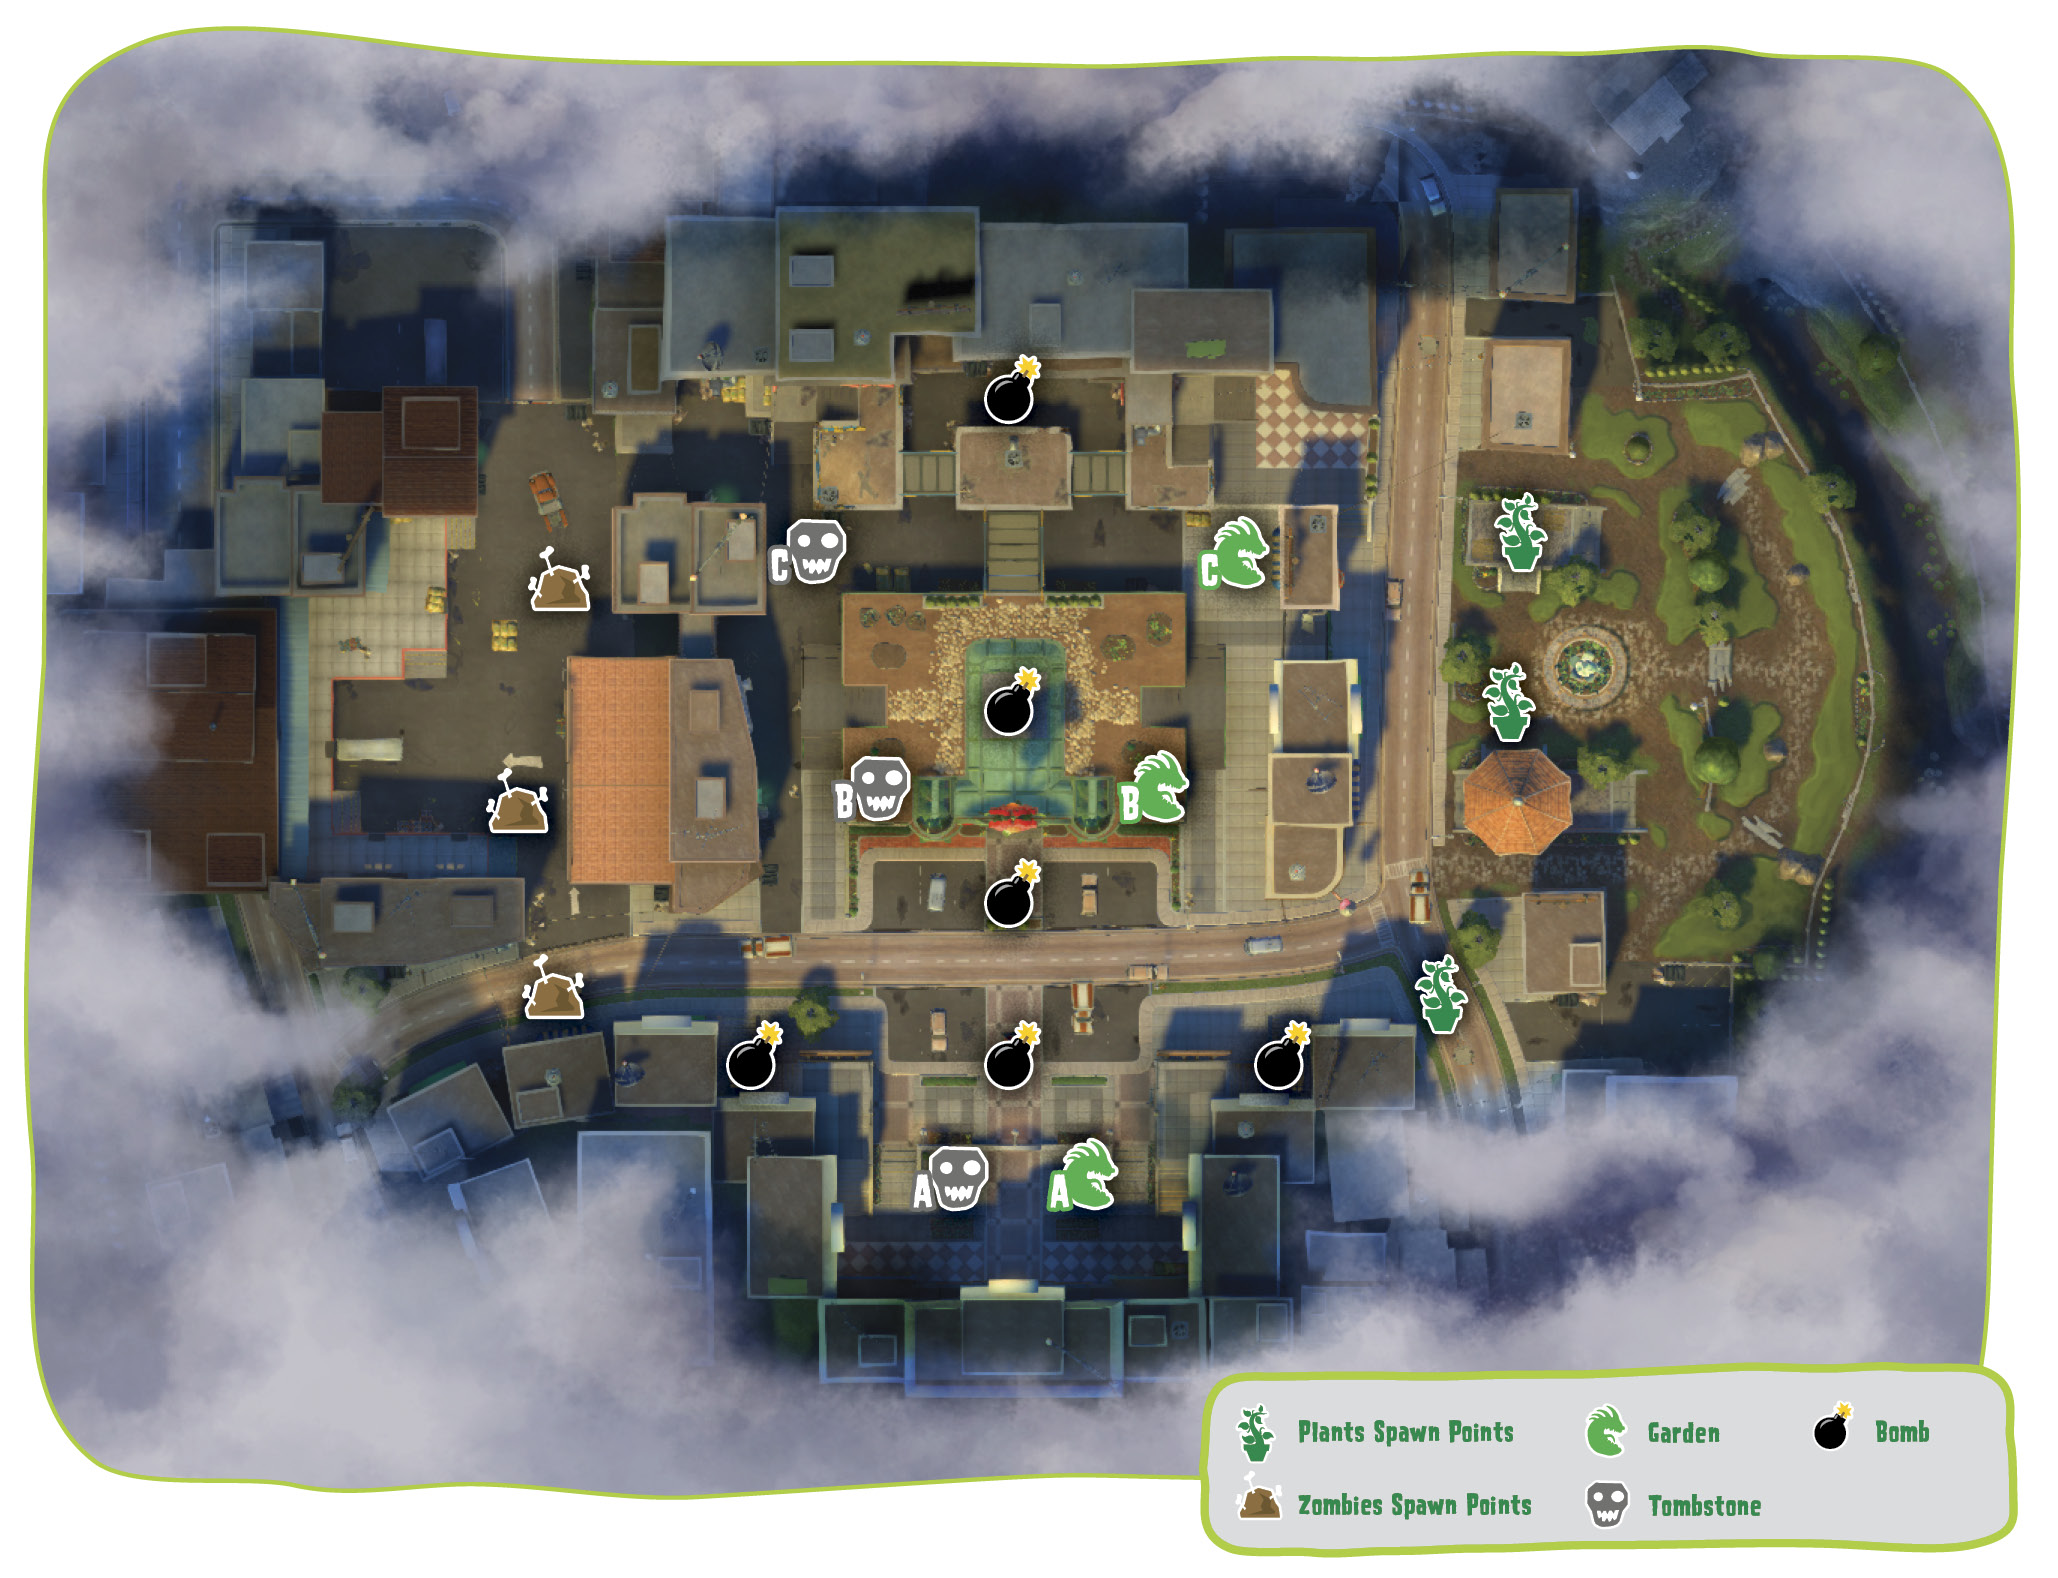
Plants’ Gardens

Plants: Use the nearby high walkways to keep an eye on this Garden, and don’t let that high ground be taken by sneak attacks from behind—there’s more than one way to access the area!
Zombies: Do whatever you can to take the high walkways to the side so you’ll be able to cover your ground forces, who should be mounting a straightforward assault.

Plants: Keep the rooftops safe in order to keep this Garden safe, and watch it from all directions, including the air. Foot Soldiers can’t Rocket Jump while holding the Gnome Bomb, but that doesn’t mean advance troops can’t!
Zombies: The same rules apply here, except in reverse, especially since you have a Tombstone on the same roof not too far away! Fight for the rooftop, always!

Plants: This area’s nothing but chokepoints, but they’re all wide and walled, giving you room to line up enemies. Spare some troops for the nearby rooftops so you don’t get caught unawares by sneaky Foot Soldiers.
Zombies: Use the bridges and rooftops to mount your assault first, then bring in your ground troops.
Zombies’ Tombstones

Plants: This one’s going to be a straightforward ground assault. Watch for Zombies trying to snipe from the upper walkways to the side.
Zombies: Plants will likely be trying to rush this Tombstone with ground forces as quickly as possible. Get to the high ground on both sides to stop that from happening.

Plants: This one’s a battle for the rooftops, no question. Spread out your forces as you advance your Gnome Bomb carrier, and concentrate your fire. There’s some nice open space for a Corn Strike or three, too.
Zombies: Get control of the rooftops! Zombies will have an easier time of this one due to Rocket Jumping Foot Soldiers being easily able to get back to this Tombstone to defend it.

Plants: Fight your way to the other end of the rooftops and high bridges, and lay down fire on incoming Zombies as you use ground troops to cover your Gnome Bomb Carrier. You’ll be doing a lot of shooting here.
Zombies: You’ll also be doing a lot of shooting to keep the Plants at bay. Try to control the rooftops if you can; your Tombstone is rather vulnerable and closed in, and you don’t want to give the Plants any easy shots at it.
Port Scallywag
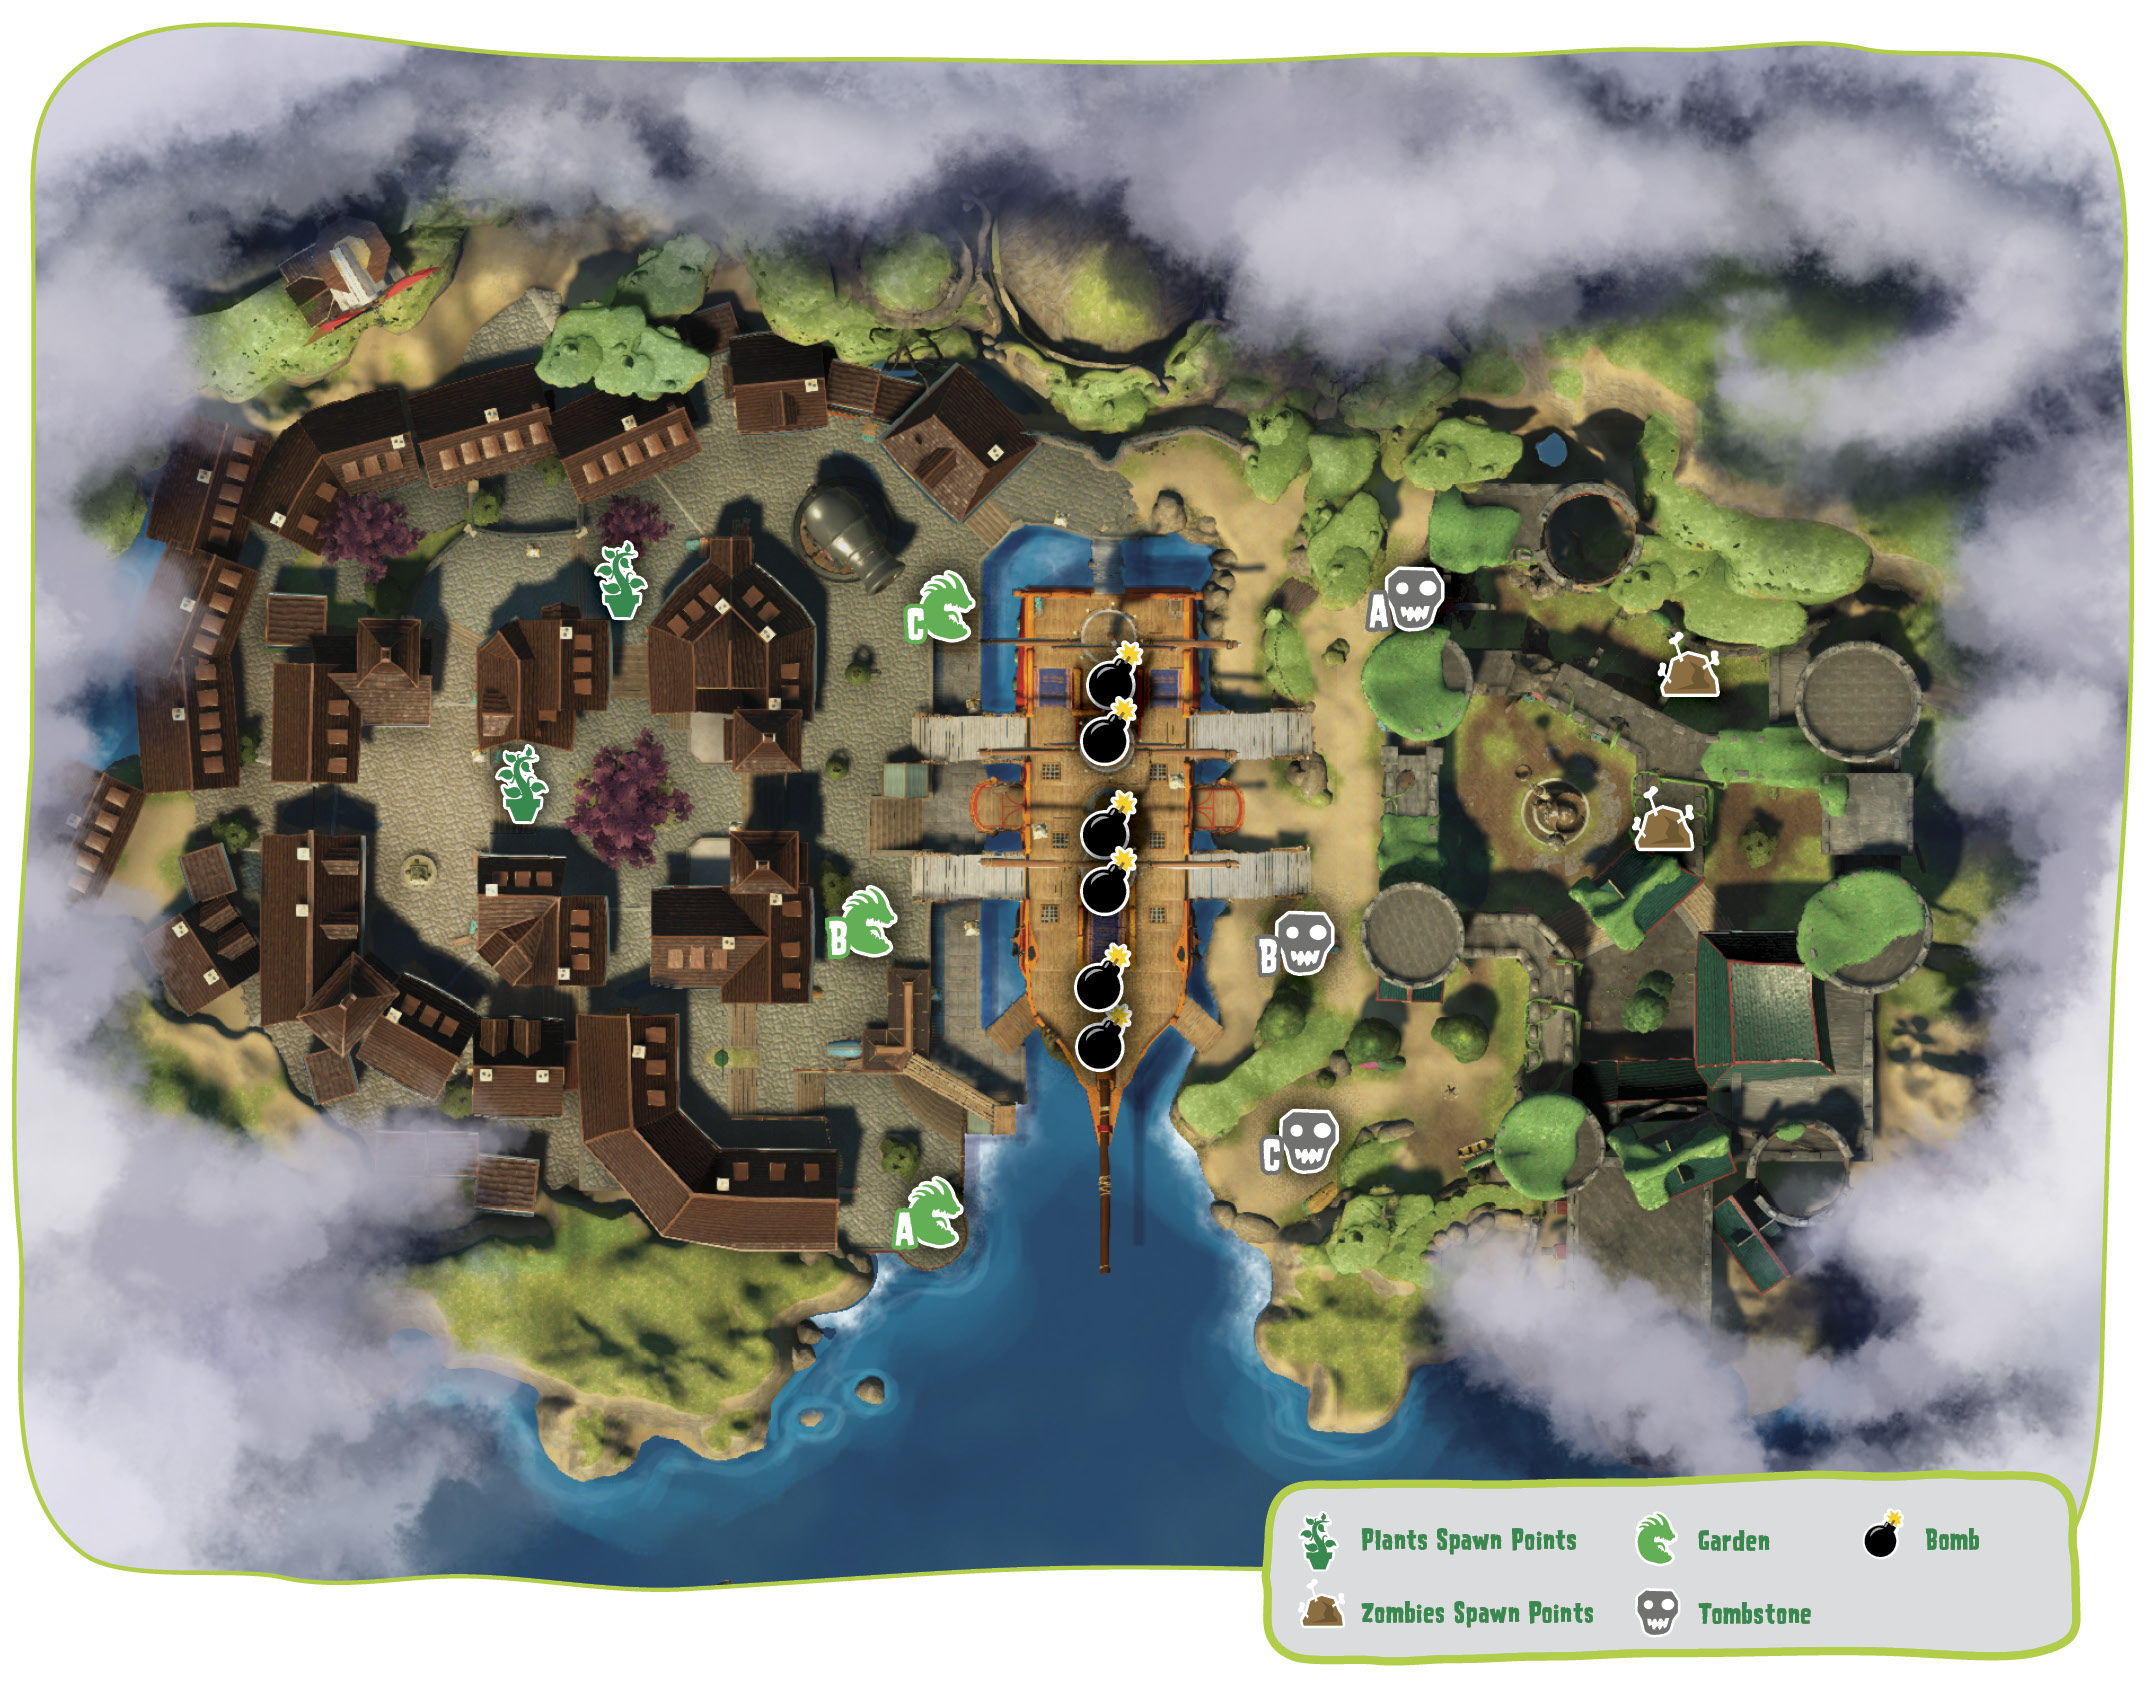
Plants’ Gardens

Plants: This is a corner Garden and far away from either force compared to the other two Gardens. Send troops here constantly to ward off Zombies. There’s less ground to watch, but also less room to maneuver.
Zombies: The fastest and best way up here while giving Plants a hard time is the walkway leading from the bottom of the pirate ship. Be sure to act when you have the Plants otherwise distracted.

Plants: This Garden is pretty much in the same position as Garden [C]. Defend it from behind, fortify it, and watch all the steps and bridges leading away from the pirate ship.
Zombies: Bring your Foot Soldiers and Rocket Jump from the bottom of the ship while also mounting an assault from the bridge.

Plants: This Garden is in a good position to be defended from behind, given where your troops spawn. Make sure to do so, and watch every single staircase and bridge leading up to it!
Zombies: Plants may see you coming from the bridge leading off of the pirate ship, but coming up the rightmost stairs after exiting the bottom of the pirate ship is a good place to mount a sneaky assault.
Zombies’ Tombstones

Plants: This will likely be the easiest of your captures, since it’s against a wall and the Zombies have to take the long way around to protect it. Constant Corn Strikes will keep the zone clear while you send Plant after Plant after the Tombstone.
Zombies: This one’s a toughie. You might want to send some advance Zombot Drones to protect this, and keep some Zombies patrolling it. It’s far from your base’s openings, so if it falls under a surprise attack, it’ll be quite hard to defend.

Plants: Try going for this Tombstone after you’ve taken care of Gardens [A] and [C]—there are fewer ways to access this one than the other two. If you can make it through the bottom of the pirate ship, however, you might have a sneaky way in.
Zombies: This one’s naturally located on high ground so you have the advantage in defending it. Watch out for Plants who try to attack from below!

Plants: This Tombstone’s in some nice open space, so storm and Corn Strike it when you can. The biggest challenge will be getting past the pirate ship, where most conflicts will take place.
Zombies: Use the elevated rock to mount a defense from the high ground. Otherwise, simply fire back at anything that moves.
Sharkbite Shores
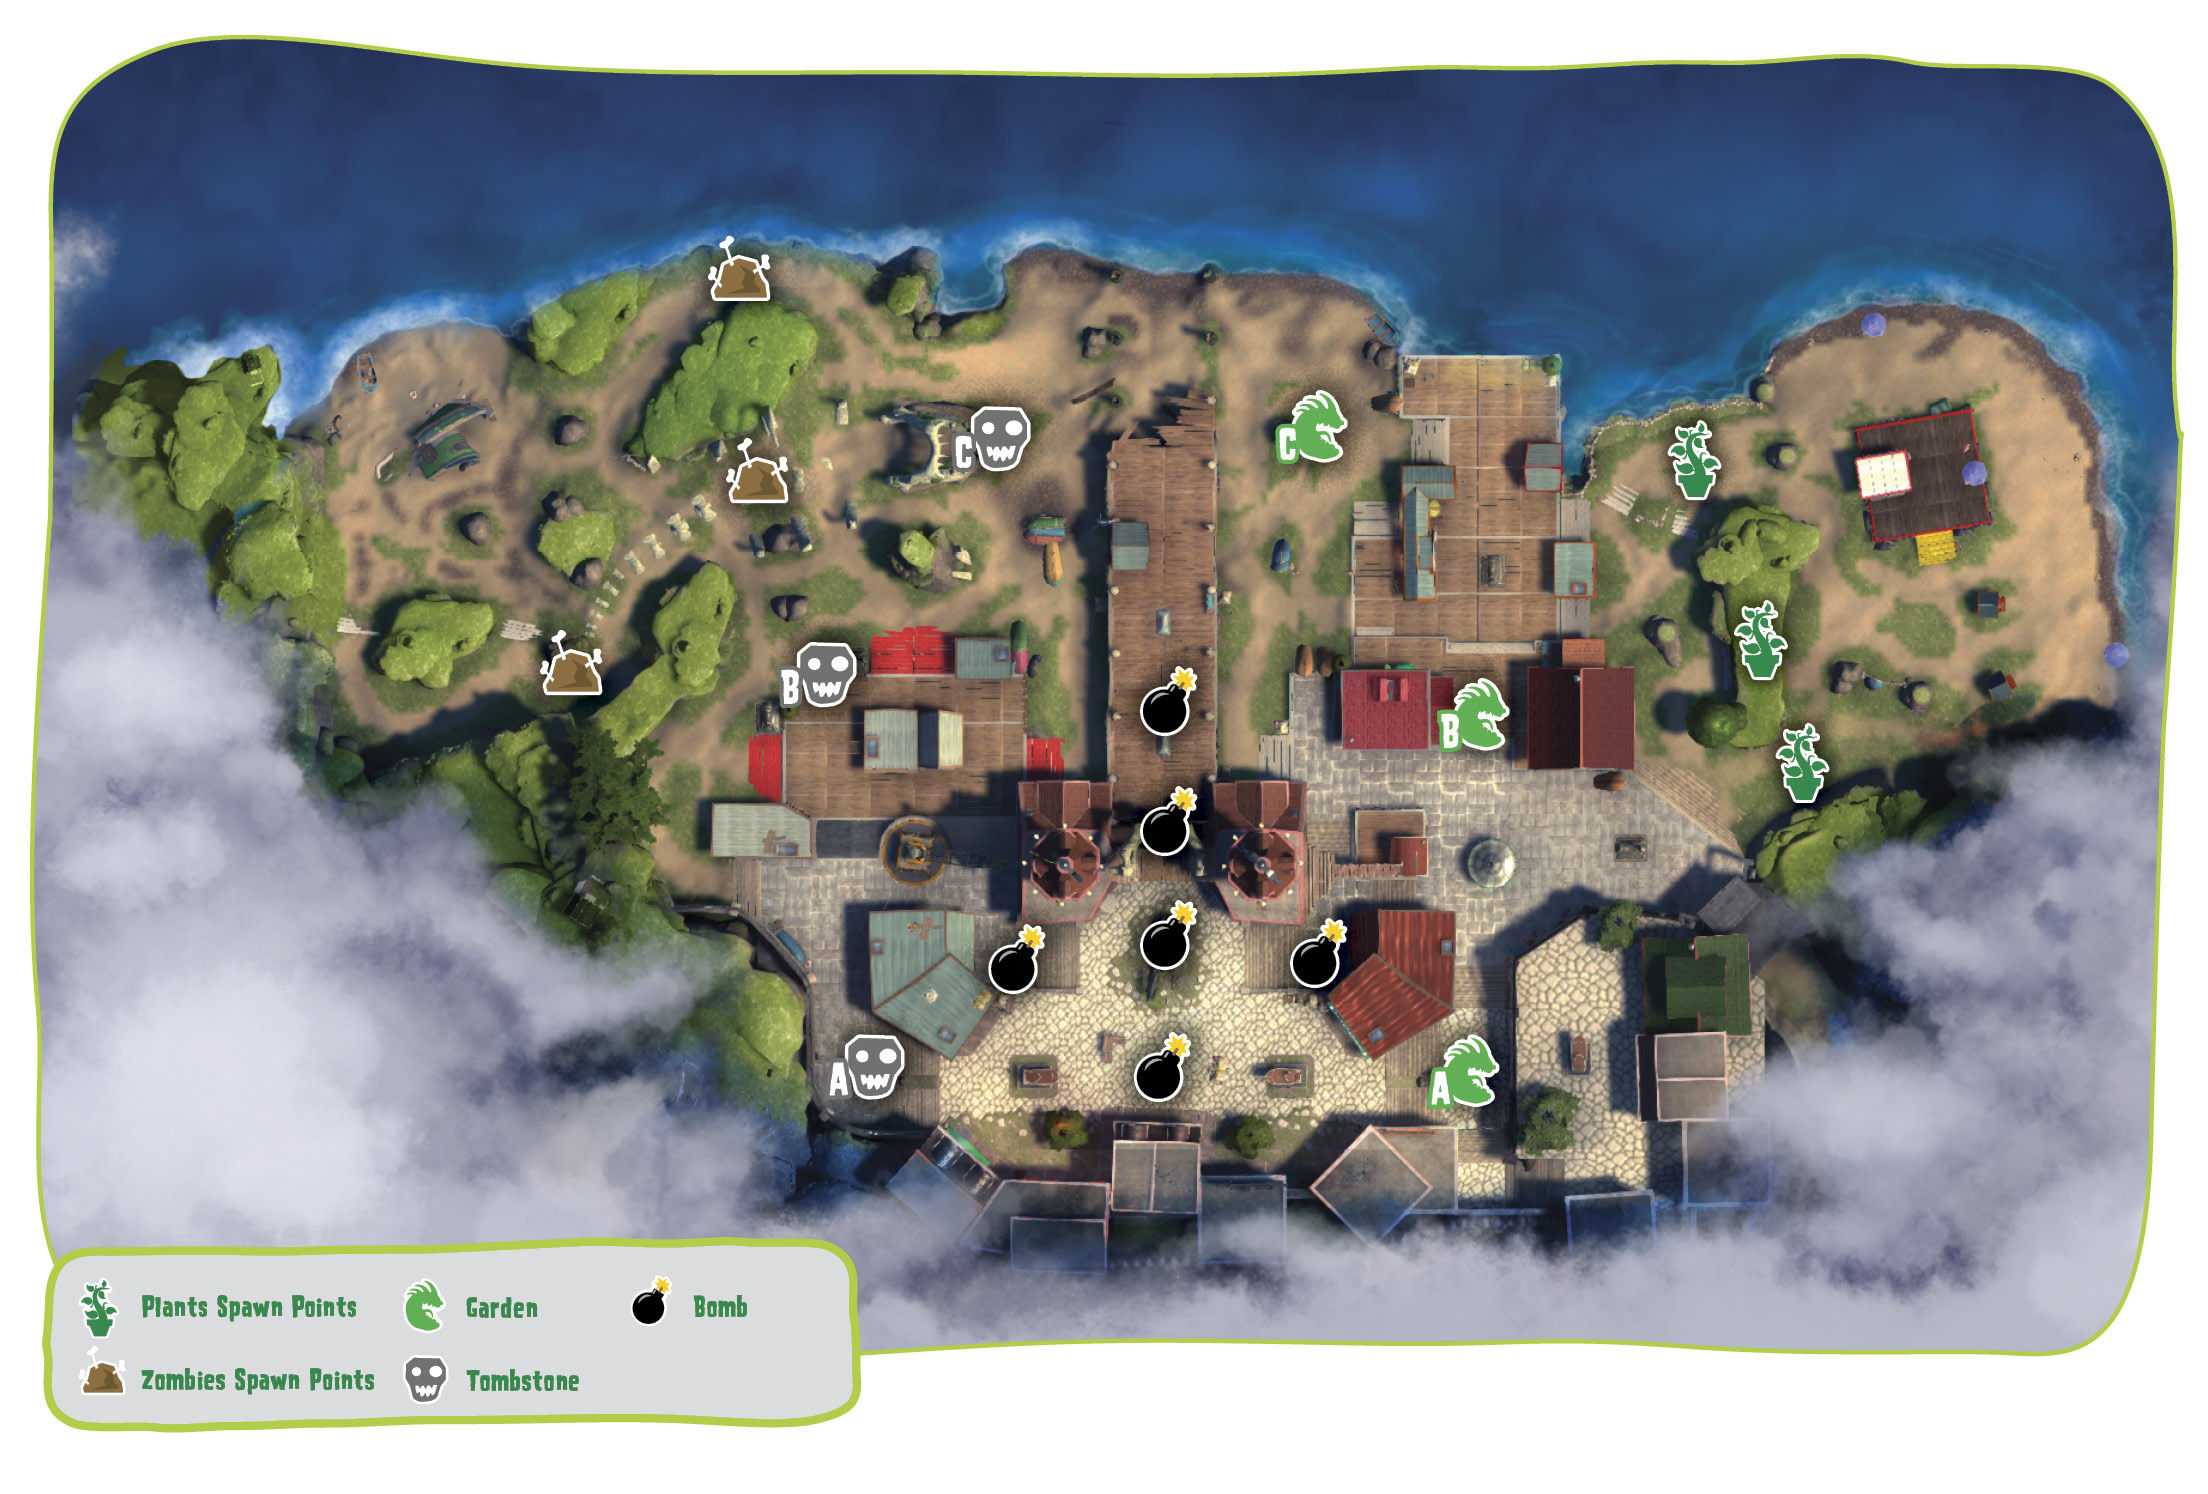
Plants’ Gardens

Plants: This Garden is in a deep place, and would be tougher to defend if it weren’t a straight line away from your spawn points. Still, you should place as many stationary defenses on the routes leading here as you can and constantly keep an eye on this place. Make sure any Zombies heading to this spot are in for several rude surprises.
Zombies: Much like your [A] Tombstone, concentrating your fire from the air and the ground is your best friend. Keep an eye out for traps.

Plants: The layout is on your side here—the Zombies have to travel a ways from their spawn point and then around the corner of a house, where they have no idea what lies on the other side. Now that you know this, use as many traps and surprise attacks as possible to let them know that this neighborhood isn’t safe.
Zombies: This will be the hardest Garden to detonate, as it has lots of cover and a bad line of sight on approach. Use your Foot Soldiers and Zombot Drones to scout before going in for the attack.

Plants: You have a little bit of cover in the form of the outhouse near your Garden, but not much else. Watch the skies as you defend the area from any Zombies slinking out from under the nearby docks.
Zombies: Storm from below the docks, the houses from the side, and the air! Use all of your means of attack. You’ll want to converge on the base in sync, then use the space around the Garden to form a perimeter once the Gnome Bomb is armed.
Zombies’ Tombstones

Plants: This Tombstone is in a tight corner with exactly two chokepoints and a rooftop. Concentrate your firepower while making sure any Zombies en route don’t get there.
Zombies: You’ll have a bit of a tough time defending this area, but it’s worth it. In cases like the this, the best defense is actually a good offense. Spread out and cut any approaching Plants off from the paths leading to this Tombstone, but keep a couple of troops there so you’re not taken by surprise.

Plants: You’ll likely be capturing this Tombstone last, as it’s the furthest away. It will especially help if you’ve blown up Tombstone [A] already—then there will be fewer troops clogging the ways to this one. Watch out for attacks from above, however!
Zombies: This is the Tombstone closest to your spawn point, and you’ve got some handy elevated rock behind it. You can set up a defensive line there with long-range weaponry, but keep in mind that the fence near the Tombstone will require you to keep some troops up close as well.

Plants: It’s a long but straightforward journey from your spawn point to this objective, so make sure your squad is coordinated. Use the pillars as cover to help your ground troops approach this Tombstone.
Zombies: The rock above makes for good elevated defense, but your view will be obscured by the docks. Do as much shooting as needed down there with your ground troops.
Suburban Flats
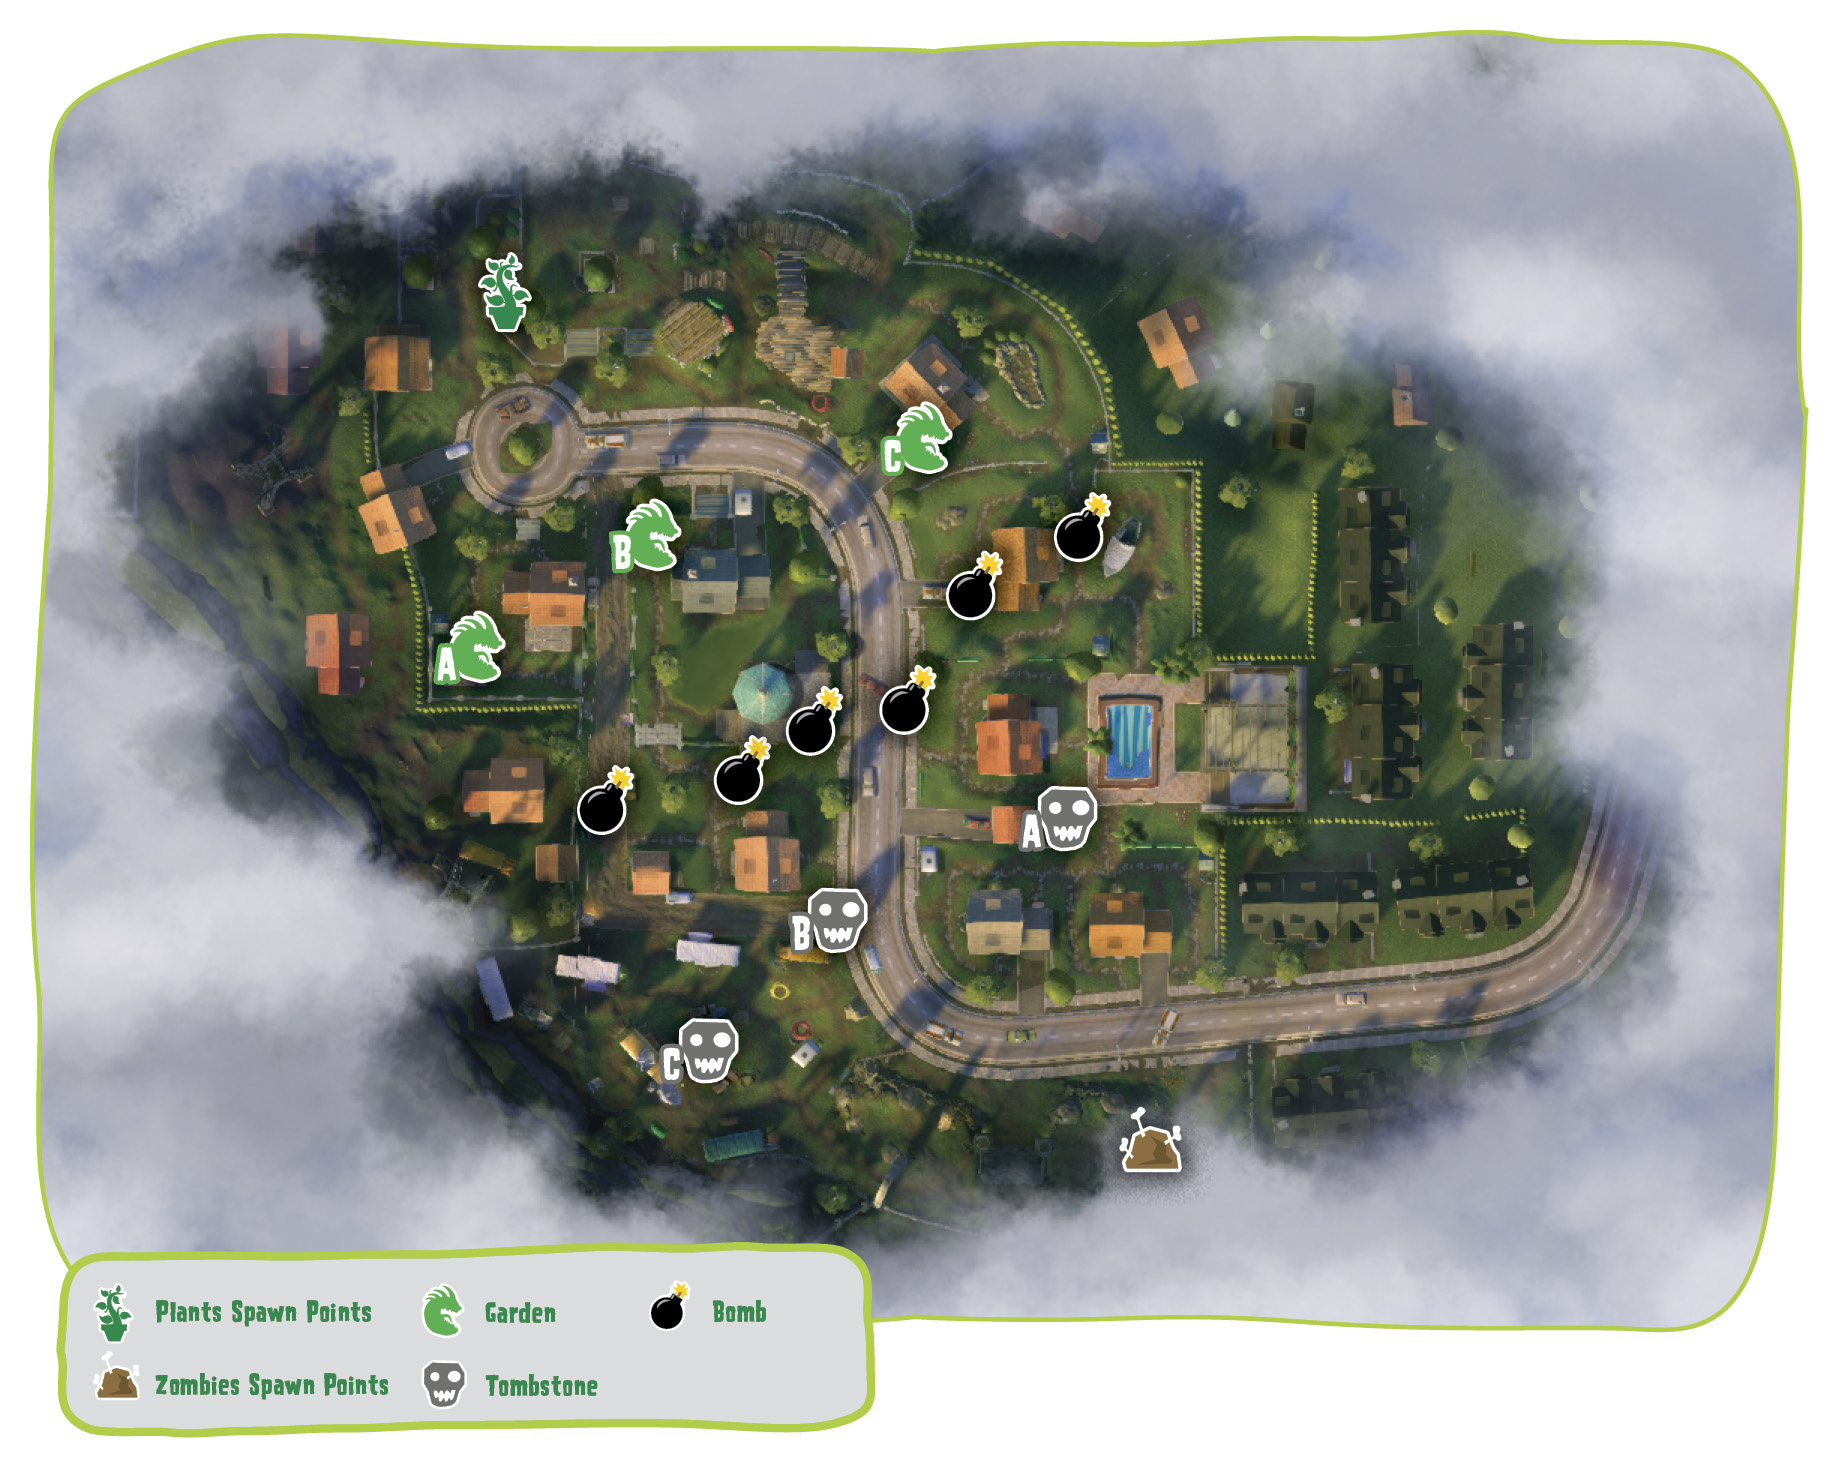
Plants’ Gardens

Plants: This is a corner Garden with lots of wide-open space and two points of access. You could not ask for a better place to defend. Form a minefield and keep plenty of sentries handy. This will usually be the Garden that keeps you alive, but you’ll have to fight hard to keep it.
Zombies: Short of Cone Strikes and using Foot Soldiers to fire from rooftops, there are really no sneaky ways to take this Garden. You’ll have to wage a war of attrition, since the Plants have many ways to defend it due to its positioning.

Plants: Watch the openings that lead to this Garden as best you can. They can let Zombies in, but the size of the pathways makes it easy for you to keep them out.
Zombies: Use Foot Soldiers to jump over the wall around this Garden and clear the way for your Gnome Bomb–carrying Zombie. The two openings give you easier access, but the Plants will most certainly be watching them.

Plants: This Garden is pretty much at the end of one huge chokepoint. Treat this like a Gardens and Graveyards match and hunker down. Let no Zombie get inside, from any side.
Zombies: Rush this Garden en masse when you feel it’s time—there’s little escape for Plants due to the house behind it.
Zombies’ Tombstones

Plants: There’s a giant hedge lining this Tombstone that will give you a bit of cover but will also make it hard to move around freely. Give the Tombstone some space when defending your armed Gnome Bomb, but stay as close as possible.
Zombies: The giant hedge is actually facing where your team spawns, making it tougher to keep Plants out, since you’ll have to get around it. Use Zombot Drones and Rocket Jumps to make this less of an issue.

Plants: You’ll come across this Tombstone most easily since it’s along the main road. Do what comes naturally, but keep in mind that Zombies will be doing the same. It’s a good idea to set up fire from nearby rooftops.
Zombies: Even on defense, this Tombstone’s pretty straightforward. Return any fire you see, and keep an eye on the main road.

Plants: This Tombstone is located in a nice open field, making it easy to swarm in en masse and also drop Corn Strikes. Do so.
Zombies: There are no easy locations to defend here, so spread out a bit and establish a perimeter so the Plants can’t easily get to your Tombstone, or take you all out in one fell swoop with aerial maneuvers. Use the nearby trucks to mount an elevated defense.
Zomboss Estate
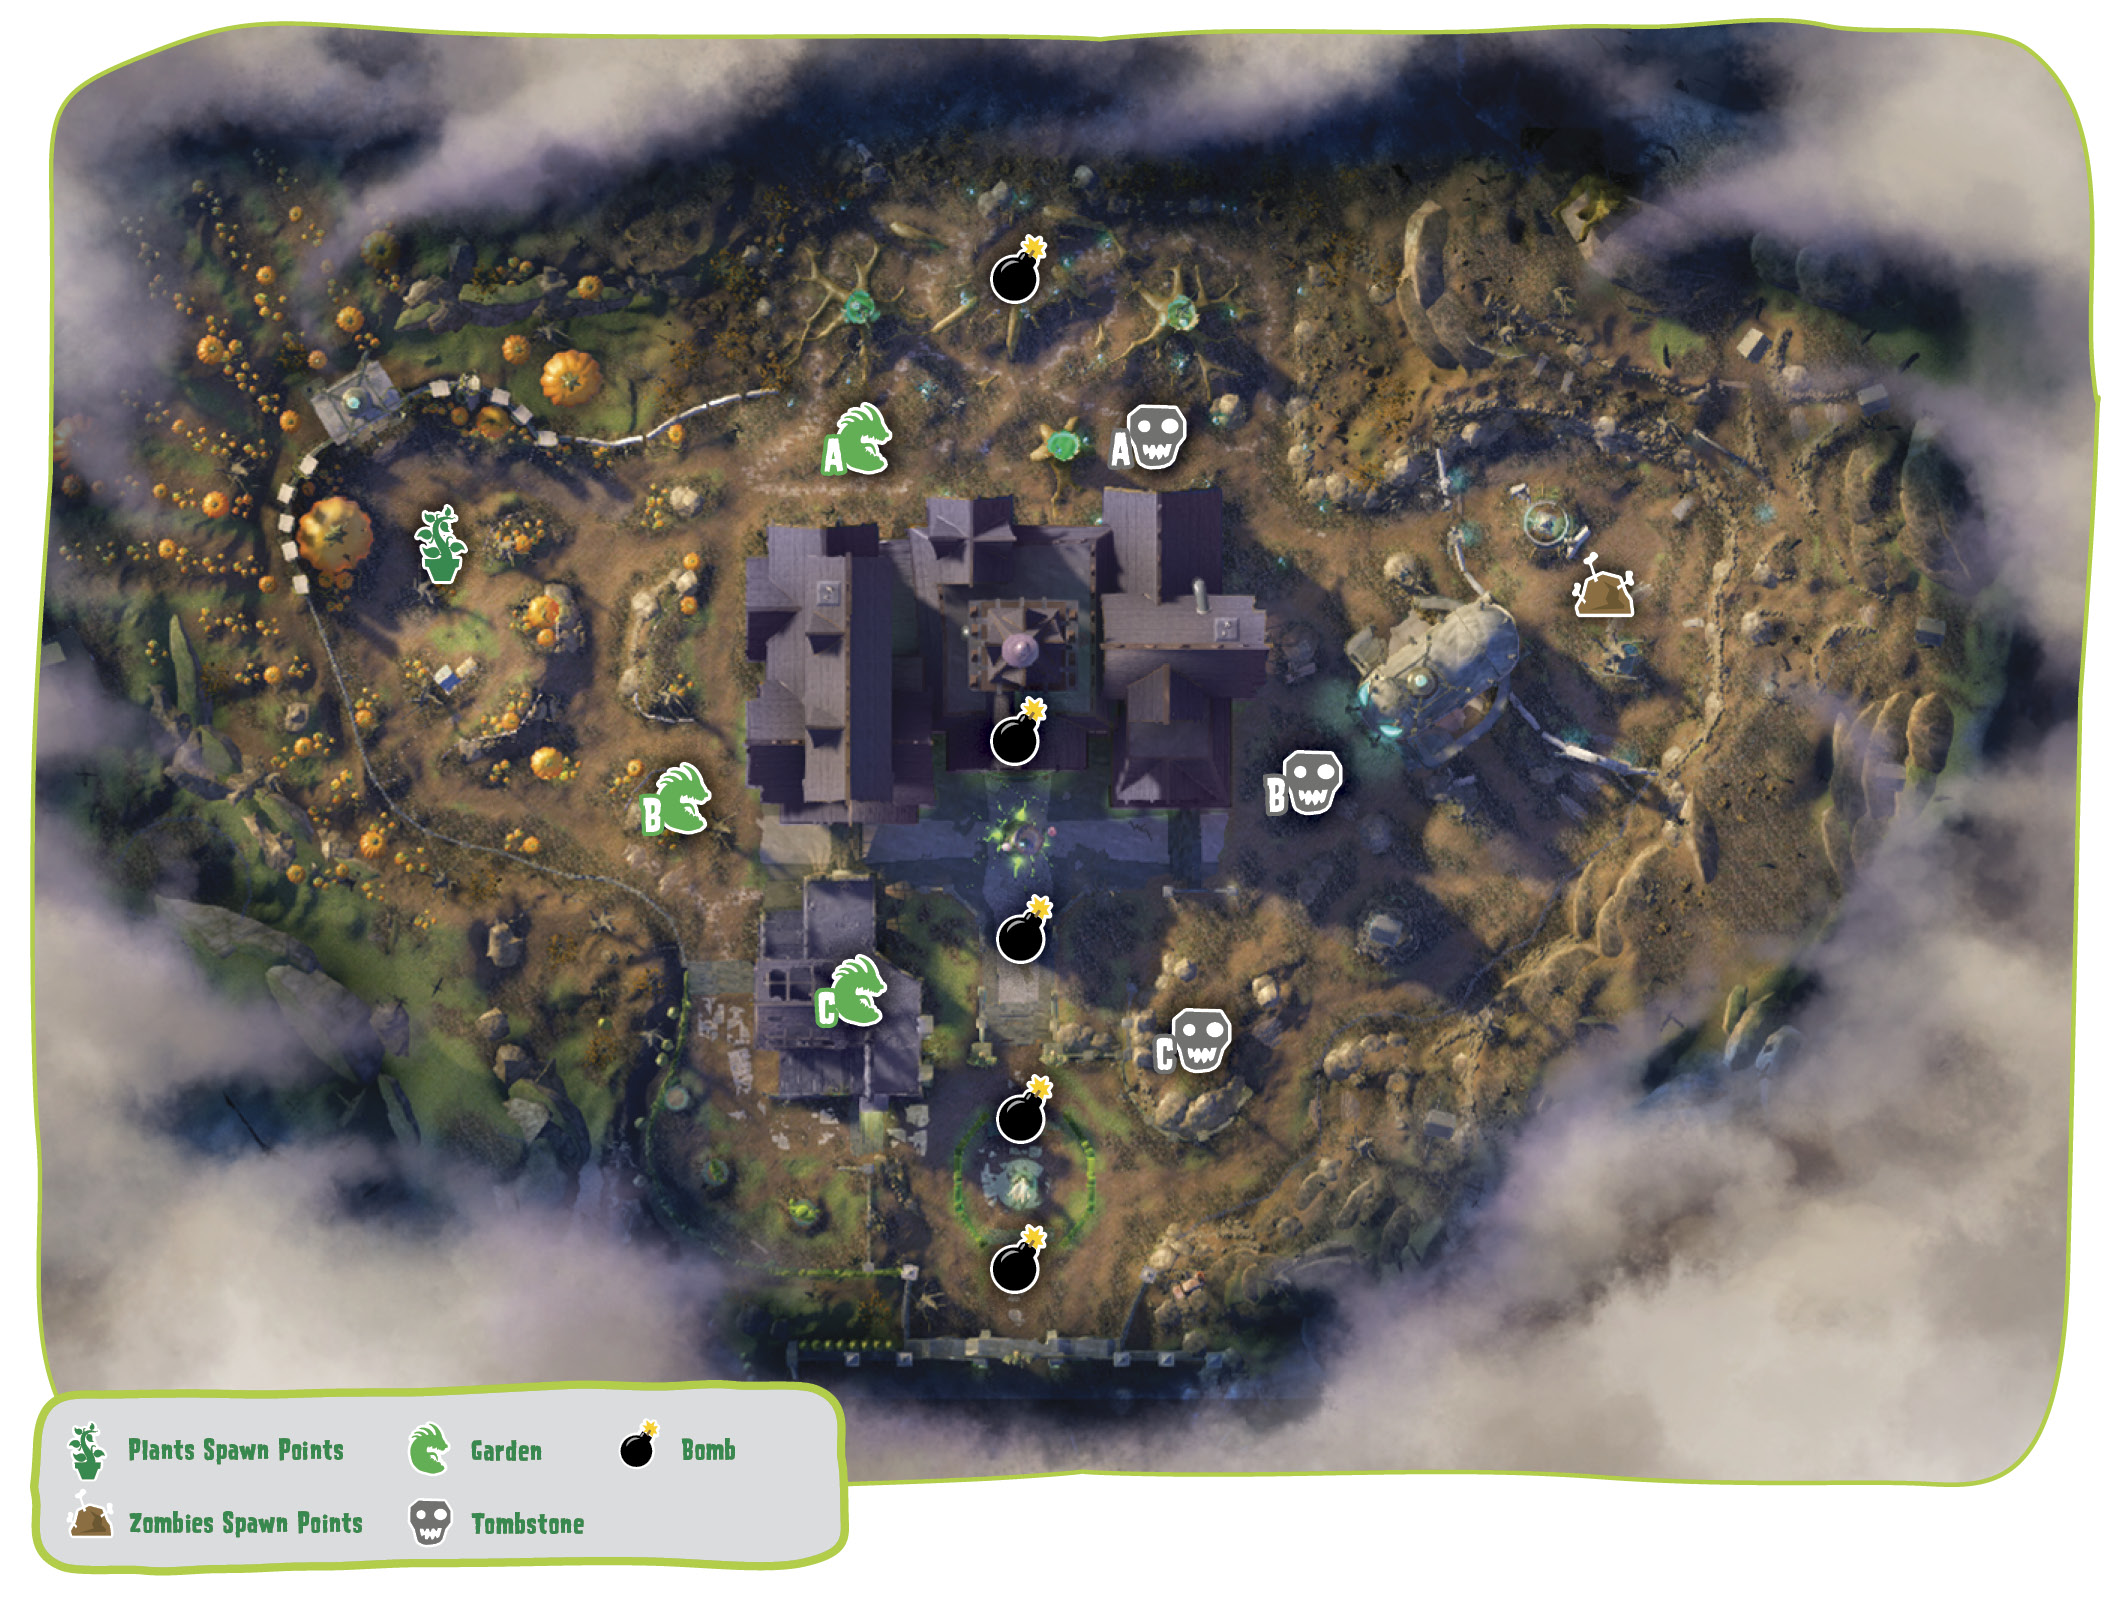
Plants’ Gardens

Plants: This one’s pretty close to the Plants’ spawn point and thus easier to defend than most. Expect an all-out ground clash here, peppered with airstrikes from both factions. Plant your mines and Tallnuts!
Zombies: In protecting your Tombstone, you’ll likely see the Plants trying to protect theirs. It’s your call as to when you want to pull double duty. Use the big hollow tree stump as cover to aid your approach.

Plants: Unless you’re a Cactus, any high ground is actually pretty far away, so don’t count on it to protect you. Still, the good news about this Garden is that it’s easy to see where the points that need defending are located. Ground troops, mines, and Spikeweeds (the latter two of which camouflage into the ground here quite well) are all good weapons in defending the area.
Zombies: Once you’ve captured Garden [C], going for this Garden will be a whole lot easier. Keep your high perch gained from Garden [C] and push against the Plants on the ground.

Plants: This is the best high ground on the map, bar none. Plant your defenses and have some of your forces act like it’s a Team Vanquish match, mowing down any Zombies in their field of vision.
Zombies: The Plants will most definitely be holed up here, and you’ll want to root them out. Corn Strikes, Rocket Jumps, and general Zombie mayhem of all kinds should do the trick. Once you have the high ground, you’ll be in a better position to blow up the Garden, too!
Zombies’ Tombstones

Plants: With the battle raging in front of the mansion, don’t forget about the back! It’s pretty much an even battle when trying to engage the Zombies here, so make sure you have superior firepower.
Zombies: Use the large hollow tree stump for purposes of cover and deception—it blocks the view of your Tombstone quite well. Otherwise, this is a power battle.

Plants: This one will be hard, as it’s close to the Zombie start point. Consider blowing it up last, once you have the Zombies cornered.
Zombies: Treat this one like a Team Vanquish match and swarm out from your spawn points in violent defense! The Plants will have to do all of the extra work they can to blow up this Tombstone!

Plants: This one’s going to be an all-out brawl as troops from both factions climb the hill to maintain control of this Tombstone. Corn Strikes will be a great asset here.
Zombies: This is technically high ground, and as such it’s your duty to protect it. Defend the Tombstone while warding off Plants at the same time with sniping weaponry. Keep a few close-quarters troops around to take care of any Plants who do get close.