
Lego Star Wars III: The Clone Wars Guide Walkthrough Separatist Missions
Chapter I: Hostage Crisis
“A secret shared is a trust formed.”
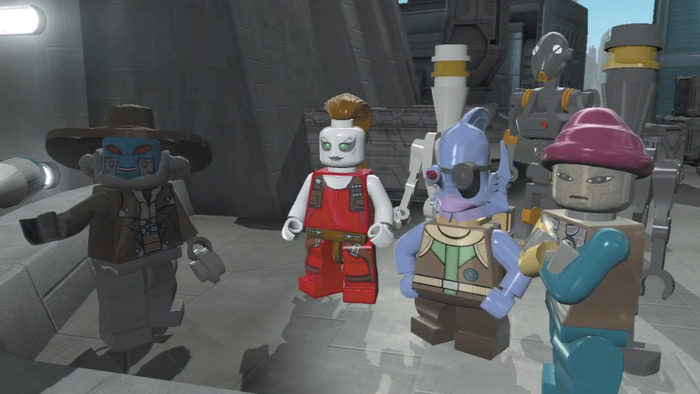
The disgusting gangster Ziro the Hutt has commissioned bounty hunter Cad Bane to secure his release from prison. Leading a band of deadly criminals, Bane intends to launch a brazen attack on the Senate Building on Coruscant, then trade the Senators’ freedom for that of the Hutt....
Minikits
|
No. |
Icon(s) |
Mode |
Notes |
| 1 | 1 |
Free Play |
Use Jar Jar to reach the minikit that hovers above the landing site’s left cruiser. |
| 2 |
1+5 |
Free Play |
Defeat the five clone troopers that are scrubbing the ships. |
| 3 | 3 |
Free Play |
Repair the landing site’s damaged right cruiser by Force-moving the three nearby parts onto the ship. |
| 4 | 4 |
Free Play |
Build and activate the landing site’s astromech Droid control panel, then use a Hailfire Droid to destroy the central fighter. |
| 5 |
1+5 |
Story |
Destroy five mouse Droids in the corridor beyond the landing site. |
| 6 |
1+5 |
Free Play |
Use the Force to reveal five ice cream machines in the corridor. |
| 7 | 7 |
Free Play |
Use the Dark Force to expose a crawl space hatch in the corridor, then head through. |
| 8 | 8 |
Free Play |
Use the Dark Force to activate the video game inside the second clone panel room. |
| 9 | 9 |
Free Play |
Use the Jedi logo to cut a hole in the wall and discover a lever, then use an astromech Droid to hover to the foreground minikit. |
| 10 |
10
|
Free Play |
Destroy the gold bars at the end of the corridor and activate the astromech Droid control panel, then give the four senate guards new hairstyles. |
True Jedi Stud Requirement: 72,000
Story Characters
Aurra Sing
HELIOS-3D
Cad Bane
Robonino
Shahan Alama
IG-86
Commando Droid
Objective 1: Clear the Landing Site

Breaking into a senate building is no easy feat—clone guards are everywhere! Hold the Attack button to aim through Aura Sing’s scope and pick off as many blue-armored senate guards as possible from the comfort of your transport ship.

You won’t be able to hit every guard from your starting position, so take control of the ship’s pilot—a Droid named HELIOS-3D—and fly right and left so you can pick off the stragglers.

HELIOS-3D lands the ship after all the senate guards have been eliminated. Take control of Cad Bane and press the Action button to hurl grenades at the silver objects to either side of the background door, from which more senate guards are emerging.

Blasting the silver objects near the background door reduces them to bits. Build these into a pair of panels, then use Robonino to activate the power panel on the left. This brings the other panel online—dispatch a senate guard and collect his helmet from the ground, then use this ingenious disguise to activate the senate guard panel on the right. The door then opens—hurry through!
Minikit 1 (Freeplay)

A minikit hovers high above the landing site’s left cruiser. Toggle to Jar Jar and use his superior jumping ability to leap up and grab it!
Minikit 2 (Freeplay)

During Free Play, five clone troopers will be busy scrubbing the ships docked at the landing site. Polish off all five cleaner clones to earn a minikit! You can hit the clones easily by taking aim and hurling a Lightsaber.
Minikit 3 (Freeplay)

The cruiser on the landing site’s right side is in disrepair. Use the Force to lift and place three nearby parts of the cruiser onto the purple pads atop the ship. The cruiser then lifts off, leaving a minikit behind!
Minikit 4 (Freeplay)

Build the loose bits near the landing site’s left cruiser to restore a portion of the nearby panel. Force-move the nearby radar dish afterward and place this atop the panel to bring it online.

Activate the astromech Droid control panel you’ve built and a Hailfire Droid will soon deploy nearby. Pilot this Separatist vehicle and use its powerful weaponry to destroy the gray starfighter near the center of the landing site. A minikit will be your reward!
Objective 2: Storm the Senate Building

Sprint down the corridor beyond the landing site and eliminate all senate guards that try to stop you. Steal another helmet if need be and use it to activate the first senate guard control panel you encounter to open the nearby door.
Tip

Don’t miss the purple stud near the foreground crates!

Five MSE-6 mouse Droids emerge from tiny wall hatches and scurry about the corridor. Seek and destroy all five of these wee Droids to receive a minikit! This is the only minikit you can obtain during Story mode from this mission. Check the map for the general locations of each little Droid.

Destroy everything inside the senate guard control panel room to obtain several red pieces. Build these to repair the pipes that run along the wall near the ceiling. Use Cad Bane’s explosives to destroy the silver objects and obtain more pieces.
Jump on the senate guards’ bunk beds to knock loose some studs!

The pipes glow with blue energy after they’ve all been restored. Exit the room and follow the glowing pipes down the corridor to reach another senate guard control panel. Activate this panel to enter a second room.

Again, destroy everything inside the second senate guard control panel room, using Cad Bane’s grenades as needed. Build the loose pieces you discover to repair the overhead piping and construct several power generators.

After repairing the piping and building all of the generators, quickly slide the generators toward the background wall. Start with the left generator and work your way to the right. Do this quickly to restore the flow of blue energy.

Follow the blue piping back out to the corridor and over to a third senate guard control panel. Activate this one as you’ve done before to access a third room.
Minikit 6 (Freeplay)

Use the Force to open five special wall consoles in the corridor and reveal soft-serve ice cream machines. Reveal all five of these delectable dessert stands to obtain a delightful minikit! Each ice cream machine is labeled on the map to help you find them.
Minikit 7 (Freeplay)

Toggle to a Sith character and use the Dark Force to raise the red glowing object near the corridor’s second senate guard control panel. This exposes a crawl space hatch—switch to a small character and creep through to reach a little ledge with a minikit!

Use Robonino to activate the power panel inside the third senate guard panel room. Then slide the generator along the checkered track and place it on the green pad to the left.

Moving the generator onto the left pad restores power to the room’s central power panel. Activate this with Robonino to open the background door. Hurry through to end this daring operation!
Minikit 8 (Freeplay)

After connecting all of the generators in the second senate guard control panel room, toggle to a Sith character and use the Dark Force to expose a lever to the right. Pull this to make a projection screen drop from the ceiling.

Pull the lever near the screen to start an exciting video game starring Indiana Jones. Quickly move onto the nearby button and watch as Indy runs to the right. Jump each time our hero nears a pit to make him leap the obstacle. Help Indy jump over every pit to set the high score and win a minikit!
Minikit 9 (Freeplay)

Near the end of the corridor, cut a hole into the wall where the Jedi logo appears to discover a lever. Pull this to open the foreground window and spy a minikit on a remote hovering platform.

Toggle to an astromech Droid and hold the Jump button to hover out from the window. Land on the hovering platform and claim your prize! This is a tricky maneuver, so expect to fall a few times in the effort.
Minikit 10 (Freeplay)

Use a rapid-fire character to destroy the gold bars that cover the astromech Droid control panel at the end of the corridor. Activate the panel afterward to access a bustling hair salon.

Four senate guards await fabulous new ’dos inside the salon. Here’s how to give each one a stunning makeover—and score a minikit in the process!
- Force-move the dryer onto the purple plate above the first guard.
- Destroy the gold object near the second guard, then build the pieces.
- Destroy the silver object near the third guard, then build the pieces.
- Pull the hook points near the fourth guard.