
Prima Games eGuides
primagames.com Browse Redeem a code Help
Deus Ex: Mankind Divided eGuide
Sign in My Guides

Sign in or create an account

We'll email you a link. No password needed, and if you don't have an account yet, the link makes one.

By creating an account or signing in, you agree to our Terms of Service and Privacy Policy.

Have a password?

Had an account on the old eGuides site, or a code from a printed guide? Help and troubleshooting

Sign in with a password

By signing in, you agree to our Terms of Service and Privacy Policy.

Check your email

A sign-in link is on its way. It works once and expires in 15 minutes. Open it and you're in, with an account if you didn't already have one.

Contents

  • Changelog
    • Updates
  • The World of Man and Machine
    • Overview
  • People and Places
    • People
    • Organizations
    • Places
  • Controls
    • Overview
    • The Main Menu
    • Controls
  • Gameplay
    • Overview
    • Reading Your HUD
    • Maintaining Health and Energy
    • How Deus Ex Works
    • Stealth Mechanics
    • Brute Force
    • Accruing Augmentations
    • Making Money in Deus Ex
    • Hacking
  • Weapons and Consumables
    • Overview
    • Primary Weapons
    • Secondary Weapons
    • Consumables and Items
    • Weapon Attachments
  • Augmentations
    • Overview
    • Regular Augmentations
    • Experimental Augmentations
  • Into the Breach
    • Overview
    • Story
    • The Basics of Breach
    • Augmentations
    • Enemies and Obstacles
    • Modifiers
    • Equipment
    • Challenges
    • AI Evolved
  • Story Missions
    • Overview
      • Before You Start
    • Dubai
      • Overview
      • Black Market Buy
    • Prague, First Visit
      • Overview
      • Morning Comes Too Soon
      • Getting in Top Shape Again
      • Checking Out TF29
      • Claiming Jurisdiction
      • Taking Care of Business
    • Golem City
      • Overview
      • The Rucker Extraction
    • Prague, Second Visit
      • Overview
      • Tracking Down the Real Terrorists
      • Checking Out the Men in Charge
      • Facing the Enigma
      • Confronting the Bomb-Maker
      • The Heist
    • GARM Facility
      • Overview
      • GARM
    • Prague, Third Visit
      • Overview
      • Hunting Down the Final Clues
    • London
      • Overview
      • Securing the Convention Centre
      • Stopping Marchenko
      • Protecting the Future
      • Resolution
  • DLC
    • System Rift DLC
      • Introduction
      • Gain Access to the Palisade Bank
      • Infiltrate and Find the Upper Elevators
      • Infiltrate the CEO’s Office
      • Infiltrate the Server Chambers
    • A Criminal Past DLC
      • Introduction
      • Get to Cellblock B
      • Find Agent Guerrero
      • Get to Solitary Confinement
      • Release Guerrero from Solitary
      • Get to the Warden’s Office
      • Escape on the Prison Transport Ship
  • Side Missions
    • Overview
    • Neon Nights
    • 01011000
    • The Golden Ticket
    • Cult of Personality
    • Samizdat
    • Fade to Black
    • All in the Family
    • The Harvester
    • The Last Harvest
    • K is for Kazdy
    • The Calibrator
    • The Fix
    • The Mystery Augs
  • Jensen's Stories
    • Overview
    • Investigating the Bombing
  • Achievements and Trophies
    • Overview
    • Achievement/Trophy List
  • Collectibles
    • Triangle Code Locations
      • Dubai
      • Prague: Poor District
      • Prague: Modern District
      • Prague: Old District
      • Golem
      • Swiss Alps
      • London
    • eBook Locations
      • Dubai
      • Prague - Poor District
      • Prague - Old & Modern District
      • Golem
      • Swiss Alps (G.A.R.M.)
      • London (Apex Centre)
  • Behind the Scenes
    • Bios
    • Developer Interviews
  • Credits
    • Legal

Deus Ex: Mankind Divided Guide › DLC › System Rift DLC

Infiltrate the CEO’s Office

Objectives

Find out which server chamber holds Santeau’s files

Ride the funicular and reach the server chambers

Overview

Palisade Blade 01: Level 4
Palisade Blade 01: Level 5

Map Legend

01: CEO’s computer

02: Funicular control

03: [BLUE DOT] = E-Book

Find Out Which Server Chamber Holds Santeau's Files

Now you need to find the CEO’s Executive Suite on the atrium’s top level. There are a number of ways to get there, but here’s the quickest.

Get to Level 5F

Open the door of Leona’s office and observe both the guard’s patrol pattern and the security turret’s sweep. If you have the Remote Hacking augmentation, you can temporarily disable the turret. Or you can activate Glass-Shield Cloaking, if you have that augmentation. Otherwise, wait until the guard turns and paces to the right through the laser grid and the turret starts to swivel away from you. Quickly sneak out and veer leftward to the elevator next to the stairs. Quickly press its call button (circled in our shot) and duck inside the moment the doors open to hide from the turret’s view. Use the panel to select "Atrium 5F." Then ride up to that level.

Floor 4F Pickups

If you choose to explore this level, you can find Nanoblade and Typhoon Ammo, and a Biocell in the Engineering office, and a Multi-Tool just outside that office’s far door. In Client Services you can find a lot of hacking software plus an E-Book. You can also pick up a Praxis Kit on top of the Client Services office.

E-Book: Palisade Blade: Security Features

Look for this E-book on a desk corner in Client Services on Level 4F.

Praxis Kit: Atop Client Services Office

Jump up from a crate onto the roof of the Client Services office and find the kit next to a fan housing.

Get Inside Ashani Talwar’s Office

When the elevator opens, you see the big doors to the Executive Suite ahead. Use Glass-Shield Cloaking again, or wait until the turret camera swivels away, and then hustle into the doorway next to the Keypad. (The camera can’t see you here.) Hack the Keypad to unlock the door and enter the suite. Safe!

Inside the office, explore for pickup items, use the password “VEDELEM” to access the blue Security computer, and turn off Intruder Tracking on the turret just outside the office door (but only if you have the Turret Domination upgrade under the Hacking Capture augmentation tree). Next, hack into the yellow computer and read the “Investments Update” from Talwar’s husband, Masaaki Oshiro. You learn that the Santeau Group’s data is inside Chamber 204.

SECONDARY: Saridakis Death (2 of 4)

When you hack into Ashani Talwar’s computer, you learn that the company founders are engaged in some questionable business activities, and that Chamber 209 (where Simona Saridakis was killed) holds the data for a client called Tai Young Medical.

Ride the Funicular and Reach the Server Chambers

Leave the Executive Suite and cross the Level 6 lobby to the funicular platform. Step aboard and press the button panel to ride up to the Server Area Door Access. Use the Pass-Port Reader and open the doors.

E-Book: HeatEye Sensors

Find this E-book on a small cart just outside the entry doors to the Blade’s server chambers.

How HeatEye Sensors Work

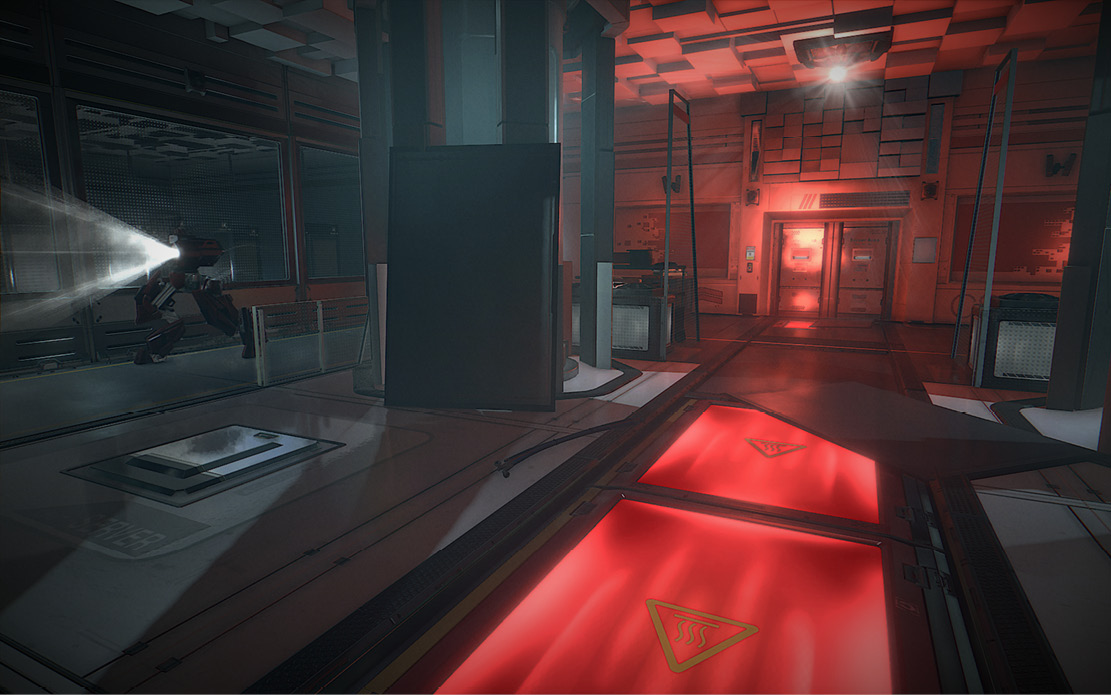
Each Palisade Blade server chamber exclusively uses deadly robots equipped with HeatEye Sensors to defend its zone. These machines are detailed in red, and employ heat vision rather than typical optic sensors. The defensive grid includes Security Cameras and Turrets, Flying Drones, and Sentry Bots.

When one of these units spots Jensen using the heat spectrum, a special version of the detection UI appears onscreen. The closer Jensen is to the heat sensor, the faster it will lock in and detect him.

Detecting > Investigating
Investigating > Hostile

Jensen can hide from them in two ways. First, he can stand behind, atop, or next to a heat source. Jensen’s heat signature will be masked by the source. Look for red crates and floor panels marked with a heat icon. A Sentry Bot can be directly in front of Jensen but fail to detect him if he’s near one of these heat sources.

A typical heat source. Look for these markings.

Second, the server rooms feature heavy shielding, so Jensen can hide behind solid walls. This isn’t true for standard cover objects, however. HeatEye Sensors can “see” Jensen right through regular crates or other such objects.

Some other notes:

Hostile machines “see” Jensen’s last known position and will attack it.

Heat-sensing drones immediately become hostile if they collide with Jensen and can detect any sounds he makes. Stay out of their way if at all possible.

Fast movement makes Jensen easier to “see,” so running over heat sources won’t reduce the detection meter. You must stand still on or near the source.

Smoke can blind HeatEye Sensors temporarily. Thus, smoke grenades or fire extinguishers can create effective cover that lets Jensen hide from the sensors.

Remote Hacking

Remember that if you have the experimental Remote Hacking augmentation you can temporarily disable cameras, turrets, and bots from afar. This is a nice ability to have in the server chambers.

Get Across the Entry Room

Immediately dash to the right to the red crate, which is a heat source that conceals your heat signature from the HeatEye Sensors in the three ceiling Turrets and the single pacing Sentry Bot. Use the red floor panels to stay hidden while moving across the entry lobby to the far door. (Ignore the locked Hatch in the center of the room; you can’t use it yet.)
Too Hot to Handle

You earn this Trophy/Achievement if you can make it through the server chamber areas above the funicular without being detected as a threat by the HeatEye Sensor systems.

If you get spotted, step onto a red heat source and stand still until the alarm and search ends. Important: If you decide to fight, you can use one weapon with EMP ammo to disable the automated units and then quickly swap to another weapon with armor piercing ammo to destroy them. When you finally reach the far side, use the Pass-Port Reader to unlock the doors and hustle into the next room.

Server Farm Entry Room Pickups

Just inside the door to the left is a HypoStim Injector on the lower shelf of a cart. A Biocell sits directly ahead on the shelf to the left of the work-desk. A row of lockers to the right holds some useful ammo items.

Keep reading with a free account

The first 3 sections of Deus Ex: Mankind Divided are open to everyone. An account opens the rest of it, and every other guide in the archive. It's free, and there's nothing to buy.

Bought guides on the old Prima Games site? Your account and every guide you own moved here, so there's nothing to buy again. Sign in.

Create a free account Or browse our free guides

PreviousInfiltrate and Find the Upper Elevators NextInfiltrate the Server Chambers