
The Witcher 2: Assassins of Kings Guide (Steam) Walkthrough Loc Muinne (Roche)
The Right to Bear Arms (If No One Catches You)
It’s safe to run around in Loc Muinne with your sword drawn provided you’re not near any of the royal encampments. The various encampments are patrolled by guards, and each set of guards essentially functions as the “town guard” for that area. So if you remember to sheathe your sword when near the Nilfgaardian, Redanian, and Temerian camps, you should be okay. If you get the “sheathe your sword” warning and refuse to do so, then the guards become hostile as usual and you can fight them. Defeating them is entirely possible, but if you do you’ll be asked to pay a fine in a cutscene. If you don’t (or can’t), then you die automatically in the next cutscene.
A Score To Settle
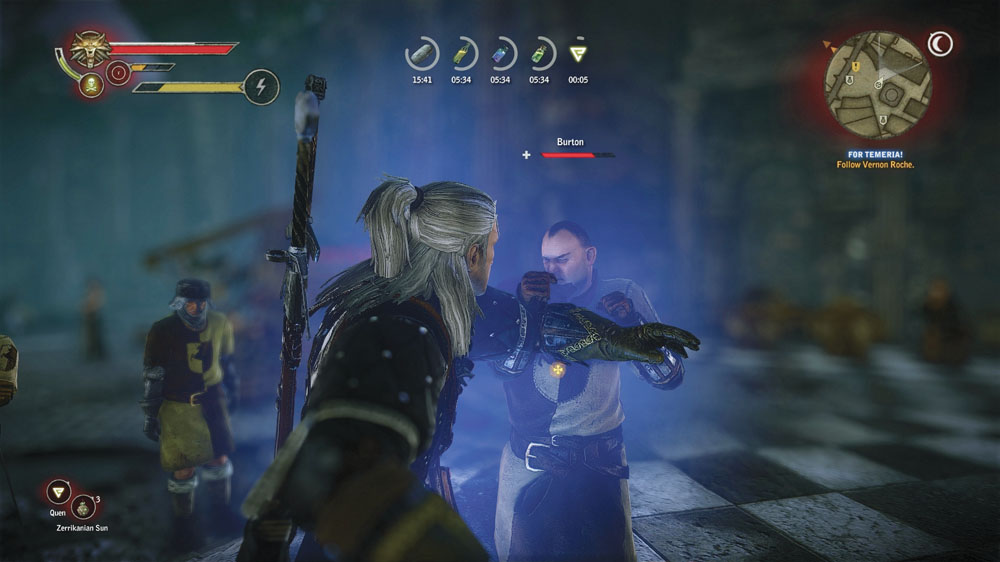
This quest triggers automatically the first time you enter the town square. Burton appears and vows to give you a proper thrashing for investigating the square coins in the previous chapter. What follows from there is an ordinary fistfight, where you should really have no trouble defeating him. You don’t get any orens for this final victory, but you do gain 150 XP.
For Temeria!

With Burton defeated, seek out Roche in the town square area of Loc Muinne and speak with him. Follow him into the Redanian camp. There’s some random loot you can obtain here, but nothing too interesting. For the most part, just follow Roche as he leads the way to King Radovid. During the conversation with Radovid, you can say whatever you wish. Some of Radovid’s conversation options will reflect choices you’ve made earlier in the game, such as whether or not you killed Henselt and whether Aryan La Valette still lives.
Radovid gives Roche and Geralt some information during the talk, that Foltest’s daughter Anais still lives and is being held by Dethmold at the Kaedweni camp. Radovid also makes it clear that Triss is being held in the Nilfgaardian camp. After the dialogue ends, follow Roche back into the town square. A conversation makes it clear that you face a choice, whether to rescue Triss from the Nilfgaardians or help Roche rescue Anais. You don’t have to make the decision right now. You can (and should) let it wait until the end of the chapter, after you’ve done all of the side quests you wish to complete.


This side quests triggers automatically after you exit the Redanian camp. It also triggers the quest Lilies and Vipers , but you can’t do much with this quest until Crown Witness is resolved in one way or another. One of Roche’s agents, Brigida Papebrock, asks to be escorted out of town. You can opt to do the quest or turn Brigida down. If you turn her down, she waits by the city gates for one hour, then disappears. If this happens, you fail both Crown Witness and Lilies and Vipers and also cannot trigger the associated side quests The Messenger or Pacta Sunt Servanda .
If you accept the mission, you can opt to escort Brigida immediately or to put it off for later. There’s no reason to put it off, though. When you begin to escort Brigida, you are teleported to the gates of Loc Muinne. Follow her through the Order of the Flaming Rose’s camp. She opens the gate at the top part of the camp that is ordinarily impassable, letting you reach a new area.
Follow Brigida until you reach the forest, then lead the way. The forest is essentially a long, winding path forward if you check either the guide map or the map option of your menu frequently. If you try to follow the mini-map, you may get lost when passing through certain wide areas. After you’ve moved forward a ways, you encounter an ambush of bandits led by a combat mage. They’re out to get Brigida, so the battles ahead are a little different than most that involve NPCs in this game. Brigida has a vitality bar of her own and can die if you fail to keep the enemies away from her, similar to the companions you hire in Arena mode . If she dies, then you automatically fail both Crown Witness and Lilies and Vipers , and you cannot trigger any of the associated side quests.

Fortunately, Brigida is not an especially fragile NPC. Even on Hard difficulty, it is actually difficult for her to get killed as long as you approach battles normally. If you want to be cautious about keeping Brigida alive, though, then instant kills are a preferred tactic in this fight and the others that follow it. Aard is very useful for setting instant kills up. After you’ve defeated the bandits, you come to an area where you must drop down a cliff to proceed. If you choose to explore the forested area behind you, you run afoul of a group of endregas.
That said, once you reach this point, you can indulge yourself in an interesting diversion. Head to the eastern side of the map and you can find a curious cave. At first, it seems to be mainly inhabited by nekkers. At the rear of the cave is a book called Dorian’s Diary . If you pick up Dorian’s Diary at night, then a werewolf appears immediately to battle you. Like the werewolves in Arena mode, this one has a ton of vitality but is easily locked up by hit-stun through repeated blows. Brigida can be helpful in this regard, since she’ll hop in to help you with the fight. Killing the werewolf is the only way to get the rare werewolf trophy. Note that if you pick up Dorian’s Diary during the day, you miss this encounter completely.
As you head toward the quest marker, you should come across another group of bandits. These bandits have set snares and attack in greater numbers. Just focus on keeping them away from Brigida and getting fast kills and you should be fine. If you take a left after this, you can find another endrega and an actual endrega nursery. You can destroy the nursery as you did the nurseries in Chapter 1 to summon a queen endrega. You should do this if you need queen endrega pheromones for the quest An Encrypted Manuscript .

When you arrive at the quest marker, you find that Brigida’s contact is dead. You’re immediately ambushed by a group of around half a dozen bandits, led by the combat mage you saw earlier. This time focus on eliminating the mage from the field, then mopping up the other soldiers. If you’ve handled the other battles well, then Brigida should be in no particular danger here. After the battle, a dialogue sequence begins. Whatever you say here, it ends with Brigida getting away safely after she gives you the orders changing the convoy’s route. You get 250 XP at this point for resolving Crown Witness . Furthering the quest line involves pursuing Lilies and Vipers .
Lilies and Vipers
You need to go find Baron Kimbolt and speak to him about the fate of Foltest’s children. Head back to Loc Muinne and enter the Temerian camp. Kimbolt’s tent is just off to your right. Enter to trigger a cutscene. You can get a lot of information here by asking the additional questions. Regardless of what you say, you end the conversation with two options. You can take the orders changing the convoy’s route to John Natalis and accuse Kimbolt, or you can take the orders to Kimbolt’s scribe to have them checked for authenticity. Kimbolt offers to pay you for confirming the true source of the orders, too.
If you choose to accuse Kimbolt based on the letter, then go see John Natalis immediately and hand the letter over to him. Kimbolt is arrested, with the support of Maravel’s forces. This resolves the quest immediately and nets you 250 XP. You cannot trigger the side quests The Messenger or Pacta Sunt Servanda if you take this decision.

If you choose to go see the scribe, you find him too drunk to stand. Go examine his things instead and you should find the note for scribe item. You can mix up the substance to test the letter yourself, but be careful. If you botch the test, you end up destroying the orders. To mix the substance, you select from a long list of options that appears when you approach the scribe’s desk.
Before you approach the desk, scan the room. You should find the book Invisible Ink and eight scribe’s notes on a shelf. Read Invisible Ink before you do anything to the orders, then read the note for scribe. This sould give you an idea of what you’re trying to do the orders. If you want to work out the correct method of making the invisible ink visible on your own, you can experiment on the scribe’s notes. If you just want to see a list of the correct ingredients to add in the correct sequence, here it is.
- 1. Add burnt lime to the flask.
- 2. Add water to the flask.
- 3. Add cormorant guano to the flask.
- 4. Heat the flask, capture the vapors, and douse them with water.
After you finish successfully testing the letter, it turns orange. That’s the wrong color for Kimbolt’s secret missives, so he had nothing to do with this. The orders become a different item, the falsified orders changing the convoy’s route. Go back to Kimbolt and report your findings. He pays you for your efforts and then offers you the task of finding out what the contents of Maravel’s letters to the Nilfgaardian camp are. If you accept this request (and you should) it triggers the side quest The Messenger . When you leave Baron Kimbolt’s courtyard, you automatically trigger the quest Pacta Sunt Servanda . You may finish either quest. Read on for Pacta Sunt Servanda or turn to for The Messenger . You can complete the quests in any order, or choose to only complete one. These decisions affect the way the overall quest line turns out.
Pacta Sunt Servanda

Go see Count Maravel as the servant invited you. After the conversation, follow your quest marker to the location of the men blackmailing Baron Kimbolt. This triggers a cutscene. Toward the end of it, you must choose whether to try and defend the blackmailers or to stand aside and let Kimbolt’s huntsmen do as they will. If you stand aside, the quest effectively ends here.
If you decide to protect the blackmailers, then it works like protecting Brigida did. The mercenary leader has his own vitality bar, and if it’s depleted, he dies and you fail the quest. That said, the mercenary leader has a ton of vitality and you’re not likely to lose him if you’re capable of beating the huntsmen at all. The huntsmen are fairly typical armored sword-wielding enemies. You can take them down quickly if you have leveled-up Aard. Even Garlen, the toughest of the lot, goes down surprisingly quickly. After the battle, the mercenary leader gives you all the information you need to accuse Kimbolt. You receive 250 XP for resolving the quest.
The Messenger

Meet Aldrich, Kimbolt’s messenger, by the fountain. He leads you to a nearby area where you see Maravel’s messenger, Hieronymus Lash, walking toward the Nilfgaardian camp. Now you need to chase down Lash and get his scrolls. You first fight off Lash’s two guards, who are ordinary swordsmen. After that, you chase him into a courtyard where five Nilfgaardian troops wait for you in ambush. Expect two swordsmen, one shieldman, and a couple of crossbowmen. They shouldn’t be hard to defeat, but try to take them out quickly. You catch up to Lash in the next courtyard, where he fights you. He teleports like most mages, but attacks using a spell that makes firebolts erupt from the ground. It works like the draug’s trebuchet fire did in the last chapter, so use the same methods to dodge it.
What’s difficult is actually damaging Lash. If you simply dash or dodge-roll toward him, he always teleports away. If you fire Aard or Igni at him, he teleports away. The best way to defeat him involves a sneaky use of Yrden. Plant your Yrden sigil in a location after he teleports away from it, then dodge the firebombs until he teleports back to that spot. If you have a leveled up Yrden, you can plant sigils in multiple locations. Lash’s teleportation around the area of the battle always follows a pattern, where he teleports to and from set places. If you place an Yrden sigil in a location where Lash was standing previously, he eventually comes back to it and gets stunned. Once he’s stunned, you can probably take him out with a single attack combo.
Loot Lash’s body after you’ve defeated him to get the diagram for the clawer and Count Maravel’s correspondence. This gives you all the information you need to accuse Maravel. This resolves the quest and gives you 250 XP.
Lilies and Vipers

Once you’ve completed The Messenger and obtained Count Maravel’s correspondence, you can take the letter to John Natalis and accuse Maravel. This leads to Maravel being arrested for treason. If you haven’t already completed the quest Pacta Sunt Servanda , it automatically fails after Maravel is arrested. Visit Kimbolt to gain your reward. Kimbolt gives you 100 orens and hands over the ceremonial Ellandrian sword, and you also get 500 XP for simply resolving the quest. His dismissive attitude is probably going to leave you feeling like you’ve been had despite your apparent victory.
If you’ve completed Pacta Sunt Servanda , go see John Natalis. You can use the mercenary’s testimony to accuse Kimbolt. This leads to Kimbolt being arrested for treason. If you haven’t already completed the quest The Messenger , it automatically fails after Kimbolt is arrested. Visit Maravel to gain your reward. Maravel gives you 200 orens and the encrusted Nilfgaardian lawgiver, which is an excellent steel sword for builds that rely on a lot of blocking and parrying. You get 500 XP for simply resolving the quest. You may leave feeling a bit like you’ve been had.
Now, if you’ve completed both Pacta Sunt Servanda and The Messenger , go see John Natalis. Now you can choose to accuse Kimbolt, Maravel, or the both of them. Choose to accuse the both of them and Geralt puts together an accurate picture of what happened to the royal children. A very different cutscene plays out than the one you get for just accusing Kimbolt or Maravel. You don’t get any equipment or orens for finishing the quest this way, but you do get 750 XP, since you actually figured out the truth this time.
Poker Face: Loc Muinne

Head for the remote area where the dice players gather, beyond the harpies. It’s near the location of your earlier run-in with the Nilfgaardian bounty hunters. Begin by approaching the two elven players, Filly and Aylaya. You can face them in any order. After you’ve beaten them both, head over to the next table and challenge first Hadrian the Black, then his apprentice. With these victories under your belt, you can go back to the town square and challenge The Incredible Lockhart. When you defeat him, you get a choice of “something nice” or 150 orens as your bonus for finishing the quest. The something nice is the diagram for making magic wraps, a runic armor enhancement, or a fire rune and an earth rune. Bear in mind that the recipe for magic wrap demands troll skin. So if you haven’t been slaughtering trolls as you came across them, the diagram is basically useless to you. Players on Roche’s route have likely had difficulty finding runes and may want to take that over the magic wrap diagram, even if they’ve otherwise been slaying trolls.
Bring it on: Loc Muinne
For this quest, you must beat only one opponent, the Mighty Numa. Go find him and challenge him. Wager the minimum amount of orens for this first bout, because it’s designed to be impossible to win. After the bout ends, you have a few options for how you can react to Mighty Numa.
You can accuse him of cheating. If you do, then this opens up a dialogue branch where you have two choices. If you say “Make my day” to Mighty Numa, it initiates a fistfight with him. He’s not especially difficult to beat. After you beat him, Mighty Numa swears to stop cheating. You get 25 XP.

You can try to intimidate Mighty Numa by saying “You’re not fast enough…”; Numa is usually fairly easy to intimidate, and most of the time this option is successful. Mighty Numa says he doesn’t need potions to beat you and swears not to cheat the next time you arm-wrestle. You get 10 XP.
You can also simply admit “I lost.” If you do things this way, then you next need to buy an Anabolic Steroids potion from Marcus. Drink it, then challenge Mighty Numa to an arm-wrestling match again while the potion is active. You should defeat him easily, so bet the full 200 orens possible so you can reap a 400-oren reward. After you beat the Mighty Numa, you get 25 XP and Numa gives you the diagram for the long, robust gauntlets. The quest resolves, awarding you with an additional 100 XP.
If you go to arm-wrestle Mighty Numa again after fistfighting him or intimidating him, the effects are the same as challenging him while under the influence of Anabolic Steroids. You should defeat him very easily, then get 25 XP, the diagram, and then an additional 100 XP. So overall, the most lucrative way to tackle this quest is to fistfight Mighty Numa after your first loss. The Anabolic Steroids potion is quite expensive, so not buying one maximizes your profit.
Mystic River

Head into the sewer entrance near the Mighty Numa’s area of the town square. When you pass by the initial chamber, if you have Malget’s notes in your possession, a giant flaming head set into the wall begins talking to you. There’s nothing you can do with this creature just now, though you’ll come back to it later. Simply say “See you,” and ignore it for the time being.
Take a right and you come to a tunnel where two bullvores patrol. As long as you don’t let yourself get caught between the bullvores, defeating them should be simple. Adrenaline abilities are highly effective here and it’s also easy to just beat them to death with strong sword strokes, provided you’ve got a strong defense at your disposal, like leveled-up Quen.
Once you’re past the bullvores, the tunnel empties out into a dead end (the gate you passed through earlier is locked now) stuffed with treasure chests. Loot them to get an amazing array of treasure. One chest contains the diagram for the armor of Ys, and the other contains the diagram for vran armor, an armor of Ysgith, a fire rune, and the steel sword Deireadh.
The quest isn’t finished until you’ve crafted the vran armor (so if you don’t want to use it, you may just want to skip this). Once you’ve gathered the materials needed to craft it and the whopping 2,000 orens it costs to make, just go visit any craftsman. The in-game quest text may make it sound like you need to specifically visit Bras of Ban Ard, but any craftsman will do. After you’ve successfully crafted the vran armor, the quest resolves. You get no XP for resolving the quest, but then again, you’ve now got the most powerful armor you can obtain on a standard difficulty. Equip and slot it with +2 enhancements before the next side quest.