
The Witcher 2: Assassins of Kings Guide (Steam) Walkthrough Flotsam
A Sword For Monsters
A Sword For Monsters
Now sober and (hopefully) awash in orens from loot and winnings, it should be trivial to get Geralt a new silver sword so he can go kill some monsters. You can buy one or forge one, but as soon as some sort of silver sword is in Geralt’s inventory this quest is over. You’ve got four basic options that don’t involve setting foot in the forest or other monster-infested areas.
If you picked up the diagram of the witcher’s silver sword earlier, you can take it to Berthold or one of the other craftsmen to be forged. You’ll have to buy two silver ore and expend one diamond dust, one iron ore, one timber, and 35 orens on this task. That said, the silver sword this diagram produces is the second-weakest in the game.

You can just buy the silver-plated sword from Berthold for 304 orens. Of course, this is more expensive than forging the witcher’s silver sword and results in Geralt having to carry around the worst silver sword in the game.
To buy a better sword, you can go to the Mysterious Merchant and buy the robust witcher’s silver sword for 267 orens. This really isn’t a bad deal, but if you’ve done the guide’s quests in order, you already have the diagram for the witcher’s robust silver sword. That means you can just make one.
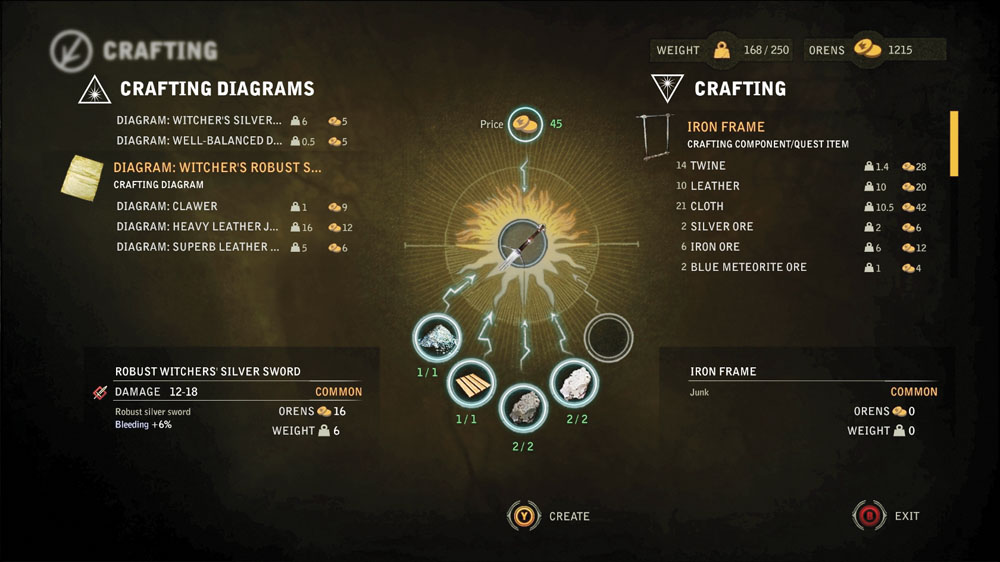
What’s amazing about doing things this way is how similar making the robust witcher’s silver sword is to making the much weaker witcher’s silver sword. The robust version only requires one extra iron ore and the slightly higher crafting fee of 45 orens. Equip it immediately once you’ve made it and the quest is complete. You can keep using this sword comfortably until you’ve got a chance to get the diagram for the chapter’s best silver sword.
The Scent Of Incense

Now that we’ve got a silver monster-killing sword, it’s time to get into some mischief. Head for Flotsam’s harbor area. On the lower pier, you should find an NPC named Vencel Pugg. He wants the formula to a special incense being sold at Vilmos Bartok’s shop. Agree to his request (otherwise the quest simply doesn’t start), then head to Vilmos Bartok’s shop in the town square. Only now there’s an angry mob gathered in front of it…
Little Shop of Dreams
This is a sub-quest. Basically, a bunch of peasants think Vilmos Bartok’s incense shop is actually selling some sort of addictive drug. They offer to reward Geralt if he can confirm this and help them get the shop closed down. It is entirely possible for Geralt to do this, but be advised that the “handsome reward” the peasant woman mentions is only 20 orens.
Anyway, when you’re ready, go talk to Vilmos Bartok. If you plan to try to shut his shop down, first select his trading dialogue option and buy any formulas you want from him. Next, ask Bartok if he’s selling drugs. After he replies, you have four potential responses. If you say “I see,” the quest basically hangs and you can leave to do something else, then come back later. The other three options let you try to gather more information about the incense before deciding either way. It is highly recommended that you try using the Axii special decision (third on the list of four), as it reveals something about how Bartok got the formula that the other two options won’t.

After you try one of the three information options, then you get to make the decision that either leaves the shop open (the top option) or closes it down. The second option lets you persuade Bartok into closing his shop, while the third lets you intimidate him into doing it. Sometimes you get an “I’ll decide later” option, which means you can try one of the other information options on Bartok or go do something else for a while before making a final decision. If you close down Bartok’s shop while he still has the special incense formula, he automatically gives the real formula to Geralt before he disappears.
You can also get the real formula from Bartok by initiating the dialogue tree that begins with, “I need a certain formula.” Bartok balks at giving you his actual secret formula and instead offers to give you a similar one. You can accept the fake by saying “I agree,” or use a special intimidation decision to try to force Bartok to give you the genuine article. You can complete The Scent of Incense by taking either the fake or the real formula, but note that Pugg won’t give you a reward for the fake. If your intimidation attempt fails, you have no choice but to complete the quest using the fake formula or reload your last save. Overall, it’s more lucrative to immediately close Bartok’s shop so he gives you the real formula automatically.
If you use any method to close him down, you get the 20 orens from the peasants and you can no longer buy from Bartok. If you leave the shop open, you get no orens but you can keep buying things from Bartok. If you’ve already bought everything from Bartok you might want, you might as well close his shop down and get the extra orens.
The Scent of Incense


Return to the harbor. When you talk to Vencel Pugg, you can take the “Not yet” option if you want to go do something else instead. If you say “I’m not about to give it to you,” Pugg threatens you and then leaves. If you head toward point 51 on the Flotsam map, Pugg’s Ambush, Pugg appears there with four bandits who attack you all at once. While the bandits are lightly armored, they have a lot of vitality and soak a fair bit of damage before they go down. You can make this battle go a lot quicker if you’ve made some bombs or drunk some potions beforehand. After you defeat the bandits, you finish the quest and gain 85 XP.
If you hand Pugg the formula, he says he wants to check its authenticity in a lab before he pays you. Go to point 52 on the Flotsam map, Pugg’s Meeting. Talk to him and Pugg says that before taking you to his secret lab, he has to blindfold you. If you refuse to be blindfolded, Pugg insists on it and you get another option to accept or refuse. If you refuse a second time, Pugg relents and marks his secret lab on your map so you can meet up with him there. Refusing to be blindfolded is worth 20 XP.
Walk to the secret lab and speak with Vencel Pugg there. If you gave him the real formula, he proclaims it an authentic, legal form of fisstech. You gain 85 XP, 200 orens, and the formula for the Tawny Owl potion for resolving the quest this way. After you’ve spoken with Pugg, loot his lab to make yourself feel better. You should be able to find the otherwise unobtainable superb short sword and a moon rune. You can then walk back to Flotsam.

If you walked to the secret lab but gave Pugg the false formula, he grows angry and orders his men to attack you. Defeating them all should be fairly easy. You receive 85 XP after you’ve defeated them, but you won’t receive any orens. You get to loot the secret lab after the battle, though. You can return to Flotsam by simply walking or by using the boat moored on the right side of the cave. Using the boat is best if looting the lab has taken you over your encumbrance limit.
Now let’s say you allowed Pugg to blindfold you. Pugg’s men jump you on the way to the lab and take your weapons. You’re held prisoner while Pugg does the tests to determine if the formula is real or a fake. If the formula is real, then after the tests Pugg says he will blindfold you again while his men escort you out. If you agree to be blindfolded on the way out, then you obtain 200 orens, your weapons are returned to you, and you get the formula for the Tawny Owl potion for your troubles. You do not receive any XP for resolving the quest and you won’t be able to return to the secret lab to loot it.

If you refuse to be blindfolded again, Pugg makes it clear that he intends to keep holding you hostage. This is also his reaction if you allowed yourself to be blindfolded on the way to the lab but gave him a fake formula. Now you’re going to have to fight your way out of the secret lab. The easiest way to do this is to blow the door open with Aard, roll rapidly across the cave, grab the superb short sword off the weapons stand, and then hack up the four bandits guarding you with it. Switch from Aard to Quen and you should have no problems. You can make the battle even easier by drinking some potions and preparing bombs before you bust your way out of the cell. After you’ve beaten the four bandits and Pugg, you get 85 XP. You don’t get the 200 orens, but you do get to loot the secret lab and recover your weapons. From here you can simply walk out of the cave or use the boat to sail back to Flotsam.
The overall most lucrative way to resolve this quest is to refuse to be blindfolded, then give Pugg the real formula. Of course, this makes Geralt part of a drug-trafficking scheme and that may not sit well with you. If you want to keep a clean conscience, then any outcome where you get access to the secret lab and then kill Pugg and his men there lets you get all of the unique loot associated with this quest without having to accept dirty orens.
The Nekker Contract
Enough of these morally ambiguous shenanigans—let’s go kill some monsters. To initiate this quest, go to the notice board outside the Flotsam inn and take the notice marked “Nekker Contract.” Your next quest goal is to learn more about nekkers. You can just wander out into the woods and kill nekkers awhile to fulfill this requirement, but it’s much easier to just go buy a book on the subject. If you got lucky, you may have found a copy of the right book during the Prologue while looting. If not, then go pay Einar Gausel a visit and purchase the book Nekkers in the Mist. Read this book to gain knowledge of nekkers. You can look at Geralt’s knowledge on the second tab of his character screen.

The book mentions that nekkers are best destroyed by grapeshot bombs. This is a hint that you need grapeshot to complete this particular quest. Go visit Cedric and purchase the formula for grapeshot. You want to manufacture at least four before setting out on this quest. You’re going to use the grapeshot when prompted to destroy the tunnels leading into nekker nests. To do this, just stand by a nest out in the forest and you should get an interaction prompt to place a bomb.
Be careful when you first venture out into the forests. The area around Flotsam is loaded with snares (traps) placed by Cedric. They’re intended to damage monsters, so you can lure enemies over them to damage them a bit. If you step onto one while running through the area, however, it’s going to damage you. You can detect snares in an area by scanning with your medallion. Once you’ve found a trap, you can disarm it and (if you like) pick it up to take with you. Take things slow while you’re getting used to the forest and scan frequently.
You can find the nekker nests by looking at the map on or tracking the quest in-game. Nekkers aren’t too strong and you can probably just hack and slash your way through them as you plant the bombs. If you want some extra insurance, drink Brock, Golden Oriole, and Rook or Swallow. Coat your silver blade in brown oil before you set out. You can also prepare some Zerrikanian sun or samum bombs to help slow down any big packs you run into while you’re trying to plant the bombs. Prioritize planting the bombs as soon as possible, since the nekkers respawn at a fairly high rate until you do. Keep Quen up when monsters are around, or if you hear a monster’s snarl but can’t see it.

Note that endregas can spawn around some of the nekker nests and are much tougher opponents at this point in the game. On the other hand, endregas and nekkers don’t care for each other and, provided you leave them alone, will actually fight each other. You may need to be ready to battle drowners when you go after the nest that’s farthest to the southeast, since they can occur around the edges of the pond at night. While the drowners aren’t too dangerous, they tend to spawn in packs of around five. This is another good time to use bombs for crowd control.
After you finish this quest, you can opt to go see Louis Merse in Flotsam to receive your reward. You should get 75 XP and 150 orens if you do. You can also wait until later in the game to turn this quest in if you like. Note that completing this quest counts toward unlocking the Pest Control achievement.
If you complete both The Nekker Contract and The Endrega Contract , you get an additional reward. If you wish, you can simply turn to and start The Endrega Contract now instead of turning the quest in to Louis Merse. This walkthrough does not recommend this, as The Endrega Contract can be fairly challenging. This walkthrough recommends doing some other quests and toughening up a bit before you attempt it.
In The Claws Of Madness


You can beat nekkers, so now it’s time to try your skills at handling wraiths. Head to the burned mansion in the southwest corner of the map after you’ve spoken to Cedric to initiate the quest. You meet Rupert standing on the winding path that leads up to the mansion area. After you speak with him, crazed nekkers swarm into the area. They won’t come down the path at you very quickly, so stand just below them and take them all out with a grapeshot or similarly damaging bomb. Once you move into the area of the burned mansion looking for Gridley’s dog, some more nekker stragglers attack. The entrance that leads into the burned mansion’s underground levels should be nearby. Head in: Note that there are some circles in this area that can be useful to trigger beforehand, though.

Head to the quest marker to trigger a cutscene. Once the cells are aflame, you can only head to the end of the hallway and then jump into what appears to be an empty room. If you walk to the quest marker, wraiths appear and jump you. Depending on your level and equipment, this could be a fairly lethal encounter. A savvier way to do the battle is to avoid the center of the room and go directly to the chest, which contains hospital files (III) and hospital records. Prepare some basic potions if you like; Petri’s Philtre can be quite useful here, if you use it to buff up Quen’s strength. Oil your silver sword with specter oil. When you’re prepared for a fight, take the chest’s contents. That auto-spawns the wraiths.
Wraiths attack with a combination of weak sword strikes and a one-two combo where the second blow is very strong. You can think you’re doing all right fighting wraiths, then get hit in the back a couple of times and be dead before you know it. Focus on keeping Quen up, and use bombs whenever the wraiths cluster together. When you can lead one away from the pack, then use a combination of light and strong attacks while you’ve got an opening. Strong attacks enhanced by specter oil can really chew through a wraith’s vitality and drop it quickly. If you keep Quen up, the wraith’s one-two combination is much less damaging. Be sure to loot the wraiths’ bodies, as they drop rare essence of death. Make sure you obtain and hold onto at least one essence of death for use in a quest later in the chapter.
Once the wraiths are gone, the flames blocking the only way out die down. Continue to follow the Nilfgaardian ghost. This involves going through an area where fire hems you in from both sides. Use Quen to protect yourself from the flames. You eventually come to another large, empty room that’s about to be inhabited by a pair of wraiths. Make any preparations for battle you deem necessary before hopping in. These wraiths spawn in random locations in the room, so be prepared to dodge-roll once you enter the area. Once you’ve got the wraiths clustered together, put up Quen and start bombing them or using hit-and-run tactics.
Once the wraiths are defeated, loot the chest to get hospital files (I), some random loot and orens, and the excellent robust cutlass. In the next hallway, use Aard on the false wall to your left to reveal the hiding place of a random armor enhancement. Continue exploring until you find Gridley. If you duck down the hallway just before you reach him, you can trigger a circle of endurance hidden in one of the cells.

Take a right just before the wall of fire at the end of the hall to reach the room where the tranquilizers you need to calm down Gridley are located. Note that when you draw near to the tranquilizers, a wraith spawns. As soon as you defeat it, a second wraith spawns. This is a very cramped area and it’s easy for you to end up pinned against a wall by the second wraith. Before you enter this room, make any necessary combat preparations. In particular, make sure your sword’s specter oil is still in effect.
Loot the room for the medicine and for some interesting papers, including hospital files (II), in a nearby chest. Among the documents is a paper pertaining to the Wild Hunt that can be brought up later if you’ve obtained it.Once you give the medicine to Gridley, he calms down and tells you the real reason why he and Rupert returned to the madhouse. Let Gridley flee while you go speak to the Nilfgaardian ghost to find out how to break the curse that lies heavily on the ruined mansion as well as Rupert and Gridley. After you speak to the ghost, you can decide to resolve the quest in one of several ways. First, find Gridley in a nearby hallway and speak with him to be taken instantly back outside.

If you think the Nilfgaardian ghost’s thirst for vengeance is justified, you can easily trick Gridley and Rupert into following you back into the mansion. Say “You need to see something. Come with me.” Simply leave them in the Nilfgaardian ghost’s clutches and their fate is sealed. They’ll burst into flames, satisfying the ghost and lifting the curse. If you do things this way, you can loot Gridley and Rupert’s bodies for 60 orens each and a diagram for the robust witcher’s silver sword (but honestly, you should already have one of these if you’re trying to do this quest). You get 100 XP for resolving the quest this way.
If you don’t think Rupert and Gridley deserve that, tell them “The ghost wants you dead.” You automatically get two nekker eyes and two nekker hearts that you could use to try to trick the Nilfgaardian ghost. At this point, you can also go back to Flotsam and purchase two pigs’ hearts and two sets of pigs’ eyes from the butcher in the Craftsman’s District. Mechanically, whether you use the pig body parts or the nekker body parts is immaterial, but you do get slightly different journal text depending on what you use to deceive the Nilfgaardian ghost.
The ghost knows you’ve tricked it as soon as it sees the hearts and eyes. It immediately attacks you. Fortunately, it’s not even half so dangerous as the wraiths you’ve fought already. If you oil your silver sword with specter oil before you speak to the ghost, then your blows do very heavy damage to it. Just block the ghost’s sword attacks, then counter with strong blows when it’s staggered. The ghost is slow and you can hit it up to three times before it blocks. Keep Quen up, more to keep from setting yourself on fire at the edges of the room than for defense. After you defeat the ghost, you can get a little random loot and more hospital files (IV) from its body.

After you’ve defeated the ghost, go speak to Rupert and Gridley again. Now you get to decide what to do with them. If you say “You have to be punished,” then Geralt takes them to Loredo. This reveals something rather interesting about Loredo’s mother that you otherwise can’t find out. Resolving the quest this way is worth 100 XP.
You can also opt to set Rupert and Gridley free after you’ve defeated the ghost, but this isn’t recommended. The game considers this a poor decision and resolving the quest this way isn’t worth any XP at all. Overall, the most lucrative way to resolve this quest is to let the ghost kill Gridley and Rupert, since that gives you the full 100 XP and lets you loot 120 orens off of their bodies. Also note that if you find all of the quest documents stashed away in the burned mansion during In the Claws of Madness , you unlock the Librarian achievement.
Malena


To begin this quest, just walk toward the group of guards standing near the entrance to Anezka’s house in Lobinden. (In fact, it’s possible that you’ve already triggered it while exploring the town.) Talk to Malena after you hear the guards begin accusing her. This initiates a cutscene. You can turn the quest down by saying “Sounds like a local squabble to me,” but note that the game considers this a failure.

To accept the quest, say “Leave it to me,” then head to the far east side of the Flotsam harbor. Take advantage of the circle of strength outside and apply the same potions you used when you cleared The Nekker Contract. Immediately upon entering the cave you should spot bloodstains on the ground. As you proceed a bit farther in, you encounter an enormous group of nekkers that can kill you quickly if you’re ill-prepared or let yourself be surrounded.Keep Quen up and use bombs to help with crowd control. You can also make very efficient use of Axii here, since what tends to kill you is getting surrounded and backstabbed by warrior nekkers. If you mind-control one of them, the nekkers tend to surround your thrall instead, which leaves you free to pick off attackers at the edge of the group.
Once the initial pack of nekkers is taken care of, loot the bodies and the chest that’s just past the entrance. Loot it and the corpse nearby.From here, keep exploring the cave. Be ready for more nekker attacks, but after you’ve taken out the first group the nekkers should be much easier to manage.
Continue to follow the bloodstains. Loot the bags you find up against the walls of the cave, as they contain silver ore. On the upper level of the cave, you should discover two guards whose bodies are peppered with Scoia’tael arrows. Be sure to examine one. From here, go all the way to the rear of the cave to find a ladder that leads up to a trap door. You can’t use this trap door right now, but keep it in mind for later in the game. Now you can head back toward the cave’s entrance. You may want to save before you exit.

Now that you know Malena is some sort of Scoia’tael agent, there are a few different ways you can opt to influence her situation. If you want, you can lie to the guards when they ask you what you found in the cave and say that monsters killed the two missing men. Although the guard is shown giving Geralt a pouch in the cutscene, you don’t actually get any orens this way. Malena expresses her gratitude after Geralt sticks up for her and makes a tantalizing offer to meet him at the waterfall in the forest.
Of course, Malena really did lure those two guards into a Scoia’tael trap. You know it and she knows it. When you meet her at the waterfall, she says that you know too much to live. Roughly six Scoia’tael immediately attack Geralt. This fight can be extremely difficult if you get caught flat-footed, but there are a few ways to prepare for it. Make sure you make these preparations before you speak to Malena, as the game auto-saves at the end of the conversation.
Bombs are useful for crowd control, particularly dancing star bombs, but only try to use them from a safe distance. The Scoia’tael soldiers are quick enough to interrupt your throwing animations. It can be very wise to run far away from the waterfall in the course of this fight, with two or three Scoia’tael pursuing. This makes their numbers easier to manage.
If you prepare potions, anything that enhances Geralt’s defensive abilities can give you an edge. If you’re using more of a mage build for Geralt, Axii can be very useful here, especially if you can get two or three of the Scoia’tael to split away from the main group and follow you. If you like to play with traps, try peppering the waterfall pool with snares or furies before you speak with Malena, or create a big mess of traps in the forest and lead some Scoia’tael into it. Use Quen to help mitigate damage once the Scoia’tael numbers are manageable.
Whatever you do, don’t try to fight these Scoia’tael the way you would nekkers or groups of dopey humans. The Scoia’tael are extremely fast and their group mixes archers and sword fighters. Sword-using Scoia’tael tend to parry your moves if you don’t catch them in an attack animation, letting the archers shoot you in the back while you’re occupied. Try to use bombs or signs to thin the Scoia’tael’s numbers before you start closing to melee. Be sure to loot the Scoia’tael bodies if you do this battle, since one of them may carry the rare and very potent Dhu Bleidd armor enhancement.
After you defeat the Scoia’tael, you need to find Malena, who has disappeared. She’s gone into the burned mansion from the In the Claws of Madness quest. If you’ve already finished the quest, she’s very easy to find and waits in a pile of rubble that appears just to the north of the main house on your in-game map. You don’t actually have to go inside the burned mansion. If you haven’t done In the Claws of Madness yet, then going near the burned mansion triggers it. Malena may appear there or she might not. Overall, it’s best simply to make sure you clear In the Claws of Madness before attempting this quest.

When you speak to Malena, you have a few dialogue options. If you say “You don’t deserve any,” then you can’t speak to her anymore. To conclude the quest, Geralt must cut her down himself. You receive 125 XP for resolving the quest this way.
If you say “Loredo will judge you,” you take her automatically back to Flotsam and hand her over to Loredo’s men. You don’t get any bonus XP for resolving the quest this way, so it’s not recommended. After all, taking her back means admitting to Loredo’s men that you fed them a line of bullshit earlier.
If you say “Away with you,” Malena swears never to be seen again in Flotsam. You get 125 bonus XP for resolving the quest this way. So really, if you’ve taken the route that gets you into a fight with the Scoia’tael, either killing or exiling Malena is equally good. Just don’t give her to Loredo.

Another option for Geralt is to tell the guards the truth about what he found in the cave but give Malena a chance to defend her actions. Say “They were shot,” when the guard asks Geralt what happened to their missing men. Next, say “Let’s hear it” when Malena swears that she’ll tell them everything. Finally, say “Lead on” when she swears that there’s something you need to see. If you’ve read the description of what happens if you meet Malena in the woods, you probably know where this is going. Malena leads Geralt and the guards back to the tree branch where Iorveth ambushed you earlier in the game.
Naturally, it’s a Scoia’tael ambush! This battle is much easier than the one in the woods, since you have a bunch of guards to help keep the Scoia’tael from clustering around you. You don’t need to prepare potions for this battle, just use Axii to turn the Scoia’tael into walking targets for the Flotsam town guard. As in the forest ambush, one of the Scoia’tael may be carrying a Dhu Bleidd you can pick up as loot.

If you choose to say “I don’t believe you” after Malena tells her story, or simply say “Enough of your lies” earlier in the conversation, then the guards decide to take Malena to Loredo. Malena leaves cursing you, but you get 125 XP for being canny enough not to fall for her tricks.
So what’s the best way to resolve this quest? Overall, it’s probably to let Malena lead you and the town guards into an ambush. You get the 125 XP for any outcome where Malena pays for her crimes in some way. If you fight Scoia’tael during this quest, you always have a chance to pick up Dhu Bleidd as loot, but fighting alongside the town guard is a cakewalk compared to doing the fight solo in the woods.
Dhu Bleidd is so desirable as an armor enhancement because it grants a persistent +5 bonus to sign intensity, which is a bit like having the effects of a Petri’s Philtre activated all the time. Any Geralt build that uses signs at all benefits from this bonus.

Note that Dhu Bleidd appears semi-randomly on the Scoia’tael in this quest, so you may not actually get to loot it from one of the Scoia’tael. It shows up a bit more regularly in the forest battle than in the battle with the guards but can be obtained in both fights. If you complete a battle and can’t loot Dhu Bleidd from one of the bodies, then it’s honestly worth repeating the quest until you get the drop. It’s much easier to quickly repeat the battle with the town guards a few times than the battle in the woods.
Troll Trouble
Take this quest off of the notice board outside the Flotsam inn. After you read the description, follow the quest marker to the collapsed bridge (also labeled in the guide map). Be ready for a fight as you travel, since the route takes you right through the edge of endrega territory. When you draw near the banks of the river, you should hear the sounds of a fight. A man armed with nothing but an oar is fighting off a small group of nekkers. Finish off the nekkers and then talk to him.
After you rescue him, the NPC fills you in on what’s been going on with the troll. He suggests that the ruined bridge has something to do with a scheme by Loredo to keep the merchants from leaving Flotsam by land, since it’s Loredo who’s put a price on the troll’s head. The NPC advises you to talk to Chorab in Lobinden before you make any rash moves against the troll, who has started drinking heavily. Head back to Lobinden.

When you find Chorab (who can be in several different places in the village depending on the time of day), talk to him. You can gather information about the troll or the kayran quest, but this is optional. To progress this quest, click the top option. Chorab explains that the troll maintains the bridge more cheaply than a craftsman would and just needs to be persuaded to stop drinking. He offers Geralt 200 orens not to kill the troll.
Head back to the ruined bridge and climb down into the riverside. Talk to the troll. What you say in this first conversation doesn’t really matter. One way or another you piss off the troll and he begins attacking you. The troll is a very big and slow target. The easiest way to defeat him is to craft a big stack of well-balanced daggers, get behind him after the fight starts, and begin pelting him with them. You can also damage him with bombs, but the daggers whittle away his HP faster. This is much safer than trying to close to melee range with the troll, though you can do hefty damage if you get behind him.
Once the troll’s vitality is down to 50 percent, he begs Geralt to stop the fight and promises to be good. Now you need to decide whether to kill or help the troll.

If you decide to kill the troll, then resolving the quest is relatively simple. Say “Not good enough.” The fight continues. You should finish the troll off without any further trouble. Be sure to loot his body to pick up a bunch of useful crafting drops and a troll trophy. You can head north of the troll’s lair to loot a random sword that’s stuck into the tree roots. Head back into Flotsam and go into Louis Merse’s office. Begin a conversation and tell him the troll is dead. Merse pays you 50 orens and you get 125 XP for resolving the quest this way. Killing the troll counts toward the Trollslayer achievement.
If you decide to help the troll, this quest is much more lucrative but takes a lot longer to resolve. Say “What’s with the heavy drinking?” The troll tells you about his mate, who was murdered and beheaded while he was out watching the bridge. Your response after that doesn’t matter; either way Geralt promises to find out who murdered the she-troll to help put the troll’s mind at ease. Before you head back to Flotsam, look in the tree roots just north of the troll’s location for some loot.
First, go into town and speak to Síle and Zoltan, who can give you some extra information about who might want a troll’s head and why. Your next stop is Lobinden. If you’ve had any dealings with Sendler, you may remember that he has a big huge head on his wall. Go talk to him about it and he says that he got the head from Dmitri. You need to go harass one of his men at the Flotsam inn after dark for more details. For now, offer to take the she-troll’s head off Sendler’s hands. Sendler doesn’t want to part with it for any amount of orens. Instead, you have to beat him at dice poker.

Next, meditate until midnight and head into the Flotsam inn. The guy you want to speak with is drinking alone at a barrel at the center of the lower level. When you ask him about the troll, he balks at telling you anything. You can try to intimidate him into telling you, but if that fails you end up fistfighting him. Fortunately, this guy isn’t difficult to beat at all. After you win, he tells you that you can find Dmitri at the graveyard above Lobinden.
Be prepared for a fairly challenging fight in tight quarters when you meet up with Dmitri. Dmitri’s lackeys are nothing special, but Dmitri hits hard and has a ton of vitality. You can’t really focus on damaging him until you’ve cleared out the four bandits that fight with him, but Dmitri keeps trying to attack you relentlessly.
At this point in the game you probably have enough levels that you can begin investing talents in specializing Geralt’s abilities, so take advantage of whatever you’ve spent. In general, stunning bombs like Zerrikanian sun can be excellent here for crowd control. If you use Quen, then you can throw around dancing stars to take advantage of incineration’s powerful effects on human enemies. Potions that intensify critical effects and sign strength are also quite good, particularly so you can use Axii to turn the bandits against each other early on. You’re fighting human opponents, so oil your steel blade with hanged man’s venom. Once you’ve defeated Dmitri and the bandits, be sure to loot the bodies and the body of the “elven spy” they did in. Dmitri in particular drops the bandit’s hideout key, which you can use to access an interesting location.

Now that Dmitri’s dead, go tell the troll the good news. Tell him that you’ve defeated his wife’s murderers. The troll promises to stop drinking and fix the bridge. Give him back his wife’s stuffed head and the troll rewards you with the diagram for hunter’s armor. Sparing this troll also counts toward unlocking the Friend of Trolls achievement. The hunter’s armor is an excellent set that you can make right away. While you acquire the slightly better kayran skin armor diagram just a little bit later in the chapter, it’s very affordable to upgrade twice in this chapter if you’ve been looting everything diligently.
Now, go see Chorab to resolve the quest. Chorab backs down from his original offer and tries to give you only 100 orens. You can accept this if you want, but there’s no reason to do so. Instead, try one of the special decision options to make him give you the full 200 orens you’re owed. You can intimidate him (first option) or persuade him (second option). After Chorab pays you, you get the 125 XP reward for resolving the quest.

Note that either way you resolve this quest, you should get an alchemy item called a troll tongue. Hold on to this item and make sure you don’t sell it or brew it into a potion by accident. You want to use it in a quest later on in this chapter.